Nokia Sprint PCS Vision 6165i User manual

User’s Guide for Nokia 6165i

Copyright
©2006Nokia.All rights reserved.
LEGAL INFORMATION
Copyright ©2006 Nokia. All rights reserved.
Nokia, Nokia Connecting People, Nokia 6165i, Pop-Port™, and the Nokia Original
Enhancements logos are trademarks or registered trademarks of Nokia Corporation. Other
company and product names mentioned herein may be trademarks or trade names of their
respective owners.
US Patent No. 5818437 and other pending patents. T9 text input software Copyright ©
1999-2006. Tegic Communications, Inc. All rights reserved.
Bluetooth wireless technology is a registered trademark of Bluetooth SIG, Inc.
Includes RSA BSAFE cryptographic or security protocol software from
RSA Security.
Java™ is a trademark of Sun Microsystems, Inc.
The information contained in this user guide was written for the Nokia 6165i products. Nokia
operates a policy of ongoing development. Nokia reserves the right to make changes to any of
the products described in this document without prior notice.
UNDER NO CIRCUMSTANCES SHALL NOKIA BE RESPONSIBLE FOR ANY LOSS OF DATA OR
INCOME OR ANY SPECIAL, INCIDENTAL, AND CONSEQUENTIAL OR INDIRECT DAMAGES
HOWSOEVER CAUSED. THE CONTENTS OF THIS DOCUMENT ARE PROVIDED “AS IS.” EXCEPT AS
REQUIRED BY APPLICABLE LAW, NO WARRANTIES OF ANY KIND, EITHER EXPRESS OR IMPLIED,
INCLUDING, BUT NOT LIMITED TO, THE IMPLIED WARRANTIES OF MERCHANTABILITY AND
FITNESS FOR A PARTICULAR PURPOSE, ARE MADE IN RELATION TO THE ACCURACY AND
RELIABILITY OR CONTENTS OF THIS DOCUMENT. NOKIA RESERVES THE RIGHT TO REVISE THIS
DOCUMENT OR WITHDRAW IT AT ANYTIME WITHOUT PRIOR NOTICE.
EXPORT CONTROLS
This device may contain commodities, technology, or software subject to export laws and
regulations from the U.S. and other countries. Diversion contrary to law is prohibited.
Copyright protections may prevent some images, music (including ringing tones), and the
content from being copied, modified, transferred, or forwarded.
ISSUE 1
i

Copyright
©2006Nokia.All rights reserved.
Contents
For your safety...................... iv
Welcome............................... vii
Getting help....................................... vii
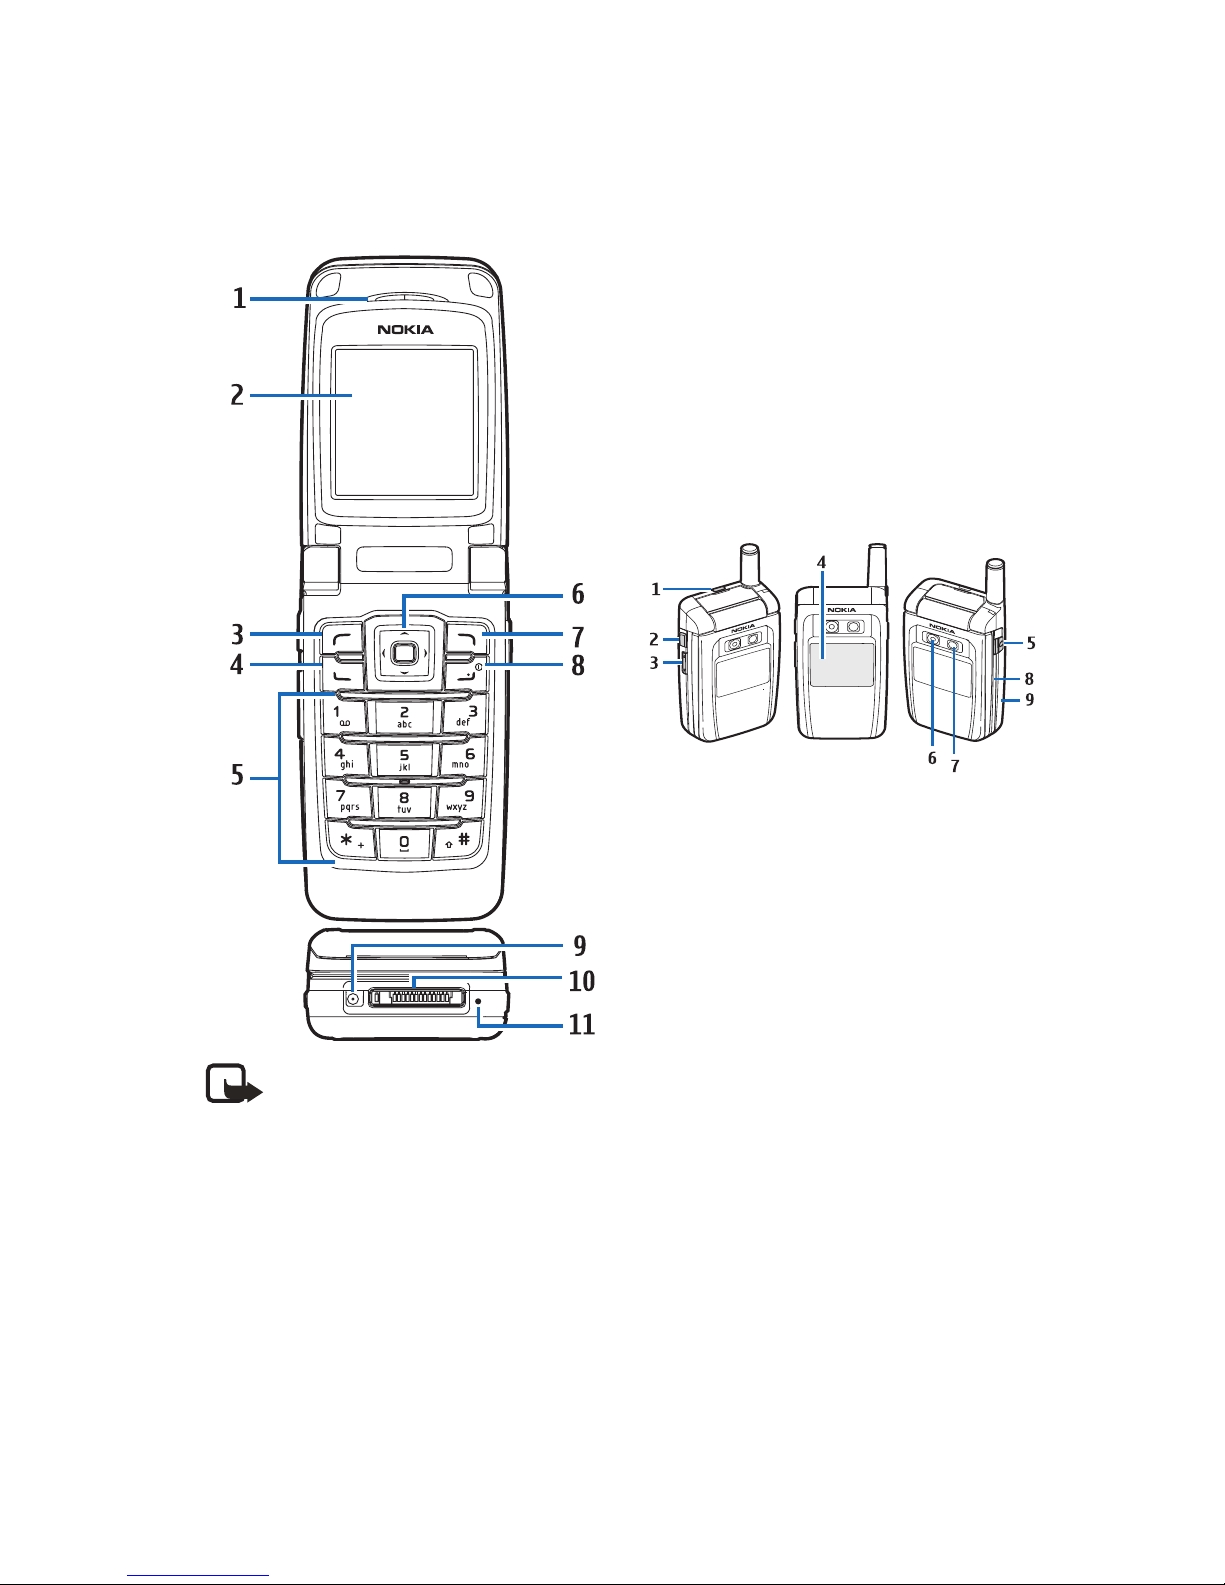
1. Phone at a glance.............. 1
Keys and parts..................................... 1
Standby mode ..................................... 2
Quick keys ............................................ 2
Indicators and icons.......................... 2
Phone menus....................................... 3
Lock code security settings............. 4
Go to functions................................... 4
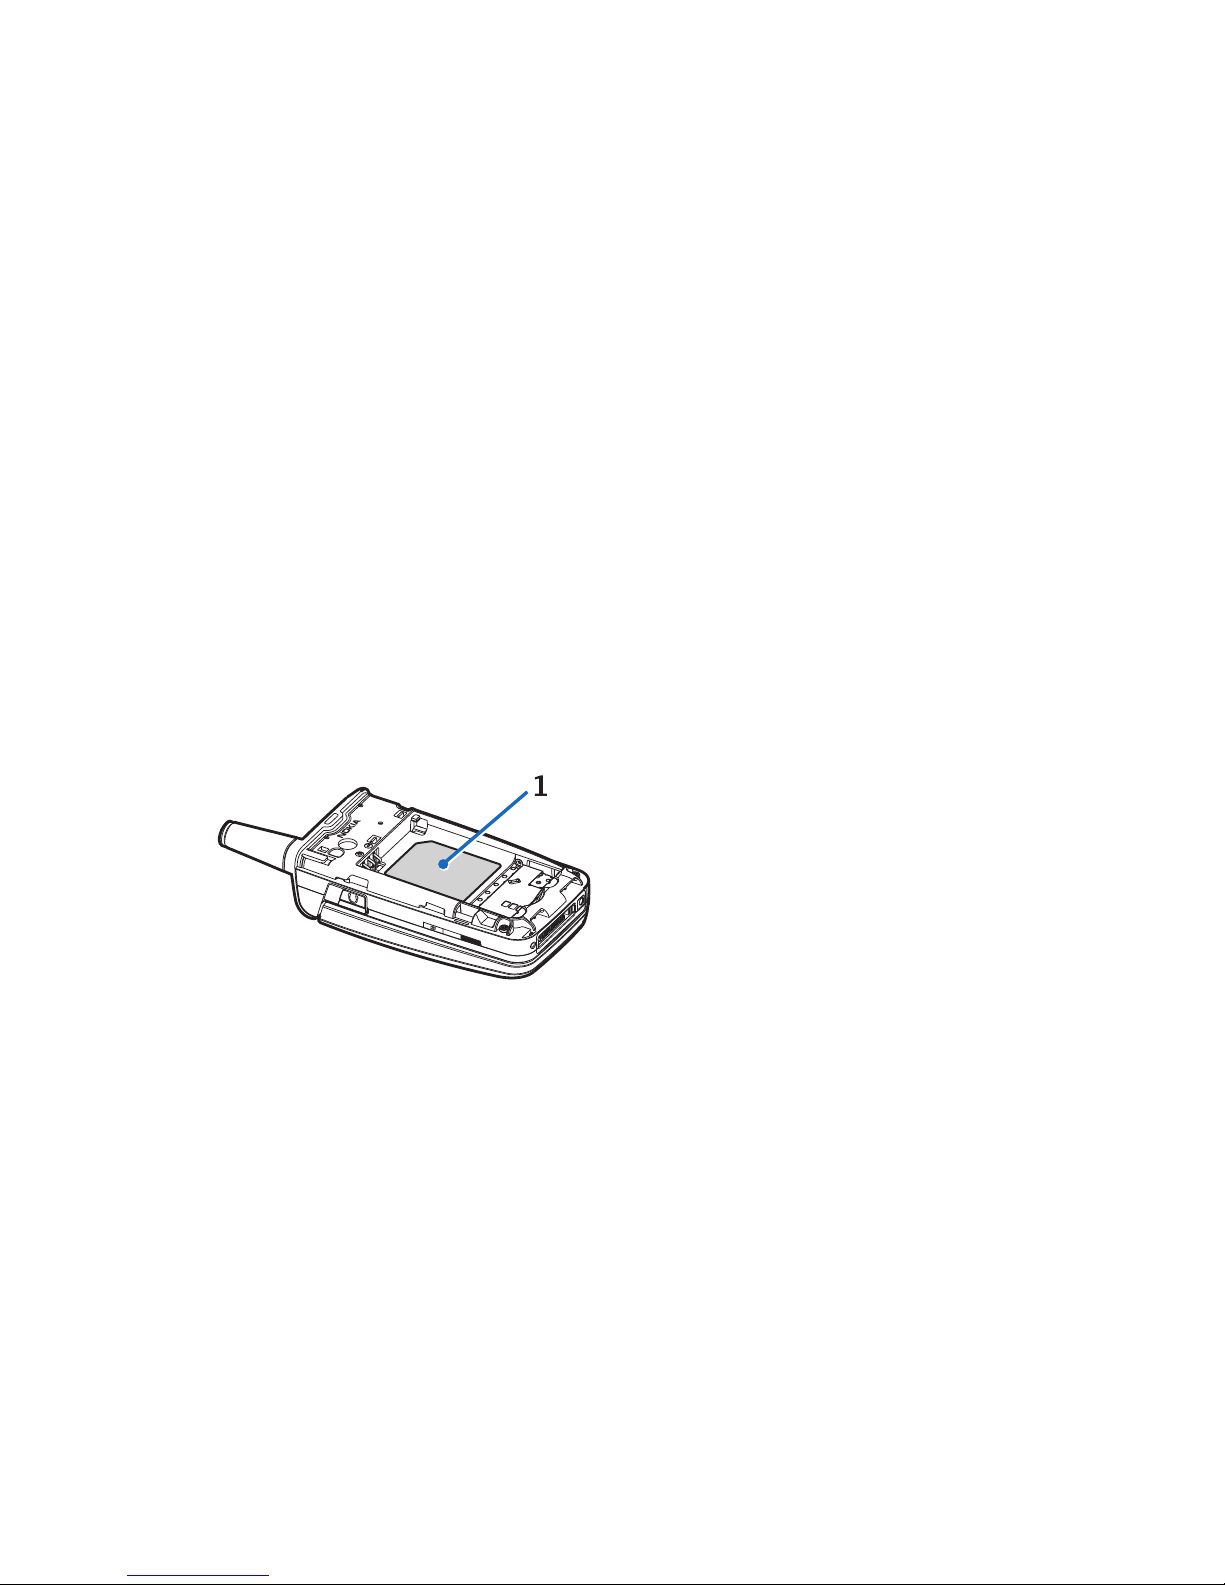
2. Set up your phone............. 6
Antenna ................................................ 6
Battery .................................................. 6
Turn your phone on or off ............... 8
Connect the headset......................... 9
Make a call .......................................... 9
Answer calls....................................... 10
Keyguard............................................. 11
3. Text entry......................... 12
Standard mode ................................. 12
Predictive text mode....................... 12
Change case and mode .................. 13
4. Messages .......................... 14
Text messages ................................... 14
Multimedia messages ..................... 19
Distribution lists............................... 26
Voice messages................................. 27
Web messaging ................................ 29
5. Log.................................... 30
View missed calls ............................. 30
View received calls .......................... 30
View dialled numbers...................... 30
View Message Recipients .............. 30
Time of call ........................................ 31
Use other options............................. 31
Clear log lists..................................... 31
Call timers .......................................... 31
Data or fax calls ............................... 32
Duration of minibrowser calls ........ 32
6. Contacts ........................... 33
Add new contacts ............................ 33
Voice tags........................................... 35
Edit contacts list entries ................ 36
Delete contacts entries................... 37
Access the contacts menu............. 37
Send and receive contacts............. 37
7. Camera.............................. 39
Take a photo ...................................... 39
8. Gallery .............................. 42
Folders ................................................. 42
Fun frames and clip art .................. 43
9. Media................................ 44
Recorder.............................................. 44
Media equaliser ................................ 44
10.Settings........................... 46
Profiles ................................................ 46
Main display and
Mini display ....................................... 47
Themes ................................................ 48
Tone settings ..................................... 48
Time and date settings ................... 49
Call settings....................................... 49
Phone settings .................................. 52
Voice commands
and voice tags................................... 54
Connectivity....................................... 55
Enhancement settings .................... 59
Security settings............................... 60
ii

Copyright
©2006Nokia.All rights reserved.
Application settings........................ 62
Network.............................................. 63
Network services.............................. 63
Restore settings ............................... 64
Phone details .................................... 64
11.Organiser........................ 65
Alarm clock........................................ 65
Calendar............................................. 66
Notes................................................... 68
To-do list............................................ 68
Calculator .......................................... 69
Timer ................................................... 70
Stopwatch ......................................... 71
12.Mobile web ................... 73
Mobile Internet access................... 73
Sign on................................................ 73
Navigate the mobile Internet....... 73
13.Extras.............................. 75
Games ................................................. 75
Collection........................................... 75
Memory .............................................. 75
14.PC connectivity.............. 76
USB data transfer............................ 76
Nokia PC Suite.................................. 77
15.Enhancements................ 78
16.Battery information ...... 79
Charging and discharging............. 79
Nokia battery authentication
guidelines........................................... 80
Care and maintenance........ 82
Additional safety
information ......................... 83
Index .................................... 88
iii

Copyright
©2006Nokia.All rights reserved.
For your safety
Read these simple guidelines. Not
following them may be dangerous or
illegal. Read the complete user guide
for further information.
SWITCH ON SAFELY
Do not switch the device
on when wireless phone
use is prohibited or when
it may cause interference
or danger.
ROAD SAFETY COMES FIRST
Obey all local laws. Always
keep your hands free to
operate the vehicle while
driving. Your first
consideration while
driving should be road
safety.
INTERFERENCE
Do not switch the device
on when wireless phone
use is prohibited or when
it may cause interference
or danger.
SWITCH OFF IN HOSPITALS
Follow any restrictions.
Switch the device off near
medical equipment.
SWITCH OFF IN AIRCRAFT
Follow any restrictions.
Wireless devices can cause
interference in aircraft.
SWITCH OFF WHEN
REFUELING
Do not use the device at a
refueling point. Do not use
near fuel or chemicals.
SWITCH OFF NEAR BLASTING
Follow any restrictions. Do
not use the device where
blasting is in progress.
USE SENSIBLY
Use only in the normal
position as explained in
the product
documentation. Do not
touch the antenna
unnecessarily.
QUALIFIED SERVICE
Only qualified personnel
may install or repair this
product.
ENHANCEMENTS AND
BATTERIES
Use only approved
enhancements and
batteries. Do not connect
incompatible products.
WATER-RESISTANCE
Your phone is not water-
resistant. Keep it dry.
BACK-UP COPIES
Remember to make back-
up copies or keep a written
record of all important
information.
iv

Copyright
©2006Nokia.All rights reserved.
CONNECTING TO OTHER
DEVICES
When connecting to any
other device, read its user
guide for detailed safety
instructions. Do not
connect incompatible
products.
EMERGENCY CALLS
Ensure the device is
switched on and in service.
Press the end key as many
times as needed to clear
the display and return to
the main screen. Enter the
emergency number, then
press the call key. Give
your location. Do not end
the call until given
permission to do so.
■About your device
The wireless devices described in this
guide are approved for use on the
CDMA 800 and 1900, AMPS networks,
and GPS in the 6165i device. Contact
your network operator for more
information about networks.
Note: The Nokia 6165iGPS
Application is a simple and
convenient navigation
system. It is not enabled for
emergency services use and is
not able to indicate your
specific location to
emergency services in the
event of an emergency.
When using the features in this
device, obey all laws and respect
privacy and the legitimate rights of
others.
Warning: To use any features
in this device, other than the
alarm clock, the device must
be switched on. Do not
switch the device on when
wireless phone use may
cause interference or danger.
■Network services
To use the device you must have
service from a network operator.
Many of the features in this device
depend on features in the wireless
network to function. These network
services may not be available on all
networks or you may have to make
specific arrangements with your
network operator before you can
utilise them. Your network operator
may need to give you additional
instructions for their use and explain
what charges will apply. Some
networks may have limitations that
affect how you can use network
services. For instance, some networks
may not support all language-
dependent characters and services.
Your network operator may have
requested that certain features be
disabled or not activated in your
device. If so, they will not appear on
your device menu. Contact your
network operator for more
information.
v

Copyright
©2006Nokia.All rights reserved.
■Shared memory
The following device features may
share memory: contacts; text
messages; photos, images, and tones
in gallery; calendar notes; games; and
applications. Use of one or more of
these features may reduce the
memory available for the remaining
features sharing memory. If your
phone displays a message that the
memory is full when you try to use a
shared memory feature, delete some
of the information or entries stored in
the shared memory features before
continuing. Some of the features, such
as photos, images, and tones in gallery;
text messages; and applications may
have a certain amount of memory
specially allotted to them in addition
to the memory shared with other
features.
vi

Copyright
©2006Nokia.All rights reserved.
Welcome
Congratulations on your purchase of
the Nokia 6165i mobile phone. Your
phone provides many functions
practical for daily use, such as a hands-
free loudspeaker, alarm clock,
calculator, calendar, and more. Your
phone can also connect to a PC or
laptop using a USB data cable,
Bluetooth wireless technology, or
infrared. To personalise your phone,
you can set your favourite ring tones.
■Getting help
Find your phone label
If you need help, the Nokia Care
Contact Center is available for
assistance. Before calling, we
recommend that you write down the
following information and have it
available:
Electronic serial number (ESN)
The ESN is found on the type label,
which is located beneath the battery on
the back of the phone. See "Remove
the back cover" on page 6 and
"Remove the battery" on page 7.
Nokia Support and
contact information
For the latest version of this guide,
downloads, services and additional
information related to your Nokia
product, please visit www.nokia-
asia.com/6165i/support or your local
Nokia web site. You may also
download free configuration settings
such as MMS, GPRS, e-mail, and other
services for your phone model at
www.nokia-asia.com/phonesettings.
Should you still require assistance,
please refer to www.nokia-asia.com/
contactus.
To check for the nearest Nokia care
center location for maintenance
services, you may like to visit
www.nokia-asia.com/repair.
Updates
From time to time, Nokia updates this
guide to reflect changes. The latest
version may be available at
www.nokia-asia.com/6165i/support.
vii

Copyright
©2006Nokia.All rights reserved.
viii

Phone at a glance
1
Copyright
©2006Nokia.All rights reserved.
1. Phone at a glance
Note: The keymat may vary
according to different
markets.
• Earpiece port (1)
• Display screen (2)
• Left selection key (3)
• Call key (4)
• Keypad (5)
• Four-way scroll and center
selection key (6)
• Right selection key (7)
• Power key and end key (8)
• Charger port (9)
• Pop-Port™ connector (10)
• Microphone (11)
■Keys and parts
• Loudspeaker (1)
• Voice command key (2)
• Volume key (3)
• Mini display (4)
• Camera lens (5)
• Camera flash (6)
• Headset connector (7)
• Camera and Video key (8)
• Infrared (9)
The voice key functions are as follows:
• Short press — Answer an incoming
call.
• Long press — Answer or make a
voice call.

Phone at a glance
2
Copyright
©2006Nokia.All rights reserved.
■Standby mode
Depending on your network operator
and the model number of your phone,
some or all of the following selection
keys may appear in the standby mode.
The standby mode
is home base and
indicates your
phone is in the idle
state.
Signal strength (1) — A higher bar
indicates a stronger network signal.
Menu (2) — Press the center selection
key to select this option.
Go to (3) — Press the left selection key
to select this option.
Names (4) — Press the right selection
key to select this option.
Battery level (5) — A higher bar
indicates more power in the battery.
■Quick keys
Note: Depending on your
network operator and the
model number of your phone,
some or all of the following
quick keys may appear in the
standby mode.
In the standby mode, the four-way
scroll key instantly takes you to
frequently-accessed menus:
Scroll up or down to view the contacts
list.
Scroll right to view the calendar or
network operator menu.
Scroll left to quickly create a text
message.
Press the center selection key to view
the main menu or a selected
submenu.
■Indicators and icons
Depending on your wireless service
provider and the model number of
your phone, some or all of the
following indicators and icons may
appear in the standby mode.
You have a new text or picture
message. See "Text messages"
on page 14.
You have missed a call. See
"View missed calls" on
page 30.
You have new voice messages.
See "Voice messages" on
page 27.
Your phone keypad is locked.
See "Keyguard" on page 11.
Your phone is set to the silent
profile. See "Profiles" on
page 46.
The alarm clock is set to on.
See "Alarm clock" on page 65.
The countdown timer is
running.
The stopwatch timer is
running in the background.
Integrated hands-free is
active. See "Loudspeaker" on
page 10.
The timed profile is selected.
See "Profiles" on page 46.

Phone at a glance
3
Copyright
©2006Nokia.All rights reserved.
or An enhancement
is connected to the phone. See
"Enhancement settings" on
page 59.
Voice privacy encryption is
active (or is not active) in the
network.
You are in a digital network.
See "Network services" on
page v.
or Location info sharing is
set to emergency or on. See
"Location info sharing," on
page 49.
You are in an analog network.
See "Network services" on
page v.
You are in a 1XRTT network.
See "Network services" on
page v.
You are roaming outside your
home network. See "Roaming
options" on page 63.
Bluetooth connectivity is
activated. See "Bluetooth
connectivity" on page 55.
Infrared connectivity is
activated. See "Infrared
connectivity" on page 58.
■Phone menus
Phone features are grouped according
to function and are accessed through
the main menus. Each main menu
contains submenus and lists from
which you can select or view items
and customise your phone features.
To access these menus and submenus,
use the scroll method or a shortcut.
You can change your menu view from
list to grid. Select Menu > Options >
Main menu view > List or Grid.
Note: Some features may not
be available, depending on
your network. For more
information, contact your
network operator.
Scroll method
You can use the four-
way scroll key to scroll
up, down, left, and right
through the options.
1. In the standby
mode, select Menu, and scroll
through the main menus.
As you scroll through the menus,
the menu number appears in the
upper right corner of the display.
Below the battery level indicator
is a scroll bar with a tab that
moves up or down on the right
side of the display screen as you
scroll through the menus,
providing a visual representation
of your current position in the
menu structure.
2. When you arrive at a menu, press
the center selection key to select
submenus.
• Select Back (the right
selection key) to return to the
previous menu.

Phone at a glance
4
Copyright
©2006Nokia.All rights reserved.
• Press the end key to return to
the standby mode from any
menu or submenu.
In-phone help
Many features have brief descriptions
(help text) you can view on the display.
To view these descriptions, you must
first activate help text as follows.
In the standby mode, select Menu >
Settings > Phone > Help text
activation > On or Off.
Scroll to a feature and wait about 14
seconds. Scroll down to view all of the
description, or select Back to exit.
■Lock code security
settings
Your device has a security option
allowing you to lock your phone with
a code. When the code is set and
turned on, no outgoing calls are
allowed and the menu cannot be
accessed without entering the correct
code first. This prevents unauthorised
outgoing calls or access to any
information stored on your device.
TheSecurity option is in the Settings
menu. The first time you access the
Security option, you must enter a lock
code. The default lock code may vary
depending on your wireless service
provider. The preset lock code may be
last four digits of your phone number,
1234 or 0000. If none of these work,
contact your wireless service provider
for help.
You must enter the lock code to
access the following Security option:
1. In the standby mode, select
Menu > Settings > Security.
2. Enter the lock code, and select OK.
See "Change lock code" on
page 61.
■Go to functions
The Go to menu enables you to
change the function of the left
selection key on your phone. With this
function, you can quickly access your
most frequently used functions from
the Go to menu in the standby mode.
Choose Go to functions
1. In the standby mode, select Go
to > Options > Select options.
2. Scroll up or down to highlight the
desired function.
3. Select Mark to add a function or
Unmark to remove a function.
4. Select Done when you have added
all desired functions.
5. Select Yes to save the changes.
6. In the standby mode, select Go to
to display a list of the functions
you selected in step 2.

Phone at a glance
5
Copyright
©2006Nokia.All rights reserved.
Organise functions
1. In the standby mode, select
Go to > Options > Organise.
2. Scroll up or down to highlight the
function you want to rearrange,
and select Move. Scroll and go to
new location, and select OK.
3. Select Done > Yes to save the
changes.

Set up your phone
6
Copyright
©2006Nokia.All rights reserved.
2. Set up your phone
■Antenna
Your device has a fixed and
extendable antenna located at the top
of the phone with the fold closed.
Hold the phone with the antenna area
pointed up and over your shoulder.
In the Nokia 6165i phone, the GPS
antenna is internal and is activated
when placing emergency calls or
when On is selected from the Location
info sharing menu (a carrier-
dependent feature). See "Location
info sharing" on page 49.
Note: The Nokia 6165iGPS
Application is a simple and
convenient navigation
system. It is not enabled for
emergency services use and is
not able to indicate your
specific location to
emergency services in the
event of an emergency.
Note: Do
not touch
the antenna
unnecessaril
y with the
device
switched on.
Contact with
the antenna
affects call
quality and
may cause the device to
operate at a higher power
level than otherwise needed.
Not touching the antenna
area during a phone call
optimises the antenna
performance and battery life.
■Battery
Note: Always switch off the
power, and disconnect the
charger and any other device
before removing the cover.
Avoid touching electronic
components while changing
the cover. Always store and
use the device with the cover
attached.

Set up your phone
7
Copyright
©2006Nokia.All rights reserved.
Remove the back cover
1. With the back of the phone facing
you, push down on the back cover.
2. Slide the back cover toward the
bottom of the phone and remove.
Remove the battery
After you have removed the back
cover, insert your finger into the
finger grip, and lift the battery from
its compartment.
Note: Always switch off the
device, and disconnect the
charger before removing the
battery.
UIM card slot
Your phone has a UIM (CDMA SIM)
card slot built into the mechanics.
However, the UIM is not functional in
this phone model. Avoid placing
anything into the UIM card slot.
Replace the battery
1. Insert the battery, gold-coloured
contact end first, into the battery
slot.
2. Push down on the other end of the
battery to snap the battery into
place.
Replace the back cover
1. Set the back cover on the phone
with the cover tabs aligned with
the slots in the phone.
2. Slide the back cover toward the
top of the phone until the back
cover is securely in place.

Set up your phone
8
Copyright
©2006Nokia.All rights reserved.
Charge the battery
Note: Before you use a
charger with this device,
check its model number. This
device is intended for use
when supplied with power
from the AC-3 or AC-4
charger.
1. Plug the charger transformer into
a standard ac outlet.
2. Insert the charger output plug
into the round jack at the bottom
end of the phone.
After a few seconds, the battery
indicator in the display starts to
scroll from bottom to top. If the
battery is completely discharged,
it may take a few minutes before
the charging indicator appears on
the display or before any calls can
be made.
The ACP-12, 9, 8, 7, and the LCH-12
can also be used to charge the phone,
but must be used with the CA-44
adaptor included in the box.
1. Plug the charger transformer into
a standard ac outlet.
Insert the charger output plug
into the CA-44 adapter jack. Insert
the CA-44 plug into the jack on
the bottom of the phone.
Warning: Use only batteries,
chargers, and enhancements
approved by Nokia for use
with this particular model. The
use of any other types may
invalidate any approval or
warranty, and may be
dangerous.
■Turn your phone on
or off
1. To turn your phone on or off, press
and hold the end key on the
keypad for at least 4 seconds.
2. Enter the lock code, if necessary,
and select OK. See "Change lock
code" on page 61.
Warning: Do not switch the
phone on when wireless
phone use is prohibited or
when it may cause
interference or danger.

Set up your phone
9
Copyright
©2006Nokia.All rights reserved.
■Connect the headset
A compatible
headset, such as
HS-3, may be
purchased with
your phone or
separately as an
enhancement. See "Enhancement
settings" on page 59.
1. Plug the headset connector into
the Pop-Port connector at the
bottom end of your phone.
appears in the standby mode.
2. Position the headset on your ear.
With the headset connected, you can
make, answer, and end calls as usual.
• Use the keypad
to enter
numbers.
• Press the call
key to place a
call. See "Phone at a glance" on
page 1.
• Press the end key to end a call.
You can also plug a compatible
headset into the 2.5-mm headset jack
on the right side of your phone to
allow hands-free operation. See
"Enhancement settings" on page 59.
■Make a call
Note: Before making or
receiving a call, fully extend
the whip antenna.
Keypad
1. Enter the phone number, and
press the call key. (To delete a
character to the left of the cursor,
select Clear.)
2. Press the end key to end the call,
or select End call to cancel the call
attempt.
Contacts list
1. In the standby mode, scroll down
to display your contacts list and
highlight your desired entry.
2. Select Details to highlight your
desired number; then select Call.
Last dialled number
1. In the standby mode, press the call
key to display the last 30 numbers
dialled.
2. Scroll to the number (or name)
you want to redial, and press the
call key.
Conference calling
This service is network dependant.
1. Make a call to the first participant.
2. With the first participant on the
line, select Options > Add new call.
3. Enter the phone number of the
second participant, or select
Search to retrieve a number from
the contacts list. Select Call. The
first participant is put on hold.

Set up your phone
10
Copyright
©2006Nokia.All rights reserved.
4. When the second participant picks
up, press the call key to connect
the calls.
5. To end the conference call, select
Options > End all calls, or press the
end key.
■Answer calls
An incoming call
1. With the fold open, press the call
key, or select Answer to answer
the call.
2. Press the end key to reject the call.
Select Silence to mute the ringing
tone, then Dismiss, or do nothing.
The call is eventually diverted to
voicemail.
With your phone set to silent in
the profiles menu, select Dismiss
to divert the call to voicemail.
3. With the fold closed, press the
volume key to mute the ringing
tone.
A short press of the voice key
answers an incoming call with the
loudspeaker.
By default, your phone answers an
incoming call when you open the fold.
You can change the setting to not
answer the call when the fold opens.
In the standby mode, select Menu >
Settings > Call > Answer when fold is
opened > On or Off.
Adjust the earpiece
volume
Whether in or out of a call, you can
scroll the volume key located on the
left side of your device up or down to
adjust the volume of the earpiece.
When you adjust the volume, a bar
chart indicates the volume level.
Answer a call with the
keypad locked
To answer a call with the keypad
locked, press the call key with the fold
open. To answer a call with the fold
closed and the keypad locked, press
and hold the voice key to answer with
the loudspeaker. During the call, all
features function as normal. When
you end or reject the call, the keypad
automatically relocks. See "Keyguard"
on page 11.
When the keypad lock is on, calls still
may be possible to the official
emergency number programmed into
your device. Enter the emergency
number, and press the call key.
Loudspeaker
Warning: Do not hold the
device near your ear when the
loudspeaker is in use, because
the volume may be extremely
loud.
You can use your phone as a
loudspeaker during a call.

Set up your phone
11
Copyright
©2006Nokia.All rights reserved.
• To activate the loudspeaker while
in a call with the fold open, select
Loudsp..
• To activate the loudspeaker when
answering a call with the fold
closed, press the voice key.
• To deactivate the loudspeaker
during a call, with the fold open,
select Normal.
The loudspeaker is deactivated
automatically when a call (or a call
attempt) ends or when certain
enhancements are connected.
Call options
Many of the options you can use
during a call are network services.
Check with your network operator for
more information.
1. Select Options during a call to
display the following options:
Loudspeaker or Handset — Activate
or deactivate the loudspeaker
while in a call.
Add new call — Initiate a
conference call. See "Conference
calling" on page 9.
Save — Save a number while in a
call to your contacts list. This
option is available only when
entering numbers during a call.
Add to contact — Add a phone
number to an existing contact in
your contacts list while in a call.
This option is available only when
entering numbers during a call.
End all calls — Disconnect from all
active calls.
Send DTMF — Enter the numbers,
and select DTMF to send the
numbers as tones.
Contacts — View the contacts
menu.
Menu — View the phone menu.
2. Select an option to activate the
option or enter its submenu.
■Keyguard
With keyguard, you can lock the
keypad to prevent keys from being
pressed accidentally. The locked
keypad unlocks when you receive a
call. After the call, the lock
automatically reactivates.
With the keyguard on, calls still may
be possible to the official emergency
number programmed into your phone.
Enter the emergency number, and
press the call key.
Lock the keypad
Select Menu with the center selection
key; then press *within 2 seconds.
Unlock the keypad
Select Unlock with the center
selection key; then press *within 2
seconds.
Other manuals for Sprint PCS Vision 6165i
4
Table of contents
Other Nokia Cell Phone manuals

Nokia
Nokia 8000 4G User manual

Nokia
Nokia TA-1235 User manual

Nokia
Nokia 2730 classic User manual

Nokia
Nokia NPD-1 Series User manual

Nokia
Nokia CP1010 Technical manual

Nokia
Nokia 6600s User manual

Nokia
Nokia 3585i User manual

Nokia
Nokia C6-01 User guide

Nokia
Nokia 1680 - Classic Cell Phone User manual

Nokia
Nokia N70-5 User manual

Nokia
Nokia N93 User manual

Nokia
Nokia 3806 User manual

Nokia
Nokia Lumia 900 User manual

Nokia
Nokia 206 User manual

Nokia
Nokia 2228Arte User manual

Nokia
Nokia 6303i classic User manual

Nokia
Nokia 5310 XpressMusic User manual

Nokia
Nokia 6126 User manual

Nokia
Nokia NPM-5 Service manual

Nokia
Nokia 2285 User manual