NovaStar taurus series User manual

Taurus Series
Multimedia Players
Application Solution
Version:
V1.0.0
Document Number:
NS120100150

Taurus Series Multimedia Players
Application Solution
www.novastar.tech
V1.0.0
i
Change History
Version
Release Date
Description
V1.0.0
2017-07-20
The first version.

Taurus Series Multimedia Players
Application Solution
www.novastar.tech
V1.0.0
ii
Table of Contents
Change History..................................................................................................................................i
Table of Contents............................................................................................................................ ii
1 Overview.........................................................................................................................................1
1.1 About This Solution...................................................................................................................................... 1
1.2 Characteristics of the Application Solution.................................................................................................. 1
1.2.1 Synchronous Playing................................................................................................................................ 1
1.2.2 Smart Brightness Adjustment................................................................................................................... 2
1.2.3 4G Module ................................................................................................................................................ 2
1.2.4 Cluster Management ................................................................................................................................ 3
1.3 Software Acquiring Method ......................................................................................................................... 3
2 AD Player and Mirror Screen Solution.....................................................................................5
2.1 Overview...................................................................................................................................................... 5
2.2 Single Application........................................................................................................................................ 7
2.2.1 Networking Diagram................................................................................................................................. 7
2.2.2 Required Software.................................................................................................................................... 7
2.2.3 Relevant Configurations ........................................................................................................................... 7
2.3 Cluster Application....................................................................................................................................... 8
2.3.1 Networking Diagram................................................................................................................................. 8
2.3.2 Required Software.................................................................................................................................... 8
2.3.3 Required Hardware Devices..................................................................................................................... 8
2.3.4 Relevant Configurations ........................................................................................................................... 9
2.4 Splicing ...................................................................................................................................................... 12
2.4.1 Networking Diagram............................................................................................................................... 12
2.4.2 Required Software.................................................................................................................................. 13
2.4.3 Relevant Configuration........................................................................................................................... 13
3 Post Screen Solution...................................................................................................................15
3.1 Overview.................................................................................................................................................... 15
3.2 Networking Diagram.................................................................................................................................. 17
3.3 Required Software..................................................................................................................................... 17
3.4 Required Hardware Devices...................................................................................................................... 17
3.5 Relevant Configuration.............................................................................................................................. 18
4 General Operations.....................................................................................................................22
4.1 Taurus Login.............................................................................................................................................. 22
4.1.1 Taurus Login upon ViPlex Handy (Android and iOS)............................................................................. 22


Taurus Series Multimedia Players
Application Solution
www.novastar.tech
V1.0.0
1
1 Overview
1.1 About This Solution
Taurus series products are the second-generation multimedia players developed by
NovaStar specially designed for the medium-small size LED full color displays, and
applicable to all kinds of display devices as well as many application scenes.
AD player, mirror screen and post screen are used here as examples to describe the
application solution of Taurus series products. Pictures of Taurus series products
used in networking diagram are taken from T6 model.
For more information of Taurus series products, please visit www.novastar.tech to
download relevant documents.
1.2 Characteristics of the Application Solution
1.2.1 Synchronous Playing
This function makes several displays play the same image at the same time with high
accuracy based on advanced synchronous playing and scheduling technologies.
The synchronous playing function could be enabled for different displays as long as
following three requirements are met:
The synchronous playing function has been enabled on the ViPlex or VNNOX.
The time of multiple Taurus products are synchronized.
Playing plans of multiple Taurus products are the same without random transition
or media.
Advantages of the synchronous playing function are shown in Table 1-1.
Table 1-1 Synchronous playing
Object
Advantage
User
Improve advertisement and information broadcast
effects
Environment
Improve city image and make the city more colorful
Display
Improve visual experience
Time could be synchronized through NTP and Lora modes from which the user could
select one as required:

Taurus Series Multimedia Players
Application Solution
www.novastar.tech
V1.0.0
2
NTP time synchronization: Taurus time synchronization is based on NTP server.
No hardware is required to be added, and time synchronization accuracy
depends on network speed. Consequently, network traffic will be consumed by
using 4G network.
Lora time synchronization: Master and slave devices are required to be set for
Taurus. Time of the slave device is synchronized with that of the master device
through Lora network, and therefore Lora device is required. This time
synchronization method is applicable to events with high time synchronization
requirement and does not consume network traffic, but its signal receiving
depends on the environment and is limited by distance.
1.2.2 Smart Brightness Adjustment
Smart brightness adjustment includes auto brightness adjustment and timing
brightness adjustment.
Auto brightness adjustment: Display brightness will automatically adjust
according to environment brightness.
Timing brightness adjustment: Display brightness will automatically adjust to a
specific value at a given point of time.
Taurus products have brightness sensor connectors. Connect the light sensor and set
smart brightness adjustment rules on ViPlex to enable the smart brightness
adjustment function.
Advantages of smart brightness adjustment are as shown in Table 1-2.
Table 1-2 Smart brightness adjustment
Object
Advantage
User
Reduce manual operations
Environment
Avoid light pollution
Display
Smarter
Taurus products support manual brightness adjustment as well.
1.2.3 4G Module
Taurus series products provide models of onboard 4G modules, and therefore 4G
network could be used for Internet connection.
When mobile data network is enabled on ViPlex and priority requirements for signal
selection are met, Taurus products with 4G module could connect to Internet.
Advantages of 4G module are as shown in Table 1-3.
Table 1-3 4G module
Object
Advantage
User
Solution transmission speed is fast without wiring
operation
Environment
-

Taurus Series Multimedia Players
Application Solution
www.novastar.tech
V1.0.0
3
Display
All Internet connection methods are available to
enable more application scenes
1.2.4 Cluster Management
Display quantity increases fast following with the development of smart city and
commercial application, and cluster solution of NovaStar emerges to uniformly
manage and monitor numerous displays in different places.
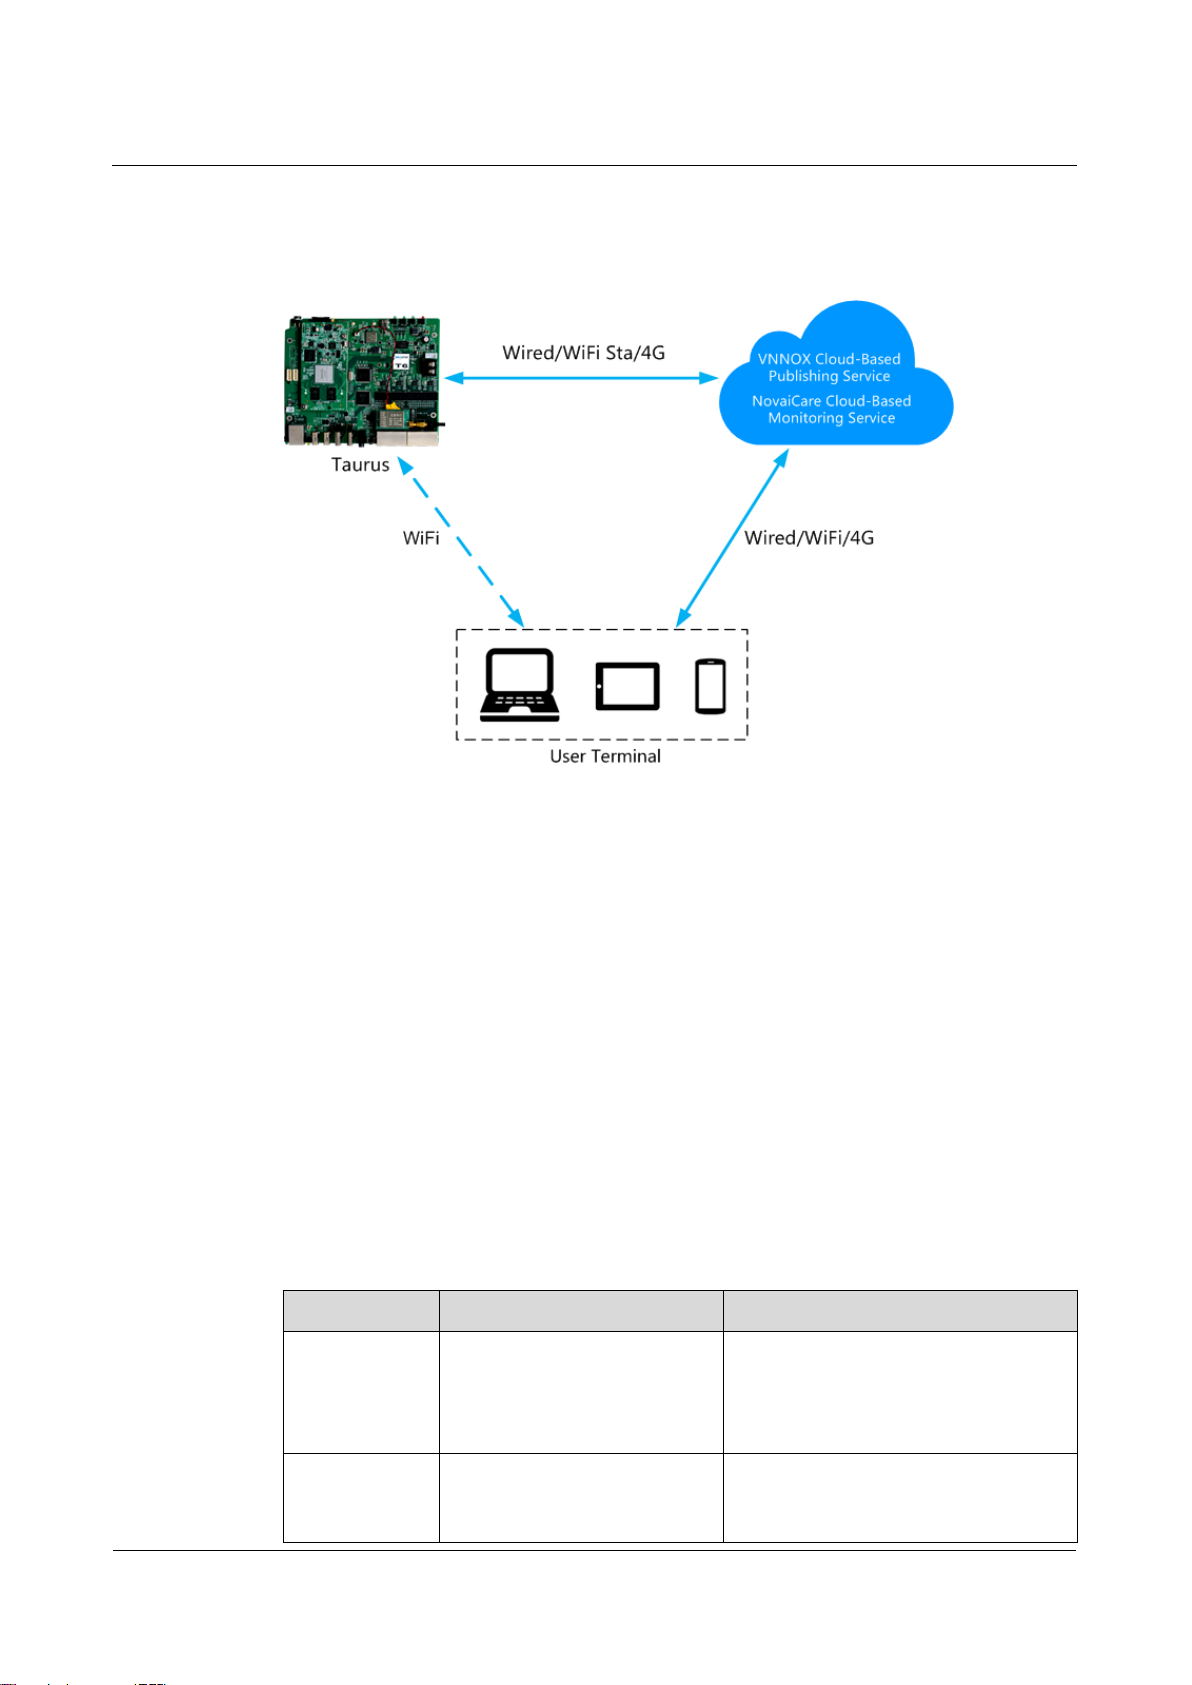
VNNOX:A cloud publishing service used to realize display remote content
management and remote terminal control.
NovaiCare:A cloud monitoring service used to realize display remote monitoring.
VNNOX and NovaiCare could be accessed to remotely and uniformly manage
displays with PC, Pad or mobile phone as long as Internet is available.
Advantages of cluster management are as shown in Table 1-4.
Table 1-4 Cluster management
Object
Advantage
User
Remotely and uniformly manage and monitor
numerous displays
Environment
Helpful for the development of the smart city
Display
Without limits on deployment position and quantity
1.3 Software Acquiring Method
Table 1-5 Software acquiring methods
Type
Description
Method
ViPlex Handy
It is a LAN-based display
management software, including the
one applicable to Android and iOS
operating systems, is mainly used for
display management as well as
solution editing and publishing.
Scan the following QR
code to download and
install the APP.
You can also download
the ViPlex Handy for iOS
from App Store.
ViPlex Express
It is a LAN-based display
management software applicable to
the Windows operating system, and
is mainly used for display
Visit www.novastar.tech,
download and install the
required software.

Taurus Series Multimedia Players
Application Solution
www.novastar.tech
V1.0.0
4
management as well as solution
editing and publishing.
VNNOX
It is a safe cloud publishing service,
and is mainly used for solution
remote editing and publishing.
Visit www.vnnox.com for
register and login.
NovaiCare
It is a safe cloud monitoring service,
and is mainly used for display remote
monitoring.
Visit www.novaicare.com
for register and login.

Taurus Series Multimedia Players
Application Solution
www.novastar.tech
V1.0.0
5
2 AD Player and Mirror Screen
Solution
2.1 Overview
AD player and mirror screen, the typical commercial display applications, are mainly
used for information publishing and advertisement display, and can be placed at the
shopping mall, hotel, office building, exhibition, bank, station and community.
There are two application modes for the mirror screen which is a mirror when the
display is turned off.
There are many application modes for the AD player and mirror screen, and only
typical applications are introduced in this chapter, including the single application,
cluster application and splicing application.
Characteristics of the AD player and mirror screen of NovaStar are as shown in Table
2-1.
Table2-1 ADplayer and mirror screen
Characteristic
Description
Required Configuration
Support for
synchronous display
Application of advanced
synchronous playing and
dispatching technologies
realize high-accuracy
synchronous playing for the
same image on different
displays.
Enable the
synchronous playing
function on the ViPlex
or VNNOX.
Set time synchronizing
rules on the ViPlex or
VNNOX.
Support for smart
brightness adjustment
Automatic and timing
brightness adjustment could
reduce manual operation,
and brightness filtering
technology could help to
avoid brightness
interference to realize
stable display brightness.
Set smart brightness
adjustment rules on
ViPlex.
Support for splicing
playing
Both individual playing and
splicing playing are
available for multiple
displays.
Set splicing-related
parameters on ViPlex.
Support for selling
advertisements played
During the process of
solution scheduling, the
Edit solutions on VNNOX.

Taurus Series Multimedia Players
Application Solution
www.novastar.tech
V1.0.0
6
in different time periods
user can divide time periods
as required to play the
specified list in every time
period.
Support for media
switching without
blackout
Blackout does not occur
during media switching
process.
No need to set.
Support for generating
play log
The Taurus products can
generate play log, and the
user can check and export
the log on VNNOX.
No need to set.

Taurus Series Multimedia Players
Application Solution
www.novastar.tech
V1.0.0
7
2.2 Single Application
2.2.1 Networking Diagram
Taurus products provide Wi-Fi AP itself. After connecting to Wi-Fi AP with PC, Pad
and mobile phone, enter the username and password to log in to the Taurus.
2.2.2 Required Software
ViPlex Handy
ViPlex Express
2.2.3 Relevant Configurations
No need to set. Refer to 4.1 “Taurus Login” for specific operations to connect and log
in to the Taurus products.
Taurus Series Multimedia Players
Application Solution
www.novastar.tech
V1.0.0
8
2.3 Cluster Application
2.3.1 Networking Diagram
VNNOX and NovaiCare could be accessed directly or by way of bridge connection.
When bridge connection is selected, following three methods for Internet connection
of Taurus products are available with priorities ranging from high to low:
Wired network
WiFi Sta
4G network
When the three methods are all enabled, Taurus products will select signals
automatically according to the priorities.
2.3.2 Required Software
ViPlex Handy
ViPlex Express
VNNOX
NovaiCare
2.3.3 Required Hardware Devices
Function
Required Hardware Device
Model
Synchronous
playing
When Lora time
synchronization is used, it is
required to purchase Lora
devices
E32-1W: Installed on the master
device.
E32-100: Installed on the slave
device.
Smart
brightness
adjustment
Light sensor
NS048D

Taurus Series Multimedia Players
Application Solution
www.novastar.tech
V1.0.0
9
2.3.4 Relevant Configurations
Before You Begin
The login username and password for VNNOX, NovaiCare and NovaLCT-Taurus
are acquired.
Create solution(s) on VNNOX without random transition and random media of the
solution(s).
Create asynchronous players on VNNOX and associate the players with the
License.
Configurations required before monitoring have been done on NovaLCT-Taurus
and NovaiCare.
Refer to software online help for specific operations of VNNOX, NovaiCare and
NovaLCT-Taurus.
Acquiring Player authentication information
Authentication information is required when ViPlex binds the asynchronous player of
VNNOX.
Step 1 Visit http://www.vnnox.com, and click the Login button at the upper-right corner.
Step 2 Select the server node and click Ok.
Step 3 Enter the account name and password, and click Login.
Step 4 Select Organization Management, System Management from the pop-up menu of
in the upper right corner.
Step 5 Select the Player Authentication tab to view Server address, Certified user name
and Certified password.
For following settings, do not exit VNNOX after above operations.
Configuring ViPlex Handy (Android and iOS)
Step 1 Log in to the Taurus. Refer to 4.1.1 “Taurus Login upon ViPlex Handy (Android and
iOS)”.
Step 2 Click screen name to enter Screen management page.
Step 3 Set rules for smart brightness adjustment.
1. Select Screen Setting, Brightness control.
2. Click Brightness mode, select Smart, and click OK.
3. Click Smart adjustment parameters.
4. Click and select Auto brightness adjust to set time and duration for
automatic adjustment, and then click OK.
5. Click Auto adjustment parameters to set the corresponding relationship
between the environment brightness and display brightness, and then click OK.
6. Click and select schedule brightness adjust to set the timing adjustment
time and duration as well as display brightness value, and then click OK.
7. Click Send to send the smart brightness adjustment rules to the Taurus.

Taurus Series Multimedia Players
Application Solution
www.novastar.tech
V1.0.0
10
Step 4 Set the connection method between the Internet and Taurus.
Priorities of wired network, Wi-Fi Sta and 4G network range from high to low. When
the three methods are all enabled, the Taurus will select signals automatically
according to the priorities.
Wired network: When static IP address is required, select Network Setting,
Wired Network Setting, turn DHCP off, enter the static IP address of the Taurus,
and click OK.
WiFi Sta: Select Network Setting, WiFi Setting, and turn WiFi on. Click the
Wi-Fi name of the external router and enter the Wi-Fi password, and click OK.
4G network: Select Network Setting, Mobile Data Setting, and turn Mobile
data on.
Step 5 Bind the asynchronous player.
1. Select Remote Management, Player Binding.
2. Set the VNNOX server and player authentication information.
3. Click Obtain and select a player from the drop-down box of Player.
4. Click OK after setting.
Step 6 If display remote monitoring is required, perform the following procedures. Otherwise,
ignore this step.
1. Select Remote Management, Remote Monitor.
2. Turn Remote Monitor on.
3. Select the service node of the NovaiCare from the drop-down box of Server.
4. Click the right side of Possessor line.
5. Enter the username for login NovaiCare in the pop-up dialog box, and click OK.
6. Click OK after setting.
Step 7 Repeat above steps to configure other Taurus products in cluster till all Taurus
products have been configured.
Configuring ViPlex Express (Windows)
Step 1 Log in Taurus and see detailed operations in 4.1.2 “Taurus Login upon ViPlex
Express (Windows)”.
Step 2 Select Screen Control.
Step 3 Set rules for smart brightness adjustment.
Currently not supported.
Step 4 Set the way to connect Taurus to the Internet.
The priority of wired network, Wi-Fi Sta and 4G network is from high to low. If all of the
three ways are enabled, the Taurus will choose signal automatically according to the
priority order.
1. Select Network configuration.
2. Select the target terminal in the terminal list and perform the following operations
according to actual needs.

Taurus Series Multimedia Players
Application Solution
www.novastar.tech
V1.0.0
11
−Wired network: If it is required to set static IP address, turn off Dynamic
DHCP, enter the IP address information of the Taurus and then click Apply
in the Wired network configuration section.
−WiFi Sta: Turn on Wi-Fi in the Wi-Fi configuration section. Click the Wi-Fi
name of external router and then enter Wi-Fi password and click Apply.
−4G network. Turn on Mobile network in the Mobile network configuration
section.
Step 5 Bind asynchronous players.
1. Select Server configuration.
2. Select the target terminal in the terminal list.
3. Configure player authentication information in Configure parameters for
connecting screens to VNNOX.
4. Click next to Player and select a player.
5. Click Apply.
Step 6 If you want to monitor displays remotely, please perform this step; otherwise, skip this
step.
1. Select Enable next to NovaiCare configuration in Configure parameters for
connecting screens to NovaiCare.
2. Configure NovaiCare server address and login user name.
3. Click Apply.
Step 7 Repeat above steps until all the Taurus products in the cluster are configured.
Configuring VNNOX
When setting timing rules and synchronous playing upon ViPlex, every Taurus
product is required to be set individually, and batch setting is available for setting
timing rules and synchronous playing upon VNNOX. When the public network is
available, VNNOX is recommended for batch configuration to reduce manual
operations.
Step 1 Set time synchronization rule.
1. Select Players Management, Time Synchronization from the pop-up menu of
in the upper right corner.
2. Click NTP server configuration.
3. Click Add to configure NTP service information, and then click Save&Close.
4. Click New on the page of time synchronization task list.
5. Enter time synchronization task name and select time synchronization method,
and then click Next.
−NTP: Select a NTP server and then click Ok.
−LORA: Select a time synchronization standard device and then click Ok.
6. Click Add in the Players tab of the time synchronization task attribute page.
−NTP time synchronization: Select all the players in cluster and then click Ok.
−LORA time synchronization: Select all the slave players in Lora network and
then click Ok.

Taurus Series Multimedia Players
Application Solution
www.novastar.tech
V1.0.0
12
7. When the time synchronization method upon Lora network is selected, and NTP
server is used for the time synchronization standard device, click Configure tab
to set NTP to Yes, and select NTP server. Otherwise, ignore this step.
8. Click Save or Save&Close. Players added in the time synchronization task will
perform time synchronization according to rules defined in the task.
Step 2 If the same image is required to be played by different screens, perform the following
procedures. Otherwise, ignore this step.
1. Select Player Management, Players in the pop-up menu of in the upper
right corner.
2. Select asynchronous players corresponding to all Taurus series products
requiring enabling the synchronous playing function.
3. Click Real-time control and select open the synchronous broadcasting from
the drop-down box.
Step 3 Associate with solution(s).
1. Select Players Management, Players from the pop-up menu of in the upper
right corner.
2. Select a player and click Attribute, or click a player name.
3. Select a solution from the drop-down box of parameter associate solution.
4. Whether solution distribution type is Manual.
−Yes. Click Save&Close to return to the player list page. Perform term 5.
−No. Click Save or Save&Close. VNNOX will automatically distribute
solutions to corresponding Taurus products.
5. Select the target player, and click Update solution to manually distribute
solutions to corresponding Taurus products.
6. Repeat above steps to associate with solutions for other players in cluster till all
players have been configured.
2.4 Splicing
2.4.1 Networking Diagram
The following figure uses three displays splicing as an example to illustrate Taurus
connection.

Taurus Series Multimedia Players
Application Solution
www.novastar.tech
V1.0.0
13
The Taurus product provides Wi-Fi AP itself. Connect to Wi-Fi AP of each Taurus
product through PC, Pad and mobile phone, and then enter the username and
password to log in to the Taurus.
2.4.2 Required Software
ViPlex Handy
ViPlex Express
2.4.3 Relevant Configuration
ViPlex Express doesn’t support following operations for the moment.
Configuring the first display
Step 1 Log in to the Taurus of the first display. Refer to 4.1.1 “Taurus Login upon ViPlex
Handy (Android and iOS)”for specific operations.
Step 2 Click screen name to enter the Screen management page.
Step 3 Select Video Control.
Step 4 Configure the required parameters.
Mode: Manual
Source: inside
Offset X: 0
Offset Y: 0
Step 5 Click OK.

Taurus Series Multimedia Players
Application Solution
www.novastar.tech
V1.0.0
14
Configuring other displays
Step 1 Log in to the Taurus of the second display. Refer to 4.1.1 “Taurus Login upon ViPlex
Handy (Android and iOS)”for specific operations.
Step 2 Click screen name to enter Screen management page.
Step 3 Select Video Control.
Step 4 Configure the required parameters.
Horizontal splicing image is taken as an example here for illustration. In the event of
vertical splicing, the way for setting Offset Y is the same as that for setting Offset X.
Mode: Manual
Source: HDMI
Offset X:(The display serial number–1)x The Image width. For example, when
the image width is 500px, it is required to be set as 500px for the second display
and 1000px for the third display.
Offset Y: 0
Step 5 Click OK.
Step 6 Repeat above steps to configure other Taurus products till all Taurus products have
been configured.
Taurus Series Multimedia Players
Application Solution
www.novastar.tech
V1.0.0
15
3 Post Screen Solution
3.1 Overview
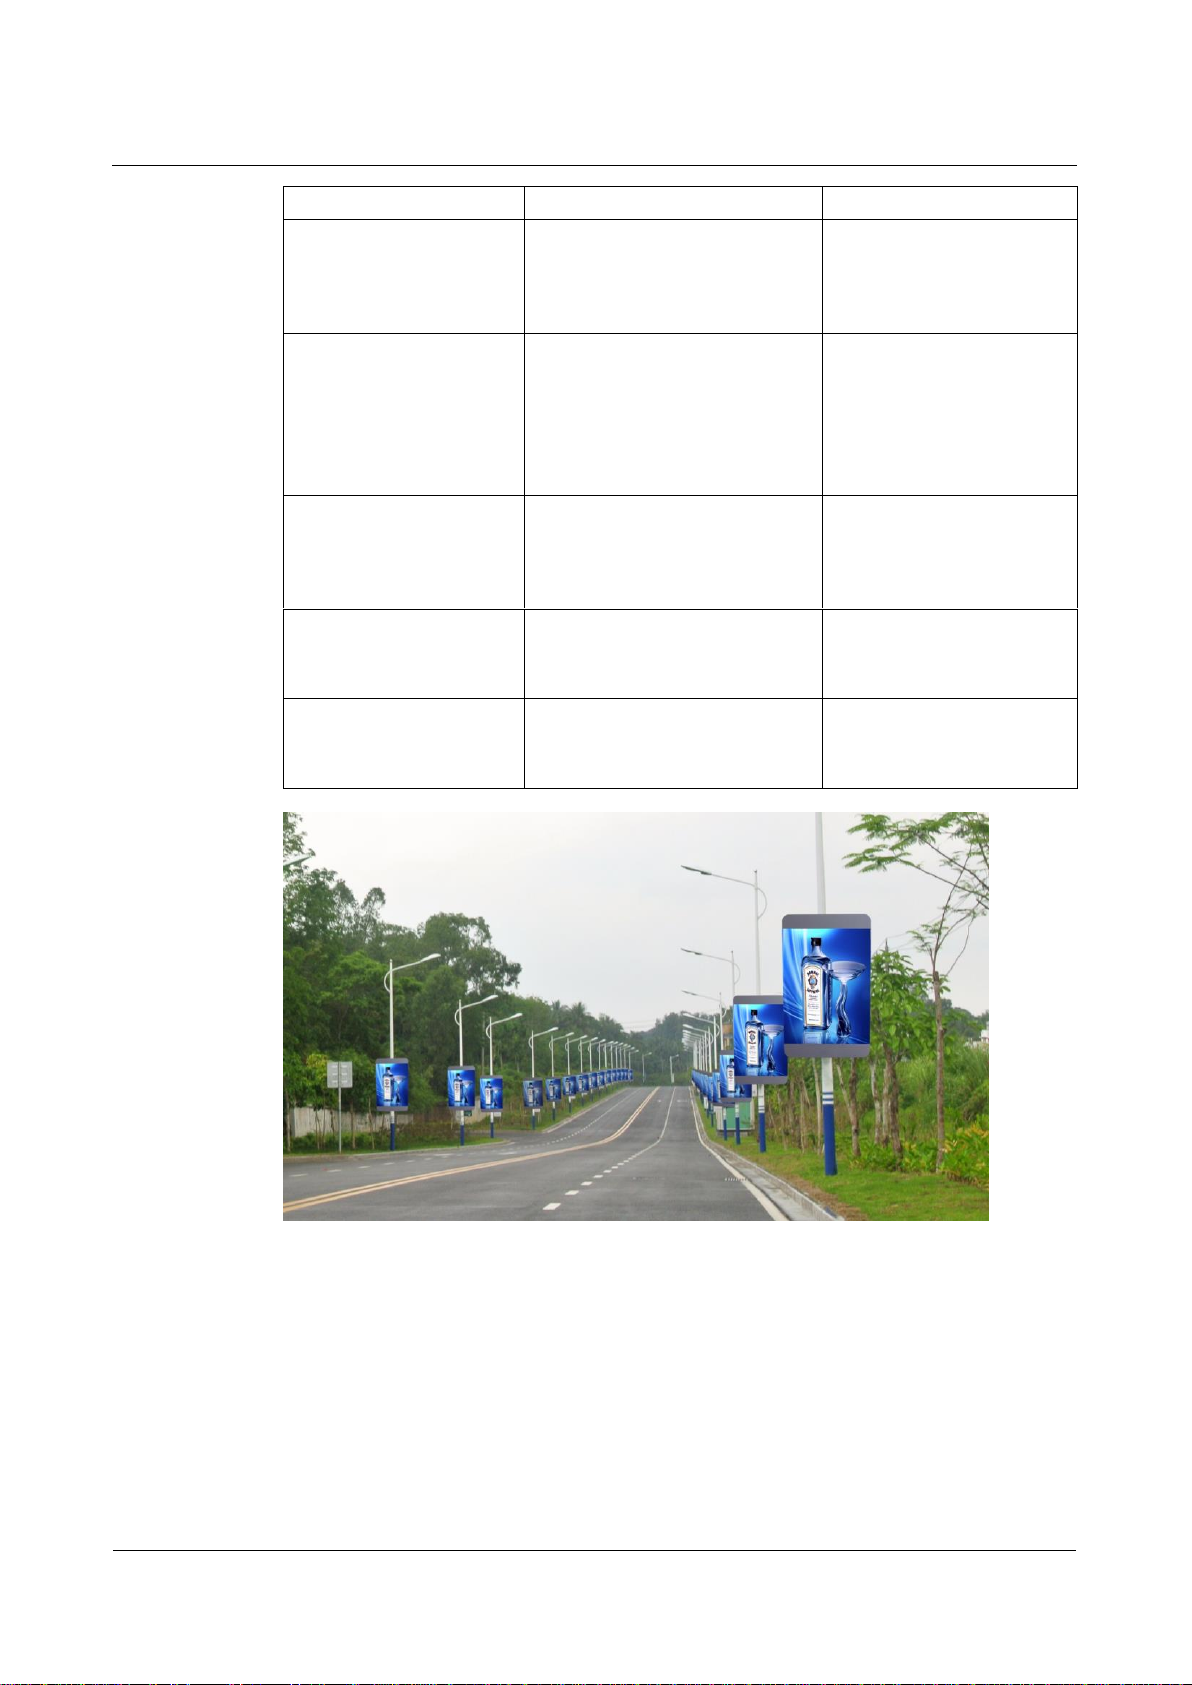
Post screens prevail on both sides of highways and roads following with the
development of the smart city. Smart post screen has distinct advantages compared
with the conventional post which features illumination and static advertisement only
and requires new manufacture and installation in case of advertisement replacement,
while the smart post provides functions including illumination, security monitoring,
environment monitoring, emergency call, charging pile and LED display which used
high-definition smart LED post screen for road leading, data release and advertising
promotion.
Post screens can be used without quantity limits, and the display contents can be
controlled individually or in batch based on cluster management method.
Characteristics of the post screen of NovaStar are as shown in Table 3-1.
Table 3-1 Post screen
Characteristics
Description
Require Configuration
Support synchronous
playing
Use advanced synchronous
playing and scheduling
technologies to make several
displays play the same image
at the same.
Enable the
synchronous playing
function on the ViPlex
or VNNOX.
Set time
synchronizing rules
on the ViPlex or
VNNOX.
Support for smart
brightness adjustment
Automatic and timing
brightness adjustment could
reduce manual operation,
and brightness filtering
technology could help to
avoid brightness interference
to realize stable display
brightness.
Set smart brightness
adjustment rules on
ViPlex.
Support for selling
advertisements played
in different time periods
During the process of solution
scheduling, the user can
divide time periods as
required to play the specified
list in every time period.
Edit solutions on
VNNOX.
Support for media
switching without
Blackout does not occur
during media switching
No need to set.
Taurus Series Multimedia Players
Application Solution
www.novastar.tech
V1.0.0
16
blackout
process.
Support for generating
play log
Taurus products can
generate play log, and the
user can check and export
the log on VNNOX.
No need to set.
Support for remote
solution publishing
VNNOX is a safe cloud
publishing service which
enables remote content
management and remote
terminal control for the LED
display.
Visit www.vnnox.com for
register and login.
Support for remote
display monitoring on
NovaiCare
NovaiCare is a safe cloud
monitoring service which
enables remote monitoring
for the LED display.
Visit www.novaicare.com
for register and login.
Support for
environment monitoring
Onboard camera connector
can monitor the environment
surround the post screen.
No need to set.
Support for 4G module
Onboard 4G module can
connect Internet through 4G
network.
Turn on mobile data
network on ViPlex.
Other manuals for taurus series
12
Table of contents
Other NovaStar Media Player manuals

NovaStar
NovaStar taurus series User manual

NovaStar
NovaStar TCB300 User manual

NovaStar
NovaStar taurus series User manual

NovaStar
NovaStar JT100 User manual

NovaStar
NovaStar taurus series User manual

NovaStar
NovaStar taurus series User manual

NovaStar
NovaStar taurus series User manual

NovaStar
NovaStar taurus series User manual

NovaStar
NovaStar PBOX150 User manual

NovaStar
NovaStar taurus series User manual


