Nuna Cudl User manual

cudl

Designed
around your life

Contents
Product Information
Product Registration 3
Warranty 3
Contact 3
Child Usage Requirements 4
Warnings 5
Parts List 7
Product Set Up 9
Product Use 11
Facing In 17
Head Support 21
Facing Out 23
Back Carry 25
Accessories
Bib 29
Harness Covers 31
Hood 33
Cleaning and Maintenance 35
CUDL™ instructions 2
IMPORTANT!
READ ALL INSTRUCTIONS
CAREFULLY BEFORE ASSEMBLING
AND USING THE SOFT CARRIER.
KEEP INSTRUCTIONS
FOR FUTURE USE

Product Information
Model Number:________________________________________________________________________________________________________________________________________________
Manufactured in (date): ____________________________________________________________________________________________________________________________
Product Registration
Please fill in the above information. The model number and the manufactured
in date are located on a label on the product. Fill out the prepaid registration
postcard attached to the product and mail it today.
To register your product please visit
www.nunababy.com
Click on the “Register Gear” link on the homepage.
Warranty
We have purposely designed our high-quality products so that they can grow
with both your child and your family. Because we stand by our product, our
gear is covered by a custom warranty per product, starting from the day it was
purchased. Please have the proof of purchase, model number and manufactured
in date available when you contact us.
For warranty information please visit
www.nunababy.com/usa/warranty
Contact
For replacement parts, service, or additional warranty questions, please contact
our customer service department.
infousa@nunababy.com
www.nunababy.com
1.855.NUNA.USA
Child Usage Requirements
Please refer to the chart below for proper usage to ensure the safety of your child.
There are four carry modes. Mode usage is determined by your child's weight.
Complies with EN 13209-2:2015
ASTM F2236-16a
Facing Out
20–30 lb (9–13.5 kg)
6+ months
Back Carry
25–35 lb (11–16 kg)
9+ months
Facing In/Infant Booster
8–15 lb (3.5–7 kg)
Birth - 4 months
Facing In
15–30 lb (7–13.5 kg)
4+ months
CUDL™ instructions3CUDL™ instructions 4

WARNING
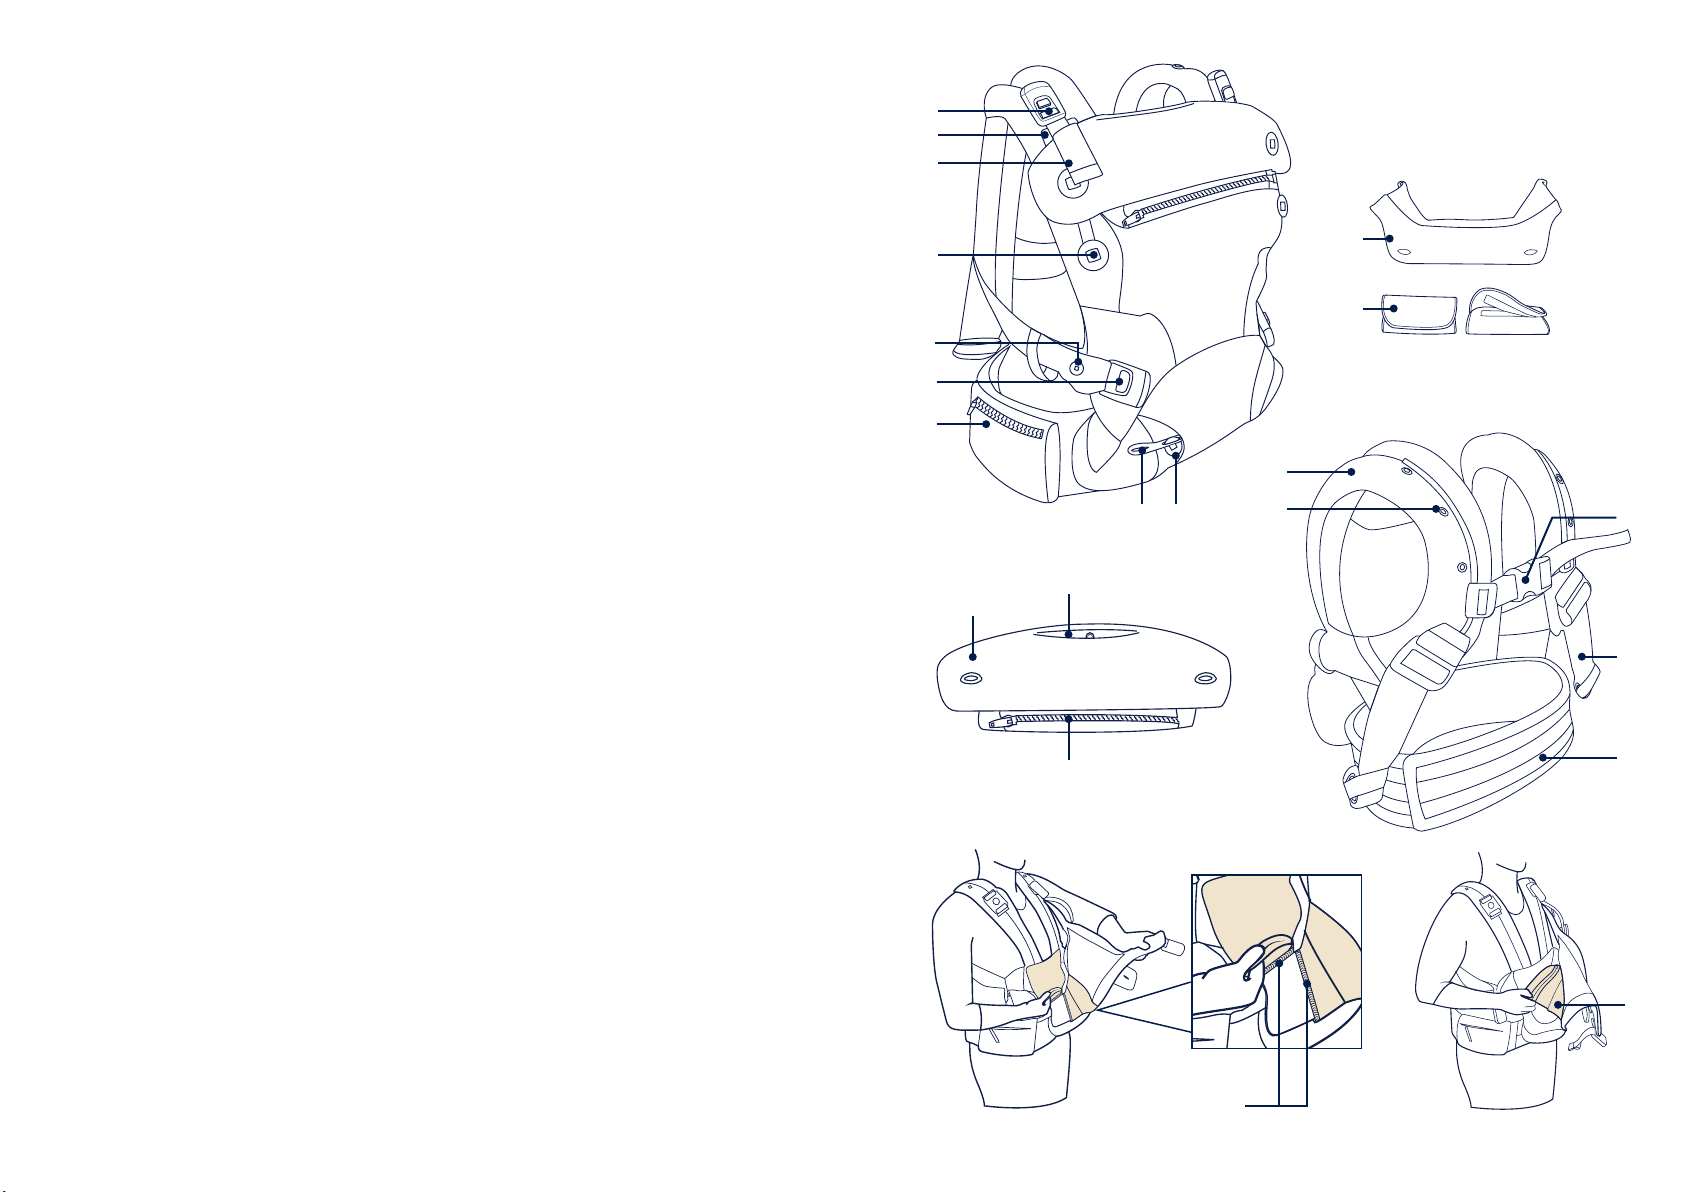
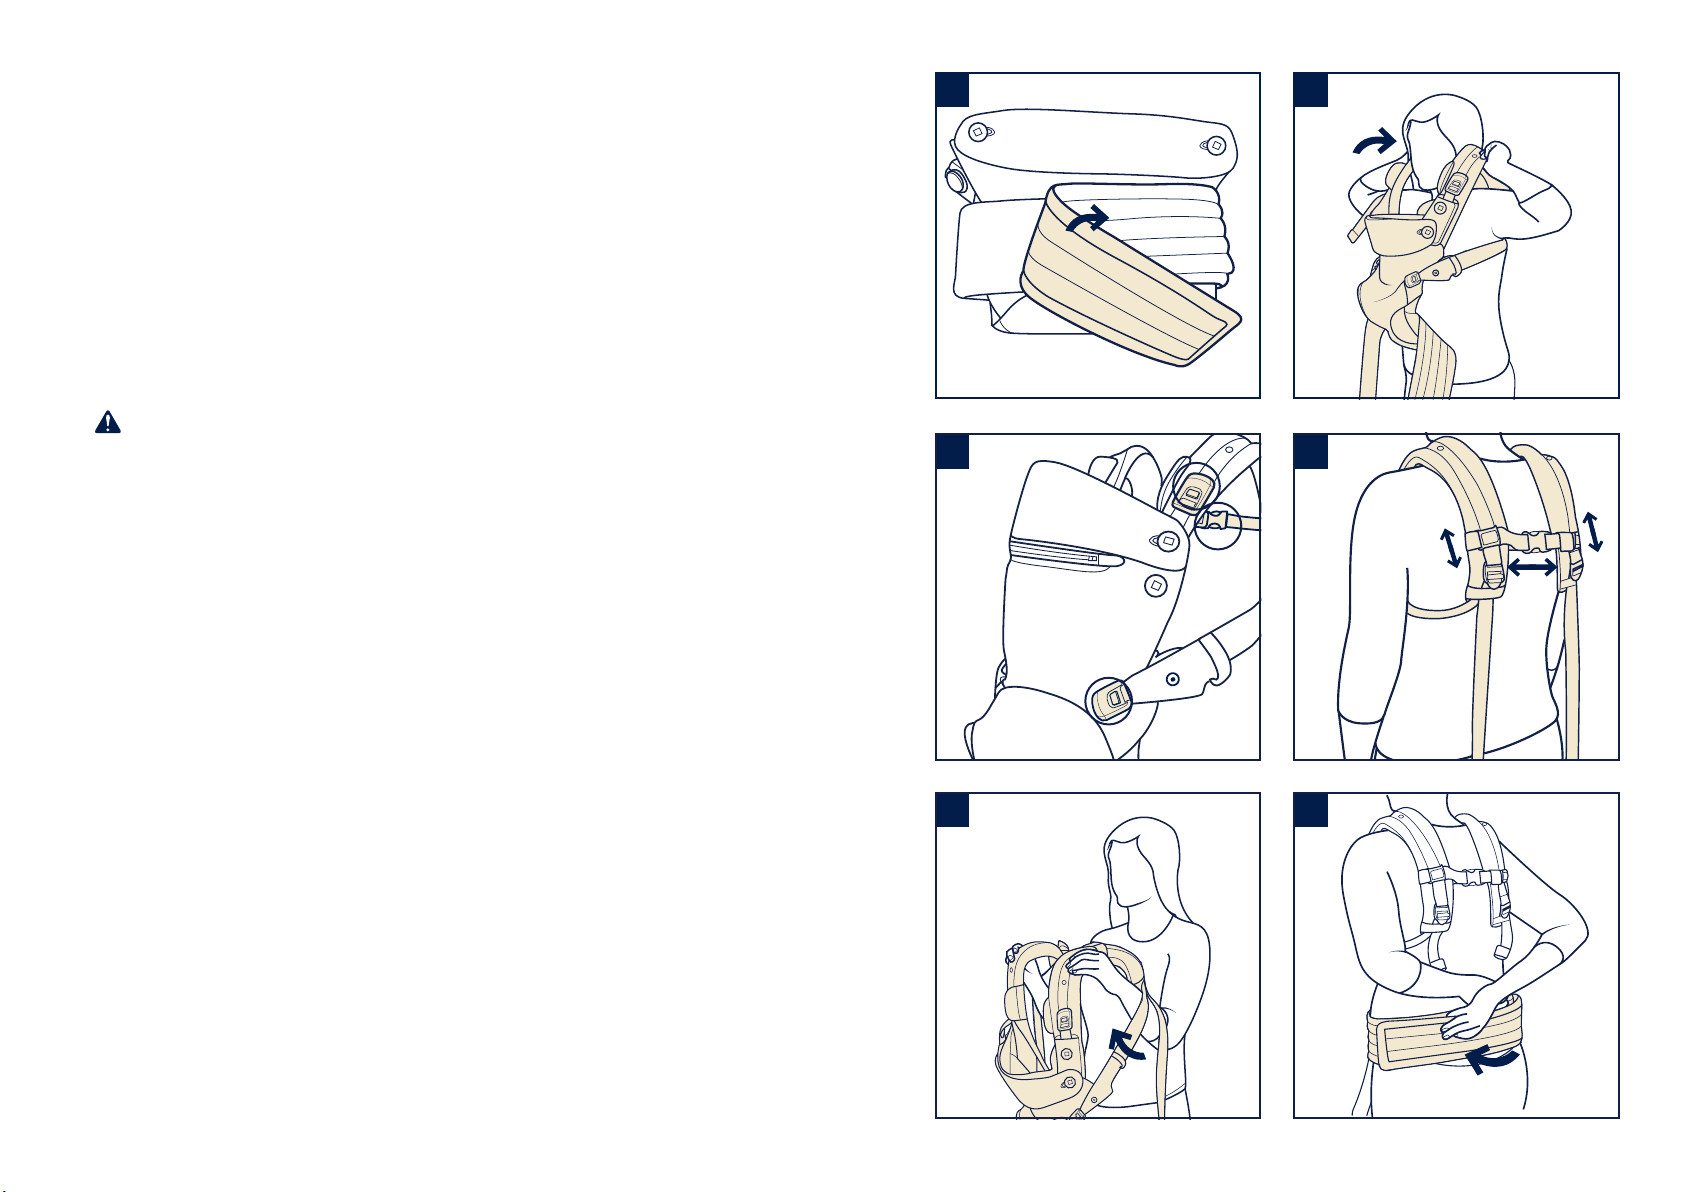
Check to assure all buckles, snaps, straps, and adjustments are
secure before each use.
Check for ripped seams, torn straps or fabric and damaged fasteners
before each use.
Stop using the carrier if parts are missing or damaged.
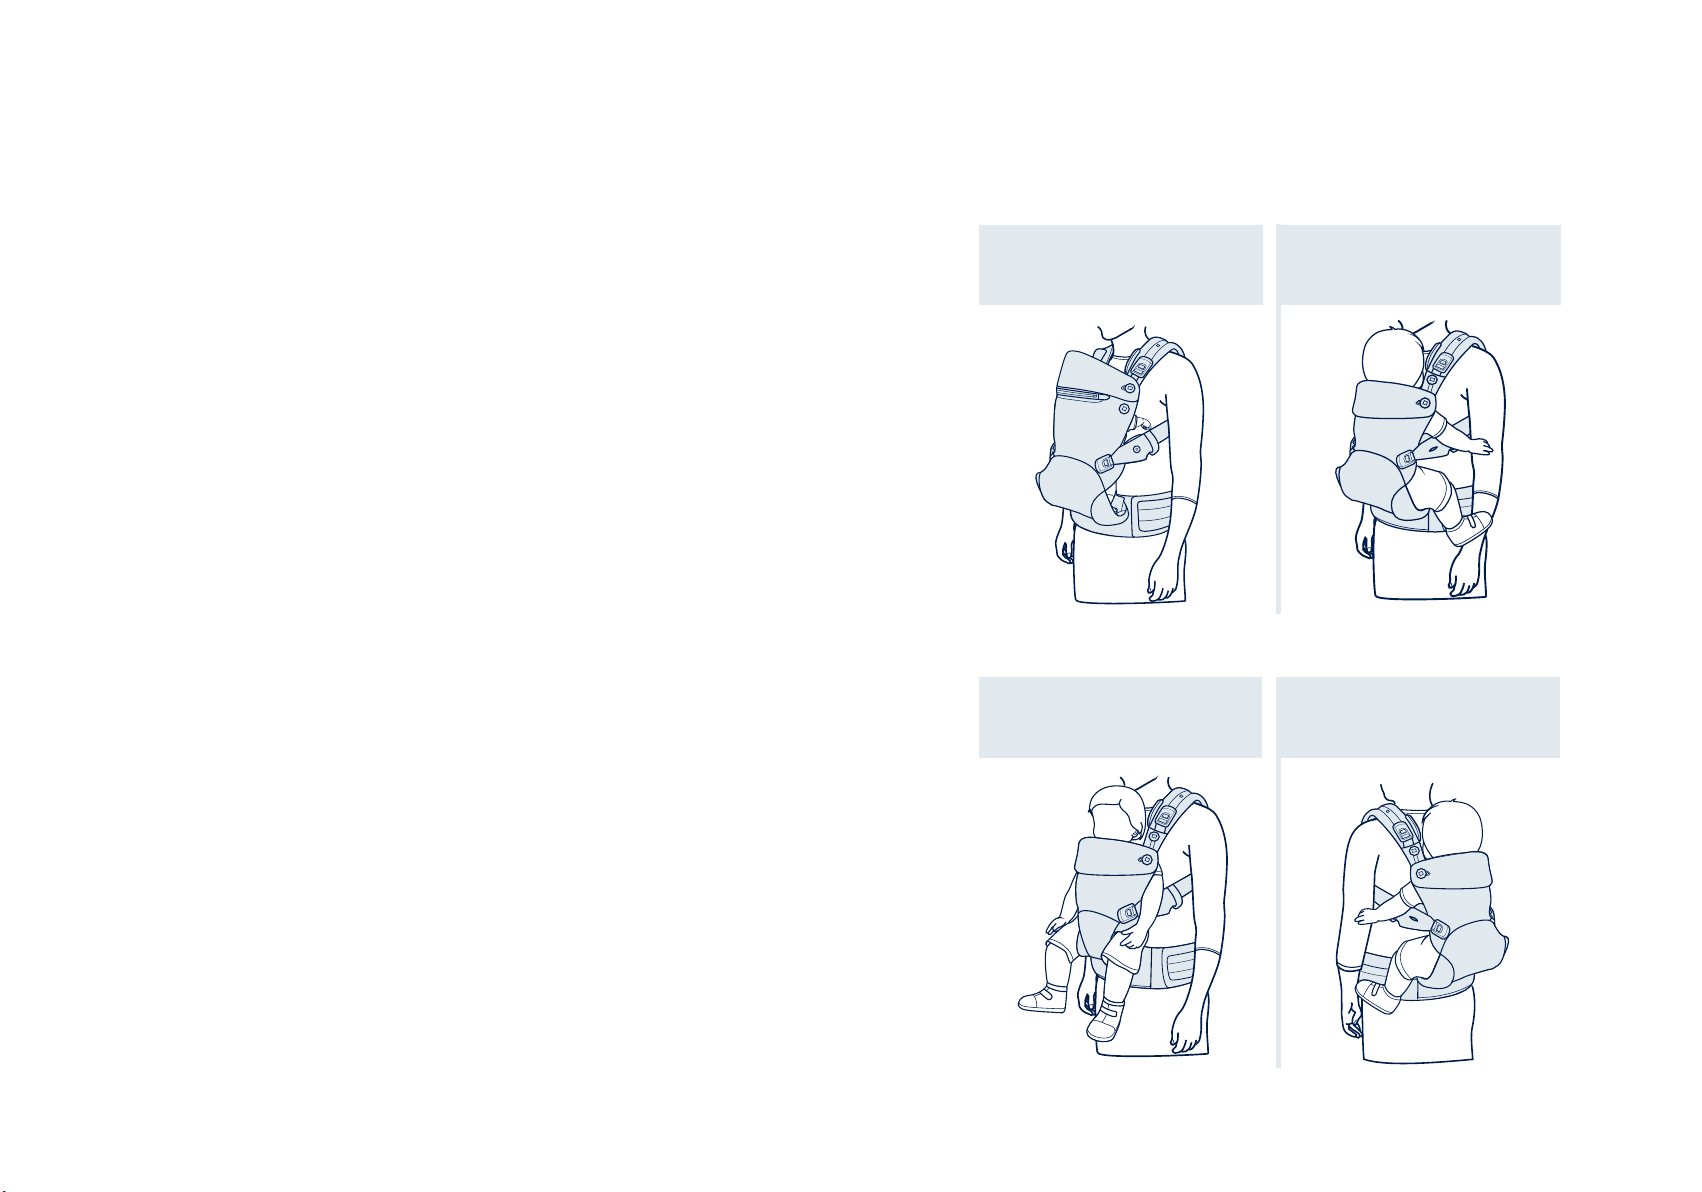
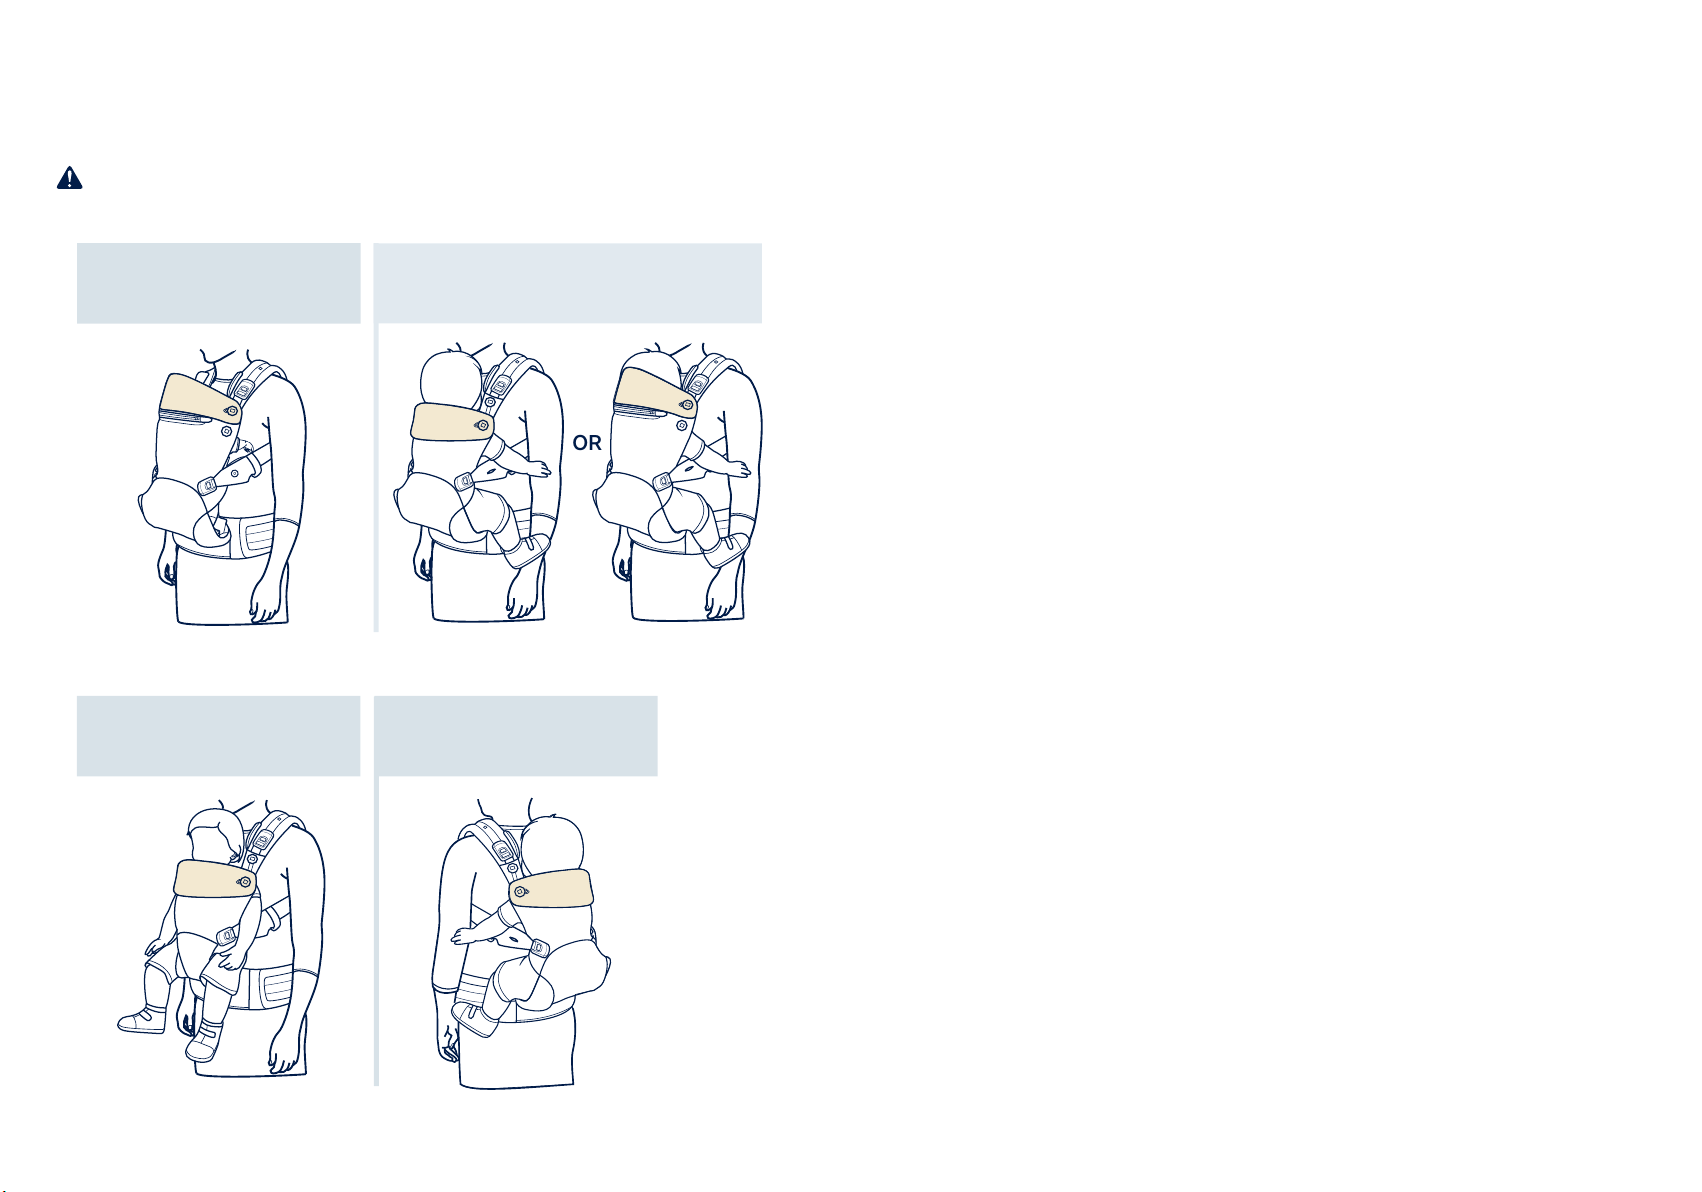
Child must face towards you until he or she can hold head upright.
Ensure proper placement of child in product including leg
placement.
Make sure baby's legs are straddling the seat and arms extend
through arm holes.
Regularly check that your child is comfortably and securely seated in
the baby carrier, especially when using as a back carrier.
To prevent hazards from falling, ensure that your child is securely
positioned in the carrier.
WARNING
FALL AND SUFFOCATION HAZARD
FALL HAZARD - Infants can fall through a wide leg opening or out of carrier.
Follow instructions for use.
•Adjust leg openings to fit baby's legs snugly.
•Before each use, make sure all buckles, fasteners, and adjustments
are secure.
•Take special care when leaning or walking.
•Never bend at waist; bend at knees.
•Only use this carrier for children between 8 lb (3.5 kg) and 35 lb (16 kg).
SUFFOCATION HAZARD - Infants under 4 months can suffocate in this
product if face is pressed tight against your body.
• Do not strap baby too tight against your body.
• Allow room for head movement.
• Keep infant’s face free from obstructions at all times.
Hold your baby closely at all times until correctly attached.
The infant booster must be used for children weighing 8–15 lb
(3.5 kg–7 kg) and should ONLY be used with your child facing in.
Premature infants, infants with respiratory problems, and infants
under 4 months are at greatest risk of suffocation.
For low birth weight babies and children with medical conditions,
seek advice from a health professional before using the product.
When using the soft carrier, monitor your child.
Be aware of hazards in the domestic environment e.g. heat sources,
spilling of hot drinks.
Take care when bending or leaning forward or sideways.
Your balance may be adversely affected by your movement and
that of your child.
This baby carrier is designed for use by adults while walking,
standing or sitting only.
This baby carrier is not suitable for use during sporting activities.
DO NOT use this soft carrier if you use a pacemaker, as the
magnetic buckles can interfere with the pacemaker.
NEVER use a soft carrier when balance or mobility is impaired
because of exercise, drowsiness, or medical conditions.
NEVER use a soft carrier while engaging in activities such as
cooking and cleaning which involve a heat source or exposure to
chemicals.
NEVER wear a soft carrier while driving or being a passenger in a
motor vehicle.
NEVER lie down or sleep with baby in the baby carrier.
CUDL™ instructions5CUDL™ instructions 6

Parts List
Make sure all parts are available before assembly. If any part is missing, please
contact Nuna. No tools are required for assembly.
1 Shoulder Buckle
2 Shoulder Buckle Strap
3 Shoulder Buckle
Adjustment
4 Head Support Button
5 Leg Hole Adjustment
Button
6 Side Buckle
7 Waist Pocket
8 Seat Width Strap
9 Seat Width Button
10 Shoulder Strap
11 Hood Snaps
12 Yoke
13 Shoulder Adjustment Strap
14 Waist Band
Removable Parts
15 Bib (x2)
16 Harness Covers
17 Head Support
18 Hood Pocket
19 Head Support Zipper
Infant Booster
20 Infant Booster
(Unzipped/Not in Use)
21 Infant Booster
(Zipped/In Use)
1
3
2
4
6
7
8 9
5
11
10
12
13
14
15
16
17
19
18
20
21
CUDL™ instructions7CUDL™ instructions 8

Product Set Up
Based on the chart below, position the head support according to your baby’s
weight.
Your baby's head should be supported until he or she has strong head control
(approximately 4 months of age).
OR
Facing In/Infant Booster
8–15 lb (3.5–7 kg)
Birth - 4 months
Facing In
15–30 lb (7–13.5 kg)
4+ months
Facing Out
20–30 lb (9–13.5 kg)
6+ months
Back Carry
25–35 lb (11–16 kg)
9+ months
CUDL™ instructions9CUDL™ instructions 10

Product Use
1 - Open the waist band.
2 - Make sure the yoke, shoulder buckles, and side buckles are connected.
3 - Holding the carrier in front of you, slide your arms through the shoulder
straps.
4 - Pull the carrier over your head.
5 - Adjust the height and width of the yoke vertically and sideways to achieve a
comfortable fit. The yoke should rest between your shoulder blades.
6 - Secure the waist band behind your back, engaging the hook and loop to
hold the band firmly in place.
To remove the carrier, reverse the steps above.
DO NOT remove the carrier while your child is in it.
1 4
2
3 6
5
CUDL™ instructions11 CUDL™ instructions 12

Opening Baby Carrier
1 - Release both shoulder buckles.
2 - Release both side buckles.
3 - The carrier is open.
4 - If your child weighs more than 15 lb (7 kg), the leg hole adjustments are not
needed. Slide the leg hole adjustment button out of the button hole on the
shoulder strap near the side buckle.
Leg hole adjustments MUST be used for children less than 15 lb (7 kg)
to decrease the size of the leg hole and prevent sliding without pinching
or chafing your child's leg.
1 3
24
CUDL™ instructions13 CUDL™ instructions 14

Infant Booster
The infant booster MUST be used if your child weighs less than 15 lb (7 kg).
1- With the shoulder and side buckles attached on one side, locate the
unzipped infant booster inside the carrier.
2- Zip the infant booster sides together.
When your child grows out of the infant booster:
3- Unzip the infant booster.
4- Fold the long side underneath itself and secure the hook and loop along the
length of the fabric.
5- Tuck in the corners.
6 - Make sure the zipper on the short side is covered by the fabric. Both parts
of the zipper should now be covered.
1 4
2
3 6
5
CUDL™ instructions15 CUDL™ instructions 16

Facing In
Securing Your Child
We recommend sitting down while securing your child in the carrier, as it
provides better control.
1- Begin with the carrier fully open (and the infant booster secured if your child
weighs less than 15 lb [7 kg]).
2- Attach one side buckle.
3- Hold your child securely against your chest with one hand, and use the
other to raise the front of the carrier.
4- Guide your child's leg down and through the opening between the seat/
booster and the attached side buckle.
5- Use one hand to hold the carrier and your child against you, and use the
other to secure the other side buckle.
6- Holding your child in the carrier with one hand, secure the shoulder buckles
one at a time.
OR
Infant Booster
8–15 lb (3.5–7 kg)
Birth - 4 months
15–30 lb (7–13.5 kg)
4+ months
1 4
2
3 6
5
CUDL™ instructions17 CUDL™ instructions 18

1 - Gently pull both shoulder buckle adjustments down to adjust the fit.
2 - Adjust the shoulder straps by gently pulling both shoulder adjustment
straps evenly out in front of you.
3 - Make sure your child is comfortable and securely seated in the baby carrier.
Adjust the straps around your child and check to make sure all buckles and
snaps are secure. Allow room for your child's head movements and keep
child's face free from obstructions.
Your child should be positioned close to you, high on your body.
Keep your child's face visible to you at all times.
1
2
3
CUDL™ instructions19 CUDL™ instructions 20

Head Support
1- For a child weighing 8–15 lb (3.5–7 kg), secure the head support so that it is
up and supporting the child's head and neck area. Attach the head support
to the upper head support buttons. Only fold the head support down when
the child is able to hold his or her head up (approx. 4 months).
2- To fold down, slide both upper head support buttons out of the button
holes on the head support.
3- Fold the head support down.
4- Attach both bottom head support buttons into the button holes on the head
support.
5- Make sure your child is comfortable and securely seated in the baby carrier.
Adjust the straps around your child and check to make sure all buckles and
snaps are secure. Allow room for your child's head movements and keep
child's face free from obstructions.
6- To remove the head support, unzip it from the carrier.
1 4
2
3 6
5
CUDL™ instructions21 CUDL™ instructions 22

Facing Out
Seat Width Strap
1- Locate both the seat width strap and the seat width button inside the front
fabric pocket.
2- Attach the seat width button into either of the button holes on the seat
width strap, depending on how much you need to narrow the seat for your
child.
The seat width is properly adjusted if your child’s thighs are supported.
3- Fold the head support down so your child's face will be above the top edge
of the carrier. The carrier is now ready for you to secure your child.
Follow the same steps for securement as Facing In mode (page 17), but
face your child outward.
OR
20–30 lb (9–13.5 kg)
6+ months
1
2
3
CUDL™ instructions23 CUDL™ instructions 24

Back Carry
Back Carry Position
We recommend practicing this method a few times without a child in the
carrier before attempting it with your child.
Child should NEVER be facing out (away from you) in back carry mode.
1 - With your child in the baby carrier facing inward, loosen both shoulder
adjustment straps (DO NOT unbuckle).
2 - Slide your right arm out of the right shoulder strap while cradling your child
with your left arm.
3 - Slide your left arm under the shoulder adjustment strap on the side while
cradling your child with your right arm.
4 - Cradling your child with your right arm, guide your child to your right hip
using your left arm.
5 - Still supporting your child, grab the shoulder strap with your left hand and
pull it down over your shoulder.
6 - Slightly lean forward and move your child onto your back.
OR
25–35 lb (11–16 kg)
9+ months
1 4
2
3 6
5
CUDL™ instructions25 CUDL™ instructions 26

1- Slide your left arm up through the shoulder adjustment strap on the side
while cradling your child behind your back with your right arm.
2- Slide your right arm down through the shoulder strap while cradling your
child with your left arm. Both shoulder straps should now be secure around
your shoulders.
3- Pull down on the shoulder adjustment straps to tighten. Adjust the yoke up
or down vertically and side to side.
4- Roll up the excess length of the shoulder adjustment straps and use the
elastic loop to wrap around the rolled up strap to store it out of the way.
5- Make sure your child is comfortable and securely seated in the baby carrier.
Adjust the straps around your child and check to make sure all buckles and
snaps are secure. Allow room for your child's head movements and keep
child's face free from obstructions.
1 4
3
5
1
2
2
CUDL™ instructions27 CUDL™ instructions 28

Accessories
Bib
1- Make sure the head support is folded down and secured in place with the
lower head support buttons.
2- Store the extra length of the shoulder buckle adjustment in the pocket on
the shoulder buckle strap.
3- Cover the front of the head support with the front of the bib and slide both
head support buttons through the button holes on the bib.
4- Fold and tuck the bib over the top edge of the head support.
5- Wrap both side edges of the bib around the shoulder buckle strap. The
back edge of the bib is slid between the shoulder strap and shoulder buckle
strap. The front edge of the bib is laid over the shoulder buckle strap.
6- Attach the sides of the hook and loop. Make sure the bib is laying flat and is
secure to the top edge of baby carrier.
1 4
2
3 6
5
CUDL™ instructions29 CUDL™ instructions 30

Harness Covers
1 - Unbutton the head support and fold it down.
2 - Store the extra length of the shoulder buckle adjustment in the pocket on
the shoulder buckle strap.
3 - Slide the harness cover between the shoulder strap and the shoulder buckle
strap.
4 - Slide the button on the shoulder buckle strap through the button hole on
the harness cover.
5 - Attach the hook and loop. Make sure the bottom edge of the harness cover
is tucked behind the head support.
6 - Repeat on the other side. When both harness covers are secure, attach
both bottom head support buttons into the button holes on the head
support.
1 4
3 6
5
2
CUDL™ instructions31 CUDL™ instructions 32

Hood
1- Make sure the head support is up and secured in place with the upper head
support buttons. Undo the snap on the pocket located on the top edge of
the head support.
2- Pull the hood out of the hood pocket.
3- Adjust the hood to the desired position to shade your child.
4- Attach three snaps on the hood strap to the three snaps on the shoulder
strap. Repeat for the other side.
Make sure the hood is not covering your child's mouth or laying too tightly
over their head.
1 3
24
CUDL™ instructions33 CUDL™ instructions 34

Cleaning and Maintenance
Refer to the care label attached to the carrier fabric for washing and drying
instructions. Carrier MUST be washed inside a mesh laundry bag.
It is normal for fabric to fade from sunlight and to show wear and tear after a long
period of use, even when used normally.
For safety reasons, only use original Nuna parts.
Check regularly that everything functions properly. If any parts are torn, broken,
or missing, stop using this product.
©2019 Nuna Baby Essentials, Inc. Nuna and all associated logos are trademarks.
CUDL™ instructions35
Other manuals for Cudl
1
Table of contents
Other Nuna Baby Carrier manuals