Oce VarioLink 5022 User manual

Critical Link
Océ
Enlarge Display
Operations
User’s
Guide
VarioLink 5022
VarioLink 4222
VarioLink 3622

VarioLink 5022/VarioLink 4222/VarioLink 3622 x-1
Introduction
Thank you for choosing this machine.
The VL5022/VL4222/VL3622 User’s Guide [Enlarge Display Operations]
contains details on the operation of the various functions available in the
Enlarge Display mode of the VL5022/VL4222/VL3622 and on the various
operating precautions. In order to ensure that this machine is used correctly
and efficiently, carefully read the Enlarge Display Mode Operations volume of
the User’s Guide before using the machine.
For descriptions on trademarks and copyrights, refer to [Trademarks/
Copyrights].
Views of the actual equipment may be slightly different from the illustrations
used in this Enlarge Display Mode Operations volume of the User’s Guide.
Explanation of manual conventions
7 CAUTION
CAUTION
%Failure to observe instructions highlighted in this manner may result in serious
injuries or property damage.
Observe all cautions in order to ensure safe use of this machine.
2
Reminder
Text highlighted in this manner indicates operation precautions. Carefully read
and observe this type of information.
!Detail
Text highlighted in this manner provides more detailed information concerning
operating procedures and other descriptions.
2
Note
Text highlighted in this manner indicates sections containing additional
information. If necessary, refer to the indicated sections.

VarioLink 5022/VarioLink 4222/VarioLink 3622 x-2
[ ]
Names highlighted as shown above indicate keys on the control panel and
buttons in the touch panel.

VarioLink 5022/VarioLink 4222/VarioLink 3622 x-3
Contents
1 Before use
1.1 Names of control panel parts and their functions ................... 1-2
1.2 Adjusting the angle of the control panel ................................... 1-4
1.2.1 To adjust the angle of the control panel ......................................1-4
1.3 Screens in Enlarge Display mode .............................................. 1-6
1.3.1 Displaying screens in Enlarge Display mode ...............................1-6
1.4 Touch panel ................................................................................. 1-8
1.4.1 Touch panel operation .................................................................1-8
1.4.2 Icons that appear in the screen ...................................................1-8
1.4.3 Paper type icons ..........................................................................1-9
1.4.4 Paper supply icons ....................................................................1-10
1.5 Feeding the original .................................................................. 1-11
1.5.1 Loading the original into the ADF ..............................................1-11
1.5.2 Placing the original on the original glass ...................................1-12
1.6 Specifying original settings ...................................................... 1-13
1.6.1 Copying originals of mixed sizes ("Mixed Original" setting) ......1-13
1.6.2 Loading folded originals ("Z-Folded Original" setting) ..............1-15
1.6.3 Selecting the original orientation (Original Direction settings) ...1-17
1.6.4 Selecting the position of the binding margin (Original Binding
Position/Binding Position settings) ............................................1-19
2 Using copy functions
2.1 General copy operation .............................................................. 2-2
2.2 Selecting the Paper settings ...................................................... 2-4
2.2.1 Automatically selecting the paper size ("Auto" Paper setting) ....2-4
2.2.2 Manually selecting the desired paper size ...................................2-6
2.3 Specifying a Zoom setting ......................................................... 2-7
2.3.1 Selecting a zoom ratio .................................................................2-8
2.4 Selecting original and copy settings ......................................... 2-9
2.4.1 Selecting single-sided or double-sided copies .........................2-10

VarioLink 5022/VarioLink 4222/VarioLink 3622 x-4
2.5 Selecting a combined copy setting ......................................... 2-12
2.6 Selecting Finishing settings ..................................................... 2-14
2.6.1 Selecting the finishing method ..................................................2-15
2.6.2 Selecting Staple/Punch settings ................................................2-16
2.6.3 Selecting a folding or binding setting ........................................2-18
2.7 Selecting not to rotate the image ............................................ 2-20
2.8 Selecting the quality of the original ......................................... 2-21
2.9 Selecting the density settings .................................................. 2-23
2.9.1 Adjusting the print density (Density settings) ............................2-23
2.9.2 Adjusting the background density (Background Removal settings) .
2-24
2.10 Selecting the Paper settings .................................................... 2-26
2.10.1Selecting a Paper Type setting for the bypass tray ...................2-26
2.10.2Selecting a Paper Size setting for the bypass tray ....................2-29
2.11 Scanning the next original to be copied while a copy job is being
printed (next job reservation) ................................................... 2-32
2.12 Pausing scanning/printing ....................................................... 2-33
2.13 Printing a proof to check the settings (Proof Copy) .............. 2-34
3 Using fax/scanning functions
3.1 General fax/scan operation ........................................................ 3-2
3.2 Specifying a destination ............................................................. 3-4
3.2.1 Selecting a destination from the address book ...........................3-5
3.2.2 Selecting a destination from the job log ......................................3-7
3.2.3 Selecting a destination with an LDAP search ..............................3-8
3.2.4 Directly typing in the number .....................................................3-10
3.3 Specifying scanning settings (Scan Settings) ........................ 3-13
3.3.1 Simplex/Duplex ..........................................................................3-13
3.3.2 Original Type ..............................................................................3-15
3.3.3 Resolution ..................................................................................3-17
3.3.4 Density .......................................................................................3-18
3.3.5 File Type ....................................................................................3-20

VarioLink 5022/VarioLink 4222/VarioLink 3622 x-5
3.3.6 Background Removal ................................................................3-21
3.3.7 Scan Size ...................................................................................3-23
3.3.8 Original Settings ........................................................................3-24
3.4 Using a program ....................................................................... 3-27
3.5 Checking the destinations ....................................................... 3-29
4 Logging on and logging off
4.1 When a logon screen appears ................................................... 4-2
4.1.1 When the screen to enter the user name appears ......................4-2
4.1.2 When the screen to enter the account name and password appears
4-5

1Before use

VarioLink 5022/VarioLink 4222/VarioLink 3622 1-2
Before use 1
1 Before use
1.1 Names of control panel parts and their functions
2
Note
For details, refer to the User’s Guide [Copy Operations], the User’s Guide
[Network Scan/Fax/Network Fax Operations].
No. Part name Description
1 Touch panel Displays various screens and messages.
Specify the various settings by directly touching the
panel.
2 Main Power indicator Lights up in green when the machine is turned on with
the main power switch.
3 [Power] (auxiliary power)
key
Press to turn on/off machine operations. When turned
off, the machine enters a state where it conserves
energy.
4 [Mode Memory] key Programmed fax/scan settings can be recalled to be
used again. (See p. 3-27)
1
2
4
5
3
6
7
12 11 8
13
14
15
16
10 9
17
18
19

VarioLink 5022/VarioLink 4222/VarioLink 3622 1-3
Before use 1
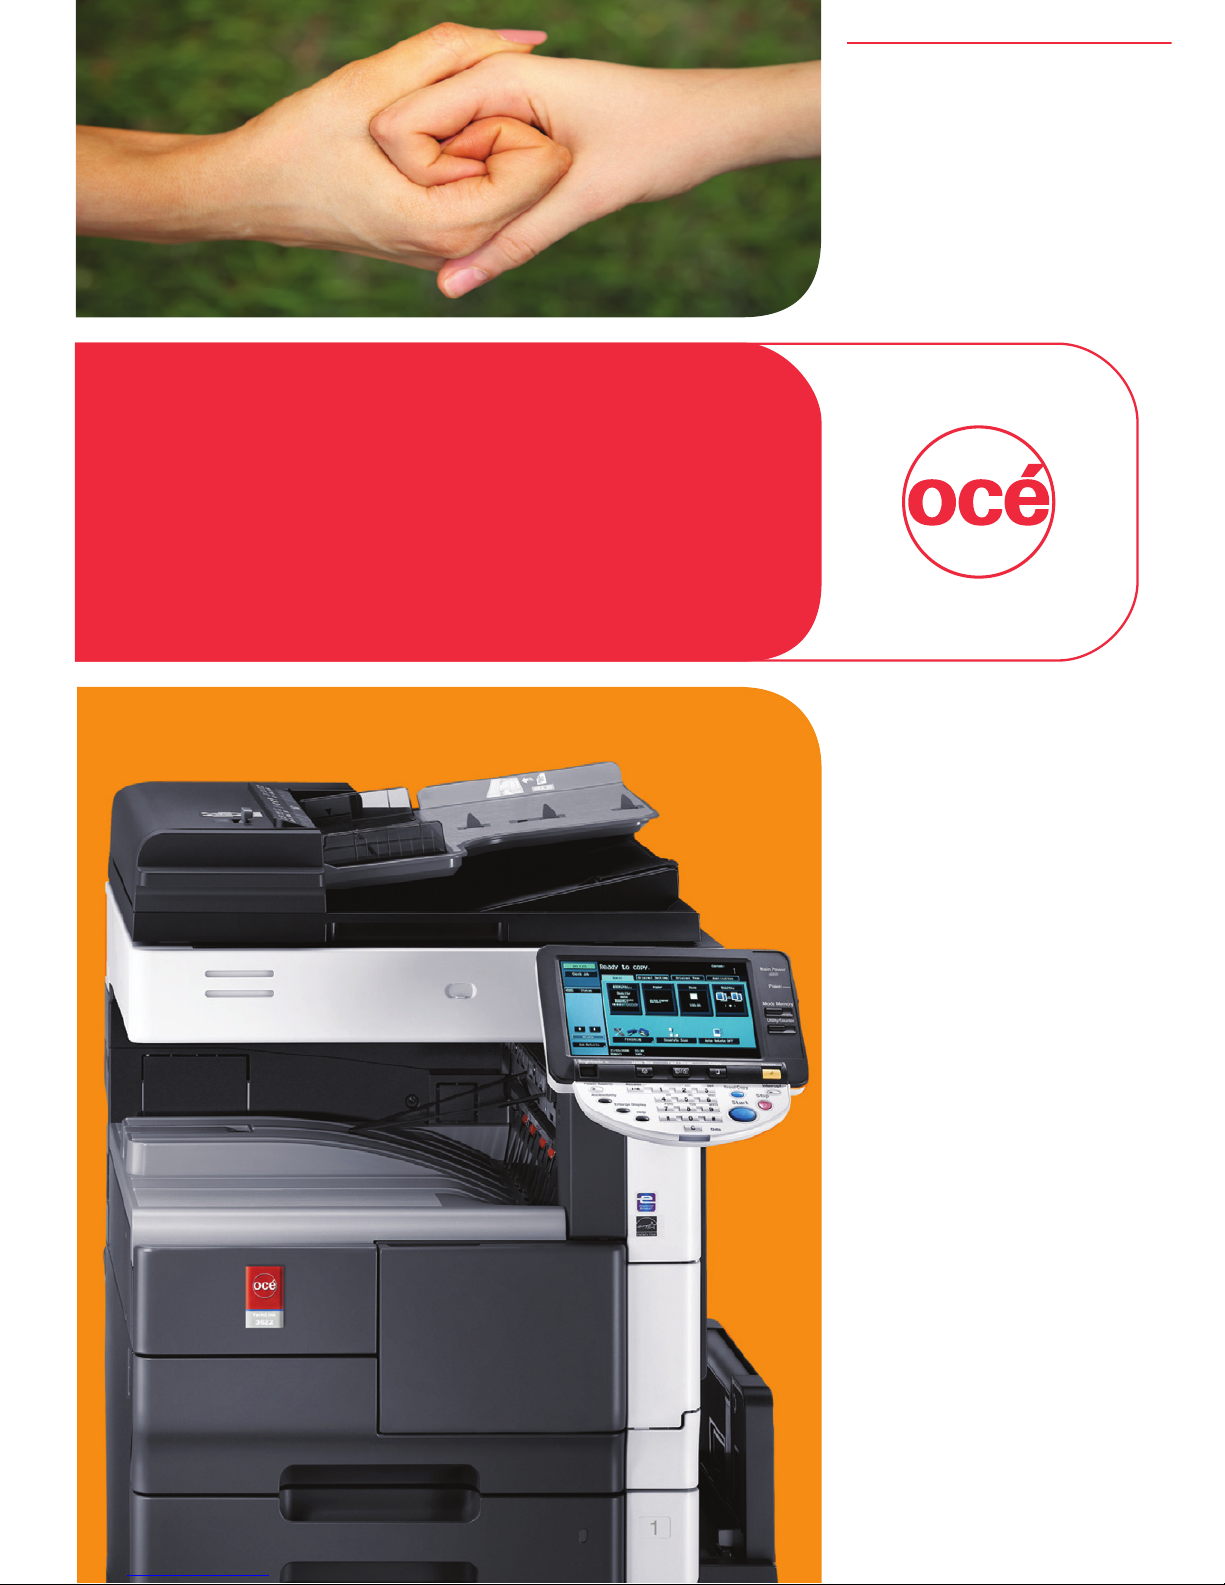
5 [Utility/Counter] key Press to display the Meter Count screen and the Utility
screen.
6 [Reset] key Press to clear all settings (except programmed settings)
entered in the control panel and touch panel.
7 [Stop] key Pressing the [Stop] key during an operation temporarily
stops the operation.
8 [Proof Copy] key Press to print a single proof copy to be checked before
printing a large number of copies. (See p. 2-34)
9 [Start] key Press to start the operation. When this machine is ready
to begin the operation, the indicator on the [Start] key
lights up in blue. If the indicator on the [Start] key lights
up in orange, the operation cannot begin.
Press to restart a stopped job.
10 Data indicator Flashes in blue while a print job or fax is being received.
Lights up in blue while a print job or fax is queued to be
printed or is being printed.
11 [C] (clear) key Press to clear a value (such as the number of copies, a
zoom ratio, or a size) entered using the keypad.
12 Keypad Use to type in the number of copies to be produced.
Use to type in the zoom ratio.
Use to type in the various settings.
13 [Enlarge Display] key Press to enter or exit Enlarge Display mode.
14 [Accessibility] key Press to display the screen for specifying settings for
user accessibility functions.
15 [Power Save] key Press to enter Low Power mode. While the machine is in
Low Power mode, the indicator on the [Power Save] key
lights up in green and the touch panel goes off. To
cancel Low Power mode, press the [Power Save] key
again.
16 [Access] key If user authentication or account track settings have
been applied, press this key after entering the user name
and password (for user authentication) or the account
name and password (for account track) in order to use
this machine.
17 Brightness dial Use to adjust the brightness of the touch panel.
18 [Fax/Scan] key Press to enter Fax/Scan mode.
While the machine is in Fax/Scan mode, the indicator on
the [Fax/Scan] key lights up in green.
19 [Copy] key Press to enter Copy mode. (As a default, the standard-
sized Copy mode screen is displayed.)
While the machine is in Copy mode, the indicator on the
[Copy] key lights up in green.
No. Part name Description

VarioLink 5022/VarioLink 4222/VarioLink 3622 1-4
Before use 1
1.2 Adjusting the angle of the control panel
The control panel can be adjusted to either of three angles.
In addition, the control panel can be tilted to the left.
Adjust the control panel to the angle that allows for easy operation.
1.2.1 To adjust the angle of the control panel
1
Pull the control panel release lever toward you to raise or lower the
control panel.
➀Upper position (base position)
➁Middle position
➂Lower position
➃Left tilt position

VarioLink 5022/VarioLink 4222/VarioLink 3622 1-5
Before use 1
2
To tilt the control panel to the left, hold the bottom of the control panel,
and then tilt the panel to the left.
– Do not grab the touch panel when turning the control panel to the left or
right.

VarioLink 5022/VarioLink 4222/VarioLink 3622 1-6
Before use 1
1.3 Screens in Enlarge Display mode
1.3.1 Displaying screens in Enlarge Display mode
1
Press the [Copy] or [Fax/Scan] key in the control panel to display the
desired screen.
2
Press the [Enlarge Display] key in the control panel.
– Depending on the settings specified in Accessibility mode, a message
appears, requesting confirmation to cancel the settings that cannot be
specified in Enlarge Display mode. For details on specifying settings in
the Accessibility screen, refer to the User’s Guide [Copy Operations].
The screen is displayed in Enlarge Display mode. While screens are
displayed in Enlarge Display mode, pressing the [Copy] or [Fax/Scan] key
displays the normal screen.
3
To return to the standard-sized screens from the screens in Enlarge
Display mode, press the [Enlarge Display] key in the control panel.

VarioLink 5022/VarioLink 4222/VarioLink 3622 1-7
Before use 1
!Detail
The default settings for Enlarge Display mode can be changed.
To change the default settings, specify desired settings in Enlarge Display mode,
and then press the [Accessibility] key. On the Accessibility Setting screen 2/2,
touch [Default Enlarge Display Settings], press the [Copy] key or the [Fax/Scan]
key, and then specify "Current Setting".

VarioLink 5022/VarioLink 4222/VarioLink 3622 1-8
Before use 1
1.4 Touch panel
1.4.1 Touch panel operation
To activate a function or to select a setting, lightly touch the button in the touch
panel for the desired function or setting.
2
Reminder
Do not apply extreme pressure to the touch panel, otherwise it may be scratched
or damaged. Never push down on the touch panel with force, and never use a
hard or pointed object to make a selection in the touch panel.
1.4.2 Icons that appear in the screen
Icon Description
This button appears when there is a message indicating that a
print error occurred. Touch this button to display the message,
and then perform the necessary steps.
Touch this button to display the message at an enlarged size.
This button appears when there is a message indicating that
consumables must be replaced or the machine requires
maintenance. Touch this button to display the message, and
then perform the replacement or maintenance procedure.

VarioLink 5022/VarioLink 4222/VarioLink 3622 1-9
Before use 1
1.4.3 Paper type icons
2
Note
For details, refer to the User’s Guide [Copy Operations].
If paper other than plain paper is specified for the selected paper tray when
using a copy function, the icon indicating the paper type appears under
"Paper" in the Basic screen.
Paper type icons that appear
Plain Paper Recycled Letterhead
Trace Transparency Envelope
Thin Paper Colored Paper User Paper
Labels

VarioLink 5022/VarioLink 4222/VarioLink 3622 1-10
Before use 1
1.4.4 Paper supply icons
The amount of paper remaining is indicated in the Copy mode screen where
the paper size is selected. For details about the screen for selecting the paper
size, refer to "Selecting the Paper settings" on page 2-4.
Paper supply icons that appear
Icon Description
This icon indicates that very little paper remains in the paper tray.
This icon indicates that paper is not loaded in the paper tray.

VarioLink 5022/VarioLink 4222/VarioLink 3622 1-11
Before use 1
1.5 Feeding the original
2
Note
For details, refer to the User’s Guide [Copy Operations] and the User’s Guide
[Network Scan/Fax/Network Fax Operations].
The original can be fed in either of the following ways. Be sure to position the
original correctly according to the type of original being scanned.
-Using the ADF
-Using the original glass
1.5.1 Loading the original into the ADF
1
Place the original in the original feed tray in the order to be scanned
with the side to be scanned faces up.
– Load the original pages so that the top of the original is toward the back
or the right side of the machine.
2
Slide the guides against the edges of the original.
A
A

VarioLink 5022/VarioLink 4222/VarioLink 3622 1-12
Before use 1
1.5.2 Placing the original on the original glass
1
Lift open the ADF.
– When placing the original on the original glass, be sure to lift open the
ADF at least 20°. If the original is placed on the original glass without the
ADF being lifted at least 20°, the correct original size will not be detected.
2
Place the original on the original glass with the side to be scanned
faces down.
– Load the original pages so that the top of the original is toward the back
or the left side of the machine.
3
Align the original with the mark in the back-left corner of the original
scales.
4
Close the ADF.
Original scales

VarioLink 5022/VarioLink 4222/VarioLink 3622 1-13
Before use 1
1.6 Specifying original settings
2
Note
For details, refer to the User’s Guide [Copy Operations].
The following describes necessary settings depending on the status and
placement of the originals to copy them as desired.
For details on selecting the original type when using fax/scanning functions,
refer to "Original Settings" on page 3-24.
1.6.1 Copying originals of mixed sizes ("Mixed Original"
setting)
Originals of different sizes can be loaded together into the ADF to be fed and
scanned one by one automatically.
1
Slide the lateral guides of the ADF to fit the size of the largest page.
2
Align the originals as the references so that the side to be scanned
faces up.

VarioLink 5022/VarioLink 4222/VarioLink 3622 1-14
Before use 1
3
Place the original in the original feed tray in the order to be scanned
with the side to be scanned faces up.
– Slide the guides against the edges of the original.
– Load the original pages into the ADF so that the top of the pages is
toward the left side of the machine.
4
In the main screen, touch the Original/Density tab.
The Original/Density screen appears.
Other manuals for VarioLink 5022
4
This manual suits for next models
2
Table of contents
Other Oce All In One Printer manuals