Octava HDMXA71 Pro HD Home Theater Series User manual

1
Installation Guide
Model: HDMXA71
Rev.H

2
Safety Information:
Electrical safety
UseonlythepowersuppliesandtheACpowercordthatwere
includedwithyourproduct.
Useofotherpowersuppliescoulddamagetheproductor
causeshock,orotherhazards
ForIndoorUseonly
Avoidexcessivehumidity,ortemperatureextremes
Donotplacetheproductinanyareawhereitmaybecome
wet.
UnplugthepowersuppliesandtheACpowercordbefore
cleaning,orremovinganypanelsforservicing.
Whenaddingorremovingdevicestoorfromtheproduct,
disconnectallpowercablesfromtheexistingproductbefore
youaddadevice.
Operation safety
Installtheproductinawellventilatedlocation.Keep
ventilationopeningfreeofobstructions.
Don'tblockanyventilationopeningsontheunit.
Avoiddust,humidity,andtemperatureextremes.
Donotplacetheproductinanyareawhereitmaybecome
wet.
Ifyouareunsure,pleasecontactyourauthorizedservice
center.

3
Contents
Safety Information........................................................... 2
Application Diagram........................................................ 4
Installation....................................................................... 4
Description...................................................................... 5
Features.......................................................................... 5
Remote Control Guide.................................................... 8
RS232 Control Commands........................................... 10
EDID Configuration.........................................................12
1 RU Rack mount...........................................................13
Disabling / Enabling IR Remote Control Receiver..........13
Warranty.........................................................................14
Disclaimers.....................................................................14
Specifications.................................................................15

4
*Note 1: Analog output supports only LPCM audio format. Unit does NOT decode Dolby or
DTS.
Note 2: You must set your PS3, or source to LPCM mode in order to use the Analog Audio
Output from HDMI.
Note 3: Aux Input port allows connecting a 2nd analog audio source and "loop thru " to the
Analog Audio Output. Does not convert Analog Audio to HDMI .
Application Diagram
Installation:
1) Connect the Display(s) to the HDMI OUT ports
2) Connect the HDMI source to the HDMI INPUT
3) Connect audio cables (optional)
4) Connect the DC power adapter

5
Description:
The HDMXA71 video matrix switch enables video switching of 4
video sources to 2 displays up to 16 viewing combinations. The
HDMXA71 also includes both analog and optical audio output for
integration with an existing audio system.
The Optical audio output supports both PCM and Bitstream audio
formats. LPCM audio is supported thru the RCA analog audio
outputs(x8). Perfect for systems with LPCM support such as PS3 . An
Auxiliary ( 8ch) audio Loop thru port is included to connect to a
second Analog (8ch) source.
Features:
1080P, 3D support
4 HDMI inputs, 2 HDMI outputs
Analog audio output (8ch.) -Note 1,2
Aux Analog Input port (8ch.)- Note 3.
Optical Toslink Digital Audio Output-2CH , Bitstream
Supports high resolution video 480 P, 720 I/P, 1080 I/P
Seamless integration with your existing Audio Receiver.
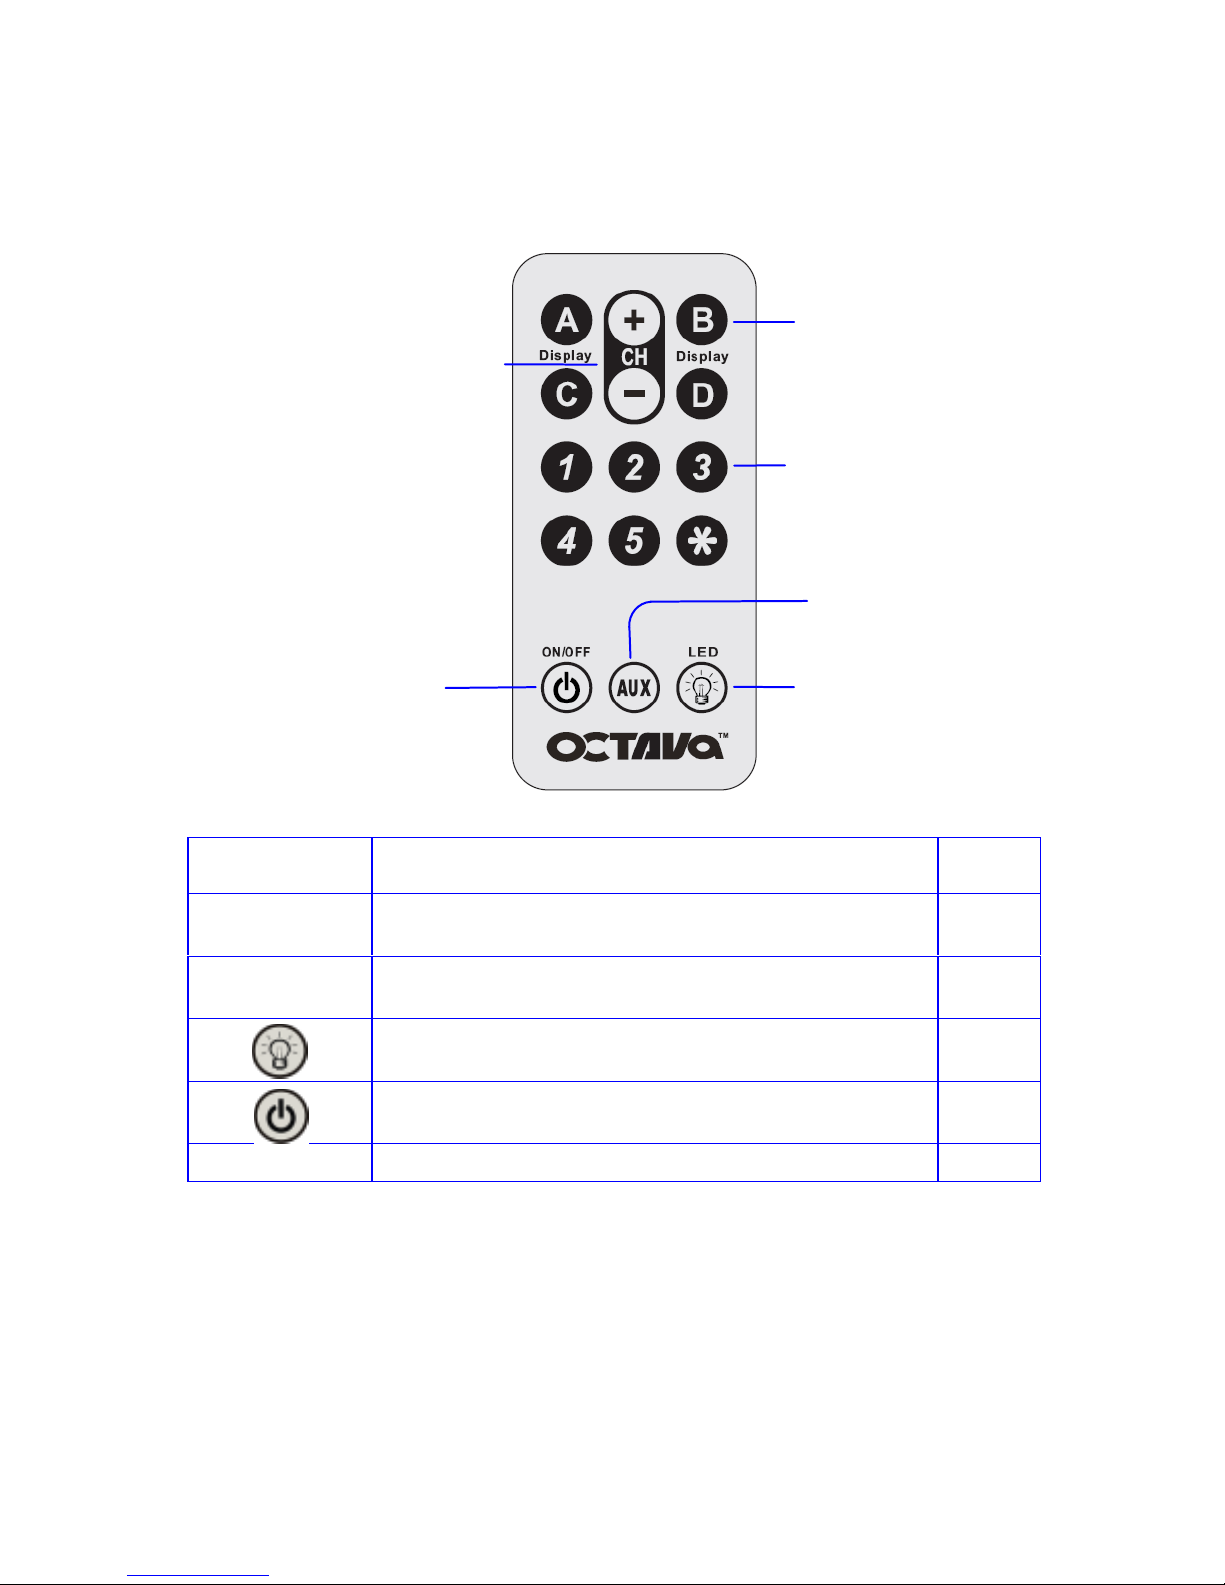
Remote Control (IR) included. Discrete Code allows direct
channel control.
1RU rack mountable.
Wired IR port for In-cabinet installations.
RS232 port for PC or Control System operation.
USB service port for EDID or code customization
*Note 1: Analog output supports only LPCM audio format. Unit does NOT decode Dolby or
DTS.
Note 2: You must set your PS3, or source to LPCM mode in order to use the Analog Audio
Output from HDMI.
Note 3: Aux Input port allows connecting a 2nd analog audio source and "loop thru " to the
Analog Audio Output. Does not convert Analog Audio to HDMI .

6
4. Wired IR input 7. Aux Audio
Select
6. Input Select
5. Infrared
Detector
2. Aux Audio
Indicator
1. Power
Indicator
3. Output A/B
indicator
Front View
Function
1 Power Indicator
2 Aux Audio Input
Indicator LED is illuminated if the Aux Input is selected ( loop thru
mode)
3 Output A/B Indicator Displays the Input selected
4 Wired IR input connect Octava supplied IR Receiver Extension cable
(optional) for hidden cabinet installs requiring line of sight
for IR control.
5 IR detector Senses IR from remote control
6 Input select button Press to switch inputs for output A and B
7 Aux Audio Select Press to change the Analog Output Mode between :
Aux Input or HDMI mode
*Note 1: Analog output supports only LPCM audio format. Unit does NOT decode Dolby or
DTS.
Note 2: You must set your PS3, or source to LPCM mode in order to use the Analog Audio
Output from HDMI.
Note 3: Aux Input port allows connecting a 2nd analog audio source and "loop thru " to the
Analog Audio Output. Does not convert Analog Audio to HDMI .

7
1. Power input (5VDC)
6. Optical audio
2. HDMI Inputs
7. RS232
3. HDMI output B
3. HDMI output A
5. Aux 7.1 Audio In
4. Analog 7.1 out
Back View
*Note 1: Analog output supports only LPCM audio format. Unit does NOT decode Dolby or
DTS.
Note 2: You must set your PS3, or source to LPCM mode in order to use the Analog Audio
Output from HDMI.
Note 3: Aux Input port allows connecting a 2nd analog audio source and "loop thru " to the
Analog Audio Output. Does not convert Analog Audio to HDMI .
Back Side Connectors Function
1 Power In 5V DC
2 HDMI Inputs connect High Speed HDMI cables to
Source device.
3 HDMI Outputs A/B connect High Speed HDMI cables to
AVR or Display device.
4 7.1 Analog Audio Output Connect to Audio Amp/receiver.
HDMI Mode
Analog Audio Output is from the
selected HDMI source. Note 1,2
Aux Input Mode ( Loop
Thru)
Analog Audio Output is from the
( see 5)connected analog audio
connection.
Note 3.
5 Aux Input 7.1 -Connect to the source Analog
Audio Outputs. Routes Analog
Audio output directly from the
source player to the 7.1 Analog
Audio Output. Routes from 5 to 4.
Note 3.
6 Optical Digital Output Outputs audio over Toslink. Audio
will play the Out A source selection.
7 RS-232 for external control of Matrix via PC
or 3rd party Control system.
8 USB Port for custom EDID/ code updates
8. USB Port
AUX audio indictor led will illuminate when
Aux input Mode (Loop thru) is selected

8
Pressing
+/-Increments/Decrements
to the next available Input.
Remote Control Guide:
Octava’s Remote control uses discrete code so can be easily
integrated with most Universal Remote Controls such as Logitech’s
Harmony.
Button Function Notes
+, - Increments/Decrements to the next available
Input
1,2,3,4 Selects the corresponding numbered Input
Turns ON/OFF the LED.
Turns ON/ soft Off(standby) the unit
Other Not used
ON/ soft
Off(standby) Turns on/off the
LED
Pressing 1-4 Selects
the corresponding
numbered Input.
Pressing A or B
Selects the output to
be controlled.
Select/deselect (AUX
Audio 7.1 input)

9
Basic Quick Start:
Use the remote control to select Output A or B Display that you wish
to control followed by the Input that you wish to watch.
For example:
-Pressing Display B, “2” will switch Input 2 to Out B.
-To connect DISPLAY A to IN1 and DISPLAY B to IN3 you simply
follow this sequence
Step 1) Display A, 1 (this will set Display A to Input 1)
Step 2) Display B, 3 (this will set Display B to Input 3)
Here are some more examples:
Output Selection
(Step 1) Input Selection
(Step2) Result
DISPLAY A “2” Display A switches to
Input 2
DISPLAY B “1” Display B switches to
Input 1
DISPLAY A “+” Display A increments to
next available Input
DISPLAY B “-” Display B decrements to
next available Input

10
RS232 Control Commands:
The Octava HD HDMXA71 can be easily integrated with 3rd Party
control systems via RS232 control. The following shows the control
protocol: RS-232 protocol
Baud Rate 9600
Data Bits 8
Parity Check none
Stop Bits 1
Flow control none
Controlling the HDMXA71 via RS232 can be done by sending a
series of commands per the RS232 Command Table.
Basic controls
Note: The commands are in HEX. No spaces between HEX codes.
“0x” denotes HEX. No need to enter “0x”
HEX CODE
Port Status 0x02 0x30 0x30 0x31 0x03
Turn ON LED 0x02 0x30 0x30 0x33 0x03
Turn OFF LED 0x02 0x30 0x30 0x34 0x03
Turn ON Power 0x02 0x30 0x30 0x35 0x03
Turn OFF Power 0x02 0x30 0x30 0x36 0x03
Example:
Send Command:
02 30 30 34 03 in Hex
ToturnoffLED

11
Switching Commands
Note: The commands are in HEX. No spaces between HEX codes.
“0x” denotes HEX. No need to enter “0x”
Output A Switching Commands HEX CODE
Select OUT A to Input port 1 0x02 0x32 0x31 0x31 0x03
Select OUT A to Input port 2 0x02 0x32 0x31 0x32 0x03
Select OUT A to Input port 3 0x02 0x32 0x31 0x33 0x03
Select OUT A to Input port 4 0x02 0x32 0x31 0x34 0x03
Output B Switching Commands
Select OUT B to Input port 1 0x02 0x32 0x32 0x31 0x03
Select OUT B to Input port 2 0x02 0x32 0x32 0x32 0x03
Select OUT B to Input port 3 0x02 0x32 0x32 0x33 0x03
Select OUT B to Input port 4 0x02 0x32 0x32 0x34 0x03
Switching Commands
Note: The commands are in HEX. No spaces between HEX codes.
“0x” denotes HEX. No need to enter “0x”
HEX CODE
Aux Analog ON/ HDMI 7.1 Audio OFF 0x02 0x39 0x30 0x31 0x03
Aux Analog OFF / HDMI 7.1 Audio ON 0x02 0x39 0x30 0x32 0x03

12
EDID Configuration:
The HDMXA71 pre-programmed EDID table is listed below (see Default
EDID).
In addition, alternative or customized EDID can be downloaded via the
USB port for optimum integration into your system.
Video EDID
Learn EDID resolutions from connected devices.
If Both Displays are connected, the lowest common resolution will be stored.
For example, a 1080i and 1080P display is connected,
1080i resolution will be stored. Audio EDID
Default
EDID
LPCM 2-Ch / 5.1/ 7.1 ( 44/88/96/176/192-kHz)
Dolby Digital 5.1, DTS 5.1
Custom
EDID
additional EDID can be downloaded to the HDMXA71 via the USB Port.
Please visit our support page
https://octavainc.com/support%20and%20updates.html#HDMXA71USB
If you are unsure or need assistance, please contact us
at: info.octavainc.com
USB Service Port:
The HDMXA71 USB port allows the unit to update EDID or functionality.
Please visit our support page
https://octavainc.com/support%20and%20updates.html#HDMXA71USB
If you are unsure or need assistance, please contact us
at: info.octavainc.com

13
1 RU Rack mount :
The Octava HDMXA71 can be installed in a 1 RU rack by simply
installing the rack mounts included.
Disabling /Enabling Front Panel IR Remote Receiver:
To disable the front panel IR remote receiver-insert the plastic plug
into the IR jack as shown.
Front panel IR receiver -disabled

14
Warranty
Octava warrants the equipment purchased to be free from defects in
material and workmanship under normal use and service for a period of 1
year. In the event applicable law imposes any implied warranties, the
implied warranty period is limited to 1 year from the date of receipt.
If Octava's equipment fails because of defects (1) year from the date of
receipt, Octava will at its option, A) repair or replace the equipment, or B)
request return of equipment for refund of the price paid for the product
provided that the equipment has not been subjected to mechanical,
electrical or other abuse or modifications.
Proof of sale required to claim warranty.
Disclaimers
IN NO EVENT SHALL OCTAVA'S OR ITS SUPPLIER’S LIABILITY FOR
ANY CLAIM WHATSOEVER EXCEED THE COST OF THE PRODUCTS
GIVING RISE TO THE CLAIM, WHETHER BASED IN CONTRACT,
WARRANTY, INDEMNITY OR TORT (INCLUDING, WITHOUT
LIMITATION, NEGLIGENCE AND STRICT LIABILITY) OR OTHERWISE.
IN NO EVENT SHALL OCTAVA INC. OR ITS SUPPLIERS BE LIABLE
FOR ANY SPECIAL, INCIDENTAL, CONSEQUENTIAL OR OTHER
INDIRECT DAMAGES (INCLUDING, WITHOUT LIMITATION, LOSS OF
REVENUES, PROFITS OR OPPORTUNITIES), HOWEVER CAUSED, ON
ANY THEORY OF LIABILITY, WHETHER OR NOT OCTAVA INC HAS
BEEN ADVISED OF THE POSSIBILITY OF SUCH DAMAGES.
WHILE EVERY PRECAUTION HAS BEEN TAKEN IN THE
PREPARATION OF THIS MANUAL, OCTAVA ASSUMES NO RESPONSIBILITY
FOR ERRORS OR OMISSIONS. IN NO EVENT WILL OCTAVA ASSUME ANY
LIABILITY FOR DAMAGES RESULTING FROM THE USE OF THE INFORMATION
CONTAINED HEREIN.
OCTAVA RESERVES THE RIGHT TO CHANGE THE SPECIFICATIONS,
FUNCTIONS OR CIRCUITRY OF THE PRODUCT WITHOUT NOTICE.

15
Description Specifications
Model HDMXA71
HDMI Inputs 4
HDMI Outputs 2
Optical Toslink Digital Audio Output 1
2CH PCM, Bit Stream
Analog Audio Output 1 ( 8ch.)
Supports only LPCM audio format. Unit
does NOT decode Dolby or DTS.
Aux Analog Audio Input
(for loop thru /bypass mode) 1 ( 8ch.)
Aux Input port allows connecting a 2nd
analog audio source and "loop thru " to the
Analog Audio Output. Does not convert
Analog Audio to HDMI
RS-232 1
USB Service Port 1
Video Resolution 480P, 720i/P, 1080i/P
Vertical Frequency Scan Rate 24 / 50 / 60 Hz
Dimension 15.07 x 4.12 x 1.67 inch
(382.9 x 104.7 x 42.3 mm)
DC adapter (included) 5VDC, 2.5A
Rack mount capable 1RU, Rack mounts included
Remote control (IR) Infrared, discrete code.
For Questions and support:
Email: [email protected]
URL: www.octavainc.com
Copyright© 2012 Octava Inc. All rights reserved.
HDMI, the HDMI logo and High-Definition Multimedia Interface are trademarks or
registered trademarks of HDMI Licensing LL.C
All trademarks are the sole property of their respective companies
Other manuals for HDMXA71 Pro HD Home Theater Series
2
Table of contents
Other Octava Matrix Switcher manuals

Octava
Octava HDMX44-V1.3 User manual

Octava
Octava HD4XSTPMX User manual

Octava
Octava HDMX42-V1.3 User manual

Octava
Octava HDMXA71 Pro HD Home Theater Series User manual

Octava
Octava HDMX44-V1.3 User manual

Octava
Octava HDMXA71-V1.3 User manual

Octava
Octava HD42CATMX User manual

Octava
Octava MVPS-UHD42VC User manual

Octava
Octava UHD44MX-IP User manual

Octava
Octava 44UHDMX User manual