OFFCARR IDRA 2.0 User manual

2
Index
1. INTRODUCTION ...........................................................................................4
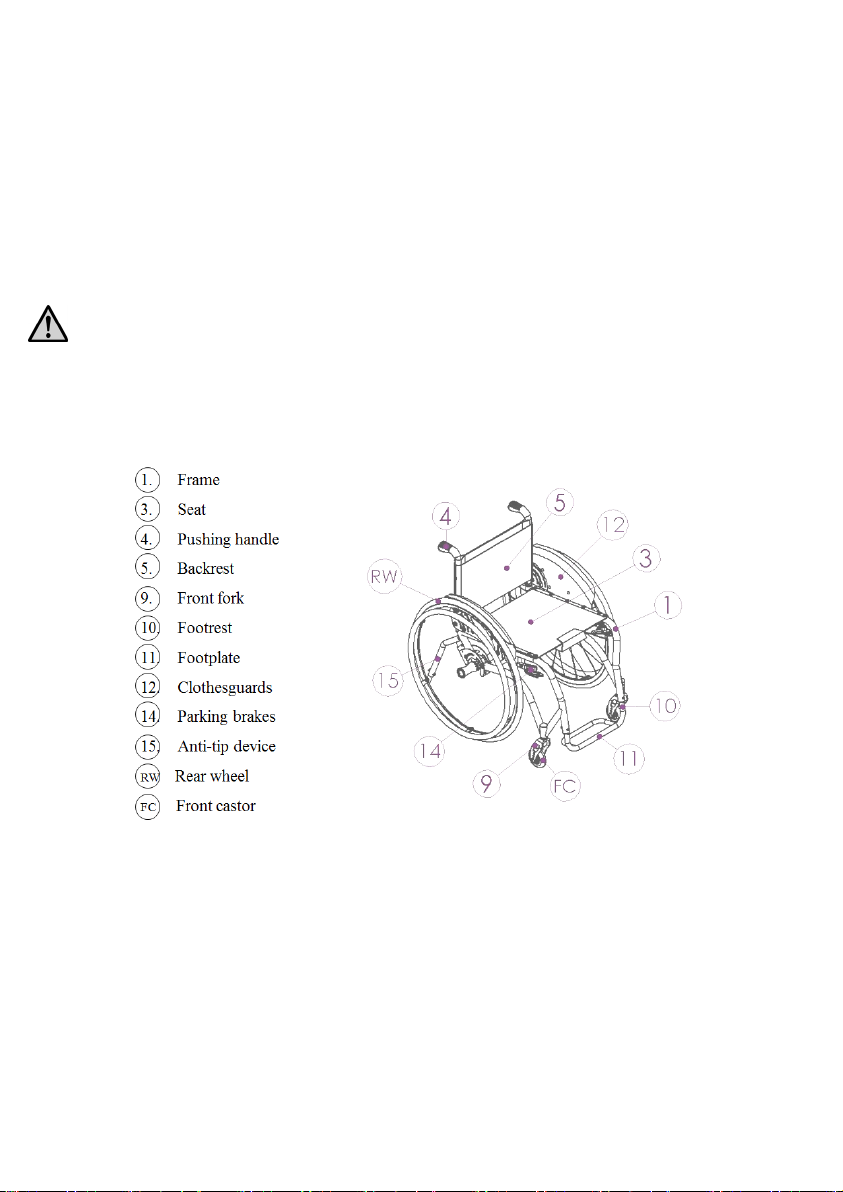
2. IDRA 2.0 DESCRIPTION ..............................................................................4
IDRA 2.0 FEATURES .......................................................................................................... 5
3. PREPARATION FOR USE ............................................................................6
3.1 OPENING/FOLDING THE BACK-REST ............................................................................. 6
3.2 REMOVING/PUTTING IN PLACE THE REAR WHEELS........................................................ 6
3.3 TYRE PRESSURE CHECK ............................................................................................... 7
3.4 BRAKES CHECK ........................................................................................................... 8
3.5 ACCESSORIES CHECK................................................................................................... 8
4. IDRA 2.0 SETUP .............................................................................................9
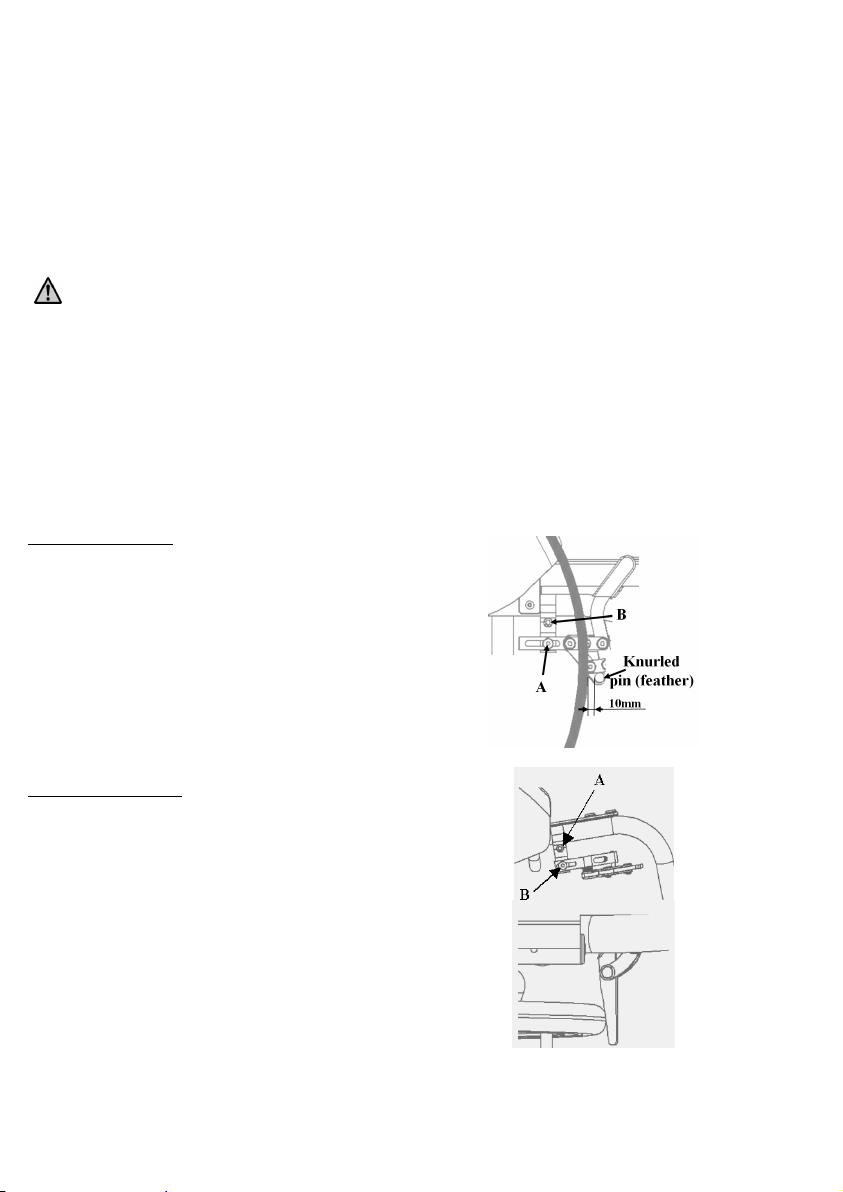
4.1 CHANGING THE GRAVITY CENTRE ................................................................................ 9
4.2 SETTING THE BACKREST TILT AND CLOTHES GUARDS POSITION..................................... 9
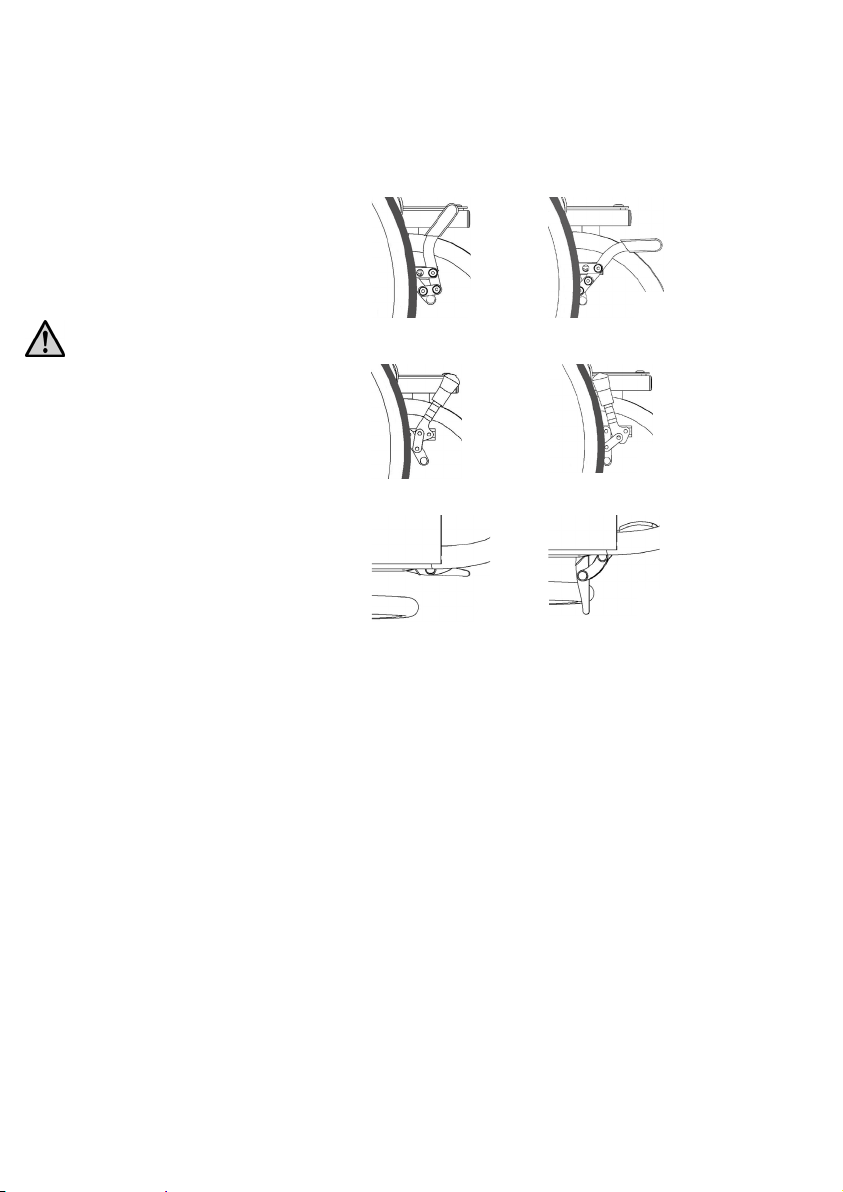
4.3 SETUP AND MAINTENANCE OF BRAKES....................................................................... 10
4.4 REPLACING THE FRONT CASTORS ............................................................................... 11
4.5 BACKREST TENSION ADJUSTMENT ............................................................................. 11
4.6 BACKREST HEIGHT ADJUSTMENT ............................................................................... 11
4.7 HEIGHT ADJUSTABLE PUSHING HANDLES ................................................................... 12
4.8 FOOTPLATE TO SEAT DISTANCE ADJUSTMENT............................................................. 13
4.9 SETTING THE REAL WHEEL CAMBER ........................................................................... 13
5. IDRA 2.0 ANTI-TIP DEVICE......................................................................14
5.1 USE OF THE ANTI-TIP DEVICE ..................................................................................... 14
5.2 ANTI-TIP DEVICE ADJUSTMENT.................................................................................. 15
5.2.1 Adjustment through fixing plates 15
5.2.2 Terminal adjustment 15
6. SPOKES GUARDS........................................................................................15
7. USE OF THE WHEELCHAIR ....................................................................16
8. KEY MEASURES TO BE TAKEN TO LIMIT THE RISKS
CONNECTED WITH MISUSE OF THE WHEELCHAIR ......................18
9. MAINTENANCE, INSPECTIONS AND CONTROLS .............................19
10. CLEANING INSTRUCTIONS ....................................................................20
12. WARRANTY TERMS ..................................................................................22
13. PACKAGING, SHIPPING AND DELIVERY............................................23
14. MATERIALS DIFFERENTIATION...........................................................23

3
Thanks for choosing an OFF CARR wheelchair.
Since 1982 OFF CARR listens and responds to the customers' needs by
developing highly innovative and technologic solutions, always aimed at
reducing daily mobility problems, with special attention to product style and
to improving customers' life quality.
OFF CARR has a certified system for quality management following UNI EN
ISO 9001:2015 regulations and a productive system certified following UNI
EN ISO 13485:2016 regulations. These certifications offer prestige to the
company and find confirmation in the quality of products and in customer
satisfaction.
OFF CARR products meet the MDR 2017/745 requirements..
Before using or making adjustments on this device, carefully
read what reported on this instruction manual.
In case of need, please contact an authorized dealer.
Manufacturer adress
OFF CARR s.r.l.
Via dell’Artigianato II, 29
35010 Villa del Conte (Padova) Italy
Tel. +39 049 9325733 Fax +39 049 9325734
E-mail: off[email protected] http://www.offcarr.com

4
1. Introduction
The ultra-lightweight wheelchair IDRA2.0 FIX, ADJ, KID (rigid frame) are non-invasive
medical devices, specifically designed to reduce and counterbalance a physical handicap.
These wheelchairs are manually propelled on the back wheels, have many setups and a wide
range of accessories that meet any customer need.
Only qualified operators must setup the devices.
It is forbidden to use the wheelchairs or parts of them in different ways from those
described on this manual.
2. IDRA 2.0 Description
IDRA 2.0 is a aluminum rigid frame wheelchair. Other components are made of aluminum,
aluminium or steel alloys, carbon fibre and other composite materials. Various frame colours
are available and can be combined with various coloured anodized accessories set. The seat
upholstery (3) and the backrest (5) are usually made of black nylon cloth. The backrest can be
also made of breathable material to increase the customer comfort.
A comfortable compartment with closing zip can be added in the lower part of the backrest
and another can be placed frontally under the seat.
There are two different available IDRA 2.0 models:
Fix IDRA 2.0 with non-adjustable centre of gravity;

5
Adjustable IDRA 2.0, more user-friendly, allowing to choose the most suitable centre of
gravity.
The backrest (5) is tilt adjustable thanks to the special cloth-guards frame (12) and can be
folded down to reduce the wheelchair size during transport operations. The backrest
upholstery is easily removable to make the cleaning and washing operations easier and its
straightening is adjustable by acting on the velstraps under the upholstery.
The footrest (10) is single and height adjustable. The foot-plate (11) is usually open but can
also be closed by a carbon fibre plate. Special setups may require separate footplates.
The rear wheels (RW) are equipped with quick releasing axles.
The front forks (9) can hold various wheel diameters (FC) at various heights.
The wheelchair is provided with carbon fibre sideguards (12) or with optional aluminium or
composite polymer sideguards, as chosen on the order form.
The brake devices (14) are available in standard or scissor model and are adjustable to
counterbalance different wheel sizes and different wheel setups.
The wide and complete range of available accessories, allows a complete customisation of
IDRA 2.0 both aesthetically and functionally.
IDRA 2.0 Features
•Aluminum rigid frame
•Models: Fixed Axle
Adjustable Axle
•Carbon fibre side-guards
•Single aluminum foot rest (open or close according to the order form)
•Foldable backrest
•Maximum load: 120 Kg
•The order form allows different setups and various combinations of accessories.

6
3. Preparation for use
The preparation for use of these devices must be performed by qualified
personnel both to evaluate the suitability of the product and to provide the
correct instructions to the user.
3.1 Opening/folding the back-rest
The wheelchair is sent with the rear wheels aside and with the backrest completely
tilted down.
OPENING
Pull the string to unlock the back-rest and pull
the back-rest upwards until the rear locks snap
in their locking places.
FOLDING
Pull the string to unlock the back-rest and push
it down until the rear locks snap in their
locking places.
3.2 Removing/Putting in place the rear wheels
Usually IDRA 2.0 are sent with the back wheels aside.
It is possible to assemble or release the wheels as follows:
• ensure the brakes are in released position;
• insert the shaft into the wheel hub by holding down the button;
• keeping the shaft button pressed insert it into the bush on the frame of the wheelchair;
• release the button;
• check the efficiency of the engagement by trying to pull out the wheel without pressing the
button and making sure it does not come out.

7
It is suggested to verify the proper assembly and the efficiency of the quick release axle
before using the wheelchair and always after performing releasing and assembly of the
rear wheels to the frame.
Test for the right functioning of the quick release axle and proper assembly of the rear wheels:
•Ensure the brakes are released;
•
Keeping the shaft button pressed, pull out the
wheel from the hub;
•Still holding down the shaft button, insert it into
the hub on the frame of the wheelchair;
•Check the efficiency of the engagement by
trying to pull out the wheel without pressing the
button and making sure it does not come out.
For safety reasons it is important to repeat this test every time that for transport
or maintenance reasons, the rear wheels are removed and reassembled to the
frame.
3.3 Tyre pressure check
A periodical check of the tyre pressure may help to keep the wheelchair efficient and more
comfortable.
Verify the tyre pressure value according to the value marked on the tyre.
Normally 7.5 BAR is the correct value for high-pressure rear tyres, and 2.5BAR is the
maximum pressure for front wheels if not solid. The above values are approximate as the
specific value is always available on every tyre.
The pressure for the model Schwalbe Marathon Plus should always be kept from a
minimum of 7 BAR to a maximum of 9 BAR to prevent damage to the surface of
the tyre itself.

8
3.4 Brakes check
To check the correct functioning and the efficiency of the parking brakes act as follows:
•Activate the brake (Fig. P, S, U);
•Check if the wheels are blocked.
The included brakes, except for
optional drum brakes, have to
be used only as parking brakes and
never to decrease the speed of the
wheelchair while moving.
To ensure the efficiency of the brakes it
is necessa
ry to maintain the proper tyre
pressure and check frequently the wear
of the clamping elements.
Pushing brake “OFF”
position
Pushing brake “ON”
position
Pulling brake “OFF”
position
Pulling brake “ON”
position
Scissor brake “OFF”
position
Scissor brake “ON”
position
3.5 Accessories check
Any accessories required when configuring the wheelchair may be shipped separately, so they
should be properly fitted before using the wheelchair.
Fig. P
Fig. O
Fig.R
Fig, S
Fig. T
Fig. U

9
4. IDRA 2.0 setup
The wheelchair is shipped in the configuration chosen on the order form. The selected options
in the order form should ensure the best possible setup to match the customer needs.
Considering potential technical restrictions it is still possible to perform other setup
adjustment to better fit the user’s needs.
Please refer to authorized and qualified personnel only to perform any type of
adjustment on the wheelchair.
4.1 Changing the gravity centre
Adjustable axle IDRA 2.0 allows changing the gravity centre.
To change the gravity centre:
•Remove the back wheels by pushing the shaft
button (see
Par.3.2);
•Unscrew without removing the “D” screws;
•
Chose the most suitable position for the axle (there are
some appropria
te signs on the frame that make the axle
align correctly with the frame);
•Fix the “D” screws back;
•Once that the rear axle position is changed it is necessary to performe again the
cloth-guards and brake adjustments (par. 4.2 and par. 4.3).
The further the rear wheels axles are assembled, the more active and agile the wheelchair
becomes, but at the same time the stability is reduced.
The more back the rear wheel axles are assembled, the more stable the wheelchair is, but
more effort is required to push it.
4.2 Setting the backrest tilt and clothes guards position
The backrest angle is adjustable:
•Unscrew without removing the “B” screws,
which fix
the carbon fibre wing to the aluminium support;
•
Remove the “A” screw by unscrewing the prevailing
torque which can be found under the seat;
•Change the backrest angle by choosing the most
suitable of the “F” holes matching the “A” connection
hole on the frame;
•Put back and fix not too thigth the “A” screw.

10
Once selected the backrest tilt, the position of the carbon fibre wing has to be
adjusted:
•Adjust the clothes guards position, making sure that the distance between the
clothes guards and the tyre stay around 6mm;
•Fix the “A” and “B” screws firmly.
4.3 Setup and maintenance of brakes
The supplied brakes are designed for parking only and they are not suitable to
reduce the wheelchair speed in any way.
If the rear wheel position has been changed from its original one, it is necessary to proceed
with the brake adjustment. IDRA 2.0 wheelchair can be equipped with classic pushing or
pulling brakes or scissor brakes.
Act as following to adjust the brake position:
•Leave the brake in OFF position (see par. 3.4 fig. O, R or T);
•Loosen without removing the “A” screws that fix the brake to its support and the “B”
screws that fix the support to the frame.
CLASSIC BRAKE:
•Move the brake on its support until the knurled
pin (feather) is about 10 mm far from the tyre;
•
Maintaining the knurled pin (feather)
perpendicular to the tyre, tighten properly the
“A” and “B” screws;
•
If the knurled pin (feather) appears worn in the
contact area wit
h the tyre, it is possible to turn
it to find a better contact area or to change it
with a new one;
SCISSOR BRAKES:
•Put the brake in ON position (see par. 3.4 fig.
U)
•
Move the brake along its support until it
touches the tyre;
•Return the brake in OFF position (see par. 3.4
fig. T) and move the brake of 3-
4mm, in the
wheel direction, then tighten properly
the “A”
and “B” screws;
•Verify the efficiency of the brake (see par. 3.4)
and if necessary repeat the adjustment procedure.

11
4.4 Replacing the front castors
If necessary, the front castor can be replaced:
•Completely unscrew one of the “D” screws and
remove the “E” pin
being careful to where the “F”
spacers are;
•If necessary, change the wheel;
•Position the wheel hub align with the
most suitable
fork hole;
•Insert the “E” pin, being careful to keep t
he “F”
spacers in their original sequence;
•Fix properly the “D” screw.
Be sure to choose the same position for both castors. Asymmetrical combinations
produce instability.
Be careful not to change the front seat height while changing the front castors
because this will modify the perpendicularity to the ground of the front fork roataing
axle.
4.5 Backrest tension adjustment
The backrest tension can be adjusted by acting on the
velstraps:
•Fold up the “B
” upholstery cover of the
backrest;
•Adjust the upholstery tension by o
pening or
closing the disclosed velstraps;
•Fold down
the “B” upholstery cover back in
place;
4.6 Backrest height adjustment
The backrest height will be assembled according to the order form selection. It is however
possible to change it over time.
If the wheelchair is equipped with pushing handles it is possible to move them up or down of
a few centimetres as shown:

12
•Remove the upholstery cover and loosen the
tensioning velstraps (see par.4.5) to reach
the
“A” screws that connect the handles tube and
the frame;
•Remove both “A” screws;
•Lower or raise the handles until reaching the most suitable height (the tubes
are pre-holed with 2 cm steps);
•Insert again the “A” screws and screw them firmly;
•Set the correct backrest tension and fold properly the
upholstery cover (see
par.4.5).
The same procedure can be also followed if the
pushing handles are height adjustable.
A similar procedure can be also
followed to change
the extention
backrest tubes when the wheelchair is
configured without pushing-handles.
4.7 Height adjustable pushing handles
If the wheelchair is equipped with height adjustable pushing
handles it is possible to adjust them as follows:
•Loosen the clamp unscrewing the “B” knob;
•Choose the most suitable position for the push-handle;
•Tighten the “B” knob properly;
•Turn the “B” knob in an appropriate position;
Note: the “B” knob is a special spring lever. To change its position it is possible to pull out
the lever, turn it in the desired position and release it again.

13
4.8 Footplate to seat distance adjustment
The telescopic footplate support is inserted into the front
frame of the wheelchair and secured through the two “E”
screws.
The height can be adjusted at 2 cm steps:
•
Unscrew and remove the “E” screws, securing the
footplate to the frame;
•Slide the footplate to the appropriate height;
•Insert again and tighten properly the “E” screws
4.9 Setting the real wheel camber
The rear wheel camber is set according to the order form selection. It is however possible to
change it if required over time replacing the bush with a new with different camber.
•Remove the wheels;
•Loosen the clamp holding the bush in place;
•Swap the bush with the one with the new desired angle;
•Place the camber bush with the camber in the correct direction and with the
two flat surfaces approximately perpendicular to the ground;
•
Before tightening the clamp, be sure to check the wheel alignment as follows:
oInsert the rear wheels and check the distances
between them (d1and d2
), measured on the
front and on the back at the level of the hub as
shown in the figure;
ob1 and b2 have to be equal;
ocheck the a
distance from frame to wheel
and verify if it is equal both on the left and
on the right side;
oIf the distances are equal on bo
th sides, tightly
fix the clamp.

14
5. IDRA 2.0 Anti-tip device
IDRA 2.0 wheelchair can be equipped with left and/or right anti-tip devices.
Never use the anti-tip wheels as transit wheels.
5.1 Use of the anti-tip device
When not in use the anti-tip wheel is positioned horizontally under the frame:
To activate the anti-tip device it is necessary to unlock it by pulling it upwards and then rotate
it until the working position is achived.
In case of double anti-tip device (right and left) need special attention to the correct
open/close sequence.

15
5.2 Anti-tip device adjustment
The position of the anti-tip is defined during the assembly. It is however possible to change its
distance from floor if necessary.
5.2.1 Adjustment through fixing plates
•Loosen without removing the “A” screws;
•Rotate the anti-
tip support until the desired
distance of the small wheel from the floor is
reached;
•Tighten properly the “A” screws.
5.2.2 Terminal adjustment
•Remove the “B” screw;
•Move the
telescopic end terminal until the small
wheel is in the correct position;
•Insert the “B” screw and fix it properly.
6. Spokes Guards
Spokes guards on real wheels prevent the user from putting accidentally hands or fingers
between the spokes of the wheels.
They are also used for aesthetical purposes: they often bear designs and are extremely
colourful (they are mostly used for children wheelchairs).
They can be attached to the spokes with velstraps or clips (it depends on the model).

16
7. Use of the wheelchair
In order to move safely and to effectively use the wheelchair, it is recommended to
always consult qualified personnel.
Here are some suggestions and recommendations for proper use of the wheelchair, also aimed
at maintaining the security features in time and duration:
•The brakes have only a parcking purpose and should never be used as service brakes
to slow down the wheelchair in motion.
•To ensure the efficiency of the brakes, maintain the tyres properly inflated and check
every 3 months the knurled locking pin wear (see par 4.3).
•The arm rests are not designed to lift the wheelchair
•Anti-tip wheels aren’t to be used under any circumstances as transit wheels
•Do not lean too far forward because, by moving the centre of gravity too much, you
may tip.
•Always deal with slopes above 6° with an assistant. This limit is only approximate
and it depends from the specific configuration, particolarly from the balancing setup,
and is related to the user. The setup also allows balancing extremes and thus a
proportional risk of rolling over. The anti-tip wheel can be mounted on request to
increase the safety of the wheelchair during the use (see chap. 5).
•The wheelchair should be only used for the transport of people and not of objects in
general
•Avoid wheelieing the wheelchair without the supervision of an assistant.
•Avoid prolonged contact between the wheelchair and water. It can cause unwanted
oxidation of some metal parts and decay of the security features of the materials
involved.
•Avoid contact with seawater and sand, and in these cases proceed to an immediate
accurate cleaning.
•Perform a general check of the wheelchair at least every three months, in particular by
checking tyre inflation (see par. 3.3), the efficiency of the quick release axles (see par.

17
3.2), and brakes (see section 3.4), the ease of operation in the movements of the frame
and possibly add some lubricant if necessary. Verify the working of removable parts.
•Clean periodically the wheelchair using a damp cloth and avoid even partial immersion.
Keeping the wheelchair clean enhances its efficiency.
•The wheelchair in specific setup can include among its parts some chromed metal
components. If you are allergic to chromium do not use the device and inform the
producer for the required substitutions, if not already specified in the order form. Please
notify the company if allergies or other similar problems due to contact with materials
making up the wheelchair are developed.
•The fabric used for the upholstery of the wheelchair is not waterproof. If needed it can be
washed with water at low temperature. In any case, avoid wetting or submerging any
other part of the wheelchair.
•Following the instructions in paragraphs 2.1 and 2.2 of this manual, there is not proven
danger of causing injury to people during the opening and folding operations.
The pressure of the Schwalbe Marathon Plus tyres should always be kept from a
minimum of 7 bars to a maximum of 9 bars to prevent damage to the tyres
themselves.
Keep the wheelchair away from direct heat sources, as not all upholsteries in the
order form are fireproof.

18
8. Key measures to be taken to limit the risks connected with
misuse of the wheelchair
Be careful not to wrap the tubes of the crossbar with the fingers during opening/folding
operations to avoid being pinched between the frame and the crossbar.
Do not use the brakes to slow down the speed of the wheelchair. They are designed only
as parcking devices.
The armrests are not designed to lift the wheelchair.
Never use the anti-tip wheels as transit wheels.
It is suggested to verify the proper assembly and the efficiency of the quick release axle
before using the wheelchair and always after performing releasing and assembly of the
rear wheels to the frame.
Brakes and clothes-guards don’t always have a gap larger than 2.5 cm from the wheels.
Be careful not to accidentally put your fingers between the wheel and clothes guards or
brakes to avoid injury.
To keep the wheelchair efficient and maintain its safety requirements is suggested to
perform regularly a maintenance program.
Ineffective maintenance operations and improper use of the device can cause damage or
injury to the user or assistant.
In case of transport by plane it is recommended to reduce the tyre pressure.
The wheelchair is not suitable for use in hyperbaric chambers.
Contact your dealer or the manufacturer to have more information about connection
points and devices needed to secure the wheelchair during transport by car.
The pressure of the Schwalbe Marathon Plus tyres should always be kept from a
minimum of 7 bars to a maximum of 9 bars to prevent damage to the tyres themselves.
Before transfering in or out of the wheelchair, always remember to activate the brakes.
.

19
9. Maintenance, inspections and controls
Weekly:
Check the quick release efficiency of the rear wheel axles (see par. 3.2) and if
necessary, grease the pins and bushes with some lubricant to ensure the correct
extraction and reinsertion of the wheels.
Check the tension of the backrest upholstery (see par. 1.5) to maintain the seating
comfortable.
Check the tyre pressure (see par.3.3). Each tyre shows on the lateral bands the
maximum pressure for which it is designed. A flat tyre affects the efficiency of
brakes and the agility of the wheelchair.
Quarterly:
Check the tightness of the rear wheel support plate screws.
Check the tightness of the front fork support screws.
Check the wear of the front wheels.
Check the efficiency of the bearings on the rear and front wheels and on the front
fork support plates.
Check the efficiency of the brakes.
Lubricate moving parts such as quick release axles and bearings. It is suggested to
use silicon oil, which is efficient and doesn’t smear.
It is recommended to refer only to authorized and qualified personnel to perform maintenance
programs, adjustments, and components replacement on the wheelchair.

20
10. Cleaning instructions
Cleaning and disinfection procedure have to be performed by qualified personnel.
Use appropriate eye/facial protection and protective gloves, during cleaning and
disinfection procedure.
In case of contamination with blood or body fluids, the wheelchair has to be cleaned first and
then disinfected as follows:
Note: Most of the time it is convenient and more effective to remove the seat and back-rest
upholstery from the frame before proceeding with the cleaning and disinfection of either the
frame or the upholstery.
FRAME
•wash the wheelchair with tepid water and neutral detergent using a damp cloth to remove
gross soiling;
•wash again the wheelchair using just tepid water to remove detergent residuals;
•dry the wheelchair prior to further processing;
•visually inspect the cleanliness of the complete device;
•disinfect the wheelchair using alcohol (70-90%);
•be sure it is completely dry before proceeding with any other operation.
UPHOLSTERY
In case of no user change during the cleaning treatment:
•wash, rinse, dry and disinfect the upholstery using the same process used for the frame;
•be sure the upholstery is completely dry before to re-assembly it again to the frame.
In case of different user after the cleaning treatment:
•in this case it is suggested to change seat and back-rest upholsteries with a new set.
Note: during this cleaning process the wheelchair should be carefully inspected also for
damage, oxidation and faults in function. If any damage or faults are found, the involved
components should be removed for service, repair or replacement.
All waste materials related to this process must be disposed in compliance with
specific local applicable law.
Table of contents
Other OFFCARR Wheelchair manuals

OFFCARR
OFFCARR COSTA User manual

OFFCARR
OFFCARR Mizar Europa User manual

OFFCARR
OFFCARR QPX-AL User manual

OFFCARR
OFFCARR DIVA User manual

OFFCARR
OFFCARR RUBY User manual

OFFCARR
OFFCARR TOP SPIN User manual

OFFCARR
OFFCARR Althea User manual

OFFCARR
OFFCARR ASSIST User manual

OFFCARR
OFFCARR FENICE User manual

OFFCARR
OFFCARR Althea User manual
Popular Wheelchair manuals by other brands

Stealth Products
Stealth Products Stealth Positioning Pelvic Belts manual

Z-Tec
Z-Tec ZT-600-600 user manual

Invacare
Invacare Typhoon II Service manual

Tendercare
Tendercare Extra Small Fold-a-Way Spring Workshop manual

Invacare
Invacare Motion Concepts MaTRx Seating Series installation instructions

Hover
Hover H Hybrid Manual owner's manual