OHAUS 5000 User manual

Courier 5000
Instruction Manual
Mode d’emploi
Bedienungsanleitung
Manuale di istruzioni
Manual de Instrucciones


REVISION HISTORY
Date
Version
Description
March 2, 2023
B
Initial release
July 6,2023
A
Updated the company address in back cover and FCC page


Courier 5000 EN-1
TABLE OF CONTENTS
1. INTRODUCTION .........................................................................................................................................2
1.1. Safety Precautions ...................................................................................................................................2
1.2. Intended Use ............................................................................................................................................2
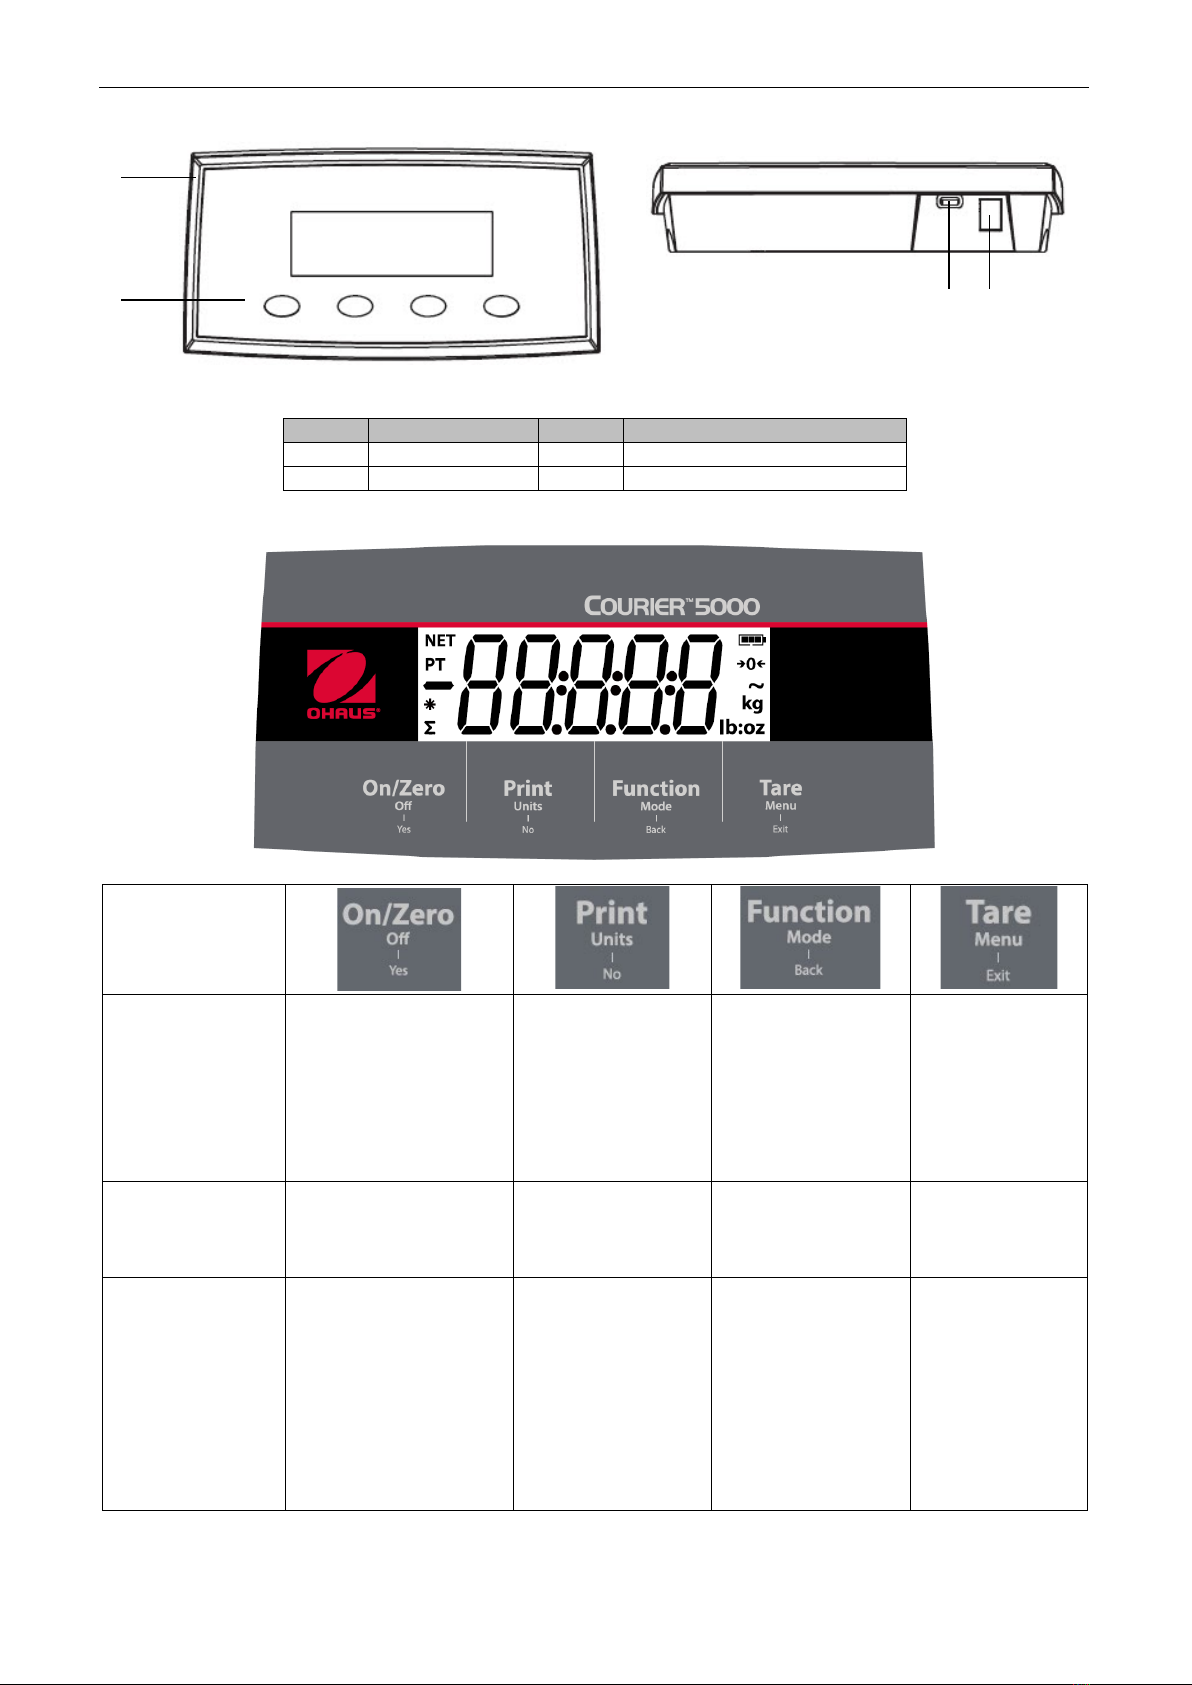
1.3. Overview of Controls................................................................................................................................3
1.4. Control Functions .....................................................................................................................................3
2. INSTALLATION ...........................................................................................................................................5
2.1 Packing List ..............................................................................................................................................5
2.2 Unpacking the Scale ................................................................................................................................5
2.3 Setup ........................................................................................................................................................5
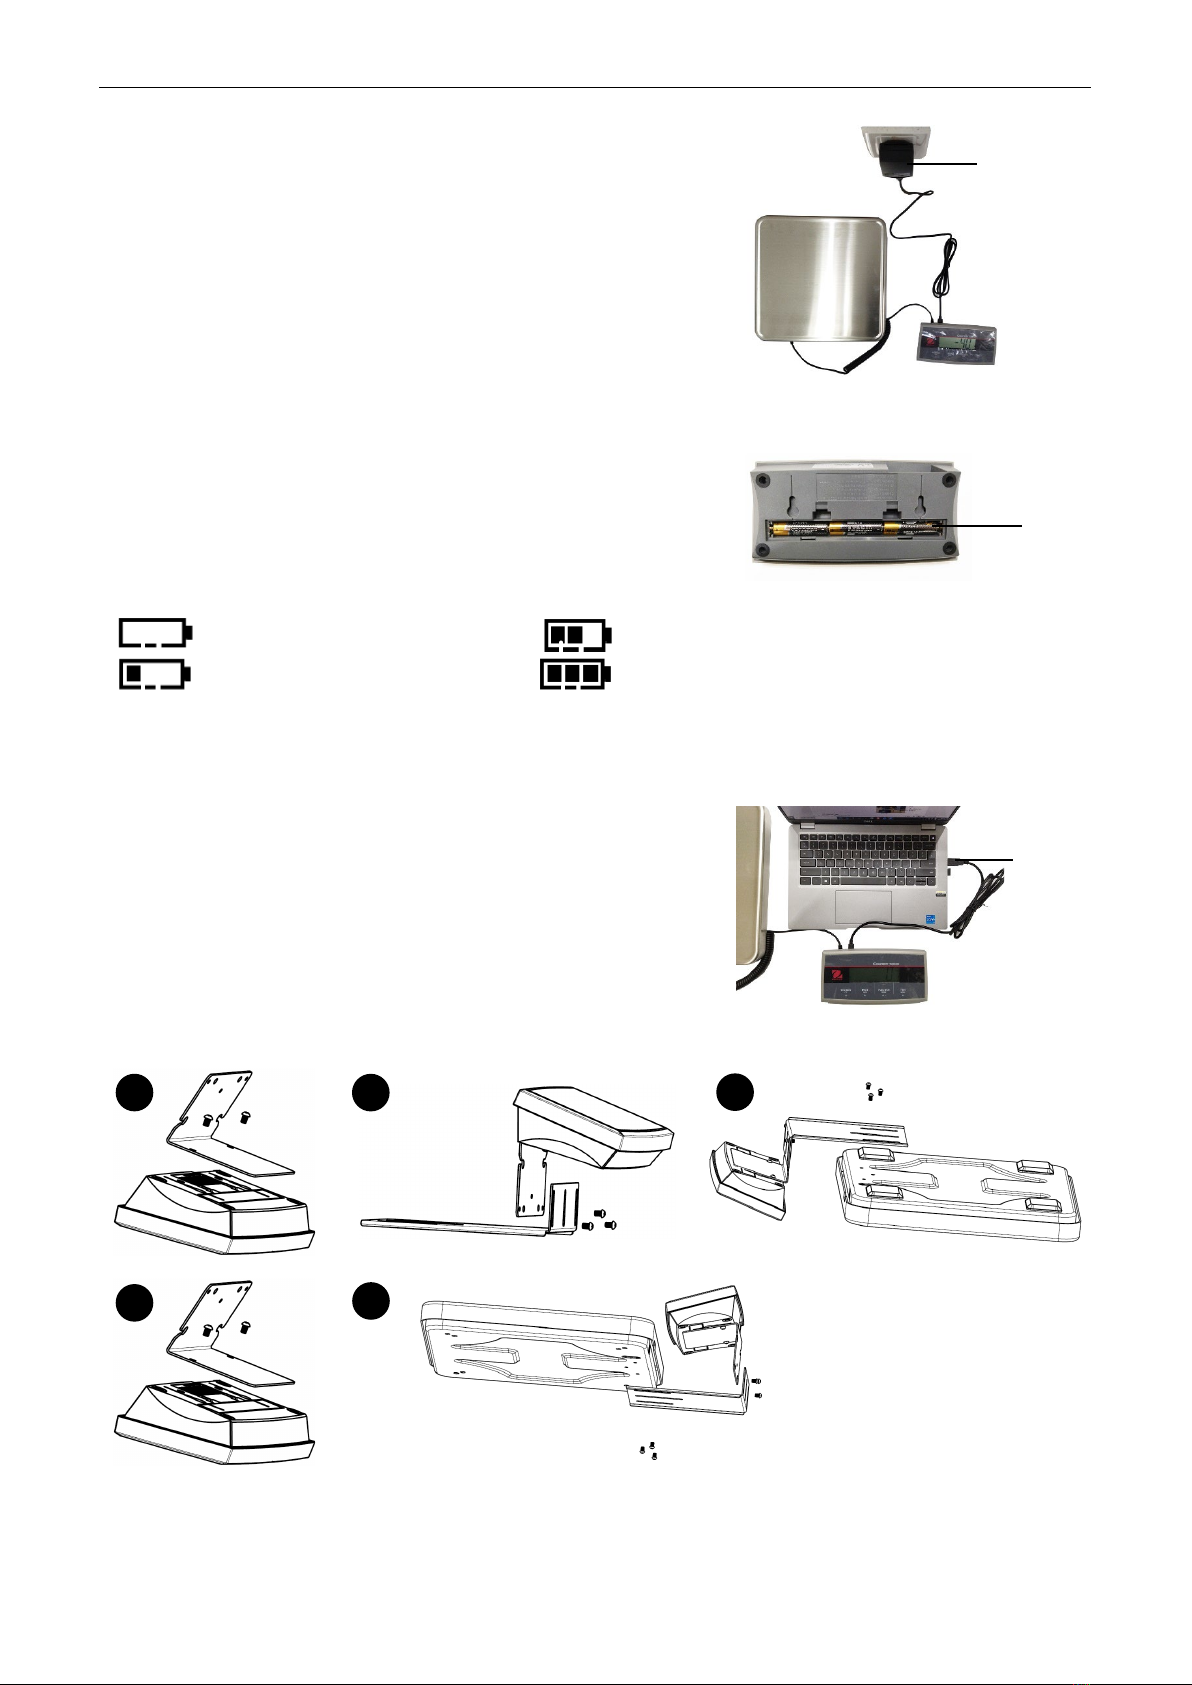
2.3.1 Power Supply Connection.................................................................................................................5
2.3.2 PC Connection..................................................................................................................................6
2.3.3 Base Mounting ..................................................................................................................................6
2.3.4 Direct Wall Mounting.........................................................................................................................7
2.4 Leveling the Equipment............................................................................................................................7
3. OPERATION ................................................................................................................................................8
3.1 Turning On/Off the Scale .........................................................................................................................8
3.2 Setting the Display to Zero.......................................................................................................................8
3.3 Changing the Units of Measure................................................................................................................8
3.4 Printing Data.............................................................................................................................................8
3.5 Application Modes ....................................................................................................................................8
3.5.1 Weighing ...........................................................................................................................................8
3.5.2 Totalization........................................................................................................................................9
3.5.3 Dynamic Weighing / Display Hold.................................................................................................. 10
3.5.4 Weight Alert.................................................................................................................................... 12
4. MENU SETTINGS .................................................................................................................................... 13
4.1 Menu Navigation ................................................................................................................................... 13
4.1.1 User Menu...................................................................................................................................... 13
4.1.2 Button Navigation........................................................................................................................... 13
4.2 Calibration Menu ................................................................................................................................... 14
4.2.1 Initial Calibration............................................................................................................................. 14
4.2.2 Zero Calibration.............................................................................................................................. 14
4.2.3 Span Calibration............................................................................................................................. 14
4.2.4 Linearity Calibration ....................................................................................................................... 15
4.2.5 GEO Code Adjustment .................................................................................................................. 15
4.2.6 End Cal .......................................................................................................................................... 15
4.3 Setup Menu ........................................................................................................................................... 16
4.4 Readout Menu....................................................................................................................................... 16
4.5 Unit Menu .............................................................................................................................................. 18
4.6 USB Menu ............................................................................................................................................. 18
4.7 Print Menu ............................................................................................................................................. 19
4.7.1 Selecting the Print Content ............................................................................................................ 21
4.8 Lock Button Configuration..................................................................................................................... 22
5. COMMUNICATION ................................................................................................................................... 23
5.1 Scale to Device Port Connections......................................................................................................... 23
5.1.1 USB (Type C) Port ......................................................................................................................... 23
5.2 UPS WorldShip to the PC Connection .................................................................................................. 23
5.3 Interface Protocols ................................................................................................................................ 24
5.3.1 UPS Protocol.................................................................................................................................. 24
6. MAINTENANCE ....................................................................................................................................... 25
6.1 Cleaning ................................................................................................................................................ 25
6.2 Troubleshooting..................................................................................................................................... 25
6.3 Service Information ............................................................................................................................... 25
7. ACCESSORY ........................................................................................................................................... 26
8. TECHNICAL DATA .................................................................................................................................. 27
8.1 Specifications ........................................................................................................................................ 27
8.2 Drawings and Dimensions .................................................................................................................... 28
8.3 Table of GEO Code Values................................................................................................................... 29
9. COMPLIANCE .......................................................................................................................................... 30
10. APPENDICES ........................................................................................................................................... 32
10.1 MT Standard Continuous Output .......................................................................................................... 32
10.2 OHAUS Commands .............................................................................................................................. 34
10.3 OH-Continuous Print ............................................................................................................................. 35

EN-2 Courier 5000
1. INTRODUCTION
This manual contains installation, operation, and maintenance instructions for Courier 5000. This instruction
manual helps you to install and use this scale easily. Therefore, you must read it carefully before installation
and operation.
1.1. Safety Precautions
Definition of Signal Warnings and Symbols
Safety notes are marked with signal words and warning symbols. These show safety issues and warnings.
Ignoring the safety notes may lead to personal injury, damage to the instrument, malfunctions and false results.
Signal Words
WARNING
For a hazardous situation with medium risk, possibly resulting in severe injuries or
death if not avoided.
CAUTION
For a hazardous situation with low risk, resulting in damage to the device or the
property or in loss of data, or minor or medium injuries if not avoided.
ATTENTION
For important information about the product. May lead to equipment damage if not
avoided.
NOTE
For useful information about the product.
Warning Symbols
General hazard Explosion hazard
Electrical shock hazard
Safety Precautions
CAUTION: Read all safety warnings before installing, making connections, or servicing this
equipment. Failure to comply with these warnings could result in personal injury and/or property
damage. Retain all instructions for future reference.
Before connecting power, verify that the equipment’s input voltage range and plug type are
compatible with the local AC mains power supply.
Do not position the equipment such that it is difficult to reach the power connection.
Make sure that the power cord does not pose a potential obstacle or tripping hazard.
Operate the equipment only under ambient conditions specified in these instructions.
The equipment is for indoor use only.
Do not operate the equipment in wet, hazardous, or unstable environments.
Do not allow liquids to enter the equipment.
Do not load the equipment above its rated capacity.
Do not drop loads on the platform.
Do not place the equipment upside down on the platform.
Use only approved accessories and peripherals.
Disconnect the equipment from the power supply when cleaning.
Service should only be performed by authorized personnel.
WARNING: Never work in an environment subject to explosion hazards! The housing of the
instrument is not gas tight. (Explosion hazard due to spark formation, corrosion caused by the
ingress of gases).
WARNING: Electrical shock hazards exist within the housing. The housing should only be opened by
authorized and qualified personnel. Remove all power connections to the unit before opening.
1.2. Intended Use
This instrument is intended for use in pharmacies, schools, businesses and light industry. It must only be used
for measuring the parameters described in these operating instructions. Any other type of use and operation
beyond the limits of technical specifications, without written consent from OHAUS, is considered as not
intended. This instrument complies with current industry standards and the recognized safety regulations;
however, it can constitute a hazard in use. If the instrument is not used according to these operating
instructions, the intended protection provided by the instrument may be impaired.

Courier 5000 EN-3
1.3. Overview of Controls
Figure 1-1 Courier 5000
Item
Description
Item
Description
1
Front housing
3
USB Type-C connector
2
Control panel
4
Load cell cable connector
1.4. Control Functions
Figure 1-2 Courier 5000 Control Panel
Button
Primary Function
(Short Press)
On/Zero
If the scale is off, short
press to turn on the
scale.
If the scale is on, short
press to set the display
value to zero.
Print
If enabled, the
current display
value can be
transmitted to the
interface port.
Function
This key initiates
the specific function
in different
application modes.
Tare
Performs a tare
operation.
Secondary
Function
(Long Press)
Off
If the scale is on, long
press to turn off the
scale.
Units
Changes the
weighing unit.
Mode
Changes the
application mode.
Menu
Enters the user
menu.
Menu Function
(Short Press)
Yes
Selects the current
setting on the display
or goes into a sub-
menu.
No
Moves to the next
menu or menu
item.
Rejects the current
setting on the
display and moves
to the next
available one.
Back
Moves back to the
previous menu
item.
Exit
Exits the user
menu.
Aborts a
calibration in
progress.
NOTE:
•Short Press: Press the key less than 1 second.
•Long Press: Press and hold the key for more than 3 seconds.
1
2
34

EN-4 Courier 5000
Figure 1-3 Display
Item
Description
Item
Description
1
Net weight symbol
6
Pound, Ounce, Pound: Ounce symbols
2
Preset Tare symbol
7
Kilogram, gram symbols
3
Negative symbol
8
Dynamic Weighing / Display Hold mode symbol
4
Stable weight symbol
9
Center of Zero symbol
5
Accumulation symbol
10
Battery symbol
1
2
3
4
5
10
9
8
7
6

Courier 5000 EN-5
2. INSTALLATION
2.1 Packing List
Item
Description
Picture
Quantity
1 Base
1
2 Terminal
1
3 Coiled cable
1
4 Brackets
2
5 Screws
8
6 AC adapter
1
7 USB cable
1
2.2 Unpacking the Scale
Steps
1. Take out the documents, USB cable, terminal, AC
adapter, load cell cable and brackets, then put them to
the side.
2. Remove the foam blocks.
3. Take the Courier 5000 scale base out of the box and put
it on a stable surface.
4. Connect the terminal to the scale base with the load cell
cable.
2.3 Setup
2.3.1 Power Supply Connection
The Type-C cable and the AC adapter can supply power to the scale.
USB Power
1. Use the Type-A end of the USB cable to connect to the
PC.
2. Use the other side of the USB cable to connect to the
terminal’s USB port.
Type A
Foam
B
locks

EN-6 Courier 5000
AC Adapter Power
1. Use the Type-A end of the USB cable to connect to the AC
adapter.
2. Use the other side of the USB cable to connect to the terminal.
3. Plug the AC Adapter into the electrical outlet.
Dry Battery Power
3 AA size dry batteries (not included) can supply power to the scale.
1. Loosen the 2 screws on the terminal mounting bracket to
remove the terminal.
2. Open the battery compartment door at the bottom of the
terminal.
3. Install the batteries in the battery compartment.
4. Close the battery compartment door.
5. Reinstall the terminal on bracket.
The battery symbol indicates the battery status:
Battery 0%-10% remaining
Battery 41%-70% remaining
Battery 11%-40% remaining
Battery 71%-100% remaining
2.3.2 PC Connection
USB to PC
If you connect a USB cable to the PC, it allows USB communication with the PC.
NOTE: The USB cable to a PC connection can supply power to the scale as well.
1. Use the Type-A end of the USB cable to connect to the PC.
2. Use the other side of the USB cable to connect the
terminal through the mounting hole in the bracket.
2.3.3 Base Mounting
Front mounting:
Rear mounting:
Battery
AC adapter
AC adapter
1
3
2
1
2

Courier 5000 EN-7
2.3.4 Direct Wall Mounting
The terminal may be mounted directly to a wall or table using two screws (not included).
Select appropriate size screws that fit into the holes at the
bottom of the terminal housing. See
Figure A. When
mounting to a wall without a solid backing, use appropriate
anchoring hardware.
Figure A. Direct Wall Mount Arrangement
2.4 Leveling the Equipment
Place the scale on a firm and stable flat surface and avoid excessive airflow, vibration, heat sources, or rapid
temperature changes. Afterwards, rotate the scale feet for leveling (only for L and X models).
112mm/4.4''

EN-8 Courier 5000
3. OPERATION
3.1 Turning On/Off the Scale
To turn on the scale, press the On button. The scale performs a display test, and momentarily displays the
software version, the GEO value and then enters the last active weighing mode.
To turn the scale off, long press the Off button until OFF is displayed.
3.2 Setting the Display to Zero
The value of the display can be set to zero under the following conditions:
1. Automatically at Power On (Initial zero).
2. Manually press the ON/ZERO Off button.
3. Semi-automatically send the Zero command (Z or alternate zero command) by USB connection to a PC.
Before pressing the ON/ZERO Off button, please make sure that the scale is stable.
3.3 Changing the Units of Measure
To change the weighing unit, long press the Print Units button until the desired weighing unit appears on the
display.
NOTE: If the desired weighing unit is not shown, check if the unit is activated in the Unit menu (See section 4.5
Unit Menu).
3.4 Printing Data
Before you print out the displayed data with a printer or sending the data to a computer, please set the
communication parameters in the Print Menu (Refer to 4.7 Print Menu).
Press the PRINT Units button for sending the displayed data to the communication port.
3.5 Application Modes
Activating / Deactivating the Application Mode
1. Long press the Menu button until mM.E.N.U appears on the display.
2. Release the Menu button, and C.A.L appears on the display.
NOTE: C.A.L does not appear if CAL LOCK is on.
3. Short press the No button several times until mM.O.d.E appears on the display.
4. Press the Yes button to enter the required application mode.
5. Short press the No button several times until the desired selection appears on the display.
6. Press the Yes button, and ON appears on the display. If you want to activate the application mode, short
press the Yes button. If you want to deactivate the application mode, short press the No button until OFF
appears on the display, then short press Yes button.
7. Press mM.E.N.U button once to exit.
3.5.1 Weighing
This mode is the default factory setting, and it is used to determine the weight of the loads in the selected unit
of measure.
Entering the Mode and Starting to Weigh
1. Long press the button Function Mode until wWEIG appears on the display.
2. Put the container on the scale. Once the value is stable, “*” will appear on the display.
3. Press the button Tare to tare. If the scale performs well, the value on the display is 0.
4. Put the load on the container and read the weight value of the load from the display. Once the value is
stable, “*” will appear on the display.
NOTE: You can check the value of the tare weight by long pressing the Tare button.
The Weighing configurations are defined below (Defaults in Bold).
Item
Available Settings
Comments
Weighing (
wWeIG
)On, off To enable or disable Weighing
NOTE: The Weighing mode cannot be disabled if the scale is in the Weighing mode currently.

Courier 5000 EN-9
3.5.2 Totalization
This application is used to accumulate multiple weights manually or automatically. Statistical data (the number
of samples, the total weight, the average weight, the minimum weight, the maximum weight and the difference
in weight) is stored in memory for review and printing.
Application Settings
There are three totalization options:
Off (OFF): Disable the totalization function.
Manual (mMAN): ` Enable the totalization function manually with Function button.
Automatic (AUtO): The scale performs the totalization function automatically.
NOTE: Manual is the default setting.
Selecting the Totalization Options:
1. Long press the Menu button until the mM.E.N.U appears on the display.
2. Release the Menu button, the C.A.L appears on the display.
3. Short press the No button several times until mM.O.d.E appears on the display, then press the Yes
button. If you do it successfully, you can see the reset on the display.
4. Short press the No button several times until t0tal appears on the display, then press Yes button to enter
the sub menu.
5. Short press the No button several times to select the desired totalization option. If the desired option
appears on the display, you can press Yes button to confirm.
6. Press the Exit button to exit.
Starting the Totalization Process
1. Long press the Mode button until tOtAL appears on the display.
2. Release the Mode button, and the CL.ACC appears on the display.
3. Refer to the explanations below to determine whether to press Yes or No button.
•To delete the stored totalization result of the last time for a new round of the totalization process, you
can press the Yes button. The display shows 0.000.
•To reuse the stored totalization result of the last time, you can press the No button to continue the
totalization of the last time. The display shows 0.000.
If there is a container on the scale, the display shows CL.PAN until the container is removed or you can
press the Tare button to tare.
4. Put the object on the platform and wait for the “∑” flashes on the display.
NOTE: Please make sure that the object weight is greater than 5d.
5. Remove the object from the platform.
6. Put the next object on the platform and wait for the “∑” flashes on the display.
7. Steps 5 and 6, if you have more than two objects that need to be weighed.
8. Remove all the objects from the platform.
9. Press Function button to check the result.
NOTE:
The gross and net weight cannot be added to the same total. If the first weight is recorded in gross, the
next one should be recorded in the same way. It is the same for the net weight.
The result includes the number of samples, the total weight, the average weight, the minimum weight, the
maximum weight, and the difference in weight (the maximum weight minus the minimum weight). The
values are displayed for 1 second each.
Totalization Rules
You will fail to do the totalization operation under the following conditions.
1. The current weight value is unstable.
2. The net weight of the load is smaller than 5d.
3. The overall totalized weight is larger than 999999.(The unit depends on your setting.)
4. The total number of totalizations exceeds 9999 times.

EN-10 Courier 5000
Printing Totalization Results and Format
1. Refer to the steps below, you can enable the Table on (tABLE) option in the menu.
a) Long press the Menu button until you see mM.E.N.U.
b) Release the Menu button and C.A.L. appears on the display if CAL lock is off.
c) Short press the No button several times until mM.O.d.E appears on the display.
d) Press the Yes button to enter the sub menu.
e) Short press the No button several times until tABLE appears on the display, then press the Yes
button to enter the table setting options.
f) Short press the No button until On appears on the screen.
g) Press the Yes button to confirm.
h) Press the Exit button to exit.
2. When the Table option is enabled.
•In automatic totalization mode, the scale will automatically totalize the current weight when it performs
totalization successfully.
•In manual totalization mode, you can press the Function button to totalize the current weight and
print it accordingly.
3. The output for current weight will appear as the example below.
Example:
4. When the totalization is finished, you can print the totalization result by below steps.
1. Remove the load from the scale.
2. Press the Function button, and the totalization result appears on the display.
3. Press the Print button to print the result.
Refer to the example below, you will see the output of the totalization result.
Example:
NOTE: The scale supports 32 characters, the first line is “-”. The colon is left aligned, and the
Weights/Numbers are right aligned.
3.5.3 Dynamic Weighing / Display Hold
This application is used to weigh an unstable load, such as a moving animal. Three different start/reset
operation types can be selected:
Off (OFF)
= Disable the mode.
Manual (mMAN)
= Averaging and resetting are initiated manually by pressing the FUNCTION key.
Semi-Automatic (
SEmMI
)
= Averaging is automatically initiated when the load weight is bigger than the start
weight; resetting is initiated by pressing the FUNCTION key.
Automatic (
AUtO
)
= Averaging is automatically initiated when the load weight is bigger than the start
weight; resetting is automatically initiated when the weight on the display is less
than 5d.
Display Hold
The C52 is set to Display Hold as a default. The instrument will hold the displayed weight value on the display if
that weight is greater than 5 divisions.
NOTE: The minimum start weight is 5 divisions. If the scale does not operate properly, please check if the load
is greater than 5 divisions.
1. 1000 g N
2. 2000 g N
3. 3000 g N
4. 1999 g N
5. 1000 g N
-------------------------
-------------------------
n: 5
Total: 100.000 g
Avg: 200.000 g
Min: 10.500 g
Max: 88.200 g
Diff: 78.300 g

Courier 5000 EN-11
Starting the Dynamic Weighing/Display Hold Mode:
1. Long press the button Function Mode until dyNa appears on the display.
2. Release the button Function Mode, and rEAdY appears on the display.
3. Put the load on the platform.
•If the operation type is manual, you must press the Function button to start the averaging process.
•If the operation type is semi-automatic/automatic, the scale performs the averaging process
automatically when the load weight is bigger than the start weight.
NOTE:
•You can set the value of the start weight via this path: mMENU > mM.O.d.e > dyNa> StArt. And the
correct range of the start weight value is 5d - capacity value.
•During the averaging period, the countdown timer decreases in one second increments. If the set
average time is 0s, the countdown timer is not displayed.
•The values on the display are averaged and held on the display when the countdown is completed.
4. Read the values on the display if the tilde (dynamic) symbol blinks on the display.
5. Reset the countdown timer:
•If the operation type is manual/semi-automatic, press the Function button to reset the countdown timer
when the countdown is running. The display shows rEAdY and start to re-count.
•If the operation type is automatic, remove the load from the scale. And the average weight will still be
displayed until the duration time is over. Then the display shows rEAdY, and start to re-count.
NOTE:
•The rEADY display must be at zero gross or net value to reset the countdown timer.
Application Settings
The Dynamic Weighing Configurations are defined below (Defaults in Bold).
NOTE: The Dynamic mode cannot be disabled if the scale is in the Dynamic mode currently.
Item
Available Settings
Comments
Dynamic Mode
(
dyNA
)
Off (
OFF
) / on (
On
)
Count down:
There is a countdown time.
Dynamic Operation
Type (tyPE)
Manual
(
mMAN
)/
Semi-auto (semMI)/
Auto (AUtO)
Manual:
The averaging process is started and reset manually.
Semi-auto:
The averaging process is started automatically and reset
manually. Resetting is initiated by pressing the FUNCTION key.
Auto:
The averaging process is started and reset automatically.
Start Weight
(StArt)
5d - Capacity Weight
Dynamic weighing will start when the load is bigger than the start
weight (for Semi-auto and Auto mode).
Duration Time
(dUrAt)
1 - 10 s
Duration time of weighing result after the load is removed (only
for AUTO type).
Average Time
(AuErA)
0- 30 s
Time in Seconds.
If the average time is 0, the first stable weight (more than or
equal to 5d) will be the result.

EN-12 Courier 5000
3.5.4 Weight Alert
This application is used to judge if the weight of the item is within the target limit. There are 2 limit values for
setting, the limit 1 is normally on as default.
Setting the Limit Values
1. Long press the Mode button until ALertappears on the display.
2. Release the Mode button, the CL.ALe appears on the display.
3. Press Yes button to remove the stored alert limit value, and LimM.1 appears on the display.
4. Press Yes button, 000000 flashes on the display with the current unit.
5. Set the limit value 1:
a) Use the buttons NO and Back to set a number for the first digit.
b) Short press the Yes button to confirm the number and move to the next digit.
c) Repeat the steps a) and b) to set numbers for all the digits.
d) Press Yes button to confirm the value. If the value is not in the correct range, the NO appears on the
display, then the display shows LimM.1. You must repeat the steps 4 and 5 to set the value. If the
value is in the correct range, the LimM.2 appears on the display.
NOTE: If the LimM.2 is set to off, the LimM.2 will not appear on the display and the scale goes into
the weighing status directly.
6. Redo steps 4 and 5 to set the limit value 2.
If the limit value 2 is not in the correct range, NO appears on the display, then the display shows LimM.1.
Please redo step 5.
If the limit value 2 is in the correct range, the scale goes into the weighing status.
NOTE:
1. You can check the limit values by short pressing the Function key.
2. You can set either or both limit values. When limit value 2 is on and limit value 1 is not equal to limit value
2. If the object weight value is between the two limit values, the segment text and the backlight blink
together. If the object weight value is larger than the maximum limit value, the segment text blinks.
If the weight value of the load is larger than both the limit values, the segment text blinks.
3. The maximum limit value is not larger than the capacity value (Refer to Table 8-1 for the capacity value of
all models).

Courier 5000 EN-13
4. MENU SETTINGS
The User Menu allows the users to customize the scale settings.
4.1 Menu Navigation
4.1.1 User Menu
C.A.L
S.E.t
r.E.A.d
mM.O.
d.E
U.N.I.t
U.S.B
P.r.N.t
l.O.C.k
E.N.
d
ZErO
SpaN
LIN
GEO
ENd
reset
PwWr.
U
ENd
reset
Stab
ZErO
FIlt
AZt
LIGHt
A-Off
PwWm
M
Lock
ENd
reset
wWeIG
tOtal
tAbLE
DYNA
type
StArt
durAt
AuErA
AleAt
LimM2
ENd
reset
UNIt g
UNIt kg
UNIt oz
UNItlb
UNItlb:oz
ENd
reset
BaUd
ParIt
StOP
SHAkE
Alt.P
Alt.t
Alt.2
ENd
reset
ASSIG
StaBl
CONtE
LAYOt
ENd
reset
ALL
OFF
ZErO
PrINt
UNIt
mMOd
E
mMEN
U
tArE
ENd
4.1.2 Button Navigation
For menu items which need to set numbers such as the Weight Alert, the current
number is displayed with all digits flashing. To revise:
1. Press the No button to begin editing.
2. The first digit is displayed flashing.
3. Press the No button to increase the digit or press the
Yes button to accept the digit and move to the next
one.
NOTE: press the Back button can decrease the digit.
4. Repeat this process for all digits.
5. Press the Yes button when the last digit has been set.
6. The new setting is displayed with all digits flashing.
Press the Yes button to accept the setting or press the
No button to resume editing.
7. To end the current menu selection, press the Yes
button to advance to the next menu, or press the No
button to return to the top of the current menu.

EN-14 Courier 5000
4.2 Calibration Menu
The scale can be calibrated using the calibration menu C.A.L.
Changing the Calibration Unit
The calibration unit is consistent with the current unit.
Steps:
1. In the weighing mode, long press the Units key. At this time, the screen will display a continuous series of
units.
2. Release the Units key when the desired unit is displayed on the screen.
4.2.1 Initial Calibration
When the scale is operated for the first time, a zero and span calibration are recommended to ensure accurate
weighing results.
Before performing the calibration, be sure to have the appropriate calibration weights as listed in table 4 - 1.
You can also adjust the GEO setting according to your location.For detailed GEO information, please check
the GEO Code Adjustment section below.
Table 4-1 Suggested Span Calibration Mass (Sold Separately)
Max Capacity (kg) Mass* (kg) Max Capacity (lb) Mass* (lb)
6kg
6kg
12lb
10lb
30kg 30kg 60lb 60lb
50kg 50kg 100lb 100lb
100kg
100kg
200lb
200lb
200kg
200kg
400lb
400lb
NOTE:The calibration unit is consistent with the current unit.
4.2.2 Zero Calibration
The scale performs zero calibration with one calibration point. The zero-calibration point is established with no
weight on the scale. You can use this calibration method to adjust for a different static load without affecting the
span or linearity calibration.
Calibration Procedures:
1. Long press the Menu button until you see mM.E.N.U.
2. Release the button and wait for the display to show C.A.L.
3. Press the Yes button. And you can see the display shows ZErO.
4. Press the Yes button. The display shows --C--, and then -DonE- when the Zero calibration is finished. The
display shows SPAN.
NOTE: If zero calibration fails or if after 40 seconds the calibration is still not successful, CAL E is
displayed for 3 seconds and the previous calibration data will be restored.
5. Press the Exit button to exit.
4.2.3 Span Calibration
The scale performs span calibration with one calibration point. It is established with a calibration mass placed
on the scale.
NOTE:Span calibration should be performed after zero calibration.
Calibration Procedures:
1. Long press the Menu button until you see mM.E.N.U.
2. Release the button and wait for the display to show C.A.L. Press the Yes button.
3. Short press the No button to navigate until you see SPAN.Press the Yes button.
4. The calibration point and the unit flashes on the display based on the scale capacity and unit set in the
menu. (e.g. 030.000 kg) If you do not need to change the calibration point, skip to step 6.
5. To change the calibration point:
a) Short press the No button several times until the desired number appears.
b) Short press the Yes button to accept the number and move on to the next digit.
c) Repeat the process until all the digits are correct.
d) Press the Yes button to accept calibration point. It is flashing on the display.
6. Place a calibration mass of the specified weight on the platform and press the Yes button.
7. The display shows --C--, and then -DonE- when the calibration is finished.
8. Then the display shows LIN. Press the Exit button to exit.

Courier 5000 EN-15
NOTE:
•If the scale does not perform the calibration successfully, CAL E is displayed for 3 seconds and the
previous calibration data is restored.
•After waiting for 40 seconds, if the scale still fails to perform the calibration, CAL E is displayed for 3
seconds, and the previous calibration data is restored.
4.2.4 Linearity Calibration
The scale performs linearity calibration with 3 calibration points. The full calibration point is established with an
item (Refer to Table 4-1 for the exact weight value of the item) on the platform. The mid calibration point is
established with a weight equal to half of the full calibration weight on the platform. The zero calibration point is
established with no weight on the platform. The full calibration and mid calibration points can be altered during
the calibration procedure.
Calibration Procedures:
1. Long press the Menu button until you see mM.E.N.U.
2. Release the button and wait for the display to show C.A.L. Press the Yes button.
3. Short press the No button several times to navigate until you see LIN.
4. Press the Yes button, then the display shows --C--.
5. Then the first calibration point and the unit will flash on the display based on the scale capacity and unit
you set in the setup menu. (For example, 015.000 kg). If you do not need to change the calibration point,
skip to step 7.
6. Change the calibration point:
a) Short press the No button several times until the desired number appears.
NOTE: press the Back button can decrease the digit.
b) Short press the Yes button to accept the number and move on to the next digit.
c) Repeat the process until all the digits are correct.
d) Press the Yes button to accept calibration point. It flashes on the display.
7. Place a calibration mass of the specified weight on the platform and press the Yes button. The display
shows --C--.
8. The second calibration point and the unit will flash on the display based on the capacity and unit you set in
the setup menu. (For example, 030.000 kg)
NOTE: After waiting for 40s, if the scale still fails to perform the calibration, CAL E is displayed for 3
seconds and the previous calibration data is restored.
9. Steps 6 and 7.
10. The display shows --C--, and then -DonE- when the Linearity calibration is finished.
11. After that the display shows GEO. Press the Exit button to exit.
4.2.5 GEO Code Adjustment
Geographical Adjustment Factor (GEO) code is used to adjust the calibration based on the current location.
Settings from 0 to 31 are available with 12 being the default. Refer to 8.3 Table of GEO Code Values to
determine the GEO factor that corresponds to the terminal's location.
Set the GEO factor:
1. Long press the Menu button until you see mM.E.N.U.
2. Release the button and wait for the display to show C.A.L. Press the Yes button.
3. Short press the No button several times to navigate until you see GEO.Press the Yes button.
4. The GEO point flashes on the display (For example, 12).
5. Short press the No button several times until the desired GEO number appears. Press the Yes button to
confirm.
NOTE: Press the Back button can decrease the digit.
6. Then the display shows END.
7. Press the Exit button to exit.
4.2.6 End Cal
When ENd is displayed, you can press the Yes button to exit this menu and enter the next sub-menu, or press
the No button to enter to the first menu item in this sub-menu.

EN-16 Courier 5000
4.3 Setup Menu
You can set the scale parameters with the menu S.E.t. Default settings are in bold.
Menu Sub-Menu
Sub-Menu
(in segment)
Options Options (in segment)
Setup
S.E.t.
Reset
reset
no, yes
NO, yes
Power On Unit
PwWr.U
Auto, g, kg, lb, oz, lb:oz
AUtO, g, kg, lb, oz, lb:oz
End
ENd
/
/
NOTE: / indicates that it is not applicable in the table above.
Reset
Reset the Setup menu to factory defaults.
NO = do not reset
yes = reset
Power On Unit
Set the unit in the weighing mode after rebooting.
AUtO = After rebooting, the weighing unit will be the previously-selected unit.
g, kg, lb, oz, lb:oz = After rebooting, the selected weighing unit in the menu will be used regardless of
previously selected unit.
NOTE: The unit will not appear unless they are set to on in the unit menu.
End
The display exits the current menu and moves to the next menu.
4.4 Readout Menu
You can set the user preferences with the readout menu. Default settings are in bold.
Menu Sub-Menu
Sub-Menu
(in segment)
Options Options ( in segment)
Read Out
(r.E.A.d)
Reset
reset
no
, yes
NO, yes
Stability
Stab
.5d, 1d, 2d, 5d
.5d, 1d, 2d, 5d
Zero Range
ZErO
2%, 100%
2, 100
Filter Level
FIlt
Low,
Medium
, High
LOwW, mMEd, HIGH
Auto Zero Track
AZt
Off, 0.5d, 1d, 3d
OFF, .5d, 1d, 3d
Back Light
LIGHt
Off, On,
Auto
OFF, On, Auto
Auto Off
A-Off
Off, 1min, 5min, 10min
OFF, 1, 5, 10
PWM.SAVE
PwWmM
ON,
OFF
On, OFF
Calibration Lock Lock ON, OFF On, OFF
End
ENd
/ /
NOTE: / indicates that it is not applicable in the table above.
Reset
Reset the readout menu to factory defaults.
NO = do not reset.
YES = reset
Stability
Set the amount reading can vary before the stability symbol turns off.
.5d = 0.5 of a scale division
1d = 1 scale division
2d = 2 scale divisions
5d = 5 scale divisions
Zero
Set the percentage of scale capacity that can be zeroed.
Other manuals for 5000
13
Table of contents
Other OHAUS Scale manuals

OHAUS
OHAUS PX Series User manual

OHAUS
OHAUS FD Series User manual

OHAUS
OHAUS Scout SJX User manual

OHAUS
OHAUS 2500 User manual

OHAUS
OHAUS DEFENDER SERIES User manual

OHAUS
OHAUS Scout SPX Series User manual

OHAUS
OHAUS BW1.5 User manual

OHAUS
OHAUS GT 210 Manual

OHAUS
OHAUS VF Series User manual

OHAUS
OHAUS SHRK07AL1 User manual

OHAUS
OHAUS Pioneer PJX Series User manual

OHAUS
OHAUS Catapult 1000 User manual

OHAUS
OHAUS ES series User manual

OHAUS
OHAUS 1400 Series Manual

OHAUS
OHAUS 5000 User manual

OHAUS
OHAUS defender 7000 User manual

OHAUS
OHAUS Emerald User manual

OHAUS
OHAUS VE Series User manual

OHAUS
OHAUS ES series User manual

OHAUS
OHAUS Adventurer series User manual