OHAUS Scout STX Series User manual

ScoutTM Series Balances - STX
Instruction Manual
Balanzas ScoutTM Series - STX
Manual de instrucciones
Balances ScoutTM Séries - STX
ScoutTM Waagen - Serien - STX
Bedienungsanleitung
Bilance Serie ScoutTM - STX

STX EN-0
TABLE OF CONTENTS
1. INTRODUCTION ...............................................................................................1
1.1 Description ................................................................................................................................................... 1
1.2 Definition of Signal Warnings and Symbols................................................................................................. 1
1.3 Safety Precautions....................................................................................................................................... 1
1.4 Features ......................................................................................................................................................... 2
2. INSTALLATION.................................................................................................4
2.1 Installing Components ................................................................................................................................. 2
2.1.1 Releasing the Transportation Lock.......................................................................................................... 2
2.1.2 Installing the Weighing Pan ..................................................................................................................... 2
2.1.3 Security Slot............................................................................................................................................. 2
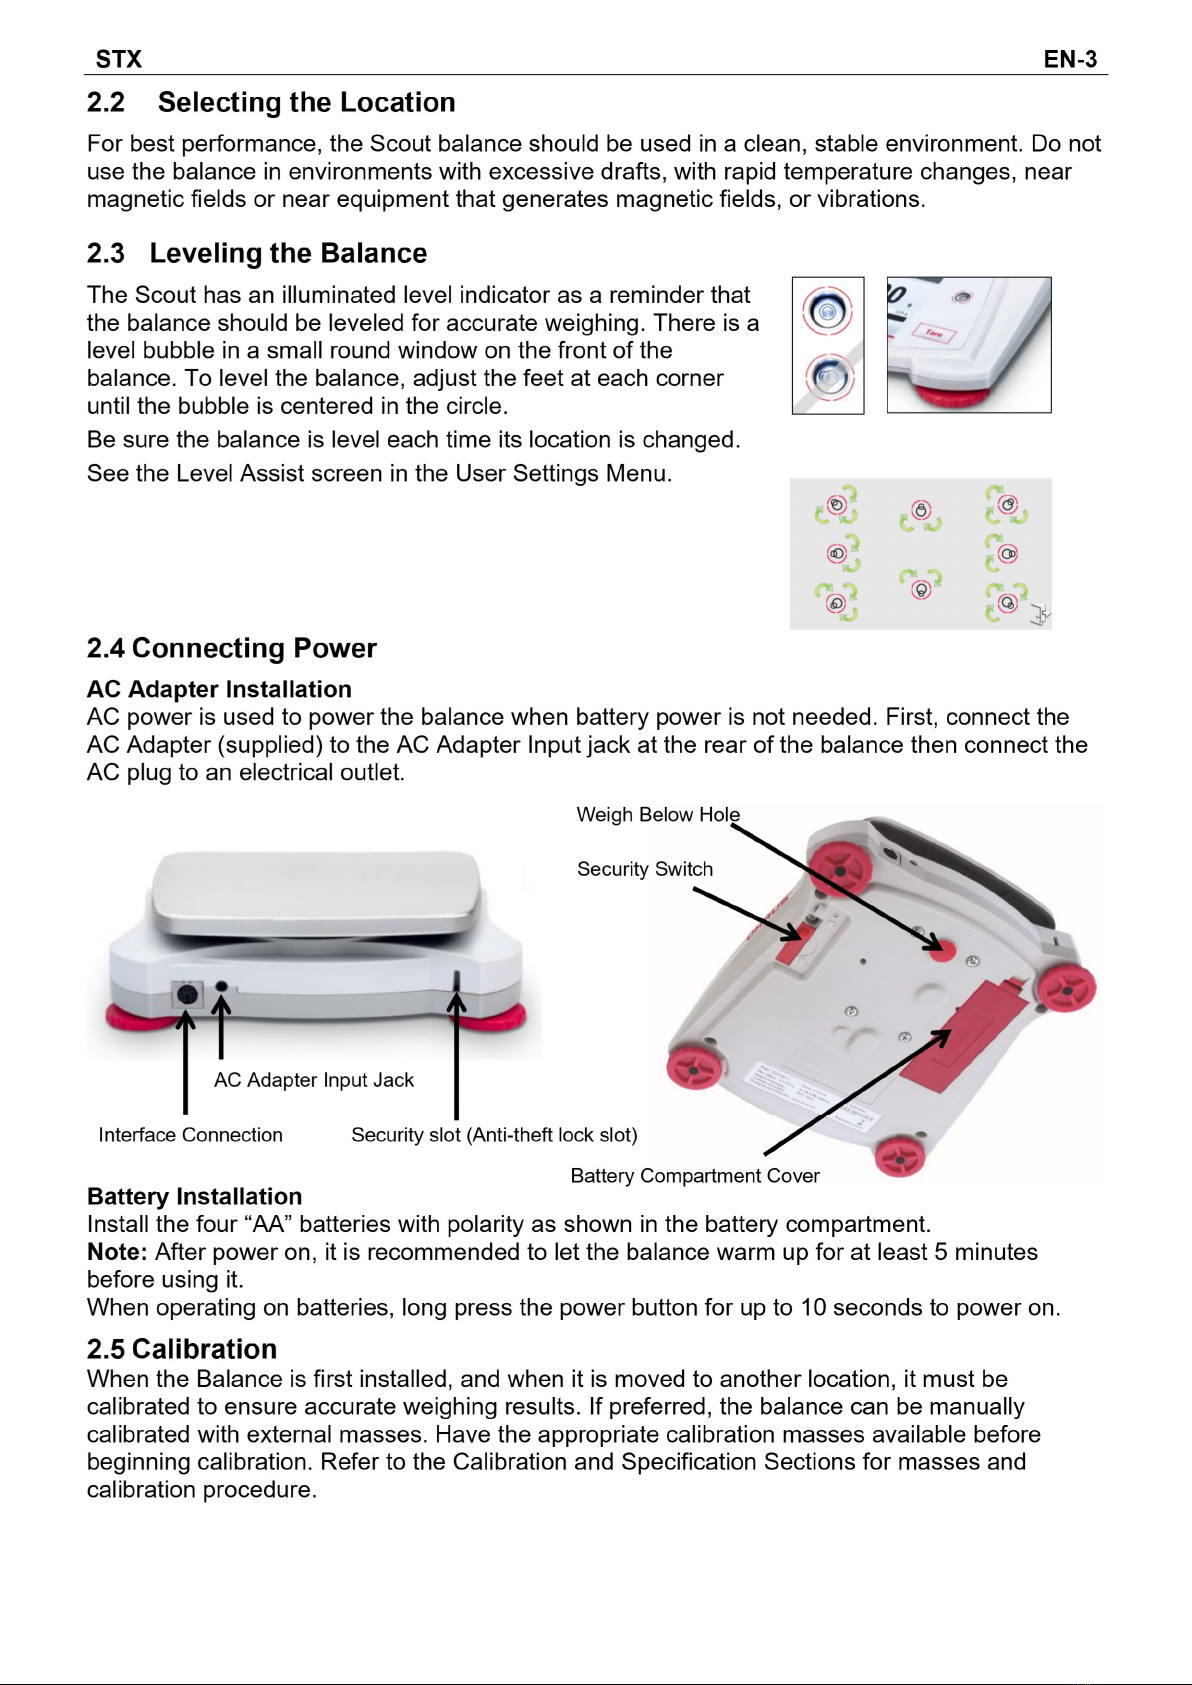
2.2 Selecting the Location.................................................................................................................................. 3
2.3 Leveling the Balance..................................................................................................................................... 3
2.4 Connecting Power........................................................................................................................................ 3
2.5 Calibration.................................................................................................................................................... 3
3. OPERATION......................................................................................................4
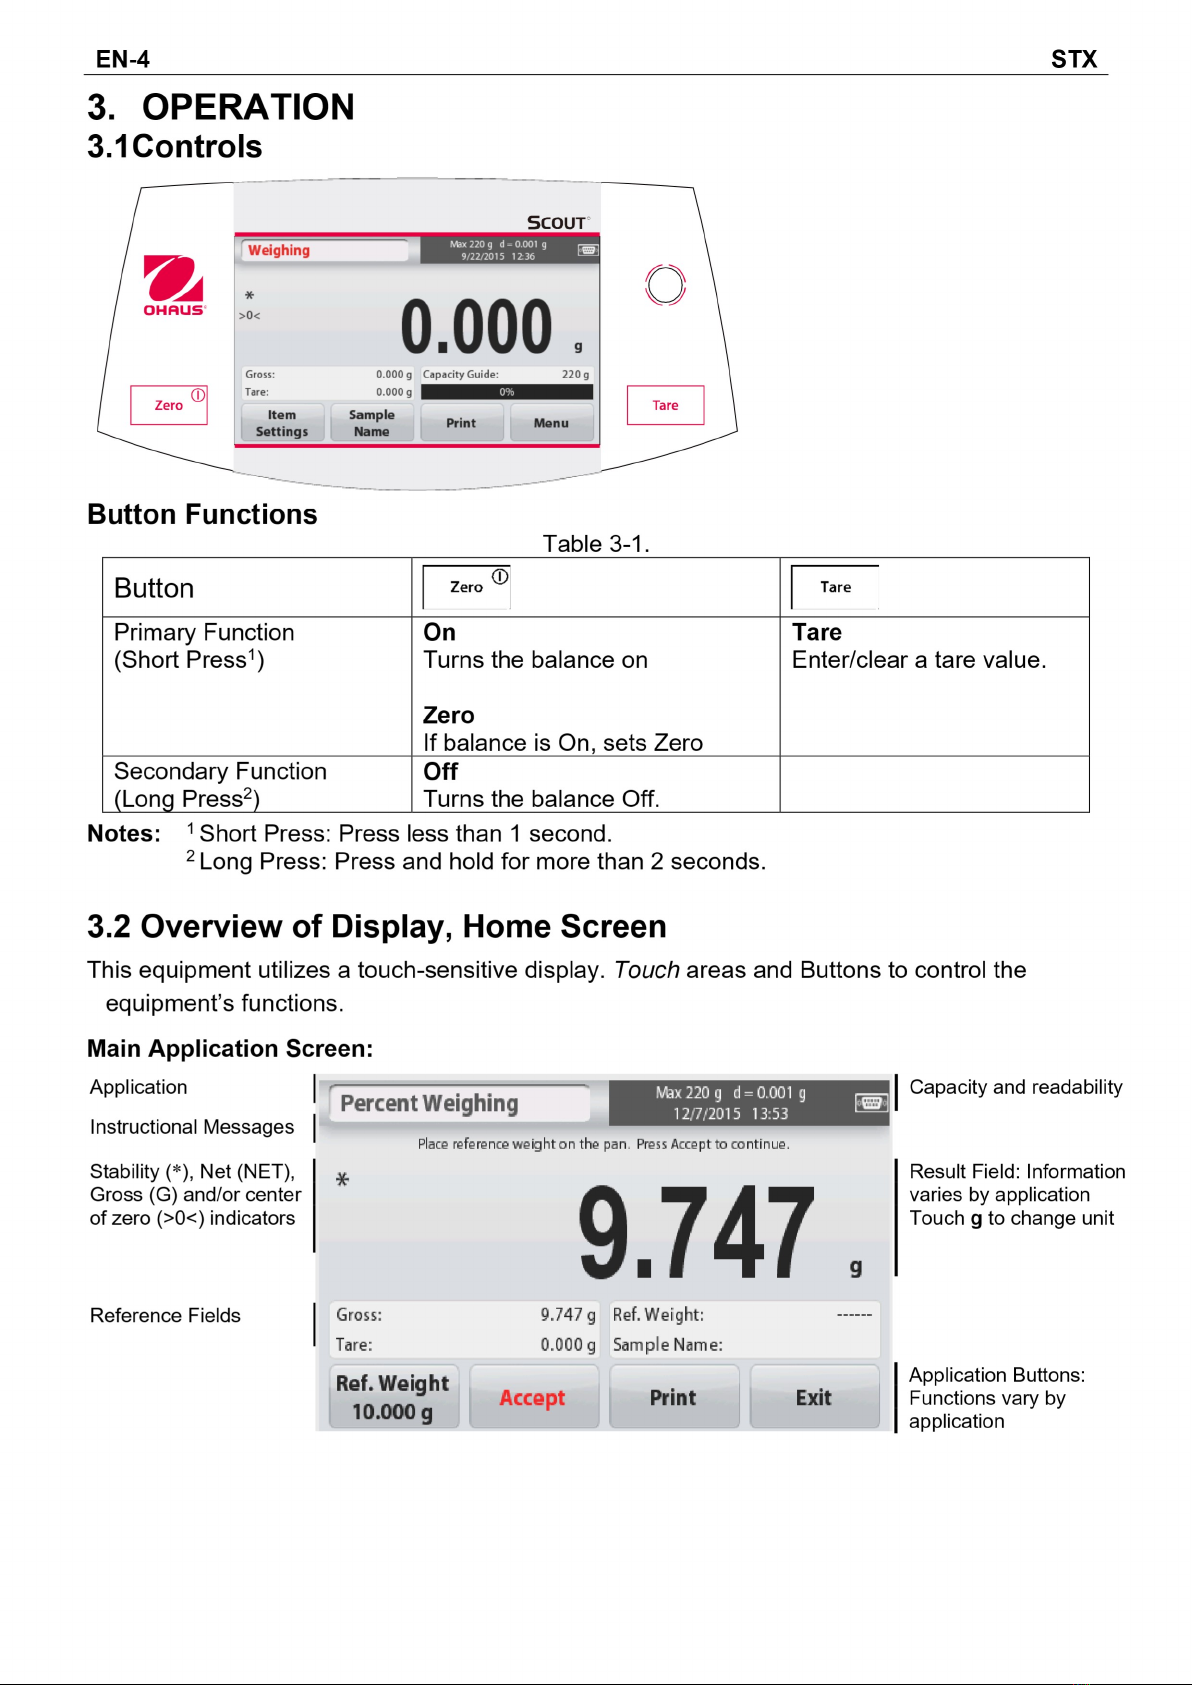
3.1 Controls........................................................................................................................................................ 4
3.2 Overview of Display, Home Screen ............................................................................................................. 4
3.3 Principal Functions and Main Menu............................................................................................................ 5
4. APPLICATIONS ................................................................................................8
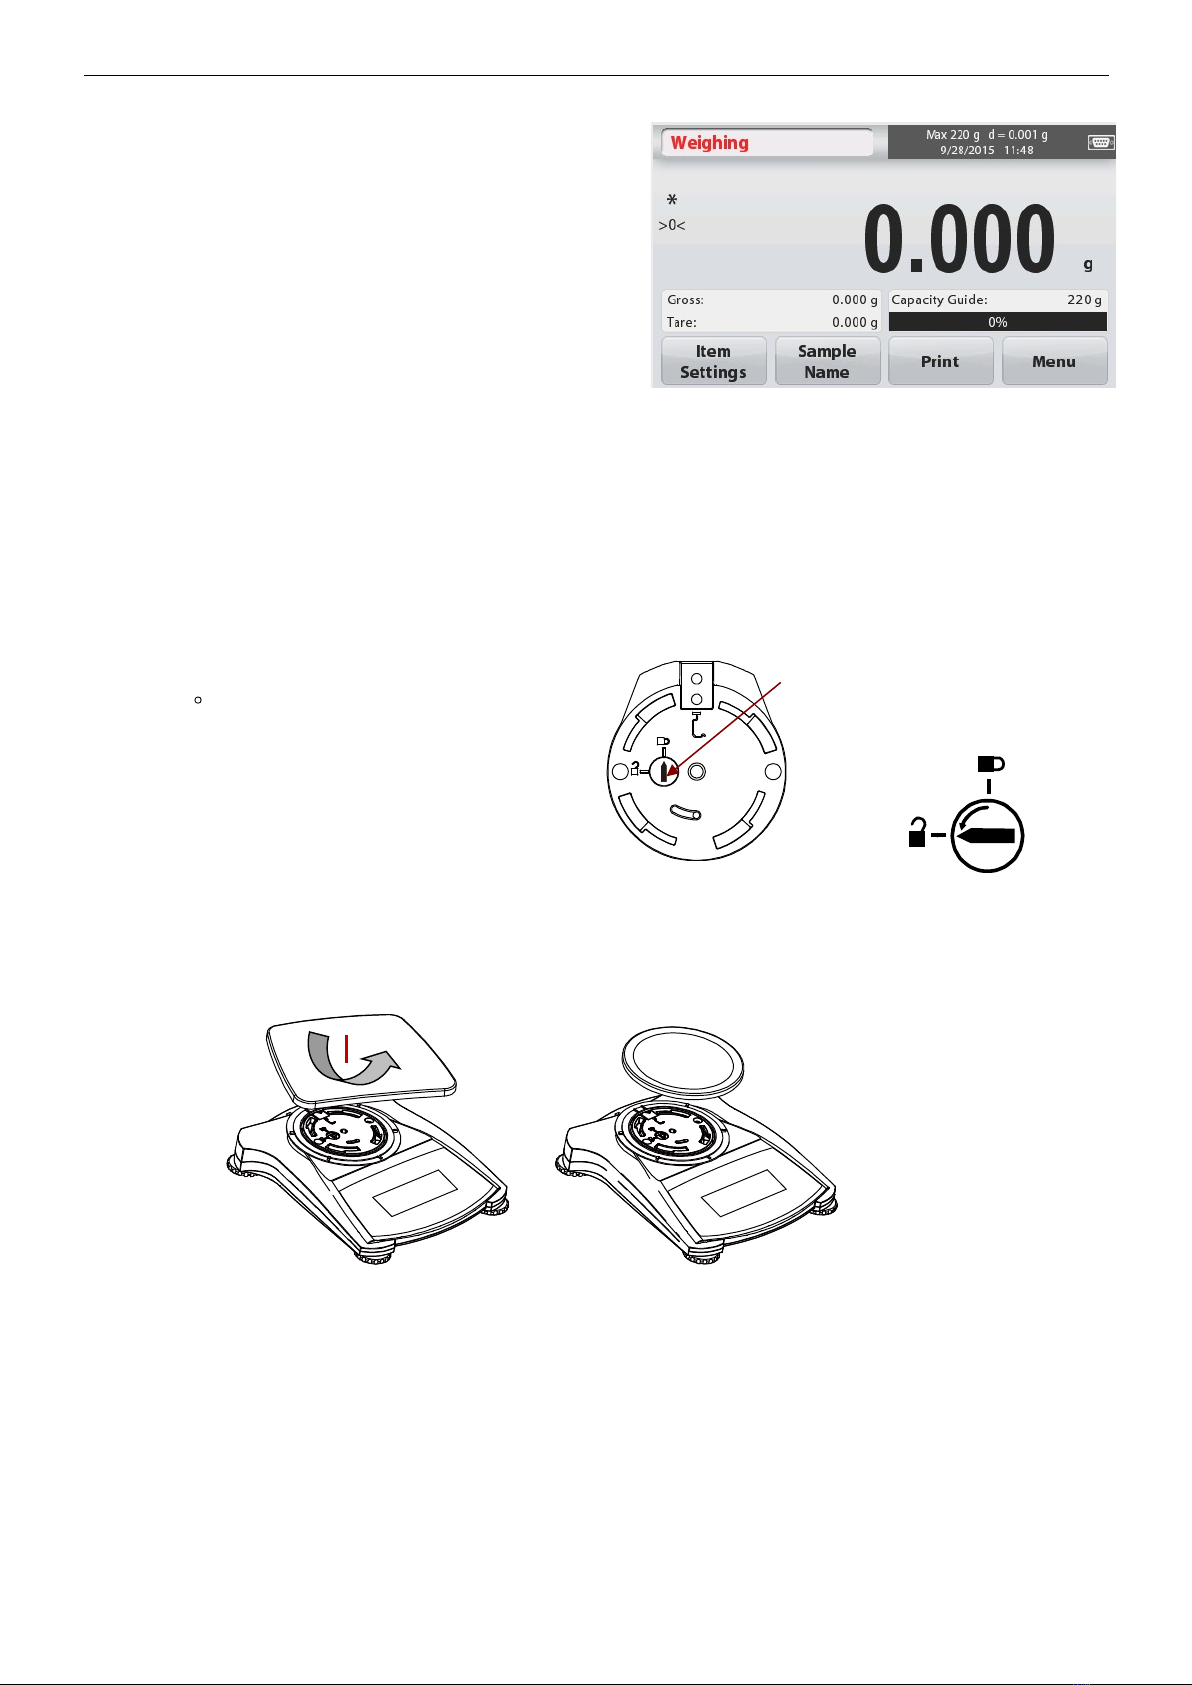
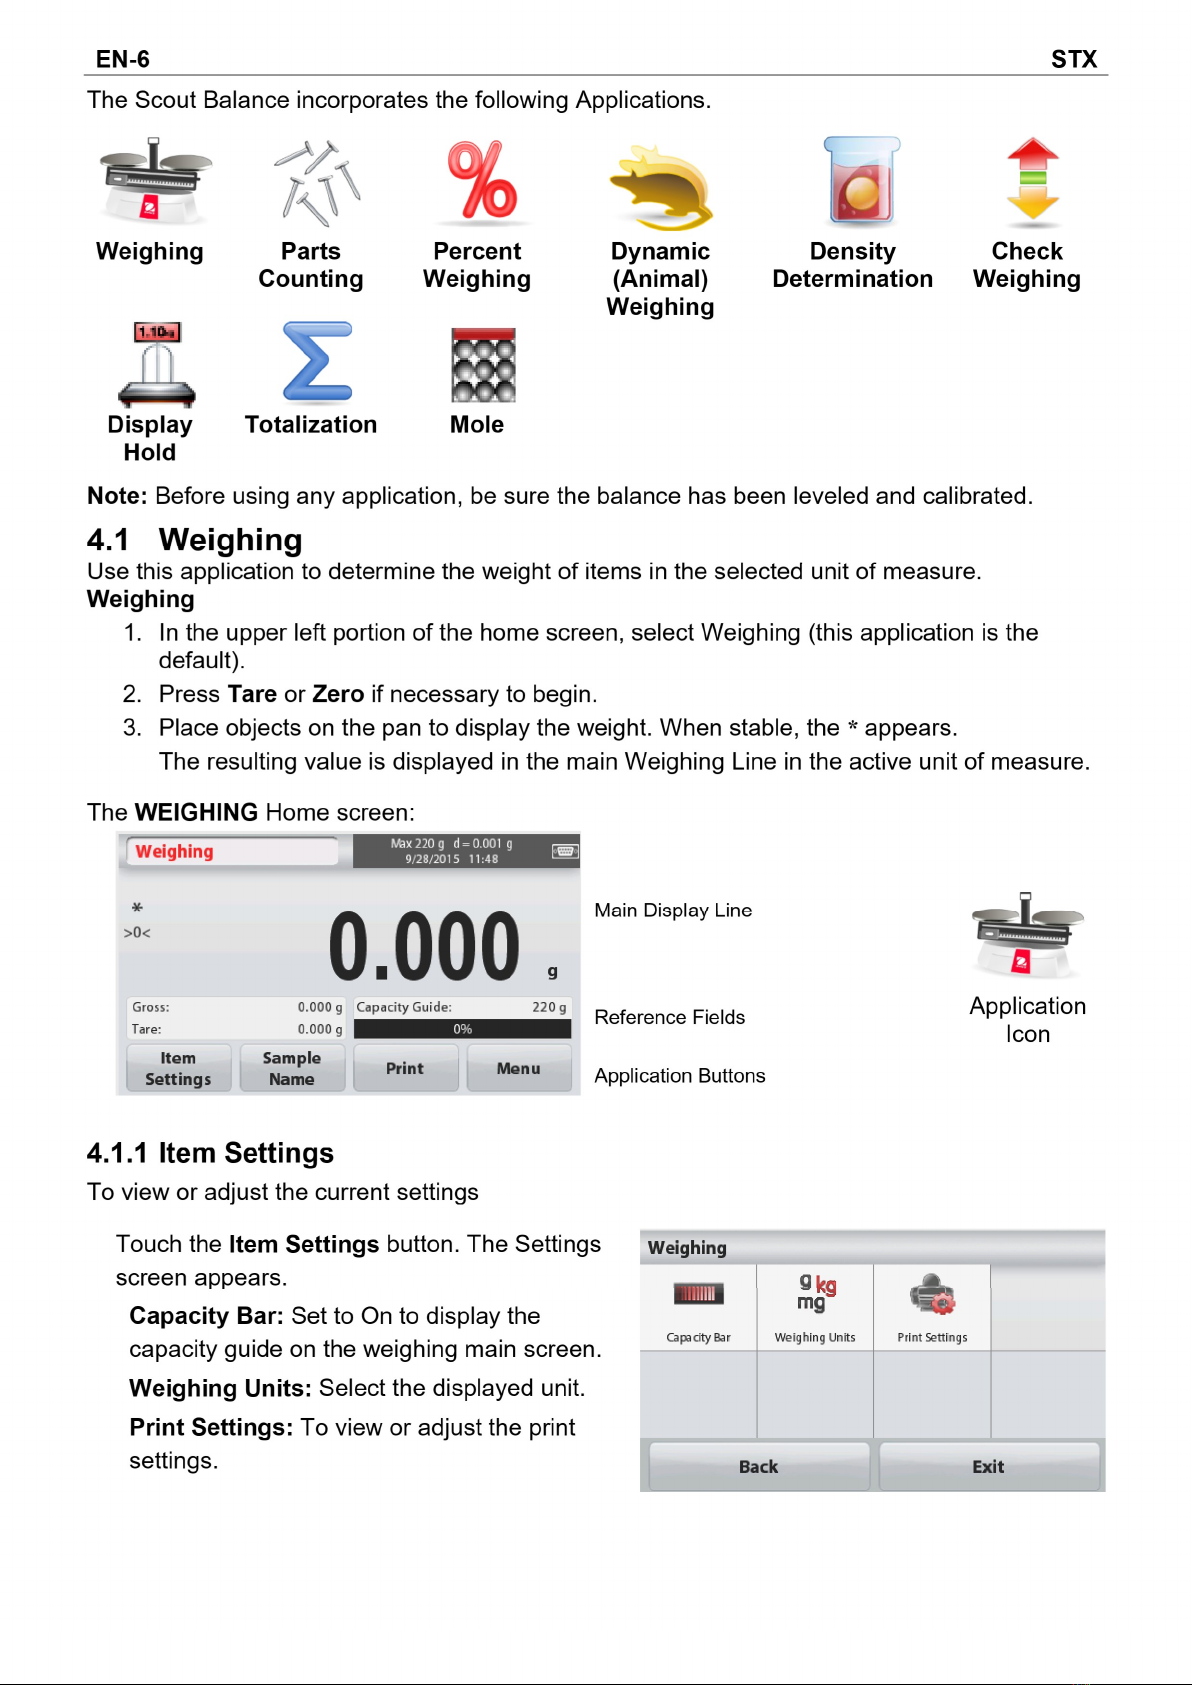
4.1 Weighing ...................................................................................................................................................... 6
4.1.1 Item Settings ............................................................................................................................................ 6
4.1.2 Sample Name .......................................................................................................................................... 7
4.1.3 Print / Save to USB .................................................................................................................................. 7
4.1.4 .................................................................................................. 7
4.2 Parts Counting ............................................................................................................................................. 7
4.2.1 Item Settings ............................................................................................................................................ 9
4.2.2 APW/Samples.......................................................................................................................................... 9
4.3 Percent Weighing......................................................................................................................................... 9
4.3.1 Item Settings .......................................................................................................................................... 10
4.3.2 Recalculate Reference Weight .............................................................................................................. 10
4.4 Dynamic/Animal Weighing......................................................................................................................... 11
4.4.1 Item Settings .......................................................................................................................................... 12
4.5 Density Determination................................................................................................................................ 13
4.5.1 Measuring the Density of a Solid Using Water (default)........................................................................... 13
4.5.2 Measuring the Density of a Solid Using an Auxiliary Liquid ..................................................................... 15
4.5.3 Measuring the Density of a liquid using a Calibrated Sinker (not supplied) .............................................. 15
4.5.4 Measuring the Density of Porous Material Using Oil ................................................................................ 17
4.6 Check Weighing......................................................................................................................................... 18
4.6.1 Item Settings .......................................................................................................................................... 19
4.6.2 ........................................................................................... 19
4.7 Display Hold............................................................................................................................................... 20
4.7.2 Display Hold Mode.................................................................................................................................... 20
4.7.3 Peak hold mode........................................................................................................................................ 20
4.8 Totalization................................................................................................................................................... 21
4.9 Mole Weighing ............................................................................................................................................. 22
4.9.1 Item Settings ............................................................................................................................................. 22
4.9.2 Enter Molar Mass...................................................................................................................................... 23
4.9.3 Calculate Molarity ..................................................................................................................................... 23
4.10 Additional Features .................................................................................................................................... 23
4.10.1 Weigh Below........................................................................................................................................... 23
4.10.2 Connecting the Interface......................................................................................................................... 23
5. MENU SETTINGS ...........................................................................................25
5.1 Menu Navigation ........................................................................................................................................ 25
5.1.1 Changing Settings.................................................................................................................................. 25
5.2 Main Menu ................................................................................................................................................. 25
5.2.1 Calibration.................................................................................................................................................. 26
5.2.1.1 Span Calibration ..................................................................................................................................... 26
5.2.1.2 Linearity Calibration ................................................................................................................................ 26
5.2.2 Balance Setup............................................................................................................................................ 27

5.2.3 Weighing Units........................................................................................................................................... 29
5.2.4 Data Maintenance...................................................................................................................................... 30
5.2.5 Communication .......................................................................................................................................... 30
5.2.6 GLP and GMP Data ................................................................................................................................... 35
5.2.7 Factory Reset............................................................................................................................................. 36
5.2.8 Lockout....................................................................................................................................................... 36
6. MAINTENANCE ..............................................................................................39
6.1 Calibration ................................................................................................................................................... 37
6.2 Cleaning ...................................................................................................................................................... 37
6.3 Troubleshooting .......................................................................................................................................... 37
6.4 Service Information ..................................................................................................................................... 37
7. TECHNICAL DATA .........................................................................................40
7.1 Specifications.............................................................................................................................................. 38
7.2 Drawings and Dimensions .......................................................................................................................... 40
8. SOFTWARE UPDATES ..................................................................................40
9. COMPLIANCE.................................................................................................41


STX EN-1
1. INTRODUCTION
1.1 Description
The Scout STX balance is a high quality weighing instrument that will provide you with years of
service if properly cared for. Models are available with ranges from 120g to 8200g.
1.2 Definition of Signal Warnings and Symbols
Safety notes are marked with signal words and warning symbols. These show safety issues and
warnings. Ignoring the safety notes may lead to personal injury, damage to the instrument,
malfunctions and false results.
Signal Words
WARNING For a hazardous situation with medium risk, possibly resulting in injuries or
death if not avoided.
CAUTION For a hazardous situation with low risk, resulting in damage to the device or
the property or in loss of data, or injuries if not avoided.
Attention For important information about the product.
Note For useful information about the product.
Warning Symbols
General Hazard Electric Shock Hazard
1.3 Safety Precautions
Caution: Read all safety warnings before installing, making connections, or servicing
this equipment. Failure to comply with these warnings could result in personal injury
and/or propert
y
dama
g
e. Retain all instructions for future reference.
Verify that the input voltage range printed on the data label and the plug type matches
the local AC power to be used.
Make sure that the power cord does not pose a potential obstacle or tripping hazard.
Use the balance only in dry locations.
Do not drop loads on the pan.
Use only approved accessories and peripherals.
Operate the equipment only under ambient conditions specified in these instructions.
Disconnect the equipment from the power supply when cleaning.
Do not operate the equipment in hazardous or unstable environments.
Service should only be performed by authorized personnel.
Do not position the balance such that it is difficult to reach the power connection.

EN-2 STX
1.4 Features
Touch Controls: Quick, graphical access to all
control functions, applications and features.
2. INSTALLATION
2.1 Installing Components
Refer to the illustrations and instructions below to identify and assemble your Scout balance
with its components. All components must be assembled before using the balance.
2.1.1 Releasing the Transportation Lock
Release the red transportation lock on the
sub-platform of the balance by turning the
pointer 90 counter-clockwise.
2.1.2 Installing the Weighing Pan
Balances with a rectangular platform are placed into the sub-platform and rotated counter-
clockwise until it locks. Round platforms are placed straight down on sub-platform.
2.1.3 Security Slot
A security slot is provided at the rear of the balance allowing the balance to be secured by an
optional cable and lock accessory.
Unlocked
Position
Locked
Position
Sub-platform
Transportation
L
o
c
k
P
o
i
n
t
e
r


STX EN-5
3.3 Principal Functions and Main Menu
Weighing: Press Zero to set the display to zero. Place an item on the pan. Display indicates
gross weight.
Taring: With no load on the pan, press Tare to set the display to zero. Place an empty
container on the pan and press Tare. Add material to the container and its net weight
is displayed. Remove co
number. Press Tare to clear.
MENU & SCREEN NAVIGATION
T
ouch Menu to open the menu list.
Calibration:
Touch to view calibration options.
Balance Setup:
Touch to view balance settings.
Weighing Units:
Touch to view weighing units.
Data Maintenance:
Touch to view data maintenance options.
Communication:
Touch to view COM Device Settings and
Print Settings.
Factory Reset:
Touch to do a Factory reset.
GLP and GMP Data:
Insert user data for traceability.
Lockout:
Touch to access the Lockout
menu list.
4. APPLICATIONS
The balance can be configured to operate in various Application modes.
Touch the top left button in the Application area to choose the mode:


STX EN-7
4.1.2 Sample Name
Enter a sample name with the alphanumerical keypad and then press Save to store the name
and return to weighing mode main screen. Press to alternate between Lower and Upper
case characters.
Lower Case: Upper Case:
4.1.3 Print / Save to USB
Print the information based on the settings in Print Settings menu.
Note: This button will be disabled if the optional interface kit (buy separately) is not installed.
When the USB Host interface kit
Save to USB
Insert the USB flash drive into the USB slot. Next, press the Save to USB button to save the
data to the USB flash drive. Once saved, the button will momentarily change color to orange.
CAUTION:
Depending on the USB drive used, all data might not be transferred from the
balance or the display might freeze. If this happens, unplug the USB flash drive
and try another USB flash drive.
Ohaus takes no responsibility if data on USB flash drive is erased or if the USB
flash drive breaks while it is connected to the balance.
To minimize the risk of problems arising, Ohaus suggests using a high quality
USB flash drive.
For more information, please refer to USB Host instruction manual.
4.1.4 Menu
To view the Main Menu options.
4.2 Parts Counting
Use this application to count samples of uniform weight.
1. In the upper left portion of the home screen, select Parts Counting.
2. Press Tare or Zero if necessary to begin.
3. Establish an Average Piece Weight (APW), the default (or last) APW is displayed.
4. Place objects on the pan to display the number of pieces on Main Display Line.


STX EN-9
APW:
Set a known Average Piece Weight (APW)
To adjust the APW value directly, touch the APW
button.
A numeric input window appears.
Key in the desired APW Weight, then press
Save.
The display returns to the application home
screen with the new APW value in the reference
field.
Samples:
Set a new Average Piece Weight (APW)
Derived
To establish a new APW, touch the Samples
button.
A numeric input window appears.
Key in the desired Sample Size (1 to 10000
pieces), then press Save.
The display returns to the application home
screen. Follow the screen instructions to
establish a new APW.
Place the reference weight on the pan and
press Accept to continue. The sample size
displayed will be used. The new APW value is
shown in the reference field.
The Main screen returns with the new APW
value calculated.
4.3 Percent Weighing
Use Percent Weighing to measure the weight of a sample displayed as a percentage of a pre-
established Reference Weight.
The default (or last) Reference Weight is displayed.
1. In the upper left portion of the home screen, select Percent Weighing.
2. Place an object on the pan. The difference between the sample and the Reference Weight
is displayed as both a weight and a percentage.


EN-12 STX
4.4.1 Item Settings
To view or adjust the current settings:
Touch the Item Settings button. The Settings
screen appears.
Averaging Time: The Averaging Time can be
set from 1 to 99 seconds.
The default value is 5 seconds.
Automatic Mode:
The cycle begins when an object (animal) is
placed on the pan, and the held value is
automatically reset when the object is removed
from the pan (10-second delay).
Sample Name: Enter a sample name with the
alphanumerical keypad and then press Save to
store the name.
Weighing Units: Select the displayed unit.
Print Settings: To view or adjust the print
settin
g
s.


EN-14 STX
The balance calculates water density based on
the water temperature value entered (internal
lookup table). Measure the actual water
temperature using a precision thermometer.
Press Back to return to the Density
Determination home screen.
To begin the Density Determination process,
press Start.
Step 1 of 2 Weigh the Sample in Air.
Press Start. Follow screen instructions, and then press Accept to store the dry sample weight
Step 2 of 2 Weigh the Sample Submerged in the Liquid.
Follow the screen instructions, then press Accept to store the sample weight (submerged in
liquid).

STX EN-15
Once the necessary weights have been
determined, the density of the sample is
displayed in g/cm3(along with the weight
in air, weight in water) on the Application
screen.
Press Start to reset all the weight values and restart the process.
The balance can also be used to measure the Density of a Buoyant Material Using Water.
Follow the same procedure as Solid Material above, except in Density Determination step 2,
push the sample down (requires special tool, not supplied) into the liquid until it is fully
submerged.
4.5.2 Measuring the Density of a Solid Using an Auxiliary Liquid
To enable this feature, enter the Item Settings screen and select the following:
Density Type: Solid
Auxiliary Liquid: Other
Porous Material: Off
Confirm the default values displayed (Liquid Density, etc) are correct.
Begin the Density determination process by pressing Start and following the screen
instructions.
4.5.3 Measuring the Density of a liquid using a Calibrated Sinker (not
supplied)
Enable this feature, enter the Density Item Settings screen and select the following;
Density Type: Liquid
Note: when the Density Type is set to Liquid, the
Liquid type and Porous material selections are
disabled.

EN-16 STX
Confirm that the default value displayed (sinker
volume) is correct. To edit the default values,
touch Sinker Volume.
A numeric input window is displayed.
Key in the desired value, then press Save.
The display returns to the previous screen.
Edit the Liquid temperature if required.
To return to the Density Determination home
screen, touch Back.
Press Start to start the process.
Step 1 of 2 Weigh the Sinker in Air.
Follow the screen instructions, then press
Accept
Step 2 of 2 Weigh the Sinker Submerged
in the Test Liquid.
Follow the screen instructions, then press
Accept to store the sinker weight (submerged
in liquid).
Once the necessary weights have been
determined, the density of the Liquid sample is
displayed in g/cm3(along with the weight in air,
weight in water) on the Application screen.
Press Start to reset all the weight values and
restart the process.
Other manuals for Scout STX Series
2
This manual suits for next models
6
Table of contents
Other OHAUS Scale manuals

OHAUS
OHAUS VF Series User manual

OHAUS
OHAUS ranger 7000 User manual

OHAUS
OHAUS YA102 Gold User manual

OHAUS
OHAUS YA102 Gold User manual

OHAUS
OHAUS VE1500P User manual

OHAUS
OHAUS EX124 User manual

OHAUS
OHAUS TROOPER SCALE User manual

OHAUS
OHAUS HP-120 User manual

OHAUS
OHAUS 5-0-2 User manual

OHAUS
OHAUS CHAMP II BASE User manual

OHAUS
OHAUS SCOUT User manual

OHAUS
OHAUS Valor 1000 User manual

OHAUS
OHAUS D500M Technical Document

OHAUS
OHAUS Courier 7000 User manual

OHAUS
OHAUS Valor 2000W Series User manual

OHAUS
OHAUS CW-11 User manual

OHAUS
OHAUS AV53 User manual

OHAUS
OHAUS 1610 User manual

OHAUS
OHAUS EB SERIES User manual

OHAUS
OHAUS PR Series User manual