Oki OF5650 User manual

Overview
OKIFAX 5650 MFP Option Kit
Setup Guide

2OKIFAX 5650 MFP Option Kit
|
Every effort has been made to ensure that the information in
this document is complete, accurate, and up-to-date. The
manufacturer assumes no responsibility for the results of
errors beyond its control. The manufacturer also cannot
guarantee that changes in software and equipment made by
other manufacturers and referred to in this guide will not
affect the applicability of the information in it. Mention of
software products manufactured by other companies does not
necessarily constitute endorsement by the manufacturer.
Copyright © 2001. Oki Data Americas, Inc. All rights
reserved.
Microsoft, MS-DOS and Windows are registered trademarks
of Microsoft Corporation. Energy Star is a trademark of the
United States Environmental Protection Agency
Other product names and brand names are registered
trademarks or trademarks of their proprietors.

Overview
|
Setup Guide: English 3
Hardware
Installation
!Warning: The fax machine must be switched off and
disconnected from the power supply before
performing this procedure.
1. Switch off the fax machine and disconnect the power cable.
2. Remove the document stacker.
3. Position the fax machine so that the rear is facing you and
the fax machine extends slightly over the edge of your
work surface.
4. Remove the two screws (1) securing the rear panel and lift
off the panel.
4OKIFAX 5650 MFP Option Kit
|
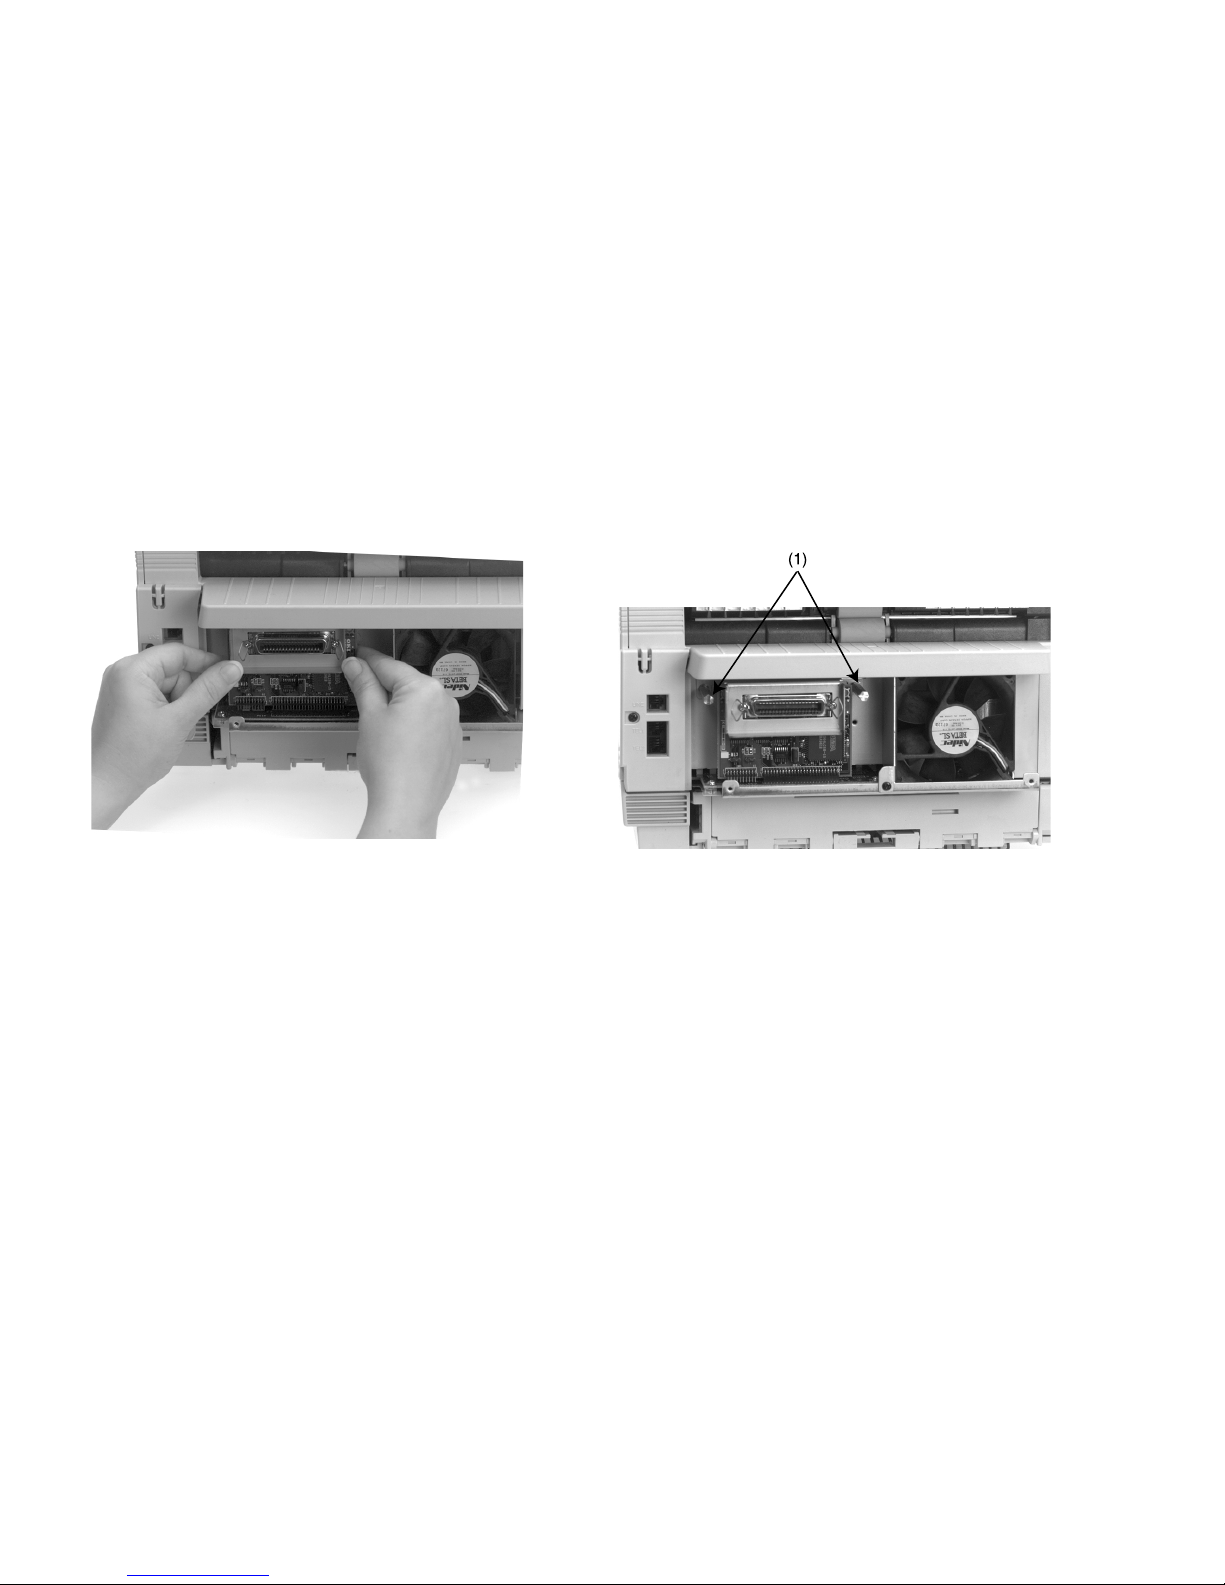
5. Plug the PC interface board into the socket nearest the rear
of the fax machine.
6. Make sure that the plug pins are correctly aligned with the
socket and that the holes on the mounting plate at the top
of the board align with two holes in the machine.
7. Secure the board in position with the two post screws (1)
provided.

|
Setup Guide: English 5
8. Fit the metal plate over the lower lip of the interface socket
mounting plate and under the rear of the machine. Be sure
to align the openings for the rear cover screw.
9. Using a sharp knife, remove the cut-out in the quarter
panel.
10. Replace the rear panel, using the screws removed in Step
4 to secure it.

Overview
6Unimessage Pro
|
Software Installation
Introduction
On the CD supplied with your OKIFAX 5650 MFP Kit you
will find the software that enables you to print, scan, copy
and send fax messages from your desktop using your fax
machine.
!Note: These installation instructions apply to all three
versions of Unimessage Pro: Unimessage Pro Xlite,
Unimessage Pro, and Unimessage Pro LAN.
Before starting software installation, ensure that your fax
machine is connected to the parallel printer port on your
computer and the fax machine is turned on
Save all open documents and close all other applications
before proceeding with driver installation.
!Note: Complete your installation of the driver
software before installing the PC fax application
software.
Minimum System Requirements
Before you install Unimessage Pro you should make sure that
you have an IBM-compatible PC running Windows 95, 98,
NT4 or above. The following minimum specification is
recommended:
• Pentium 120MHz, 16 MB Ram when running Windows 95
or 98 First Edition.
Microsoft Windows 95 OSR1 Service Pack 1 is
recommended.
• Pentium 120MHz, 32 MB Ram when running Windows
NT4 or 98 Second Edition.
When using Windows NT4 please ensure that Microsoft
NT4 Service Pack 4 or later is installed.
• Pentium 133MHz, 64 MB Ram when running Windows
2000 - 128 MB Ram recommended.
A 24-Bit color video card and driver is recommended.

|
Setup Guide: English 7
Please note that Unimessage Pro will operate on the above PC
configuration however, this is a minimum.
For each of the above systems requirements, the following
configuration is also required:
• Bi-directional parallel printer port
• IEEE1284-1994 standard parallel interface cable
• Internet Explorer 4.0 or above, to view the on-line User’s
Guide.
Driver Setup
Windows 2000
Note: Administrator’s authority is required for
installation with Windows 2000.
1. Make sure that both the printer and the computer are
turned OFF.
2. Connect the fax machine and computer with a parallel
interface cable.
3. Turn the computer ON and allow Windows to start.
4. Turn the fax machine ON. At the prompt telling that a new
device has been detected, select Cancel.
5. Insert the OKIFAX 5650 MFP Option Kit CD-ROM into
your CD-ROM drive.
6. After the setup program has automatically started, click
Setup device driver and Unimessage Pro and follow the
on-screen instructions as appropriate This installs both the
printer driver and the Unimessage Pro software.
Note: If you want to install only the driver, click Setup
device driver.
Note: If the setup program does not automatically start
or Auto insert notification is turned off, click
Start→→
→→
→Run.... Type in D:\SETUP.EXE (where D is
the drive letter of your CD-ROM drive) and click OK.
7. When the Fax Port Installation dialog appears, click OK.
8. When the Add/Remove Hardware Wizard dialog
appears, do the following:
(a) When the Welcome to the Add/Remove Hardware
Wizard dialog appears, click Next.
(b) When the Choose a Hardware Task dialog appears,
select Add/Troubleshoot a device and click Next.

8OKIFAX 5650 MFP Option Kit
|
(c) When the New Hardware Detection dialog appears,
select Add a new device from the device list and click
Next.
(d) When the Find New Hardware dialog appears, select
No, I want to select the hardware from a list and click
Next.
(e) When the Hardware Type dialog appears, select Ports
(COM&LPT) from the list and click Next.
(f) When the Select a Device Driver dialog appears, click
Have Disk.
(g) When the Install From Disk dialog appears, type
D:\DRIVER\SETUP\DISK1\WIN2K (where D is the drive
letter of your CD-ROM drive) in Copy manufacturer’s
files from and click OK.
(h) Select Okidata Fax Port from the list and click Next.
(i) When the Start Hardware Installation dialog appears,
click Next.
(j) When the Completing the Add/Remove Hardware
Wizard dialog appears, click Finish.
9. During copying, the Find Fax Port dialog appears and the
fax port is found; then click OK.
10.When the Modem Installation dialog appears, click OK.
11.If the Location Information dialog appears, enter
information about your current location and click OK.
12.When the Phone and Modem Options dialog appears, do
the following:
(a) Open the Modems tab and click Add.
(b) Check Don’t detect my modem; I will select it from
a list. and click Next.
(c) Click Have Disk and when Install From Disk dialog
appears, type D:\DRIVER\SETUP\DISK1\WIN2K (where
D: is the drive letter of your CD-ROM drive) in Copy
manufacturer’s files from and click OK.
(d) When the Install New Modem screen appears, select
the appropriate device and click Next.
(e) Check Selected ports, select the port displayed in Step
8, and click Next.
(f) When Digital Signature Not Found appears, click Yes.
(g) Click Finish and when the Modems Properties dialog
appears, click OK.
13. When Install Complete screen appears, click OK and the
setup of the driver is now complete.

|
Setup Guide: English 9
Windows Me/98/95
1. Make sure that both the printer and the computer are
turned OFF.
2. Connect the fax machine and computer with a parallel
interface cable.
3. Turn the fax machine and computer ON and allow
Windows to start. If you see a prompt telling you that a
new device has been detected, press Cancel.
4. Insert the OKIFAX 5650 MFP Option Kit CD-ROM into
your CD-ROM drive.
5. After the setup program has automatically started, click
Setup device driver and Unimessage Pro and follow the
on-screen instructions as appropriate.
Note: If you want to install only the driver, click Setup
device driver.
Note: If the setup program does not automatically start
or Auto insert notification is turned off, click on
Start→→
→→
→Run.... Type in D:\SETUP.EXE (where D is
the drive letter of your CD-ROM drive) and click OK.
6. When the Install Complete screen appears, click Finish.
After the computer restarts, setup of the driver is complete.
Windows NT 4.0
Note: Administrator’s authority is required for
installation with Windows NT 4.0.
1. Make sure that both the printer and the computer are
turned OFF.
2. Connect the fax machine and computer with a parallel
interface cable.
3. Turn the fax machine and computer ON and allow
Windows to start. If you see a prompt telling you that a
new device has been detected, press Cancel.
4. Insert the OKIFAX 5650 MFP Option Kit CD-ROM into
your CD-ROM drive.
5. After the setup program has automatically started, click
Setup device driver and Unimessage Pro and follow the
on-screen instructions as appropriate This installs both the
printer driver and the Unimessage Pro software.
Note: If you want to install only the driver, click Setup
device driver.
Note: If the setup program does not automatically start
or Auto insert notification is turned off, click
Start→→
→→
→Run... Type in D:\SETUP.EXE (where D is
the drive letter of your CD-ROM drive) and click OK.

10 OKIFAX 5650 MFP Option Kit
|
6. During copying, the Find Fax Port dialog appears and the
fax port is found.
7. When the Modem Installation dialog appears, click OK.
8. When the Install New Modem dialog appears, do the
following:
Note: If the Modems Properties dialog appears, click
Add and the Install New Modem dialog pops up.
(a) Check Don’t detect my modem; I will Select it from
a list., and click Next.
(b) Click Have Disk, and when Install From Disk dialog
appears, type D:\DRIVER\SETUP\DISK1\WINNT40
(where D is the drive letter of your CD-ROM drive) in
Copy manufacturer’s files from and click OK.
(c) When the Install New Modem screen appears, select
the appropriate device and click Next.
(d) Check Selected ports, then select the port displayed in
Step 6 and click Next.
(e) Click Finish, and when Modems Properties dialog
appears, click Close.
9. When the Install Complete screen appears, click OK.
10. The setup of the driver is complete.
Unimessage Setup
After the installation of the OKIFAX driver is complete, the
installation of the Unimessage Pro software should begin. If
this does not happen or you are re-installing the Unimessage
software:
a) Insert the OKIFAX 5650 MFP Option Kit CD-ROM
into your CD-ROM drive.
b) After the setup program has automatically started,
click Setup Unimessage Pro and follow the on-screen
instructions.
Note: If the setup program does not automatically start
or Auto insert notification is turned off, click
Start→→
→→
→Run.... Type in D:\SETUP.EXE (where D is
the drive letter of your CD-ROM drive) and click OK.
1. The first screen asks you to select a language. If the
highlighted language is appropriate, click OK. Otherwise,
select a language and click OK.
2. When following the on-screen instructions, make sure you
select the following when prompted: Yes, look for devices
connected to this computer and install the appropriate
drivers and CLASS 1 device
Other manuals for OF5650
3
This manual suits for next models
1
Table of contents
Other Oki All In One Printer manuals

Oki
Oki MB441MFP User manual

Oki
Oki C5510n MFP Service manual

Oki
Oki MC770 series User manual

Oki
Oki OKIPAGE 24DX User manual

Oki
Oki CX3641 MFP User manual

Oki
Oki CX3641 MFP Use and care manual

Oki
Oki C9650n Service manual

Oki
Oki OKIOFFICE 84 Instruction Manual

Oki
Oki C9600 Series Configuration guide

Oki
Oki MC360 How to use


