Oki OKIFAX 4510 User manual


2
Please read and follow all warnings and instructions.
The fax machine should be installed on a level and stable sur-
face. The surface should be smooth and horizontal. Do not
place the machine on carpet. The fax machine may be dam-
aged if it falls and may cause serious injury, especially to small
children.
Do not place anything in front of the fax machine, as this will
obstruct the document feeder.
Place the fax machine on a flat surface and at least 35 cm away
from other electrical devices and objects.
Do not place the fax machine in direct sunlight. Do not place
it near to a radiator, heater, radio, television or air condition-
ing unit. Do not allow it to come into contact with dust, water
or chemicals.
To avoid risk of overheating do not cover your fax machine.
Place the fax machine so that air can circulate freely. Do not
operate it in enclosed spaces such as cabinets, cupboards or
drawers. Do not cover the fax machine with tablecloths, paper
or folders. Do not place the fax machine on soft surfaces such
as beds, duvets, cushions, sofas or carpets as there is a risk of
overheating and fire.
Do not connect the mains or telephone line in a damp atmos-
phere, unless the connectors are especially adapted. Do not
touch sockets or telephone connectors with wet hands.
Do not touch telephone wires or mains cables where the insu-
lation is missing or damaged unless they are already discon-
nected.
Ensure the cabling is safe and does not present a trip hazard as
this may damage both the cable and the fax machine.
Unplug the fax machine from the mains and the telephone line
before cleaning.
Do not use liquid or aerosol cleaners such as sprays or polishes.
Never spill liquid of any kind into the machine. There is a risk
of electric shock or other injury. The machine may be dam-
aged. If liquid is accidentally spilled into the machine, unplug
the machine immediately and have it inspected.
If the display is broken, a weak acid may leak out. Avoid con-
tact with skin and eyes.
If the casing or the mains cable is damaged, unplug the fax
machine. The cover of the fax machine may only be opened
by authorized service personnel.
Safety instructions
Your machine has been tested to EN 60950 or IEC 60825-1
and may only be operated on telephone networks and power
supplies that conform to these standards.
Do not expose your fax machine to rain or other liquids, as
there is a risk of electric shock or fire.
Disconnect the fax machine from the mains and the telephone
line during thunderstorms. If this is not possible, avoid using
the fax machine during the storm. There is a risk of electric
shock from lightning and risk of damage to the machine.
If there is a power failure the fax machine will not work.
During a power failure the numbers and names stored in the
telephone book and the speed dial keys and other data will be
saved with the aid of a backup battery. If the battery is dead,
the information will be lost.
If there is a power failure any faxes stored in the memory will
be lost.
This fax machine is only intended for use in the country in
which it was purchased. It meets the requirements of the tel-
ephone companies.

3
Contents
Installation..........................4
Packaging ..................................................................................... 4
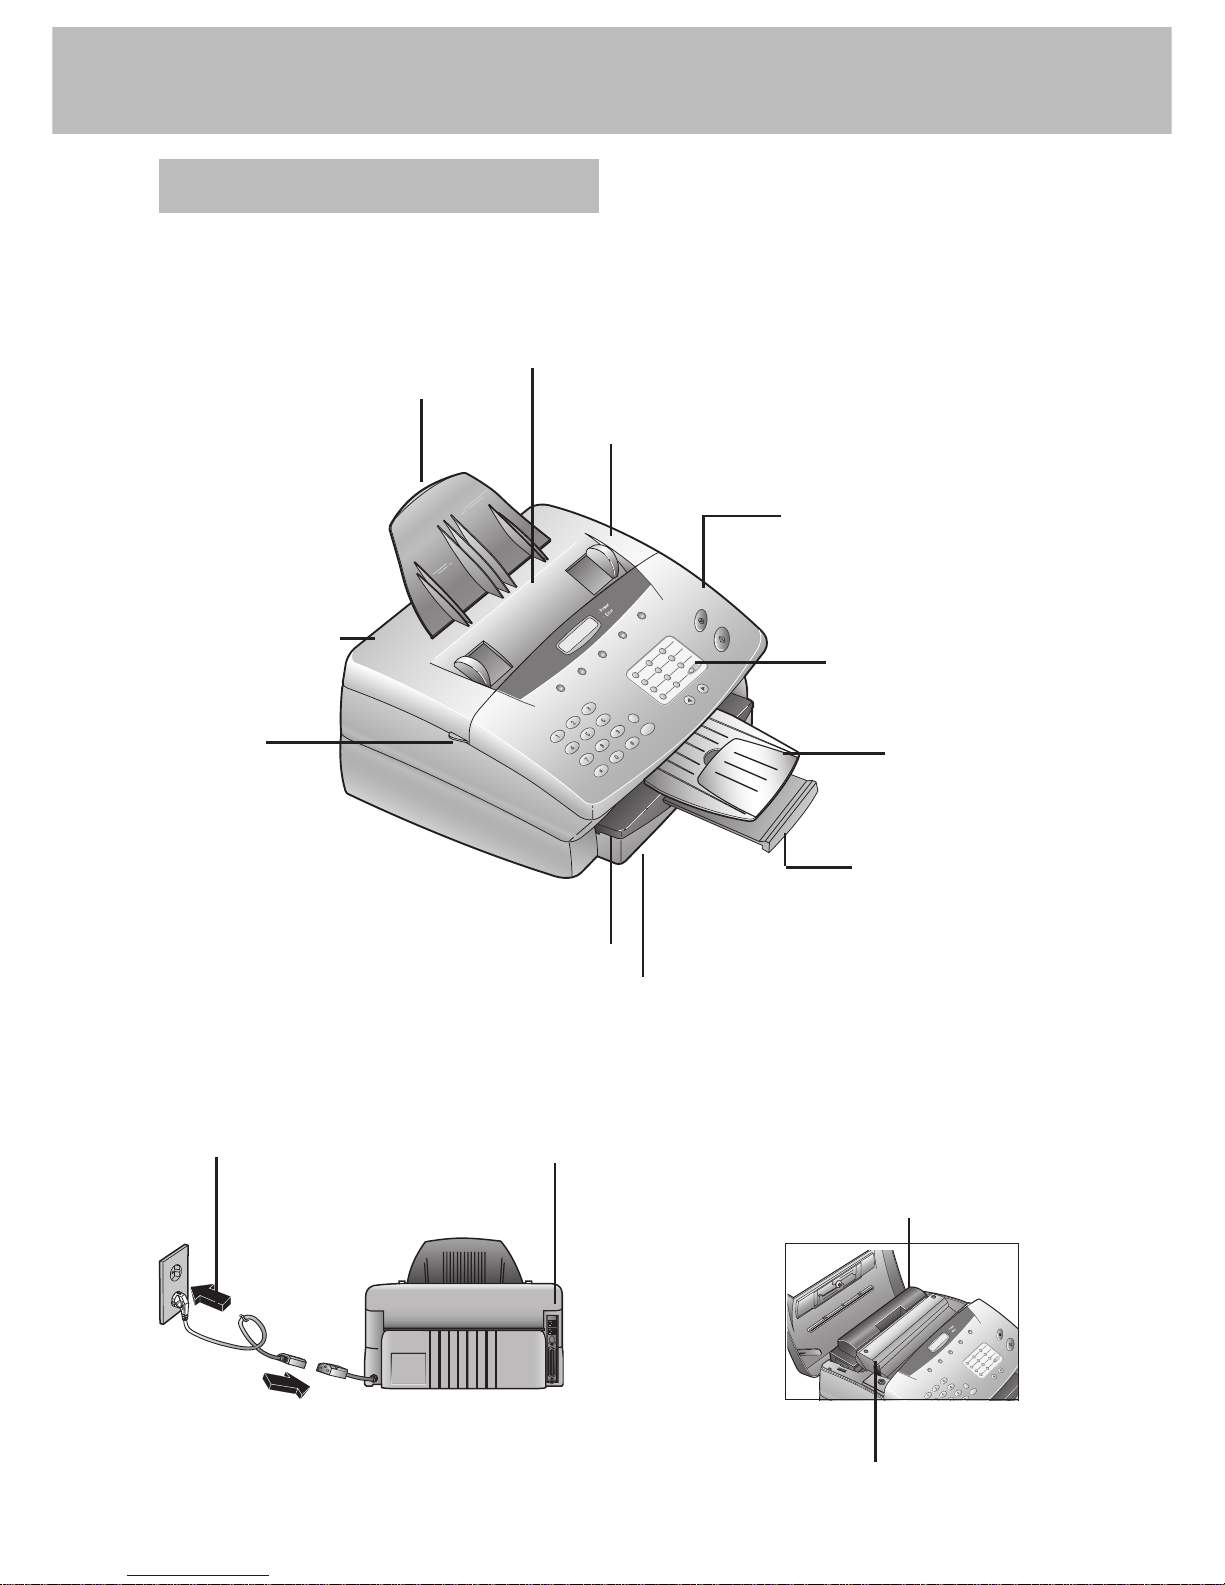
Description .................................................................................. 5
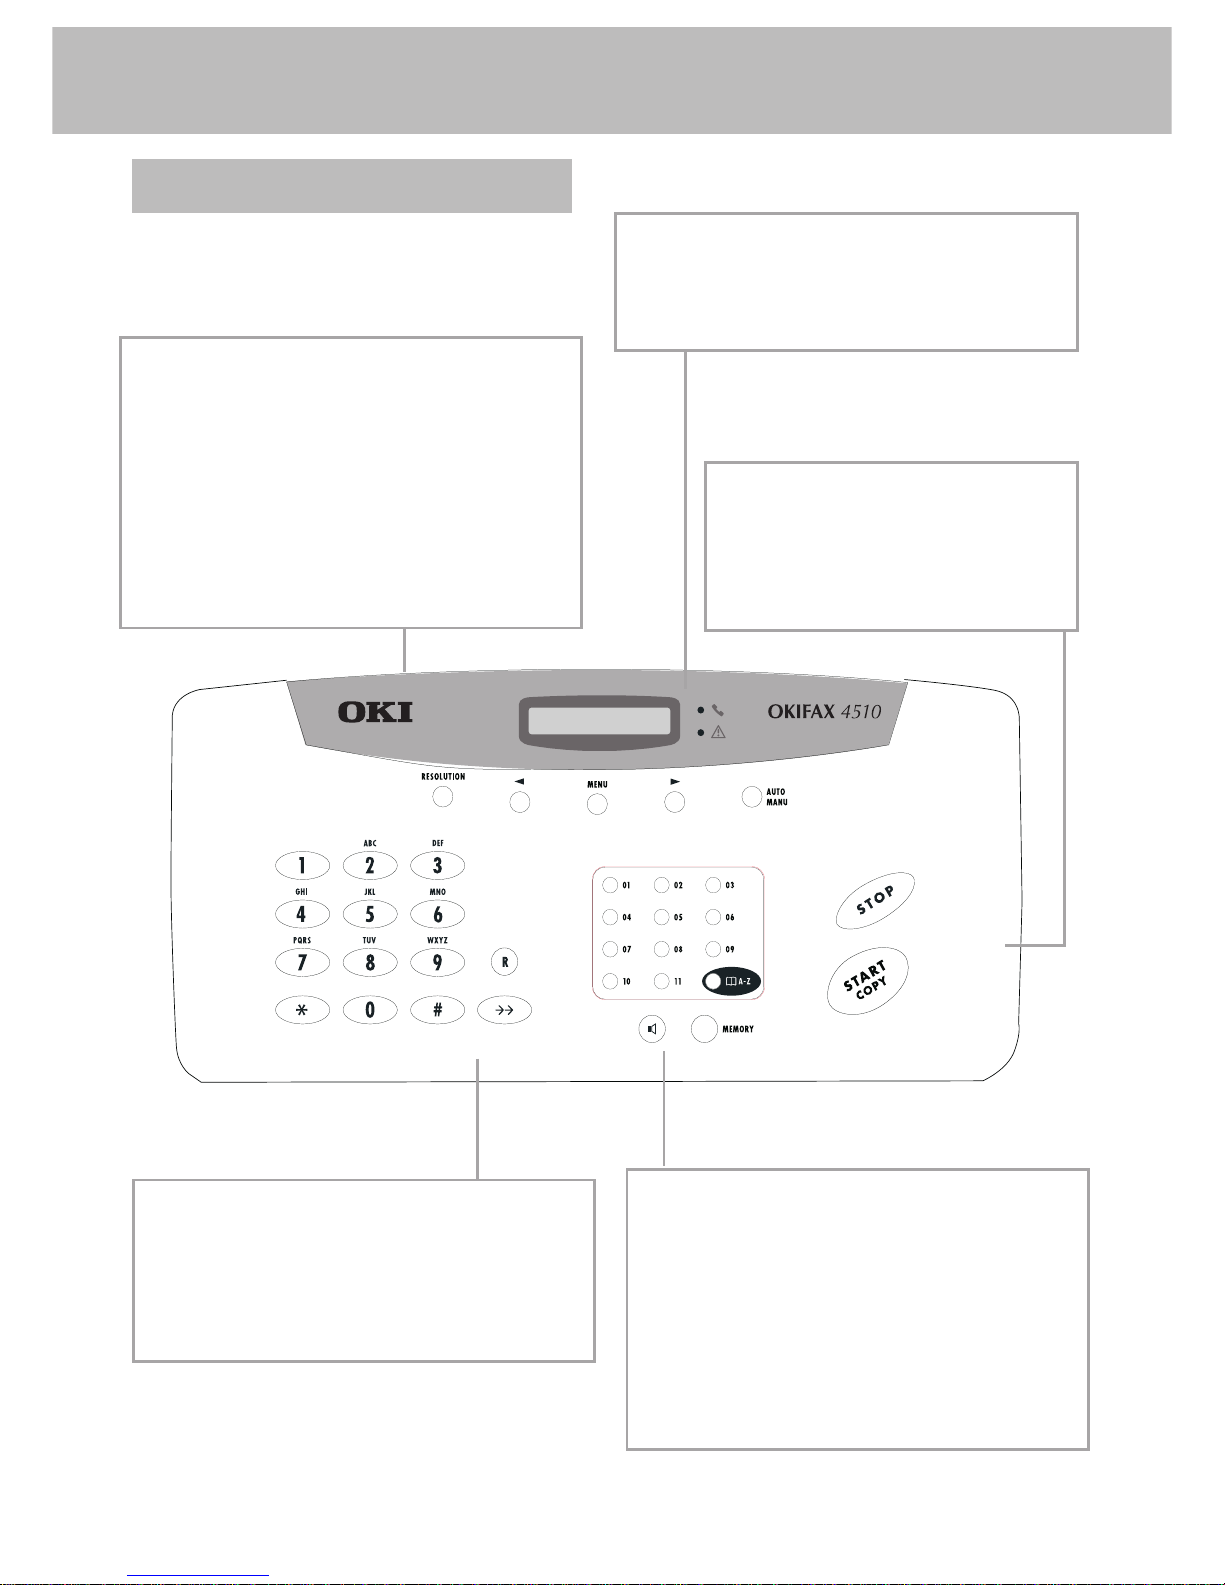
Controls ....................................................................................... 6
Accessories ................................................................................... 7
Inserting paper ............................................................................ 8
Inserting toner ............................................................................ 8
Changing toner ........................................................................... 9
Connecting the fax machine ...................................................... 9
Additional telephones.............................................................. 10
ISDN connection ...................................................................... 10
Private branch exchange (PABX) ............................................. 10
Basic settings................... 11
Country selection ...................................................................... 11
Display language ....................................................................... 11
Help............................................................................................ 11
Your number ............................................................................ 11
Your name ................................................................................. 11
Time and date ........................................................................... 11
Volume ...................................................................................... 12
Energy save mode .................................................................... 12
Toner save mode ...................................................................... 12
List of settings .......................................................................... 12
Fax switch ........................ 13
MANU mode ........................................................................... 13
AUTO mode ............................................................................. 13
Fax reception from a different phone ..................................... 13
Dial options ..................... 14
Re-dialling .................................................................................. 14
Speed dialling ............................................................................ 14
Phonebook................................................................................ 14
Groups ...................................................................................... 15
Calling line identification ......................................................... 15
Printing a journal ...................................................................... 16
Fax .................................... 17
Inserting a document ............................................................... 17
Sending a fax ............................................................................. 17
Resolution ................................................................................. 17
Reducing .................................................................................... 17
Memory ..................................................................................... 18
Broadcast ................................................................................... 18
Sending later .............................................................................. 19
Sending with code .................................................................... 19
Receive polling .......................................................................... 19
Transmit polling ....................................................................... 20
Transmission speed .................................................................. 20
Reception speed ........................................................................ 20
Transmission report ................................................................. 20
Reception report ....................................................................... 20
Copy ........................................................................................... 21
Troubleshooting .............. 22
Error codes ...................... 24
Annex ............................... 26
Technical data............................................................................. 26
Glossary ..................................................................................... 26
Guarantee .................................................................................. 27
Declaration of conformity ....................................................... 28
Index................................. 29

4
Packaging
The shipment includes the following parts:
Installation
Telephone cable with connector
User Manual
Toner cartridge
Document holder
Document exit tray
Installation Guide
Fax machine with paper tray

5
Document holder
Document feeder
(Maximum 20 pages)
Document guide
Cover
Cover grip
Paper tray
(Maximum 125 pages)
Cover for paper tray
Document exit tray
Paper exit tray
pull out of paper tray
to the power supply to the telephone socket
Toner cartridge
Paper eject lever
Description
Control panel
Space for entering names

6
Controls
g
indicates that your fax machine is transmitting
v
If this symbol flashes please read the display
STOP
Interrupts the process / ejects the document /
cancels the input
START/COPY
Starts fax transfer or copies document
RESOLUTION
Improves the clarity of text and drawings when sending and
copying
u
Select options / set volume / move display cursor
MENU
Use to select functions
AUTO/MANU
Set receive mode (AUTO/MANU)
R
For special functions e.g. when using a PABX or accessing
functions provided by your telephone provider
PP
Redial the last five numbers dialed / insert a pause between
two digits
Speed dial keys
Dial stored numbers
mA-Z
Look up names and numbers
l
Dialing
MEMORY
Memory functions

7
A
Accessories
Document holder
Insert the paper holder firmly into the opening behind the
document feeder until it blocks.
Document exit tray
Insert the document exit tray gently into the opening under
the control panel. For non-standard documents (e.g. larger
than A4) just extend the tray.
Paper exit tray
The paper exit tray is permanently attached to the paper tray.
When pulling out the paper exit tray keep one hand on the
paper tray.

8
Inserting paper
1Pull out the paper tray.
2Fan the paper to prevent more than one sheet being drawn
through at a time.
3Open the cover of the paper tray and insert paper up to the
mark (Standard A4 210 x 297 mm, 80 g/m2). The tray holds
up to 125 sheets.
4Insert documents that need to be printed or copied (such as
templates or headed paper) with the printed side (face)
down.
5Push the paper down until the small lever (A) locks into
place. Replace the cover.
6Carefully push in the paper tray.
vv
vv
vDo not fill the paper tray above the mark. Do
not insert paper when the machine is printing.
Do not use paper that has already been printed
by a laser printer as this can lead to paper jams.
Inserting toner
Before you can send, receive or copy documents, there must
be a toner cartridge in the fax machine. A free toner cartridge
is included with your fax machine.
1Take the cartridge out of the packaging and remove the
extra paper.
2Shake the toner several times to improve the print quality.
vv
vv
vDo not touch the underside of the toner cartridge
as this can affect the print quality.
3Carefully pull out the tab on the left-hand side of the car-
tridge.

9
4Grip the cover at the sides and fold it backwards. Insert the
toner cartridge into the holder until it locks and then close
the cover.
DOnly use original toner from OKI.
Changing toner
1Follow points 1-3 under Inserting a toner cartridge.
2Grip the cover at the sides and fold it backwards.
3Remove the toner cartridge by grasping it firmly in the mid-
dle and pulling upwards.
4Insert the new toner in the holder until it locks and then
close the cover.
DKeep the open/used toner in its original packaging or wrap
it in a cloth and return it to your local retailer.
Connecting the fax
machine
To the mains
1Plug the fax machine into the wall socket.
2The display shows SELECT COUNTRY.
3Press START/COPY and choose the country where the
fax machine will be used with u.
4Confirm with START/COPY. After warming up the ma-
chine passes into the energy save mode.
To the telephone line
Connect the telephone cable to the fax machine by inserting it
into the socket labeled LINE on the rear of the machine.

10
Additional
telephones
In addition to your fax machine you can connect other devices
to your telephone line such as phones, answering machines,
charge counters or modems to a single telephone line.
If you want to use other equipment with your fax machine
please contact your dealer.
Separate sockets
(not in all countries)
You can connect additional devices to separate sockets on the
same line even if they are in different rooms.
Please note: If you connect additional devices to separate sock-
ets (e.g. in separate rooms) your fax switch cannot control them
(which means that your fax machine behaves like any ordinary
fax machine). Therefore we recommend you to connect your
additional devices to the same socket.
ISDN connection
Your fax machine does not support ISDN fax (Group 4). It is
an analog (Group 3) fax machine. It cannot be directly con-
nected to an ISDN connection but requires an (analog) adapter
or an ISDN system with connections for analog terminals.
For further information please see the user guide for your
ISDN system.
Private branch
exchange (PABX)
PABXs are common in large companies. ISDN systems that are
now often used in homes are also PABXs. To obtain a connec-
tion from an extension on such a system to the public network
a digit must be dialed before each call to get an outside line.
1To connect your fax machine to a PABX press MENU and
336. Then press START/COPY. The display shows
LINE TYPE: PSTN.
2Use uto select the PABX mode: LINE TYPE: PABX.
3Press START/COPY and then STOP twice.
vv
vv
vThe exchange code is provided by the manufac-
turer. It may be 0, R (known as FLASH on some
systems) or any other digit.
DIn case your PABX requires Rto obtain an outside line
but it is still not possible to get through to the line, your
system might not be according to the most recent regula-
tions. Therefore some technical settings have to be changed
on your fax machine.

11
Basic settings
2Press START/COPY. The display shows ENTeR NaME.
3Enter your name using the keypad. Use >to move the
cursor one position to the right. Use <to delete the last
digit. To delete the whole entry press STOP.
Key character
0 space . - 0 + ?/ : * % ! ( ) [ “
11
2 A B C 2 a b c Ä Å Æ Ç ä å æ ç
3 D E F 3 d e f
4 G H I 4 g h i
5 J K L 5 j k l
6 M N O 6 m n o Ñ Ö ñ ö
7 P Q R S 7 p q r s
8 T U V 8 t u v Ü ü
9 W X Y Z 9 w x y z
4Confirm the entry by pressing START/COPY and then
STOP twice.
D“Your name” and “your telephone number” are transmit-
ted at the top of each page (the first 4 mm) together with
the date, time and page number.
Time and date
1Press MENU then 16. The display shows DATE/TIME.
2Press START/COPY: YEAR: 2003.
3Enter the year using the keypad.
4Press START/COPY. The display shows MONTH: 05.
5Enter the month (e.g. 05 for May).
6Press START/COPY and enter the day (e.g. 07 for 7
May 2002).
7Finalise the entry by pressing START/COPY. The display
shows TIME 00:00.
8Enter the exact time (e.g. 2330 for 2330). The display
shows TIME 23:30.
9To confirm the entry press START/COPY and then STOP
twice.
Country selection
1To select the country press MENU and 18. The display
shows 18 COUNTRY.
2Press START/COPY and use uto select the country,
where the fax machine will be used.
3Confirm with START/COPY and press STOP twice.
Display language
1To set the display language press MENU then 17. The
display shows 17 LANGUAGE.
1Press START/COPY. Use uto select the display lan-
guage.
1To confirm the entry press START/COPY and then STOP
twice.
Help
1Press MENU, 667 and START/COPY.
2A list of functions (including a brief description of the
main functions) is printed.
Your number
When you enter your number, it will appear on the recipient's
fax printout. You can enter up to 20 digits for your number.
1Press MENU and 14. The display shows 14 Your
NUMBER.
2Then press START/COPY. The display shows Enter
NUM.
3Enter your telephone or fax number using the digit keys.
Use >to move the cursor one position to the right. Use
<to delete the last digit. To delete the whole entry press
STOP.
4Confirm the entry by pressing START/COPY and then
STOP twice.
Your name
You can use the digit keys to write up to 32 letters to enter your
name. Each key is assigned several letters (see table). By pressing
a digit key several times you can reach the next character in the
table. After the fifth character the row starts again.
1Press MENU and 15. The display shows 15 Your
NaME.

12
Volume
Ringing tone
You can set the volume of the ringing tone when the machine
is in standby mode or is actually ringing.
1Press u. You will see the current setting displayed for
approximately 3 seconds and hear the volume.
2To change the value, press uuntil the desired volume is
reached.
vv
vv
vIf the volume level is set to zero, no ringing tone
will be heard but faxes will still be automati-
cally received.
Loudspeaker
1Press lto set the loudspeaker volume.
2Set the volume using u.
3Exit using lor STOP.
Key tones
1Press MENU and 22. The display shows BEEPER
VOL.
2Press START/COPY. Use uto select the volume of
the key tones.
3To confirm the entry press START/COPY and then STOP
twice.
Energy save mode
Energy save mode reduces the energy consumption in standby
mode. You can select how many minutes after the last entry
before energy save mode is activated.
1Press MENU and 335. The display shows SAVE
MODE.
2Press START/COPY. Use uto select POWER SAVE.
3Press START/COPY. Use uto select 5, 15, 30,
60 minutes or OFF.
4To confirm the entry press START/COPY and then STOP
three times.
Toner save mode
The toner save mode decreases the consumption of the toner.
Printing quality may fall off.
1Press MENU and 335. The display shows SAVE
MODE.
2Press START/COPY. Use uto select TONER SAVE.
3Press START/COPY. Use uto select ON or OFF.
4To confirm the entry press START/COPY and then STOP
three times.
List of settings
You can print out a list of all functions and settings currently
available.
1Press MENU, 666 and START/COPY.
2A list of all settings is printed.

13
Fax switch
The built-in fax switch enables a single telephone connection to
be used to send and receive faxes and use extra devices. There
are two operating modes. Your machine is preset to AUTO
mode.
1The desired operating mode can be selected using AUTO/
MANU. Press the button until the desired mode appears.
MANU mode
If you receive a fax call you have to press START/COPY to
start fax reception. Automatic fax reception is turned off.
AUTO mode
In AUTO mode your machine will ring up to nine times de-
pending on the setting. Faxes are received automatically.
1To set the number of rings press MENU and 222.
The display shows AUTO RING COUNT.
2Press START/COPY and enter the desired number of
rings.
3Press START/COPY and then STOP twice.
vv
vv
vIf the volume level is set to zero,no ringing tone
will be heard but faxes will still be automatically
received.
Fax reception from
a different phone
If you pick up another phone and hear a fax call (you will hear
a high-pitched tone or nothing at all) you can start the fax
machine using a code. If this does not work, press START/
COPY on the fax machine.
1To define the code press MENU and 224. The dis-
play shows REMOTE FAX START.
2Press START/COPY. Use uto select ON or OFF.
3Press START/COPY and enter the last digit of the code.
This always starts with *5.
4Press START/COPY and then STOP twice.

14
Re-dialling
By means of PP you can redial the last five numbers:
1Press PP for the last five numbers dialed.
2Press uuntil the number you want appears.
3The machine will dial the number automatically.
Speed dialling
There are eleven speed dial keys for numbers you use regularly.
Storing numbers
1Press MENU and 1. The display shows 11 SPEED
DIAL.
2Press START/COPY.
3Press the speed dial key where you want to store the entry
and confirm by pressing START/COPY.
4Enter a name using the digit keys (up to 32 characters) and
press START/COPY.
5Enter the fax number. Press START/COPY to confirm.
6Press STOP three times to end the function.
Using speed dial
1Press the relevant speed dial key.
2Press START/COPY.
DIf you want to hear the dialtone, press l.
Changing speed dial entries
1Press MENU and 1.
2Press START/COPY.
3Press the relevant speed dial key and press START/COPY
to confirm.
4Enter a name using the digit keys (up to 32 characters) and
press START/COPY.
5Enter the new number. Press START/COPY to con-
firm.
6Press STOP three times to end the function.
Speed dial list
1Press MENU, 662 and START/COPY.
2The speed dial list will be printed out.
Phonebook
Your fax machine has space to store around 99 names and
numbers. The precise number will depend on the length of
the entries.
Storing numbers
1Press MENU and 12.
2Press START/COPY.
3Use uto select ENTRY: NEW and press START/
COPY to confirm.
4Enter a name using the digit keys (up to 32 characters) and
press START/COPY.
5Enter the fax number. Press START/COPY to confirm.
6Press STOP three times to end the function.
Using the phonebook
1Press aand START/COPY. The first name in the
alphabet will appear on the display. Use uto select the
desired entry.
2Press START/COPY.
Correcting entries
1Press MENU and 12‚ and then START/COPY.
2Use uto select ENTRY: OLD and press START/
COPY to confirm.
3Press START/COPY again and use uto find the
entry you want to correct.
4Press START/COPY and make the changes.
5Press START/COPY again and then STOP twice to
end the function.
Deleting entries
1Press MENU and 12‚ and then START/COPY.
2Use uto select ENTRY: OLD and press START/
COPY to confirm.
3Press START/COPY again and use uto find the
entry you want to delete.
4Press STOP.
5Use uto select DELETE? Y and press START/
COPY to confirm. If you don't want to delete the entry,
press STOP.
6Press STOP twice to end the function.
Dial options

15
Printing out the phonebook
1Press MENU, 663 and then START/COPY.
2The numbers stored are printed out.
Groups
You can combine entries in your phonebook into groups so
you can send a fax to several people at the same time, for
example.
Setting up a group
1Press MENU, 13 and then START/COPY. The dis-
play shows 13 GROUPS.
2Use uto select the digit under which you want to
store the group (max of five groups), e.g. GROUP NO.:
01.
3Press START/COPY.
4Enter a name for the group using the digit keys (up to 32
characters) and press START/COPY.
5Enter the first fax number. Press START/COPY to con-
firm. The display shows NUMBER: 01.
6The machine will automatically ask you for the next number
(maximum of ten). Press START/COPY to confirm each
time.
7Press STOP four times to end the function.
Sending to a group
1Place the document to be faxed (maximum of 20 sheets)
loosely in the document feeder.
2Press MEMORY‚ 2and START/COPY. The display
shows 2 BROADCAST.
aIf you want to sent the fax immediately, select 1NOW
and press START/COPY.
bIf you want to send the fax later select 2LATER, enter
the time you want to send it (within 24 hours, e.g. 18
30 for 6.30 pm) and press START/COPY.
3Use uto select the group and press START/COPY.
4
aIf you want to enter further numbers, use uto select
ANOTHER? Y and enter the numbers you want.
bWhen you have finished entering numbers, use uto
select ANOTHER? N. Then press START/COPY.
5The document is scanned and automatically sent.
Canceling
To cancel automatic redial, press MENU, 776 and START/
COPY. Press START/COPY again to confirm.
DIf you want to clear the fax from the memory, press STOP.
DIf the line is busy, automatic redial is activated.
Correcting groups
1Press MENU, 13 and then START/COPY.
2Use uto select the group you want to change and press
START/COPY to confirm.
3Use uto select ENTRY: OLD and press START/
COPY.
4You can now change the name of the group. When you
have done this, press START/COPY.
5Change the entry and press START/COPY.
6Press STOP four times to end the function.
Deleting a group
1Press MENU, 13 and then START/COPY.
2Use uto select the group you want to delete and
press START/COPY to confirm.
3Use uto select DELETE? Y and press START/COPY.
Group overview
1Press MENU and 664 and START/COPY.
2The group overview is printed out.
Calling line
identification
(not available in all countries)
Your fax machine can display the number of the sender. Check
with your telephone company whether you can activate this
function on your telephone line.
The numbers of the last twenty senders are stored.
Printing a caller list
The caller list contains the numbers of the last twenty fax calls
received, provided the senders have activated calling line identi-
fication.
1Press MENU, 665 and then START/COPY.
2The caller list is printed out.
The caller list can be printed out automatically as soon as it
reaches twenty entries.

16
1Press MENU and 227. The display shows 27 AUTO
PRINT.
2Press START/COPY and use uto select 2 CALLER
ID LIST.
3Press START/COPY and use uto select ON or OFF.
4Press START/COPY and then STOP three times to end
the function.
Printing a journal
The journal contains the numbers of the last forty faxes sent or
received.
1Press MENU, 66 and then START/COPY.
2The journal is printed out.
The journal can be printed out automatically.
1Press MENU and 227. The display shows 27 AUTO
PRINT.
2Press START/COPY and use uto select 1 CALL
LOG LIST.
3Press START/COPY and use uto select ON or OFF.
4Press START/COPY and then STOP three times to end
the function.

17
vv
vv
vIt is best only to use A4 documents (80 g/m2).
Documents smaller than A5 may jam in the ma-
chine.
vv
vv
vDo not try to send documents that are
... damp, coated with correction fluid, dirty or have
coated surfaces,
... written on in soft pencil, ink, crayon or charcoal,
... taken from newspaper (printer’s ink!),
... held by paper clips or staples; always remove
these before faxing,
... wrinkled or torn,
... glued together, too thick or too thin or covered
with any adhesive notes ("Post-It®" notes),
... made of foil or continuous paper.
Inserting a
document
1Place the document face down in the document feeder
(maximum of 20 sheets).
2Adjust the guides to match the width of the document.
Sending a fax
1Dial the number.
2To improve the image quality press RESOLUTION.
3Press START/COPY.
Transmission starts. If the fax machine is unable to establish a
connection, it will redial automatically after a certain time.
DIf you wish to cancel automatic redial with the document
still in the machine, press STOP. The document will be
ejected.
DIf you wish to cancel automatic redial without ejecting the
document, press MENU, 773 and then START/
COPY. Press START/COPY to confirm.
Resolution
Your fax machine has four different resolutions. In addition
to STANDARD (for faxes), there is FINE (for small print and
drawings), SUPER FINE (for copies) and PHOTO (for pho-
tographs and other such images). Keep pressing RESOLU-
TION until the display shows the option you want.
Reducing
To ensure that faxes that are longer than A4 are printed out on
one page, you can automatically reduce the page. You can define
the extent to which the page is reduced.
Automatic
If this function is activated, an over-long fax is reduced by the
amount specified in the function described below (see Limit).
1Press MENU and 334. The display shows 34 RE-
DUCTION.
2Press START/COPY and use uto select AUTO RE-
DUCTION.
3Press START/COPY and use uto select ON or OFF.
4Press START/COPY and then STOP three times to end
the function.
Limit
This function lets you select the amount by which an over-long
fax is to be reduced.
1Press MENU and 334. The display shows 34 RE-
DUCTION.
2Press START/COPY and use uto select THRESH-
OLD.
3Press START/COPY use uto select a value between
0and 30 mm.
4Press START/COPY and then STOP three times.
Fax

18
Memory
If there is no paper in the paper tray or if the toner is empty,
incoming faxes will be stored in memory (around 120 pages
according to Slerexe letter). If an incoming fax has been stored
in memory the display will show FAX IN MEMORY. Once the
paper tray is refilled or the toner replaced all the faxes stored in
memory can be printed out (see Printing from memory).
When a fax has been printed it is deleted from memory. If
printing is interrupted all the faxes that have not yet been printed
in full remain in memory. Once the memory is full no further
pages can be stored.
Printing later
You can choose whether faxes are to be printed immediately
from memory or later.
1Press MENU,333. The display shows 33 MEMORY
MODE. Press START/COPY.
2Use uto select PRINT NOW (faxes are printed out as
soon as the paper tray is refilled) or PRINT LATER (faxes
are printed out when you want).
3Press START/COPY and then STOP twice.
Printing from memory
If there is a document in memory the display will show FAX
IN MEMORY.
1Press MEMORY and 3.
2Press START/COPY. If faxes are stored they will be
printed out.
Sending from memory
You can scan in documents, store them in memory and send
them from memory. When they have been sent, the faxes are
cleared from memory.
1Place the document to be faxed (maximum of 20 sheets)
loosely in the document feeder, face down.
2Press MEMORY,2 and START/COPY.
aIf you want to sent the fax immediately, select 1 NOW
and press START/COPY.
bIf you want to send the fax later select 2 LATER, and
press START/COPY. Enter the time you want to send it
(within 24 hours, e.g.18 30 for 6.30 pm) and press
START/COPY.
3Enter the fax number and press START/COPY. The docu-
ment will be scanned and sent.
Canceling
1Press MEMORY, 4 and START/COPY. The display
shows ARE YOU SURE?
2Press START/COPY to delete the faxes from memory.
If the line is busy, automatic redial is activated.
1If you wish to cancel automatic redial, press MENU,
774 and then START/COPY.
2Press START/COPY again to confirm.
DA power failure will clear the faxes from memory.
Clearing memory
With this function you can delete faxes or documents from
memory.
1Press MEMORY, 4and START/COPY. The display
shows ARE YOU SURE?
2Press START/COPY to delete the faxes from memory or
press STOP to cancel.
Broadcast
You can send the fax either to a group you have already stored
or to individual numbers.
1Place the document to be faxed (maximum of 20 sheets)
loosely in the document feeder, face down.
2Press MEMORY and 2. The display shows 2 BROAD-
CAST. Press START/COPY.
aIf you want to sent the fax immediately, select 1 NOW.
bIf you want to send the fax later select 2 LATER and
press START/COPY. Enter the time you want to send it
(within 24 hours, e.g. 18 30 for 6.30 pm) and press
START/COPY.
3The display shows: dial num: group. Enter the re-
cipients:
aIf you want to sent the fax to a group, use uto select
GROUP and press START/COPY. Use uto select
the group. You can also use the digit keys to select a group.
bIf you want to send the fax to specific numbers, use u
to select enter NUMBER and press START/COPY.
Enter the number and press START/COPY. If you want
to enter further numbers, use uto select ANOTHER ?
Yand enter the press START/COPY to confirm. When
you have finished adding numbers, press ANOTHER? N.

19
4Finally, press START/COPY. The document will be
scanned and automatically sent.
Broadcast list
The broadcast list contains the numbers of all the addresses in
a broadcast (up to 50 numbers).
1Press MENU and 664. The display shows 64 GROUP
LIST.
2Press START/COPY. The list will be printed out.
Sending later
If you wish to take advantage of off-peak telephone charges or
if you know that the person to whom you are sending a fax is
available only at certain times you can set up your fax machine to
send a fax automatically at a later time (within 24 hours).
1Place the document to be faxed (maximum of 20 sheets)
loosely in the document feeder, face down.
2Press MENU, 44. The display shows 41 SEND
LATER. Press START/COPY two times.
3Enter the time you want to send it (within 24 hours, e.g.
18 30 for 6.30 pm) and press START/COPY.
4Enter the fax number and press START/COPY.
Canceling
If you remove the document the delayed fax job will be
canceled.
You can also cancel the time. To do this, press MENU, 77
and START/COPY. The display shows ARE YOU SURE?
Press START/COPY again to confirm.
Sending with code
If your fax partner has entered a code to protect the fax re-
ception please follow the procedure:
1Place the document to be faxed (maximum of 20 sheets)
loosely in the document feeder, face down.
2Press MENU, 442 and START/COPY.
3Enter the code which you have received from your fax
partner (up to 20 digits) and press START/COPY.
4Enter the fax number and press START/COPY.
Receive polling
This function enables you to receive documents that have been
stored for you in a remote fax machine.
Quick polling
1Press MENU, 552. The display shows 52 POLL-
ING RX. Press START/COPY.
2Select the fax number and press START/COPY two times.
Receive polling with code
If your fax partner has entered a code to protect the documents,
proceed as follows:
1Press MENU, 552. The display shows 52 POLL-
ING RX. Press START/COPY.
2Use uto select WITH CODE and press START/
COPY.
3Enter the code (up to 20 digits) and press START/COPY.
4Enter the fax number and press START/COPY.
Delayed polling
If you wish to take advantage of off-peak telephone charges
you can poll a fax at a later time (within 24 hours).
1Press MENU, 552. The display shows 52 POLL-
ING RX. Press START/COPY.
2You now have two options:
aIf you want to poll a fax without a code, use uto
select LATER and press START/COPY. Enter a time
(within 24 hours, e.g. 18 30 for 6.30 pm) and press
START/COPY.
bIf you want to enter a code, use uto select LATER/
Cand press START/COPY. Enter a time for polling and
press START/COPY. Now enter the code (up to 20 dig-
its) and press START/COPY.
3Enter the fax number and press START/COPY.
DIf the line is busy, automatic redial is activated. If you
wish to cancel automatic redial, press MENU and
775.The display shows 75 POLL REDIAL. Press
START/COPY two times.
DIf you wish to cancel the entire process, press MENU,
771 and START/COPY.

20
Transmit polling
You can program your fax machine to send documents when it
is polled by a remote fax machine.
1Place the document to be faxed (maximum of 20 sheets)
loosely in the document feeder, face down.
2Press MENU and 55. The display shows 51 POLL-
ING TX. Press START/COPY.
3You can now choose whether or not to protect the fax
against unauthorized access.
aIf you want to protect the fax, use uto select WITH
CODE and press START/COPY. Enter a code (up to 20
digits) and press START/COPY. Anyone you give this
code to will be able to poll the fax.
bIf you do not want to use a code, use uto select NOW
and press START/COPY.
The process is canceled as soon as you remove the document
from the fax machine.
DPoll coding is based on the international ITU standard.
However, there are manufacturers who use different pro-
cedures. Their machines are therefore not compatible.
DIf you send faxes to or poll faxes from fax databases, some
of these databases allow you to append the subaddress
directly to the fax number. This will save you telephone
charges. First enter the fax number of the database and
press RR
RR
R. Now enter the subaddress. If you are not sure
whether your fax polling service supports subaddresses,
contact the service provider.
Transmission speed
If the telephone connection used for transmission is poor,
transmission errors may occur at normal speed (14,400 bps).
In such cases it is best to reduce the speed. When you have
successfully sent the fax, remember to set your fax machine
back to the standard speed.
1Press MENU and 33: 31 TX SPEED.
2Press START/COPY and use uto select the speed
you want.
3Press START/COPY and then STOP twice.
Reception speed
If the telephone connection used for reception is poor, errors
may occur at normal speed (14,400 bps). In such cases it is
best to reduce the speed. When you have successfully received
the fax, remember to set your fax machine back to the stand-
ard speed.
1Press MENU and 332: 32 RX SPEED.
2Press START/COPY and use uto select the speed
you want.
3Press START/COPY and then STOP twice.
Transmission report
In the default setting, a transmission report is printed out only
in the event of a transmission error. However, you can change
this setting so that a transmission report is printed for every
fax transmitted, only in the event of an error or never.
1Press MENU and 225: 25 TX REPORT.
2Press START/COPY and use uto select ERROR,
ON or OFF.
3Press START/COPY and then STOP twice.
Reception report
In the default setting, a reception report is printed out only in
the event of a transmission error. However, you can change
this setting so that a reception report is printed for every fax
received, only in the event of an error or never.
1Press MENU and 226: 26 RX REPORT.
2Press START/COPY and use uto select ERROR,
OFF or ON.
3Press START/COPY and then STOP twice.
Table of contents
Other Oki Fax Machine manuals