Oki OF5700 User manual

Overview
Quick Reference |E-1
Contents
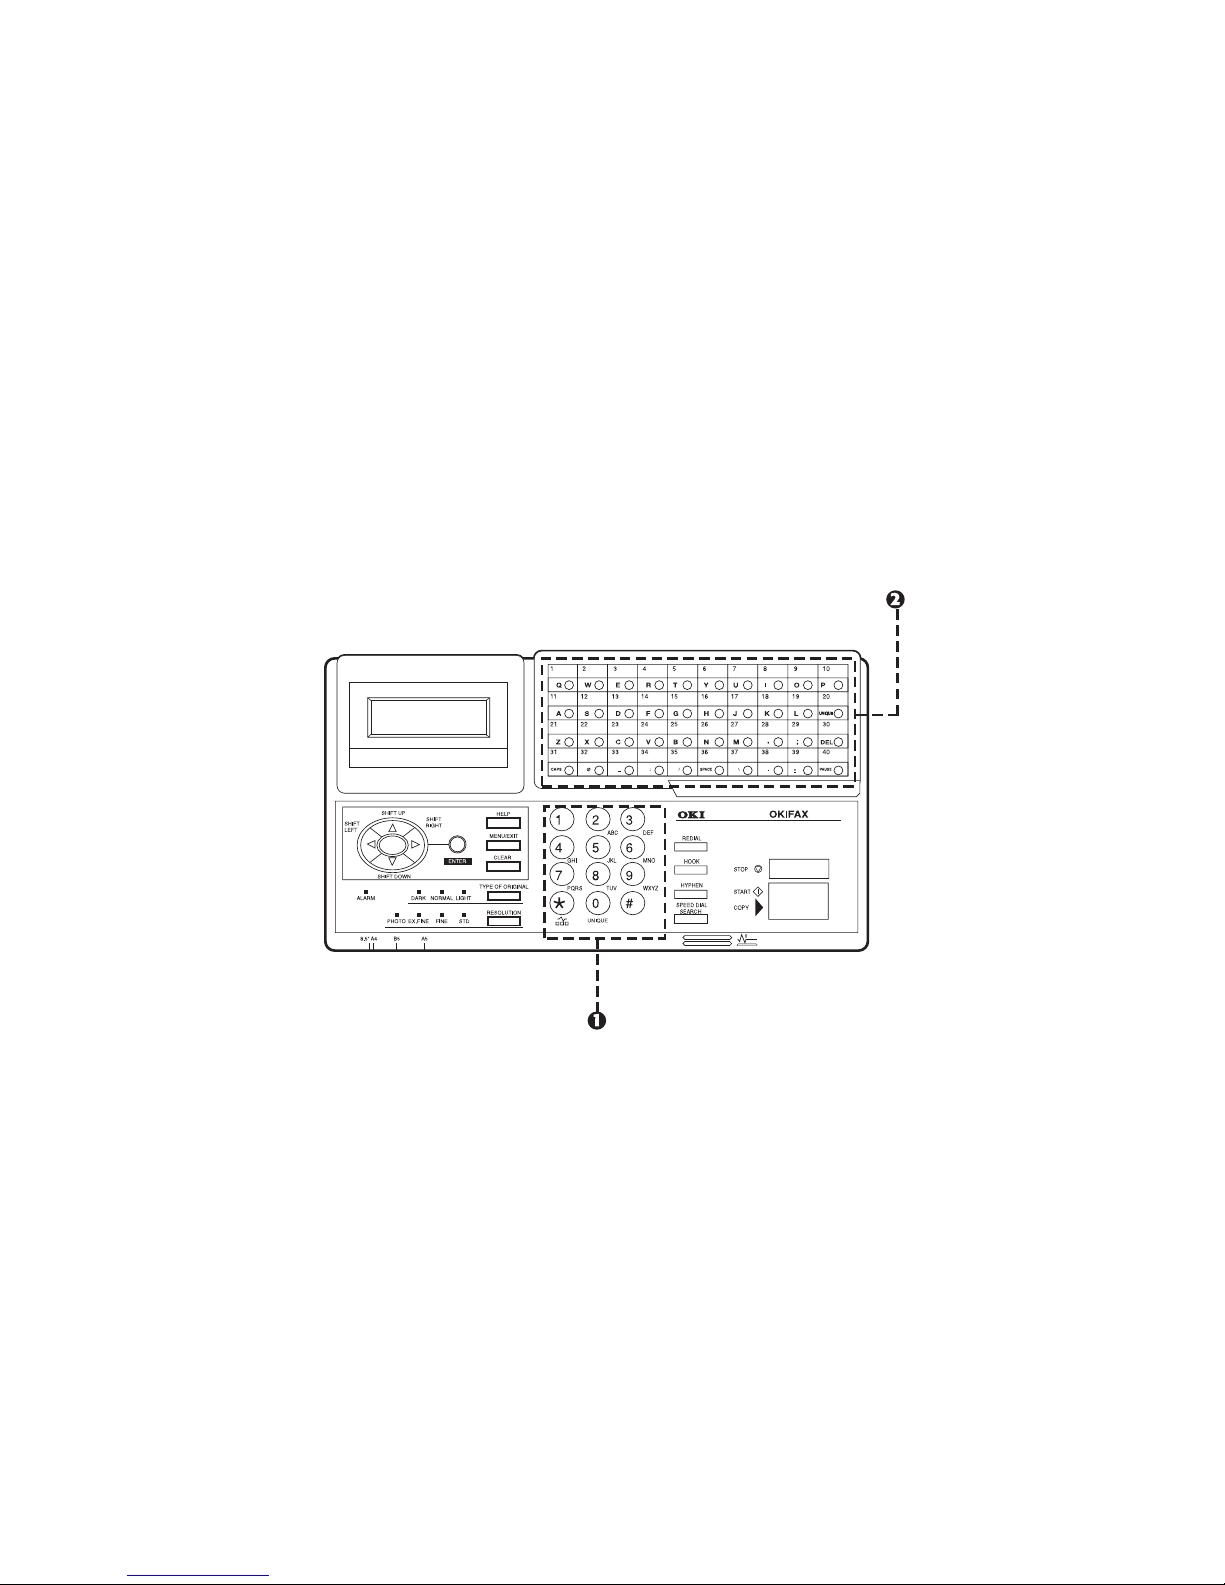
Control Panel ........................................................... 3
Faxing........................................................................ 4
Setting Up the Fax .......................................................... 4
Date and Time................................................................. 4
FaxI.D............................................................................. 4
Loading the Document................................................... 5
Using Manual Feed ........................................................ 5
Changing Resolution ..................................................... 6
Changing Contrast ......................................................... 6
SpeedAccess................................................................... 6
Accessing a User Function ............................................. 6
Send to Single Location / Keypad Dialing .................... 9
Regular Dialing .............................................................. 9
Speed Dial: One-Touch .................................................. 9
Speed Dial: 2- or 3-digit Dial ....................................... 10
Group Dial .................................................................... 10
Broadcasting................................................................. 11
Redialing ...................................................................... 11
Switching Between Instant Dialing (Memory) & Feeder
Transmit Modes ............................................................ 11
Search Key Dialing....................................................... 11
Delay Transmission ...................................................... 12
Confirmation Report .................................................... 12
Copying ................................................................... 13
Making Copies ............................................................. 13
Using Manual Paper Feeder.......................................... 13
Printing (optional) ................................................. 14
Using Manual Feed ...................................................... 14
Scanning (optional)................................................ 15
Scanning the Document Using JetSuite Pro................. 15
Using JetSuite Pro (optional)............................... 16

E-2|OKIFAX 5700/5900
Every effort has been made to ensure that the information in
this document is complete, accurate, and up-to-date. Okidata
assumes no responsibility for the results of errors beyond its
control. Okidata also cannot guarantee that changes in
software and equipment made by other manufacturers and
referred to in this guide will not affect the applicability of the
information in it. Mention of software products manufactured
by other companies does not necessarily constitute
endorsement by Okidata.
Copyright 1999 by Okidata. All rights reserved.
Written and produced by the Okidata Training &
Publications Department. Please address any comments on
this publication
•by mail to:
Training & Publications Department
Okidata
2000 Bishops Gate Blvd.
Mount Laurel, New Jersey 08054-4620
•or by email to:
We welcome you to visit our multilingual web site:
http://www.okidata.com
Okidata and OKIFAX are registered trademarks of Oki
Electric Industry Company, Ltd. Okidata marques désposés
de Oki Electric Industry Company, Ltd.; marca registrada,
Oki Electric Industry Company, Ltd. JetSuite is a registered
trademark of eFax.com.
ENERGY STAR is a registered trademark of the United States
Environmental Protection Agency.

Quick Reference |E-3
Control Panel
1) Numeric Keypad
2) One Touch Keypad

Overview
E-4|OKIFAX 5700/5900
Faxing
Setting Up the Fax
Date and Time
1Press Menu/Exit.
2Enter speed access number 00 and wait. This displays:
00 CLOCK ADJUSTMENT
[2/12/1999 02:00]
ENTER WHEN DONE
3Enter current date (mm/dd/yyyy) and time (hh:mm) using
the numeric keypad. Press Enter.
4Press Menu/Exit.
Fax I.D.
1PressMenu/Exit.
2Enter speed access number 02.
3Enter up to 32 numbers and characters, then press Enter.
4PressMenu/Exit.

Quick Reference |E-5
Loading the Document
1Adjust the document guides to the width of the
documents.
2Neatly stack the documents, and then insert them face
down into the document tray. Readjust the document
guides for a snug fit.
3The OKIFAX grips the documents and pulls them in,
beginning with the bottom page first.
Using Manual Feed
1Load the documents in the document tray.
2Fold down the manual paper feeder tray (see arrow in
figure below).
3Insert a sheet of paper face up into the tray. Push into the
slot until the OKIFAX takes hold of the paper.

E-6|OKIFAX 5700/5900
Changing Resolution
Press Resolution. The selection (photo, extra fine, fine, or
standard) displays next to the key.
Changing Contrast
Press Type of Original. The selection (light, normal, or dark)
displays next to the key.
Speed Access
For direct access to user functions. See your OKIFAX 5700/
5900 User’s Handbook for more details.
Accessing a User Function
1PressMenu/Exit.
2Using the numeric keypad, enter the speed access number.
The user function display appears.

Quick Reference |E-7
Clock Adjustment
00 Clock Adjustment
ID/Password Programming
01 TSI/CSI 03 Personal Box
02 Sender ID 04 Memory Password
Machine Settings
10 Auto Answer Mode 18 Instant Dial
11 Monitor Volume 19 Restrict Access
12 Buzzer Volume 20 ECM Function
13 User Language 21 Closed Network
14 Remote Diagnosis 22 Toner Save
15 TX Mode Default 23 Sender ID Switch
16 No Toner Memory Receive 24 1st Paper Size
17 Memory Full Save 25 2nd Paper Size **
* Set only by a service center.
** Active only when 2nd paper tray is installed.

E-8 OKIFAX 5700/5900
|
Dial Options
40 Redial Tries 47 Pulse Make Ratio *
41 Redial Interval 48 Pulse Dial Type *
42 Auto Start 49 MF Tone Duration *
43 Dial Tone Detect 50 PBX Line
44 Busy Tone Detect 51 Flash/Earth/Normal *
45 MF/DP 52 Dial Prefix
46 Pulse Dial Rate *
Incoming Options
60 Incoming Ring 64 PC/FAX Switch
61 Remote Receive 65 CNG Count
62 T/F Timer Program 66 Ring Response
63 Continuous Tone 67 Distinctive Ring
Report Options
70 MCF (Single Loc.) 72 Message in MCF
71 MCF (Multiple Loc.) 73 Error Report (MCF)
LAN Options
80 Auto Tray Switch 83 IP Address
81 Paper Size Check 84 Subnet Mask
82 LAN Print Timeout 85 Default Gateway
* Set only by a service center.
** Active only when 2nd paper tray is installed.

Quick Reference |E-9
Send to Single Location / Keypad
Dialing
Regular Dialing
1Load the document.
2Using the numeric keypad, dial as if using a telephone.
3PressStart.
Speed Dial: One-Touch
How to Program
1Press Menu/Exit.
2Press Äto select Location Program, press Enter or ©.
3Press Enter to select Speed Dial.
4Enter One Touch Speed Dial number to be programmed.
PressEnter.
5Enter telephone number using the numeric keypad. Press
Enter.
6Enter name, then press Enter.
7Enter alternate telephone number using numeric keypad.
PressEnter.
8Repeat steps 3 through 7 until finished programming.
When finished, press Menu/Exit.
How to Use
1Load the document.
2Press the desired One Touch key.
3Press Start.

E-10|OKIFAX 5700/5900
Speed Dial: 2- or 3-digit Dial
How to Program
1Press Menu/Exit.
2Press Äto select Location Program, press Enter or ©.
3Press Enter to select Speed Dial.
4Enter 2-digit or 3-digit Speed Dial number to be
programmed.PressEnter.
5Enter telephone number using the numeric keypad. Press
Enter.
6Enter name, then press Enter.
7Enter alternate telephone number. Press Enter.
8Repeat steps 3 through 7 until finished programming.
When finished, press Menu/Exit.
How to Use
1Load the document.
2Press Speed Dial, then enter the Speed Dial number using
the numeric keypad.
3Press Start.
Group Dial
How to Program
1PressMenu/Exit.
2Press Äto select Location Program. Press Enteror ©.
3Press Äto select Group. Press Enter or ©.
4Enter group dial number, then press Enter.
5At “Select Location(s),” press Speed Dial.
6Enter the Speed Dial number of the telephone number you
want to add to the group.
7PressEnter.
8Repeat steps 5 through 7 until all telephone numbers for
the group have been registered.
9Enter name, then press Enter.
10Press Menu/Exit to return to standby mode.
How to Use
1Load the document.
2Press Speed Dial, then enter the group dial number using
the numeric keypad.
3PressStart.

Quick Reference |E-11
Broadcasting
1Load the document.
2Select a location: press the One Touch key,or press Speed
Dial, then enter the 2- or 3-digit number,or dial as if using
a telephone.
3PressEnter.
4Repeat steps 2 and 3 until all locations for the broadcast
are entered.
5PressStart.
Redialing
You can redial a number at any time by pressing Redial.
Switching Between Instant Dialing
(Memory) & Feeder Transmit Modes
1Press Menu/Exit.
2Enter speed access number 18.
3Use the ©key to switch instant dialing on or off, then
press Enter.
4Press Menu/Exit.
Search Key Dialing
1Press Search. The display shows Enter 1st Char.
2Enter the first letter of the name of the desired location.
3Repeatedly press the letter key to scroll through the list of
location IDs beginning with that letter.
4When the correct location is found, press Start to begin
faxing.

E-12|OKIFAX 5700/5900
Delay Transmission
1Load the document.
2Press Menu/Exit.
3Press Enter or ©to enter Delayed TX.
4Press Äor ¶to move between date and time settings, and
©or §to move between columns.
5Enter the desired date and time (up to three days). Press
Enter.
6Delayed TX display shows Select Location(s).
7Enter desired location using either Speed Dial numbers or
numeric keypad.
8Press Start. The OKIFAX scans the document into memory
and waits until the time programmed to begin
transmission.
Confirmation Report
1After transmission, press Enter (with no documents
loaded) to see the confirmation report on the display.
2Press Enter again to print the report.

Overview
Quick Reference |E-13
Copying
Making Copies
1Load the document in the document tray.
2PressCopy.
3If only one copy is required, wait and the machine will
begin copying momentarily.
To make multiple copies, enter the number of copies
required using the numeric keypad.
4Press Copy again to start copying.
Using Manual Paper Feeder
1Load the document in the document tray.
2Fold down the manual paper feeder tray (see arrow in
figure below).
3Insert a sheet of paper face up into the tray. Push into the
slot until the OKIFAX grabs the paper.
4Press Copy (see instructions above).

Overview
E-14|OKIFAX 5700/5900
Printing (optional)
!Requires optional PC Interface Kit. See your Software
User’s Guide for more details.
1Select File, Print.
2Select OKIFAX 5700 or OKIFAX 5900.
3Click OK.
Using Manual Feed
1Load the documents in the document tray.
2Fold down the manual paper feeder tray (see arrow in
figure below).
3Insert a sheet of paper face up into the tray. Push into the
slot until the OKIFAX takes hold of the paper.

Overview
Quick Reference |E-15
Scanning (optional)
!Requires optional PC Interface Kit. See your JetSuite
Pro Software User’s Guide for more details.
Scanning the Document Using
JetSuite Pro
1Insert the pages to be scanned into the document feeder
print side down, with the top edge into the OKIFAX.
2A dialog box appears, saying, “A Document has been
placed into the input tray. Would you like to scan it?”
3Click Yes.
4A dialog box lets you control resolution, regular or
inverted image, dimensions of scanned document, level of
contrast, and dithering (“16 shades” for pictures with
grays, “none” for black and white images or text).
5Click Scan. When scanning is complete, the document
appears on the desktop.

Overview
E-16|OKIFAX 5700/5900
Using JetSuite Pro
(optional)
JetSuite Pro is included in the optional PC Interface Kit. See
your JetSuite Software User’s Guide for more details.
1) Select folder.
2) Select file.
3) Select operation.
Other manuals for OF5700
7
This manual suits for next models
4
Table of contents
Other Oki Fax Machine manuals