Oki B4100 User manual


3
Table of Contents
Check Package Contents . . . . . . . . . . . . 4
Prepare a Location . . . . . . . . . . . . . . . . . 4
Set Up the Printer . . . . . . . . . . . . . . . . . 4
Prepare the Image Drum Cartridge . . . . . 4
Install the Toner Cartridge . . . . . . . . . . . 6
Load Paper . . . . . . . . . . . . . . . . . . . . . . 7
Insert Power Cable. . . . . . . . . . . . . . . . . 8
Computer Connection. . . . . . . . . . . . . . . 8
Windows Setup . . . . . . . . . . . . . . . . . . . 9
Macintosh Setup . . . . . . . . . . . . . . . . . 10
Service and Support. . . . . . . . . . . . . . . 11
Table des matiéres
Vérification du contenu de l’emballage . . 12
Préparation d'un emplacement . . . . . . . 12
Configuration de l'imprimante . . . . . . . . 12
Préparation de la cartouche de
tambour d’image . . . . . . . . . . . . . . . . 13
Installation de la cartouche de toner . . . 14
Chargement du papier . . . . . . . . . . . . . 15
Installation du cordon d’alimentation . . . 16
Connexion à l'ordinateur. . . . . . . . . . . . 16
Installation sous Windows. . . . . . . . . . . 17
Installation sous Macintosh . . . . . . . . . . 19
Service et soutien . . . . . . . . . . . . . . . . 20
Contenido
Verifique el contenido de la caja . . . . . . 21
Prepare el lugar. . . . . . . . . . . . . . . . . . 21
Instale la impresora . . . . . . . . . . . . . . . 21
Preparar el Cartucho de cilindro
de imagen . . . . . . . . . . . . . . . . . . . . . 22
Instalar cartucho de tóner. . . . . . . . . . . 23
Cargar papel . . . . . . . . . . . . . . . . . . . . 24
Conectar el cable de alimentación . . . . . 25
Conexión a la computadora. . . . . . . . . . 25
Procedimientos de Windows . . . . . . . . . 26
Procedimientos de Macintosh . . . . . . . . 28
Assistencia Técnica y Soporte . . . . . . . . 29
Sumário
Inspecione o conteúdo da embalagem . . 30
Prepare o local de instalação . . . . . . . . . 30
Instale a impressora . . . . . . . . . . . . . . 30
Prepare o cartucho do cilindro OPC . . . . 31
Instale o cartucho de toner . . . . . . . . . . 32
Coloque o papel. . . . . . . . . . . . . . . . . . 33
Insira o cabo de alimentação. . . . . . . . . 34
Conexão do computador . . . . . . . . . . . . 34
Configuração do Windows . . . . . . . . . . . 35
Configuração do Macintosh . . . . . . . . . . 37
Assistência ténica e suporte . . . . . . . . . 37

English 4
Printer Setup
Check Package Contents
1 Printer
2 CD-ROM
3 Power Cable
4 Toner Cartridge
•Black light-shield bag, to protect drum/toner
cartridge if unit is shipped (not shown)
•This Setup Guide (not shown)
•Safety, Warranty, Regulatory Information booklet
(not shown)
Note: We recommend you keep your packing
materials and carton in case you need to
ship or transport the unit.
Prepare a Location
Note: Space requirements are approximate.
Set Up the Printer
Lift the printer and place it on the selected
location. The printer weighs approximately 24
lbs.
IMPORTANT!
Other safety information is contained in the
Safety, Warranty and Regulatory Information
booklet supplied with this product and should be
read prior to setting up the printer.
1 Remove all shipping tape.
2 Remove any packing materials.
Prepare the Image Drum
Cartridge
1 Press button and lift the top cover.

English 5
2 Lift the drum cartridge from printer.
Note: Do not expose cartridge to light for more
than 5 minutes.
Note: Do not touch shiny green surface at
bottom of drum cartridge.
3 Lift tape, then pull out protective paper as
shown below. Lift out and discard shipping
restraints.
4 Reinstall drum cartridge in the printer:lower it
into place in the printer locating the pegs (1)
at each end into their slots in the sides of the
printer cavity (2).

English 6
Install the Toner
Cartridge
1 Unpack the toner cartridge.
2 Shake the cartridge several times vertically
and horizontally to distribute toner.
3 Holding the cartridge in a horizontal position,
slowly peel off the tape.
4 Hold the cartridge with the (blue) knob (1) on
the right. Tilt the cartridge slightly and insert
the left side under the protrusions (2) on the
image drum cartridge.
5 Lower the right side, aligning the slot in the
toner cartridge with the guide post of the
image drum. Push the toner cartridge down
completely until it snaps into place.
6 Holding the toner cartridge down so it does not
pop up, turn the knob in the direction show.
Note: The arrow on the knob should align with
the arrow on the drum cartridge.
7 Close the top cover.

English 7
Load Paper
1 Pull out the paper tray.
2 Set guides to paper width and paper length.
Note: For legal size paper, slide the release
lever to the left while pulling out the
paper guide to the LGL position.
3 Load paper (face down and top edge towards
the front for letterhead paper). Be sure guides
are snug against the paper and are locked in
place. Close the paper tray.

English 8
Insert Power Cable
Insert the power cable.
Note: Do NOT turn the printer on.
WARNING!
Be sure to use the 15A AC power cord supplied
with the printer. Use of a power cord NOT
supplied with this printer, or an extension cord,
may result in overheating, and could be a safety
hazard.
CAUTION!
To prevent fire or shock hazards, connect
the power plug only to a properly rated
power outlet.
Do not connect this product to an
uninterruptible power supply (UPS). For
further information please contact Oki Data
at 1-800-OKIDATA or www.okidata.com.
Computer Connection
Note: Interface cables are not supplied.
Network Connection
Connect the network cable between the printer
network port and the Ethernet hub or router.
USB Connection
Note: If installing for Windows© with USB
connection, install the software BEFORE
installing the USB cable. See “Software
Installation” on page 9.
Connect the USB cable between the printer USB
port and the computer.
Parallel Connection
Note: Requires UL approved bi-directional (IEEE
1284 compliant) cable.
Connect the Parallel cable between the printer’s
Parallel port and the computer.

English 9
Software
Installation
Windows Setup
Models B411dn and B431dn:
Install the Driver on a
Network
First, Print the Menu Map
Model B411dn
1 Click on Start > All Programs > Okidata >
Configuration Tool and select Configuration
Tool.
2 Click the B411 icon in the left panel.
3 Click the Device Setting tab.
4 Click the Menu Setting button.
5 Click USER MENU.
6 Click INFORMATION MENU.
7 Click the EXECUTE button beside PRINT MENU
MAP.
The Menu Map prints.
Keep these sheets handy: they contain
information you need to set up the printer on
your network.
Model B431dn
1 Press Menu ▲or ▼on the control panel to
select the Information Menu.
2 Press OK button.
3 Press the ▲or ▼button to select Network.
4 Press OK button to print the Menu Map.
Keep these sheets handy: they contain
information you need to set up the printer on
your network.
Second, Install the Driver
Models B411dn, B431dn
1 Insert the CD in the CD-ROM drive. The CD will
autorun.
2 Select your language. Click Next.
3 If you accept the license agreement, select I
Accept.
4 Select the Driver Setup tab then click Install
Driver.
5 Select nNetwork printer.
6
Select Directly to the network using TCP/IP.
7 Enter the IP address (locate the address on
the Print Menu Map in the Network Menu) or
select Search Address to locate the printer on
the network.
8 Follow the on-screen instructions.
Third, Test the Printer Driver
Installation
Models B411dn, B431dn
To make sure the printer driver is correctly
installed, print a test page:
1 On the Windows taskbar click Start/Settings/
Printers.
2 Right-click the printer model then click
Properties.
3 Click the Print Test Page button. Reinstall the
driver if the installation failed.
Configure Settings Using a Web
Browser (optional)
Models B411dn, B431dn
If you are working in a TCP/IP-enabled
environment, you can use a web browser to
display the printer or job printing status, and to
change settings on an embedded web page.
1 Activate your web browser (Microsoft
Explorer®/™, Netscape Navigator™ 4.4 or
higher, Mozilla®, Firefox®).
2 Enter the IP Address for the printer. (Locate
the address on the Print Menu Map in the
Network Menu.
3 When the web page appears, select from the
categories in the menu list.
Models B411d and B431d:
Install the Driver on a USB or
Parallel Setup
Install the Driver
1 Insert the CD in the CD-ROM drive. The CD will
autorun.
2 Select your language. Click Next.
3 If you accept the license agreement, select I
Agree.
4 Select the Driver Setup tab then click Install
Driver.
5 Select Local Printer. Click Next.
6 Select the Port: USB or LPT1 (Parallel). Click
Next.

English 10
7 Select printer model. Click Next.
8 If your model is a B431, select printer
emulation type (PCL or PS).
9 Follow the on-screen instructions.
10 When done, click Finish.
Test the Printer Driver Installation
To make sure the printer driver is correctly
installed, print a test page:
1 On the Windows taskbar click Start > Settings
> Printers [Printers and faxes].
2 Right-click the printer model then click
Properties.
3 Click the Print Test Page button. Reinstall the
driver if the installation failed.
Model B411 only: Install the
Configuration Tool
1 When the driver has been installed, the
installer will go back to the menu screen.
2 Click Optional Utiities.
3 Click Install Configuration Tool.
4 With Configuration Tool highlighted, click
Install.
5 When the inslattaion is complete, click Close.
All Models: Finish the
Installation
Install Utilities and Downloads
Note: You must be connected to the internet to
install Internet downloads.
1 Select Optional Utilities or Internet Downloads
from the CD installer menu.
2 Click on the utilities and downloads you want
to install and follow the instructions.
Change the Display Language
The default language used by your printer for
display messages is English. To change it:
1 Select Optional Utilities > Change the Printer
Display Language from the CD menu.
2 Follow the on-screen instructions.
Install the User Guide
1 Select the Driver Setup from the CD installer
menu bar.
2 Click Install User’s Guide.
3 Follow the on-screen instructions to install the
manual on your computer.
4 To view the manuals, click Start > Programs >
OkiData B411/B431 User Guide.
Note: To open the on-line user guide, you must
have Adobe®Acrobat®Reader 5.0 or
higher installed.
Activate Printer Options
If you have an optional paper tray installed, it
must be activated in the printer driver.
1 Click Start > Settings > Printers on the Win-
dows task bar.
2 Right click the printer icon and choose
Properties.
3 Click on the Device Options tab.
4 Select Lower Cassette.
5 Click OK to activate the settings.
Note: If optional memory is installed, follow the
installation instructions provided with the
memory card.
Macintosh
®
Setup
The printer drivers support OS 10.2.8 and above.
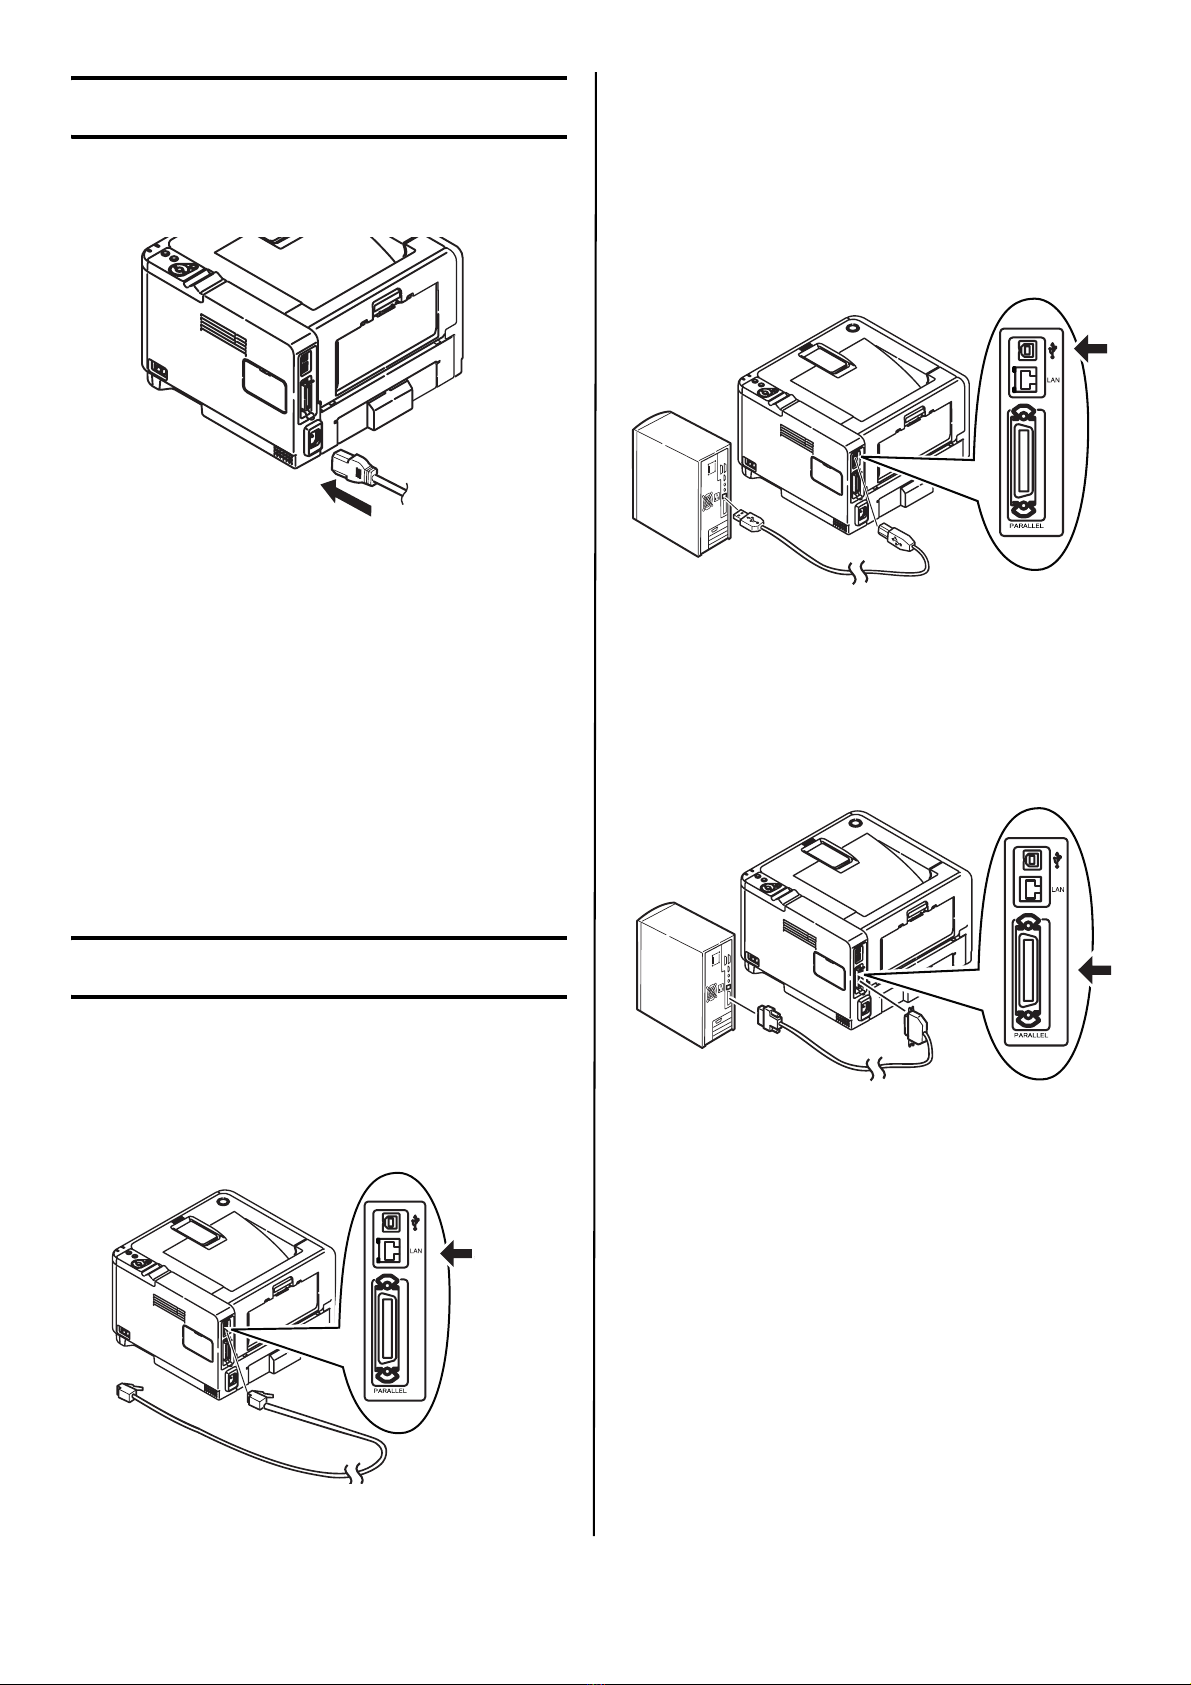
Connect the cable
See “Computer Connection” on page 8.
Note: Printer operation is not assured if another
USB compatible device is connected
concurrently with it.
Install the Printer Driver
1 Turn on the printer, then turn on the computer.
2 Place CD in the CD-ROM drive.
3 Double-click the CD icon that appears on the
desktop.
4 Open the MAC folder.
5 Open the OSX folder.
6 Open the Driver Installer folder.
7 Open the Multilingual folder. The installer will
automatically install the language selected in
the OS.
8 Select PCL, or select PS (B431 only).
9 Follow the on-screen instructions.
Add the Printer
1 Run the Print Center or Print Setup Utility or
Print and Fax.
2 Click Add.
3 Click More Printers.
4 For USB, select OKI USB and quit.
5 For network models select OKI TCP/IP or
Bonjour from the drop-down menu.
6 Enter the printer’s IP address (network
models).
7 Quit.

English 11
Install the Utilities
1 Insert the CD in the CD-ROM drive.
2 Double-click the CD icon that appears on the
desktop.
3 open the Mac folder.
4 Double-click the OSX icon.
5 Double-click the Utility Installer.
6 Click Multilingual.
7 Click OSX B400 Series Utilities. Follow the on-
screen instructions.
8 When the utilities list appears, check the
utilities you want to install.
Install the Documentation
Note: Adobe®Acrobat®Reader 5.0 or higher is
required to view the manuals.
1 Insert the CD into your CD-ROM drive.
2 Double-click the CD icon that appears on the
desktop.
3 Install the manuals from the root directory.
To load: drag the .pdf file to the
desktop
To view: double-click it.
Service and Support
Available 24 hours a day, 7 days a
week.
• Visit our website:
www.okiprintingsolutions.com
• Call 1-800-654-3282 (1-800-OKI-DATA)

Français 12
Configuration de
l'imprimante
Vérification du contenu de
l’emballage
1 Imprimante
2 CD-ROM
3 Cordon d’alimentation
4 Cartouche de toner
•Sac en plastique noir (pour protéger la cartouche
tambour/toner si expédiée)
•Le présent Guide d'installation (non montré)
•Livret Safety, Warranty and Regulatory [Sécurité,
garantie et règlementation] (non montré)
Note: Conservez les matériaux d'emballage et
le carton en cas où vous auriez besoin
d'expédier ou de transporter
l'imprimante.
Préparation d'un
emplacement
Note: Les exigences concernant l'espace requis
sont approximatives.
Configuration de
l'imprimante
Soulevez l'imprimante et déposez-la à l'endroit
sélectionné. Le poids de l'imprimante est
d'environ 24 lb.
IMPORTANT!
D'autres renseignements de sécurité sont
indiqués dans le livret Safety, Warranty and
Regulatory [Sécurité, garantie et
règlementation] fourni avec l'imprimante et
devraient être consultés avant l'installation de
l'imprimante.
1 Retirez tous les rubans d'expédition. Retirez
tout matériau d'emballage.

Français 13
Préparation de la
cartouche de tambour
d’image
1 Appuyez sur le bouton et soulevez le capot
supérieur.
2 Sortez la cartouche de tambour d'image de
l'imprimante.
Note: N'exposez pas la cartouche à la lumière
pendant plus de cinq minutes.
Note: Ne touchez pas à la surface verte glacée
au bas de la cartouche.
3 Retirez le ruban, puis tirez la feuille de
protection comme montré ci-dessous (a).
Retirez la protection du logement du toner et
mettez-la au rebut (b).
4 Réinstallez la cartouche de tambour d'image
dans l'imprimante: insérez-le dans
l'imprimante en s'assurant d'insérer les ergots
(1) à chacune des extrémités dans leurs fentes
de chaque côté de l'imprimante (2).

Français 14
Installation de la
cartouche de toner
1 Sortez la cartouche de toner de son embal-
lage.
2 Secouez à plusieurs reprises la cartouche de
gauche à droite pour répartir le toner dans la
cartouche.
3 Maintenez la cartouche en position horizontale
et retirez le ruban.
4 Maintenez la cartouche, avec la poignée bleue
(1) à droite. Inclinez légèrement la cartouche
et insérez son côté gauche sous les
protubérances (2) de la cartouche de tambour
d'image.
5 Insérez le côté droit de la cartouche en
alignant la fente de la cartouche de toner avec
la tige sur le tambour d'image (b). Poussez
vers le bas sur la cartouche de toner pour
l'enclencher en place.
6 Maintenez la cartouche de toner pour ne pas
qu'elle ressorte, puis tournez la poignée dans
le sens indiqué.
Note: La flèche sur la poignée doit être alignée
avec la flèche indiquée sur la cartouche
de tambour d'image (c).
7 Fermez le capot supérieur.

Français 15
Chargement du papier
1 Sortez le bac à papier.
2 Réglez les guides pour convenir au format du
papier. et à la longueur du papier.
Note: Pour le papier de format légal, coulissez le
levier (a) vers la gauche et maintenez-le
en place et tirez le guide-papier pour le
placer à la position LGL.
3 Chargez le papier à en-tête face imprimée vers
le bas, bord supérieur vers l'avant du bac.
Assurez-vous que les guides sont appuyés
contre le papier et le maintiennent bien en
place. Fermez le bac à papier.

Français 16
Installation du cordon
d’alimentation
Installez le cordon d'alimentation.
Note: Ne mettez l'imprimante sous tension.
AVERTISSEMENT!
Utilisez uniquement le cordon d'alimentation CA
de 15 A fourni avec l'imprimante. L’utilisation
d’un cordon AUTRE que celui fourni avec le
produit ou d’une rallonge peut entraîner une
surchauffe de l’appareil et constituer un danger.
ATTENTION!
Afin de prévenir les risques d'incendie et
d'électrocution, branchez le cordon
d'alimentation uniquement dans une prise
électrique appropriée.
Ne raccordez pas l'appareil à un dispositif
d'alimentation sans coupure. Pour plus
d'information, communiquez avec Oki Data
au 1 800 OKIDATA ou visitez
www.okidata.com.
Connexion à l'ordinateur
Note: Les câbles d'interface ne sont pas fournis.
Connexion réseau
Branchez le câble réseau dans le port réseau de
l'imprimante et au concentrateur ou routeur
Ethernet.
Connexion USB
Note: USB Windows – Installez les logiciels de
l'imprimante AVANT d'installer le câble
USB. See “Installation des logiciels” on
page 17.
Branchez le câble USB dans les ports USB de
l'imprimante et de l'ordinateur.
Connexion parallèle
Note: Un câble parallèle bidirectionnel
homologué UL (conforme IEEE 1284) est
requis.
Branchez le câble parallèle dans les ports
parallèles de l'imprimante et de l'ordinateur.

Français 17
Installation des
logiciels
Installation sous
Windows
Les Modèles B411dn et
B431dn : Installation réseau
du pilote d'imprimante
D'abord, Impression de la liste des
paramètres des menus
Modèle B411dn
1 Cliquez sur Start [Démarrer] > All Programs
[Tous les programmes] > Okidata > Printer
Menu Setup Tool [Outil de configuration des
menus de l'imprimante], puis sélectionnez
Printer Menu Setup Tool [Outil de configuration
des menus de l'imprimante].
2 Clique no ícone da B411 no painel esquerdo.
3 Clique na guia Device Settings (Configurações
do dispositivo).
4 Clique no botão Menu Setting (Configuração
do menu).
5 Clique em USER MENU (Menu do usuário).
6 Clique em INFORMATION MENU (Menu
Informação).
7 Clique no botão EXECUTE (Executar) ao lado
de PRINT MENU MAP (Imprimir estrutura dos
menus).
La liste des menus (Menu Map) s'imprime.
Conservez ces feuilles sous la main : elles
contiennent des renseignements dont vous aurez
besoin pour configurer l’imprimante sur le réseau
Modèle B431dn
1 Appuyez sur le bouton Menu ▲ou ▼du pan-
neau de commande pour sélectionner Infor-
mation Menu [Menu Information].
2 Appuyez sur le bouton OK.
3 Appuyez sur ▲ou le bouton ▼pour
sélectionner Network [Réseau].
4 Appuyez sur le bouton OK pour imprimer la
liste des paramètres des menus.
Conservez ces feuilles sous la main : elles
contiennent des renseignements dont vous aurez
besoin pour configurer l’imprimante sur le
réseau.
Seconde, installation du pilote
Modéles B411dn et B431dn
1 Insérez le CD dans l'unité CD-ROM. Le CD est
lancé automatiquement.
2 Sélectionnez la langue d’installation. Clique
sur Next (Suivant).
3 Si vous acceptez le contrat de licence, cliquez
sur I Agree [J'accepte].
4 Sélectionnez Driver Setup [Installation du
pilote], puis cliquez sur Install Driver [Installer
le pilote].
5 Sélectionnez Network Printer [Imprimante
réseau].
6
Sélectionnez Directly to the network using TCP/IP
[Directement au réseau en utilisant TCP/IP].
7 Entrez l'adresse IP de l'imprimante (l'adresse
IP est indiquée dans l'option Print Menu Map
[Imprimer mappe menu] du Network Menu
[Menu Réseau]) ou sélectionnez Search
Address [Rechercher l'adresse] pour localiser
l'imprimante sur le réseau.
8 Observez les directives à l’écran.
Toisième, essai du pilote
d'imprimante
Modéles B411dn et B431dn
Afin de s'assurer que le pilote d'imprimante a
bien été installé, imprimez une page de test :
1 Dans la barre des tâches de Windows, cliquez
sur Start [Démarrer] > Settings [Paramètres]
> Printers [Imprimantes].
2 Cliquez avec le bouton droit de la souris sur
l’icône de l'imprimante, puis sélectionnez
Properties [Propriétés].
3 Cliquez sur le bouton Print Test Page
[Imprimer une page de test]. Réinstallez le
pilote en cas de problème.
Configuration des paramètres en
utilisant un navigateur Web
(optionnel)
Modéles B411dn et B431dn
Si vous œuvrez dans un environnement TCP/
IP, vous pouvez utiliser un navigateur Web
pour afficher l'état de l'imprimante ou les
travaux d'impression ainsi que modifier des

Français 18
paramètres par l'entremise d'une page Web
intégrée.
1 Lancez votre navigateur Web (Microsoft
Explorer®/MC, Netscape NavigatorMC 4.4 ou
version ultérieure, Mozilla®ou Firefox®).
2 Entrez l’adresse IP de l'imprimante. (L'adresse
IP est indiquée dans l'option Print Menu Map
[Imprimer mappe menu] du Network Menu
[Menu Réseau].)
3 Lorsque la page Web s'affiche, sélectionnez
parmi les catégories affichées.
Modéles B411d et B431d:
Installation du pilote pour
une connexion USB ou
parallèle
Installation du pilote
1 Insérez le CD dans l'unité CD-ROM. Le CD est
lancé automatiquement.
2 Sélectionnez la langue d’installation. Clique
sur Next (Suivant).
3 Si vous acceptez le contrat de licence, cliquez
sur I Agree [J'accepte].
4 Sélectionnez Driver Setup [Installation du
pilote], puis cliquez sur Install Driver [Installer
le pilote].
5 Sélectionnez Local printer [Imprimante
locale]. Clique sur Next (Suivant).
6 Sélectionnez le port : USB ou LPT1 (parallèle).
Clique sur Next (Suivant).
7 Sélectionnez votre modèle d’imprimante.
Clique sur Next (Suivant).
8 Si le modèle de l'imprimante est B431dn,
sélectionnez le type d'émulation d'imprimante
(PCL ou PS).
9 Observez les directives à l’écran.
10 Lorsque terminé, cliquez sur Finish
(Terminer).
Essai du pilote d'imprimante
Afin de s'assurer que le pilote d'imprimante a
bien été installé, imprimez une page de test :
1 Dans la barre des tâches de Windows, cliquez
sur Start [Démarrer] > Settings [Paramètres]
> Printers [Imprimantes] ou Printers and
Faxes [ Imprimantes et télécopieurs].
2 Cliquez avec le bouton droit de la souris sur
l’icône de l'imprimante, puis sélectionnez
Properties [Propriétés].
3 Cliquez sur le bouton Print Test Page
[Imprimer une page de test]. Réinstallez le
pilote en cas de problème.
Modèle B411 seulement :
Installation de l'outil de
configuration
1 Une fois le pilote installé, le programme
d'installation revient à l'écran du menu.
2 Cliquez sur Optional Utilities (Utilitaires en
option).
3 Cliquez sur Install Configuration Tool (Installer
l'outil de configuration).
4 Avec Configuration Tool (Outil de
configuration) en surbrillance, cliquez sur
Install (Installer).
5 Une fois l'installation terminée, Cliquez sur
Close (Fermer).
Tous les modèles : Terminez
l’installation
Installation des utilitaires et
téléchargements
Note: Un accès à Internet est requis pour
effectuer les téléchargements.
1 Sélectionnez Optional Utilities [Utilitaires
optionnels] ou Internet Downloads [Télé-
chargements Internet] dans la barre de menus
du CD.
2 Cliquez sur les utilitaires et les
téléchargements que vous désirez installer,
puis observez les directives à l'écran.
Pour modifier la langue d'affichage
La langue d’affichage par défaut utilisée pour
l'affichage des messages sur le panneau de
commande de l'imprimante est l'anglais. Pour la
modifier, effectuez ce qui suit :
1 Sélectionnez Optional Utilities [Utilitaires
optionnels] > Change the Printer Display Lan-
guage [Modifier la langue d'affichage de
l'imprimante] dans la barre de menus du CD.
2 Observez les directives à l’écran.
Installation du Guide de l'utilisateur
1 Sélectionnez Driver Setup [Installation du
pilote] dans la barre de menus du CD.
2 Cliquez sur Install User’s Guide [Installer le
Guide de l'utilisateur].
3 Observez les directives à l’écran pour installer
le Guide sur votre ordinateur.
4 Pour consulter le Guide, cliquez sur Start
[Démarrer] > Programs [Programmes] >
OkiData B410d/B410dn/B420dn/B430dn User
Guide [Guide de l'utilisateur B410d/B410dn/
B420dn/B430dn OkiData].

Français 19
Note: Pour accéder au Guide de l'utilisateur en
ligne, la version 5.0 ou une version
ultérieure d'Acrobat®Reader d'Adobe®
doit être installée.
Activation des options de
l'imprimante
Si un bac à papier optionnel a été installé, celui-
ci doit être activé dans le pilote d'imprimante.
1 Cliquez sur Start [Démarrer] > Settings
[Paramètres] > Printers [Imprimantes] dans la
barre des tâches de Windows.
2 Cliquez avec le bouton droit de la souris sur
l’icône de l'imprimante, puis sélectionnez
Properties [Propriétés].
3 Cliquez sur l’onglet Device Options [Options du
périphérique].
4 Cochez la case Lower Cassette [Bac inférieur].
5 Cliquez sur OK pour activer les paramètres.
Note: Lorsque de la mémoire optionnelle est
installée, observez les directives
d'installation fournies avec la carte
mémoire.
Installation sous
Macintosh
Les pilotes d'imprimante prennent en charge OS
10.2.8 et les versions ultérieures.
Connexion du câble
Voyez « Computer Connection » à la page 8.
Note: Le fonctionnement de l’imprimante n’est
pas garanti si un autre périphérique
compatible USB est connecté en même
temps avec l’imprimante.
Installation du pilote
d’imprimante
1 Mettez sous tension l’imprimante, puis l’ordi-
nateur.
2 Insérez le CD dans l’unité CD-ROM.
3 Double-cliquez sur l’icône de CD qui figure sur
le bureau.
4 Ouvrez le dossier MAC.
5 Ouvrez le dossier OSX.
6 Ouvrez le dossier Driver Installer [Installateur
de pilotes].
7 Ouvrez le dossier Multilingual [Multilingue].
L'Installateur effectuera automatiquement
l'installation du pilote en fonction de la langue
sélectionnée dans le système d'exploitation de
l'ordinateur.
8 Sélectionnez PCL ou PS (B431 seulement).
9 Observez les directives à l’écran.
Ajout de l'imprimante
1 Lancez Print Center [Centre d’impression] ou
Print Setup Utility [Utilitaire de configuration
d’impression] ou Print and Fax [Imprimer et
télécopie].
2 Cliquez sur Add [Ajouter].
3 Cliquez sur More Printers [Autres
imprimantes].
4 Pour USB, sélectionnez OKI USB et quittez.
5 Pour modèles réseau, sélectionnez OKI USB,
OKI TCP/IP ou Bonjour dans le menu
déroulant.
6 Entrez l'adresse IP de l'imprimante (modèles
réseau).
7 Quittez.
Installation des utilitaires
1 Insérez le CD dans l'unité CD-ROM.
2 Double-cliquez sur l’icône de CD qui figure sur
le bureau.
3 Ouvrez le dossier MAC.
4 Double-cliquez sur l’icône OSX.
5 Double-cliquez sur Utility Installer [Installateur
d'utilitaires].
6 Cliquez sur Multilingual [Multilingue].
7 Cliquez sur OSX B400 Series Utilities
[Utilitaires OSX pour la série B400]. Observez
les directives à l’écran.
8 Une fois la liste des utilitaires affichées, cochez
les utilitaires à installer.
Utilisation de la page Web intégrée
pour configurer l'imprimante
(optionnel)
Si vous œuvrez dans un environnement TCP/IP,
vous pouvez utiliser un navigateur Web pour
afficher l'état de l'imprimante ou les travaux
d'impression ainsi que modifier des paramètres
par l'entremise d'une page Web intégrée. Entrez
l'adresse IP de l'imprimante (l'adresse IP est
indiquée dans l'option Print Menu Map [Imprimer
mappe menu] du Network Menu [Menu
Réseau]). Sélectionnez parmi les catégories
affichées dans la liste à gauche.
Note: Cette page est accessible uniquement
lorsque l'imprimante est raccordée à un
réseau.

Français 20
Installation de la
documentation
Note: La version 5.0 ou une version ultérieure
d'Acrobat®Reader d'Adobe®5.0 est
requise pour consulter les guides.
1 Insérez le CD dans l'unité CD-ROM.
2 Double-cliquez sur l’icône de CD qui figure sur
le bureau.
3 Installez les guides depuis le répertoire racine.
Pour charger un guide : glissez le fichier PDF
sur le bureau.
Pour le consulter, double-cliquez dessus.
Service et soutien
Offert 24 heures sur 24, 7 jours sur 7
• Visitez notre site Web multilingue :
www.okiprintingsolutions.com
• Composez le 1-800-OKI-DATA (1-800-654-
3282.
Other manuals for B4100
12
This manual suits for next models
6
Table of contents
Languages:
Other Oki Printer manuals

Oki
Oki GL408e User manual

Oki
Oki B6500 Series User manual

Oki
Oki MC560 MFP CX2032 User manual

Oki
Oki C6100dn User manual

Oki
Oki OKIPAGE 8c Plus User manual

Oki
Oki B 6200n Instruction Manual

Oki
Oki C5650 Technical specifications

Oki
Oki C6000dn User manual

Oki
Oki ML 186 Service manual

Oki
Oki OKIPAGE6w User manual

Oki
Oki C711WT User manual

Oki
Oki MPS711c Quick start guide

Oki
Oki B6300 Series User manual

Oki
Oki ML520 User manual

Oki
Oki C9800hdn User manual

Oki
Oki MC160N Installation and maintenance instructions

Oki
Oki OKIMATE 10 User manual

Oki
Oki C610N User manual

Oki
Oki C 9650dn User manual

Oki
Oki OKIPAGE 8z Specification sheet