Oki C C3200 User manual

C3200
User’s Guide

Preface> 2
P
REFACE
Every effort has been made to ensure that the information in this document is
complete, accurate, and up-to-date. The manufacturer assumes no responsibility
for the results of errors beyond its control. The manufacturer also cannot guarantee
that changes in software and equipment made by other manufacturers and referred
to in this guide will not affect the applicability of the information in it. Mention of
software products manufactured by other companies does not necessarily constitute
endorsement by the manufacturer.
While all reasonable efforts have been made to make this document as accurate and
helpful as possible, we make no warranty of any kind, expressed or implied, as to
the accuracy or completeness of the information contained herein.
The most up-to-date drivers and manuals are available from the Oki Europe
website:
http://www.okieurope.com
Copyright © 2005. All rights reserved.
Oki and Microline are registered trademarks of Oki Electric Industry Company, Ltd.
Energy Star is a trademark of the United States Environmental Protection Agency.
Hewlett-Packard, HP, and LaserJet are registered trademarks of Hewlett-Packard
Company.
Microsoft, MS-DOS and Windows are registered trademarks of Microsoft
Corporation.
Apple, Macintosh, Mac and Mac OS are registered trademarks of Apple Computer.
Other product names and brand names are registered trademarks or trademarks of
their proprietors.
As an Energy Star Program Participant, the manufacturer has
determined that this product meets the Energy Star guidelines for
energy efficiency.
This product complies with the requirements of the Council
Directives 89/336/EEC (EMC) and 73/23/EEC (LVD) as amended
where applicable on the approximation of the laws of the member
states relating to electromagnetic compatibility and low voltage.

Preface> 3
CONTENTS
Preface . . . . . . . . . . . . . . . . . . . . . . . . . . . . . . . . . . 2
Notes, Cautions and Warnings . . . . . . . . . . . . . . . . 5
Introduction . . . . . . . . . . . . . . . . . . . . . . . . . . . . . . 6
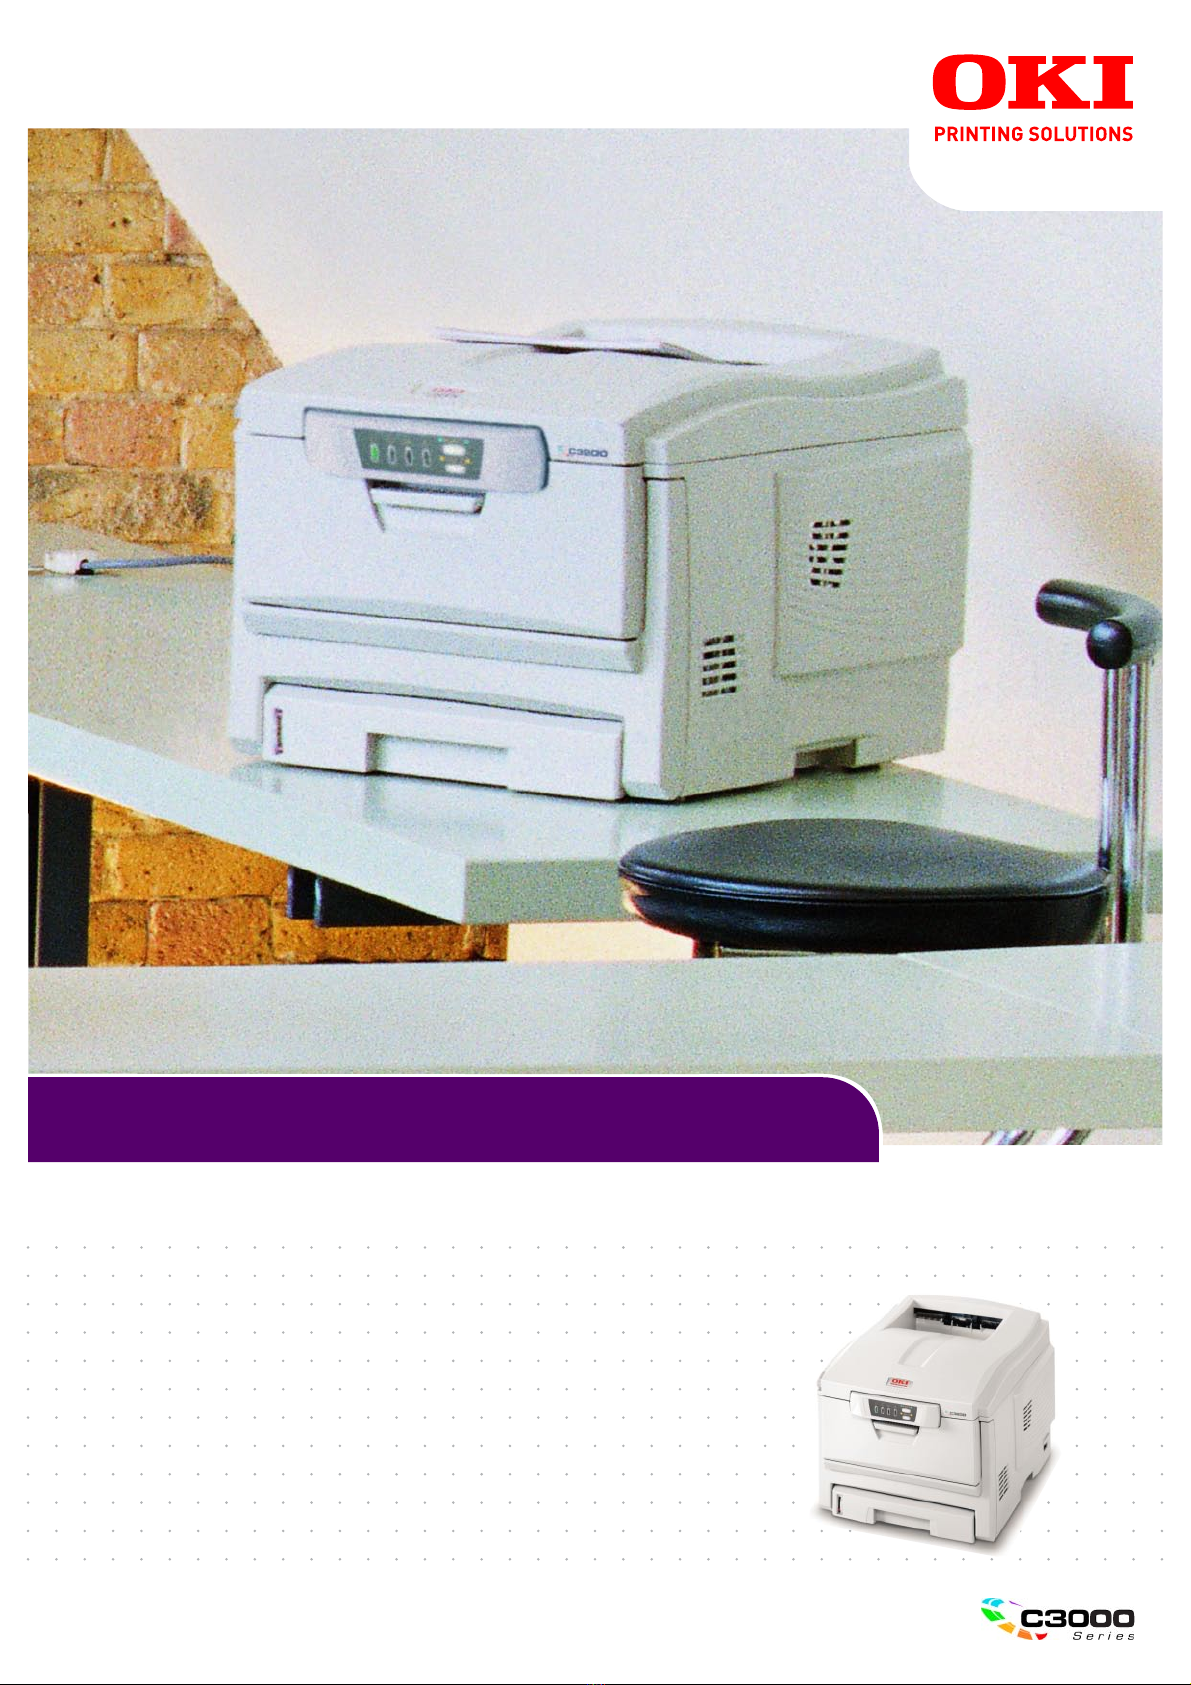
Printer overview. . . . . . . . . . . . . . . . . . . . . . . . . . 7
Front view. . . . . . . . . . . . . . . . . . . . . . . . . . . . 7
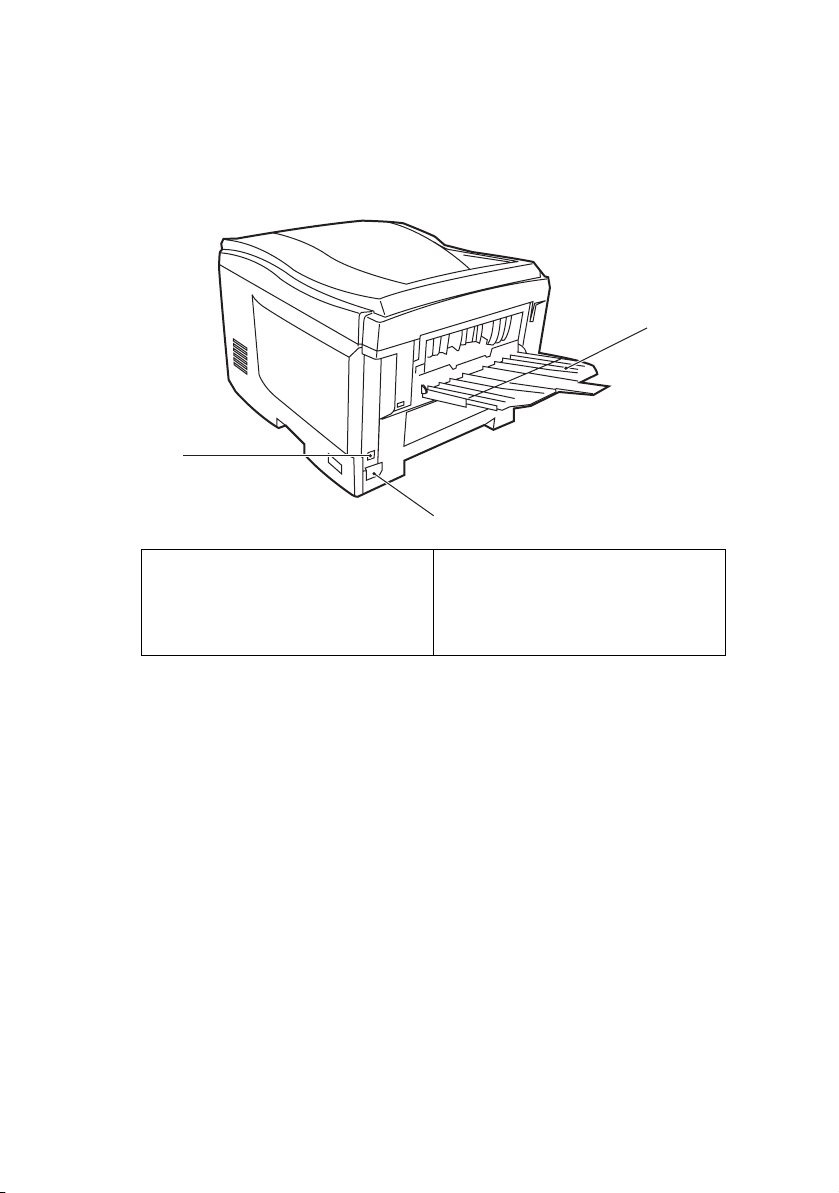
Rear view . . . . . . . . . . . . . . . . . . . . . . . . . . . . 8
The Status Panel . . . . . . . . . . . . . . . . . . . . . . . . . 9
Switches. . . . . . . . . . . . . . . . . . . . . . . . . . . . 10
LED displays . . . . . . . . . . . . . . . . . . . . . . . . . 11
Paper recommendations. . . . . . . . . . . . . . . . . . . . 14
Cassette tray . . . . . . . . . . . . . . . . . . . . . . . . . . . 15
Multi purpose tray . . . . . . . . . . . . . . . . . . . . . . . 15
Face down stacker . . . . . . . . . . . . . . . . . . . . . . . 16
Face up stacker . . . . . . . . . . . . . . . . . . . . . . . . . 16
Loading Paper. . . . . . . . . . . . . . . . . . . . . . . . . . . . 17
Cassette tray . . . . . . . . . . . . . . . . . . . . . . . . . . . 17
Multi purpose tray . . . . . . . . . . . . . . . . . . . . . . . 20
Printer settings in Windows . . . . . . . . . . . . . . . . . 21
Printer driver settings . . . . . . . . . . . . . . . . . . . . . 21
Printing preferences in Windows applications. . . . . 21
Setup tab . . . . . . . . . . . . . . . . . . . . . . . . . . . 22
Job Options tab . . . . . . . . . . . . . . . . . . . . . . . 23
Colour tab. . . . . . . . . . . . . . . . . . . . . . . . . . . 24
Setting from Windows Control Panel . . . . . . . . . . . 25
General tab . . . . . . . . . . . . . . . . . . . . . . . . . . 25
Advanced tab . . . . . . . . . . . . . . . . . . . . . . . . 26
Colour Printing . . . . . . . . . . . . . . . . . . . . . . . . . . . 28
Factors that affect the appearance of prints. . . . . . 28
Tips for printing in colour . . . . . . . . . . . . . . . . . . 30
Printing photographic images . . . . . . . . . . . . . 30
Printing from Microsoft Office applications. . . . . 30
Printing specific colours (e.g. a company
logo) . . . . . . . . . . . . . . . . . . . . . . . . . . . . . 30
Adjusting the brightness or intensity of a
print . . . . . . . . . . . . . . . . . . . . . . . . . . . . . . 30
Accessing the colour matching options . . . . . . . . . 31
Setting the colour matching options . . . . . . . . . . . 31
Using the Colour Swatch feature . . . . . . . . . . . . . 33
Using the Colour Correct Utility . . . . . . . . . . . . . . 34

Preface> 4
The Status Monitor . . . . . . . . . . . . . . . . . . . . . . . . 35
Using the Status Monitor. . . . . . . . . . . . . . . . . . . 35
Printer State tab . . . . . . . . . . . . . . . . . . . . . . 36
Printer Setup tab . . . . . . . . . . . . . . . . . . . . . . 36
Preferences tab . . . . . . . . . . . . . . . . . . . . . . . 39
Printer functions (User Settings) . . . . . . . . . . . . . 40
Information menu . . . . . . . . . . . . . . . . . . . . . 40
Print menu . . . . . . . . . . . . . . . . . . . . . . . . . . 40
Media menu . . . . . . . . . . . . . . . . . . . . . . . . . 41
Colour menu . . . . . . . . . . . . . . . . . . . . . . . . . 44
System configuration menu . . . . . . . . . . . . . . 45
USB menu . . . . . . . . . . . . . . . . . . . . . . . . . . 46
Memory menu . . . . . . . . . . . . . . . . . . . . . . . . 47
System adjustment menu . . . . . . . . . . . . . . . . 47
Maintenance menu. . . . . . . . . . . . . . . . . . . . . 48
Usage menu . . . . . . . . . . . . . . . . . . . . . . . . . 49
Printing settings . . . . . . . . . . . . . . . . . . . . . . 50
Changing the display language . . . . . . . . . . . . 50
Replacing consumable items . . . . . . . . . . . . . . . . 51
Consumable order details . . . . . . . . . . . . . . . . . . 52
Toner cartridge replacement . . . . . . . . . . . . . . . . 53
Image drum replacement . . . . . . . . . . . . . . . . . . 59
Replacing the belt unit . . . . . . . . . . . . . . . . . . . . 62
Fuser replacement . . . . . . . . . . . . . . . . . . . . . . . 65
Cleaning the LED head . . . . . . . . . . . . . . . . . . . . 68
Installing additional memory . . . . . . . . . . . . . . . . 69
Order codes. . . . . . . . . . . . . . . . . . . . . . . . . . . . 69
Memory upgrade . . . . . . . . . . . . . . . . . . . . . . . . 69
Clearing paper jams . . . . . . . . . . . . . . . . . . . . . . . 73
Specifications . . . . . . . . . . . . . . . . . . . . . . . . . . . . 81
Index . . . . . . . . . . . . . . . . . . . . . . . . . . . . . . . . . . 82
Oki contact details . . . . . . . . . . . . . . . . . . . . . . . . 84

Notes, Cautions and Warnings> 5
N
OTES
, C
AUTIONS
AND
W
ARNINGS
NOTE
A note provides additional information to supplement the
main text which may help you to use and understand the
product.
CAUTION!
A caution provides additional information which, if
ignored, may result in equipment malfunction or
damage.
WARNING!
A warning provides additional information which, if
ignored, may result in a risk of personal injury.

Introduction> 6
I
NTRODUCTION
Congratulations on buying this Oki colour printer. Your new
printer is designed with advanced features to give you clear,
vibrant colour prints and crisp black and white pages at high
speed on a range of office print media.
Your printer includes these features:
>Up to 12 pages per minute in full colour for fast printing of
high impact colour presentations and other documents
>Up to 20 pages per minute in black and white for fast and
efficient printing of all general purpose documents not
requiring colour
>1200 x 600dpi (dots per inch) print resolution for high
quality image production showing the finest detail
>Single Pass Colour Digital LED technology for high speed
processing of your printed pages
>High speed USB 2.0 interface
>Photo Enhance mode to improve printouts of photographic
images
>“Ask Oki” – a brand new, user-friendly function that gives
a direct link from your printer driver screen (but not
always illustrated in this guide) to a dedicated web site
specific to the exact model you are using. This is where
you’ll find all the advice, assistance and support you could
need to help you get the best possible results from your
Oki printer.
Additionally, the following optional feature is available:
>Additional memory, to allow printing of more complex
pages.

Introduction> 7
P
RINTER
OVERVIEW
F
RONT
VIEW
1. Output stacker, face
down.
Standard printed copy
delivery point. Holds up
to 250 sheets at 80g/m².
2. Multi purpose feeder
release (2) (press).
3. Status Panel.
Status LEDs and operator
buttons.
4. Front Cover release (lift).
5. Paper tray.
Standard blank paper tray. Holds up to 300
sheets of 80g/m² paper.
6. Multi purpose feeder (shown closed).
Used for feeding heavier paper stocks,
envelopes and other special media. Also
for manual feeding of single sheets when
required.
7. ON/OFF switch.
1
3
5
6
7
2
2
4

Introduction> 8
R
EAR
VIEW
This view shows the connection panel and the rear output
stacker.
When the rear paper stacker is folded down, paper exits through
the rear of the printer and is stacked here face up. This is mainly
used for heavy print media. When used in conjunction with the
multi purpose feed tray, the paper path through the printer is
essentially straight. This avoids bending the paper around curves
in the paper path and enables feeding of up to 203g/m² media.
8
9
10
8. USB interface. (USB cable must
be of length 2m maximum for
reliable Status Monitor
operation.)
9. AC power socket.
10. Rear, face up, 100 sheet stacker.

Introduction> 9
T
HE
S
TATUS
P
ANEL
The Status Panel allows operator intervention and indicates both
when the printer is operating normally and when it requires
attention. Detailed printer status is provided by the Status
Monitor. (See “Using the Status Monitor” on page 35.)
The Status Panel incorporates 4 LEDs and 2 push-button switches
as follows:
1. Power (Ready) LED (green)
2. Paper LED (amber)
3. Consumable LED (amber)
4. Alarm LED (amber)
5. ON LINE switch
6. CANCEL switch
The switches enable printer operation while the LEDs display the
status of the printer operation.
1 2 3 4 5 6

Introduction> 10
S
WITCHES
Operation
The switches are labelled ON LINE and CANCEL and each has
three modes of operation as follows:
Function
The results of operating the switches in different contexts are
summarised below.
MODE OF
OPERATION
DESCRIPTION
Momentary press
(Press 1)
Press the switch and release it within 2 seconds of
pressing it. The operation starts immediately the
switch is released.
2-second press
(Press 2)
Press the switch and release it between2 and 5
seconds after pressing it. The operation starts
immediately the switch is released (except at job
cancellation).
5-second press
(Press 5)
Press the switch and hold it for 5 seconds or more.
The operation starts 5 seconds after pressing the
switch, even if you hold it pressed for more than 5
seconds.
STATUS
BEFORE
PRESSING
ONLINE SWITCH CANCEL SWITCH
PRESS
1
PRESS
2
PRESS
5
PRESS
1
PRESS
2
PRESS
5
ON LINE
(idling
mode)
Shifts to
OFF LINE
Prints
Menu
Map
(*1)
Prints
Demo
Print
–––
OFF LINE
(idling
mode)
Shifts to
ON LINE
Prints
Menu
Map
(*2)
prints
Demo
Print
(*2)
– – –
ON LINE
(data being
received,
processing
or printing)
Shifts to
OFF LINE
–– –Cancels
job
(*3)
–

Introduction> 11
*1: The Menu Map (or Status Page) provides details of printer
settings and status information.
*2: Shifts to ON LINE after printing has started.
*3: Executes job cancellation 2 seconds after start of switch
operation (even if the switch is held down longer).
LED
DISPLAYS
General
Printer status (as indicated by the LEDs) can be broadly
categorised as follows:
1. Normal status: the printer is operating normally e.g. it is
ON LINE or processing.
2. Warning status: you can continue to use the printer
without intervention but an error may result.
Requesting
manual
feed, no
paper in MP
Tray or
paper size
mismatch
Starts
paper
supply
– – – Cancels
job
(*3)
–
No paper in
Tray 1 or
Tray 1 open
––––Cancels
job
(*3)
–
Memory
overflow or
invalid data
Recovers
from the
error and
shifts to ON
LINE
– – – – –
Paper jam – – – – – –
At cover
open/close
after the
waste toner
has become
full
Recognises
the toner
has been
changed
– – Recognises
the toner
has not
been
changed
– –
STATUS
BEFORE
PRESSING
ONLINE SWITCH CANCEL SWITCH
PRESS
1
PRESS
2
PRESS
5
PRESS
1
PRESS
2
PRESS
5

Introduction> 12
3. Error status: you cannot continue to use the printer.
Intervention is required to recover from the error. Fatal
errors are irrecoverable and require a service call.
When several different status situations occur concurrently, only
the status with the highest priority is displayed on the LEDs.
Warning status combined with the highest-priority normal status
is displayed on the LEDs.
Function
A summary of the functions of each LED is given below:
Illumination and meaning
To be able to indicate a large number of status situations both
individually and in combination, the LEDs are illuminated as
follows:
LED FUNCTION
Power
(Ready)
Indicates POWER ON, ON LINE, OFF LINE, power saving,
data receiving, printing, job cancelling, warming up,
density adjustment/temperature adjustment in progress
Paper Indicates paper out warning/alarm, manual feed request
Consumable Indicates consumables life warning/alarm, consumables
installation error
Alarm Indicates paper jam, cover open error
LED ILLUMINATION STATUS
Power
(Ready)
Green
OFF Power OFF
ON ON LINE (idle)
Blinking 1 (2S cycle) OFF LINE (this blinking pattern
always takes place while an
error is occurring)
Blinking 2 (500mS cycle) Data being received, printing,
warming up, density
adjustment/temperature
adjustment in progress
Blinking 3 (120mS cycle) Job cancelling in progress
Blinking 4 (4.5S ON and
500mS OFF)
Power saving mode

Introduction> 13
The Status Monitor provides a readable description of the printer
status corresponding to the indications of the LEDs. If you have
the Status Monitor Preferences set to Pop up on alerts, this
readable message will be presented on screen whenever an
abnormal condition occurs.
Paper,
Consumable,
Alarm
(Amber)
OFF ON LINE
ON A warning is indicated
(printing possible)
Blinking 1 (2S cycle) An error has occurred but
printing can continue if you
press the ON LINE or CANCEL
switch.
Blinking 2 (500mS cycle) An error has occurred. You
need to replace consumables
or remove jammed paper, for
example. The printer then
recovers from the error and
printing becomes possible
again.
Blinking 3 (120mS cycle) A serious error has occurred.
rebooting or a service call is
required.
LED ILLUMINATION STATUS

Paper recommendations> 14
P
APER
RECOMMENDATIONS
Your printer will handle a variety of print media, including a range
of paper weights and sizes, transparencies and envelopes. This
section provides general advice on choice of media, and explains
how to use each type.
The best performance will be obtained when using standard
75~90g/m² paper designed for use in copiers and laser printers.
Suitable types are:
• Arjo Wiggins Conqueror Colour Solutions 90g/m²;
• Colour Copy by Neusiedler.
Use of heavily embossed or very rough textured paper is not
recommended.
Pre-printed stationery can be used, but the ink must not offset
when exposed to the high fuser temperatures used in the printing
process.
Envelopes should be free from twist, curl or other deformations.
They should also be of the rectangular flap type, with glue that
remains intact when subjected to hot roll pressure fusing used in
this type of printer. Window envelopes are not suitable.
Transparencies should be of the type designed for use in
copiers and laser printers. We strongly recommend Oki
transparencies (Order No. 01074101). In particular, avoid office
transparencies designed for use by hand with marker pens.
These will melt in the fuser and cause damage.
Labels should also be of the type recommended for use in
copiers and laser printers, in which the base carrier page is
entirely covered by labels. Other types of label stock may
damage the printer due to the labels peeling off during the
printing process. Suitable types are:
• Avery White Laser Label types 7162, 7664, 7666 (A4),
or 5161 (Letter);
• Kokuyo A693X series (A4) or A650 (B5).
Business cards recommended are produced by Oki (Order
No. 09002985).

Paper recommendations> 15
C
ASSETTE
TRAY
If you have identical paper stock loaded in the multi purpose tray,
you can have the printer automatically switch to the other tray
when the current tray runs out of paper. When printing from
Windows applications, this function is enabled in the driver
settings. (See “Printer settings in Windows” on page 21.) When
printing from other systems, this function is enabled in the Print
Menu. (See “Printer functions (User Settings)” on page 40.)
M
ULTI
PURPOSE
TRAY
The multi purpose tray can handle the same media sizes as the
cassette trays but in weights of 75g/m² to 203g/m². For very
heavy paper stock, use the face up (rear) paper stacker. This
ensures that the paper path through the printer is almost
straight.
The multi purpose tray can feed paper widths as small as 105mm
and lengths up to 1200mm (banner printing).
For paper lengths exceeding 356mm (Legal 14in.) use paper
stock between 90g/m² and 128g/m² and the face up (rear) paper
stacker.
Use the multi purpose tray for printing on envelopes and
transparencies. Up to 50 sheets of transparencies or 10
envelopes can be loaded at one time, subject to a maximum
stacking depth of 10mm.
Paper or transparencies should be loaded print side up and top
edge into the printer.
SIZE DIMENSIONS WEIGHT (G/M²)
A6 105 x 148mm
Light 64-74g/m²
Medium 75-90g/m²
Heavy 91-120g/m²
A5 148 x 210mm
B5 182 x 257mm
Executive 184.2 x 266.7mm
A4 210 x 297mm
Letter 215.9 x 279.4mm
Legal 13in. 216 x 330mm
Legal 13.5in. 216 x 343mm
Legal 14in. 216 x 356mm

Paper recommendations> 16
F
ACE
DOWN
STACKER
The face down stacker on the top of the printer can hold up to
250 sheets of 80g/m² standard paper and can handle paper
stocks up to 120g/m². Pages printed in reading order (page 1
first) will be sorted in reading order (last page on top, facing
down).
F
ACE
UP
STACKER
The face up stacker at the rear of the printer should be opened
and the tray extension pulled out when required for use. In this
condition paper will exit via this path, regardless of driver
settings.
The face up stacker can hold up to 100 sheets of 80g/m²
standard paper, and can handle stocks up to 203g/m².
Always use this stacker and the multi purpose feeder for paper
stocks heavier than 120g/m².

Loading Paper> 17
L
OADING
P
APER
C
ASSETTE
TRAY
1. Remove the paper tray from the printer.
2.
Fan the paper to be loaded at the edges (1) and in the
middle (2) to ensure that all sheets are properly separated,
then tap the edges of the stack on a flat surface to make it
flush again (3).
123

Loading Paper> 18
3. Load the paper (for letter headed paper load face down
with top edge towards the front of the printer).
4. Adjust the rear stopper (1) and paper guides (2) to the
size of paper being used.
To prevent paper jams:
• Do not leave space between the paper and the guides
and rear stopper.
• Do not overfill the paper tray. Capacity depends on the
type of paper stock.
• Do not load damaged paper.
• Do not load paper of different sizes or types at the
same time.
• Do not pull the paper tray out during printing.
• Close the paper tray gently.
21

Loading Paper> 19
5. For face down printing, make sure the face up (rear)
stacker (3) is closed (the paper exits from the top of the
printer). Stacking capacity is approximately 250 sheets,
depending on paper weight.
6. For face up printing, make sure the face up (rear)
stacker (3) is open and the paper support (4) is extended.
Paper is stacked in reverse order and tray capacity is
approximately 100 sheets, depending on paper weight.
7. Always use the face up (rear) stacker for heavy paper
(card stock etc.).
CAUTION!
Do not open or close the rear paper exit while printing as it
may result in a paper jam.
3
4

Loading Paper> 20
M
ULTI
PURPOSE
TRAY
1. Open the multi purpose tray and press gently down on the
paper platform (1) to ensure it is latched down.
2. Load the paper and adjust the paper guides (2) to the size
of paper being used.
• When printing on headed paper load the paper into the
multi purpose tray with pre-printed side up and top
edge into the printer.
• Envelopes should be loaded face up with top edge to
the left and short edge into the printer.
• Do not exceed the paper capacity of about 50 sheets or
10 envelopes. Maximum stacking depth is 10mm.
3. Press the tray latch button (3) inwards to release the
paper platform, so that the paper is lifted and gripped in
place.
Set the correct paper size for the multi purpose tray in the Media
Menu. (See “Printer functions (User Settings)” on page 40.)
2
1
3
This manual suits for next models
1
Table of contents
Other Oki Printer manuals

Oki
Oki C9300 Series User manual

Oki
Oki C8800dn Owner's manual

Oki
Oki CX3641 MFP User manual

Oki
Oki C5450 User manual

Oki
Oki C5400 Series User manual

Oki
Oki C610dn Quick start guide

Oki
Oki MPS6150c User manual

Oki
Oki C5150n User manual

Oki
Oki C9200 User manual

Oki
Oki C911dn Operating and maintenance instructions

Oki
Oki C 5650dn Installation instructions

Oki
Oki C110 Quick start guide

Oki
Oki C9000 Series User manual

Oki
Oki C710dn User manual

Oki
Oki B6200 Series User manual

Oki
Oki OKIPAGE18 User manual

Oki
Oki C330dn User manual

Oki
Oki OKIPAGE 14ex User manual

Oki
Oki Okipage8z Technical manual

Oki
Oki MICROLINE MX Series User manual