Oki ES6150 User manual

User’s Guide
ES6150

Preface > 2
P
REFACE
Every effort has been made to ensure that the information in this document is complete,
accurate, and up-to-date. The manufacturer assumes no responsibility for the results of
errors beyond its control. The manufacturer also cannot guarantee that changes in software
and equipment made by other manufacturers and referred to in this guide will not affect
the applicability of the information in it. Mention of software products manufactured by
other companies does not necessarily constitute endorsement by the manufacturer.
While all reasonable efforts have been made to make this document as accurate and helpful
as possible, we make no warranty of any kind, expressed or implied, as to the accuracy or
completeness of the information contained herein.
The most up-to-date drivers are available from:
http://www.okiexecutiveseries.com
Copyright © 2009 Oki Europe Ltd. All rights reserved.
Oki is a registered trademark of Oki Electric Industry, Company Ltd.
Oki Printing Solutions is a registered trademark of Oki Data Corporation.
Energy Star is a registered trademark of the United States Environmental Protection
Agency.
Microsoft, MS-DOS and Windows are registered trademarks of Microsoft Corporation.
Other product names and brand names are registered trademarks or trademarks of their
proprietors.
Printer Model No:ES6150 (B6500): JEB-6
Achieves ENERGY STAR energy savings, product fully qualifies when packaged
with (or used with) a duplex unit.
This product complies with the requirements of the Council Directives 2004/
108/EC (EMC) and 2006/95/EC (LVD) and 1999/5/EC (R&TTE) as amended
where applicable on the approximation of the laws of the member states
relating to electromagnetic compatibility, low voltage and radio &
telecommunications terminal equipment.

Emergency first aid > 3
E
MERGENCY
FIRST
AID
Take care with toner powder:
If swallowed, give small amounts of cold water and seek medical
attention. DO NOT attempt to induce vomiting.
If inhaled, move the person to an open area for fresh air. Seek medical
attention.
If it gets into the eyes, flush with large amounts of water for at least
15 minutes keeping eyelids open. Seek medical attention.
Spillages should be treated with cold water and soap to help reduce
risk of staining skin or clothing.
M
ANUFACTURER
Oki Data Corporation,
4-11-22 Shibaura, Minato-ku,
Tokyo 108-8551,
Japan
I
MPORTER
TO
THE
EU/
AUTHORISED
REPRESENTATIVE
Oki Europe Limited (trading as Oki Printing Solutions)
Blays House
Wick Road
Egham
Surrey, TW20 0HJ
United Kingdom
For all sales, support and general enquiries contact your local distributor.

Contents > 4
C
ONTENTS
Preface . . . . . . . . . . . . . . . . . . . . . . . . . . . . . . . . . . . . . . . . . . . . . . . . . . .2
Emergency first aid . . . . . . . . . . . . . . . . . . . . . . . . . . . . . . . . . . . . . . . . . .3
Manufacturer. . . . . . . . . . . . . . . . . . . . . . . . . . . . . . . . . . . . . . . . . . . . . . .3
Importer to the EU/authorised representative. . . . . . . . . . . . . . . . . . . . .3
Contents . . . . . . . . . . . . . . . . . . . . . . . . . . . . . . . . . . . . . . . . . . . . . . . . . .4
Notes, cautions and warnings . . . . . . . . . . . . . . . . . . . . . . . . . . . . . . . . . .6
Basic Operations . . . . . . . . . . . . . . . . . . . . . . . . . . . . . . . . . . . . . . . . . . . .7
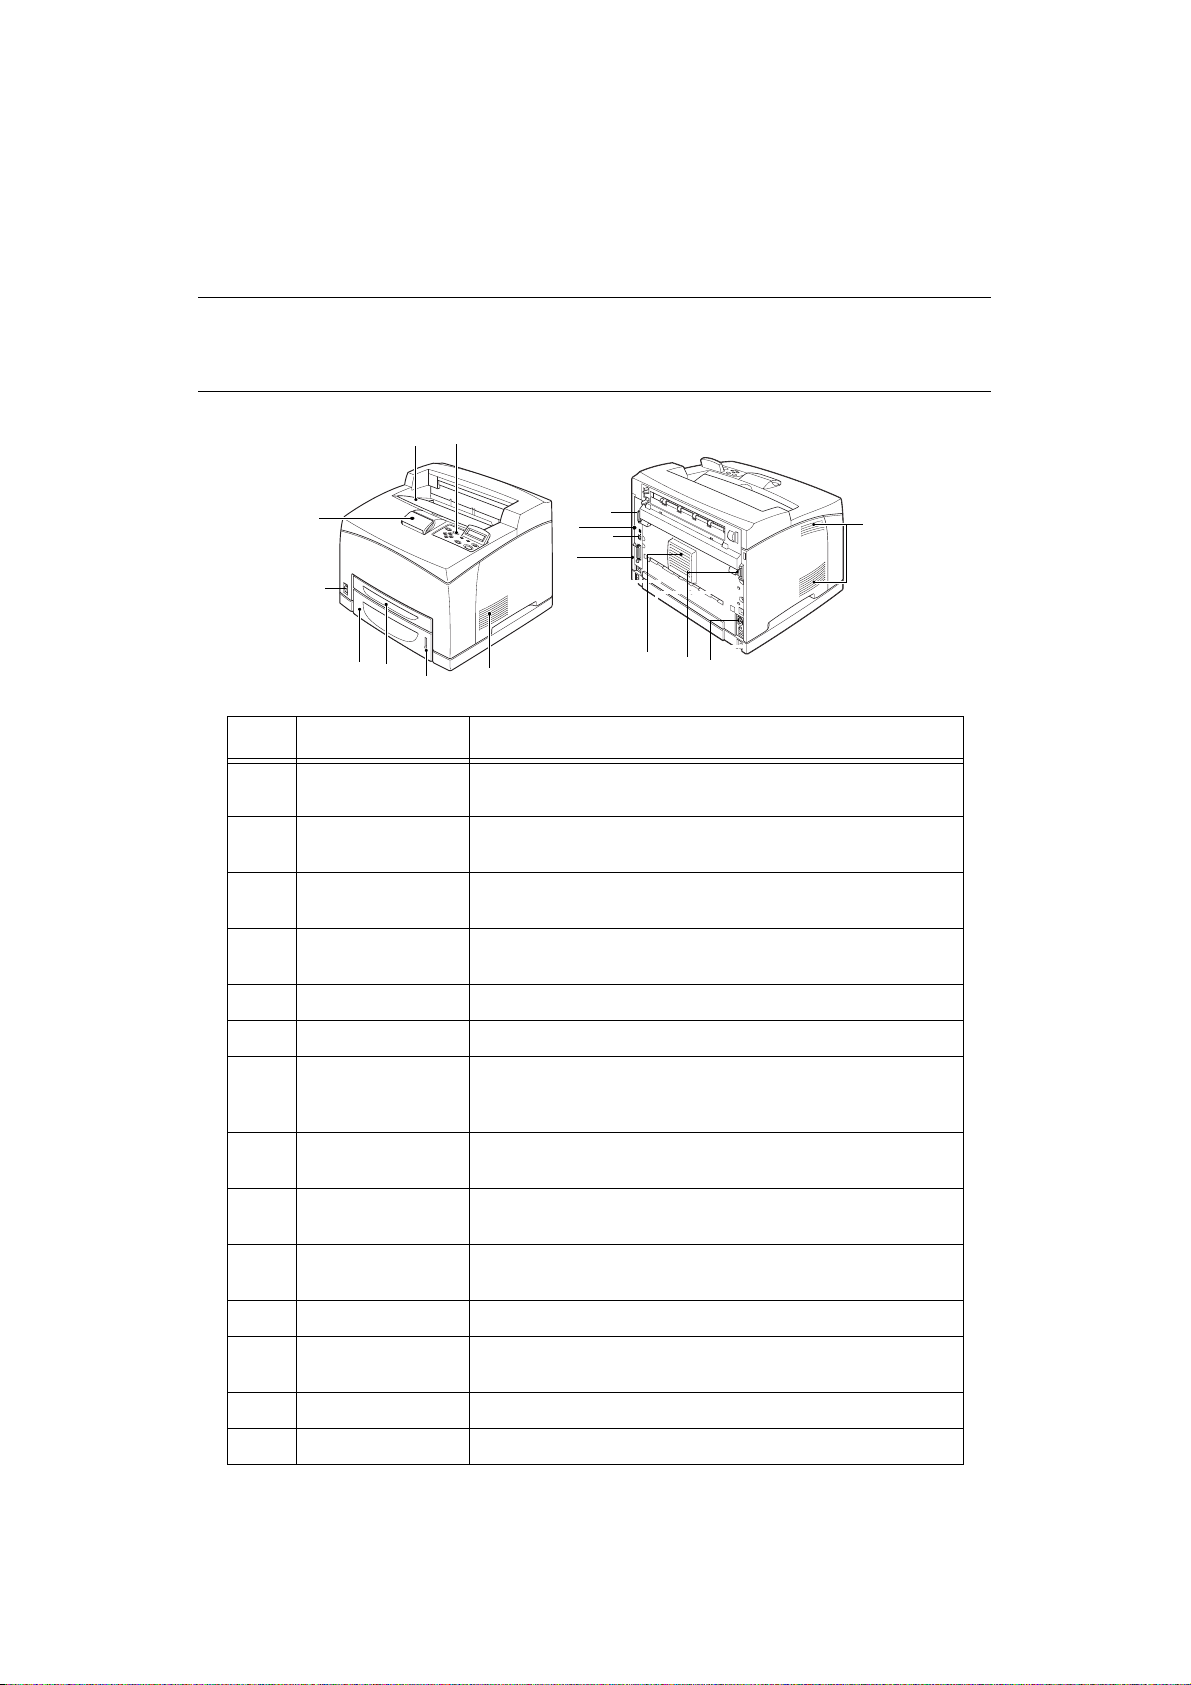
Main Components and Their Functions . . . . . . . . . . . . . . . . . . . . . . . . . . . 7
Standard Configuration . . . . . . . . . . . . . . . . . . . . . . . . . . . . . . . . . . . 7
With Optional Accessories. . . . . . . . . . . . . . . . . . . . . . . . . . . . . . . . . . 8
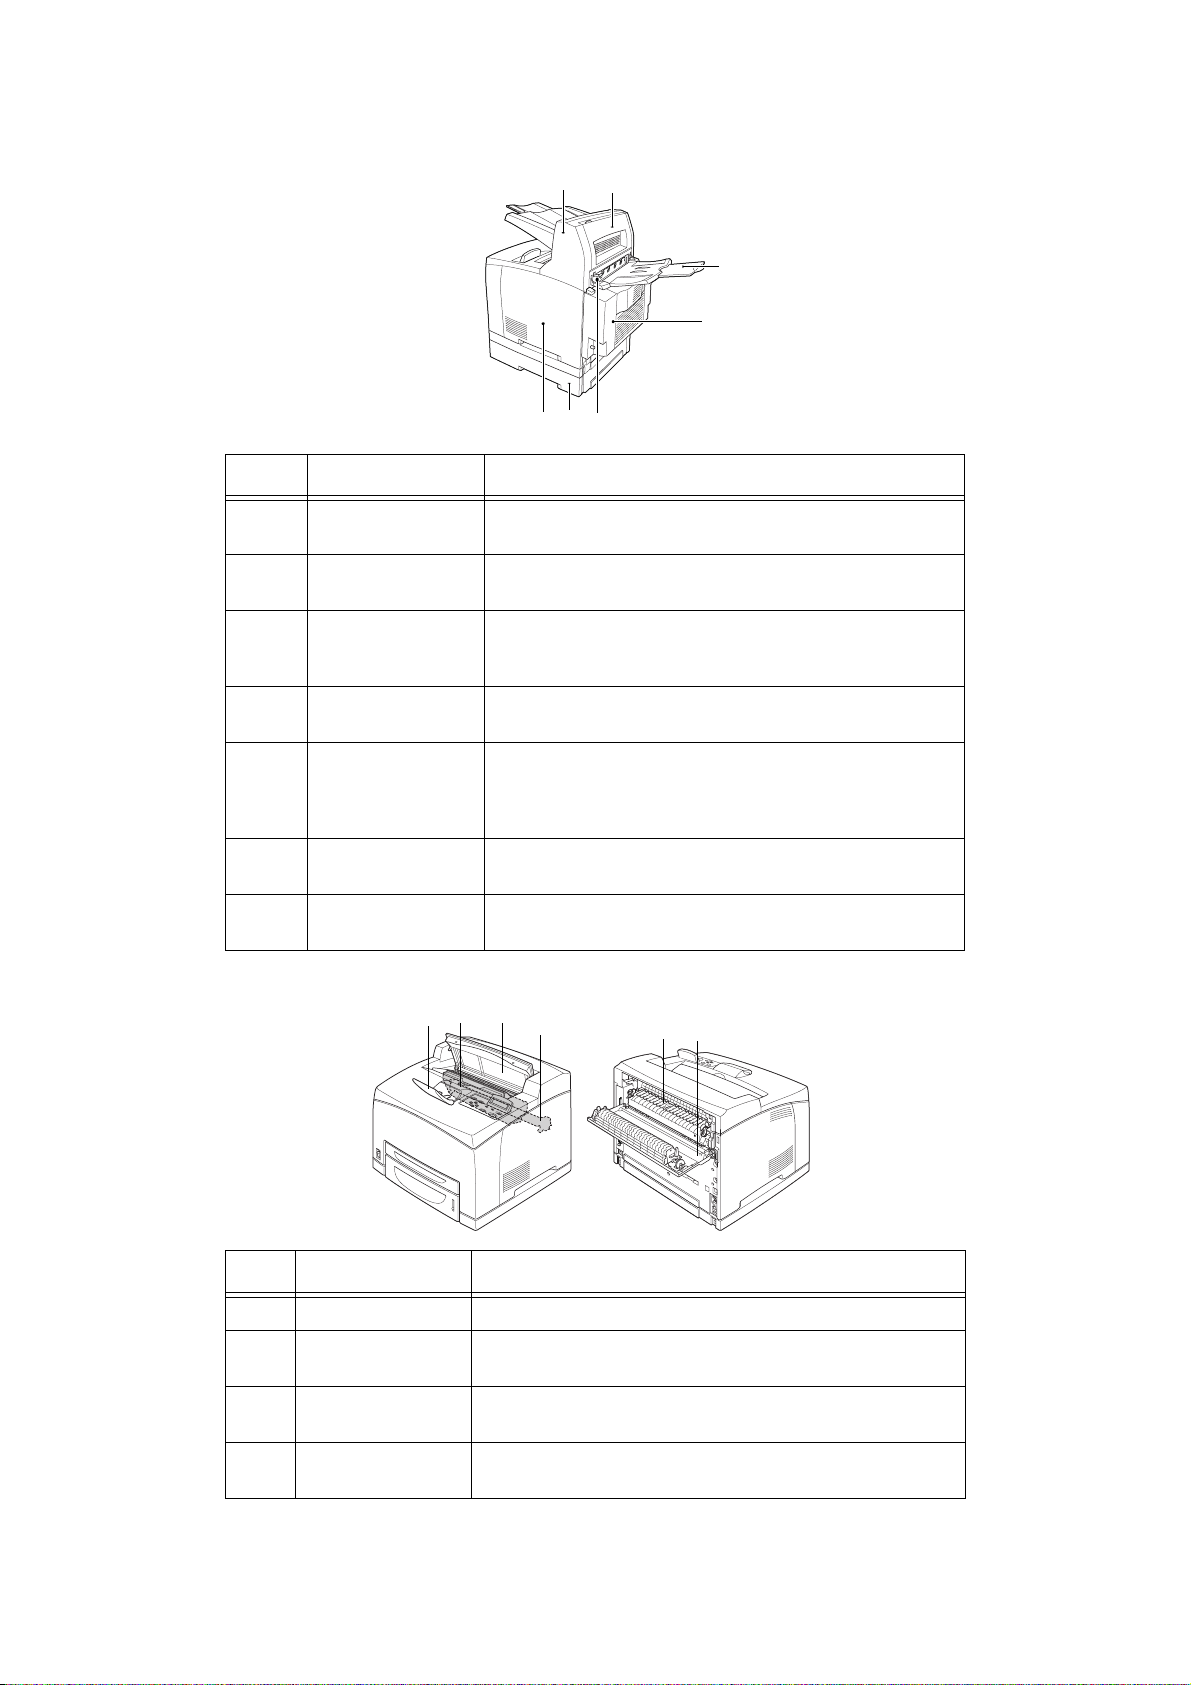
Internal View . . . . . . . . . . . . . . . . . . . . . . . . . . . . . . . . . . . . . . . . . . 8
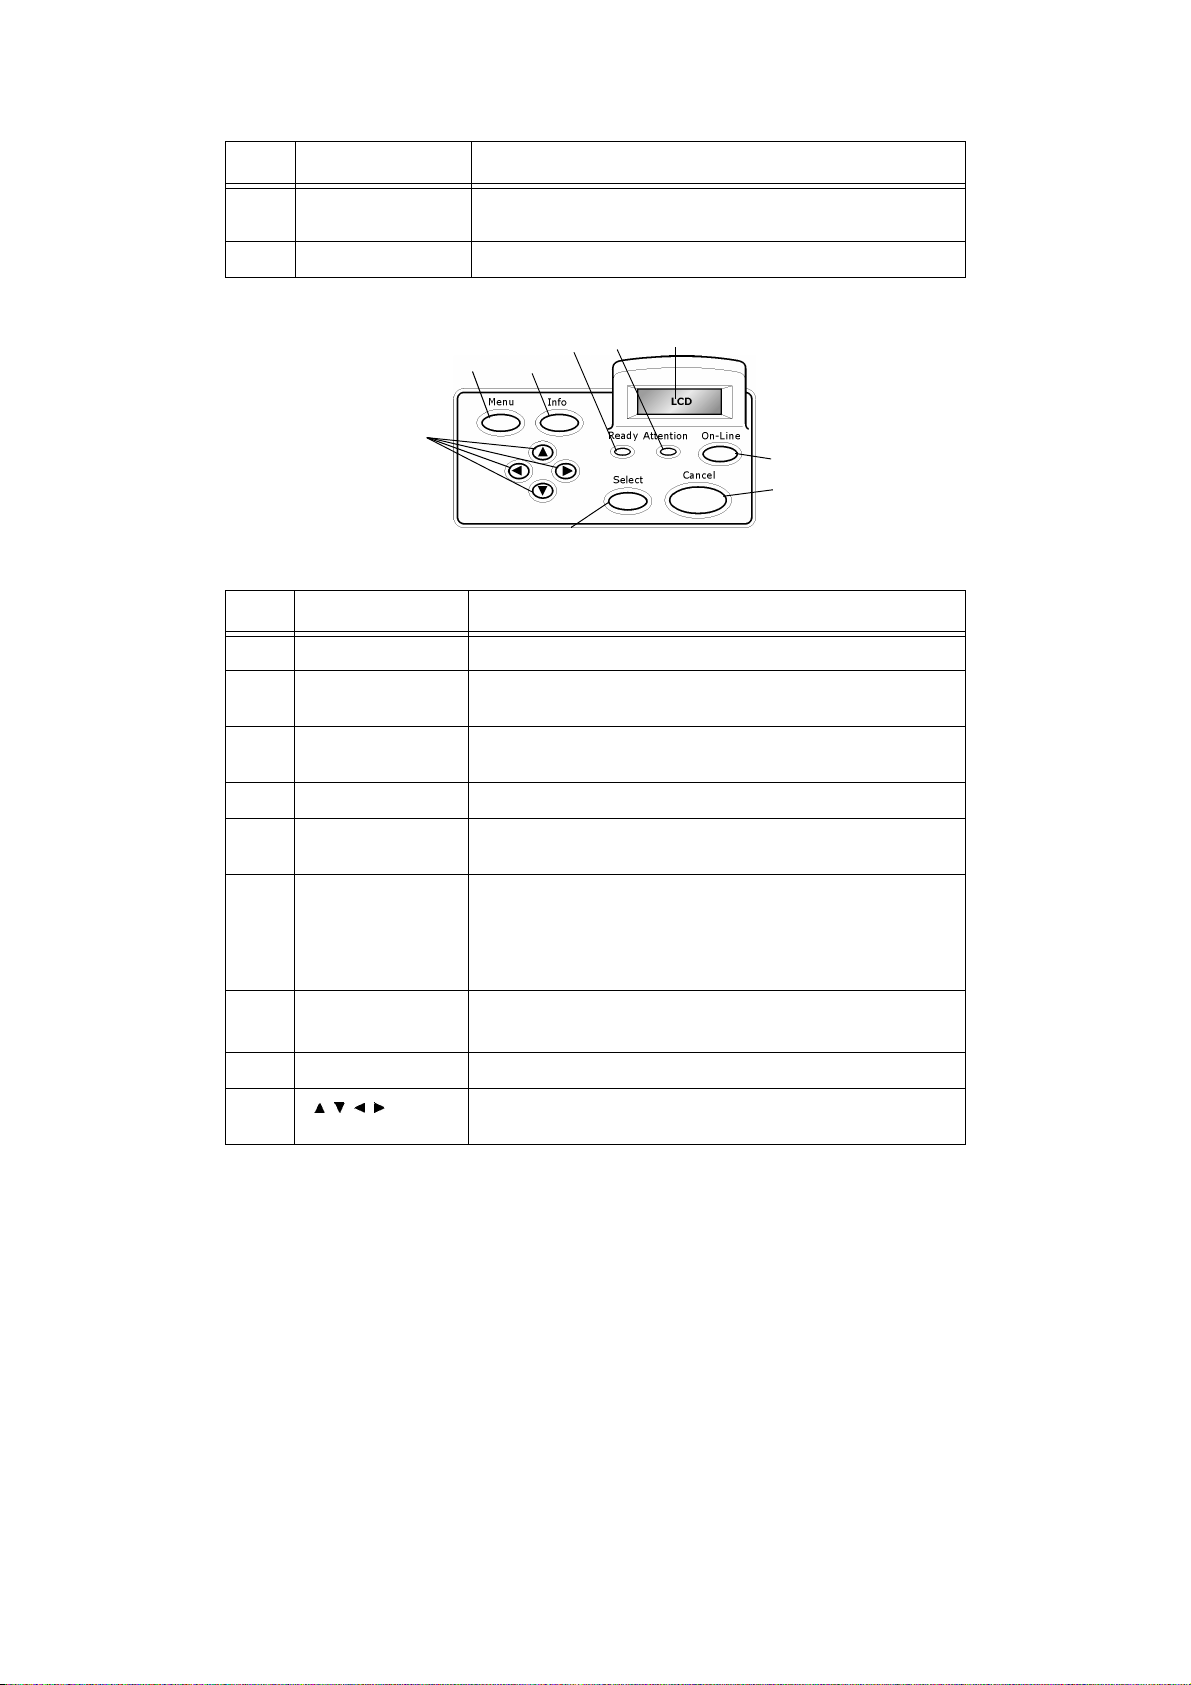
Control Panel . . . . . . . . . . . . . . . . . . . . . . . . . . . . . . . . . . . . . . . . . . . . 9
Display. . . . . . . . . . . . . . . . . . . . . . . . . . . . . . . . . . . . . . . . . . . . . . . . .10
Print Screen . . . . . . . . . . . . . . . . . . . . . . . . . . . . . . . . . . . . . . . . . . .10
Menu Screen. . . . . . . . . . . . . . . . . . . . . . . . . . . . . . . . . . . . . . . . . . .10
Switching On and Off the Power . . . . . . . . . . . . . . . . . . . . . . . . . . . . . . .11
Switching On the Power . . . . . . . . . . . . . . . . . . . . . . . . . . . . . . . . . . . . .11
Switching Off the Power . . . . . . . . . . . . . . . . . . . . . . . . . . . . . . . . . . . . .11
Power Save Modes . . . . . . . . . . . . . . . . . . . . . . . . . . . . . . . . . . . . . . . .12
Exiting the Power Save Mode . . . . . . . . . . . . . . . . . . . . . . . . . . . . . . .12
Cancelling/Checking Printing. . . . . . . . . . . . . . . . . . . . . . . . . . . . . . . . . .12
Cancelling Printing. . . . . . . . . . . . . . . . . . . . . . . . . . . . . . . . . . . . . . .12
Checking Status of Print Data . . . . . . . . . . . . . . . . . . . . . . . . . . . . . . .13
Displaying Optional Accessory Configuration and Paper Tray Settings . . . . .13
Printing . . . . . . . . . . . . . . . . . . . . . . . . . . . . . . . . . . . . . . . . . . . . . . . . . .14
Printing From the Computer . . . . . . . . . . . . . . . . . . . . . . . . . . . . . . . . . .14
Useful Print Features In Properties Dialog Box . . . . . . . . . . . . . . . . . . .14
Printing on Envelopes . . . . . . . . . . . . . . . . . . . . . . . . . . . . . . . . . . . . . .15
Loading Envelopes. . . . . . . . . . . . . . . . . . . . . . . . . . . . . . . . . . . . . . .15
Printing on Envelopes . . . . . . . . . . . . . . . . . . . . . . . . . . . . . . . . . . . .15
Printing on Transparencies . . . . . . . . . . . . . . . . . . . . . . . . . . . . . . . . . . .16
Loading Transparencies . . . . . . . . . . . . . . . . . . . . . . . . . . . . . . . . . . .16
Printing on Transparencies . . . . . . . . . . . . . . . . . . . . . . . . . . . . . . . . .16
Printing on Custom Size Paper/Long Paper . . . . . . . . . . . . . . . . . . . . . . . .17
Loading Custom Size Paper . . . . . . . . . . . . . . . . . . . . . . . . . . . . . . . .17
Setting Custom Paper Sizes . . . . . . . . . . . . . . . . . . . . . . . . . . . . . . . .18
Printing on Custom Size Paper . . . . . . . . . . . . . . . . . . . . . . . . . . . . . .19
Special Printing Features . . . . . . . . . . . . . . . . . . . . . . . . . . . . . . . . . . . .19
Print Confidential Document - Secure Print . . . . . . . . . . . . . . . . . . . . . .19
Stored Job . . . . . . . . . . . . . . . . . . . . . . . . . . . . . . . . . . . . . . . . . . . .19
Proof Print - Print After Checking Printing Result . . . . . . . . . . . . . . . . .19
Print at a Specified Time - Timed Job. . . . . . . . . . . . . . . . . . . . . . . . . .19
Direct Printing of PDF Files . . . . . . . . . . . . . . . . . . . . . . . . . . . . . . . . .20
Printing via Electronic Mail - E-mail Printing . . . . . . . . . . . . . . . . . . . . .20
Barcode Printing . . . . . . . . . . . . . . . . . . . . . . . . . . . . . . . . . . . . . . . .20
Loading Paper . . . . . . . . . . . . . . . . . . . . . . . . . . . . . . . . . . . . . . . . . . . . .21
Settings on the Control Panel . . . . . . . . . . . . . . . . . . . . . . . . . . . . . . . . .23
About this Chapter . . . . . . . . . . . . . . . . . . . . . . . . . . . . . . . . . . . . . . . .23
Control Panel Features . . . . . . . . . . . . . . . . . . . . . . . . . . . . . . . . . . . . . .23
LCD Display . . . . . . . . . . . . . . . . . . . . . . . . . . . . . . . . . . . . . . . . . . .24
Navigating the Control Panel Menus. . . . . . . . . . . . . . . . . . . . . . . . . . . . .24
Changing the Display and Reporting Language . . . . . . . . . . . . . . . . . . . . .24

Contents > 5
Troubleshooting . . . . . . . . . . . . . . . . . . . . . . . . . . . . . . . . . . . . . . . . . . .25
When Paper Jams . . . . . . . . . . . . . . . . . . . . . . . . . . . . . . . . . . . . . . . . .25
Inside Cover A . . . . . . . . . . . . . . . . . . . . . . . . . . . . . . . . . . . . . . . . .25
Inside Paper Tray . . . . . . . . . . . . . . . . . . . . . . . . . . . . . . . . . . . . . . .25
Inside Cover B . . . . . . . . . . . . . . . . . . . . . . . . . . . . . . . . . . . . . . . . .26
Inside Cover C (Duplex Unit) . . . . . . . . . . . . . . . . . . . . . . . . . . . . . . .26
Inside Cover D (Offset Catch Trays) . . . . . . . . . . . . . . . . . . . . . . . . . .26
When Problems Occur . . . . . . . . . . . . . . . . . . . . . . . . . . . . . . . . . . . . . .27
When the Print Quality is Poor . . . . . . . . . . . . . . . . . . . . . . . . . . . . . . . .30
Network Related Troubles. . . . . . . . . . . . . . . . . . . . . . . . . . . . . . . . . . . .32
Using TCP/IP. . . . . . . . . . . . . . . . . . . . . . . . . . . . . . . . . . . . . . . . . . .32
Daily Care . . . . . . . . . . . . . . . . . . . . . . . . . . . . . . . . . . . . . . . . . . . . . . . .33
Drum/Toner Cartridge Replacement . . . . . . . . . . . . . . . . . . . . . . . . . . . .33
Caution on Handling the Drum/Toner Cartridge. . . . . . . . . . . . . . . . . . .33
Replacing the Drum/Toner Cartridge . . . . . . . . . . . . . . . . . . . . . . . . . .33
Cleaning the Printer. . . . . . . . . . . . . . . . . . . . . . . . . . . . . . . . . . . . . . . .35
Cleaning the Exterior . . . . . . . . . . . . . . . . . . . . . . . . . . . . . . . . . . . . .35
Cleaning the Interior . . . . . . . . . . . . . . . . . . . . . . . . . . . . . . . . . . . . .35
Cleaning the Feed Rolls . . . . . . . . . . . . . . . . . . . . . . . . . . . . . . . . . . .36
When Moving the Printer . . . . . . . . . . . . . . . . . . . . . . . . . . . . . . . . . . . .37
Index . . . . . . . . . . . . . . . . . . . . . . . . . . . . . . . . . . . . . . . . . . . . . . . . . . . .39

Notes, cautions and warnings > 6
N
OTES
,
CAUTIONS
AND
WARNINGS
For the protection of your product, and in order to ensure that you benefit from its full
functionality, this model has been designed to operate only with genuine original toner
cartridges. Any other toner cartridge may not operate at all, even if it is described as
“compatible”, and if it does work, your product's performance and print quality may be
degraded.
Use of non-genuine products may invalidate your warranty.
Specifications subject to change without notice. All trademarks acknowledged.
NOTE
A note provides additional information to supplement the main text.
CAUTION!
A caution provides additional information which, if ignored, may
result in equipment malfunction or damage.
WARNING!
A warning provides additional information which, if ignored, may
result in a risk of personal injury.

Basic Operations > 7
B
ASIC
O
PERATIONS
M
AIN
C
OMPONENTS
AND
T
HEIR
F
UNCTIONS
S
TANDARD
C
ONFIGURATION
NOTE
Images used in this manual may include optional features that your printer
does not have installed.
NO. NAME DESCRIPTION
1 Centre output tray Print jobs are output here with the printed side facing
down.
2 Control panel Consists of the essential operation buttons, indicators and
display.
3 Ventilation hole Releases heat to prevent the interior of the printer from
heating up.
4 Paper meter A meter to check the amount of remaining paper.
Attached to the 550 tray.
5 Tray 1 Sets the 150 tray.
6 Tray 2 Sets the 550 tray.
7 Power switch Switches the power of the printer on and off. Pressing the
switch to the <|> position switches it on and pressing it to
the <0> position switches it off.
8 Paper stopper Raise this when printing on paper larger than Letter/A4
size.
9 Duplex unit
connector
For connecting the optional duplex unit.
10 Power cord cable
connector
For connecting the power cord cable.
11 Parallel connector For connecting the parallel cable.
12 Network
connector
For connecting the network cable when connecting this
printer to the network for use.
13 USB connector For connecting the USB cable.
14 Serial connector For connecting the serial cable.
12
8
7
3
654
13 12
11
3
3910
14

Basic Operations > 8
W
ITH
O
PTIONAL
A
CCESSORIES
I
NTERNAL
V
IEW
NO. NAME DESCRIPTION
1 Offset catch tray
(optional)
Allows you to stagger the output position for each print
job (offset output).
2 Cover D (optional) Open this when paper is jammed inside the offset catch
tray.
3Reartray
(optional)
Use this tray if you want to reduce curling of paper when
printing heavyweight paper. Print jobs are output here
with the printed side facing up.
4 Duplex unit (Cover
C) (optional)
Enables 2 sided printing. When paper is jammed inside
the duplex unit, it is described as cover C.
5 Rear output tray
lever
When the rear tray has been installed, the paper output
location can be switched between it and the centre
output tray. Raise the lever to output to the rear tray
and lower the lever to output to the centre output tray.
6 A4 universal tray
(optional)
Can install up to two levels of an Letter/A4 universal tray
(550) to this printer.
7Rightdetachable
cover
Remove this when installing optional accessories such as
hard disk and additional memory.
NO. NAME DESCRIPTION
1 Paper stopper Raise this when printing on paper larger than A4 size.
2 Drum/toner
cartridge
Contains the toner and the photosensitive drum.
3 Cover A Open this when replacing the drum/toner cartridge and
removing jammed paper.
4 Fuser unit Fixes the toner on the paper. Do not touch this when
using the printer as it is hot.
12
4
5
3
6
7
5
32
146

Basic Operations > 9
C
ONTROL
P
ANEL
5 Transfer roll
cartridge
Transfers the toner image on the surface of the
photosensitive drum to the paper.
6 Cover B Open this when removing jammed paper.
NO. NAME DESCRIPTION
1MENU button Press to move to menu operation.
2INFO button Press to print the menu map. The menu map (2 pages)
will print with all the current printer settings.
3READY indicator When the light is on, the printer is ready to receive data
from the computer.
4LCD display Displays the setting items, machine status, and messages.
5ATTENTION
indicator
When the light is on, there is a malfunction in the printer.
6On-Line button Press to enter the off-line status. When in the off-line
status, the machine cannot receive data or process
printing. Press again to exit the off-line status and enter
the on-line status (where the machine can receive data
from the computer).
7CANCEL button Press to cancel printing.
Press to exit Menu Mode.
8Select button Press to select the currently displayed menu on setting.
9buttons Press these to move to the required menu, item and
candidate value on the display.
NO. NAME DESCRIPTION
12
34
5
6
7
8
9

Basic Operations > 10
D
ISPLAY
There are two types of screens shown: Print screen (for displaying printer status) and Menu
screen (for setting configuration).
P
RINT
S
CREEN
The Print screen appears when the machine is printing or waiting for data. The following
contents are shown on the screen.
Current printer status—Shown at top left, e.g. ONLINE (ready to print), printing, etc.
Port receiving data—Shown at bottom left. Which printer port is currently receiving print
data, e.g. USB, Net, etc.
Emulation—Shown at bottom right. Which page description language emulation is currently
in use, e.g. PCL, PS, etc.
M
ENU
S
CREEN
Screen for configuring settings related to the printer.
This screen appears when you press the Menu button. The first of a list of menus appears
at top right. Further depressions of the Menu button or the buttons cycle through the
available printers menus.
Refer to:
>Items that can be set on the Menu screen: “Settings on the Control Panel” on
page 23.
NOTE
The message displayed differs according to the options installed and setting
status.

Switching On and Off the Power > 11
S
WITCHING
O
N
AND
O
FF
THE
P
OWER
S
WITCHING
O
N
THE
P
OWER
1. Press the power switch of the printer to the <|> position.
2. When the power is switched on, various screens will be
displayed on the control panel. Check that this display
changes to ONLINE.
Important:
>If error message is displayed, refer to the Message List in the Reference Guide for
guidance on how to fix it.
S
WITCHING
O
FF
THE
P
OWER
Important:
>Do not switch off the printer power when printing is in progress. It may lead to a
paper jam.
>Once the power is switched off, print data remaining in this printer or information
saved in the memory of this printer will be deleted.
1. By checking the display on the control panel, confirm that the printer is not
processing any data.
2. Press the power switch to the <O> position to switch the
power off.
NOTE
When PLEASE WAIT… is displayed, the printer is in the process of warming
up. Printing is unavailable during this period. When the printer is ready for
printing, ONLINE will be displayed.

Switching On and Off the Power > 12
P
OWER
S
AVE
M
ODES
This printer is equipped with a Power Save mode to reduce power consumption when it is
left idle.The default idle time from last print activity until the Printer enters Power Save
mode is 5 minutes. This time can be adjusted by the operator to any of the following: 5,
15, 30, 60 or 120 minutes.
When no print data is received within 5 minutes (default) since the last page is printed, the
printer will enter Power Save mode. An informative message is displayed on the operator
panel indicating Power Save Mode. Consumption of power during Power Save mode is 10
Watts or less, and the time required to exit from the Power Save mode to a print-ready
status is about 10 seconds.
E
XITING
THE
P
OWER
S
AVE
M
ODE
The printer automatically exits from Power Save mode once it receives data from the
computer or if any key on the operator panel is pressed.
C
ANCELLING
/C
HECKING
P
RINTING
C
ANCELLING
P
RINTING
To cancel printing, you can either cancel the print job at this printer or at the computer.
Cancelling a Print Job at the Printer
Press the CANCEL button then press the ON-LINE button on the control panel. However,
pages being printed at the moment will continue to be printed.
Cancelling Print Jobs at the Computer
Double-click the printer icon at the bottom right of the taskbar in Windows.
From the displayed window, click the document name that you wish to delete and press the
Delete key.

Switching On and Off the Power > 13
C
HECKING
S
TATUS
OF
P
RINT
D
ATA
Checking in Windows
Double-click the printer icon on the task bar at the bottom right of the screen.
From the displayed window, check the column, [Status].
D
ISPLAYING
O
PTIONAL
A
CCESSORY
C
ONFIGURATION
AND
P
APER
T
RAY
S
ETTINGS
When using this printer as a network printer and with SNMP protocol enabled, you can
display on the printer driver, the optional accessory configuration and settings configured
at the control panel such as paper type or size. These settings are displayed on the
[Options] tab. This section explains the procedure using Windows XP as an example.
Important:
>When using USB or Parallel connection to this printer, this feature cannot be used.
You have to manually set the items on the printer driver.
>The rear tray information cannot be obtained. You have to manually set the item.
>For paper size and paper type settings, you must configure them at the control panel
beforehand. Even if you change the settings here, they will not be reflected on the
printer itself.
1. From the Start menu, click Printers and Faxes and then display the properties of
the printer to be used.
2. Click the Device Options tab.
3. Click Get Information from Printer.
4. Click OK. The contents of the Device Options tab will be updated based on the data
obtained from the printer.
NOTE
>When using this feature, you have to activate the SNMP port (default:
[Enable]) on the printer using the control panel.
>For Windows NT 4. 0/Windows 2000/Windows2003/Windows XP and
Windows Vista, only users with administrator’s rights can change the
settings. Users without administrator’s rights can only check the contents.
NOTE
The properties of the printer can be displayed on the printer driver.

Printing > 14
P
RINTING
P
RINTING
F
ROM
THE
C
OMPUTER
This section explains the basic flow when printing from application software in a Windows®
environment.
(The procedure may differ according to the computer or system configuration used.)
Important:
>Do not switch off the power to the printer when printing is in progress. It may lead
to a paper jam.
1. From the File menu of the application software, select Print.
2. Select this printer as the printer to be used to start printing. To use the various print
features of this printer, display the printer properties dialog box to set the necessary
items.
For details on each item and how to set them, refer to the Online Help for the printer
driver.
Important:
>If the paper tray information is not correct, change the settings on the Set Up tab of
the printer driver before continuing. For details on how to do the settings, refer to
the Online Help for the printer driver.
U
SEFUL
P
RINT
F
EATURES
I
N
P
ROPERTIES
D
IALOG
B
OX
>The following selections are available in the Setup tab: Paper Size, Media Type,
Paper Source, Paper Destination Paper Feed Options*, Finishing Mode**, and 2-
sided Printing.
*Paper Feed Options include: Auto Resize, Covers, Auto Tray Change, Media Check,
and Skip Blank Pages, Tray 1 Settings, and Media Type.
**Finishing Mode includes: Standard, 2-up, 4-up, 6-up, 8-up, 9-up, 16-up,
PosterPrint, and Booklet.
NOTE
This section explains printing with the PCL driver as an example.
NOTE
You can set the print features in the properties dialog box from the printer icon
by selecting [Printers and Faxes] (or [Settings] > [Printers] depending on the
OS).

Printing > 15
P
RINTING
ON
E
NVELOPES
For details on the envelopes that can be used, refer to “Usable Paper” in the Reference
Guide. The procedure to print on envelopes is as follows.
L
OADING
E
NVELOPES
You have to close the flaps of the envelopes and load them with the address side facing up
in the orientation shown in the diagram below.
Envelopes should be loaded with the flap side down and to be fed into the printer in the
direction indicated by the arrow.
The following explains how to load the envelopes, using COM-10 envelopes as an example,
in trays 1 to 4.
Important:
>The reverse side of the envelope cannot be printed on.
1. Load the envelopes in the portrait orientation so that the flaps
are turned to the right side.
2. Slide the length guide and right width guide to the size of the
loaded envelopes.
3. On the control panel, change the paper type to ENVELOPE. For
details, refer to “Setting Paper Types” in the Reference Guide.
4. On the control panel, change the paper size of the tray to
COM-10 ENVELOPE. For details, refer to “Setting Custom Paper Sizes” in the
Reference Guide.
P
RINTING
ON
E
NVELOPES
To print on envelopes, display the Tray/Output tab and Basic tab. This section explains
the procedure using WordPad on Windows XP as an example.
1. From the File menu, select Print.
2. Select this printer from the drop down list and click Properties.
3. Click the Setup tab.
NOTE
For details on the procedure to load paper in a paper tray, refer to “Loading
Paper” on page 21.
NOTE
The way to display the printer properties dialog box differs according to the
application software. Refer to the manual of each application software.

Printing > 16
4. Select the loaded paper tray from Source or click the Media Type and then select
Com10.
5. Click OK.
6. Click Print in the Print dialog box to start printing.
P
RINTING
ON
T
RANSPARENCIES
L
OADING
T
RANSPARENCIES
Load transparencies in trays 1 to 4.
Important:
>Transparencies with white frames or full-colour transparencies cannot be used.
The way to load transparencies in the paper tray is the same as the way to load standard
size paper. For details, refer to “ Loading Paper” (P. 21).
You must also set paper type for the paper tray to TRANSPARENCY on the control panel.
Refer to “Setting Paper Types” in the Reference Guide to change the setting.
P
RINTING
ON
T
RANSPARENCIES
To print on transparencies, click on Properties from the File Print menu, click the Setup
tab. This section explains the procedure using WordPad on Windows XP as an example.
1. From the File menu, select Print.
2. Select this printer as the printer to be used and click Preferences.
3. Click the Media Type drop down box and click on transparencies.
4. Select the loaded paper tray from Source Drop down and click on the tray that
contains the transparencies.
5. Click the Paper Size drop down.
6. From Paper Size, select the size of the original document.
7. Click OK.
8. Click Print in the Print dialog box to start printing.
NOTE
>The way to display the printer properties dialog box differs according to
the application software. Refer to the manual of your respective
application software.
>Printing transparencies continuously may lead to the output
transparencies sticking to each other. As a guide, remove the
transparencies from the output tray after about 20 sheets and then fan
them to lower their temperatures.

Printing > 17
P
RINTING
ON
C
USTOM
S
IZE
P
APER
/L
ONG
P
APER
This section explains how to print on custom size paper such as long paper.
The paper sizes that can be set on this printer are as follows:
L
OADING
C
USTOM
S
IZE
P
APER
The way to load custom size paper with the long edge shorter than 356 mm in trays 1 to 4
is the same as loading standard size paper. For details, refer to “ Loading Paper” (P. 21).
To load long paper in tray 1, follow the procedure below:
1. Pull the paper tray out to its maximum.
2. Load the paper with the side to be printed facing up. Curl up
the back end of the paper so that it will not fall from the tray.
3. Push the paper tray completely into the printer.
LONG EDGE SHORT EDGE REMARKS
Tray 1 127–900mm (5”–35.4”) 76–216mm (3”–8.5”) To load long-size
paper with the long
edge exceeding
356mm, load the
paper with the
edge protruding
from the tray.
Trays 2–4 148–356mm (5.8”–14”) 98–216mm (3.9–8.5”)
NOTE
Pull the extendable part out to its maximum. For details on the procedure to
extend the paper tray, refer to “ Loading Paper” (P. 21)

Printing > 18
S
ETTING
C
USTOM
P
APER
S
IZES
Before printing, set the custom size on the printer driver.
You have to configure the settings on the control panel too when loading custom size paper
in trays 1 to 4 for printing. For details on setting the control panel, refer to “Setting Custom
Paper Sizes” in the Reference Guide.
On the printer driver, set the custom size in the Paper Size dialog box. This section
explains the procedure using Windows XP as an example.
1. From the File menu, click Print.
2. Select Properties then select the Setup tab.
3. Select Option as needed: Source, Media Type, etc.
4. You may select a previously stored custom size from the list or you may add an
additional custom size.
5. To add a new custom size:
(a) Select paper feed options.
(b) Select Custom Size.
(c) In the Name Field, Type a name for your custom size.
(d) Click on the Unit of measure radio button for the units you would like to use
(mm for millimetres or inch for inches.)
(e) In the Width field, enter the width of the custom size paper.
(f) In the Length field, enter the length of the custom size paper.
(g) Click add to store the new custom size.
(h) Click OK to close the Dialog Box.
CAUTION!
When setting the paper size on the printer driver and the control
panel, specify the size of the actual paper used. Setting the wrong
size for printing will cause jam detection. This is especially true if
you configure a bigger size when using a narrow width paper.
NOTE
For Windows, only users with administrator’s rights can change the settings.
Users without the rights can only check the contents.
NOTE
>You may use the Modify selection to change a previously stored custom
size.
>You may use the Delete Selection to delete a previously stored custom
size.

Printing > 19
P
RINTING
ON
C
USTOM
S
IZE
P
APER
The procedure to print on custom size paper is as follows.
This section explains the procedure using WordPad on Windows XP as an example.
1. From the File menu, select Print.
2. Select this printer as the printer to be used and click Preferences.
3. Click the Setup tab.
4. Select the appropriate tray from Source.
5. From Paper Size, select the size of the original document.
6. From Media Types, select the registered custom size, and then click OK.
7. Click Print in the Print dialog box to start printing.
S
PECIAL
P
RINTING
F
EATURES
Use of these features requires the optional hard disk or compact flash to be installed in the
printer.
Detailed instructions on how to use these features are contained in the User Reference
Guide.
IMPORTANT:
>The hard disk may be damaged and erase important data saved in the hard disk. We
recommend you back up your data.
P
RINT
C
ONFIDENTIAL
D
OCUMENT
- S
ECURE
P
RINT
Secure Print is a feature that allows you to attach a password to a print job on the
computer, send it to the printer for temporary storage, and then print the job from the
printer control panel. When the printing of a Secure Print job is complete, the job is
automatically deleted.
S
TORED
J
OB
A stored job is the same as a secure print job except that it is not deleted from the storage
device after it is printed unless you specifically ask for this at the printer control panel. By
storing frequently-used data in the printer, you can print the job from the printer control
panel, without sending it from the computer again and again.
P
ROOF
P
RINT
- P
RINT
A
FTER
C
HECKING
P
RINTING
R
ESULT
Proof Print is a feature that allows you to store the print data of multiple copies in the hard
disk or compact flash, print out only the first set to check the print result and if satisfactory,
print the remaining copies from the control panel.
P
RINT
AT
A
S
PECIFIED
T
IME
- T
IMED
J
OB
The delayed print feature allows you to store the data in the printer beforehand and then
print it out automatically at the specified time.
NOTE
The way to display the printer properties dialog box differs according to the
application software. Refer to the manual of your respective application
software.

Printing > 20
D
IRECT
P
RINTING
OF
PDF F
ILES
You can send a PDF file directly to the printer for printing without using the printer driver.
As the print data is sent directly to the printer, the printing process is simpler than printing
with the printer driver and it is done at a faster speed. The way to print a PDF file directly
is as follows.
Using PostScript Feature
You can use the PostScript feature to send a PDF file to the printer directly for printing.
PDF Files That Can Be Printed
PDF files that can be printed are those created by Adobe Acrobat 4 and Adobe Acrobat 5
(except one part of the features added by PS 1.4).
P
RINTING
VIA
E
LECTRONIC
M
AIL
- E-
MAIL
P
RINTING
When the optional hard disk or compact flash has been installed and the printer is
connected to a network, enabling it to receive e-mails via TCP/IP communication, e-mails
can be sent from the computer to this printer.
Printing of e-mail contents and TIFF or PDF attachments can be done from this printer.
This feature may need to be enabled via the webpage under Networking/Receive Settings.
B
ARCODE
P
RINTING
This printer uses standard PCL font selection commands to enable printing of algorithm
generated bar codes.
Benefits:
>Any size barcode generation
>Automatically generates checksums
>Automatically adds stop and start characters
Intelligent barcoding
Unlike some barcode solutions, which merely add fonts to a PC or printer, this printer
actually extends the PCL5 language. Barcode formatting, error detection and checksum
calculation are performed by the printer, reducing the load on the host and the network.
Barcodes can be printed in almost any size or rotation, bar width and height. Caption text
can be embedded in the bars or printed above or below the bars in a variety of fonts and
sizes.
See the Reference Guide for detailed use information.
NOTE
You may not be able to print some PDF files directly by the printer due to the
way they were created. When this happens, open the PDF files and use the
printer driver to print them.
Table of contents
Other Oki Printer manuals

Oki
Oki ML184 Turbo + User manual

Oki
Oki C610dn Operating and maintenance instructions

Oki
Oki Pacemark PM4410 Quick start guide

Oki
Oki B410D How to use

Oki
Oki OKIPAGE6w User manual

Oki
Oki B2200 User manual

Oki
Oki MICROLINE MX Series User manual

Oki
Oki OKIPAGE 10e User manual

Oki
Oki LD630D User manual

Oki
Oki B4100 Firmware update