Oki LE810DT User manual

User’s Guide
59320201 my.okidata.com
RT322
LE810DT

Copyright Information
Copyright © 2010 by Oki Data. All Rights Reserved
Document Information
LE810DT User’s Guide
P/N 59320201
Revision 1.2
April, 2010
Disclaimer
Every effort has been made to ensure that the information in this document is
complete, accurate, and up-to-date. The manufacturer assumes no responsibility for
the results of errors beyond its control. The manufacturer also cannot guarantee
that changes in software and equipment made by other manufacturers and referred
to in this guide will not affect the applicability of the information in it. Mention of
software products manufactured by other companies does not necessarily constitute
endorsement by the manufacturer .
While all reasonable efforts have been made to make this document as accurate and
helpful as possible, we make no warranty of any kind, expressed or implied, as to
the accuracy or completeness of the information contained herein.
The most up-to-date drivers and manuals are available from the web site:
http://www.okiprintingsolutions.com
Trademark Information
Oki is a trademark of Oki Electric Industry Company Ltd.
Apple, Macintosh and Mac OS are registered trademarks of Apple Computers Inc.
Hewlett-Packard, HP, and LaserJet are registered trademarks of Hewlett-Packard
Company. Microsoft, MS-DOS and Windows are either registered trademarks or
trademarks of Microsoft Corporation in the United States and/or other countries.
Other product names and brand names are registered trademarks or trademarks of
their proprietors.
Note
The appearance of your printer may differ somewhat
from the illustrations in this manual, depending on the
model you purchased.

Contents _________________________
LE810DT User’s Guide 3
Introduction . . . . . . . . . . . . . . . . . . . . . . 4
About This Manual . . . . . . . . . . . . . . . . . . . 4
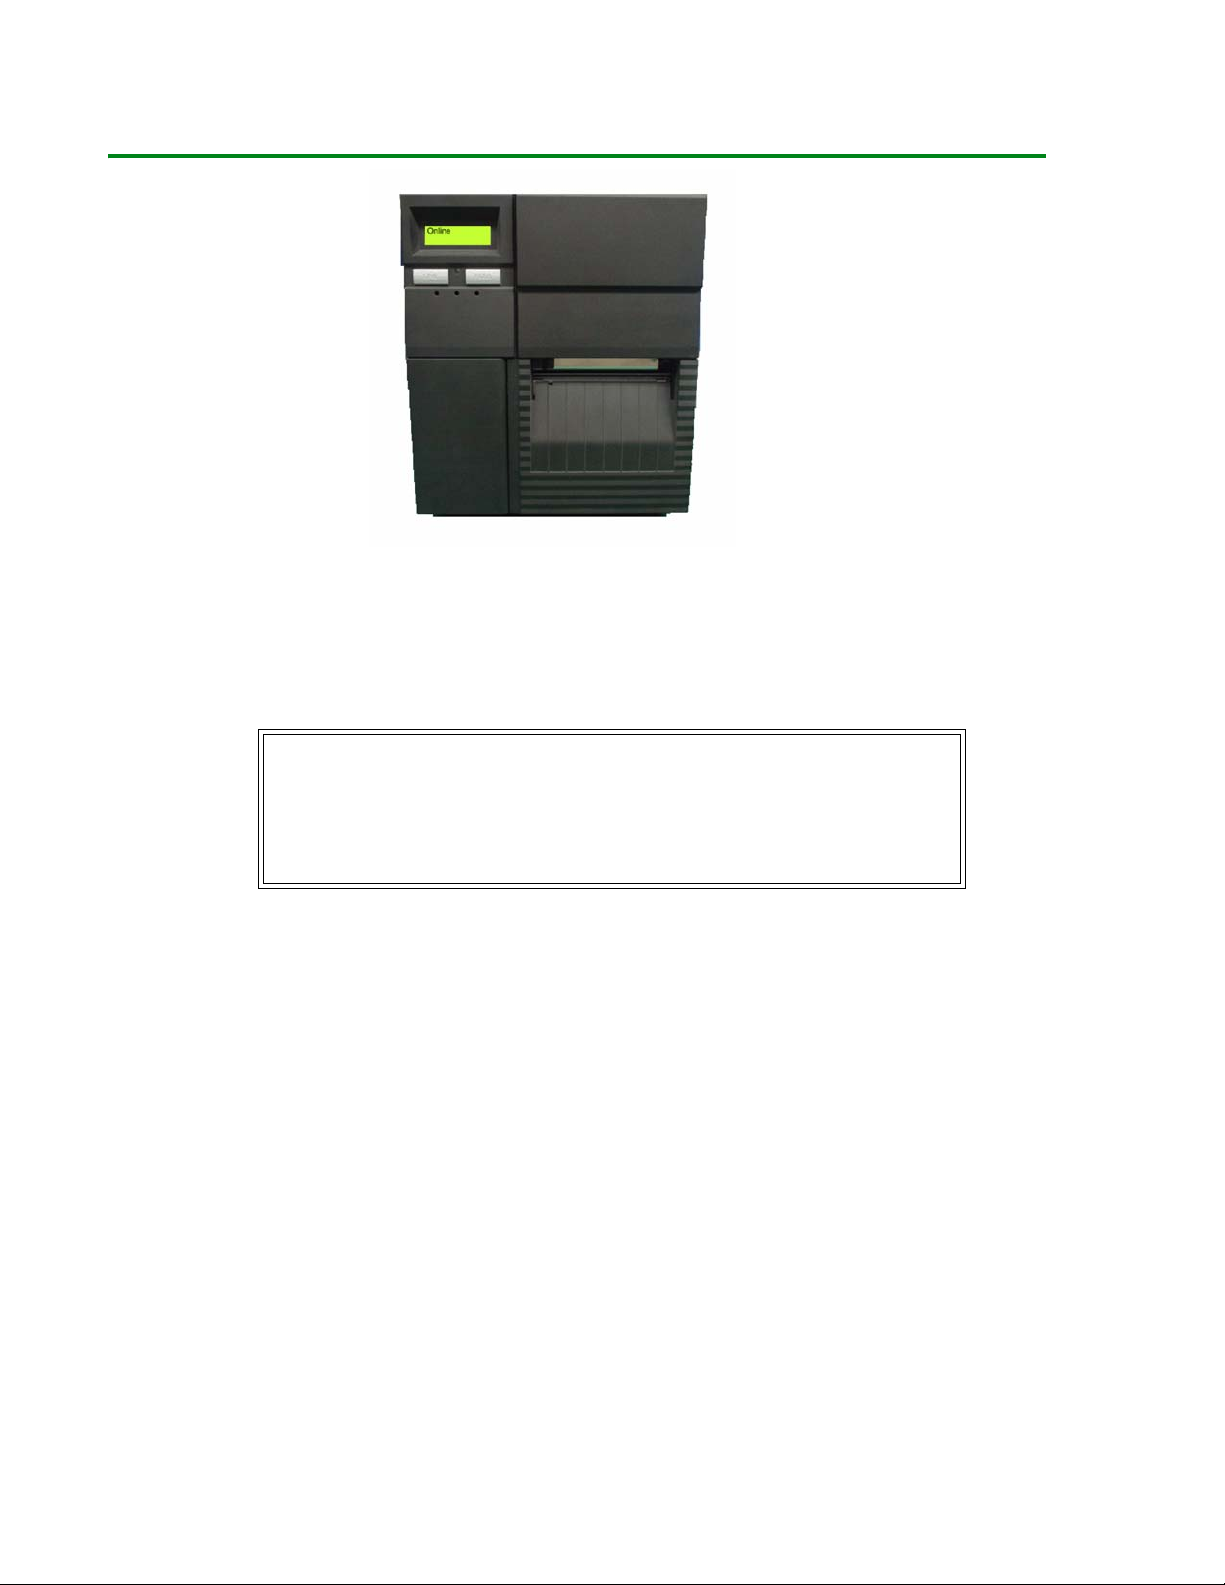
General Printer Description . . . . . . . . . . . . . 5
Printer Components . . . . . . . . . . . . . . . . . . 6
Operator Panel . . . . . . . . . . . . . . . . . . . . . 7
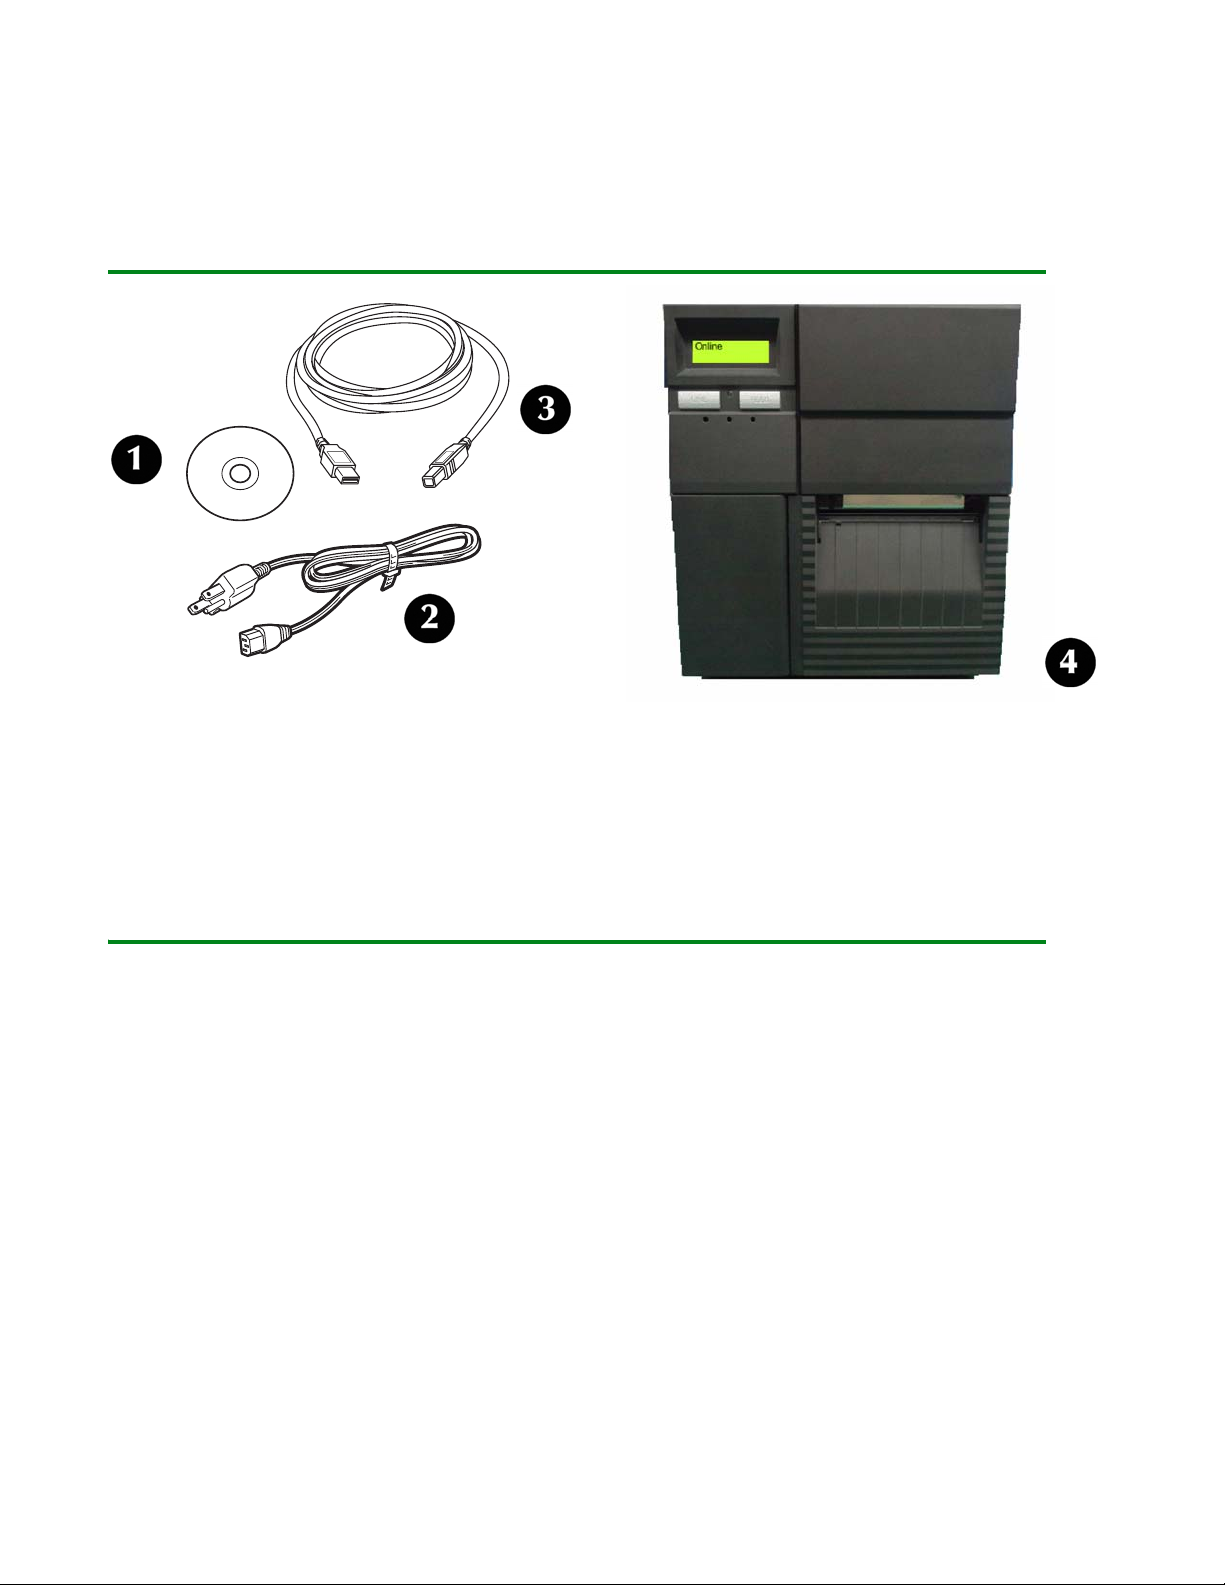
Installation. . . . . . . . . . . . . . . . . . . . . . . 8
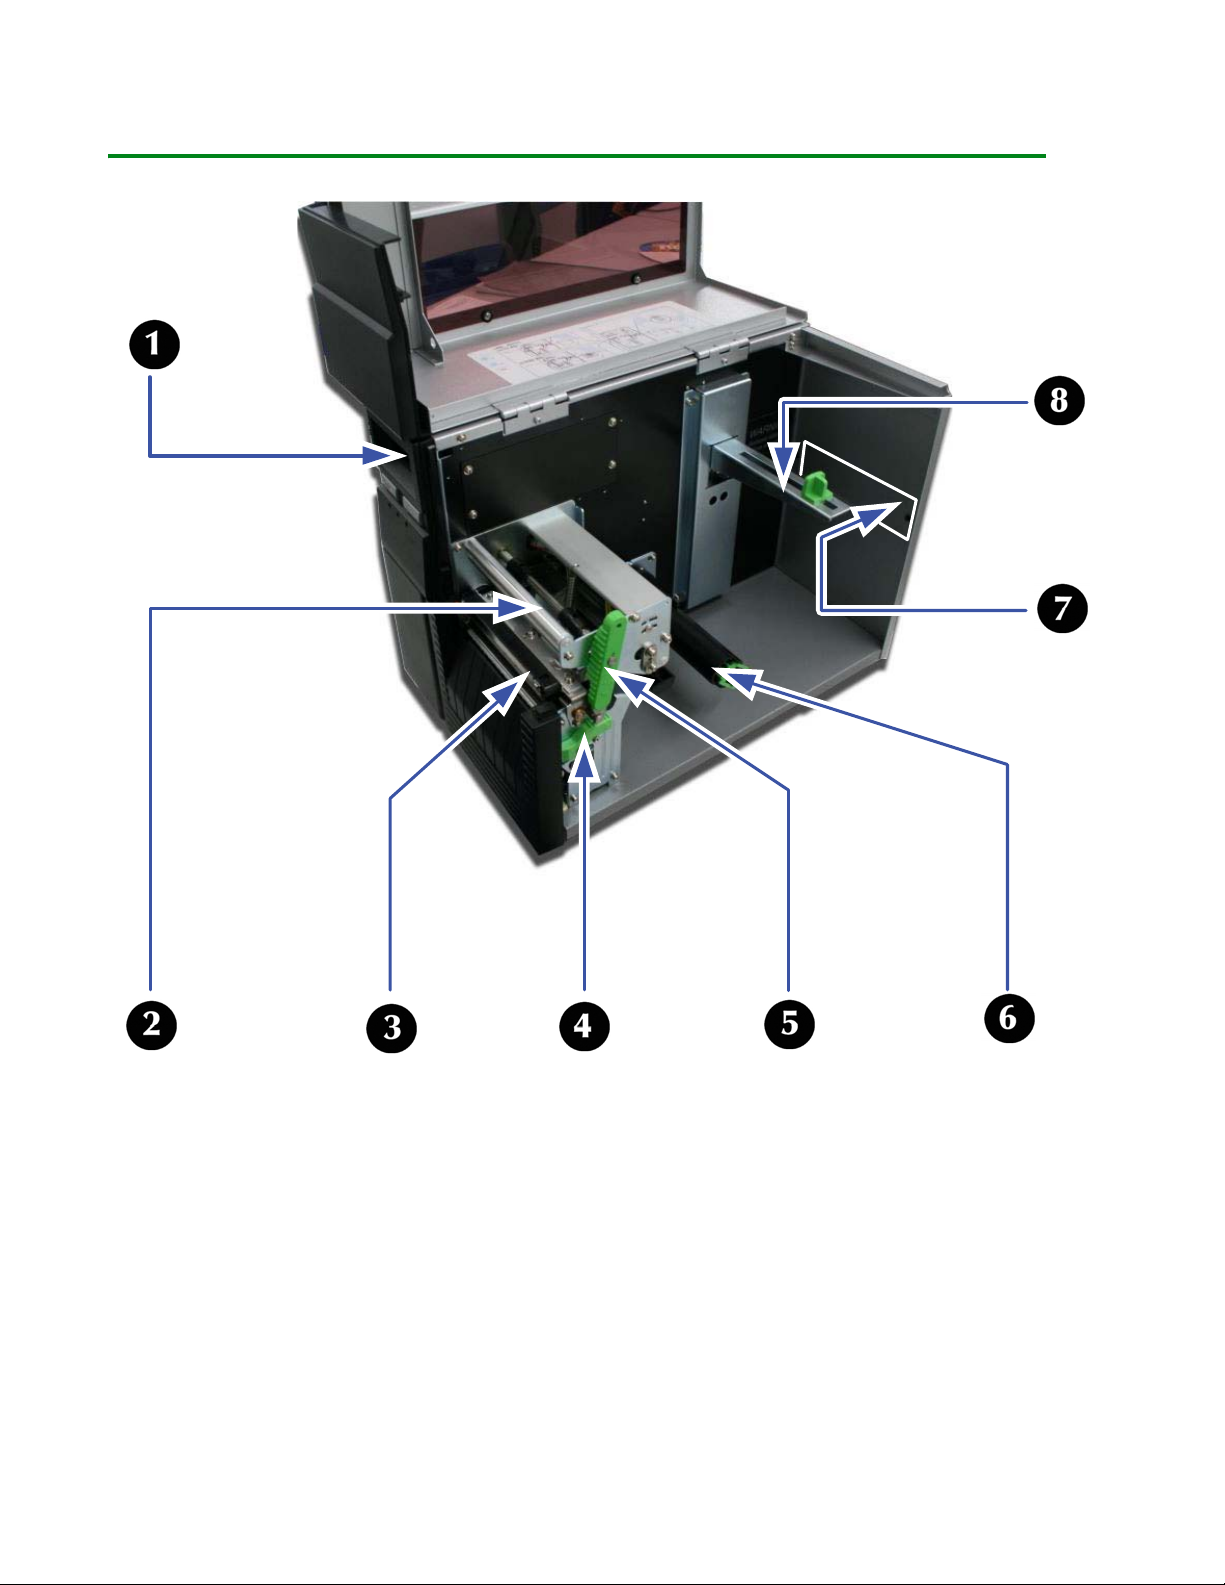
Parts Identification . . . . . . . . . . . . . . . . . . 8
Printer Installation . . . . . . . . . . . . . . . . . . . 8
Site Location . . . . . . . . . . . . . . . . . . . . . 8
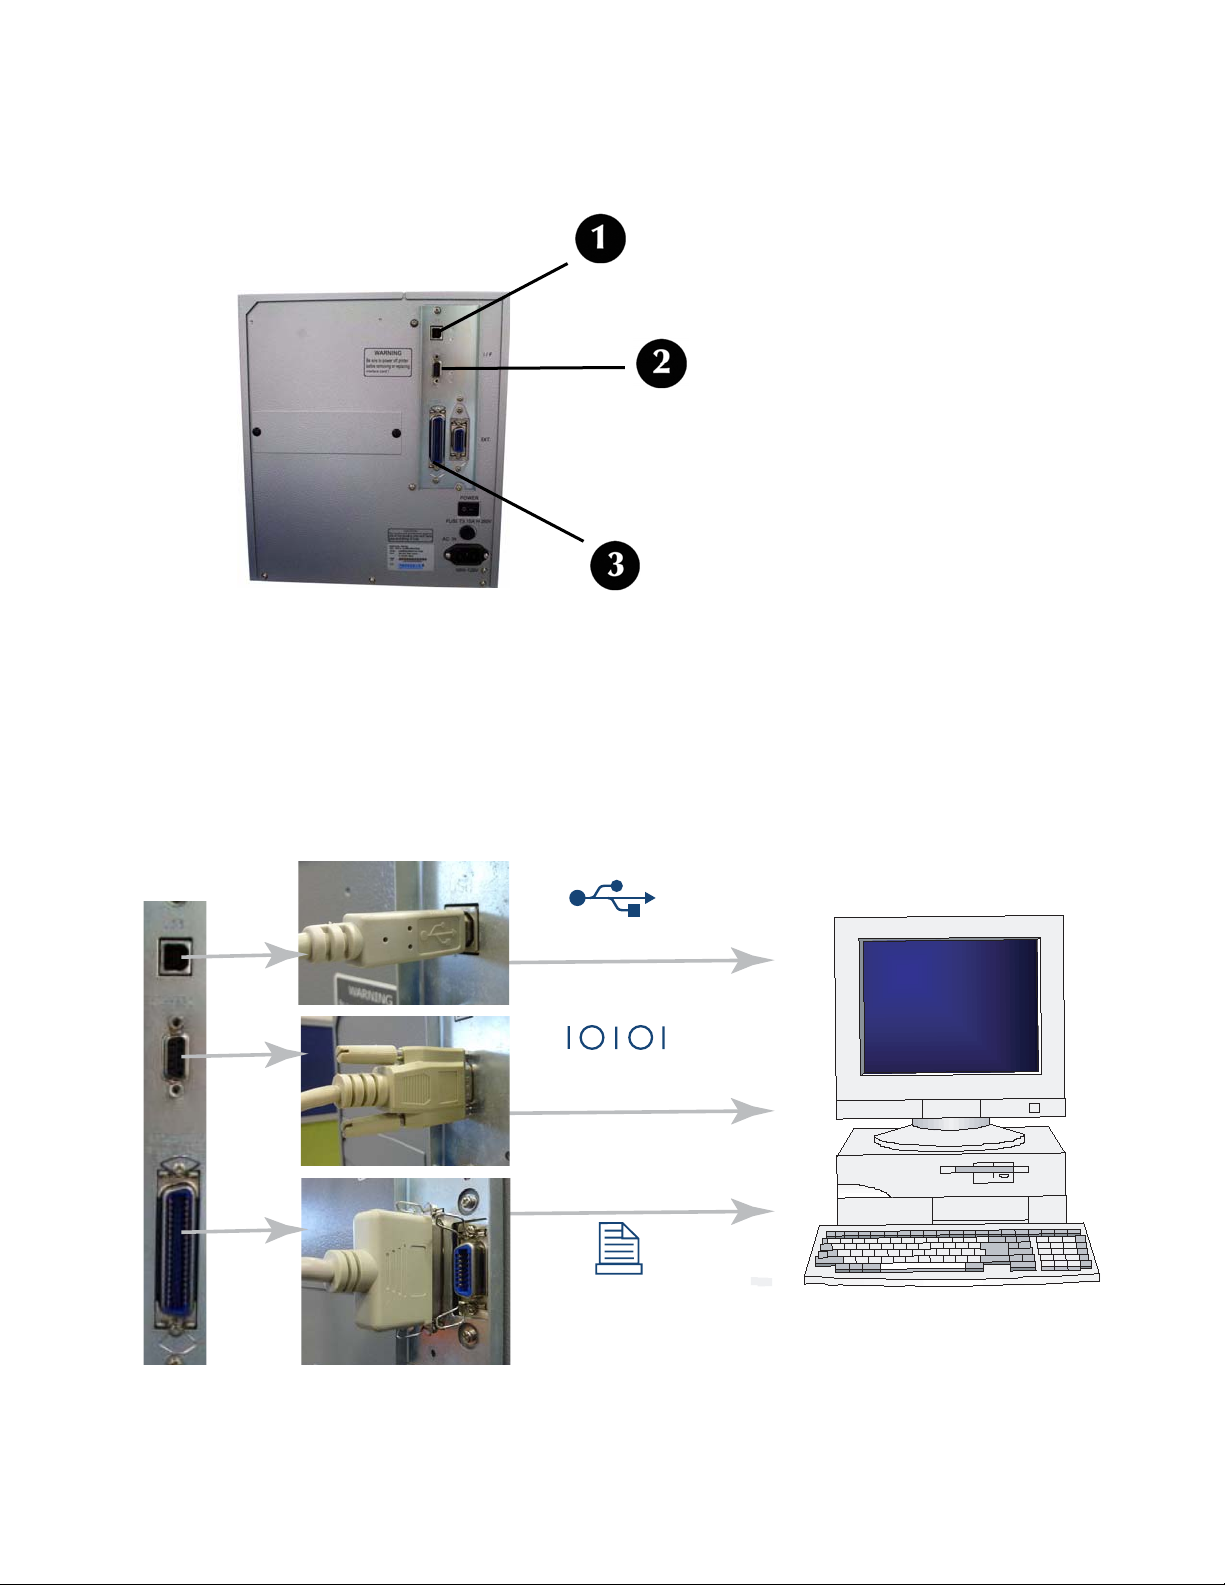
Interface Connection . . . . . . . . . . . . . . . . 9
USB / RS232C / IEEE Models . . . . . . . 9
Ethernet (LAN) Models . . . . . . . . . . 10
USB Only Model . . . . . . . . . . . . . . . 10
Connect to Power . . . . . . . . . . . . . . . . . 11
Media Selection . . . . . . . . . . . . . . . . . . 12
Loading Media . . . . . . . . . . . . . . . . . . . . . 13
Roll-Type, with Liner Fed to Rewinder
Shaft . . . . . . . . . . . . . . . . . . . . . . . . . 13
Roll-Type, Front Exit with Liner Attached 20
Fanfold Type . . . . . . . . . . . . . . . . . . . . 26
Operational Mode Selection . . . . . . . . . . . . 32
Tear-off Mode. . . . . . . . . . . . . . . . . . . . 32
Continuous Mode . . . . . . . . . . . . . . . . . 32
Dispense Mode . . . . . . . . . . . . . . . . . . . 32
Printer Configuration . . . . . . . . . . . . . . 33
Basic Configuration Modes. . . . . . . . . . . . . 33
Normal Mode . . . . . . . . . . . . . . . . . . . . 33
Advanced Mode . . . . . . . . . . . . . . . . . . 34
Counters Mode . . . . . . . . . . . . . . . . . . . 35
Test Print Mode. . . . . . . . . . . . . . . . . . . 36
Default Setting Mode. . . . . . . . . . . . . . . 37
Hex Dump Mode . . . . . . . . . . . . . . . . . . 38
Menu Definition Tables . . . . . . . . . . . . . . . 39
Normal Mode . . . . . . . . . . . . . . . . . . . . 39
Advanced Mode . . . . . . . . . . . . . . . . . . 40
Counters Mode . . . . . . . . . . . . . . . . . . . 41
Test Print Mode. . . . . . . . . . . . . . . . . . . 42
Default Setting Mode . . . . . . . . . . . . . . 43
Hex Dump Mode . . . . . . . . . . . . . . . . . 43
Troubleshooting . . . . . . . . . . . . . . . . . . 44
Test Label Printing . . . . . . . . . . . . . . . . . . 44
Sample Test Print Label . . . . . . . . . . . . 45
Maintenance . . . . . . . . . . . . . . . . . . . . . 46
Cleaning the Printer . . . . . . . . . . . . . . . . . 46
Removing Debris. . . . . . . . . . . . . . . . . . 46
Cleaning the Print Head and Platen . . . . 47
Cleaning the Printer Housing . . . . . . . . . 48
Specifications. . . . . . . . . . . . . . . . . . . . .49
Physical Characteristics . . . . . . . . . . . . . . 49
Power . . . . . . . . . . . . . . . . . . . . . . . . . . 49
Environmental. . . . . . . . . . . . . . . . . . . . . 49
Processing . . . . . . . . . . . . . . . . . . . . . . . 49
Interfaces . . . . . . . . . . . . . . . . . . . . . . . 50
Print Specifications . . . . . . . . . . . . . . . . . 50
Sensing Specifications . . . . . . . . . . . . . . . 50
Media . . . . . . . . . . . . . . . . . . . . . . . . . . 51
Commands . . . . . . . . . . . . . . . . . . . . . . 51
Character Font Capabilities . . . . . . . . . . . . 52
Bar Code Capabilities . . . . . . . . . . . . . . . 53

LE810DT User’s Guide 4 Introduction
Introduction
About This Manual
This manual uses special information boxes. Examples of these boxes and the type
of information provided in each, are below.
Warning!
Provides information that, if unheeded, may
result in personal injury.
Caution!
Provides information that, if unheeded, may
result in equipment damage.
Attention!
Provides information that is deemed of special
importance but will not result in personal injury or
product damage if unheeded.
Note
Provides helpful hints to assist in performing the tasks
at hand.

LE810DT User’s Guide 5 Introduction
General Printer Description
The LE810DT printer comes in several configurations which can differ by
• Connection ports on the back of the printer
• Default print mode
• Internal path for print media
Note
The appearance of your printer may differ somewhat
from the illustrations in this manual, depending on the
model you purchased.

LE810DT User’s Guide 6 Introduction
Printer Components
1Operator Panel
2Print Assembly
3Platen Roller
4Dispenser Latch
5Print Head Latch
6Rewinder Shaft (only present on some models)
7External Media Slot
8Media Holder

LE810DT User’s Guide 7 Introduction
Operator Panel
1LCD Display
2Status LED
- Illuminates green when online and turns off when offline.
- Blinks green when receiving data or the buffer is near full.
- Illuminates or blinks red when detecting a printer error.
3LINE button
- Press to switch back and forth between online and offline state.
- Press to scroll through menu options.
- Press to initiate other special functions as indicated later in this manual.
4FEED button
- Press to advance the label media.
- Press to select menu options.
- Press top initiate other special functions as indicated later in this manual.

LE810DT User’s Guide 8 Installation
Installation
Parts Identification
1CD-ROM
2Power Cable
3USB Cable (included only on models equipped with a USB port)
4Printer (front view)
Printer Installation
Site Location
• Place the printer on a solid flat surface, away from hazardous materials.
• Make sure it is within operational distance of the host, based on interface
specifications.

LE810DT User’s Guide 9 Installation
Interface Connection
USB / RS232C / IEEE Models
1. Locate the interface connection ports on the back of the printer.
1: USB
2: Serial (RS-232C)
3: IEEE Parallel
2. Connect the appropriate cable to the interface port, then connect it to the
computer.
RS232C
IEEE
USB

LE810DT User’s Guide 10 Installation
Ethernet (LAN) Models
1. Locate the Ethernet port on the back of the printer.
2. Plug a 10/100Base T Category 5 Ethernet cable (not supplied) into the Ethernet
port on the printer and then into the computer.
USB Only Model
1. Locate the USB port on the back of the printer.
2. Plug the USB cable supplied with the printer into the USB port on the printer,
then into the USB port on the computer.
USB

LE810DT User’s Guide 11 Installation
Connect to Power
1. Connect the power cable to the power socket on the back of the printer, then
connect it to a 120-volt, grounded power outlet.
2. Turn the printer on.
3. Set the interface option in the configuration menus of the operator panel. Refer
to the Configuration unit of this manual to configure the printer for host
computer interfacing.
Note
Multiple interface options may display in the printer’s
LCD menus, the desired option must be chosen.

LE810DT User’s Guide 12 Installation
Media Selection
Both roll-type and fanfold media can be used with the printer. To use fanfold
media, you may need to remove the access plate on the back of the printer as
described under Loading Media, Fanfold Type.
Caution
The media width should be equal to, or just
narrower than, the print head. Using media that
does not cover the print head will allow the
platen roller to tread on it and wear it out. The
media edge will also wear a groove in the platen
roller affecting print quality.

LE810DT User’s Guide 13
Loading Media
Roll-Type, with Liner Fed to Rewinder Shaft
With roll-type media loaded this way, the liner (1) automatically separates from the
media and is pulled back into the printer and wrapped around the rewinder shaft
(2). The self-adhesive label (3) without its liner moves out the front of the printer
for pickup and direct application. The printer will not print another label until the
printed label is removed.
1. Lift up the Top Access Cover.

LE810DT User’s Guide 14
2. Open the printer front door: push down on the green dispenser latch (1) to
release the door, then swing it open (2).
3. Open the Print Head Assembly by rotating the Head Latch (1) counter clockwise.

LE810DT User’s Guide 15
4. Pull the green Media Supply Guide (1) out as far as it will go, then angle the
label roll over it and push the roll back against the printer housing. Push the
Media Support Guide back in until it fits snugly against the media roll (2).
5. Locate the metal Outside Media Guide (1) under the print path and slide it
toward you as far as it will go.

LE810DT User’s Guide 16
6. Push in on the bottom of the Outside Media Guide (1) to move the top out of the
way while you are loading the media.
7. Slide the media into the print path, making sure it goes under the Media
Hold-Down (1) and under the Sensor Assembly (2) Push it against the back of
the printer.
Attention!
If the media does not go under the Sensor Assembly,
the printer will not recognize that media is loaded.

LE810DT User’s Guide 17
8. Adjust the media sensor to compensate for irregularities in the media (i.e.:
notch, tag hole, gap, perforation or markings). The proper position will be
media-dependent. To properly adjust the sensor position, loosen the green
Sensor Adjust Knob located on the bottom side of the Media Transport Assembly
and move the sensor in ¼-inch increments (or finer) until the sensor error is
cleared. After the error is cleared, retighten the Sensor Adjust Knob.
9. Pull out the bottom of the Outside Media Guide so that it is upright, then push
the guide inward until it barely contacts the outside edge of the media.

LE810DT User’s Guide 18
10.Pull the media roll out until about 24 inches are exposed, then remove the labels
from that section. Feed the end of the liner back into the bottom of the printer,
under the Backing Drive Roller (1).
11.Pull out the green tab (1) on the front of the Take-Up Spindle (2). Notice the two
prongs (3) on the Take-Up Spindle. Pull the liner through the bottom of the
printer and pass the end under the two prongs, then use the green tab to rotate
the spindle until the liner is wrapped around it several times. When you are
done, swing the tab back into place.

LE810DT User’s Guide 19
12.Swing the Head Latch back down to close the print head, then latch it in place.
13.Close the front door and lower the top access cover into place.
Attention!
These covers have interlock switches and the printer
will not operate if either is open.
b

LE810DT User’s Guide 20
Roll-Type, Front Exit with Liner Attached
1. Lift up the Top Access Cover.
Other manuals for LE810DT
6
This manual suits for next models
1
Table of contents
Other Oki Printer manuals

Oki
Oki C5400 Series User manual

Oki
Oki C 5650dn User manual

Oki
Oki OKICOLOR 8 User manual

Oki
Oki B4100 User manual

Oki
Oki ES6405 User manual

Oki
Oki C5800Ldn Series User manual

Oki
Oki C 9400 User manual

Oki
Oki COREFIDO B822dn User manual

Oki
Oki C5500n Series Service manual

Oki
Oki C5650 Technical specifications