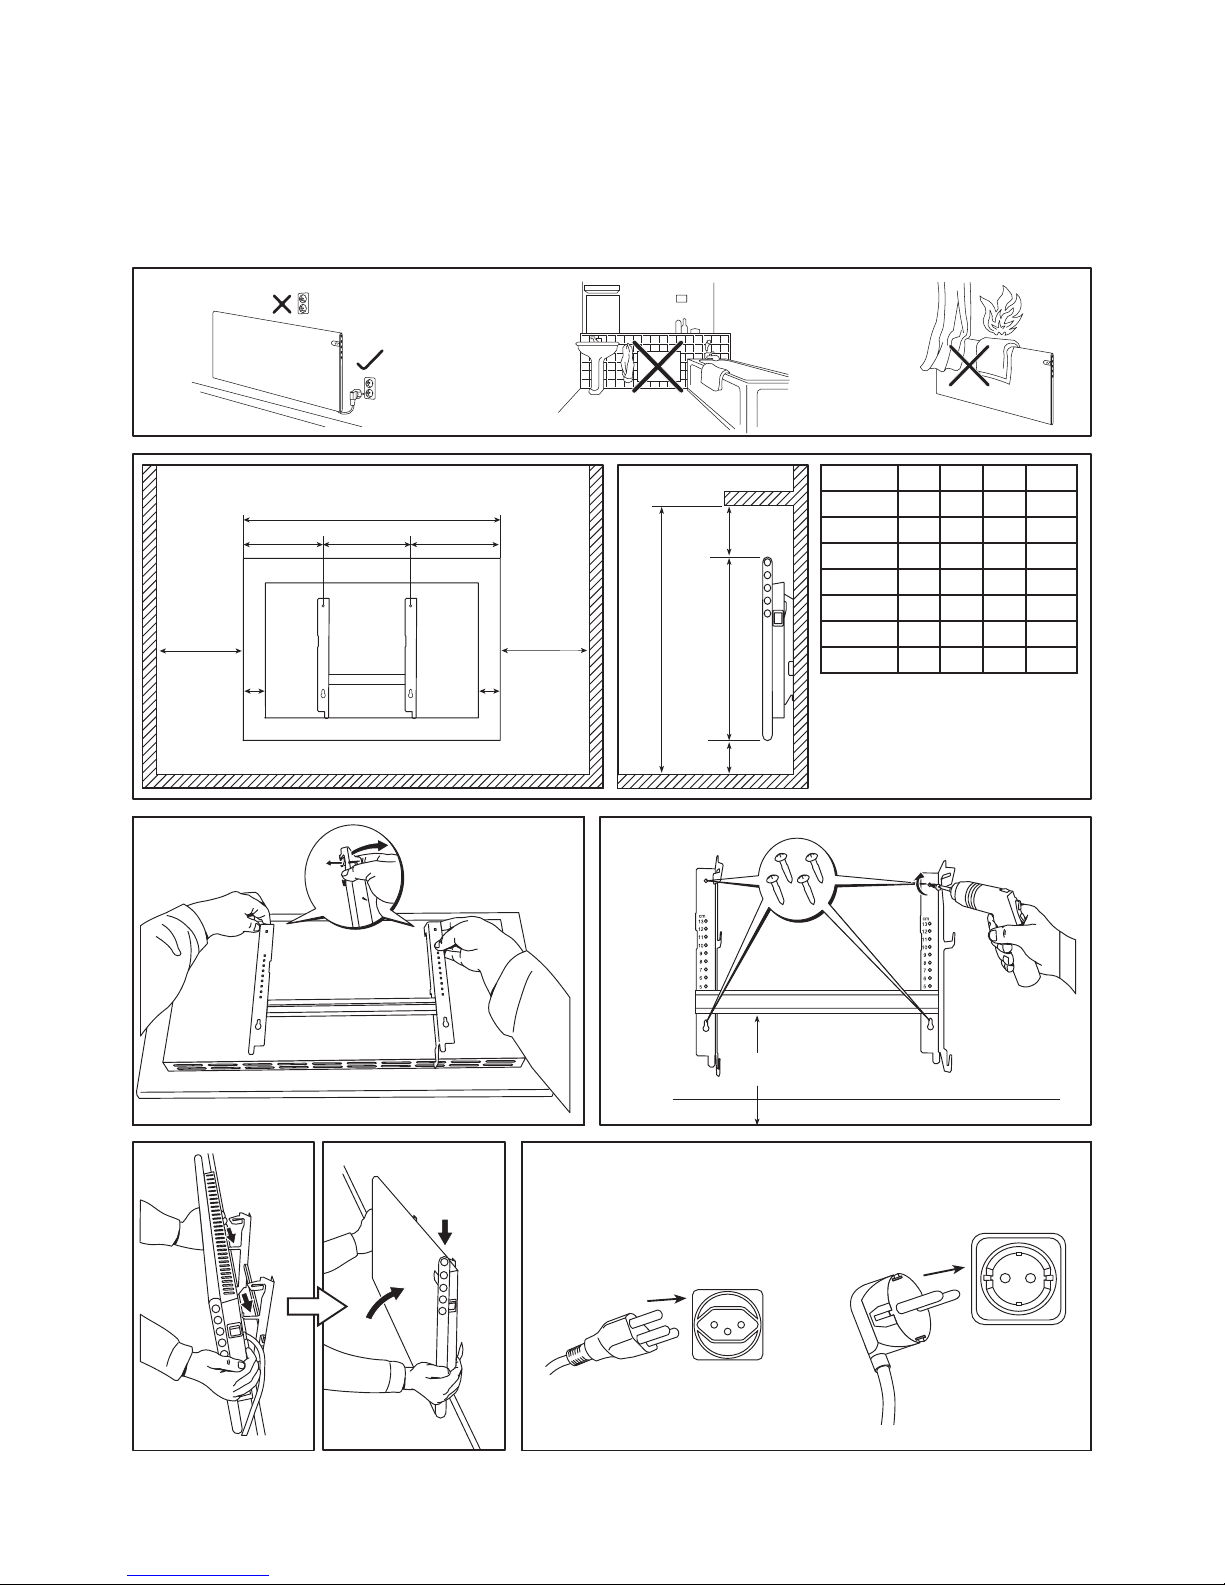
Olsberg Noblesse User manual

OLSBERG
Instruction Manual
Noblesse
Convector

3
Bitte lesen Sie die in dieser Anleitung
aufgeführten Informationen sorgfältig durch. Diese
geben wichtige Hinweise für die Sicherheit, die
Installation und den Gebrauch der Geräte.
Der Hersteller haftet nicht, wenn die nachstehenden
Anweisungen nicht beachtet werden. Die Geräte dür-
fen nicht missbräuchlich, d.h. entgegen der
vorgesehe-nen Verwendung benutzt werden.
Die Anleitung muss dem Betreiber nach der
Installation übergeben und sorgfältig aufbewahrt
werden. Sie ist im Bedarfsfall dem Kundendienst
auszuhändigen. Bei Besitzerwechsel ist die Anleitung
mit zu übergeben.
Inhaltsverzeichnis
Aufstellanleitung.................................................6
Bedienungsanleitung für den Benutzer ....8
Betriebsweisen des Konvektors ............................. 8
Bei Inbetriebnahme und nach einem Stromausfall
von über 24 Stunden ................................................ 8
HOme Modus ............................................................ 9
Start der Nachtabsenkung ....................................... 9
Start der Tagabsenkung ........................................... 9
Absenkperiode einmalig aufheben ........................... 9
Aktuelle Temperatur einmalig ändern ...................... 9
Komforttemperatur dauerhaft ändern ....................... 9
Absenktemperatur dauerhaft ändern ....................... 9
Nachtabsenkung (Dauer und Temperatur)
dauerhaft ändern ...................................................... 9
Tagabsenkung (Dauer, Tag und Temperatur)
dauerhaft ändern .................................................... 10
Absenkung dauerhaft löschen ............................... 10
OFfice Modu .......................................................... 10
Start der Absenkung .............................................. 10
Aktuelle Temperatur einmalig ändern .................... 10
Komforttemperatur dauerhaft ändern ......................11
Absenkung (Dauer, Tag und Temperatur)
dauerhaft ändern .....................................................11
Absenkung dauerhaft löschen ................................11
CAbin Modus (Wochenendhaus) .......................... 11
Abwesenheitseinstellung ........................................11
Absenkperiode vorzeitig beenden ...........................11
Funktionen in allen Modus-Einstellungen ........... 11
Kindersicherung ......................................................11
Kalibrierung .............................................................11
Werkseinstellung wieder herstellen ........................11
Allgemeine Garantiebedingungen .............11
Please read all the information contained in this manu-
al carefully. The manual contains important information
on the safety, installation, and use of the equipment.
The manufacturer will not assume any liability if the
instructions below are not observed. The equipment
must not be improperly used, i.e. for purposes other
than the intended purpose.
Upon installation, this manual must be handed over to
the owner and stored carefully. It must be handed out
to customer service if required. The manual must be
included when the equipment switches owners.
Contents
Installation instructions ................................... 6
Operating manual for the user ................... 12
Operating modes of the convector ....................... 12
At start-up and after a power failure
lasting more than 24 hours.................................... 12
HOme mode ............................................................ 13
Beginning of night time reduction ........................... 13
Beginning of day time reduction ............................. 13
Suspending the reduction period once .................. 13
Changing the current temperature once ................ 13
Changing the comfort temperature permanently ... 13
Changing the reduction temperature permanently . 13
Changing night time reduction (duration and
temperature) permanently ...................................... 13
Changing day time reduction (duration and
temperature) permanently ...................................... 14
Deleting the reduction permanently ....................... 14
OFfice mod ............................................................ 14
Beginning of the reduction ..................................... 14
Changing the current temperature once ................ 14
Changing the comfort temperature permanently ... 15
Changing the reduction (duration, day and
temperature) permanently ...................................... 15
Deleting the reduction permanently ....................... 15
CAbin mode (weekend home) ............................... 15
Absence settings .................................................... 15
Ending the reduction period prematurely ............... 15
Functions available for all mode settings ............ 15
Child-proofin ......................................................... 15
Calibration .............................................................. 15
Restoring factory settings ...................................... 15
General warranty terms ................................ 15

6
Aufstellanleitung
Installation instructions
Guide d‘installation
Installatiehandleiding
Instrucciones de montaje
Οδηγίες τοποθέτησης
Min
50
370
Min
150
Min
570
Min
50
Min
50
B
AC
L
5050
2
1
3 4230V~
IP20, Class I
κατηγορία προστασίας IP20, κλάση I
min. 165mm
A B C L
15/251-3 125 202 150 477
15/252-3 180 202 208 590
15/253-3 190 302 215 707
15/254-3 220 302 240 762
15/255-3 155 605 175 935
15/256-3 215 605 230 1050
15/258-3 380 605 410 1395
+/- 3mm
230V~
IP20, Class I
κατηγορία προστασίας IP20,
κλάση I
Eine defekte Anschlussleitung ist durch den Kunden-
dienst oder eine qualifizierte Person zu ersetzen
If defective, the connecting cable must be replaced by
customer service or a qualified person

7
5 • Öl verdunstet, max. 5 Min.
• Oil evaporates, max. 5 min.
• Vapeurs de pétrole durant minutes 5 max.
• Olie verdampt, max. 5 min.
• El aceite evapora, máx. 5 minutos
• Το λάδι εξατμίζεται, το πολύ 5 λεπτά
6 • Auto-reset, Übertemperatursicherumg.
• Auto reset, over-temperature fuse.
• Réinitialisation automatique de la sécurité contre
la surchauffe.
• Auto-reset, oververhittingsbeveiliging.
• Reset automático, seguro contra sobretempera-
tura.
• Αυτόματη επαναφορά ρυθμίσεων, ασφάλεια
υπερθέρμανσης.
7
• Reinigung, 1x im Monat während der Heizperiode.
• Cleaning, once a month during the heating period.
• Nettoyage, 1x par mois durant la période de chauffage.
• Reiniging, 1x per maand gedurende de
verwarmingsperiode.
• Limpieza, 1x al mes durante el período de calefacción.
• Καθαρισμός, 1 φορά το μήνα κατά τη διάρκεια της περι-
όδου χρήσης.
• Das dargestellte Symbol bedeutet:
”Nicht abdecken”
• The shown symbol means:
„Do not cover“
• Le symbole représenté signifie :
”Ne pas couvrir”
• Het weergegeven symbool betekent:
”Niet afdekken”
• El símbolo representado significa
“No tapar”
• Το σύμβολο αυτό ερμηνεύεται ως εξής:
”Μην καλύπτετε την επιφάνεια”
Un câble de branchement défectueux doit être rem-
placé par le service après-vente ou par toute personne
qualifiée pour ce faire
Een defecte aansluitleiding moet door de klantenser-
vice of door een gekwalific erde persoon vervangen
worden.
Una línea de conexión defectuosa debe sustituirse por
el servicio técnico o por una persona cualificada
Εάν ο αγωγός σύνδεσης είναι ελαττωματικός, θα πρέ-
πει να αντικαθίσταται από την υπηρεσία εξυπηρέτησης
πελατών ή από κατάλληλα εκπαιδευμένο πρόσωπο.

12
Operating manual for the user The appliance is not suitable for unsupervised use by
children or by persons with learning disabilities, lim-
ited sensory capacity or physical disabilities. Ensure
that it is not operated by persons who, due to lack of
experience and/or knowledge, might not be aware of
the risks associated with it, unless they are supervised
and instructed by a person who has read the operating
manual. Ensure that the appliance cannot be switched
on by children while unsupervised.
Operating modes of the convector
There are 3 different operating modes available de-
pending on the required application.
HO (HOme mode)
for private rooms. Daily day time and night time reduc-
tion, no day time reduction on the weekend.
OF (OFfice mode
for offices and rooms of similar use. Automatic night
time reduction during the week, constant reduction on
the weekend.
CA (CAbin mode)
for weekend homes. No reduction during the stay.
Constant reduction during absence.
At start-up and after a power failure
lasting more than 24 hours
The start-up/reset procedure has to be performed to
establish the correct modus and function.
The procedure must be completed in one continuous
sequence to be valid.
Should the procedure be performed incorrectly or fail;
switch off the heater and start a new reset procedure.
After the heater is switched on, a sequence like °C / 17
/ rE will flash in the displa .
This tells that the thermostat has been without power
for a long period and need to be restarted.
To set the heater back to factory default, switch off the
heater by using the main switch.
Press [F] and hold while switching on by using the main
switch. Continue to press [F] until rE flash in the dis-
play. Release [F].
* After some seconds HO (Home) will flash in the dis-
play.
You can select between the modus HO (Home), OF
(OFfice) and CA (CAbin = weekend home) by pressing
[+] / [–].
Confirm your choice by pressing [F]. 22 (°C) will flas
Select the comfort temperature you wish by pressing
[+] / [–].The comfort temperature is the room temper-
ature that will be maintained outside of the reduction
times.
Confirm by pressing [F] more than 5 seconds, till the
comfort temperature is flashing. The selected comfort
temperature has been stored.
1....LED day time reduction
2....Display desired set temperature
3....LED heating On / Off
4....LED night time reduction
[F] ..Function button
[+] ..Button +
[–]...Button –
[5]...Button day time reduction
[7]...Button night time reduction
1
2
3
4

13
If no comfort temperature has been set, 22 (°C) will
automatically be saved after 7 seconds.
Please note that if the product for some reason has
been reset to factory default the procedure will be as
from the *-mark in the above.
HOme mode
Beginning of night time reduction
Keep pressing the [7] button until “h” (hours) starts
flashing and set the time at which the night time reduc-
tion is supposed to begin. “07” (07 = 7 hours) will flash
afterwards.
Use the [+] / [–] buttons to set the duration of the night
time reduction in hours.
Confirm by pressing [F]
°C flashes 3 times. “17” (°C) will flash afterward
Press the [+] / [–] buttons to set the reduction tempera-
ture.
Confirm by pressing [F]
The set reduction temperature lights up, while the
green LED (4) flashes to indicate that night time reduc-
tion has been activated.
The temperature will be lowered for the number of
hours you set. This process will be repeated every
evening at the same time.
Beginning of day time reduction
Keep pressing the [5] button until “h” (hours) starts
flashing and set the time at which the day time reduc-
tion is supposed to begin. “05” (05 = 5 hours) will flash
afterwards.
Use the [+] / [–] buttons to set the duration of the day
time reduction in hours.
Confirm by pressing [F]
“d” lights up briefl . “1” will flash afterwards
Use the [+] / [–] buttons to set the correct day of the
week (Monday = 1, Tuesday = 2, etc.).
Confirm by pressing [F]
“17” (°C) will flash
Press the [+] / [–] buttons to set the reduction tempera-
ture.
Confirm by pressing [F]
The set reduction temperature lights up, while the
green LED (1) flashes to indicate that the day time re-
duction has been activated.
The temperature will be lowered for the number of
hours you set. This process is repeated on all week-
days. Day time reduction will not take place on Satur-
days and Sundays.
Suspending the reduction period once
While pressing [F], press the buttons [7] (night time re-
duction) or [5] (day time reduction) once to suspend the
currently active or subsequent reduction period. While
the reduction period is suspended, the LEDs (1) or (4)
and the comfort temperature will be on. The reduction
will be activated again starting with the subsequent pe-
riod.
Changing the current temperature once
Press the [+] / [–] buttons to set the desired tempera-
ture.
The temperature change will only apply until the next
period begins.
Changing the comfort temperature permanently
Press the [+] / [–] buttons to set the desired tempera-
ture while in comfort temperature mode.
Keep pressing [F] until the comfort temperature flashes
briefl . The selected comfort temperature has been
changed permanently.
Changing the reduction temperature permanently
Press the [+] / [–] buttons to set the desired tempera-
ture while in the respective reduction mode.
Keep pressing [F] until the reduction temperature
flashes briefl . The selected reduction temperature has
been changed permanently.
Changing night time reduction (duration and
temperature) permanently
While pressing [F], press twice on [7].
“h” (hours) will flash. The set reduction period will flash
afterwards (e. g. 06 = 6 hours).
Press the [+] / [–] buttons to change the reduction pe-
riod.
Confirm by pressing [F]
°C flashes 3 times. The set reduction temperature will
flash afterwards
Press the [+] / [–] buttons to change the reduction tem-
perature.
Confirm by pressing [F]
The set reduction temperature lights up, while the
green LED (4) flashes to indicate that night time reduc-
tion has been activated.

14
Changing day time reduction (duration and
temperature) permanently
While pressing [F], press twice on [5].
“h” (hours) will flash. The set reduction period will flash
afterwards (e. g. 06 = 6 hours).
Press the [+] / [–] buttons to change the reduction pe-
riod.
Confirm by pressing [F]
“d” lights up briefl . The set weekday will flash after-
wards.
Use the [+] / [–] buttons to change the day of the week
(Monday = 1, Tuesday = 2, etc.).
Confirm by pressing [F]
The set reduction temperature will flash
Press the [+] / [–] buttons to change the reduction tem-
perature.
Confirm by pressing [F]
The set reduction temperature lights up, while the
green LED (1) flashes to indicate that the day time re-
duction has been activated.
Deleting the reduction permanently
Keep pressing [5] (day time reduction) or [7] (night time
reduction) until the green LED goes out. The comfort
temperature lights up.
OFfice mod
Beginning of the reduction
Three hours prior to the desired start of the reduction
period, press the [7] button until “h” (hours) starts flas -
ing. “12” (12 = 12 hours) will flash afterwards
Use the [+] / [–] buttons to set the duration for the re-
duction in hours.
Confirm by pressing [F]
“d” lights up briefl . “1” will flash afterwards
Use the [+] / [–] buttons to set the correct day of the
week (Monday = 1, Tuesday = 2, etc.).
Confirm by pressing [F]
“17” (°C) will flash
Press the [+] / [–] buttons to set the reduction tempera-
ture.
Confirm by pressing [F]
The comfort temperature will be lit for the next 3 hours
until the reduction sets in, while the green LED (4) indi-
cates that the reduction has been activated.
This process is repeated on all weekdays. The reduc-
tion will last for 24 hours on Saturdays and Sundays.
Changing the current temperature once
Press the [+] / [–] buttons to set the desired tempera-
ture.
The temperature change will only apply until the next
period begins.
1....LED day time reduction
2....Display desired set temperature
3....LED heating On / Off
4....LED night time reduction
[F] ..Function button
[+] ..Button +
[–]...Button –
[5]...Button day time reduction
[7]...Button night time reduction
1
2
3
4

15
Changing the comfort temperature permanently
Press the [+] / [–] buttons to set the desired tempera-
ture while in comfort temperature mode.
Keep pressing [F] until the comfort temperature flashes
briefl . The selected comfort temperature has been
changed permanently.
Changing the reduction (duration, day and
temperature) permanently
While pressing [F], press twice on [7] three hours
before the desired onset of the reduction.
“h” (hours) will flash. The set reduction period will flash
afterwards (e. g. 13 = 13 hours).
Press the [+] / [–] buttons to change the reduction
period.
Confirm by pressing [F]
“d” lights up briefl . The set weekday will flash after-
wards.
Use the [+] / [–] buttons to change the day of the week
(Monday = 1, Tuesday = 2, etc.).
Confirm by pressing [F]
The set reduction temperature will flash
Press the [+] / [–] buttons to change the reduction tem-
perature.
Confirm by pressing [F]
The comfort temperature will be lit for the next 3 hours
until the reduction sets in, while the green LED (4) indi-
cates that the reduction has been activated.
Deleting the reduction permanently
Keep pressing [7] until the green LED goes out. The
comfort temperature lights up.
CAbin mode (weekend home)
Every comfort temperature you set while in CAbin
mode will be stored automatically.
Absence settings
Proceed as follows to set the duration of the absence
and the associated reduction temperature:
Press [7] until “d” starts flashing
“01” (01 = 1 day of absence) will flash afterwards
Use the buttons [+] / [–] to set the number of the days
of absence (1 - max. 40 days).
Confirm by pressing [F]
“10” (°C) will flash
Press the [+] / [–] buttons to set the reduction tempera-
ture.
Confirm by pressing [F]
The set reduction temperature lights up, while the
green LEDs (1+4) will flash
The comfort temperature will flash to indicate that the
reduction period is complete.
If no button is pressed, another reduction period will
begin automatically after 48 hours.
Ending the reduction period prematurely
To end the reduction period prematurely, keep press-
ing the [7] button until the comfort temperature is dis-
played.
Functions available for all mode settings
Child-proofin
Activate:
Press the buttons [5] and [7] at the same time until “– –”
appears on the display.
Deactivate:
Press the buttons [5] and [7] at the same time until the
indicator on the display starts flashing
Calibration
If the room temperature deviates from the temperature
shown on the display, you can use the thermostat to
adjust the temperature.
Before doing so, ensure that the heater evenly and
constantly keeps the current temperature setting for
an extended period of time. In order to ensure that the
temperature in the room stays as constant as possible,
keep all windows and doors closed during this period.
While pressing [F], press once on [–].
°C flashes 3 times. The set temperature will flash af-
terwards.
Keep pressing [+] / [–] until the temperature indicated
on the display corresponds to the actual temperatures
measured in the room.
Keep pressing [F] until the set temperature flashes
briefl .
The heater will now be regulated to the temperature
value you set. This procedure can be repeated if the
display is still not indicating the correct temperature.
Restoring factory settings
Turn the heater off.
While pressing the [F], turn on the heater and hold the
[F] button down until rE starts flashing
For more information, see chapter “At start-up and after
a power failure lasting more than 24 hours”.
General warranty terms
Our products are covered by warranty according to the
statutory regulations that apply in the various countries.
If you wish to make a claim under warranty, please con-
tact your dealer.

32
3) 78/4615.2503 11/2012
Olsberg GmbH
Hüttenstraße 38
59939 Olsberg
T +49 2962 805-0
F +49 2962 805-180
olsberg.com
Table of contents
Other Olsberg Heater manuals

Olsberg
Olsberg CTSC User manual

Olsberg
Olsberg Confort User manual

Olsberg
Olsberg 14/691-3 User manual

Olsberg
Olsberg AirCom Zentral User manual

Olsberg
Olsberg Orayonne User manual

Olsberg
Olsberg 14/512 User manual

Olsberg
Olsberg Corona Series User manual

Olsberg
Olsberg Orayonne plus User manual

Olsberg
Olsberg 14/71*-3 Series User manual