Omron BP652CAN User manual

ENGLISH
7 series
Automatic Wrist Blood
Pressure Monitor
Model BP652CAN
INSTRUCTION MANUAL

2
TABLE OF CONTENTS
Before using the Monitor
Introduction ......................................................................................................... 3
Safety Information ................................................................................................ 4
Operating the Device .......................................................................... 4
Care and Maintenance ......................................................................... 5
Operating Instructions
Before Taking a Measurement .............................................................................. 6
Know Your Unit ................................................................................................... 7
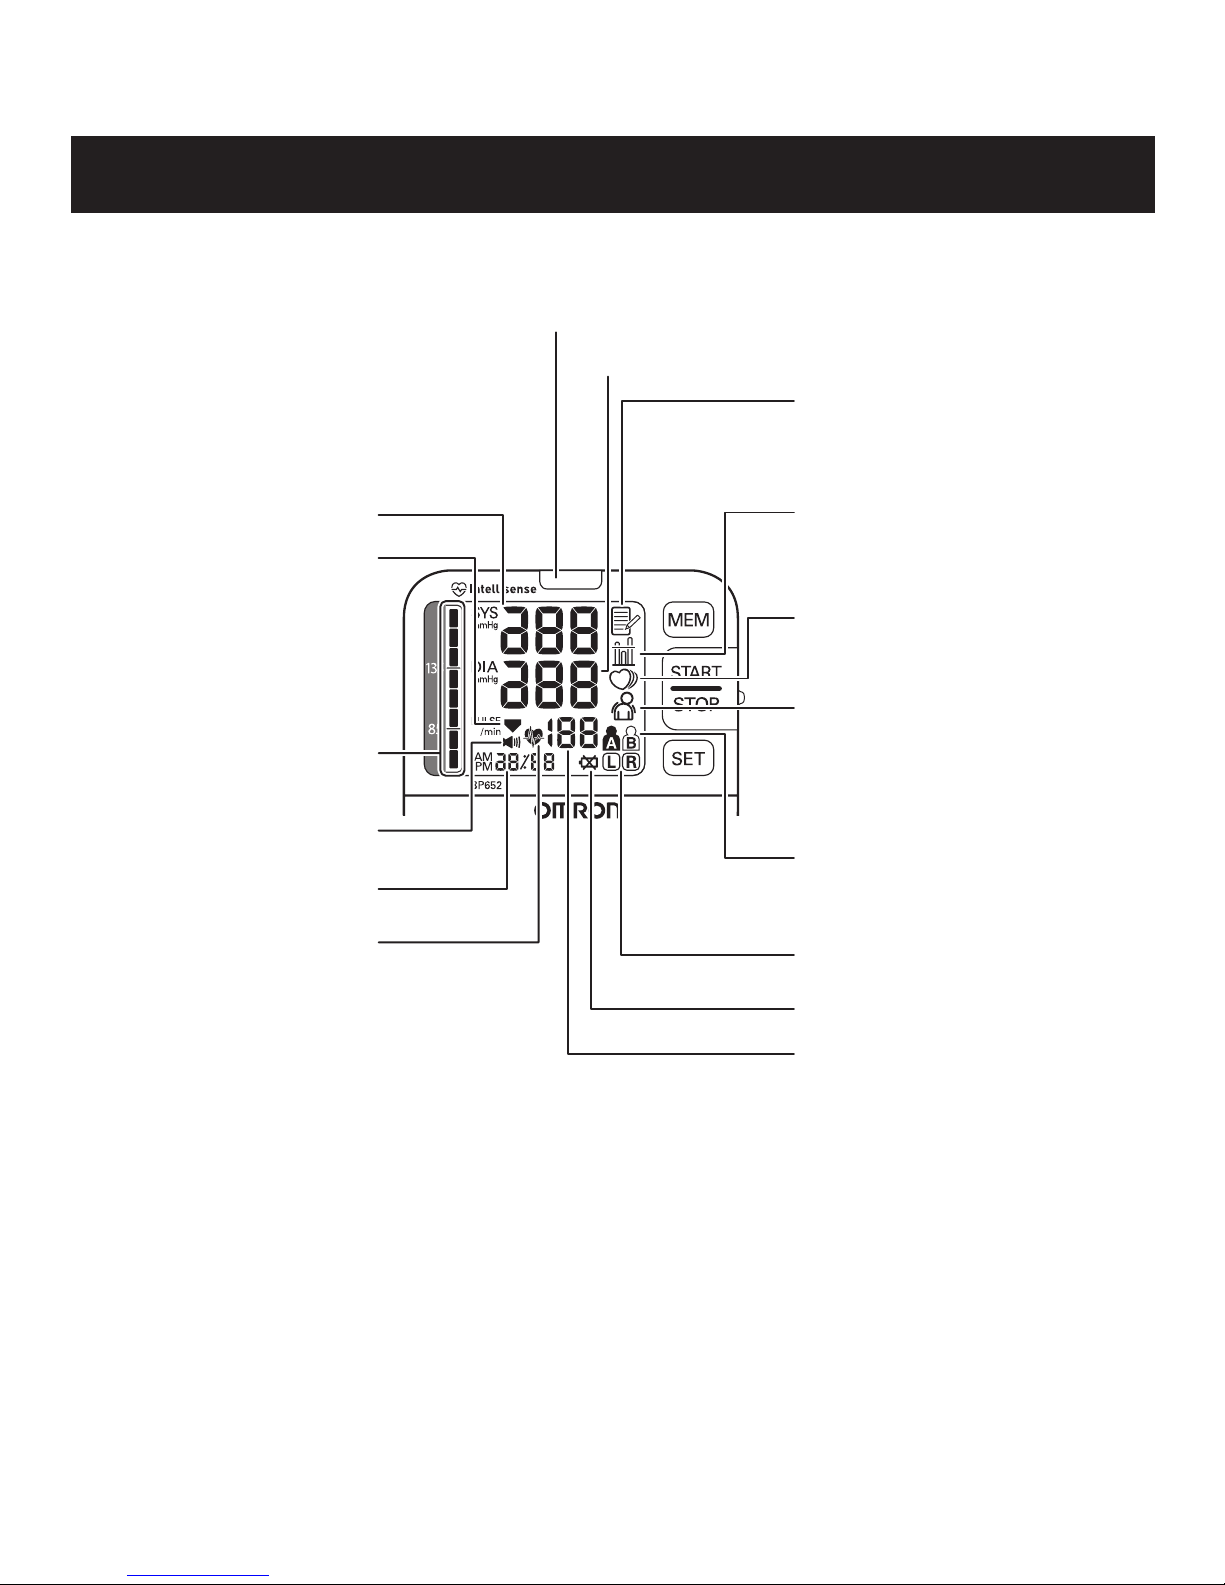
Unit Display ......................................................................................................... 8
Display Symbols ................................................................................................... 9
Irregular Heartbeat Symbol.................................................................. 9
Movement Error Symbol .................................................................... 9
Battery Installation ............................................................................................. 11
Setting the Date and Time .................................................................................. 13
Setting the Heart Guide Indicator........................................................................ 15
Setting the Heart Guide Indicator ...................................................... 15
Setting for Right or Left Wrist Measurement ................................... 16
Setting the Buzzer.............................................................................. 16
Resetting to the Default Setting ......................................................... 17
Applying the Wrist Cuff ..................................................................................... 18
Applying the Cuff on the Left Wrist .................................................. 18
Applying the Cuff on the Right Wrist................................................ 19
Taking a Measurement ....................................................................................... 20
Using the Memory Function ............................................................................... 22
Averaging Function............................................................................ 22
To Display the Measurement Values ................................................. 22
To Delete All Values Stored in the Memory ..................................... 23
Care and Maintenance ............................................................................................... 24
Error Indicators ................................................................................................... 25
Troubleshooting Tips........................................................................................... 26
FCC Statement .................................................................................................... 27
Limited Warranty ................................................................................................ 28
Specications...................................................................................................... 29
table of contents

3
INTROdUCTION
Thank you for purchasing the Omron®BP652CAN 7 series Automatic Wrist Blood
Pressure Monitor.
The monitor is compact and easy-to-use at home, at work, and during travel. Perfect for
people who frequently monitor their own blood pressure.
Your new digital blood pressure monitor uses the oscillometric method of blood
pressure measurement. This means the monitor detects your blood’s movement
through your brachial artery and converts the movements into a digital reading. An
oscillometric monitor does not need a stethoscope so the monitor is simple to use.
Clinical research has proven a direct relationship between blood pressure in the wrist
andbloodpressureinthearm.Changesinwristbloodpressurereectchangesinarm
blood pressure because the arteries in the wrist and the arm are close to each other.
Frequently measuring the blood pressure in your wrist will provide your physician with
an accurate indication of changes in your blood pressure.
The BP652CAN comes with the following components:
•Monitor•StorageCase•2“AAA”AlkalineBatteries
•InstructionManualprintedinEnglishandFrench•QuickStartGuide
The BP652CAN 7 series Automatic Wrist Blood Pressure Monitor is intended for home use.
Please read this instruction manual thoroughly before using the unit.
Please keep for future reference.
Forspecicinformationaboutyourownbloodpressure,CONSULTYOURDOCTOR.
Fill in for future reference.
DATE PURCHASED:__________________
SERIAL NUIMBER:___________________
• Staple your purchase receipt here
• Register your product on-line at
www.register-omron.com
SAVE THESE INSTRUCTIONS

4
SAfETY INfORMATION
INTENDED USE
This product is designed to measure the blood pressure and pulse rate of people within the
range of the designated wrist cuff, following the instructions in this instruction manual.
Itismainlydesignedforgeneralhouseholduse.Pleasereadthe“SafetyInformation”
in this instruction manual before using the unit.
To assure the correct use of the product, basic safety measures should always be
followed including the warnings and cautions listed in this instruction manual.
SAFETY SYMBOLS USED IN THIS INSTRUCTION MANUAL
WARNING Indicates a potentially hazardous situation which, if not avoided,
could result in death or serious injury.
CAUTION
Indicates a potentially hazardous situation which, if not avoided,
may result in minor or moderate injury to the user or patient or
damage to the equipment or other property.
OPERATING THE DEVICE
Contactyourphysicianforspecicinformationaboutyourbloodpressure.Self-
diagnosis and treatment using measured results may be dangerous. Follow the
instructions of your physician or licensed healthcare provider.
DO NOT adjust medication based on measurement results from this blood pressure
monitor. Take medication as prescribed by your physician. Only a physician is
qualiedtodiagnoseandtreatHighBloodPressure.
The monitor is not intended to be a diagnostic device.
Ifbatteryuidshouldgetinyoureyes,immediatelyrinsewithplentyofclean
water. Contact a physician immediately.
If you have a condition that may compromise circulation, you may get an inaccurate
reading with this device. Consult your physician before using this device.
Read all of the information in the instruction manual and any other literature in the
box before operating the unit.

5
SAfETY INfORMATION
This device is intended for use in measuring blood pressure and pulse rate in the
adult population. Do not use this device on infants or persons who cannot express
their intentions.
Operate the device only as intended. Do not use the device for any other purpose.
Dispose of the device, components and optional accessories according to applicable
local regulations. Unlawful disposal may cause environmental pollution.
Do not use a cellular phone near the device. It may result in an operational failure.
Use only Omron authorized parts and accessories. Parts and accessories not
approved for use with the device may damage the unit.
Useonly1.5V“AAA”alkalinebatterieswiththisdevice.Donotuseothertypes
of batteries. This may damage the unit.
CARE AND MAINTENANCE
Donotsubjectthemonitortostrongshocks,suchasdroppingtheunitontheoor.
Do not submerge the device or any of the components in water.
Store the device and the components in a clean, safe location.
Changesormodicationnotapprovedbythemanufacturerwillvoidtheuser
warranty. Do not disassemble or attempt to repair the unit or components.

6
BEfORE TAKING A MEASUREMENT
To ensure a reliable reading follow these recommendations:
1. Avoid eating, drinking alcohol, smoking, exercising, and bathing for 30 minutes
before taking a measurement. Rest for at least 15 minutes before taking the
measurement.
2. Stress raises blood pressure. Avoid taking measurements during stressful times.
3. The cuff can be applied to your left or right wrist.
4. Measurements should be taken in a quiet place.
5. Position the unit at heart level throughout the measurement.
6. Remain still and do not talk during the measurement.
7. Wait 2-3 minutes between measurements. The wait time allows the arteries to return
to the condition prior to taking the blood pressure measurement. You may need to
increase the wait time depending on your individual physiological characteristics.
8. Keep a record of your blood pressure and pulse readings for your physician.
A single measurement does not provide an accurate indication of your true blood
pressure. You need to take and record several readings over a period of time. Try
to measure your blood pressure at the same time each day for consistency.

7
KNOW YOUR UNIT
Main Unit:
Components:
2 “AAA”Alkaline Batteries Instruction
Manual
Quick Start
Guide
Display Wrist cuff
Memory (MEM)
button
START/STOP button
User ID selection
switch
SET button
Battery compartment
Date/Time setting
( ) button
Date/Time setting
( ) button
INTRODUCTION
Thank you for purchasing the Omron BP652CAN 7 series Automatic Wrist Blood
Pressure Monitor .
Fill in for future reference.
DATE PURCHASED: __________________
SERIAL NUMBER: ____________________
•Stapleyourpurchasereceipt here
INSTRUCTION MANUAL
Model BP652CAN
5330245-3A
7 series
Automatic Wrist Blood
Pressure Monitor

8
UNIT dISPLAY
Heart guide indicator
Diastolic blood pressure
Irregular heartbeat symbol
Memory symbol
Average value symbol
Movement error symbol
User ID symbol (A or B)
(If “GUEST”is selected, A or
B will not be displayed.)
Wrist symbol (L or R)
Battery low symbol
Pulse display
Heartbeat symbol
(Flashes during
measurement)
Date/Time display
Buzzer symbol
Blood pressure level
indicator
Deflation symbol
Systolic blood pressure

9
dISPLAY SYMBOLS
IRREGULAR HEARTBEAT SYMBOL ( )
When the monitor detects an irregular rhythm two or more times during the
measurement, the Irregular Heartbeat Symbol ( ) will appear on the display with the
measurement values.
Anirregularheartbeatrhythmisdenedasa
rhythm that varies by less than 25% from the
average rhythm or 25% more than the average
rhythm detected while the monitor is measuring
the systolic and diastolic blood pressure.
If the irregular heartbeat symbol ( )
displays with your measurement results,
we recommend you consult your
physician. Follow the directions of your
doctor.
MOVEMENT ERROR SYMBOL ( )
The Movement Error Symbol ( ) is displayed if you move your body during the
measurement. Please remove the wrist cuff, and wait 2-3 minutes. Reapply the wrist
cuff and take another measurement.
The Canadian Hypertension Society (CHS) recommends the
following guideline for upper limit of normal for home blood
pressure readings:
CHS Home Guideline for Upper Limit of Normal BP
Systolic Blood Pressure 135 mmHg
Diastolic Blood Pressure 85 mmHg
Normal Heartbeat
Irregular Heartbeat
Pulse
Pulse
Short Long
Blood
pressure
Blood
pressure

10
This is a general guideline because blood pressure depends on age and morbidity.
The CHS recommends a lower home blood pressure goal for certain patients,
including people with diabetes or kidney disease1.
WARNING
Contactyourphysicianforspecicinformationaboutyourbloodpressure.
Self-diagnosis and treatment using measured results may be dangerous.
Follow the instructions of your physician or licensed healthcare provider.
WARNING
DO NOT adjust medication based on measurement results from this blood
pressure monitor. Take medication as prescribed by your physician. Only
aphysicianisqualiedtodiagnoseandtreatHighBloodPressure.
WARNING
The monitor is not intended to be a diagnostic device.
1Canadian Hypertension Education Program. 2006 Public Recommendations.
dISPLAY SYMBOLS

11
BATTERY INSTALLATION
CAUTION
Useonly1.5V“AAA”alkalinebatterieswiththisdevice.
1. Press the hook on the bottom of the battery cover
and lift the cover off in the direction of the arrow.
2. Install2“AAA”sizebatteriessothe+(positive)and-
(negative) polarities match the polarities of the battery
compartment as indicated.
3. Set the date and time.
Referto“SettingtheDateandTime”.
4. Replace the battery cover.
NOTE: Make sure that the battery cover is securely in
position.

12
BATTERY REPLACEMENT
Low Battery Indicator
When the Low Battery Indicator appears on the display, turn the monitor off and
remove all the batteries. Replace with 2 new batteries at the same time. Long-life
alkaline batteries are recommended.
WARNING
Ifbatteryuidshouldgetinyoureyes,immediatelyrinsewith
plenty of clean water. Contact a physician immediately.
NOTES: •Turntheunitoffbeforereplacingthebatteries.Ifthebatteriesareremoved
while the unit is still on, the date and time will be reset to that of the
previous use. The measurement results are not deleted.
•Whenthebatteriesarereplaced,youmayneedtoresetthedateandtime.
Iftheyearisashingonthedisplay,referto“SettingtheDateandTime”.
•Thebatteriesincludedwiththedevicemayhaveashorterlife.
CAUTION
Dispose of the device, components and optional accessories according to
applicable local regulations. Unlawful disposal may cause environmental
pollution.
BATTERY INSTALLATION

13
SETTING THE dATE ANd TIME
Setthemonitortothecurrentdateandtimebeforetakingameasurementfortherst
time. The setting buttons are inside the battery compartment.
1. TO START THE SETTING
Press the Date/Time Setting button ( ) to adjust the
date and time.
Theyearashesonthedisplay.
2. SETTING THE YEAR
Press the Date/Time Setting button ( ) to advance
by increments of one year.
Press the Date/Time Setting button ( ) to set the
current year.
Themonthashesonthedisplay.
NOTES: •Theyearcanbesetbetween2009and
2030. When the display reaches 2030,
it will return to 2009.
•Pressandholdthe( ) button to
increase the date and time values faster.
3. SETTING THE MONTH
Press the Date/Time Setting button ( ) to advance
by increments of one month.
Press the Date/Time Setting button ( ) to set the
current month.
Thedayashesonthedisplay.

14
4. SETTING THE DAY
Press the Date/Time Setting button ( ) to advance
by increments of one day.
Press the Date/Time Setting button ( ) to set the
current day.
Thehourashesonthedisplay.
5. SETTING THE HOUR
The time is set using AM or PM.
Press the Date/Time Setting button ( ) to advance
by increments of one hour.
Press the Date/Time Setting button ( ) to set the
current hour.
Theminuteashesonthedisplay.
6. SETTING THE MINUTE
Press the Up button ( ) to advance by increments of
one minute.
Press the Date/Time Setting button ( ) to set the
minute setting.
7. TO TURN THE MONITOR OFF
Press the START/STOP button.
Replace the battery cover when done setting date and time.
SETTING THE dATE ANd TIME

15
SETTING THE HEART GUIDE INDICATOR
You can change the options for various settings on your monitor. Pressing the SET
button to change a setting. Press the MEM button to select the options for that setting.
After selecting a setting, press the START/STOP button to conrm the setting and turn
the power off.
Heart Guide Technology ensures more accurate readings. When activated, the
Heart Guide Indicator uses orange and blue lights help guide your wrist to heart level.
This is the correct position to take your blood pressure using your wrist monitor.
SETTING THE HEART GUIDE INDICATOR
1. Select your User ID.
2. Press the SET button.
NOTE: The default setting is “on1”.
3. Press the MEM button to select the Heart Guide Indicator “on1”,“on2”, or “oFF”.
User A User B

16
on1: After the Heart Guide Indicator lights in blue for more than 2 seconds, or
in orange for more than 5 seconds, measurement starts automatically, even
though the monitor may not be in the proper position.
on2: When in the correct position, the Heart Guide Indicator lights in blue for more
than 2 seconds, measurement starts automatically. Measurement will not start
if it lights in orange.
oFF: Measurement starts without the Heart Guide Indicator.
SETTING FOR RIGHT OR LEFT WRIST MEASUREMENT
1. While in the setting mode, press the SET button until
the wrist symbol ( or ) appears on the display.
NOTES: • The default setting is “ ”.
• If you choose “oFF” for the Heart Guide
Indicator, the monitor skips this process.
2. Press the MEM button to select the left wrist ( ) or the right wrist ( ).
SETTING THE BUZZER
1. While in the setting mode, press the SET button until
the buzzer symbol ( ) appears on the display.
NOTE: The default setting is “on1” or “on”,
depending on the Heart Guide Indicator
you set.
SETTING THE HEART GUIDE INDICATOR

17
2. Press the MEM button to select the buzzer setting.
IftheHeartGuideIndicatoris“on1”or“on2”:
on1: The buzzer sounds only when the monitor is in proper position.
on2: The buzzer sounds a series of two short blips if your wrist is too far away from
the measuring position, and beeps when your wrist is in the proper position.
oFF: The buzzer will not sound.
IftheHeartGuideIndicatoris“oFF”:
on: The buzzer sounds when pressing any buttons.
oFF: The buzzer will not sound.
RESETTING TO THE DEFAULT SETTING
TheHeartGuideIndicatorisset“on1”,thewristformeasurementisset“ ”,andthe
buzzerisset“on1”asdefault.
To reset to the default setting, press and hold the SET button while in the setting mode,
then press the START/STOP button simultaneously for more than 2 seconds.
SETTING THE HEART GUIdE INdICATOR

18
CAUTION
Read all of the information in the instruction manual and any other
literature in the box before operating the unit.
CAUTION
This device is intended for use in measuring blood pressure and
pulse rate in the adult population. Do not use this device on infants
or persons who cannot express their intentions.
APPLYING THE CUFF ON THE LEFT WRIST
1. Roll up sleeve. Make sure your sleeve is not rolled up too
tightlyonyourarm.Thismayconstricttheowofblood
in your arm.
2. Wrap the cuff directly against your skin.
Do not apply over clothing. Place the cuff over your
left wrist with your left thumb facing upward.
3. Position the cuff leaving a space of approximately 1/2 to
1 inch between the cuff and the bottom of your palm.
4. Hold the bottom part of the cuff and wrap it around the
wristsoittscomfortablyandsecurelyaroundyourwrist.
NOTE: Make sure the wrist cuff does not cover the
protruding part of the wrist bone on the outside
of the wrist.
APPLYING THE WRIST CUff

19
5. Fold the remaining part of the wrist cuff back out of the
way.
APPLYING THE CUFF ON THE RIGHT WRIST
When taking a measurement using the right wrist position
the cuff as shown in the illustration.
Referto“SettingforRightorLeftWristforMeasurement”.
APPLYING THE WRIST CUff

20
The monitor is designed to take measurements and store the measurement values in
memory for two people using USER ID A and USER ID B. The monitor can be used to
takeasinglemeasurementusingtheGUESTmodearenotstoredinthememory.
1. Sitcomfortablyonachairwithyourfeetatontheoor.
2. Select your User ID (A or B).
3. Press the START/STOP button.
All symbols appear on the display.
4. Hold your arm across your chest at heart level.
Holdyourelbowrmlytoavoidbodymovement.
Sit still and do not talk or move during the measurement.
IftheHeartGuideIndicatorissetto“on2”,theorangelight
will turn to blue when your arm is in the correct position.
(Ifsettoeither“on1”or“oFF”,thecuffwillinate
automatically.)
TAKING A MEASUREMENT
Table of contents
Other Omron Blood Pressure Monitor manuals

Omron
Omron RX - 1 User manual

Omron
Omron HEM-432C Series User manual

Omron
Omron HeartGuide BO8000-L User manual

Omron
Omron HEM-7155T-ESL User manual

Omron
Omron HEM-4030 User manual

Omron
Omron BP654 User manual

Omron
Omron M2 Compact User manual

Omron
Omron HEM-6121 User manual

Omron
Omron i-Q142 User manual

Omron
Omron BP710 User manual

Omron
Omron HEM-7200 User manual

Omron
Omron IntelliSense BP762 User manual

Omron
Omron IntelliSense HEM-773AC User manual

Omron
Omron BP654 User manual

Omron
Omron IntelliSense Elite 7300W User manual

Omron
Omron HEM-7201 User manual

Omron
Omron HEM-7120 User manual

Omron
Omron HBP-9020 User manual

Omron
Omron IntelliSense HEM-712C User manual

Omron
Omron BP742CANN User manual