manuals.online logo
Brands
  1. Home
  2. •
  3. Brands
  4. •
  5. Open Plan Systems
  6. •
  7. Indoor Furnishing
  8. •
  9. Open Plan Systems XPAND REACH User manual

Open Plan Systems XPAND REACH User manual

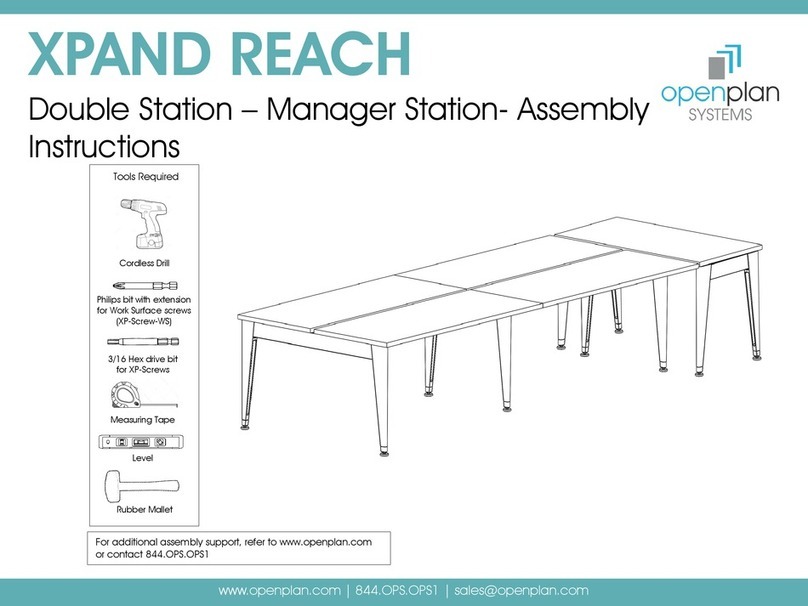
For additional assembly support, refer to www.openplan.com
or contact 844.OPS.OPS1
XPAND REACH
Double Bench: Multiple Station- Assembly Instructions
www.openplan.com | 844.OPS.OPS1 | sales@openplan.com
Tools Required
Cordless Drill
Measuring Tape
3/16 Hex drive bit
for XP-Screws
Level
Rubber Mallet
XPand Parts Used for Assembly
2
XPand Reach – Double Multiple Stations
Item Part name Part Description Image
1 XP-LA Leg Assembly
2 XP-SB-Bracket Stretcher Bar
Bracket
3 XP-LR-XX Leg Rail, XX”
4 XP-WSSA-XX
Work Surface
SupportArm,
Double
5 XP-LRC-XX” Leg Rail Cover XX”
6 XP-SB-XX Stretcher Bar, XX”
7
XP-MLC
Mid Leg Connector
Item Part name Part Description Image
8 XP-CTA-XX Cable Tray
9 XP-CTC Cable Tray Clip
10 XP-WSSB Work Surface
Support Bracket
11 XP-WS-Glide Glide for Work
Surface
12 XP-TXXXX Work Surface
13 XP-SCREWS
5/16-18 x .5” Hex
Socket Cap Screw,
FT, SS
14 XP-SCREWS-
WS
10-9X1 PH Pan
Head, ST P’bd
Screw, ZP
XPand offers two types of end legs, Tapered
legs and Rectangular legs. Though the legs look
different, the assembly process is same.
Step 1: Prepare a large floor space to put
the XPand order together. Unpack the
parts and check to see if all the XPand
parts are present as per the sales order
pick list.
Tapered leg
(XP-LA)
Rectangular leg
(XP-LA-RL)
Step 2: Attach the Leg Assembly (XP-LA)
to the Leg Rail (XP-LR-XX) using (2) XP-
Screws.
Step 3: Attach another Leg Assembly to
the other end of the Leg Rail using (2)
XP-Screws.
Left leg Right leg
3
XPand Reach – Double Bench: Multi Station
Step 4: Assemble (2) XP-SB-Brackets to the Leg Rail
using (2) XP-Screws per Bracket. Make sure the Top
Face of the Bracket faces upwards. See Figure A.
Step 5: Assemble the Stretcher Bars (XP-SB-XX) to the
XP-SB-Brackets using (2) XP-Screws per Bracket.
4
Note: The Stretcher bar is 5” shorter than the specified size.
For example, XP-SB-60 is actually 55” long.
XPand Reach – Double Bench: Multi Station
Bracket on top/rear
indicates “Top”.
Figure A
(XP-SB-Bracket)
XPand Reach – Double Bench: Multi Station
5
Step 6: Assemble two XP-MLC (Mid Leg Connector) to the XP-LA legs using (2) XP-Screws.
Note:
For orders with Return Glass Assemblies , XP-MLC-S is
used instead of XP-MLC
(XP-MLC-S)
The (2) holes on
the Surface
indicates the Top
Face.
Step 7: Assemble both the Mid Leg Assemblies to the
Stretcher Bars using (2) XP-Screws per Connector.
Figure B
XPand Reach – Double Bench: Multi Station
6
Step 8: Repeat Step 2 to Step 5 to build
another End Leg Assembly with XP-SB-
Brackets and Stretcher Bars. Assemble the
Stretcher Bar to the Mid Leg Connector
using (2) XP-Screws per Connector.
Note: If multiple Double Benches need to
be ganged, don’t attach the 2nd End Leg
Assembly yet. Repeat Step 6 to build (2)
Mid-Leg Connectors and repeat Step 7 to
assemble it.
Step 9: Place Work Surface Support Arms (XP-
WSSA-XX) on either side of the Stretcher bar and
assemble it with the (2) XP-Screws per arm.
www.openplan.com | 844.OPS.OPS1 | sales@openplan.com
7
Step 10: Slide Cable Tray Clips onto the Cable
Trays.
Step 11: Secure the assembled Cable Tray
Clips to the Stretcher Bar.
XPand Reach – Double Bench: Multi Station
www.openplan.com | 844.OPS.OPS1 | sales@openplan.com
8
Step 12: If the Stretcher bars are longer than 48”,
assemble (1) XP-WSSB to the center of the Stretcher bar
using (1) XP-Screw as a Set Screw.
Note: No XP-WSSB is used for Stretcher bars less than 48”.
Step 13: Place the Work Surfaces on the support brackets and position them 1.5” apart,
centered over the large hole in the XP-WSSA-XX. Leave ½” overhang on each side edge (as
shown in Figure B). Secure the Work Surface to the XP-WSSA-XX using (4) glides & (8) Work
Surface Screws (XP-SCREWS-WS) per arm (Shown in Figure C & D).
½”
overhang
from legs
on the
ends.
1.5” gap over center hole of XP-WSSA-XX
XPand Reach – Double Bench: Multi Station
Figure D
Note: If you want the Work Surface to slide using the glides, don’t screw the Work Surface
to the XP-WSSB.
Figure C
Step 15: Level the Station unit by turning the leveling feet.
Note: For Rectangular legs, use Rectangular
Leg Rail covers (XP-LRC-R-XX)to the leg rails.
www.openplan.com | 844.OPS.OPS1 | sales@openplan.com
9
Step 14: Snap on the Leg Rail Covers (XP-LRC-XX) to the Leg Rails.
XPand Reach – Double Bench: Multi Station

Other manuals for XPAND REACH

4

Other Open Plan Systems Indoor Furnishing manuals
Open Plan Systems OPS-B14 IMPACT User manual

Open Plan Systems

Open Plan Systems OPS-B14 IMPACT User manual

Open Plan Systems XPAND REACH User manual

Open Plan Systems

Open Plan Systems XPAND REACH User manual

Open Plan Systems MOTIVATE - MID BACK 820 User manual

Open Plan Systems

Open Plan Systems MOTIVATE - MID BACK 820 User manual

Open Plan Systems E-TABLE-2S-T-LEG User manual

Open Plan Systems

Open Plan Systems E-TABLE-2S-T-LEG User manual

Open Plan Systems PGHM User manual

Open Plan Systems

Open Plan Systems PGHM User manual

Open Plan Systems e-table90-j Assembly instructions

Open Plan Systems

Open Plan Systems e-table90-j Assembly instructions

Open Plan Systems E-TABLE-2S-HOME-OFFICE User manual

Open Plan Systems

Open Plan Systems E-TABLE-2S-HOME-OFFICE User manual

Open Plan Systems DTR-CR User manual

Open Plan Systems

Open Plan Systems DTR-CR User manual

Open Plan Systems L2 Lumen User manual

Open Plan Systems

Open Plan Systems L2 Lumen User manual

Open Plan Systems XPAND REACH Single Station Spine Fabric... User manual

Open Plan Systems

Open Plan Systems XPAND REACH Single Station Spine Fabric... User manual

Open Plan Systems EMERGE II User manual

Open Plan Systems

Open Plan Systems EMERGE II User manual

Open Plan Systems XPAND UP User manual

Open Plan Systems

Open Plan Systems XPAND UP User manual

Open Plan Systems TRAINING TABLE User manual

Open Plan Systems

Open Plan Systems TRAINING TABLE User manual

Open Plan Systems XPAND REACH User manual
Open Plan Systems

Open Plan Systems XPAND REACH User manual

Open Plan Systems XPAND REACH User manual

Open Plan Systems

Open Plan Systems XPAND REACH User manual

Popular Indoor Furnishing manuals by other brands

Rauch M1638 Assembly instructions

Rauch

Rauch M1638 Assembly instructions

Royal Catering RC-FT 6 user manual

Royal Catering

Royal Catering RC-FT 6 user manual

OSP Home Furnishings RLE55 Assembly instructions

OSP Home Furnishings

OSP Home Furnishings RLE55 Assembly instructions

Tchibo Eklund 619 441 Assembly instructions

Tchibo

Tchibo Eklund 619 441 Assembly instructions

dobue MOVELARIA PARIS 300045 Assembly instruction

dobue MOVELARIA

dobue MOVELARIA PARIS 300045 Assembly instruction

Costway JV10895WH manual

Costway

Costway JV10895WH manual

Jysk LIMFJORDEN manual

Jysk

Jysk LIMFJORDEN manual

Allen + Roth FWA70317-B quick start guide

Allen + Roth

Allen + Roth FWA70317-B quick start guide

Demeyere 210794 - 00 Assembly instructions

Demeyere

Demeyere 210794 - 00 Assembly instructions

MSW MSW-STSH-36 user manual

MSW

MSW MSW-STSH-36 user manual

Donco kids 760 Assembly instructions

Donco kids

Donco kids 760 Assembly instructions

Article LENIA Assembly instructions

Article

Article LENIA Assembly instructions

Next PORTOFINO 892163 Assembly instructions

Next

Next PORTOFINO 892163 Assembly instructions

Homelegance 5741S Assembly instruction

Homelegance

Homelegance 5741S Assembly instruction

Habitat Marel 817588 quick start guide

Habitat

Habitat Marel 817588 quick start guide

Forte Ricciano RCQL1184 Assembling Instruction

Forte

Forte Ricciano RCQL1184 Assembling Instruction

Emmezeta BCCT134 Assembling Instruction

Emmezeta

Emmezeta BCCT134 Assembling Instruction

Extreme Networks VX-RPS-CH3 quick reference

Extreme Networks

Extreme Networks VX-RPS-CH3 quick reference

manuals.online logo
manuals.online logoBrands
  • About & Mission
  • Contact us
  • Privacy Policy
  • Terms and Conditions

Copyright 2025 Manuals.Online. All Rights Reserved.