manuals.online logo
Brands
  1. Home
  2. •
  3. Brands
  4. •
  5. Optex
  6. •
  7. Accessories
  8. •
  9. Optex i-OneX T User manual

Optex i-OneX T User manual

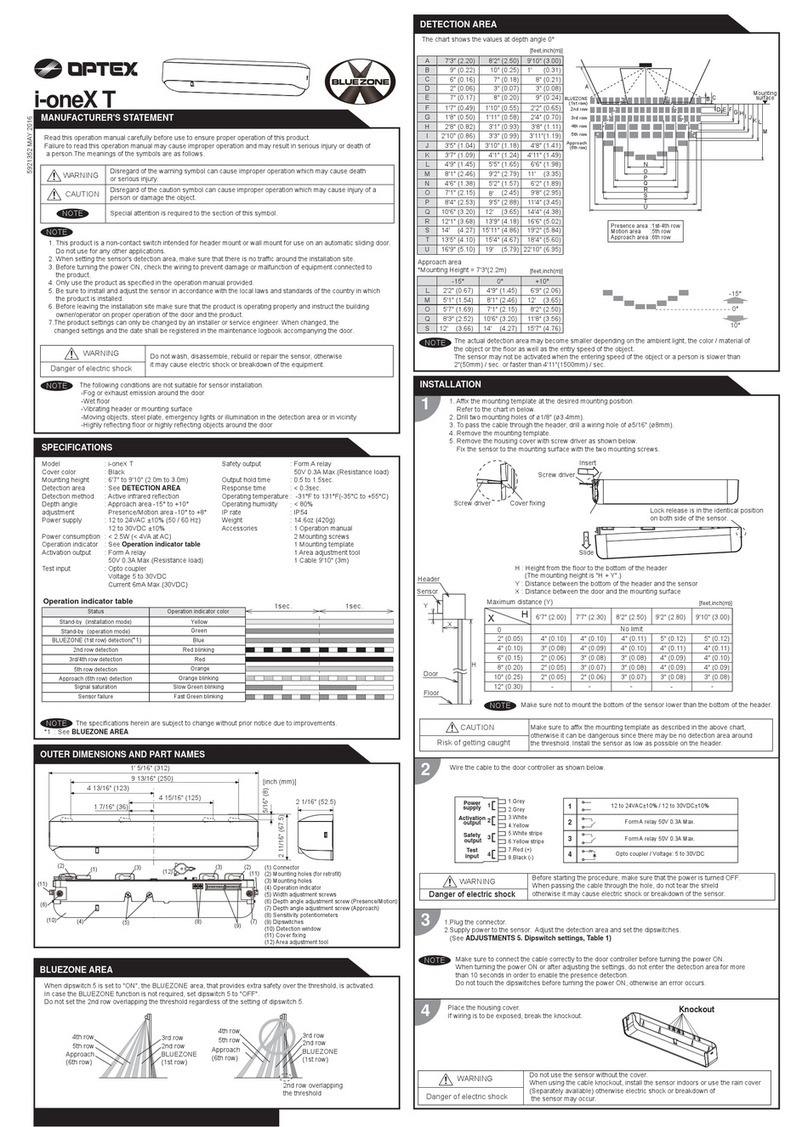
Sensor Mounting Location
Remove Cover
OPTEX i-OneX T Quick Setup Guide
For detailed information, please refer to the installation manual supplied with each sensor
and notes please refer to the i-OneX T Connection Matrix.
2”
1/4”
Header
Align with center of clear door opening
Use supplied Mounting Template.
Place template so that it is in the
center of the clear door opening
and so that the bottom of the tem-
plate is between 1/4” and 2” from
the bottom edge of the header.
Drill (2) 1/8” holes and (1) 5/16” hole as indi-
cated on the template. Remove template from
header. Remove the cover from the sensor.
Fasten the sensor securely to the header
using the supplied screws (do not over-torque
screws or sensor body may distort).
Remove the cover
1
2
.
Screw driver
Insert
Slide forward to
remove cover
Screw driver Cover locking
tabs
Dipswitch Settings
Dipswitch 3
Dipswitch 4
Dipswitch 5
Dipswitch 13
Dipswitch 14
Dipswitch 15
Dipswitch 16
Dipswitch 18
Frequency
BLUEZONE™
Direction
Simultaneous output
Safety Output (to door controller)
Safety Input (from door controller)
Installation Mode
When using more than one sensor close to each other,
set the frequency different for each sensor
When dipswitch 5 is set to “ON”, the BLUEZONE (1st row)
is active and looks through the threshold.
When dipswitch 13 is set to “Uni”, this enables the door to
close faster when a person walks away from the door.
When dipswitch 14 is set to “ON”, both the activation &
safety relay outputs will operate simultaneously regard-
less of detection area. But only the Safety ouput relay
will respond back with a Safety output when it receives a
Safety input.
Select “N.O.”/”N.C.” for Safety output.
The delay time between Safety input and Safety output is
10 msec.
Set dipswitch 18 to “ON” to adjust the 2nd row. During the
installation mode only the 2nd row remains active and the
operation indicator shows yellow. After setting the row, turn
dipswitch 18 “OFF”.
Setting 1 Setting 2 Setting 3 Setting 4
3 4 3 43 4 3 4
OFF
OFF ON
ON
Bi Uni
5
13
15
14
15
16 16
18 18
N.O. N.C.
High Low
5
13
14
OFF ON
Adjusting the Pattern Width
Left eliminated Right eliminated
1
Width adjustment screws
2 3 78 9
Opens all
areas
Opens all
areas
123456789123456789
Dipswitches 1 2 3 4 5 6 7 8
98 10
1234 5 678
Active area
Inactive area
The width of the Approach area can be adjusted
by changing Dipswitches 8-10 as shown below.
elimination elimination
123789
(continue other side)
All manuals and user guides at all-guides.com
all-guides.com
18730 Wilmington Ave, Unit 100
Rancho Dominguez, CA 90220
Ph 310 214-8644
Fax 310 898-1098
Toll free 800 877-6656
www.ot-inc.com
OPTEX Technologies Inc.
(East Coast Ofce)
8510 McAlpine Park Dr.
Suite 108
Charlotte, NC 28211
OPTEX Technical Support (800) 877-6656
East Coast: Perry Watkins, Ext. 220
Central U.S.: Jason Kirn, Ext. 201
Support: Refugio Guadaljara, Ext. 202
Area Depth Angle Adjustments
Sensitivity Adjustment
Cover Installation
Troubleshooting
Operation LED turns FLASHING RED, then the door reopens
(Row 2 Presence Detection Door).
Adjust Presence/Motion adjustment screw Clockwise until ghost-
ing stops.
Note: Before making adjustments set dipswitch 18 ON, once
adjustment are complete set dipswitch 18 Off.
Operation indicator table
Status Operation Indicator color
Stand-by (installation mode)
Stand-by (operation mode)
BLUEZONE (1st row) detection
2nd row detection
3rd-4th row detection
5th row detection
Approach (6th row) detection
Signal saturation
Sensor failure
Slow green blinking
Fast green blinking
Orange
Orange blinking
Red blinking
Red
Green
Blue
Yellow
1sec
The cover locking tab on the sensor must align with
the locking catch on the sensor cover.
HighLow
Approach sensitivity
Presence/Motion
sensitivity
The Presence/Motion sensitivity potentiometer is used to adjust the detec-
tion area sensitivity for rows 1-5. The Approach sensitivity potentiometer is
used to adjust the detection area sensitivity of row 6. Turning clockwise in-
creases the sensitivity; turning counterclockwise decreases the sensitivity.
Use the area adjustment tool to change sensitivity.
Depth angle adjustment
screw for the Presence/
Motion area.
Depth angle adjustment
screw for the Approach
area.
-6
-10 +8
0
+4
-2
The Presence/Motion area angle depth
adjustment screw adjusts rows 1-5
simultaneously.
Shallow Deep
Shallow Deep
-15 +10
-10
0
-5
The Approach area angle depth
adjustment screw adjusts row 6
independently.
Note: Walk Test
Power up sensor and wait
10 seconds prior to walk
testing the presence area.
Perform walk test procedure
to verify substantial com-
pliance with ANSI/BHMA
A156.10 section 8.
(Continued from other side)
Push cover straight into the locking tab on the sensor.
Note: Walk Test
Perform walk test procedure to verify substantial compliance with
ANSI/BHMA A156.10 section 8.
All manuals and user guides at all-guides.com

Other Optex Accessories manuals

Optex Pro Swing Elite ST User manual

Optex

Optex Pro Swing Elite ST User manual

Optex SIP-3020/5 User manual

Optex

Optex SIP-3020/5 User manual

Optex GEN-DC User manual

Optex

Optex GEN-DC User manual

Optex QA-AXIS II User manual

Optex

Optex QA-AXIS II User manual

Optex RC-20U User manual

Optex

Optex RC-20U User manual

Optex V2 Series User manual

Optex

Optex V2 Series User manual

Optex OA AXIS T User manual

Optex

Optex OA AXIS T User manual

Optex Fiber SenSys Terrain Defender TD 100 User manual

Optex

Optex Fiber SenSys Terrain Defender TD 100 User manual

Optex OA-FLEX T User manual

Optex

Optex OA-FLEX T User manual

Optex EZ User manual

Optex

Optex EZ User manual

Optex X-Zone T User manual

Optex

Optex X-Zone T User manual

Optex i-OneX T User manual

Optex

Optex i-OneX T User manual

Optex TS-1000-D User manual

Optex

Optex TS-1000-D User manual

Optex Elite OA-603 User manual

Optex

Optex Elite OA-603 User manual

Optex OAM-DUAL II User manual

Optex

Optex OAM-DUAL II User manual

Optex HX-80N User manual

Optex

Optex HX-80N User manual

Optex OA-4500S User manual

Optex

Optex OA-4500S User manual

Optex CVS2 User manual

Optex

Optex CVS2 User manual

Optex OVS-01GT User manual

Optex

Optex OVS-01GT User manual

Optex ProSafe OA-Presence User manual

Optex

Optex ProSafe OA-Presence User manual

Optex OA-FLEX AIR T User manual

Optex

Optex OA-FLEX AIR T User manual

Optex OA-FLEX T User manual

Optex

Optex OA-FLEX T User manual

Optex Reaction One User manual

Optex

Optex Reaction One User manual

Optex Prosafe OA-1V User manual

Optex

Optex Prosafe OA-1V User manual

Popular Accessories manuals by other brands

Poly Rove B4 setup sheet

Poly

Poly Rove B4 setup sheet

Comelit 1622 Technical manual

Comelit

Comelit 1622 Technical manual

Bittium Faros 180 manual

Bittium

Bittium Faros 180 manual

RAB Lighting LOS800CA installation manual

RAB Lighting

RAB Lighting LOS800CA installation manual

EARLDOM OD-KFX001 instruction manual

EARLDOM

EARLDOM OD-KFX001 instruction manual

Panasonic MA24D50 Specification sheet

Panasonic

Panasonic MA24D50 Specification sheet

Hubbell Electric Cable Reels TMR Series Installation and maintenance instructions

Hubbell

Hubbell Electric Cable Reels TMR Series Installation and maintenance instructions

Oakley AIRWAVE 1.5 owner's manual

Oakley

Oakley AIRWAVE 1.5 owner's manual

Sapir SP-8510-AD instruction manual

Sapir

Sapir SP-8510-AD instruction manual

OXFORD CRYOSYSTEMS AD51 Quick setup guide

OXFORD CRYOSYSTEMS

OXFORD CRYOSYSTEMS AD51 Quick setup guide

Aervoe Sierra Wave Spirit operating instructions

Aervoe

Aervoe Sierra Wave Spirit operating instructions

ZIGBEE OPS305 quick start guide

ZIGBEE

ZIGBEE OPS305 quick start guide

Velleman Whadda WPSE476 manual

Velleman

Velleman Whadda WPSE476 manual

Sensit PTS 310A instruction manual

Sensit

Sensit PTS 310A instruction manual

Lippert Components Solera Power Awning XL owner's manual

Lippert Components

Lippert Components Solera Power Awning XL owner's manual

Arizona AirScent OFFICEMATE product manual

Arizona AirScent

Arizona AirScent OFFICEMATE product manual

FIBARO FGFS-101-EN-A operating manual

FIBARO

FIBARO FGFS-101-EN-A operating manual

Servodan 33-210 Fitting and operating instructions

Servodan

Servodan 33-210 Fitting and operating instructions

manuals.online logo
manuals.online logoBrands
  • About & Mission
  • Contact us
  • Privacy Policy
  • Terms and Conditions

Copyright 2025 Manuals.Online. All Rights Reserved.