4
A cura del Servizio Assistenza e Pubblicazioni Tecniche
PROPRIETA’ RISERVATA
In dotazione ad ogni affilatrice viene fornita una copia di questo manuale.
N.B. Le descrizioni e le illustrazioni contenute nel presente manuale si intendono non rigorosamente impegnative. La Ditta si riserva il
diritto di apportare eventuali modifiche senza impegnarsi ad aggiornare di volta in volta questo manuale.
AFFILATRICE ELETTRICA PER CATENE
AFFILATRICE ELETTRICA MINIGRINDER 106550 230Vac
CARATTERISTICHE DELLA MACCHINA:
- Costruttore: Tecomec SpA - Via Secchi, 2 - 42011 Bagnolo in Piano - Reggio Emilia - ITALY
- Macchina: Affilatrice elettrica per catene AFFILATRICE ELETTRICA MINIGRINDER 106550 230Vac
DATI E MODELLI:
- versioni: AFFILATRICE ELETTRICA MINIGRINDER 106550 230Vac
- potenza installata: Motore elettrico 50Hz 85Wtensione 230Vac
- classe di isolamento II
- dimensioni mole: diametro esterno 105mm, diametro interno 22.3mm
- spessori: 3.2 - 4.7 - 6 mm
- velocità massima: 5000 min-1 (15 min)
- livello di pressione acustica: 76dB (A)
- livello delle vibrazioni trasmesse all’impugnatura: < 2,5 m/S
2
- tipi di catene previste: passi – 1/4” - .325” – 3/8” - .404” – 1/2”
- peso della macchina completa: 19.6N (2 kg)
- accessori forniti: N.1 mola spessore 4.7 mm; N.1 protezione mola; N.1 ravviva mola; N.1 dima ; N.1 impugnatura. N.1 VITE M6x25
INTRODUZIONE:
Conservare con cura il presente manuale.
Per un corretto impiego dell’affilatrice e per evitare incidenti, non iniziare il lavoro senza aver letto questo manuale con la massima
attenzione. Troverete su questo manuale le spiegazioni di funzionamento dei vari componenti e le istruzioni per i necessari controlli e per
la manutenzione.
ATTENZIONE – Tutte le operazioni di manutenzione non riportate sul presente manuale devono essere effettuate da un’officina autorizzata.
Per garantire un costante e regolare funzionamento dell’affilatrice, ricordare che le eventuali sostituzioni delle parti di ricambio dovranno
essere effettuate esclusivamente con RICAMBI ORIGINALI.
NORME DI SICUREZZA:
ATTENZIONE – L’affilatrice, se ben usata, è uno strumento di lavoro rapido, comodo ed efficace. Perché il vostro lavoro sia sempre
piacevole e sicuro, rispettare scrupolosamente le norme di sicurezza riportate qui di seguito e nel corso del manuale.
1 - L’affilatrice deve essere usata solo da persona adulta, in buone condizioni fisiche e a conoscenza delle norme d’uso
2 - Non indossare anelli, bracciali e/o indumenti ingombranti che possono entrare a contatto con la mola
3 - Durante le fasi di lavoro o di ravvivatura mola, indossare guanti e occhiali protettivi
4 - Non arrestare mai la rotazione della mola con le mani anche dopo aver spento il motore
5 - Eseguire il montaggio della mola e ogni altra operazione di manutenzione e trasporto, con la spina disinserita dalla rete
6 - Non mettere in moto l’affilatrice priva di protezione mola. La protezione viene fornita nel sacchetto accessori e deve essere applicata
all’affilatrice dopo aver montato la mola (foto 6). Deve essere rimossa solo in caso di sostituzione della mola e poi rimessa
7 - Controllare che la tensione e la frequenza indicate sulla etichetta dati tecnici applicata all’affilatrice, corrispondano a quelle della
rete d’allacciamento
8 - Non usare cavi, spine o prolunghe difettose e/o non a norma
9 - Disinserire immediatamente la spina dalla rete se il cavo è danneggiato o tagliato; per la riparazione o sostituzione rivolgersi al
rivenditore o centro di assistenza autorizzato. Il cavo di alimentazione è completo di terminali. Il collegamento elettrico interno consiste
nell’infilare i terminali del cavo di alimentazione direttamente sull’interruttore. Il collegamento elettrico alla rete deve essere disposto
in modo da evitare che persone o veicoli possano danneggiarlo mettendo loro e Voi in pericolo.
10 - Assicurarsi che la zona di lavoro della mola sia sgombra da utensili o altri oggetti, prima di avviare l’affilatrice.
11 - Controllare la posizione del cavo di alimentazione durante il lavoro, affinchè rimanga sempre lontano dal raggio d’azione della
mola e non venga posto in tensione. Non molare in vicinanza di altri cavi elettrici.
12 - Non muovere la catena con le mani prima che la mola sia completamente lontana dalla zona di lavoro.
13 - Non permettere ad altri di sostare nelle vicinanze dell’affilatrice durante il suo funzionamento, né di toccare il cavo di alimentazione.
14 - Mantenere sempre asciutta e pulita l’impugnatura.
15 - Prima di avviare l’affilatrice, assicurarsi che la mola sia fissata in modo corretto e lontano dalla zona di lavoro.
16 - Lavorare sempre con la macchina fissata in modo stabile, a banco o a muro.
17 - Lavorare sempre in posizione stabile, sicura e prestare la massima attenzione senza distrarsi.
18 - Seguire sempre le istruzioni previste per le operazioni di manutenzione.
19 - Controllare prima dell’uso l’affilatrice per assicurarvi che ogni dispositivo di sicurezza e non, sia funzionante.
20 - Non lavorare con una affilatrice danneggiata, mal riparata, mal montata o modificata arbitrariamente. Non togliere o danneggiare
o rendere inefficiente alcun dispositivo di sicurezza.
21 - Non utilizzare mole diverse da quelle indicate nella tabella catene a fondo libretto (colonne I e L)
22 - Non utilizzare l’affilatrice come troncatrice o per molare oggetti che non siano catena da taglio.
23 - Consegnare o prestare l’affilatrice soltanto a persone esperte e a conoscenza del funzionamento e del corretto utilizzo.
24 - Conservare sempre l’affilatrice in luogo asciutto e sollevato dal suolo e fuori dalla portata dei bambini.
25- Rischio di danno, dovuto ad accensione accidentale. Non usare in area dove possono essere presenti dei bambini.
26 - L’affilatrice può essere usata ininterrottamente per un tempo massimo di 15 minuti poi lasciata riposare per un tempo adeguato.
27 - Non esporre l’affilatrice alla pioggia e/o a condizioni di particolare umidità e in aree dove possano essere presenti dei bambini.
28 - Non utilizzare l’affilatrice in atmosfera esplosiva o infiammabile.
29 - In caso di necessità della messa fuori servizio dell’affilatrice, non abbandonarla nell’ambiente, ma consegnarla al vostro rivenditore,
il quale provvederà alla corretta collocazione.
ITALIANO
4
30 - Rivolgersi sempre al Vs. rivenditore per qualsiasi altro chiarimento o intervento prioritario.
31 - Non strattonare il cavo di alimentazione per disinserirlo dalla presa di rete. Tenere il cavo lontano da fonti di calore, olio o bordi
taglienti.
32 - Per evitare il rischio di tagliarsi, muovere la catena afferrandola correttamente sulla maglia di collegamento e non sulla parte tagliente
del dente
33 - Non avviare l’affilatrice trattenendo la mola con le mani.
34 - Non forzare l’utensile durante le fasi di lavoro.
ATTENZIONE – INSTALLAZIONE AFFILATRICE
- collocare l’affilatrice in luogo protetto dalla polvere e dall’umidità, ben illuminato, fuori dalla portata dei bambini, lontano da gas,
liquidi o materiali combustibili o esplodenti e in modo da poter inserire la spina di corrente in una presa appropriata senza usare
pericolose prolunghe.
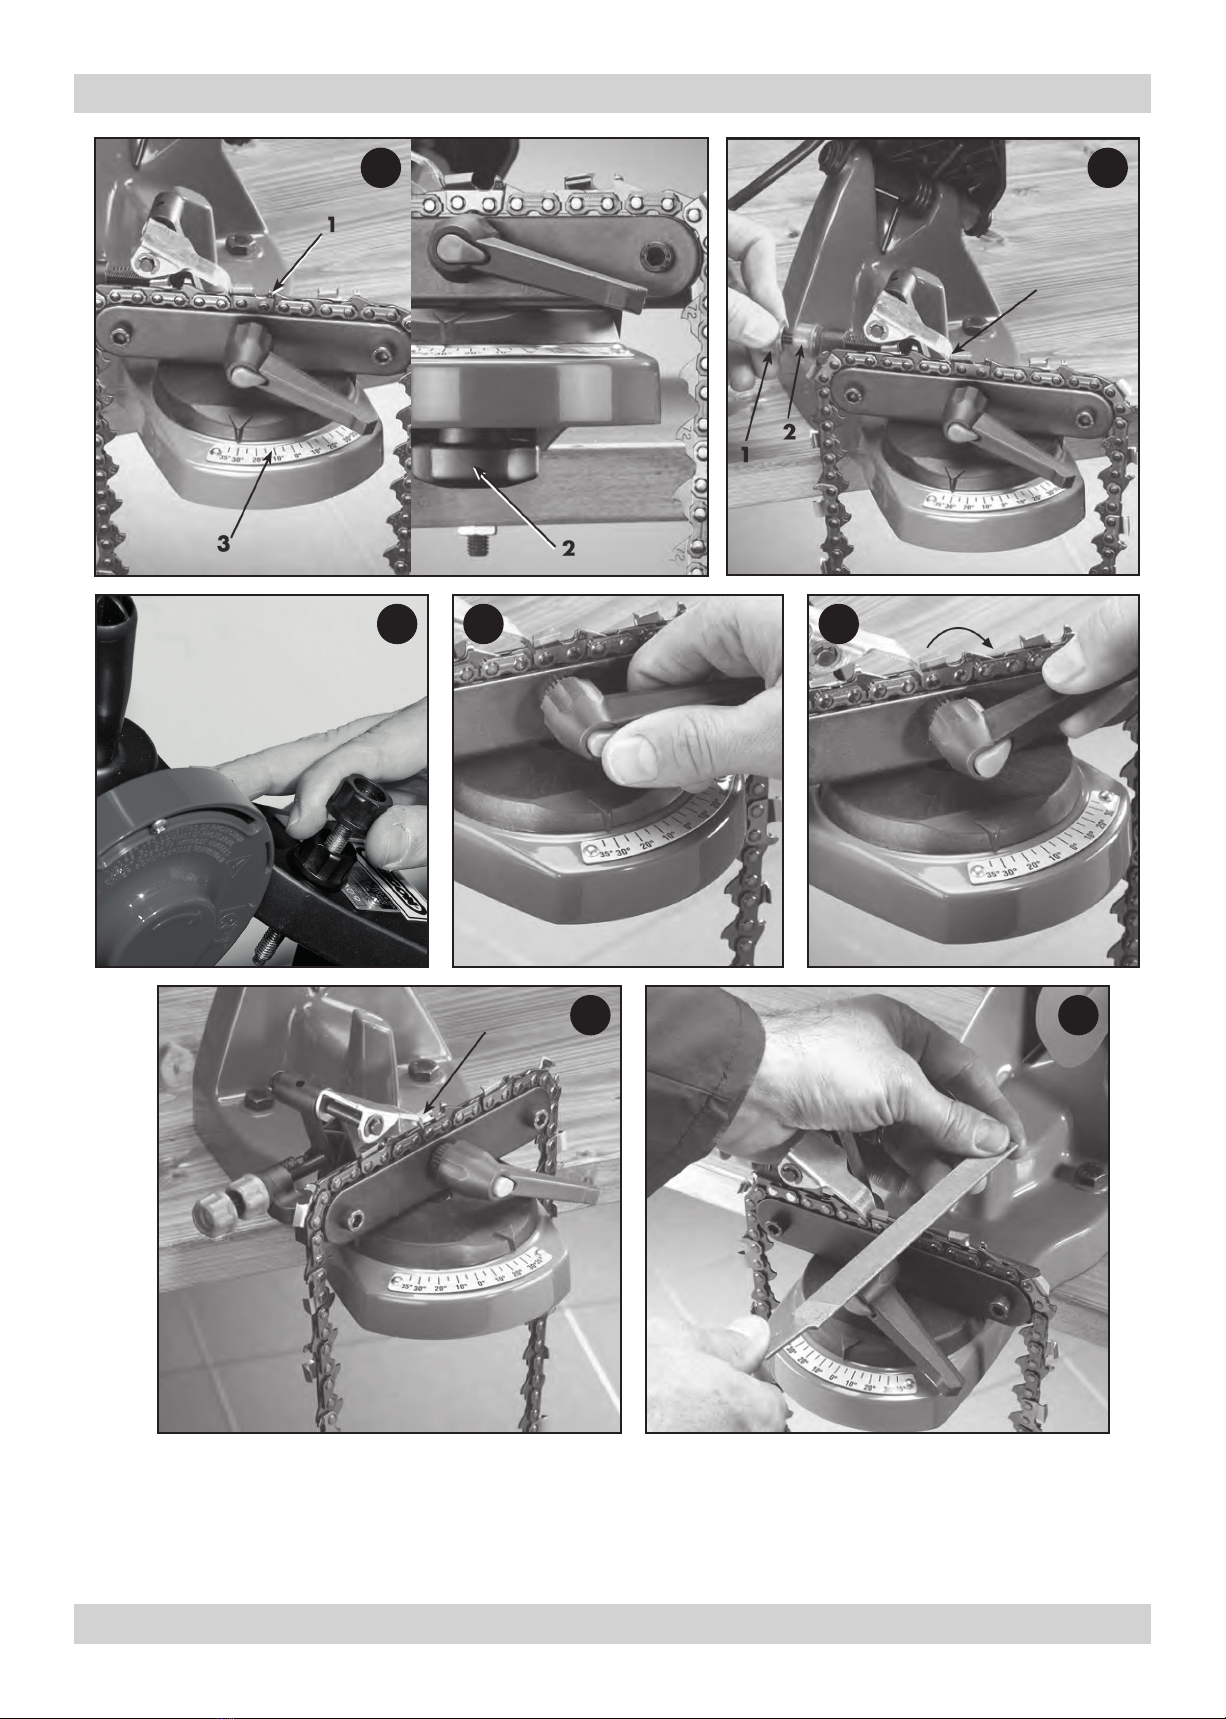
- fissare a banco (foto 1 ) o a muro (foto 2) l’affilatrice con due bulloni di M8 non in dotazione. Per il fissaggio dell’affilatrice a banco,
occorre posizionarla in modo corretto servendosi delle apposite tacche di riferimento.
- Nel montaggio a muro o a parete (foto 2) servirsi dell’apposito supporto a squadro (non in dotazione), assicurandosi che la macchina
non venga fissata all’altezza degli occhi dell’operatore. Si consiglia il montaggio ad una altezza massima di circa 120-130cm dal piano
terra.
- inserire la vite M6x25 in dotazione, facendola scorrere fino alla fine della propria sede sul braccio (foto 3)
- avvitare l’impugnatura in dotazione sulla vite M6x25, facendo attenzione che la vite sia ancora posizionata alla fine della propria sede.
In caso contrario non sarà possibile montare la protezione mola. (foto 4)
- dopo avere correttamente installato l’affilatrice si può procedere al montaggio della mola.
MONTAGGIO E AVVERTENZE SULLA MOLA:
- utilizzare la mola adatta al tipo di catena da affilare consultando la tabella catene allegata a fondo libretto (colonna I - L)
-prima dell’impiego accertarsi del perfetto stato delle mole in dotazione appendendole al foro centrale e battendole leggermente con
un oggetto non metallico lateralmente vicino alla periferia, dovranno emettere un suono metallico. Un suono sordo è indice di crepe o
rotture, quindi la mola è da scartare.
- non inserire con forza una mola sul mozzo né modificare il diametro del foro di centraggio, evitando di utilizzare mole che non si
adattino perfettamente
- per il montaggio della mola utilizzare esclusivamente mozzo e ghiera puliti e non danneggiati
- accertarsi che le dimensioni dei diametri esterni sia del mozzo che della ghiera siano identici (fig. 1)
- il mozzo è montato stabilmente sull’albero del motore elettrico
- svitare manualmente la ghiera, centrare e montare correttamente la mola sul mozzo, e riavvitare manualmente la ghiera (foto 5)
-fare molta attenzione al montaggio della ghiera la quale deve essere orientata con lo scarico dal lato della mola (fig.2)
- una mola installata con ghiera troppo serrata potrebbe spaccarsi o disintegrarsi durante il funzionamento mettendo in pericolo l’operatore.
Per evitare tale rischio si consiglia di non serrarla eccessivamente trattandosi anche di una ghiera in materiale termoplastico
- posizionare correttamente la protezione mola sulla carcassa del motore all’interno della propria sede (foto 6) e fissarla in modo stabile
nella posizione posta sulla carcassa stessa (foto 6)
VERIFICA DELLA MOLA:
- mettersi a fianco della mola, mettere in funzione l’affilatrice e controllare visivamente che la mola non oscilli né lateralmente né
trasversalmente provocando vibrazioni anomale
- se questo avviene fermare immediatamente la macchina e controllare che il montaggio della mola sia avvenuto correttamente. In caso
di necessità sostituire la mola con un’altra originale
- a macchina ferma verificare il profilo della mola con l’apposita dima in dotazione di colore arancione (fig.3 punto C)
- se necessario, dopo avere indossato un paio di occhiali e di guanti, avviare l’affilatrice e provvedere a ritoccare il profilo della mola
con il ravviva mola in dotazione, lavorando sempre con estrema cautela, impugnando con due mani e con presa sicura ed efficace il
ravviva mola stesso. Il contatto con la mola che gira ad alta velocità può provocare ustioni e abrasioni
- provare sempre una mola appena montata a velocità di esercizio per almeno un minuto prima di procedere alla molatura, tenendosi
in disparte e controllando che altre persone non si trovino sulla traiettoria del suo piano di rotazione.
N.B.: sostituire le mole quando hanno raggiunto un diametro minimo di circa 80mm (3.14 inches)
MESSA IN FUNZIONE:
- dopo avere installato la macchina sul banco o a muro, montato correttamente la mola, montato correttamente la sua protezione, montato
correttamente l’impugnatura e controllato che il senso di rotazione della mola sia quello indicato sulla protezione mola, si può procedere
alla messa in funzione
- la macchina è dotata di un interruttore di sicurezza con bobina di sgancio, ciò significa che in caso di interruzione improvvisa di corrente
in linea, l’interruttore si disattiva autonomamente lasciando la macchina in stato di stallo nel caso ci sia un ritorno improvviso della
corrente stessa (per rimettere in funzione l’affilatrice agire nuovamente sull’interruttore)
- la macchina deve essere collegata ad una presa che garantisca una tensione 230Vac.
OPERAZIONE DI AFFILATURA:
- è consigliabile pulire la catena prima di sottoporla all’affilatura
- trattandosi di una affilatrice ad angolo fisso per l’inclinazione mola , l’angolo di taglio superiore del dente è fissato a 60°misurandolo
in senso antiorario
- posizionare la catena che si vuole affilare sulle due ganasce facendo attenzione che il delimitatore di profondità sia sulla destra come
indicato (foto 7 - punti 1)
- allentare la morsa servendosi del pomolo sottostante (foto 7 - punto 2) e ruotare la morsa in senso orario della gradazione corrispondente
all’angolo di affilatura superiore del dente destro servendosi della scala graduata (foto 7 - punto 3)
- portare a battuta un dente destro contro l’arresto catena e tramite la vite di registro (foto 8 - punto 1) regolare l’avanzamento del dente
- l’arresto catena è installato su un perno montato a sua volata sulla biella in plastica. Detto perno ha due tacche di posizione consentendo
di posizionare l’arresto catena esattamente in mezzo al dente che si vuole affilare in quel momento
- a motore spento abbassare il braccio e con vari tentativi, tramite la vite di registro avanzamento catena, avvicinare il dente alla mola
fino a sfiorarla, iniziando sempre dal dente più consumato individuato con la dima in dotazione (fig. 3 punto D)
- avviare l’affilatrice e sempre con la vite di registro avanzamento dente determinare la quantità da asportare
- stabilita la quantità da asportare, bloccare la vite di registro tramite la ghiera (foto 8 - punto 2)
-per non caricare eccessivamente il motore e per non danneggiare i denti della catena, asportare quantità minime di materiale e non
soffermarsi a lungo sullo stesso dente rischiando di bruciare il tagliente
5
Tecomec
1190117_R05_DEF.indd 4 23/04/2010 15.08.06
A cura del Servizio Assistenza e Pubblicazioni Tecniche
PROPRIETA’ RISERVATA
In dotazione ad ogni affilatrice viene fornita una copia di questo manuale.
N.B. Le descrizioni e le illustrazioni contenute nel presente manuale si intendono non rigorosamente impegnative. La Ditta si riserva il
diritto di apportare eventuali modifiche senza impegnarsi ad aggiornare di volta in volta questo manuale.
AFFILATRICE ELETTRICA PER CATENE
AFFILATRICE ELETTRICA MINIGRINDER 106550 230Vac
CARATTERISTICHE DELLA MACCHINA:
- Costruttore: Tecomec SpA - Via Secchi, 2 - 42011 Bagnolo in Piano - Reggio Emilia - ITALY
- Macchina: Affilatrice elettrica per catene AFFILATRICE ELETTRICA MINIGRINDER 106550 230Vac
DATI E MODELLI:
- versioni: AFFILATRICE ELETTRICA MINIGRINDER 106550 230Vac
- potenza installata: Motore elettrico 50Hz 85Wtensione 230Vac
- classe di isolamento II
- dimensioni mole: diametro esterno 105mm, diametro interno 22.3mm
- spessori: 3.2 - 4.7 - 6 mm
- velocità massima: 5000 min-1 (15 min)
- livello di pressione acustica: 76dB (A)
- livello delle vibrazioni trasmesse all’impugnatura: < 2,5 m/S2
- tipi di catene previste: passi – 1/4” - .325” – 3/8” - .404” – 1/2”
- peso della macchina completa: 19.6N (2 kg)
- accessori forniti: N.1 mola spessore 4.7 mm; N.1 protezione mola; N.1 ravviva mola; N.1 dima ; N.1 impugnatura. N.1 VITE M6x25
INTRODUZIONE:
Conservare con cura il presente manuale.
Per un corretto impiego dell’affilatrice e per evitare incidenti, non iniziare il lavoro senza aver letto questo manuale con la massima
attenzione. Troverete su questo manuale le spiegazioni di funzionamento dei vari componenti e le istruzioni per i necessari controlli e per
la manutenzione.
ATTENZIONE – Tutte le operazioni di manutenzione non riportate sul presente manuale devono essere effettuate da un’officina autorizzata.
Per garantire un costante e regolare funzionamento dell’affilatrice, ricordare che le eventuali sostituzioni delle parti di ricambio dovranno
essere effettuate esclusivamente con RICAMBI ORIGINALI.
NORME DI SICUREZZA:
ATTENZIONE – L’affilatrice, se ben usata, è uno strumento di lavoro rapido, comodo ed efficace. Perché il vostro lavoro sia sempre
piacevole e sicuro, rispettare scrupolosamente le norme di sicurezza riportate qui di seguito e nel corso del manuale.
1 - L’affilatrice deve essere usata solo da persona adulta, in buone condizioni fisiche e a conoscenza delle norme d’uso
2 - Non indossare anelli, bracciali e/o indumenti ingombranti che possono entrare a contatto con la mola
3 - Durante le fasi di lavoro o di ravvivatura mola, indossare guanti e occhiali protettivi
4 - Non arrestare mai la rotazione della mola con le mani anche dopo aver spento il motore
5 - Eseguire il montaggio della mola e ogni altra operazione di manutenzione e trasporto, con la spina disinserita dalla rete
6 - Non mettere in moto l’affilatrice priva di protezione mola. La protezione viene fornita nel sacchetto accessori e deve essere applicata
all’affilatrice dopo aver montato la mola (foto 6). Deve essere rimossa solo in caso di sostituzione della mola e poi rimessa
7 - Controllare che la tensione e la frequenza indicate sulla etichetta dati tecnici applicata all’affilatrice, corrispondano a quelle della
rete d’allacciamento
8 - Non usare cavi, spine o prolunghe difettose e/o non a norma
9 - Disinserire immediatamente la spina dalla rete se il cavo è danneggiato o tagliato; per la riparazione o sostituzione rivolgersi al
rivenditore o centro di assistenza autorizzato. Il cavo di alimentazione è completo di terminali. Il collegamento elettrico interno consiste
nell’infilare i terminali del cavo di alimentazione direttamente sull’interruttore. Il collegamento elettrico alla rete deve essere disposto
in modo da evitare che persone o veicoli possano danneggiarlo mettendo loro e Voi in pericolo.
10 - Assicurarsi che la zona di lavoro della mola sia sgombra da utensili o altri oggetti, prima di avviare l’affilatrice.
11 - Controllare la posizione del cavo di alimentazione durante il lavoro, affinchè rimanga sempre lontano dal raggio d’azione della
mola e non venga posto in tensione. Non molare in vicinanza di altri cavi elettrici.
12 - Non muovere la catena con le mani prima che la mola sia completamente lontana dalla zona di lavoro.
13 - Non permettere ad altri di sostare nelle vicinanze dell’affilatrice durante il suo funzionamento, né di toccare il cavo di alimentazione.
14 - Mantenere sempre asciutta e pulita l’impugnatura.
15 - Prima di avviare l’affilatrice, assicurarsi che la mola sia fissata in modo corretto e lontano dalla zona di lavoro.
16 - Lavorare sempre con la macchina fissata in modo stabile, a banco o a muro.
17 - Lavorare sempre in posizione stabile, sicura e prestare la massima attenzione senza distrarsi.
18 - Seguire sempre le istruzioni previste per le operazioni di manutenzione.
19 - Controllare prima dell’uso l’affilatrice per assicurarvi che ogni dispositivo di sicurezza e non, sia funzionante.
20 - Non lavorare con una affilatrice danneggiata, mal riparata, mal montata o modificata arbitrariamente. Non togliere o danneggiare
o rendere inefficiente alcun dispositivo di sicurezza.
21 - Non utilizzare mole diverse da quelle indicate nella tabella catene a fondo libretto (colonne I e L)
22 - Non utilizzare l’affilatrice come troncatrice o per molare oggetti che non siano catena da taglio.
23 - Consegnare o prestare l’affilatrice soltanto a persone esperte e a conoscenza del funzionamento e del corretto utilizzo.
24 - Conservare sempre l’affilatrice in luogo asciutto e sollevato dal suolo e fuori dalla portata dei bambini.
25- Rischio di danno, dovuto ad accensione accidentale. Non usare in area dove possono essere presenti dei bambini.
26 - L’affilatrice può essere usata ininterrottamente per un tempo massimo di 15 minuti poi lasciata riposare per un tempo adeguato.
27 - Non esporre l’affilatrice alla pioggia e/o a condizioni di particolare umidità e in aree dove possano essere presenti dei bambini.
28 - Non utilizzare l’affilatrice in atmosfera esplosiva o infiammabile.
29 - In caso di necessità della messa fuori servizio dell’affilatrice, non abbandonarla nell’ambiente, ma consegnarla al vostro rivenditore,
il quale provvederà alla corretta collocazione.
ITALIANO
4
30 - Rivolgersi sempre al Vs. rivenditore per qualsiasi altro chiarimento o intervento prioritario.
31 - Non strattonare il cavo di alimentazione per disinserirlo dalla presa di rete. Tenere il cavo lontano da fonti di calore, olio o bordi
taglienti.
32 - Per evitare il rischio di tagliarsi, muovere la catena afferrandola correttamente sulla maglia di collegamento e non sulla parte tagliente
del dente
33 - Non avviare l’affilatrice trattenendo la mola con le mani.
34 - Non forzare l’utensile durante le fasi di lavoro.
ATTENZIONE – INSTALLAZIONE AFFILATRICE
- collocare l’affilatrice in luogo protetto dalla polvere e dall’umidità, ben illuminato, fuori dalla portata dei bambini, lontano da gas,
liquidi o materiali combustibili o esplodenti e in modo da poter inserire la spina di corrente in una presa appropriata senza usare
pericolose prolunghe.
- fissare a banco (foto 1 ) o a muro (foto 2) l’affilatrice con due bulloni di M8 non in dotazione. Per il fissaggio dell’affilatrice a banco,
occorre posizionarla in modo corretto servendosi delle apposite tacche di riferimento.
- Nel montaggio a muro o a parete (foto 2) servirsi dell’apposito supporto a squadro (non in dotazione), assicurandosi che la macchina
non venga fissata all’altezza degli occhi dell’operatore. Si consiglia il montaggio ad una altezza massima di circa 120-130cm dal piano
terra.
- inserire la vite M6x25 in dotazione, facendola scorrere fino alla fine della propria sede sul braccio (foto 3)
- avvitare l’impugnatura in dotazione sulla vite M6x25, facendo attenzione che la vite sia ancora posizionata alla fine della propria sede.
In caso contrario non sarà possibile montare la protezione mola. (foto 4)
- dopo avere correttamente installato l’affilatrice si può procedere al montaggio della mola.
MONTAGGIO E AVVERTENZE SULLA MOLA:
- utilizzare la mola adatta al tipo di catena da affilare consultando la tabella catene allegata a fondo libretto (colonna I - L)
-prima dell’impiego accertarsi del perfetto stato delle mole in dotazione appendendole al foro centrale e battendole leggermente con
un oggetto non metallico lateralmente vicino alla periferia, dovranno emettere un suono metallico. Un suono sordo è indice di crepe o
rotture, quindi la mola è da scartare.
- non inserire con forza una mola sul mozzo né modificare il diametro del foro di centraggio, evitando di utilizzare mole che non si
adattino perfettamente
- per il montaggio della mola utilizzare esclusivamente mozzo e ghiera puliti e non danneggiati
- accertarsi che le dimensioni dei diametri esterni sia del mozzo che della ghiera siano identici (fig. 1)
- il mozzo è montato stabilmente sull’albero del motore elettrico
- svitare manualmente la ghiera, centrare e montare correttamente la mola sul mozzo, e riavvitare manualmente la ghiera (foto 5)
-fare molta attenzione al montaggio della ghiera la quale deve essere orientata con lo scarico dal lato della mola (fig.2)
- una mola installata con ghiera troppo serrata potrebbe spaccarsi o disintegrarsi durante il funzionamento mettendo in pericolo l’operatore.
Per evitare tale rischio si consiglia di non serrarla eccessivamente trattandosi anche di una ghiera in materiale termoplastico
- posizionare correttamente la protezione mola sulla carcassa del motore all’interno della propria sede (foto 6) e fissarla in modo stabile
nella posizione posta sulla carcassa stessa (foto 6)
VERIFICA DELLA MOLA:
- mettersi a fianco della mola, mettere in funzione l’affilatrice e controllare visivamente che la mola non oscilli né lateralmente né
trasversalmente provocando vibrazioni anomale
- se questo avviene fermare immediatamente la macchina e controllare che il montaggio della mola sia avvenuto correttamente. In caso
di necessità sostituire la mola con un’altra originale
- a macchina ferma verificare il profilo della mola con l’apposita dima in dotazione di colore arancione (fig.3 punto C)
- se necessario, dopo avere indossato un paio di occhiali e di guanti, avviare l’affilatrice e provvedere a ritoccare il profilo della mola
con il ravviva mola in dotazione, lavorando sempre con estrema cautela, impugnando con due mani e con presa sicura ed efficace il
ravviva mola stesso. Il contatto con la mola che gira ad alta velocità può provocare ustioni e abrasioni
- provare sempre una mola appena montata a velocità di esercizio per almeno un minuto prima di procedere alla molatura, tenendosi
in disparte e controllando che altre persone non si trovino sulla traiettoria del suo piano di rotazione.
N.B.: sostituire le mole quando hanno raggiunto un diametro minimo di circa 80mm (3.14 inches)
MESSA IN FUNZIONE:
- dopo avere installato la macchina sul banco o a muro, montato correttamente la mola, montato correttamente la sua protezione, montato
correttamente l’impugnatura e controllato che il senso di rotazione della mola sia quello indicato sulla protezione mola, si può procedere
alla messa in funzione
- la macchina è dotata di un interruttore di sicurezza con bobina di sgancio, ciò significa che in caso di interruzione improvvisa di corrente
in linea, l’interruttore si disattiva autonomamente lasciando la macchina in stato di stallo nel caso ci sia un ritorno improvviso della
corrente stessa (per rimettere in funzione l’affilatrice agire nuovamente sull’interruttore)
- la macchina deve essere collegata ad una presa che garantisca una tensione 230Vac.
OPERAZIONE DI AFFILATURA:
- è consigliabile pulire la catena prima di sottoporla all’affilatura
- trattandosi di una affilatrice ad angolo fisso per l’inclinazione mola , l’angolo di taglio superiore del dente è fissato a 60°misurandolo
in senso antiorario
- posizionare la catena che si vuole affilare sulle due ganasce facendo attenzione che il delimitatore di profondità sia sulla destra come
indicato (foto 7 - punti 1)
- allentare la morsa servendosi del pomolo sottostante (foto 7 - punto 2) e ruotare la morsa in senso orario della gradazione corrispondente
all’angolo di affilatura superiore del dente destro servendosi della scala graduata (foto 7 - punto 3)
- portare a battuta un dente destro contro l’arresto catena e tramite la vite di registro (foto 8 - punto 1) regolare l’avanzamento del dente
- l’arresto catena è installato su un perno montato a sua volata sulla biella in plastica. Detto perno ha due tacche di posizione consentendo
di posizionare l’arresto catena esattamente in mezzo al dente che si vuole affilare in quel momento
- a motore spento abbassare il braccio e con vari tentativi, tramite la vite di registro avanzamento catena, avvicinare il dente alla mola
fino a sfiorarla, iniziando sempre dal dente più consumato individuato con la dima in dotazione (fig. 3 punto D)
- avviare l’affilatrice e sempre con la vite di registro avanzamento dente determinare la quantità da asportare
- stabilita la quantità da asportare, bloccare la vite di registro tramite la ghiera (foto 8 - punto 2)
-per non caricare eccessivamente il motore e per non danneggiare i denti della catena, asportare quantità minime di materiale e non
soffermarsi a lungo sullo stesso dente rischiando di bruciare il tagliente
5
Tecomec
1190117_R05_DEF.indd 4 23/04/2010 15.08.06
ITALIANO
- Non esporre l’apparecchio alla pioggia.
- Non usare l’apparecchio in luoghi umidi o bagnati.
- Tenere ben illuminata l’area di lavoro.
- Non usare l’apparecchio in presenza di liquidi inammabili o gas.
- Controllare che la tensione e la frequenza indicate sulla targhetta
dati tecnici, corrispondano a quelle della rete di alimentazione.
- Per evitare avviamenti involontari, accertarsi che l’interruttore
sia nella posizione “0” quando si inserisce la spina.
- Scollegare l’apparecchio dall’alimentazione elettrica quando no
lo si utilizza, prima della manutenzione e quando si sostituiscono
gli accessori (es. la mola).
- Prima di utilizzare l’apparecchio, controllarlo con attenzione per
stabilire se funzionerà in modo appropriato e svolgerà la funzione
prevista: in particolare, vericare l’integrità delle protezioni mola.
- Vericare l’allineamento e l’aderenza delle parti mobili, l’eventuale
rottura dei componenti, il montaggio ed altre eventuali condizioni
che possono inuenzare il funzionamento.
- Le protezioni mola ed i particolari danneggiati devono
essere riparati o sostituiti da un tecnico specializzato, se non
diversamente indicato nel presente manuale.
- Far sostituire gli interruttori difettosi da un Tecnico Specializzato.
- Tenere le persone non coinvolte nel lavoro, specialmente i
bambini, lontano dall’area di lavoro. Impedire che tocchino
l’apparecchio ed il cavo di prolunga.
- Usare occhiali di sicurezza e guanti.
- Usare maschere per la faccia od antipolvere, se la lavorazione
crea delle polveri.
- Non indossare vestiti larghi o gioielli, che possano impigliarsi
nelle parti in movimento.
- Indossare copricapo di protezione, per trattenere i capelli lunghi.
- Quando si lavora all’esterno, si consigliano scarpe antiscivolo.
- Mantenere sempre la posizione e l’equilibrio appropriati.
- Non distrarsi mai. Controllare quello che si sta facendo. Usare
buon senso. Non azionare l’apparecchio quando si è stanchi.
- Vericare sempre che le chiavi esagonali siano state tolte
dall’apparecchio, prima del suo utilizzo.
- Tenere pulita l’area di lavoro. Aree e banchi di lavoro disordinati
facilitano gli infortuni.
- Evitare il contatto del corpo con superci messe a terra od a
massa.
- Utilizzare sempre la morsa per tenere ferma la catena da aflare:
non aflare tenendo la catena con le mani.
- Non forzare l’apparecchio ad una velocità superiore a quella
prevista.
- Non arrestare mai la rotazione della mola con le mani anche
dopo aver spento il motore.
- Quando si utilizza l’apparecchio all’esterno, utilizzare soltanto
cavi di prolunga adeguati a questo uso e marcati di conseguenza.
- Non tirare mai il cavo di alimentazione per scollegarlo dalla
presa. Tenere il cavo lontano da calore, olio e spigoli vivi.
- Non utilizzare l’apparecchio se l’interruttore non si accende nè si
spegne.
- L’uso di accessori (es. la mola) diversi da quelli raccomandati
dal costruttore, può provocare infortuni.
- Non manomettere i dispositivi di sicurezza.
- Conservare l’apparecchio con cura.
- Seguire le istruzione per la sostituzione degli accessori.
- Esaminare periodicamente, a vista, il cavo dell’apparecchio e,
se danneggiato, farlo riparare da un tecnico specializzato.
- Esaminare periodicamente, a vista, i cavi di prolunga e, se
danneggiati, sostituirli.
- Tenere le impugnature asciutte, pulite e prive di olio e grasso.
- Il valore totale dichiarato della vibrazione è stato misurato in accordo con un metodo standard di test e può essere usato per confrontare
uno strumento con un altro.
- Il valore totale dichiarato della vibrazione può anche essere usato in una valutazione preliminare dell’esposizione.
- L’emissione della vibrazione durante l’uso attuale dell’utensile elettrico può differire dal valore totale dichiarato a seconda dei modi
in un lo strumento è usato e dal bisogno di identicare misure di sicurezza per proteggere l’operatore che sono basate su una stima
dell’esposizione nelle condizioni attuali d’uso (tenendo conto di tutte le parti del ciclo operativo quali i tempi in cui l’utensile è spento e
quando gira al minimo, oltre al tempo di attivazione).
PRESCRIZIONI DI SICUREZZA:
ATTENZIONE! Quando si utilizzano utensili elettrici, si debbono sempre rispettare le precauzioni base di sicurezza per ridurre il
rischio di incendio, scossa elettrica e danni personali.
590181 230 Volt
590181 230 Volt
590181 230 Volt
230 Volt
26.3N (2,7 kg)
N. 1 mola spessore 3.2 mm; vite Ø3,5x9,5
7000 54.1dB (A)
;