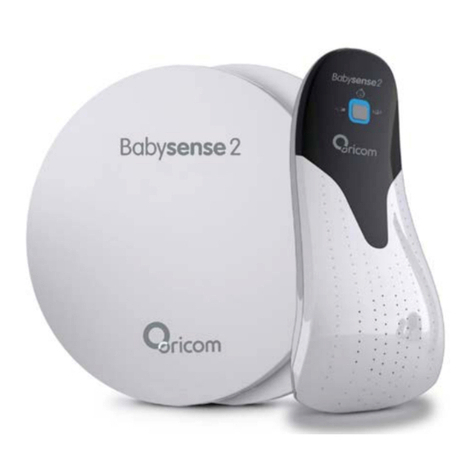
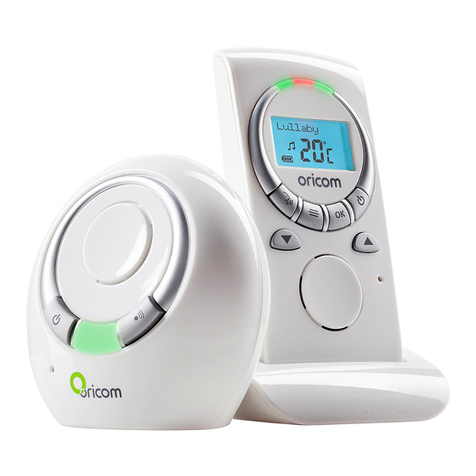
Oricom Babysense2 User manual

Babysenese2 is intended for use as an Infant Apnoea Alarm. ALWAYS
READ THE LABLE AND USER GUIDE, USE ONLY AS DIRECTED.
Please retain your purchase receipt and attach to the back page of this
user guide you will need to produce this if warranty service is required.
Babysense2 is included as a
medical device on the Australian
Register of Therapeutic Goods
(ARTG No. 97479)
User Guide

Table of contents
Important Use And Safety Warning .........................................2
General Information ...............................................................4
Installation.............................................................................6
Operation...............................................................................8
Troubleshooting Guide .........................................................11
Customer Support................................................................12
Express Warranty .............................................................. 13
Need Help?
If you need assistance setting up or using your Oricom Babysense2 now
or in the future, call Oricom Product Support.
Australia 1300 889 785 or 02 4574 8888
www.oricom.com.au
Mon-Fri 8am – 6pm AEST
New Zealand 0800 67 42 66
www.oricom.co.nz
Mon-Fri 10am – 8pm NZST

1
Important Use And Safety Warning
IMPORTANT USE AND SAFETY WARNING
It is essential that all users of your Babysense2 monitor read and
understand this user guide thoroughly before installing or using the
product. This user guide contains detailed information on installation
and operation of the Babysense2 monitor which all users need to be
aware of to ensure that the monitor operates properly. If you are
unsure of how to install and operate the Babysense2 monitor, please
contact Customer Support on 1300 889 785.
Your Babysense2 monitor is designed to be an aid for use with
heathy infants up to one year of age and should not be used as
a substitute for responsible and proper adult supervision of
your baby.
The Babysense monitor has been designed to provide an alert in the
form of an alarm if your baby’s breathing movement rate slows below
10 breaths per minute or cannot be detected for more than 20
seconds. However, you must always stay within hearing range of the
alarm control unit (as determined from your daily testing of the
product) during use and keep background noise to a minimum. Each
home or place of care will have a different hearing range. It is
important to determine the correct hearing range in every location that
you use Babysense2 for the product to adequately assist you.
Babysense is a high quality, high sensitivity medical device
which must be handled with care. The following steps are
recommended for the best operation of the Babysense2:
t:PVNVTUVOEFSUBLFUIFQFSGPSNBODFUFTUEBJMZPGUIF#BCZTFOTF
monitor (as set out in this user guide).
t.BLFTVSFUIFDPOUSPMVOJUBOEDBCMFTBSFLFQUPVUPGSFBDIPGZPVS
baby and other young children.
t/FWFSQMBDFUIFDPOUSPMVOJUJOTJEFZPVSCBCZhTDPUPSCBTTJOFU
2
Important Use And Safety Warning
t5PBWPJEQPTTJCMFEBOHFSTFOTPSDPSETFOTVSFUIBU excess cords are
secured under the mattress with the included cable ties and are not
visible or within reach of baby or other infant.
t%POPUQMBDFUIFDPSETJOBIJHIXFBSBOEUFBSMPDBUJPO
t/FWFSVTFBGSBZFEPSEBNBHFEDPSE
t/FWFSDPWFSUIFDPOUSPMVOJUXJUIDMPUIFTUPXFMTPSCMBOLFUTPSBOZother
item.
t/FWFSVTFPSQMBDFZPVSDPOUSPMVOJUJOPSOFBSXBUFSFHOFBSBCBUI
t%POPUIBOEMFSPVHIMZESPQPSUISPXUIFNPOJUPS
t'PMMPXUIFJOTUBMMBUJPOJOTUSVDUJPOTDBSFGVMMZUPFOTVSFUIBUJUJTJOTUBMMFEsecurely
and correctly.
t#BCZTFOTF2JTOPUBUPZ%POPUBMMPXDIJMESFOPGBOZBHFUPQMBZXJUIJU
t#BCZTFOTF2XJMMOPUXPSLXJUIBOPUIFSMJWJOHCFJOHQSFTFOUJOUIFTBNF
cot, crib or bassinet as your baby.
t&OTVSFBEFRVBUFMZDIBSHFECBUUFSJFTBSFVTFEBUBMMUJNFT
t#BCZTFOTF2TFOTPSQBETNVTUCFQMBDFECFMPXUIFNBUUSFTTPGZPVS
baby’s cot, crib or bassinet. Do not place the sensor pads above the
mattress.
IMPORTANT: It is strongly advised that every caregiver
lear how to administer first aid.

3
General Information
General Information
During the first year of life, infants may experience irregular breathing
patterns. These may signs indicate a cold, fever, or other illness.
Babysense2 is an Infant Apnoea Alarm which gives parenets (or
caretakers) some confort, by improving the possibility of intervention in
the event of irregular breathing movement rate or distress.
What is Babysense2?
#BCZTFOTFJTBIPNFCSFBUIJOHNPWFNFOUrate NPOJUPSdesigned to be an
aid for use with healthy infants up to one year of age and is not to be relied
on for use with infants requiring medical attention or supervision. If you
have any concerns about your baby's health, always consult a medical
practitioner.
#BCZTFOTFDPOUJOVBMMZEFUFDUTZPVSCBCZhTCSFBUIJOHNPWFNFOU rateBOE will
set off a sound and visual alarm if the breathing movement rate slows to
below 10 breaths per minute or cannot be detected for more than 20 seconds.
Check that the alarm can be heard in all locations throughout the home or
place of care.The system's non-touch sensor pads under the mattress monitor
your baby's breathing movement rate without impeding your baby.
IMPORTANT: It is strongly advised that every caregiver to your
baby learn how to give rst aid.
Principle of Operation

4
General Information
Technical Specications
t1PXFSFECZTJ[F""WPMU"MLBMJOFCBUUFSJFTOPUTVQQMJFE1PXFS
consumption approx. 1mA.
t#BUUFSZMJGFBQQSPYNPOUITVTJOHIJHIRVBMJUZBMLBMJOFCBUUFSJFT
t"MBSNWPMVNFUZQJDBMMZE#41-BUEJTUBODFPGPOFNFUSFGSPNDPOUSPMVOJU
t*MMVNJOBUJPOUZQJDBMMZN$%
t 4J[FPGTFOTPSQBEJTDNYDN
Pack Contents
t 0OFDPOUSPMVOJU
t0OFIBOHJOHIPPL
t5XPTFOTPSQBET
t0OFDPOOFDUJOHDBCMF
t3FVTFBCMFQMBTUJDDBCMFUJFT
Batteries are not included with this product.
If any items are missing from the pack please call Oricom Customer
support.

5
Installation
1. Place the two sensor pads on the bottom of the cot (see illustration 1),
or one sensor pad (see note below on newborns). When using with a
slat based cot, ensure the sensor pads are stable and supported
adequately to enable full contact of the sensor pads with the
mattress. If the mattress is not in direct contact with the sensor pads
or if the cot base is soft or padded, place plywood (not supplied) on
the cot base, place the sensor pads on the plywood and place the
mattress firmly on top to enable full contact of the sensor pads with
the mattress.
2. Remove battery cover (see illustration 4), remove battery housing and
insert, 4 new AA 1.5 volt Alkaline batteries (not supplied), Replace
battery housing and close cover.
Note: Please dispose of used batteries in accordance with local waste
regulations.
3. Plug in the cords of the two sensor pads to the double-connector of
the connecting cable, then attach the connecting cable to the outlet
NBSLFE4&/403*/POUIFDPOUSPMVOJU
8IFOVTJOHBTJOHMFTFOTPSQBEBUUBDIDPSEEJSFDUMZUPUIF4&/403
*/PVUMFUXJUIPVUVTJOHUIFDPOOFDUJOHDBCMF
IMPORTANT: To avoid possible danger from excess sensor cords, it
is recommended to collect excess cord length and safely tether with
the included ties.
4. Press hanging hook firmly into slot in back of control unit (see
illustration 4), and hang from the edge of the cot, or anywhere out of
baby's reach.
Installation

6
Note on installation for newborns
When using for infant not yet able to crawl, use only one sensor
pad - without the connecting cable. (see illustration 2).
This will ensure greater relative sensitivity.
Make sure that the sensor is placed underneath baby’s location in cot.
When baby begins to move around and is able to move onto areas in the
DPUOPUDPWFSFECZUIFTFOTPSQBEUIFOUIFTFDPOEQBENVTUCFVTFE
and attached, using the connecting cable.
Installation

7
Operation
Operation
See illustration 3 for layout of control unit featuring:
t0O0GGCVUUPOVOEFSQSPUFDUJWFDPWFS
t#SFBUIJOHNPWFNFOUrate JOEJDBUPSMJHIU
t3FEBMBSNMJHIUBDUJWBUFEJGCBCZhTCSFBUIJOHDBOOPUCFEFUFDUFEPS
slows signicantly.
t-PXCBUUFSZXBSOJOHMJHIU
When switched on, the red control lights switch on briey and a click
sound will be heard. When breathing and movement are sensed, the
green light ashes.
If red low-battery warning light ashes (see illustration 3), replace all
batteries as soon as possible. If a clicking sound is heard, all batteries
must be replaced immediately.
Turn off by pressiOH0O0GGCVUUPO

8
Operation
Testing Operation
#BCZTFOTFJTBOFYDFFEJOHMZTFOTJUJWFEFWJDFXIJDINPOJUPSTCBCZhT
breathing movement rate through the mattress during sleep. There are
two main causes of malfunction technical malfunctions and malfunctions
due to environmental factors.
Technical malfunction
In order to minimize technical problems, follow installation and operation
instructions carefully.
Environmentally caused malfunction
%VFUPUIFFYUSFNFTFOTJUJWJUZPG#BCZTFOTFJUDBOCFJOþVFODFECZ
fans, wind, air conditioning, and so forth. Such environmental effects
could be picked up by the sensors on a similar level to that of breathing
movements, thus preventing or delaying alarm activation.
Testing Operation
You must conduct this quick performance test daily
t 3FNPWFCBCZGSPNDPUBOEUVSOPGGEFWJDF"GUFSUVSOJOHPGGXBJU
minute while the mattress shifts due to removal of the baby's weight.
t 5VSOEFWJDFCBDLPOBOEBWPJENPWJOHPSUPVDIJOHUIFDPUXJUIPVU
baby in cot).
t 8BUDIGPSHSFFOMJHIUCMJOLJOHXJMMJOEJDBUFUIBUFOWJSPONFOUBM
disturbances are being read as false movement recordings.
t &OTVSFUIBUBMBSNHPFTPGGXJUIJOTFDPOETEVFUPBCTFODF
of breathing movements). The alarm may sound with or without
preliminary ticking.
t $IFDLUIBUBMBSNDBOCFIFBSECZUIFDBSFSJOBMMMPDBUJPOTUISPVHIPVU
the home or place of care.
t 5IJTQFSGPSNBODFUFTUNVTUCFDPOEVDUFEFWFSZEBZ
IMPORTANT: You should not rely on Babysense2 in any location
throughout the home or place of care where the alarm cannot be heard.
t$IFDLUIBUXIFOCBCZJTJOUIFDPUUIFHSFFOMJHIUþBTIFT

9
Operation
Locating and dealing with environmental disturbances
During testing outlined on page 8, if the alarm does not sound after 20
seconds, eliminate all environmental disturbances by actions such as
changing ventilation, removing cot mobile, closing windows,
repositioning cot and the like.
Babysense2cannot be used for two infants in one cot. Never allow
animals in the cot. Do not operate vaporizer or ventilator directly towards
the cot.
In the event of alarm
In the event of alarm commence first aid, and seek the assistance of
emergency services and/ or medical advice.
IMPORTANT: It is strongly advised that every caregiver to your baby
learn how to give first aid.
False alarms
Isolated cases of false alarms are possible. If this occurs, check if this is
caused by:
tBGBVMUZDPOOFDUJPOCFUXFFOUIFTFOTPSQBETBOEUIFDPOUSPMVOJU
tDPOOFDUJPO PG POMZ POFsensor QBE XIFO ZPVS CBCZ DBO NPWF
PGG UIF JNNFEJBUFBSFBPS
tGBJMVSFPGUIFTFOTPSQBETUPCFEJSFDUMZBHBJOTUUIFNBUUSFTT
A mattress of a stiff material such as polystyrene foam could
cause false alarms.
It has been noted that false alarms resulting from slow breathing
movement rate occur with one in about 200 babies.
Please contact our Oricom Customer Support team with any product related
questions.
tconnection of two sensor pads, far apart from eachother when
baby is not crawling yet; or

When you are no longer using your Babysense2 always store the product
safely to avoid damage.
- Store product in a dry shaded place.
- Do not place heavy objects on the sensor pags and avoid shocks.
- Ensure the batteries are removed from the control unit.
- If you choose to reuse the produyct again ensure you test the product
carefully in accorance with the user instructions.
- Babysense2 is an eceedingly sensitive device and therefore the
manufacturer recommends that the sensor pads be replaced after 2 years
of use.
Made by Hisense Ltd.
ISO 9001:2008 and ISO 13485:2003 certified
23 Becker St. Rishon le Zion 75359, Israel
www.hisense.co.il
10
Operation
Please note
Babysense2 monitors and alerts with respect to breathing
movement rates, but cannot prevent cessation of breathing. The
responsibility for applying first aid rests on you.
#BCZTFOTFTFOTFTCSFBUIJOHNPWFNFOUTBOEDBOOPUNPOJUPSPUIFS
occurrences. The purpose of the device is to alert when slowing of
breathing and movement rate is detected.
Caring for your Babysense2
Warning
Babysense2is a high quality, high sensitivity electronic device which must
be handled with care:
t %POPUIBOEMFSPVHIMZESPQPSUISPX
t 'PMMPXUIFJOTUBMMBUJPOJOTUSVDUJPOsDBSFGVMMZUPFOTVSFUIBUJUJTJOTUBMMFE
securely and correctly.
t #BCZTFOTF2JTOPUBUPZ%POPUBMMPXDIJMESFOPGBOZBHFUPQMBZXJUIJU
#BCZTFOTFSFRVJSFTOPTQFDJBMUSFBUNFOUCFZPOESFQMBDJOHCBUUFSJFT when
the battery indicator light illuminates. The sensor pads and control unit
may be wiped with a damp cloth.
Product Storage

11
Troubleshooting Guide
Symptom Possible Cause Solution
Lights on Control
unit do not
illuminate when
turned ON
t#BUUFSJFTBSFOPUJOTFSUFE
correctly or may be at.
t$IFDLCBUUFSJFTBSFJOTFSUFEJOUIF$POUSPMVOJUPCTFSWJOHUIF
correct polarity.
t$POUSPMVOJUSFRVJSFTY""7"MLBMJOFCBUUFSJFTOPU
supplied).
Low battery
voltage warning
(red light) on the
Control Unit
t#BUUFSJFTBSFMPX t3FQMBDFBMMCBUUFSJFT
False alarm up to
30 seconds from
turning on
t4JOHMFTFOTPSQBEDPOOFDUFE
through the connecting cable.
t4FOTPSQBEJTEFGFDUJWF
t$POOFDUJOHDBCMFJTEFGFDUJWF
(when using 2 sensors).
t5XPTFOTPSTBSFOPU
connected correctly to the
Control unit.
t$BCMFJTDPOOFDUFEUPUIF
control units blocked socket.
t8IFOVTJOHPOMZPOFTFOTPSQBENBLFTVSFJUJTDPOOFDUFE
directly into the Control unit without the connecting cable.
Connect one sensor pad without the connecting cable and lay
the baby on the cot for 1minute. If alarm does not activate,
the sensor pad is ok. If alarm activates, disconnect and place
the sensor pad aside.
t$POOFDUUIFPUIFSTFOTPSQBEBOESFQFBUTUFQTBCPWF
t*GCPUITFOTPSQBETBSFJOXPSLJOHPSEFSDPOOFDUUIF
connecting cable and lay the baby on the cot for 1 minute. If
the alarm activates the connecting cable is damaged.
t%POPUDPOOFDUBOZDBCMFTUPUIFCMPDLFETPDLFUPO$POUSPM
unit (only to “SENSOR IN” socket).
Alarm goes off
after a few hours
t5IFNBUUSFTTJTOPUUPVDIJOH
the sensor pads.
t5IFNBUUSFTTJTSBJTFEUIFSF
is an object near the sensor
pads).
t5XPTFOTPSQBETBSF
connected but the baby is not
yet crawling.
t0OMZPOFTFOTPSQBEJT
connected and the baby has
crawled off the sensor pad.
t5IFNBUUSFTTEPFTOPUFOBCMF
adequate transfer of baby
movement (a rigid mattress,
a mattress with springs or
mattress with air pockets).
t.BLFTVSFUIBUUIFNBUUSFTTBOETFOTPSQBETBSFUPVDIJOH
t.BLFTVSFUIBUUIFSFBSFOPPCKFDUTOFYUUPUIFTFOTPSQBET
and that the Twin connector is not placed on or near the
sensor pads (it is preferable to locate the Twin connector
outside the cot area).
t$POOFDUTFOTPSQBETBTQFSUIFVTFSNBOVBM*GCBCZJTOPU
yet able to crawl, use only one sensor pad – and make sure
sensor is placed underneath baby's location in cot to ensure
greater relative sensitivity.
t1MBDFBTIFFUPGQMZXPPEOPUTVQQMJFEVOEFSUIFTFOTPSQBE
so that the sensor pad and the mattress will be tightly pressed
together.
Delayed alarms
while taking the
baby out of the
cot
t1FSGPSNBODFUFTUJTOPU
correct.
t%POPUDPOEVDUQFSGPSNBODFUFTUCZUBLJOHUIFCBCZPVU
of cot and waiting for the alarm to go off. Kindly conduct
performance test according to the performance test
instruction in user guide.
The alarm does
not go off within
20 seconds
when performing
the correct
performance test
t&OWJSPONFOUBM*OþVFODFT
detected by the sensor
pads, such as wind, fan,
airconditioner, cot mobile
vibrations.
t1FSGPSNBUFTUXIJDIXJMMEFUFDUUIFTPVSDFPGUIFNPWFNFOU
UIBUUIFEFWJDFEFUFDUTFHTPVSDFTPGXJOETVDIBTBJS
conditioner, an open window or a fan, movements of cot
mobile (which can vibrate even if it’s not turned on) walking
around the cot area or an intercom placed near the cot
with intense transmission levels. Eliminate sources of wind,
remove the mobile etc. After neutralizing all environmental
interruptions, perform the test again.
For all product related questions and warranty support please call our
customer support team 1300 889 785 or 02 4574 8888.

12
Customer Support
Customer Support
If you have any problems setting up or using this product you will nd useful
tips and information in the Troubleshooting section of this user guide as well
as “Frequently Asked Questions” on our website www.oricom.com.au.
If you have further questions about using the product after reviewing the
resources above or would like to purchase replacement parts or accessories
please call our Customer Support Team. Our dedicated local support team
are more likely to be able to help you than the retailer where you made your
purchase.
Important
Please retain your purchase receipt and attach to the back page of this user
guide as you will need to produce this if warranty service is required. Take a
few moments to register your product online: www.oricom.com.au

13
Express Warranty (Australia)
Oricom International Pty Ltd is the distributor of Babysense2 in Australia. This
Express Warranty is provided by Oricom International Pty Ltd ABN 46 086
116 369, Unit 1, 4 Sovereign Place, South Windsor NSW 2756, herein after
referred to as “Oricom”.
Oricom products come with guarantees that cannot be excluded under the
Australian Consumer Law. You are entitled to a replacement or refund for a
major failure and compensation for any other reasonably foreseeable loss or
damage. You are also entitled to have the goods repaired or replaced if the
goods fail to be of acceptable quality and the failure does not amount to a
major failure.
Oricom warrants that the product is free from defects in materials or
workmanship during the Express Warranty Period. This Express Warranty
does not extend to any product from which the serial number has been
removed or was purchased outside of Australia.
Nothing in this Express Warranty excludes, restricts or modifies any
condition, warranty, guarantee, implied term, right or remedy pursuant to the
Australian Consumer Law and which may not be so excluded, restricted or
modified. For such conditions, terms, guarantees and warranties that cannot
be excluded, restricted or modified, Oricom limits the remedies available to
extent permitted in the relevant legislation.
The Express Warranty Period will be 2 years from the date of purchase of the
product evidenced by your dated sales receipt. You are required to provide
proof of purchase as a condition of receiving Express Warranty services.
You are entitled to a replacement product or repair of the product at our
discretion according to the terms and conditions of this document if your
product is found to be faulty within the Express Warranty Period. This Express
Warranty extends to the original purchaser only and is not transferable.
Products distributed by Oricom are manufactured using new materials or
new and used materials equivalent to new in performance and reliability.
Spare parts may be new or equivalent to new. Spare parts are warranted to
be free from defects in material or workmanship for thirty (30) days or for
the remainder of the Express Warranty Period of the Oricom branded product

14
Express Warranty (Australia)
in which they are installed, whichever is longer. During the Express Warranty
Period, Oricom will where possible repair and if not replace the faulty
product or part thereof. All component parts removed under this Express
Warranty become the property of Oricom. In the unlikely event that your
Oricom product has a recurring failure, Oricom may always, subject to the
Competition and Consumer Act 2010, at its discretion, elect to provide you
with a replacement product of its choosing that is at least equivalent to your
product in performance.
No change to the conditions of this Express Warranty is valid unless it is
made in writing and signed by an authorised representative of Oricom.
Oricom will not be liable under this Express Warranty, and to the extent
permitted by law will not be liable for any defect, loss, damage or injury
arising out of or in connection with a:
1. failure by you to adhere to the warnings and follow the instructions set
out in this user guide for the proper installation and use of the product;
2. wilful misconduct or deliberate misuse by you of the product;
3. any external cause beyond our control, including but not limited to power
failure, lightning or over voltage; or
4. modification to the product or services carried out on the product by
anyone other than Oricom or Oricom’s authorised service provider.
How to make a claim under your Express Warranty
in Australia
Oricom has a simple warranty process for you to follow:
•
Please call or email our Customer Support Team, 1300 889 785 or
•A Customer Support Team member will verify after troubleshooting with
you if your product qualies under warranty. If so, they will give you a
Product Return Authorisation number.
•We will then email or fax a Return Authorisation form and a Repair Notice
(if necessary), together with instructions on how to return the goods for
warranty service.
Please note that if a Customer Support Team member advises that your product

15
does not qualify for return, this warranty does not apply to your product.
Products that are authorised to be returned to Oricom in Australia must include
all of the following:
•A completed Return Authorisation form
•A copy of your Proof of Purchase (please keep your original copy)
•The faulty product, including all accessories.
Send the approved returns to:
Oricom International Pty Ltd
Locked Bag 658
South Windsor NSW 2756 Australia
Please note that this Express Warranty excludes expenses incurred by you in
returning any faulty product to us. You must arrange and pay any expenses
incurred (including postage, delivery, freight, transportation or insurance of the
product) to return the faulty product to us, however, we will arrange delivery of the
repaired or replaced faulty product to you.
Important Information
Repair Notice
Please be aware that the repair of your goods may result in the loss of any
user-generated data (such as stored telephone numbers, text messages and
contact information). Please ensure that you have made a copy of any data
saved on your goods before sending for repair.
Please also be aware that goods presented for repair may be replaced by
refurbished goods or parts of the same type rather than being repaired.
Express Warranty (Australia)


Ref: 29112013
Table of contents
Other Oricom Baby Monitor manuals

Oricom
Oricom Secure 530 User manual

Oricom
Oricom secure 910 User manual

Oricom
Oricom secure 210 User manual

Oricom
Oricom Secure 100 User manual

Oricom
Oricom Secure 850 User manual

Oricom
Oricom Secure 700 User manual

Oricom
Oricom OBH36T User manual

Oricom
Oricom SC520 User manual

Oricom
Oricom OBH643P User manual

Oricom
Oricom 08BUN User manual

Oricom
Oricom Secure 710 User manual

Oricom
Oricom Secure 110 User manual

Oricom
Oricom Secure740 User manual

Oricom
Oricom OBH36T User manual

Oricom
Oricom SC320 User manual

Oricom
Oricom SC330 User manual

Oricom
Oricom secure55 User manual

Oricom
Oricom Secure 50 User manual

Oricom
Oricom Secure895 User manual

Oricom
Oricom 200 User manual