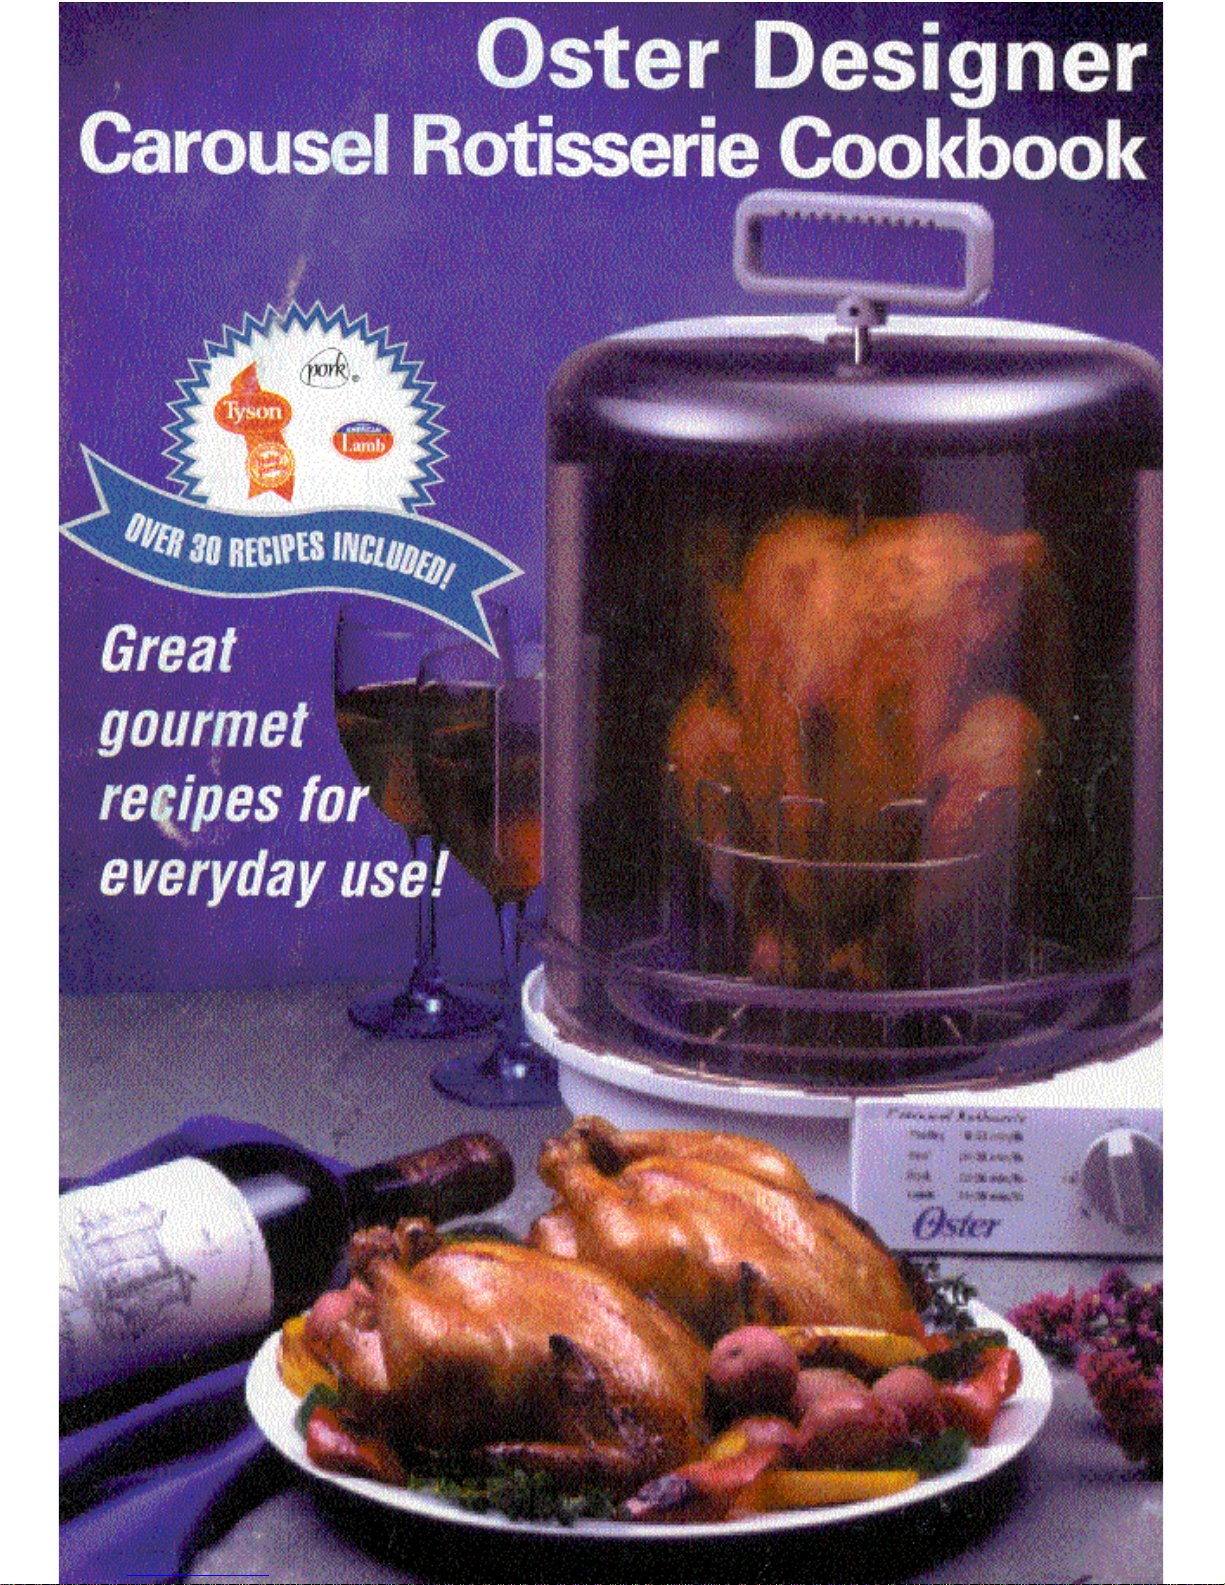
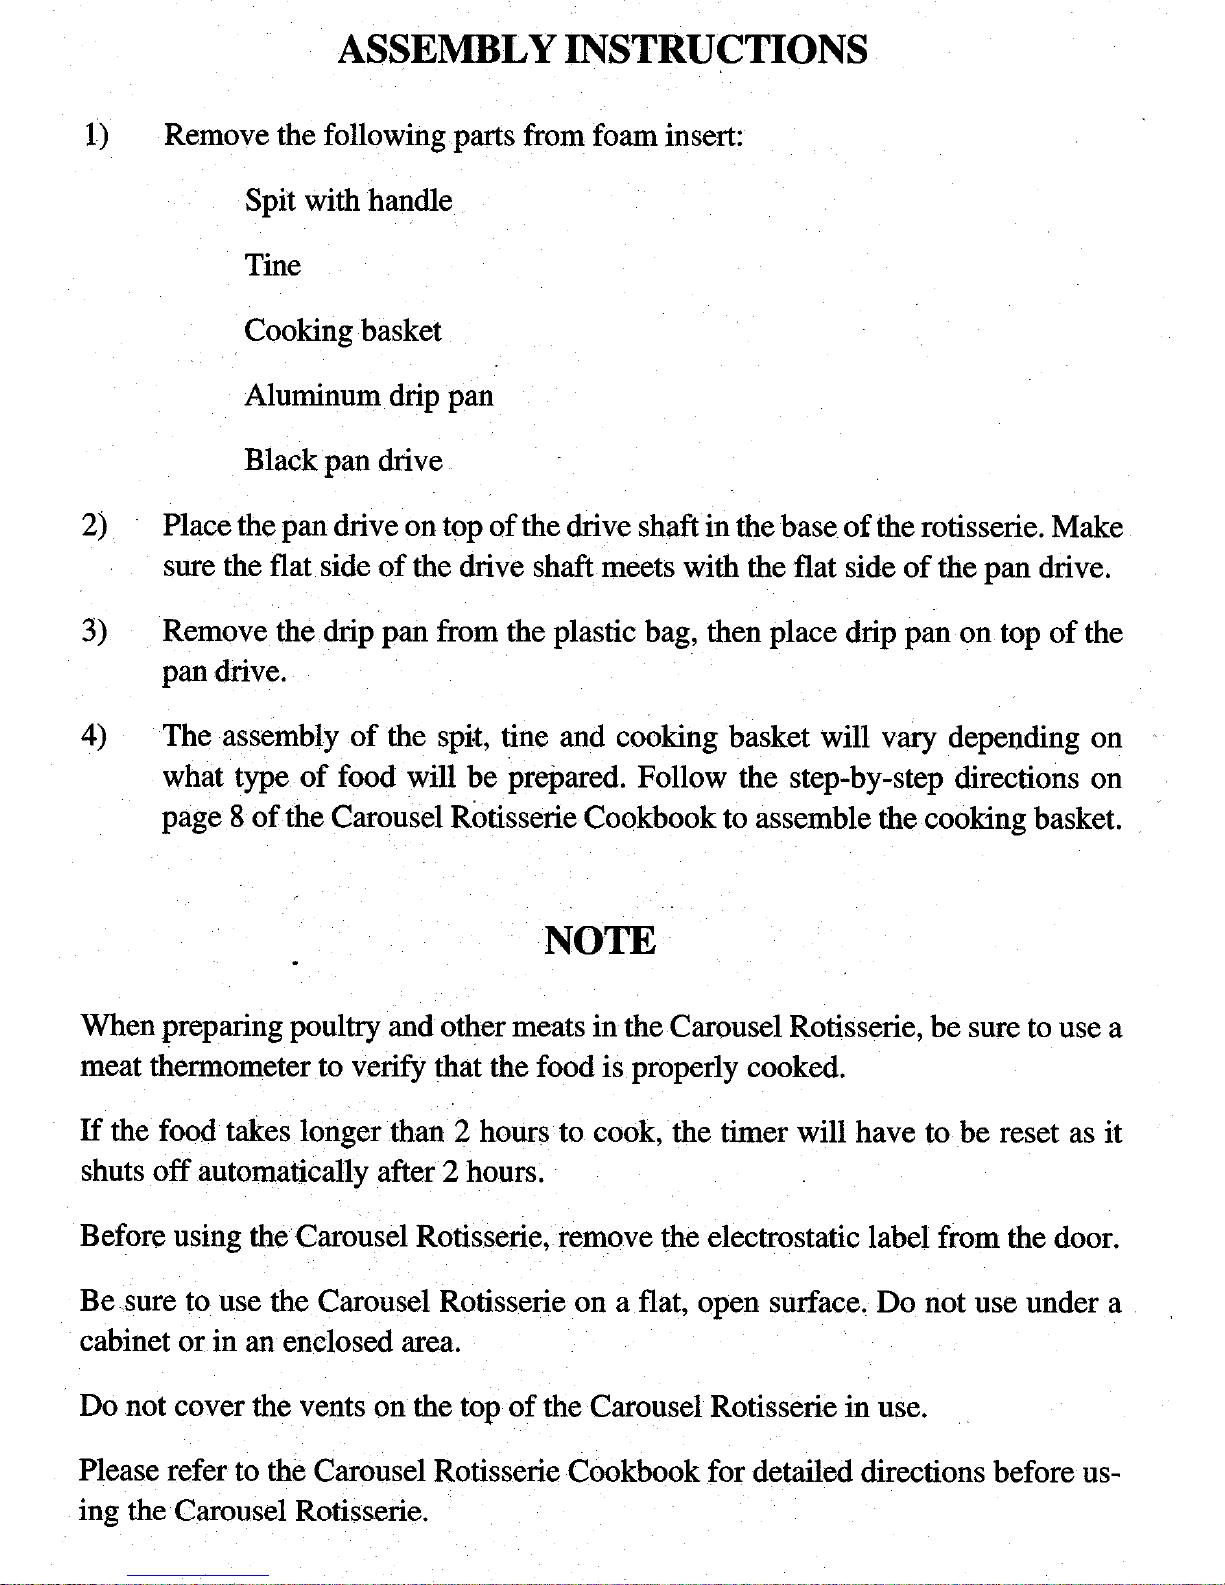
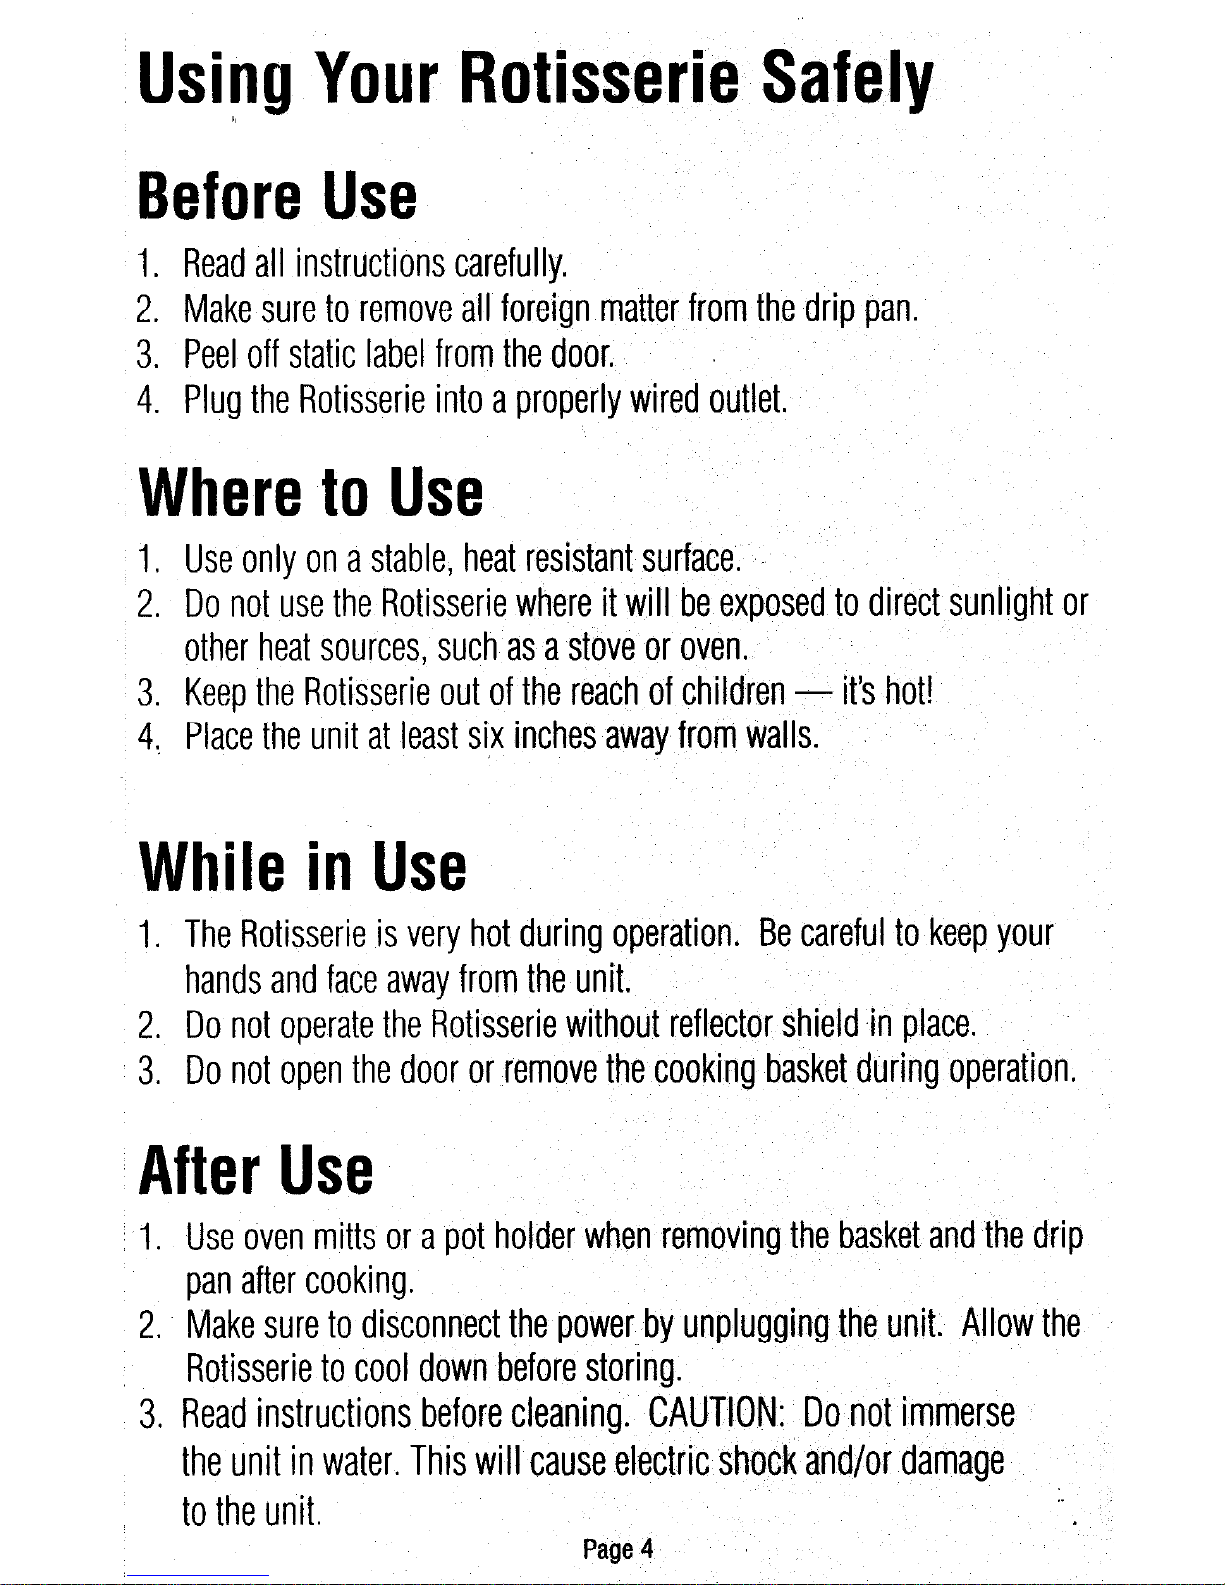
Oster 4783 User manual


Congratulations!
Enjoy rotisserie cooking at home in just a few, easy steps
with
your new Oster Carousel Rotisserie.
We’ve done everything we can to make rotisserie cooking a
breeze. Our instruction book is designed to give you help-
ful information, tips and a host of great recipes.
Your Oster Carousel Rotisserie will:
!
Seal in natural juices while unwanted fats
drip away.
chicken to be moist and flavorful inside,
crispy and golden brown outside.
*Evenly brown and cook a wide variety of foods
to perfection,
!
Provide a smokeless cooking environment with
see through door.
up easily with dishwasher safe
components.
Page1

31

Table
of
Contents
Introduction .........................................................
1
Using Your Rotisserie Safely
................................
4
Important Safeguards..........................................
5
Know your Oster Carousel
Rotisserie..
................
7
Step-by-Step Directions.......................................
8
Cleaning and Caring for Your Rotisserie..
............
9
Cooking Times
..........
............................................
9
Carving Tips..........................................................
11
Warranty
...............................................................
12
Recipes:
Chicken
....................................................
14
Lamb
........................................................
29
Pork
.........................................................
25


IMPORTANT SAFEGUARDS
When using electrical appliances, to reduce the risk of fire, electric shock,
and/or injury to persons basic safety precautions should always to be fol-
lowed, including the following:
1.
Read all instructions carefully.
2.
Do not touch hot surfaces, use the handles or knobs. Always use oven
mitts when handling hot materials. Allow metal parts to cool before
cleaning. Allow the Rotisserie to cool thoroughly before putting in or
removing parts.
3.
When unit is not in use and before cleaning, unplug the Rotisserie from
wall outlet.
4.
To protect against electric shock, do not place cord, plug or appliance in
water or other liquids.
5.
Close supervision is always necessary when this or any appliance is
used by or near children.
6.
Do not allow anything to rest on the power cord. Do not plug in cord
where people may walk or trip on it.
7.
Do not operate this or any appliance with a damaged cord or plug or
after the appliance malfunctions or has been damaged in any manner.
Return appliance to an authorized service facility for examination, repair
or adjustment.
8. Avoid contact with moving parts.
9. Do not use attachments that are not recommended by the manufacturer;
they may cause fire, electric shock or injury.
IO. Do not use outdoors or for commercial purposes.
11,
Do not let the cord hang over the edge of a table or counter or touch hot
surfaces. Do not place the appliance on an unsteady or cloth-covered
surface.
12. Do not place the appliance near a hot gas or electric burner or in a
heated oven.
13. To unplug, grip plug and pull from wall outlet.
14. Extreme caution must be used when moving an appliance containing
hot oil or other hot liquids.
15. Do not use appliance for other than intended use.
16. Use
extreme’cautionwhen
removing drip pan or disposing of hot
grease.
.
Page 5

Use of extension cords:
a) A short power supply cord (or detachable power-supply cord) is to be
provided to reduce the risk resulting from becoming entangled in or
tripping over a longer cord.
b) Longer detachable power-supply cords or extensions cords are
available and may be used if care is exercised in their use.
c) If a longer detachable power-supply cord or extension cord is used,
1) The marked electrical rating of the cord set or extension cord
should be at least as great as the electrical rating of the appliance,
and
2) The cord should be arranged so that it will not drape over the
countertop or tabletop where it can be pulled on by children or
tripped over unintentionally.
d) If the appliance is of the grounded type, the extension cord
should be a grounding-type 3-wire cord.
Electrical power: If electric circuit is overloaded with other appliances, your
Rotisserie may not operate properly. The Rotisserie should be operated on
a separate electrical circuit from other appliances.
This appliance has a polarized alternating current plug (one blade is wider
than the other). To reduce the risk of electric shock, as a safety feature, this
plug will fit in a polarized outlet only one way. If the plug does not insert
fully in the outlet, reverse the plug. If it still fails to fit, contact a qualified
electrician to replace the obsolete outlet. DO NOT ATTEMPT TO DEFEAT
THIS SAFETY FEATURE.
SAVE THESE INSTRUCTIONS
NO USER MAINTENANCE
RETURN TO SERVICE STATION
HOUSEHOLD USE ONLY
Page 6

KNOW YOUR ROTISSERIE
Removable
Shield
Door
Drip Pan
Page 7
Handle
I
Cooking Basket
Two
Timer

STEP-BY-STEP
DlRECTiONS
1.
Place unit on a clean, dry surface with at least six inches of clearance on all sides.
2.
Peel off the static label from the door.
3.
To open the door, slide it counterclockwise.
4.
Cooking basket should be removed from the unit before loading with food.
5.
Vegetables or cut-up pieces of meat must be placed inside the basket around the spit.
6.
Chicken, roasts or other large cuts of meat should
be
skewered through the spit as fol-
lows:
!
Lift tines to the top of the spit.
!
By holding the tines with one hand, skewer the spit through the meat.
!
Screw the spit into the cooking basket until spit stops turning. DO NOT
SCREW
THE SPIT TOO TIGHTLY.
!
Once the spit is secured, lower tines and press them into the meat
CAUTION: THE SPIT AND TINES HAVE SHARP ENDS.
Note: Chicken or other poultry should be placed with the wings upward, legs
downward; stuffed poultry should be placed with the wings downward, legs upward.
7.
Position drip pan inside the Rotisserie.
8.
Lower basket onto center of the drip pan.
9.
Plug cord into 120 volt outlet.
10.
Set the timer for correct cooking time.
11. Cooking times vary by the size and type of food and recipes. The maximum capacity
for the rotisserie is 8 pounds.
(See
recipes section for cooking times).
12. The unit needs to cool for at least one half hour before using’it again. Allow your
Rotisserie to cool before cleaning and storing.
Page 8
.

CLEANING THE ROTISSERIE
Before using your Oster Carousel Rotisserie for the first time:
Wash the cooking basket, spit, drip pan, reflector shield and door in hot, soapy water.
Rinse and dry.
NOTE: The following items are dishwasher safe: door (top rack only), drip pan, cooking
basket, and reflector shield. To remove the door from the rotisserie, turn the door
counter-clockwise until it has been rotated to the back of the unit. Then, lift it straight
up from the unit. When replacing the door onto the rotisserie
un.it,
be sure to locate the
door so that it will be on the back side of the unit when it is installed. Locate the pin on
the door into the hole that is on the top of the rotisserie. Once the pin and hole are
engaged, the door can be rotated clockwise to the front of the unit.
The reflector shield can be removed by grasping the handle on either side and pulling in
either direction until it is pulled clear of the unit.
CAUTION: REFLECTOR SHIELD HAS A SHARP EDGE.
Always make sure rotisserie is unplugged and cool, before attempting to clean,
To clean, wipe with a damp,
sot?
cloth. Do not use any abrasive materials.
Do not immerse in water! Wash individual parts as instructed above.
CARING FOR
YOliR
ROTISSERIE
1.
Keep your Rotisserie clean.
2.
Do not use metal utensils.
3.
Make sure that the unit is completely cool and dry before storing.
COOKING TIMES
The cooking times provided in this chart are only a guideline to the approximate
cooking times, based on test averages. Cooking times wiil vary because of dif-
ferences in meat, shape, size, and amount of fat and bone.
When cooking with the Oster Rotisserie, use a meat thermometer. Insert the
point of the thermometer stem at least 2 inches into the thickest part of the
meat,
not near the bone or gristle. The meat thermometer must not touch the
heating element while the basket is rotating. See the chart below for the tem-
peratures required for the meat to be cooked.
Page 9

OVER
CAROUSEL ROTISSERIE COOKING CHART
FOOD Weight Temperature Approximate
Meat Thermometer Cooking Time
POULTRY
Chicken, whole 2 to 3 Ibs. 185°F
30 min.
-
60 min.
Chicken, whole
3
l/2
to 5 Ibs.
185°F
60 min.
-
110
min.
Cornish hens 1 or 2 hens 185°F 60 min.
Duck 3 to 5 Ibs. 185°F
110 min.
-
2 hr.
10
min
Turkey breast
4 to 6
Ibs.
185°F
70min.
-
100 min.
Turkey breast 6 to 8 Ibs. 185°F
100 min.
-
3 hrs.
PORK
Crown roast of pork 4 to 5 Ibs.
165”F-170°F 100 min.
-
2 hrs.
IO
min.
Loin roast
2
i/5
to 5
l/2
Ibs. 165”F-170°F 60 min.
-
70 min.
Pork tenderloin 3/4
to 1
112
Ibs. 165”F-170°F 20min.- 40min.
Rolled pork roast 3 to 6 Ibs.
165F” 80 min. -2 hrs. 35 min.
Spareribs
2
l/2
to 4
112
Ibs. 16O”F-165°F 60 min.
-
120 min.
HAM
Ham, canned 2 to 7 Ibs.
145°F150°F 45min.
-
60 min.
Ham Shank 3 to 6 Ibs.
145”F-150°F
50 min.
LAMB
Leg of lamb 4 to 6 Ibs.
175”F-180°F 80 min.
-
120 min.
Rolled lamb roast 3 to 6 Ibs.
175”F-180°F 60 min.
-
120 min.
VEAL
Leg of veal 3 to 6 Ibs. 170°F 70 min.
-
120 min..
Rolled veal roast 3 to 6 Ibs. 170°F 75 min.
-
120 min..
BEEF
Beef tenderloin roast 2 to 6 Ibs.
15O”F-160°F
55min.-2hrs50min..
’
Rolledribroast
4 to 6 Ibs.
150°F-160°F 100min.
-
2 hrs. 50 min..
Rolled sirloin tip
or rump roast 4 to 8 Ibs.
15O”F-160°F 100 min.
-
3 hrs. 45 min.
Standingribroast
4 to 8 Ibs.
15O”F-160°F
lOO.min.
-
3 hrs. 45 min.
OTHER
Hot dogs
7 min.
-
10 min.
Pre-cooked bratwurst
15min.
-
17 min.
New potatoes
60 min.
-
80 min.
Baked potatoes
60 min.
-
80 min.
Corn on the cob
60 min.
-
80 min.
Vegetables
20min.
-
30 min.
’
Cookingtimesgivenonthechartarebasedonfoodsthathavealreadybeenthawed.
* If timer needs to be set for less than
IO
minutes, turn the knob beyond the
10
minutemarking,thenset.
Page 10

CARVING TIPS
Carving Poultry
Arrange the chicken or other poultry on a carving board with the legs to the right.
Starting at the side facing the carver, cut the leg off body by grasping the leg with your
left hand pulling gently while cutting through the meat and the joint at the thigh.
Place the leg on the carving board and cut through the joint to sever the thigh bone from
the drumstick. Slice the meat from the leg and thigh, carving parallel to the bone.
Insert the meat fork into the. breast meat to secure the body. Sever the wing from the
body by carving through the joint.
Start carving the breast just above the joint where the wing was removed. Cut thin slices
of white meat, carving upward and cutting parallel to the breast bone.
Carving a Whole Ham, pork Roast or Roast leg of lamb
Place a whole ham, pork roast or leg of lamb on the carving board with the shank end to
the right of the carver. For a ham, turn the scored fat side up. For the leg of lamb, place
the roast so that the meaty section faces away from the carver.
Insert a meat fork into the heavy part of the meat and cut several lengthwise slices from
the less meaty side.
Turn the ham, pork roast or leg of lamb so that it rests upright on the cut surface. Cut a
wedge from the shank end by starting at the base of the bulge and slicing down to the
leg bone. Then, make another cut at an angle to this, close to the shank end. Lift out the
wedge.
Starting at the shank end, cut thin uniform slices down to the
leg
bone.
Carving a Rib Roast
Arrange the roast on a platter
or
a cutting board with the largest end of the roast down,
and the rib side to your left. The small end of the roast is nearest the carver. Insert a
carving fork between the two top ribs.
Slice across the roast from the fat edge of the rib bone. Free the slice from the bone
using the tip of the knife.
Page 11

LIMITED WARRANTY
What is Covered and For How
Long
Congratulations on your recent purchase of a qualify Osfer product. We are confident that our product will
perform well and therefore warrant to you, as the original retail purchaser, for a period of 2 years from the
date of original purchase, that your new product will be free of mechanical and electrical defects in materi-
al and workmanship.
What Osfer Will Do & How to Get Service
If your product is covered during the warranty period, we will repair or replace you new product (at our
option), which will be your exclusive remedy under this warranty. Simply send your product postage pre-
paid, with proof of purchase and a short description of the problem directly to our factory service center at
the following address:
OSTER HOUSEHOLD PRODUCTS
Service Station
117 Central Industrial Row
Purvis, MS 39475
California residents may call our toll free number to locate the nearest authorized service center: 1-800-
526-2832.
What is Not Covered
Our warranty for your product will not cover normal wear of
parts,
damage resulting from negligent use or
misuse of the product, use on improper voltage or current, ‘use contrary to operation instructions, glass
breakage (if applicable), disassembly, repair, or alteration by any person other than an authorized service
station. Any implied warranty of merchantability of fitness for a particular purpose on your product is lim-
ited to the duration of this written warranty. We shall not be liable for any incidental or consequential dam-
ages for breach of any express or implied warranty on your product.
How Your
State’s
Law Mav
Apply
Some provinces do not allow limitations on how long an implied warranty lasts or the exclusion or
limita-
fion of incidental or consequential damages, so the above limitation may not apply to you. This warranty
gives you specific legal rights, and you may also have other rights which vary from province fo province.
01996 Sunbeam Corporation or ifs affiliated companies, all rights reserved. is a registered
trade-
mark of Sunbeam Corporation or ifs affiliated companies.
Distributed by: Sunbeam Household Products, Schaumburg, Illinois 60173
Model 4783
P.N.
67185-l
I
Page 12


RECIPES
GARLIC LOVERS' CHICKEN
4 servings
1 whole Tyson Holly Farms Fresh Young Chicken (broiler-fryer) (3 to 3
l/2
Ibs.)
3 heads garlic, peeled (about 35 garlic cloves)
1 cup chicken broth
Rinse chicken in cold running water. Drain, pat dry inside and out with paper towel.
Combine garlic and broth in small saucepan. Bring to a boiling; cook 5 minutes. With
slotted spoon, remove garlic and place inside whole chicken. Reserve broth for basting.
Spray inside of rotisserie basket with nonstick vegetable coating spray; place chicken on
the spit and screw spit into the basket. Center chicken on spit with wings downward,
legs upward. Place basket with chicken inside the rotisserie.
Close the rotisserie door. Plug in, be certain unit rotates freely. Cook until juices run
clear and internal thermometer inserted in the breast reads 185°F (approximately 60 to,
65 minutes). Brush with reserved broth every
IO
minutes; discard any remaining broth.
Open rotisserie door. Grasp end of spit and basket with pat holders and place on a
heatproof work surface. Remove chicken to a warm platter to serve. Refrigerate left-
overs.
HERB-RUBBED SAVORY CHICKEN
4 servings
1 whole Tyson Holly
Farms Fresh
Young Chicken (broiler-fryer) (3 to 3
l/2
Ibs.)
l/4
cup vegetable oil
teaspoon dried basil
l/2
teaspoon dried oregano
l/2
teaspoon dried sage
teaspoon dried thyme leaves
Page 14

Rinse chicken in cold running water. Drain, pat dry inside and out with paper towel.
Combine oil and seasonings. Rub skin evenly with this mixture.
Spray inside of rotisserie basket with nonstick vegetable coating spray; place chicken on
the spit and screw spit into the basket.
Center chicken on spit with wings downward,
legs upward. Place basket with chicken inside the rotisserie.
Close the rotisserie door. Plug in, be certain unit rotates freefy. Cook until juices run
clear and thermometer inserted in breast registers 185°F (approximately 60 to 65 min-
utes).
Open rotisserie door. Grasp end of spit and basket with pot holders and place on a
heatproof work surface. Remove chicken to a warm platter to serve. Refrigerate left-
overs.
CITRUS-BASTED
CHICKEN
4
servings
1 whole Tyson Holly Farms Fresh Young Chicken (broiler-fryer) (3 to 3
l/2
Ibs.)
1 orange, halved, cut into slices
1 lemon, halved, cut into slices
3/4 cup orange juice, divided
3 tablespoons lemon juice, divided
1 tablespoon lime juice
2 tablespoons honey
1 teaspoon cornstarch
Rinse chicken in cold running water. Drain, pat dry inside and out with paper towel.
Place orange and lemon slices inside chicken,
Spray inside of rotisserie basket with nonstick vegetable coating spray; place chicken on
the spit and screw spit into the basket. Center chicken on spit with wings downward,
legs upward. Place basket with chicken inside the rotisserie.
Combine cup orange juice, 1 tablespoon lemon juice, and lime juice. Brush
,
one-third of mixture over chicken. Reserve remaining mixture.
Page
15

Close rotisserie door. Plug in be certain unit rotates freely. Cook until juices run clear
and thermometer inserted in breast registers
185°F
(approximately 60 to 65 minutes).
Brush with remaining mixture during last 15 minutes of cooking.
Meanwhile, combine remaining cup orange juice, 2 tabtespoons lemon juice, honey
and cornstarch in small saucepans. Cook over medium heat until boiling. Cook 2
minutes, stirring constantly until thickened and clear. Serve as sauce with chicken.
Open rotisserie door. Grasp end of spit and basket with’ pot hofders and place on a
heatproof work surface. Remove chicken to warm platter to serve. Refrigerate leftovers.
CHILI BUTTER CHICKEN
4 servings
1 whole Tyson Holly Farms Fresh
Young Chicken
(broiler-fryer) (3 to 3
l/2
Ibs.)
2 tablespoons butter or margarine, softened
l/2
teaspoon chili powder
Rinse chicken in cold running water. Drain, pat dry inside and out with paper towel.
Blend butter and chili powder. Gently loosen skin from chicken at breasts. Rub chili
butter evenly under skin of chicken.
Spray inside of rotisserie basket with nonstick vegetable coating spray; place chicken on
the spit and screw spit into the basket., Center chicken on spit with wings downward,
legs upward. Place basket with chicken inside the rotisserie.
Close rotisserie door. Plug in, be certain unit rotates freely. Cook until juices run clear
and thermometer inserted in breast registers 185°F (approximately 60 to 65 minutes).
Open rotisserie door. Grasp end of spit and basket with pot holders and place on a
heatproof work surface. Remove chicken to a warm platter to serve. Refrigerate left-
overs.
Page 16

BROTH-BASTED CHICKEN
4 servings
1
whole Tyson Holly Farms Fresh Young Chicken (broiler-fryer) (3 to 3
l/2
Ibs.)
2 whole carrots, peeled, cut in 2-inch lengths
2 ribs celery, cut in two-inch lengths
1 small onion, peeled, cut in chunks
1 cup double-strength chicken-broth
Rinse chicken in cold running water. Drain, pat dry inside and out with paper towel.
Combine carrots, celery, onion and broth in small saucepan. Cook over medium heat
until boiling; cook 5 minutes or until vegetables are tender. With slotted spoon, remove
vegetables and place inside whole chicken. Reserve broth for basting.
Spray inside of rotisserie basket with nonstick vegetable cooking spray; place on spit
and fit unit on hub of drip tray. Center chicken on spit with wings downward, legs
upward.
Close rotisserie door. Plug in; be certain unit rotates freely. Cook until juices run clear
and thermometer inserted in breast registers 185°F (approximately 60 to 65 minutes).
Brush with reserved broth every 10 minutes; discard any remaining broth.
Open rotisserie door. Grasp end of spit and basket with pot holders and place on a
heatproof work surface. Remove chicken to a warm platter to serve. Refrigerate leftovers.
APRICOT GLAZED CORNISH HENS
2 servings
2
Tyson Rock Cornish game hens (3
l/2
to 4 Ibs. for two)
l/2
cup apricot preserves
2 tablespoons vinegar
1 tablespoon soy sauce
If frozen, place hens in refrigerator 24 hours to defrost or use microwave.
. .
Page17

Rinse defrosted hens in cold running water. Drain, pat dry inside and out with paper
towel.
Combine preserves, vinegar and soy sauce. Divide sauce in half.
Spray inside of rotisserie-basket with nonstick vegetable coating spray; place on spit and
fit unit on hub of drip tray.
Center one hen on spit with wings downward; center second
hen on spit with wings upward.
Close rotisserie door. Plug in; be certain unit rotates freely. Cook until juices run clear
and thermometer inserted in breast registers 185°F (approximately 55 to 60 minutes).
Brush hens with half of sauce during last 10 minutes of cooking.
Open rotisserie door. Grasp end of spit and basket with pot holders and place on a
heatproof work surface. Remove
hens to
a warm platter to serve. Heat the reserved half
of sauce and serve with hens. Refrigerate leftovers.
TANGY BBQ GLAZED CORNISH HENS
2 servings
2 Tyson Rock Cornish game hens (3
l/2
to 4 Ibs. for two)
1 cup red wine
l/2
cup catsup
2 tablespoons Dijon mustard
2 tablespoons sugar
2 teaspoons cornstarch
If frozen, place hens in refrigerator 24 hours to defrost or use microwave.
Rinse defrosted hens in cold running water. Drain, pat dry inside
and out
with paper
towel. Place two 36-inch lengths on flat work surface.
Combine wine, catsup, mustard, sugar and cornstarch in small saucepan. Cook over
medium heat until boiling, stirring constantly. Cook 2 minutes or until thickened. Use
l/2
cup of sauce for basting hens; reserveremaining sauce.
Spray inside of rotisserie basket with nonstick vegetable coating spray; place on spit and
fit unit on hub of drip tray. Center on spit with Wings downward; center second;
hen on spit with wings upward.
Page18
Table of contents
Other Oster Kitchen Appliance manuals

Oster
Oster TSP200 User manual

Oster
Oster 696404999 User manual

Oster
Oster DiamondForce User manual

Oster
Oster Deluxe Electric Wine Opener plus Wine... Operating instructions

Oster
Oster ELECTRIC WOK User manual

Oster
Oster FPSTJE320S User manual

Oster
Oster 2605 User manual

Oster
Oster 3850 Quick guide

Oster
Oster CKSTPCEC57M-013 User manual

Oster
Oster FPSTEMM803 User manual

Oster
Oster 2600 SERIES User manual

Oster
Oster FPSTPP7310 User manual

Oster
Oster FPSTEK2803B User manual

Oster
Oster BVSTMF1000 User manual

Oster
Oster FPSTJE317 User manual

Oster
Oster FPSTMDM960 User manual

Oster
Oster 4815 User manual

Oster
Oster FPSTHB2607 User manual

Oster
Oster 2805 User manual

Oster
Oster OS-WC08SC User manual