manuals.online logo
Brands
  1. Home
  2. •
  3. Brands
  4. •
  5. Outdoor Furniture Plus
  6. •
  7. Outdoor Furnishing
  8. •
  9. Outdoor Furniture Plus ESDC2127 Firmware update

Outdoor Furniture Plus ESDC2127 Firmware update

This manual suits for next models

1

Other Outdoor Furniture Plus Outdoor Furnishing manuals
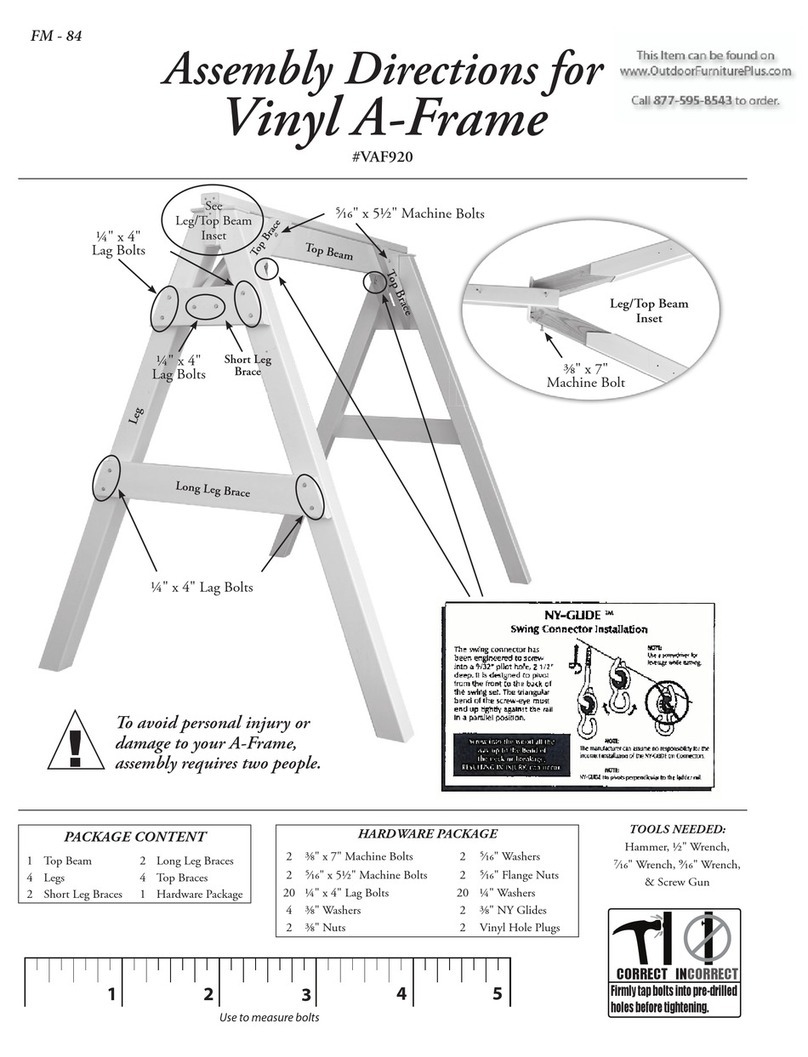
Outdoor Furniture Plus Double Cozi-Back Glider Firmware update

Outdoor Furniture Plus

Outdoor Furniture Plus Double Cozi-Back Glider Firmware update

Outdoor Furniture Plus Vinyl Swing Arbor Firmware update

Outdoor Furniture Plus

Outdoor Furniture Plus Vinyl Swing Arbor Firmware update

Outdoor Furniture Plus PECC2131 Firmware update

Outdoor Furniture Plus

Outdoor Furniture Plus PECC2131 Firmware update

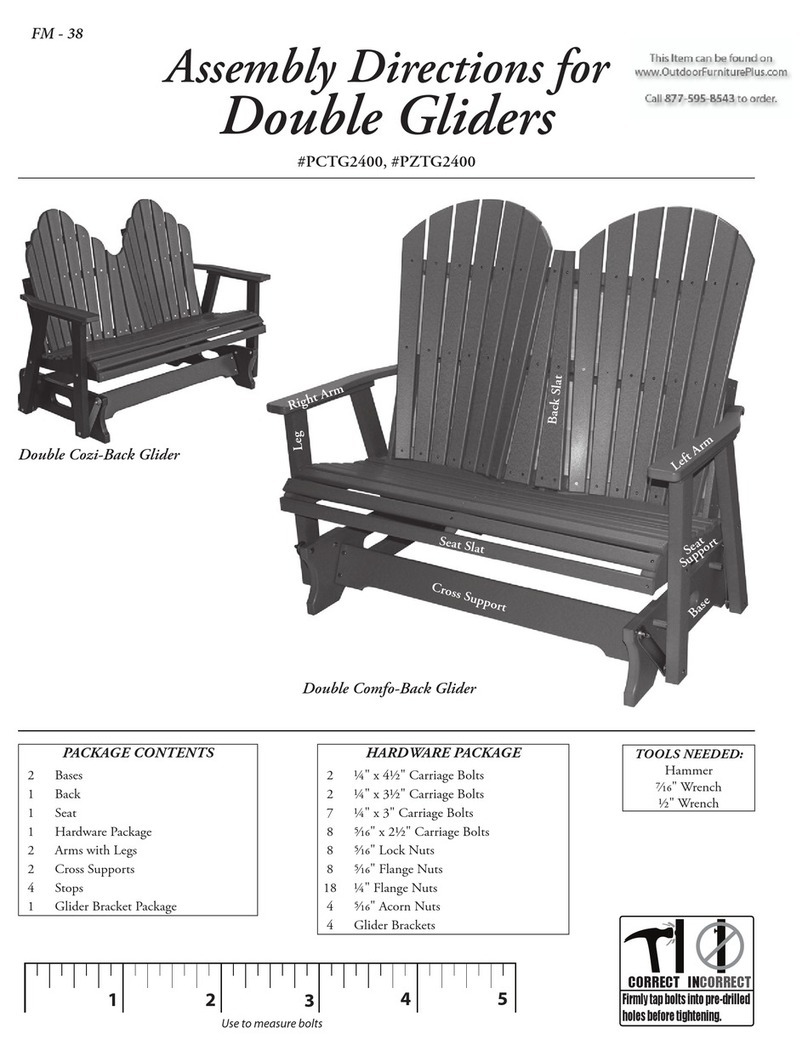
Outdoor Furniture Plus Vinyl A-Frame Firmware update
Outdoor Furniture Plus

Outdoor Furniture Plus Vinyl A-Frame Firmware update

Outdoor Furniture Plus PCTC2400 Firmware update

Outdoor Furniture Plus

Outdoor Furniture Plus PCTC2400 Firmware update

Popular Outdoor Furnishing manuals by other brands

felton industries FELEPG5T6 Assembly instruction

felton industries

felton industries FELEPG5T6 Assembly instruction

Dreamo OTF-503S quick start guide

Dreamo

Dreamo OTF-503S quick start guide

Garden Furniture Direct Borrowdale Assembly instructions

Garden Furniture Direct

Garden Furniture Direct Borrowdale Assembly instructions

Rowlinson Clarendon Assembly instructions

Rowlinson

Rowlinson Clarendon Assembly instructions

Garden Treasures 8201268 Assembly instructions

Garden Treasures

Garden Treasures 8201268 Assembly instructions

Safavieh Outdoor Marson PAT7062 quick start guide

Safavieh Outdoor

Safavieh Outdoor Marson PAT7062 quick start guide

SSC-LUXon 990070716 Assembly & operating instructions

SSC-LUXon

SSC-LUXon 990070716 Assembly & operating instructions

supremo LEISURE 2-Seat Stool 110*40cm Assembly instruction

supremo LEISURE

supremo LEISURE 2-Seat Stool 110*40cm Assembly instruction

Hatteras Hammocks DCA1-K-HH instructions

Hatteras Hammocks

Hatteras Hammocks DCA1-K-HH instructions

Lemeks Palmako PA120-5959 Assembly, installation and maintenance manual

Lemeks

Lemeks Palmako PA120-5959 Assembly, installation and maintenance manual

OLT 24 Assembly manual

OLT

OLT 24 Assembly manual

forest-style HACIENDA 2354 Building instructions

forest-style

forest-style HACIENDA 2354 Building instructions

Courtyard Creations RUS0188-WM Assembly instructions

Courtyard Creations

Courtyard Creations RUS0188-WM Assembly instructions

kingsley-bate MC-55 Assembly instructions

kingsley-bate

kingsley-bate MC-55 Assembly instructions

Weltevree Carrier product manual

Weltevree

Weltevree Carrier product manual

Grange Fencing Elite Arch Assembly instructions

Grange Fencing

Grange Fencing Elite Arch Assembly instructions

Grosfillex AUVENT YR14 Assembly instructions

Grosfillex

Grosfillex AUVENT YR14 Assembly instructions

X-METAL EAGLE 33511 Assembly instructions

X-METAL

X-METAL EAGLE 33511 Assembly instructions

manuals.online logo
manuals.online logoBrands
  • About & Mission
  • Contact us
  • Privacy Policy
  • Terms and Conditions

Copyright 2025 Manuals.Online. All Rights Reserved.

FM - 42
#ESDC2127, #ZSDC2127
Hardware Package
2 ¼" x 2¼" Carriage Bolts
6 ¼" x 3½" Carriage Bolts
8 ¼" Flange Nuts
12 " x 1¼" Machine Bolts
6 " Flange Nuts
6 " Square Nuts
6" Lock Washers
Package contents
1 Seat
1 Back
2 Arm Assemblies
1 Base
1 Swivel Mechanism
3 Fiberglass Springs
2 Aluminum Plates
1 Hardware Package
tools needed:
Hammer
" Wrench
½" Wrench
Firmly tap bolts into pre-drilled
holes before tightening.
CORRECT INCORRECT
1 2 34 5
Use to measure bolts
Cozi-Back Chair
Assembly Directions for
Swivel Rocker Dining Chair
Seat Slat
Left Arm
Right Arm
Curved Seat Slat
Front Leg
Back Leg
Base
Back Slat
FM - 43
STEP #2 - Turn chair on other side and repeat
step one.
STEP #4 - Fasten the swivel mechanism to the springs with
an aluminum plate on top of the springs. Please
note: Only hand tighten the Flange Nuts until
all six bolts are installed, then fully tighten.
STEP #5 - Lift the chair assembly onto the base and place
the stem of the swivel mechanism into the
receiver of the base. Push rmly on the chair
until it sits securely in the receiver.
Your Swivel Rocker Dining Chair is complete!
¼" x 3½" Carriage Bolts ¼" x 3½" Carriage Bolts
¼" x 3½" Carriage Bolts
¼" x 2¼" Carriage Bolts ¼" x 2¼" Carriage Bolts
⁄" x 1¼" Machine Bolt
Swivel Mechanism
Aluminum PlateFiberglass Springs
STEP #3 -
Fasten the 3- berglass springs and aluminum
plates to the frame with the springs pointing
towards the front of the chair. Please note:
Only hand tighten the Flange Nuts until all
six bolts are installed, then fully tighten.
Lock
Washer
Square
Nut
STEP #1 - A. Attach the seat to the
back using 1- ¼" x 3½"
Carriage Bolt and Flange
Nuts.
B. Attach the arm
assembly to the Seat
and Back using 2- ¼" x
3½" and 1- ¼" x 2¼"
Carriage Bolts and Flange
Nuts.
A.
A.
B.
B.
B.
⁄" x 1¼" Machine Bolt
Fiberglass Springs
Aluminum Frame
Aluminum Plate
¼" Flange Nut
FM - 60
#GMRT0038D, #GMRT0038C, #GMRT0038B, #GCRT0038D, #GCRT0038C, #GCRT0038B, #PRCT0018
HARDWARE PACKAGE
8 ¼" x 2" Carriage Bolts
8 ¼" Flange Nuts
2 Umbrella Knobs
16 3" Screws
PACKAGE CONTENTS
1Top
2 Bases
1 Cross Support
2 Footrests (Bar and Counter Height Only)
4 Braces
1 Hardware Package
TOOLS NEEDED:
Hammer
7/" Wrench
Cordless Drill/Screwdriver
Firmly tap bolts into pre-drilled
holes before tightening.
CORRECT INCORRECT
1 2 34 5
Use to measure bolts
Umbrella
Holder
Cross Support
Footrest
Base
Upright
Top Boards
Apron
Assembly Directions for
Conversation and 38" Round Table
Garden Classic
Rose II Table
Round Conversation Table
NOTE: Bar
and Counter
Height Only
FM - 61
STEP #1 -
Fasten one Base to the Aluminum
Frame of the Top using 4- ¼" x 2"
Carriage Bolts and 4- ¼" Flange Nuts.
STEP #2 - First attach the Cross Support to the
Base using 3" screws. Second attach
the two Footrests to the Base using 3"
screws (counter and bar height only).
STEP #3 - First fasten the Second Base to the
Aluminum Frame of the Top using
4- ¼" x 2" Carriage Bolts and 4-
¼" Flange Nuts. Second fasten the
Footrests and Cross Support to the
Base using 3" Screws.
Umbrella
Knobs
3" Screws
Cross
Support
Footrest
¼" x 2"
Carriage Bolts
3" Screws
¼" x 2"
Carriage Bolts