Palinka Master Palinka Master 98L User manual


Contents
1. Technical data __________________________________3
2. About the still __________________________________4
3. User's guide ____________________________________5
3.1. Preparations ______________________________________ 5
3.2. Heating up the still _________________________________ 7
3.3. The heads_________________________________________ 8
3.4. The hearts ________________________________________ 9
3.5. The tails and finishing distillation ____________________ 10
3.6. Emptying the still _________________________________ 12
4. Safety regulations ______________________________13
5. Cleaning ______________________________________14
6. Warranty and repairs ___________________________14

Pálinka Master–fractionating/combined pálinka still
1. Technical data
Full capacity: 98 litres (with dome)
Filling capacity: max. 80 litres
1.4301 acid-proof, faceted, 2 mm thick, stainless steel cauldron with
concave bottom plate, three legs with optional flame deflector
Equipped with double walls, water bath (bain marie), pressure relief valve and
suction valve
Tap: 3" ball valve
2 mm thick polished copper top with built-in window, silicone
seal and camlock to fasten the dome to the cauldron.
1.4301 stainless steel column with digital core thermometer, dephlegmator
thermometer, double-walled pipe and a window below the dephlegmator to
check the reflux process
Our own, special copper filling in the column
Dimensions: 75×75×250 cm
Weight: 80 kg
Distilling time: 240–330 minutes
Water bath heating: with gas or electric heating (optional)
What is a fractionating/combined still? The fractionating still has a distillation
column with a copper filling, but can be used as a traditional, two-phase pot still
as well: its owner may choose which process to use to distil the spirits.

2. About the still

3. User's guide
3.1. Preparations
Before use, rinse the cauldron, the column and the double-walled water bath with
plenty of water. We recommend that you steam the device before the first use and
after washing the still. (Steaming: Fill the still halfway up, and put the column on it
without the copper filling. Do not cool the column with water! Fill up the double-
walled water bath and start to heat up the water in the still. Steam will leave the
condenser. Steam the device for 20 to 30 minutes.)
Rinse the copper filling! Put it in a clean bucket filled with water. Add 200 to 300 g
of salt (any kind will do). Add 100 g citric acid and 1–200 millilitres of lemon juice.
Let the filling steep for 10 minutes, then mix the water thoroughly with a wooden
spoon until the filling becomes shiny. Remove the salty-acidic water, and fill the
bucket with fresh water. Mix the water thoroughly again. Repeat this process two
or three times.
Stuff the three sponges into the bottom of the column, and fill the column with the
copper filling (using a large funnel). Close the column by putting the silicone
stopper with the core thermometer into its place at the top of the column.
Open both nipples on the double-walled water bath. Fill up the water bath
container with water through the lower nipple. Wait for the water to flow out
through the upper nipple (wait until the water flows without bubbles). When the
water flows continually from the upper nipple, close the lower nipple, then the
upper nipple. Check the pressure meter of the double-walled container. The meter
should at the zero position. If not, drain some water through the upper nipple until
the needle rests at the zero mark.
Fill the cauldron with the mash. Do not fill more than 80 litres! (2 cm from the
upper edge of the cauldron.) To prevent foaming, add anti-foaming agent to the
mash, and mix well (5-10 ml/100l).
Put the dome onto the cauldron, and use your fingers to check it fits properly.
Fasten the dome with the camlocks. Put the column onto the dome, and tighten
the screws by hand (it is not necessary to use a wrench). Fasten the built-in
window by hand.

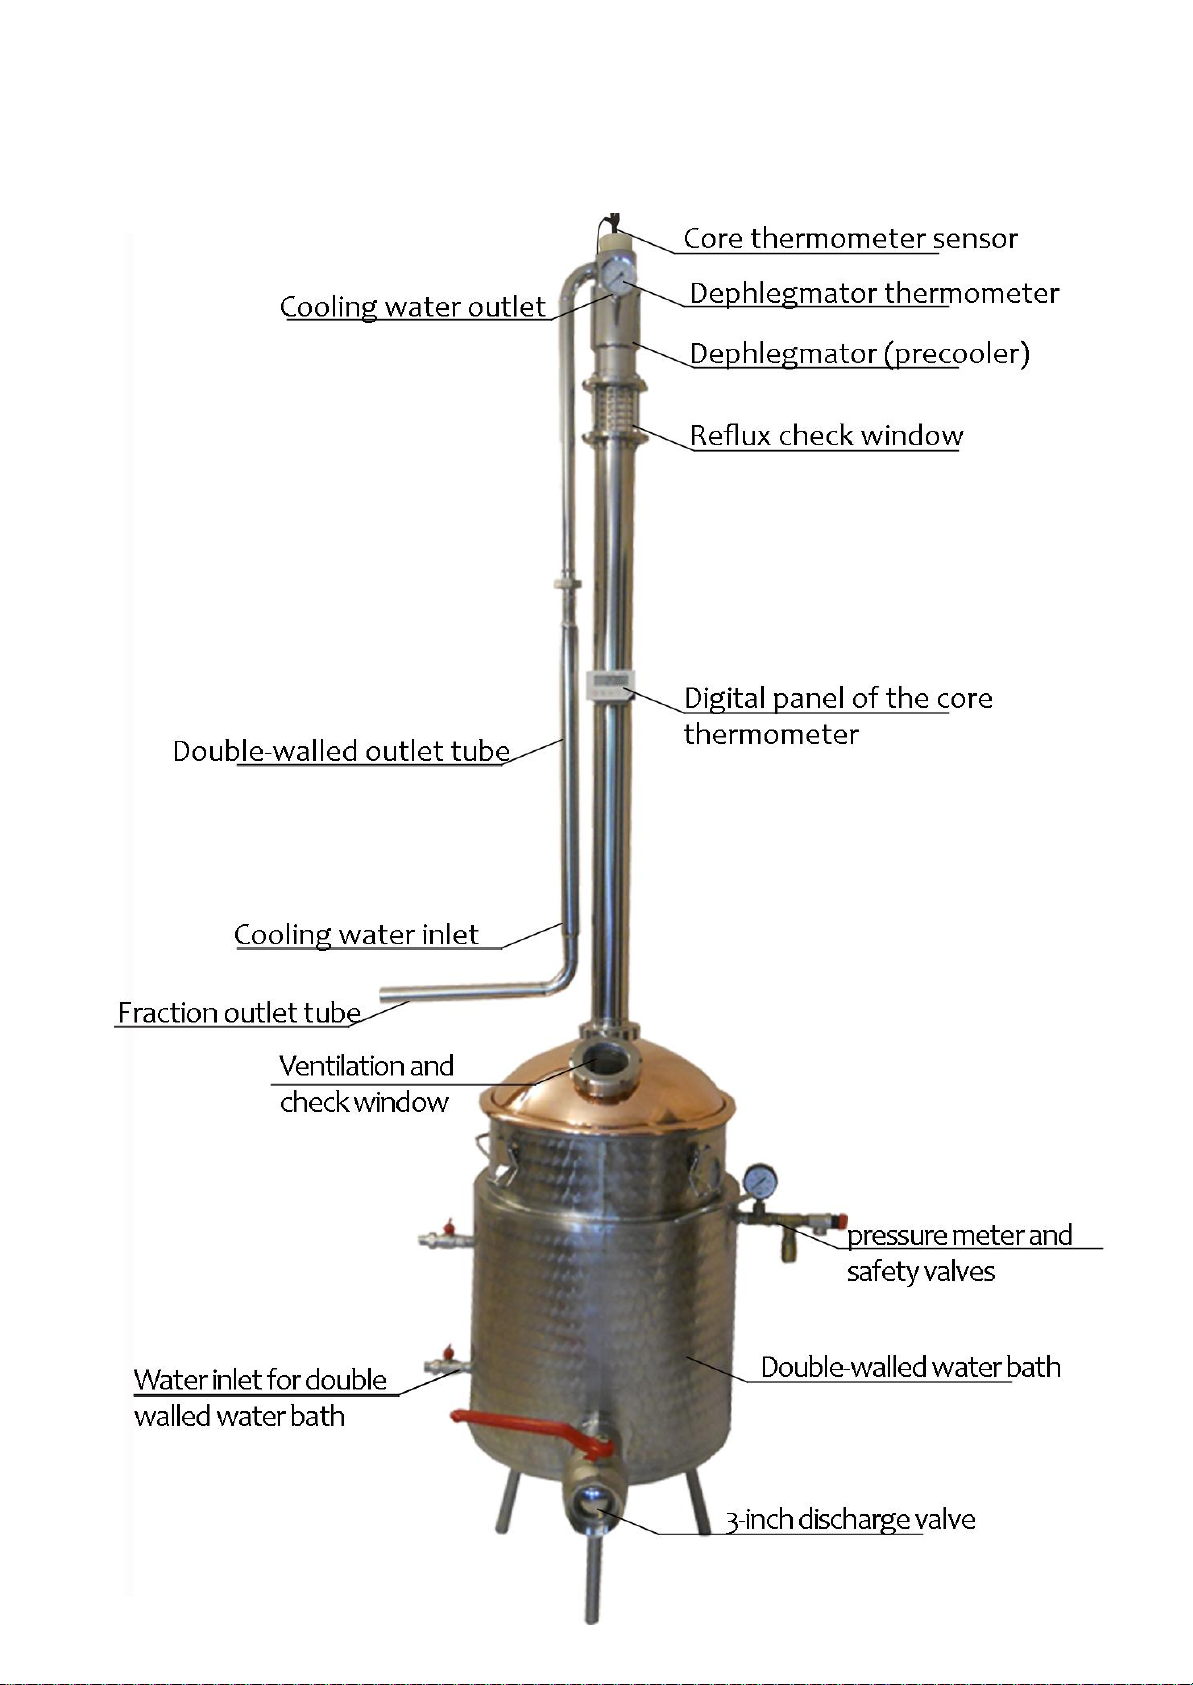
Connect a hose to the cooling water nipple, and connect another hose to the
nipple of the dephlegmator. You will need 170 to 300 litres of cooling water
depending on the quantity of mash. Before heating up, test the cooling of the still.
Let some water flow through the cooling pipes to avoid surprises.
Prepare the appropriate gas burner (26 cm diameter, flat flame) for heating. There
should be a distance of 7 to 10 cm from the gas burner to the bottom plate of the
boiler. (You may purchase a gas burner stand prepared this way from us.) For
safety reasons use the canister with a reductor. The heat up flame and the
distilling flame can be fine-tuned with a tap controlled gas burner.
For electrical operations connect the filament to the mains.
/The 4.5kw filament requires 20 Amperes, while the 6kw filament requires 25
Amperes. The smaller ones may need up to two and half hours heating up time,
while the bigger ones need only two hours. In a consecutive distillation, that is
when the system is still hot, you can save 15-20 minutes in both cases. As for the
electronic operation the longer heat up time is compensated by accurate control
and cheaper operation costs. The temperature in the distillation phase may be
held constant, which makes the process simple as the operator does not have to
monitor the ever changing tiny gas flame coming out of the canister./
Set the controller to 100% and before the foreshot starts to flow regulate the
4.5kw filament to 70%, and the 6kw filament to 60%.
Turn on the digital thermometer. If it does not turn on, remove the battery saving
foil in the back of the unit.
Create a pedestal at the condenser's end. Put a measure next to the pipe's end.
The measure will collect the heads. Prepare the eprouvette, the hydrometer with
thermometer and a pot or jar to collect the heart run.
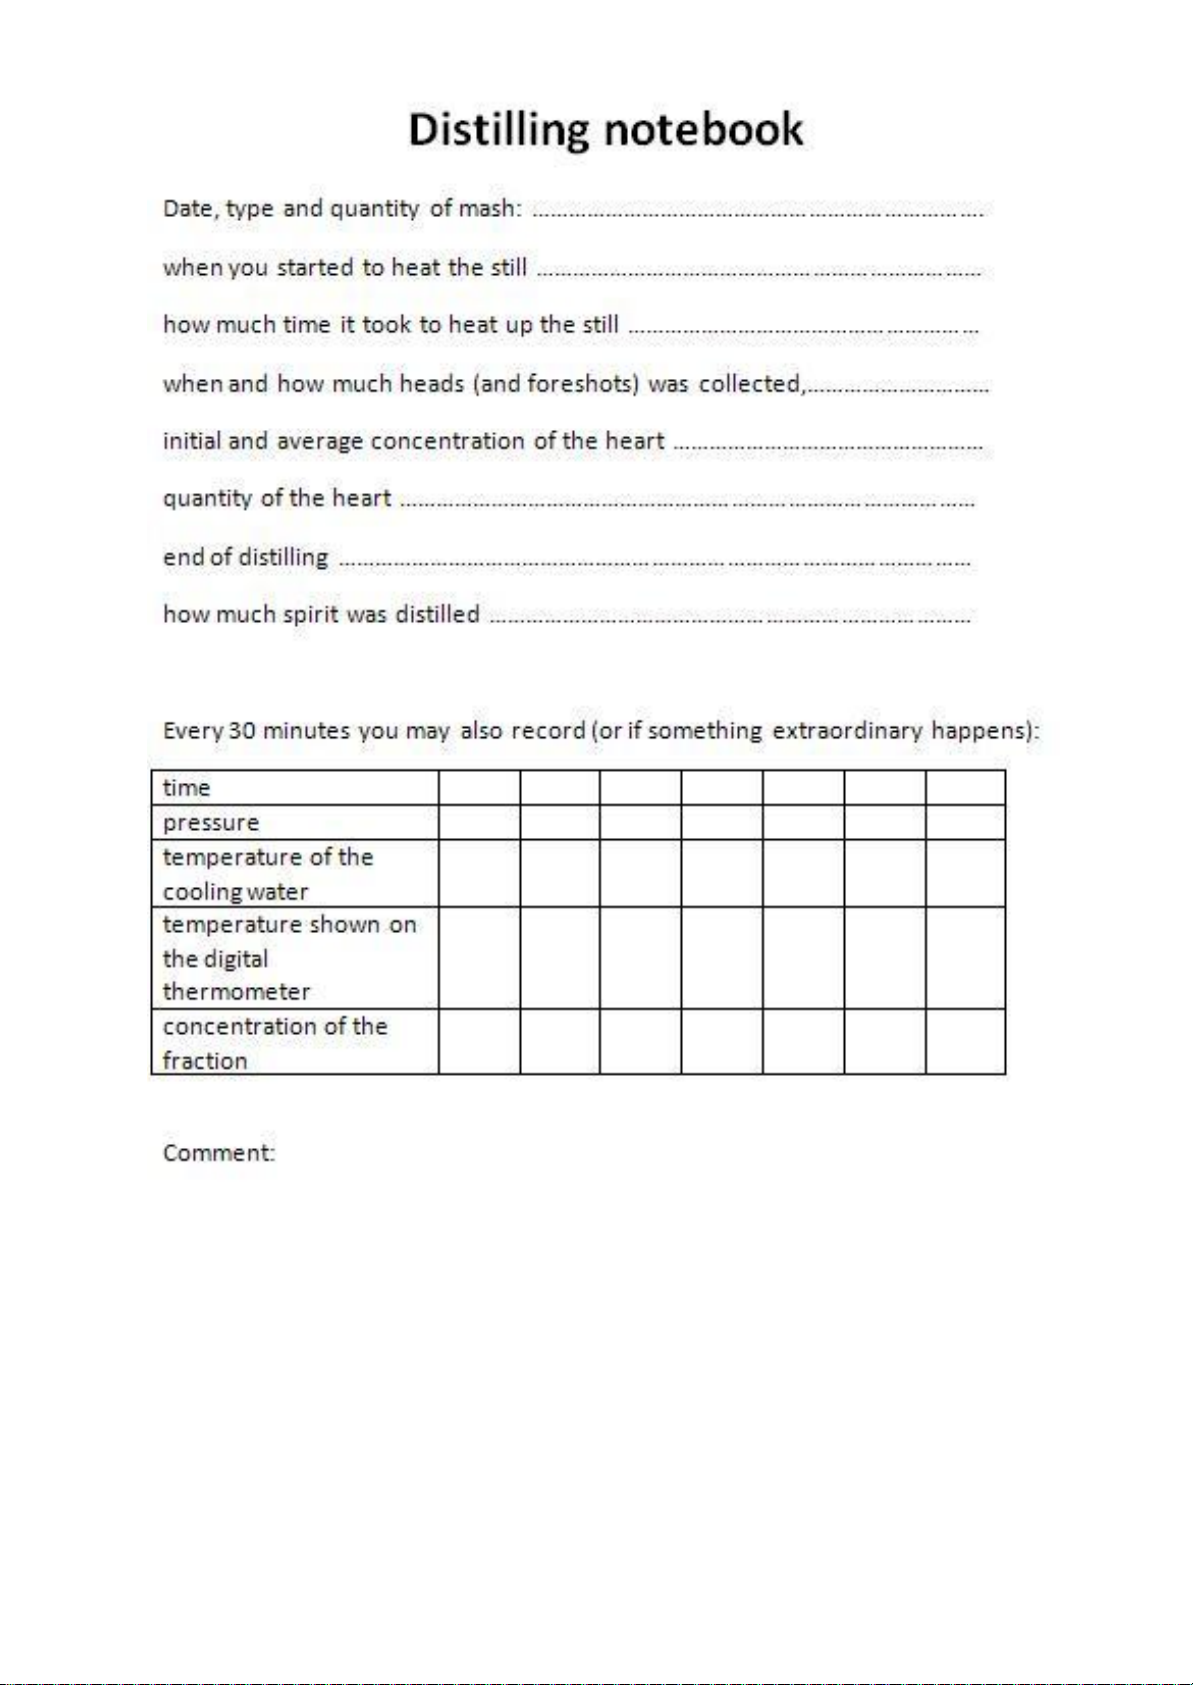
Keep a distilling notebook. The documented data may serve useful information in
the future. Record the following in the template provided:
Date, type and quantity of mash, when you started to heat the still, how much
time it took to heat up the still, when and how much heads (and foreshots) was
collected, initial and average concentration of the heart, quantity of the heart, end
of distilling, how much spirit was distilled. Every 30 minutes you may also record
(or if something extraordinary happens): the time, pressure, temperature of the
cooling water, temperature shown on the digital thermometer, concentration of
the fraction.

.....................................................................................................
3.2. Heating up the still
Heat up the gas burner. Try to aim for a bluish, intensive flame to heat up the still
quickly. The maximum pressure in the cauldron must not exceed 0.8 bar. If this
happens, carefully open the pressure relief valve until the pressure returns to
normal. The safety valve will open if the pressure reaches 1.5 bar. The pressure in
the cauldron should be between 0.4 and 0.5 bar, when the spirit starts to flow.
Control the pressure with the gas burner.
When heating up the device, you can use the built in window to check, if the mash

is starting to foam. If the mash foams (it covers the control window and steam
pipes through the silicone sealing), immediately stop the heater and remove the
control window carefully (beware, it’s hot!). Let the foam settle, remove the reflux
column, and clean the sponge if it became contaminated. Check if the foam
contaminated the copper filling. If so, clean the filling as well. Then start to distil
the mash again.
While heating up, check the pressure and the digital thermometer regularly.
Record these values in your distilling notebook.
The temperature shown on the digital thermometer will rise slowly. You can check
the temperature by hand. The column starts to heat up from its bottom. When the
column is hot at the height of the digital thermometer, be prepared. When the
digital thermometer starts to rise, immediately reduce the flame (maximum 1.5 cm
high flame is allowed) or the power and turn on the flow of cooling water. The
cooling water should flow just like a child pees. The water should flow in a thin
stream. There is no need for intensive cooling. Keep the temperature of the
dephlegmator around 30 °C and do not let it rise above 40 °C.
When the digital thermometer reaches 76 °C, the heads and foreshots start to
flow. You can check the reflux process through the window at the top of the
column. If the distillation is successful, the fraction starts to dip slowly, then
speeds up, and finally will pour in a thin stream.
3.3. The heads
The first parts of the fraction are called the foreshots and the heads. They must be
separated from the hearts. Our device separates a very concentrated head run, so
there will be only a small amount of heads.
Experience shows that the heads are 0.2–0,4% of the mash. So from 80 litres of
mash at least 50 ml will be the heads (you may count the amount of heads using
the same ratio). After the foreshots, prepare 5x200 ml glasses numbered from 1 to
5. After the first 50 ml of foreshots, pour 50 ml of fraction into each glass, starting
with number one. After separating the first 5x50ml, take the eprouvette to the
condenser's nipple, a jar next to the eprouvette, and put the hydrometer into the
eprouvette. If the eprouvette is filled with fraction, you can see the initial abv, and
you can record it in the distilling notebook. At this point you will be collecting the
hearts, but do not forget to monitor the head run.

The first 50 ml is called the foreshots. It must be discarded. Add 50 ml of distilled
water to each of the five glasses of heads. Starting with the fifth glass, smell and
taste the water and fraction mixtures. If you smell aldehyde or acetaldehyde, that
glass will count as heads. If you smell fruity odours, that glass will be hearts. If you
can't decide for sure, taste and smell the glasses you are in doubt about again, and
compare to the heads. Pour the hearts from the glasses into the jar that collects
the heart run. Discard the heads and foreshots.
3.4. The hearts
When separating the hearts, you will need to keep the temperature shown on the
digital thermometer between 78 and 90 °C, and make sure that the fraction pours
evenly. Try to keep the temperature around 78-80 °C for as long as possible. The
table below shows the connection between abv and the temperature of the core
thermometer. For example: if you can keep the temperature at 79 °C, the vapour
curve will show 90% abv. So the abv of your condensed fraction will be 90. Keep
this temperature as long as possible.

The alcohol ratio will decrease while the water ratio increases throughout the
distillation process. The fraction will pour evenly only at higher temperatures. But
higher temperatures produce lower abv measurements. At 90 °C you will have a
fraction of 67 abv.
Your aim is to control the heating and cooling and keep the digital thermometer
reading at 80 °C to have an even stream of fraction. (When separating the heads,
the flame is like when cooking chicken broth.)
During the process watch the pressure meter and the cooler's thermometer, and
record all measurements.
3.5. The tails and finishing distillation
When you have to raise the temperature to 90–92 °C to get an even stream from
the condenser, that means the abv of the fraction is between 62 and 67. It is time
to start smelling and tasting the fraction regularly. When you feel the taste and
odour typical of the tail run, stop separating the heart run, and stop the distilling
process, or collect the tails. You may collect the tails and distil them again, but you
will have to discard the tails made from a tail run. How can you identify the tails?
The fruity, pleasant odour turns into an unpleasant smell, and the taste becomes
sour. If you use Pálinka Master, start to examine the fraction regularly when the
temperature reaches 91 °C, and the abv reaches 65. You may collect the tail run
until its abv reaches 3 to 5.
Record the quantity of the head run, its average abv, and the quantity of your
pálinka as if its abv were 50. A hydrometer with thermometer shows the actual abv
of the pálinka at 20 °C. If the temperature is different, use the table to correct the
measurements.
When you finish distilling, close the gas and the cooling water valves.
IMPORTANT!!! Before draining the mash residue through the discharge valve at
the bottom, carefully (it is hot!) remove the control window at the top of the
dome. If you open the valve without removing the check window, the vacuum
may distort the cauldron!

Determining the actual abv.

3.6. Emptying the still
After removing the check window from the dome, drain the thin mash residue
from the cauldron. When you have finished draining the thin residue, remove the
column with the dome (beware, they are hot!), and use a wooden spoon or plastic
tool to remove the dense residue (if there is any) from the cauldron. After this you
may easily flush the remainder with a hose. BE CAREFUL WHEN DRAINING THE
RESIDUE AS THE LIQUID IS HOT!!! You should refill the cauldron while it is still hot.
There is no need to rinse out the cauldron, unless you are going to distil a
completely different type of mash.

4. Safety regulations
The equipment may only be operated by an adult who is able to use the still
expertly and safely.
You have to observe the general rules of safety during use of the still.
It is strictly forbidden to use the device in inflammable or explosive
environment (boiler house, shed, etc.)
Provide good ventilation if used in closed areas.
Do not leave the gas heater unattended! If the gas stops, immediately close
the gas valve, and ventilate the room.
In case of malfunction do not start troubleshooting until the still cools down.
You have to observe the general rules for using a gas heater.
Never leave the still unattended!
No children are allowed in the immediate proximity of the still. Use
appropriate clothing, gloves and other protective clothing.
In case of malfunction do not use the still!
Do not lean anything against the still! It is very dangerous, as the still may tip
over.
Do not put anything on top of the still when in use!
Always empty the still after distilling. If you do not want to use the still for a
long time, empty the double-walled water bath as well, especially if you keep
it in a place subject to below-zero temperatures.
We recommend filling the cauldron with not more than 75-80 litres of mash. It is
recommended to use an anti-foaming agent. If you use an anti-foaming agent,
always observe the manufacturer's instructions.
ATTENTION!
All parts of this device are still hot after distilling, and may cause burns! The
operator should wear protective clothing, such as gloves, a long-sleeve shirt and
trousers, protective shoes to protect against injury.
The residue of the mash is very thick and hot, and will keep its temperature for a
long time. Be careful when you empty the cauldron, because there is a high risk of
burning yourself. Especially look out for people near the still.

5. Cleaning
To keep the still's efficiency as high as possible, clean the still after every use. Clean
the still without causing any chemical or physical damage.
Do not use cold water for cleaning the still right after distilling, when the device is
still hot. Clean the inside and the outside of the cauldron with a wet sponge and a
cloth. Put the copper filling into a clean bucket, and wash it thoroughly before the
next use. Replace the stuffing sponges if they are rusty or damaged. Clean the
column and the condenser with running water. Then put a clean, dry rag into the
column, and push it through with a plastic or wooden rod. Clean the inside of the
dome with a sponge. You may polish the outside of the dome with special
chemicals, or you can buy the dome with heat-proof varnish.
If you have not used the still for a long time, clean it using the steaming method
described in section 3.1.
6. Warranty and repairs
Kontur Bt.
1164 Budapest,
Simongát u. 43.
Hungary
+36 70 609 6072
info@palinkastill.com
info@palinkafozes.com
www.palinkastill.com
www.palinkadistiller.com
www.hazipalinka.com
www.palinkafozes.com

DEAR CUSTOMER,
Thank you for choosing our still. We are confident that you will be satisfied with
our device. If you need repairs within the warranty period, contact the seller or us
directly using any contact method.
PLEASE, READ THE MANUAL BEFORE FIRST USE!
WARRANTY DOCUMENT
Type of
still
Stock keeping
unit
Date of
purchase
Seller's
signature
and
stamp
Number of
invoice

1. With this warranty document, the manufacturer promises to repair all
failures due to manufacturing defects within the warranty period. The
warranty does not cover any items made of glass.
2. The warranty period is 12 (twelve) months from the date of purchase.
3. The warranty is extended by as many days as the device is under repair.
4. If the failure cannot be repaired, the manufacturer will provide the buyer
with an identical device.
5. You will be asked to provide us with the invoice proving your purchase and
an authenticated warranty document to validate your warranty.
6. Warranty is void, if:
the buyer cannot provide us with proof of purchase, or
the warranty document is not authenticated, or
the fault is due to improper use, or
you attempted to repair or alter the device, or
the fault is due to improper use or mishandling during shipping.
Made by:
Kontur Bt.
1164 Budapest,
Simongát u. 43.
HUNGARY
Date of
arrival at
service station
Service station
signature
Stamp
Date of
repair

Table of contents