manuals.online logo
Brands
  1. Home
  2. •
  3. Brands
  4. •
  5. Palram
  6. •
  7. Lawn And Garden Equipment
  8. •
  9. Palram Skylight Shed - 6x3 User manual

Palram Skylight Shed - 6x3 User manual

Other manuals for Skylight Shed - 6x3

1

This manual suits for next models

2

Other Palram Lawn And Garden Equipment manuals

Palram Cold Frame 3'x3' User manual

Palram

Palram Cold Frame 3'x3' User manual

Palram Autovent User manual

Palram

Palram Autovent User manual

Palram 700492 User manual

Palram

Palram 700492 User manual

Palram PROLEAFY Operating instructions

Palram

Palram PROLEAFY Operating instructions

Palram SanRemo 3x4.25 User manual

Palram

Palram SanRemo 3x4.25 User manual

Palram Canopia SanRemo 13x14 Administrator Guide

Palram

Palram Canopia SanRemo 13x14 Administrator Guide

Palram Feria SideWall 3 User manual

Palram

Palram Feria SideWall 3 User manual

Palram 701550 User manual

Palram

Palram 701550 User manual

Palram Arizona 5000 Wave - WINGS User manual

Palram

Palram Arizona 5000 Wave - WINGS User manual

Palram SanRemo 3x5.4 User manual

Palram

Palram SanRemo 3x5.4 User manual

Palram Grow Station User manual

Palram

Palram Grow Station User manual

Palram Canopia AQUILA Administrator Guide

Palram

Palram Canopia AQUILA Administrator Guide

Palram CANOPIA AQUILA 3x5/1x1.5 Administrator Guide

Palram

Palram CANOPIA AQUILA 3x5/1x1.5 Administrator Guide

Palram Columba 1500 User manual

Palram

Palram Columba 1500 User manual

Palram Feria 3x4.2 User manual

Palram

Palram Feria 3x4.2 User manual

Palram Arcadia 4300 User manual

Palram

Palram Arcadia 4300 User manual

Popular Lawn And Garden Equipment manuals by other brands

Sunforce SOLAR user manual

Sunforce

Sunforce SOLAR user manual

GARDEN OF EDEN 55627 user manual

GARDEN OF EDEN

GARDEN OF EDEN 55627 user manual

Goizper Group MATABI POLMINOR instruction manual

Goizper Group

Goizper Group MATABI POLMINOR instruction manual

Rain Bird 11000 Series Operation & maintenance manual

Rain Bird

Rain Bird 11000 Series Operation & maintenance manual

Cub Cadet BB 230 brochure

Cub Cadet

Cub Cadet BB 230 brochure

EXTOL PREMIUM 8891590 Translation of the original user manual

EXTOL PREMIUM

EXTOL PREMIUM 8891590 Translation of the original user manual

Snapper 690179 installation instructions

Snapper

Snapper 690179 installation instructions

Exmark SAR481KA30 Operator's manual

Exmark

Exmark SAR481KA30 Operator's manual

Yazoo/Kees Z12 Operator's manual

Yazoo/Kees

Yazoo/Kees Z12 Operator's manual

Makita EM408MP Original instruction manual

Makita

Makita EM408MP Original instruction manual

Exmark Quest Bagger Setup instructions

Exmark

Exmark Quest Bagger Setup instructions

Manitou Systems AS960 Operator's manual

Manitou Systems

Manitou Systems AS960 Operator's manual

Vertex 1/3 HP Maintenance instructions

Vertex

Vertex 1/3 HP Maintenance instructions

GHE AeroFlo 80 manual

GHE

GHE AeroFlo 80 manual

Land Pride Post Hole Diggers HD25 Operator's manual

Land Pride

Land Pride Post Hole Diggers HD25 Operator's manual

Yazoo/Kees Z9 Commercial Collection System Z9A Operator's & parts manual

Yazoo/Kees

Yazoo/Kees Z9 Commercial Collection System Z9A Operator's & parts manual

Premier designs WindGarden 26829 Assembly instructions

Premier designs

Premier designs WindGarden 26829 Assembly instructions

Snapper 1691351 installation instructions

Snapper

Snapper 1691351 installation instructions

manuals.online logo
manuals.online logoBrands
  • About & Mission
  • Contact us
  • Privacy Policy
  • Terms and Conditions

Copyright 2025 Manuals.Online. All Rights Reserved.

19.8_600804_M-V-4.7
SkyLightTM Shed - 6x3
6x3 6x3 Tan / Deco
x2
4 mm
5/32”
10mm
13/32”
Wind Resistance
90km/hr
56ml/hr
Snow Load
15.4lbs/ft2
75kg/m2
Light Transmission
Roof - 10%
Panels - 0%
AFTER SALE SERVICE
palramapplications.com/after-sales-service
LOCATIONS
USA
England
France
Germany
International
customer.service@palram.com
customer.serviceUK @palram.com
customer.serviceFR@palram.com
customer.serviceDE @palram.com
customer.service@palram.com
www.palramapplications.com
877-627-8476
01302-380775
0169-791-094
0180-522-8778
+972 4-848-6816
FOUNDATION
Site Preparation!
Base or foundation must be flattened, leveled
and prepped priorto installing the product!
The product must be built on a solid level
surface in order to perform properly. We
recommend using concrete or wood deck as base.
The shed cannot be built on grass or gravel.
* We recommend checking for restrictions or
covenants for building this product in your area.
In addition we advise you to check if you need to
sumbit any forms or if any permitsare required
prior to building the product.
Clear the surface ofloose empediments
Level the ground surface
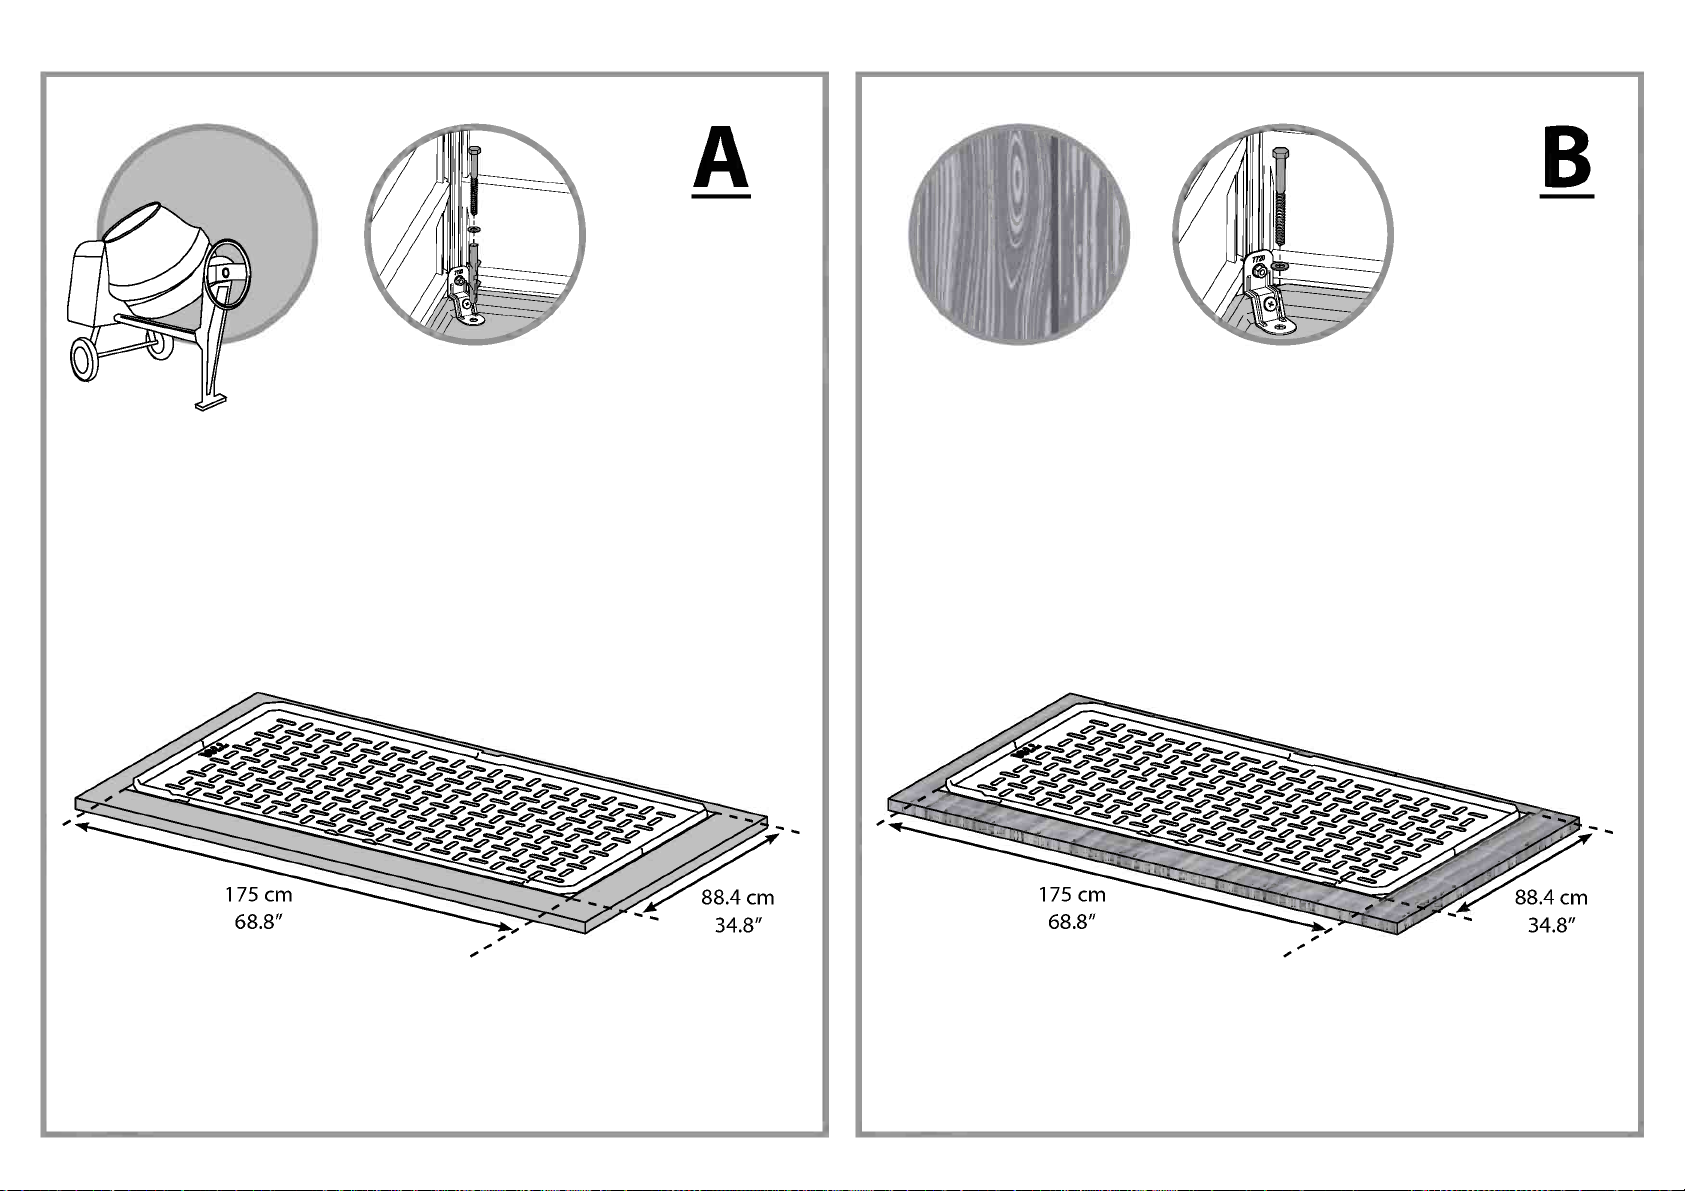
* See below 2 recommended options
A Solid Base (Concrete /Wood Deck) (drawing)
B Wood deck (drawing)
In order to allow easy access during assembly,
make sure you clear the surface around the
product's assembly site.
Make sure you have at least 5 cm (2 in.)
between the product's base and the edge of your
foundation.
A
Secure the product to the solid base ofyour
choosing using suitable screws and plugs or
masonry anchors. (Not supplied)
B
Secure the product to the wood deckusing
suitable standard lag bolt screws or structural
screws. (Standard lag bolt screws or structural
screws are not supplied)
La preparation du terrain !
La base ou la fondation doivent etre aplaties,
nivelees et preparees avant !Installation du
produit !
Le produit doit etre construit sur une surface de
niveau solide afin de fonctionner correctement.
Nous recommandons !'utilisation de beton ou le
plancher en bois commefondation.
Le hangar ne peut pas etre construit sur
l'herbe ou legravier.
* Nous recommandons la verification des
restrictions ou les accords de construction
de produits dans votre region. Nous vous
recommandons de verifier si vous avez besoin de
soumettre des formulaires ou si des permis sont
requis avant la construction du produit.
Degagez la terrain des obstacles libres
Niveler la surface du terrain
* Voir deux options recommandees ci-dessous
A - Base Solide (Beton / terrasse en bois)
(dessin)
B - Plancher en bois (dessin)
Afin de permettre un acces facile pendant
('assemblage, assurez-vous de &gager la surface
autour du site de montage du produit.
Assurez-vous d'avoir au moins 5 cm (2 po) entre
la base du produit et le bord de votre fondation.
A
Fixez le produit a la dalle de beton a l'aide de
vis et de chevilles approprieesou d'ancres de
maconnerie. (Les vis et les chevilles ou les ancres
de maconnerie ne sont pas fournis)
B
Fixez le produit au plancher en bois avec des
vis a boulon standard ou de vis structurales
appropriees. (Les vis a boulon standard ou les vis
structurelles ne sont pas fournies)
Baustellenvorbereitung!
Der Boden oder das Fundament mussen vor
der Montage des Produkt planiert, nivelliert und
vorbereitetwerden!
Der Produkt muss auf einem festen, ebenen
Untergrund errichtet werden, um seine Funktion
einwandfrei leisten zu konnen. Wir empfehlen die
Verwendung von Beton oder eines Holzdecks als
Untergrund.
Der Schuppen kann nicht auf Gras oder Kies
aufgebaut werden.
* Wir empfehlen die Prufung auf Einschrankungen
oder Verpflichtungen an I hrem Wohnort hinsichtlich
dem Erbau eines Produkt. Dal-Ober hinaus
empfehlen wir Ihnen, vor dem Bau des Produkt zu
prufen, ob Sie irgendwelche Formulare ausfullen
mussen oder ob Genehmigungen erforderlich sind.
Entfernen Sie die jegliche Hindernisse von der
Oberflache.
Bodenoberflache nivellieren
* Siehe unten zwei empfohlene Optionen
A Massiver Untergrund (Beton / Holzdeck)
(Zeichnung)
B Holzdeck (Zeichnung)
Um einen leichten Zugang wahrend der Montage
zu ermoglichen, ist darauf zu achten, dass die
Oberflache um den Montageort des Produkt herum
frei ist.
Stellen Sie sicher, dass Sie mindestens 5 cm (2
in.) zwischen dem Schuppenboden und dem Rand
Ihres Fundaments haben.
ABefestigen Sie das Produkt mit geeigneten
Schrauben und Dubeln, oder Mauerwerksdubeln
an einem festen Untergrund Ihrer Wahl. (nicht
mitgeliefert)
BBefestigen Sie den Produkt am Holzdeck mit
geeigneten handelsublichenSchrauben und Bolzen
oder Konstruktionsschrauben. (Diese Standard-
Schrauben, bzw. die Konstruktionsschrauben
werden nicht mitgeliefert)die erforderlicheTiefekir
diese Locher.
iPreparacion del Sitio!
iLa base o cimentaci6n debe estar aplanada,
nivelada y lista antes de instalar el producto!
El producto debe construirse sobre una
superficie sOlida y nivelada para funcionar
correctamente.Recomendamos usar una
plataforma de concreto o madera como base.
El cobertizono se puede construirsobre
hierba o grava.
* Recomendamos verificar restricciones u
ordenanzas para la construcci6n de productos en
su area. Adernas, le aconsejamos que verifique si
necesita enviar algun formulario o si se requieren
permisos antes de construir el producto.
Despeje la superficie de obstaculos sueltos
Nivelela superficie del suelo
* Abajo, yea 2 opciones recomendadas
A Base Salida (Hormigon / Deck de Madera)
(dibujo)
B Deck de madera (Dibujo)
Para permitir un facil acceso durante el montaje,
asegurese de despejar la superficie alrededor del
sitio de montaje del producto.
Asegurese de tener al menos 5 cm (2 pulgadas)
entre la base del producto y el borde de su cimiento.
AAsegure el producto a una base sOlida de su
elecciOn, utilizando tornillos y tacos adecuados o
anclajes de mamposteria. (No incluido)
B
Fije el producto a la plataforma de madera
utilizando tornillos estandar adecuados o tornillos
estructurales. (No se suministran los tornillos de
perno estandar o los tornillos estructurales)
:15n5 niN5nin ninivoronv nisn *
(muiv) RT / iivo) pxin unn A
(Innv) in; RT B
'3 ,n117nni5nn1 n5p nw' 7U'oN5 731
iNinn nna max anti nvvn nH nn,n
nma n" 5 ninth 5v pmn 35VP "3 ircni
.n35v ni-rinm 5v nNpni iNinn
A
nnia nivNnNa -pan nvvn Srf iNinn nH ipm
naivi nn71)iiv15 nmistnin nnaiv nnawnn
(3,poinn nvx
B
yv ma) yv nivNnNa yvn pi 5N iNinn nH ipm
03,poinn paw
mum mon
napnn nth ni-nn,n nroan nH nvv5i ivr,5 v.,
nymn
'731 1'Y'1 nvvn nnni,n5 arm iNinn
vnnvn5 n,N,5nn lax nniNn 'NanaTiny, istinv
.nma3 yvn p-ra nvvna
.yxn 511 ixNUM 511 ixinn rut nno5 in rt5
iNinn nma5 ni51an ip-ranv n,N,5nn lax *
vnn5 er, DX prr15 nnrNn lax p in] .D311TX1
nma nth ,v-rra iNinn nna5 nmov
Minn
nnina unman nvvn no nx npa
.nvvn no nx On
Platsforberedelse!
Basen eller grunden m5ste vara tillplattad,
utjamnad och forberedd innan du monterar
produkten!
Produkten m5ste byggas p5 en fast och slat yta
for att kunna fungera ordentligt.Vi rekommenderar
att du am/ander betong eller tradack som bas.
Skjulet kan inte byggas pa gras eller grus.
* Vi rekommenderar att du kontrollerar
restriktioner eller overenskommelser fOr
skjulbyggande i ditt omracle.Vi rekommenderar
dessutom att du kontrollerar om du behover skicka
in nagra blanketter eller om nagra tillstand krays
innan du bygger produkten.
Rensa ytan fr5n losa hinder.
Jamna ut markytan
* Se nedan 2 rekommenderade alternativ
A Fast grund (Betong /Tradack) (ritning)
B Tradack (ritning)
F6r att mojliggora enkel 5tkomst vid montering,
se till att du rensar ytan runt produktens
monteringsplats.
Se till att du har minst 5 cm (2 turn) mellan
produktens bas och och kanten p5 din grund.
A
Sakra produkten till den valfria fasta grunden
med hjalp av lampliga skruvar och pluggar eller
murareankare. (Medfoljer ej)
B
Sakra skjulet till tradacket med hjalp av lampliga
bultskruvar eller konstruktionsskruvar.
(Bultskruvar eller konstruktionsskruvar medfoljer ej)
Klargjoring!
Sokkelen eller underlaget ma bearbeides, jevnes
ut og klargjores for produktet monteres!
Produktet m5 monteres p5 et fast og jevnt
underlag slik at den kan sta stott.Vi anbefaler
bruke betong eller plattform av tre som fundament.
Boden ma ikke monteres pa gress eller grus.
* Vi anbefaler at du undersoker om det finnes
restriksjoner for oppsett av bod der du bor. I tillegg
er det lurt a undersoke om du ma sende inn soknad
eller om det er nodvendig med eventuelle tillatelser
for du monterer boden.
Rydd omr5det for soppel og skrot
Jevn ut bakken
* Se under 2 Anbefalte alternativer
A Solid fundament (betong / tredekk) (tegning)
B Plattform av tre (illustrasjon)
For at det skal vrelett 5 komme til for
montering, ma du surge for a rydde bade p5 og
rundt omr5det.
Sorg for at det er minst 5 cm mellom bodens
sokkel og kanten p5 fundamentet.
A
Fest produktet til det fundamentet du velger
ved hjelp av egnede skruerog plugger eller
murankre. (Ikke !evert)
B
Fest boden til plattform av tre ved a bruke egnede
standard franske treskruer eller konstruksjonsskruer
(disse folger ikke med).
Kohteen valmistelu!
Pohja tai perustus on tasoitettava, oikaistavaja
valmisteltava ennen vajan asennusta!
Vaja on rakennettava kiintealle, tasaiselle pinnalle,
jotta se toimii oikein. Suosittelemme betonin tai
puulattian kayttamistapohjana.
Vajaa ei voi rakentaa ruoholle tai soralle.
* Suosittelemme selvittamaan alueesi vajojen
rakentamiseen liittyvat rajoitukset tai toimenpiteet.
Lisaksi kehotamme selvittamaan,onko tarve
toimittaa erityisia lomakkeita tai vaaditaanko vajan
rakentamiseen luvan hakemista.
Tyhjenna irtopaallysteen pinta
Tasaa pohjapinta
* Katso alta 2 suositeltua vaihtoehtoa
A Kiintea alusta (betoni / puulattia) (piirustus)
B Puulattia (piirustus)
Jotta tyoskentely kokoamisen aikana on helppoa,
varmista, etta vajan kokoamispaikan ymparisto on
vapaa.
Varmista, etta sinulla on vahintaan 5 cm (2") tilaa
vajan alaosan ja perustuksen reunan valilla.
AKiinnita tuote valitsemaasi kiinteaan alustaan
sopivilla ruuveilla ja tulpilla tai muurausankkureilla.
(Eivat sisally toimitukseen)
B
Kiinnita vaja puulattiaan sopivilla, tavallisilla
kansiruuveilla tai rakennusruuveilla. (Tavalliset
kansiruuvit tai rakennusruuvit eivat sisally
toimitukseen.)
Forberelse af opsaetningstedet!
Din base eller grundlag skal vrefladt, jvnt
og forberedt, for produktet installeres.
Produktet skal opsaettes p5 en solid base for
atfungere. Vi anbefaler at anvende beton eller et
trgulvsom base.
Skuret kan ikke opsaettes pa grass eller grus.
* Vi anbefaler at tjekke regler og lign. omkring
opstningaf produktet i dit omr5cle.Vi anbefaler
desuden at tjekke, hvorvidt du vil skulle indsende
formularer, eller om tilladelser krves, for
opstningaf produktet.
Rengor overfladen for lose genstande, som
kunne komme i vejen
Gor overfladen jvn
* Se to anbefalede muligheder herunder
A solid base (beton / traedaek) (tegning)
B Traegulv (tegning)
For nemt at kunne tilg5 omr5clet, hvor
produktet sttes sammen, sa sorg for at du
rydder op omkring samlingsstedet.
Sorg for at du har mindst 5 cm mellem
produktet base og kanten af dit grundlag.
A
Fastgor produktet til den solide base, du vIger,
ved hjlp af passende skruer og stik eller
muryrk ankre. (Medfolger ikke)
B
Fastgor skuret til trgulvet ved hjlpaf lagskruer
eller strukturelle skruer.
(Disse tilvejebringes ikke)
NL/BE
Voorbereiding van de site!
De basis ofde fundering moet worden
afgemalen, geegaliseerd en geprepareerd
voorafgaand aan het installeren van de het
product!
De het product moet op een solide, vlakke
ondergrond worden gebouwd om goed te
kunnen functioneren.We raden aan om beton of
een houten dek als basis te gebruiken. De loods
kan niet op gras of grind worden gebouwd.
* We raden u aan te controleren of er
beperkingen of convenanten zijn voor het
bouwen van een het product in uw regio.
Daarnaast adviseren wij u om te controleren of u
formulieren moet insturen of dat er vergunningen
vereistzijn voordat u de het product gaat
bouwen.
Ontruim het oppervlak van losse voorwerpen
Breng het grondoppervlak waterpas
* Zie hieronder 2 aanbevolen opties
A Een stevigebasis (beton / houten terras)
(tekening)
B Houten dek (tekening)
Om tijdens de montage gemakkelijk toegang
te krijgen, moet u het oppervlak rondom de
montageplaats van de het product schoonmaken.
Zorg ervoor dat u ten minste 5 cm (2 in.) tussen
de basis van de het product en de rand van uw
fundering zit.
A
Bevestig het product aan de solide basis van uw
keuze met geschikte schroeven en pluggen of
bevestigingsklauwen. (Niet meegeleverd)
B
Bevestig de schuur aan het houten dek
met behulp van geschikte standaard
lagboutschroeven of structureleschroeven.
(Standaard lagboutschroeven of structurele
schroeven worden niet meegeleverd)
Come preparare it sito:
La piattaforma o le fondamenta devono essere
appiattite, livellate e preparate prima di installare it
prodotto!
II it prodottodeve essere costruito su una
superficie solida per garantire una resa adeguata.
Si raccomanda l'uso di piattaforme in cemento o in
legno.
II capannone non pun esserecostruito
sull'erba ne sulla ghiaia.
* Si prega di verificare le restrizioni e le
convenzioni vigenti nella vostra zona, per quanto
riguarda la costruzione dei capanni. Inoltre, si
raccomanda di verificare se sia necessario inviare
dei moduli e/o ottenere dei permessi prima di
iniziare la costruzione del prodotto.
Rimuovere qualunque ostacolo dalla superficie
sceltaLivellare la superficie del terreno
0
* Si prega di far riferimento alle 2 seguenti opzioni
consigliate:
A Base solida (calcestruzzo/ piano di legno)
(disegno)
B Piattaforma in legno (vedi immagine)
Per consentire un comodo accesso durante
l'assemblaggio, assicurarsi di ripulire la superficie
attorno al sito di assemblaggio del prodotto.
Assicurarsi di avere a disposizione almeno 5 cm
(2 pollici) tra la base del it prodottoe it bordo delle
fondamenta.
A
Ancorare it prodotto alla solida base di vostra scelta
utilizzando viti e tasselli adeguati o ancoraggi in
muratura. (Non forniti)
B
Assicurare it capanno alla piattaforma in legno
utilizzando viti mordenti o viti strutturali. (viti
mordenti standard e viti strutturali standard non
incluse)
Priprava miesta!
Ne2 zathete Produkt stavat je potrebne si pred
pripravit, zarovnat a uhladit podklad alebo zaklady!
produkt musi byt postavena na pevnej
rovnej ploche, abysa mohla spravne pouZivat.
OdportiCamevarn ako podklad pouZit bet6n alebo
drevo.
Bahia sa nemoie stavaf na trave alebo itrku.
* OdportiCame varn skontrolovatobmedzenia
alebo nariadenia na vystaybu produkt vo va'Som
okolf. Taktie2varn odportiCame, aby ste si zistili, Ci
potrebujete yypInit akekolVek formulare, alebo Ci
potrebujete povoleniepred vystaybou produkt.
VyCistite povrch od roznych preitaZok
Zarovnajte plochu
* Pozri ni ie na 2 odportiCane moZnosti
A Pevne zaklady (beton / drevena podlaha)
(obrazok)
B Drevena podlaha (vykres)
Uistite sa, Ze ste vyCistili okolie miesta na monta2
produkt, aby ste k montaZi mali l'ahky pristup.
Uistitesa, Ze mate najmenej 5 cm medzi
podkladom produkt a okrajom zakladov.
AZaistite vyrobok pomocou vhodnych skrutieka
hmokliniek na pevnom zaklade podl'a vlastneho
vyberu. (Nie su v baleni)
B
Upevnite Writ' do drevenej podlahy za pomoci
vhodnych 'Standardnych skrutiek alebo stavebnych
skrutiek. (Standardne skrutky alebo staybarske
skrutky nie su v baleni)
Priprava terena!
Pred postavitvijo izdelek je treba osnovno
povrSino ali podlago zravnati!
Zaradi pravilnosti izvedbe je treba izdelek
postaviti na trdno in ravno povrSino. Za osnovo
priporoeamo betonsko ali leseno podlago.
izdelek ni dovoijeno postaviti na travo ali
gramoz.
* Priporoeamo, da preverite omejitve ali zahteve
glede gradnje lop na vaSem obmoeju. Poleg tega
yam svetujemo, da preverite, ali je potrebna kakrSna
koli priglasitev ali dovoljenje, preden izdelek
zgradite.
5 povrSine odstranite vse ovire
Izravnajte povrSino tal
* Spodaj si oglejte 2 priporoeeni moZnosti
A Trdna osnova (Beton / Lesen podest) (risba)
B lesena podlaga (risba)
Da bi med montaZo omogoeili enostaven dostop,
poskrbite za cisto povrSino okrog mesta montane.
Zagotovite vsaj 5 centimetrov razdalje med
osnovo izdelek in robom vaSih temeljev.
AIzdelek pritrdite na trdno podlago po vaSi izbiri
s primernimi vijaki in vtiei ali zidnimi sidri.
(niso priloleni)
B
Lopo pritrdite na leseno podlago z uporabo
standardnih vijakovz matico ali lesnih vijakov.
(Standardni vijaki z matico ali lesni vijaki niso
priloleni)
Koha ettevalmistamine
Alus vOi vundament peab olema tasandatud ja
ette valmistatud enne toodet paigaldamist!
Toodet tuleb ehitada tugevale tasapinnale,et
see 6igesti toimida saaks. Me soovitame alusena
kasutada betoon- vOi puittekki.
Toodet ei saa ehitada murule voi kruusale.
* Me soovitame kontrollida piiranguid vOi
reeglistikke, mis toodetde ehitamist piirkonnas
reguleerivad. Lisaks soovitame teil kontrollida, kas
peate enne toodet ehitamist taitma vorme vOi on
tarvis lube.
Puhastage pind lahtistest takistustest
Tasandagemaapind
* Tutvuge alljargnevalt 2 soovitusliku valikuga
A Tahke alus (Betoon / Puidust tekk) (joonis)
B Puittekk (joonis)
VOimaldamakskerget ligipaasu kokkupaneku
ajal, veenduge, et puhastate toodet umbritseva
kokkupanekuala pinna.
Veenduge,et on vahemalt 5 cm ruumi toodet
aluspinna ja vundamendi acre vahel.
AKinnitage toode enda valitud tahkele alusele,
kasutades sobivaid kruvisid ja pistikuid vOi
mairitise ankruid. (Ei kuulu komplekti)
B
Kinnitage kuur puitteki kulge, kasutades sobilikku
standardset poltkruvi vOi strukturaalset kruvi.
(standardsed poltkruvid ega strukturaalsed kruvid
ei kuulu komplekti)
Epitesi Wallet elokeszitese!
Az alapnak simanak es vizszintesnek kell lennie, s
elo kell kesziteni a felepftese a termek!
A termeks szilard feluletre kell felepfteni annak
erdekeben, hogy funkciOjat megfeleloen lassa el.
Javasoljuk, hogy a beton vagy a hajOpad16 alapot
hasznaljon.
A feszer nem epitheto fore vagy kavicsra.
* Javasoljuk, hogy ellenorizze,hogy milyen
korlatozasokvagy elorrasokvannak ervenyben
lakOhelyen a termeks epitesere vonatkozOan.
Ezenitivul azt tanacsoljuk, hogy ellenorizze, nincs-e
szukseg valamilyen formanyomtatvany, vagy
engedely benyujtasara a epitese a termek.
Minden akadalyt tavolftson el a talajfelszinrol
A talaj legyen vizszintes
* Alabb megtalal 2 altalunkjavasolt opci6t
A Szilard alap (beton / fa pad16) (rajz)
B Fa hajopadlo (lasd rajz)
Annak erdekeben, hogy konnyii legyen az
osszeszereles, gyozodjon meg rOla, hogy a termek
koruli teruleten sincsenekakadalyozei tenyezok.
Gyozodjon meg rOla, hogy legalabb 5 cm (2
huvelyk) k6z6tt van a termek alapja es az alapitvany
szele k6z6tt.
A
A termeket csavarokkal, tiplikkel vagy
falazOhorgokkal rogzitse a valasztott szilard alapra.
(Nincs mellekelve)
BA feszert a fa alapra megfelelo csavarokkal es
anyakkal, vagy szerkezeti csavarokkal rogzitse.
(A rogzito csavarok es anyak, valamint a szerkezeti
csavarok nincsenek mellekelve)
Przygotowanie miejsca budowy!
Przed monta2em produkt pocio2e lub
fundamenty nale2y wyrOwnae, wypoziomowae i
przygotowae.
Aby zapewnie prawidlowe funkcjonowanie,
szopa musi by zbudowana na solidnej poziomej
powierzchni. Zalecamy zastosowanie betonowej
lub drewnianej podstawy.
Szopy nie moina budowa4 na trawie lub
iwirowympodtoiu.
* Zalecamysprawdzenie ograniczeri lub um6w
dotyczacychbudowy szop w okolicy. Ponadto
zalecamysprawdzie, czy nale2y dostarczy
jakiekolwiek formularze lub zgody przed
rozpoczcciem budowy produkt.
OczyScie powierzchnic z przeszkOd
WyrOwnae pocio2e
* Patrz poni2ej 2 zalecane opcje
A Podstawa stata (beton / Poktad drewniany)
(rysunek)
B Drewniany podktad (rysunek)
A by umaiwie latwy dostop podczas monta2u,
nale2y oczyScie powierzchnic miejsca
monta2u produkt.
Pomicdzy podstawa produkt a krawcdzia
fundamentu nale2y zapewnie co najmniej 5 cm.
AZamocuj produkt do podstawy stalej za pomoca
odpowiednich wkrctOw i zaSlepek lun kotew
murarskich. (Nie sa dostarczane)
B
Zamocuj szopc do drewnianego podidadu za
pomoca odpowiednich standardowych grub do
drewna lub grub konstrukcyjnych. (Standardowe
ruby do drewna lub ruby konstrukcyjne nie sa
dostarczane)
nCHVOTOBKa nnouwm!
OCHOBaH0e 14111/1 )yFigamei-n- pprilKHbl 661Tb
co6paHbi, Bblp0BHeHbl VI 11011HOCTbF0 11OR1OTOBBeHbl
K yCTaHOBKe npogykr!
ripopykr npegHa3Ha4eH yCTaHOBK0 Ha
eepetio6 m poeHo6 noeepxHocfm. Mbl pekomeHgyem
6eTOHH0e/gepeBAHHOe OCHOBaH0e.
He peuomemyerca yCTaHaBBHBaTb HaBeC Ha
Tpaee HnH rpaarm.
* PekomeHmem nepeg yCTaHOBK06 03HaKOMOTbal
C BOKaBbHbIM0 npaemnamm m orpaHmHeHmemm
no CTp00TeribCTBy npogykr. PeKOMeHegyeM TaKlKe
npegeapmfenbHo BbIFICHOTb, fpe6yerce 111/1
cnemmanbHoe pa3peweHme Ha ycfaHoeky fakoro
poga coomoKeHm6.
OHOCTOTb nnowagky OT HeyCTO640BbIX
3FleMeHTOB VI npenfrrcrem6.
3apoeHfrrb noeepxHocm.
* CM. Hvoice 2 pekormeHgyervibix eapmaFrra
A TBepAaSIOCHOBa (BeT0H Aepeespmaa
nany6a) (HeRrexc)
ilepeBAHHaSI OCHOBa (pmcyHok)
grin o6nerHeHmn pa6o4ero npomecca
pekomeHgyerce OHOCTOTb reppwropmF0 easpyr
mecra c6opkm.
Y6egmfecb B HaM/1400 MOHVIMaribHOTOpaccronHon
B 5CM (2 RF&Ma) mexcgy onoparom koHcfpyktimm 0
Kpaem OCHOBaH011.
A3akpenwre npogykr Ha npo4lo6 ocHoee noeawermy
ebi6opy mcnonb3yn noxixogni.gme BOHTbl VI 3a1ByWKI/1
mrim FIKorm knagkm. (He nocraennerce)
B
YkpenwreHaeec Ha gepeenHHorm ocHoeamm npm
nOMOLIAM CTaHeEtapTHbIX cfonopHbix 60FITOB 14111/1
KOHCTpyKLIWOHHbIX wypynoe (6011Tbl/Wypyribl B
KOMOBeKT He mown-) .
Vietnes sagatavoiana!
Pirms produkts uzstadganas atbalsta punktam
vai pamatam ir jabut nolidzinatam, izgludinatam
un sagatavotam!
Lai veiktu pareizi, produkts ir jabut uzceltai uz
cietas virsmas. Mes iesakam izmantot betonu vai
koka klaju ka atbalsta punktu.
Nojume nevar but uzcelta uz zales vai grants.
Mes iesakam parbaudit ierobekijumus vai
noliguma noteikumus nojumu ceRanai jusu
apgabala.Turklat mes iesakam parbaudit, vai
jums ir jaiesniedz jebkadas veidlapas, vai,ja pirms
produkts celtniecibas, ir nepiecieSama kada atlauja.
Attiriet virsmu no 'Skersliem
Nogludiniet zemes virsmu
* Skatiet zemak 2 ieteiktas iespejas
A Stingra virsma (betons / koka klajs) (zimejums)
B Koka klajs (rasejums)
Lai nodro'Sinatu ertu piekluvi montaZas laika,
parliecinieties, vai virsma ir attirita virs produkts
montaZas vietas.
Parliecinieties, lai starp produkts atbalsta punktu
un pamatnes malu ir vismaz 5 cm (2 collas).
ANostipriniet produktu pie izveletas pamatnes,
izmantojot piemerotas skruves un aizbaZnus vai
mura enkurskruves. (Nav ieklautas komplekta)
B
Nostipriniet nojumi koka klajam, izmantojot
piemerotas standarta nobides skruves vai
strukturas skruves. (Standarta nobides skruves vai
strukturas skruves netiek piegadatas)
Priprava mista!
Baze nebo zakladna musr byt zplo'Stela, vyrovnana
a opravena pied vybudovannn produkt!
Pro spravnou funkci, produkt musr byt postavene
na pevnern povrchu. DoporuCujeme pouNvat beton
nebo dtevo jako bazr.
Chata nembie byt postavenana trave nebo
iterku.
* DoporuCujeme zkontrolovatomezenr nebo
zavazky tykajrcr se vystavby produkt ye va'Sr
oblasti.Take varn doporuCujeme zkontrolovat pied
vystavbou produkt zda je pottebnevypinit nejake
formulate nebo poskytnout pfrpadnepovolenr.
VyCistetepovrch od nanos6
Vyrovnejte povrch zeme
* Viz nine 2 doporuCene moZnosti
A Pevny podklad (beton / drevena palubka)
(vykres)
B Dreveny podstav (vykres)
Abyste behem montane meli snadny ptistup,
ujistete se, Zeje vyCisteny povrch kolem mrsta
montane.
Ujistete se, Zeje alespon 5 cm (2 palce) mezi
zakladnou chaty a okrajem zakladny.
APtipevnete vyrobek k pevnernu podkladu dle
vlastnrho volby pomocr vhodnych 'Sroub6 a kotev.
(Nenr souCastrdoclavity)
B
Zajistete chatu k dtevenernu podstavu pouZitnn
vhodnych standardnrch 'Sroubu nebo konstrukCnrch
'Sroubu. (standardnr 'Srouby nebo konstrukthr
'Srouby nejsou souCastr doclavity)
coI
4CI
E
U
CO rn
CO
E
U co
o6
%.0
IMPORTANT
Please read these instructions carefully before you start to assemble this product .
Please carry out the steps in the order set out in these instructions.
Keep these instructions in a safe place for future reference.
Safety Advice
For safety purposes we strongly recommend the product to be assembled by at least two people.
Some parts may have sharp edges. Please be careful when handling components. Always wear gloves,
eye protection, and long sleeves when assembling or performing any maintenance on your product.
Do notattempt to assemble the product in windy or wet conditions.
Do notattempt to assemble the product if you are tired, have taken drugs,
medications or alcohol, or if you are prone to dizzy spells.
Dispose ofall plastic bags safely -keep them awayfrom children's reach.
Keep children awayfrom the assembly area.
When using a stepladder or power tools, make surethat you are following
the manufacturer's safety advice.
Do notclimb or stand on the roof.
Do not hang or lay on the profiles.
Heavy articles should not be leaned against the poles.
Keep roof and gutters clear ofsnow, dirt & leaves.
Heavy snow load on the roof can make it unsafeto stand below or nearby.
Do not lean against or push the product during construction.
Hot items such as recently used grills, blowtorchesetc. must not be stored inside the product.
Note: This product must be anchored on to a leveled surface and solid foundation to ensure its stability.
Make sure that screws and anchors are compatible with foundation type. Make sure that there are no
obstructions between the assembly area and the final position.
Cleaning Instructions
In order to clean the product, use a mild detergent solution and rinsewith cold clean water.
Do not use acetone, abrasivecleaners, or other special detergents to clean the panels.
Clean the product once assembly is complete.
Before Starting Assembly
Choose your site carefully before beginning assembly.
The ground surface must be perfectly flat and leveled and havea solid base such as concrete,
asphalt, deck etc.
Complete site preparation before unpacking parts and beginning assembly.
Sort the parts and check against the content parts list.
Parts should be laid out close at hand. Keep all small parts (screws etc.) in a bowl so they do not get lost.
Please consult your local authorities ifany permits are required prior to constructing the product.
During Assembly
MWhen encountering the information icon, please refer to the relevant assembly step
for additional comments and assistance.
This icon indicates
that the installer should
be inside the product.
Attention
This icon indicates that the
11 installer should be outside
the product.
Step 2: Place the backwall panel on the shed base panel according to the
stamped serial number (part #7701).
Door Assembly
Step 26, 27: Note that panels and profiles are connected in the right direction and
that profile holes are placed correctly as illustrated.
Step 29: Push aluminum profiles against part #8439and then use Self-Drilling
screws (#4045) to connect to the profile (diagram b). No pre holes are needed.
Step 34: Anchor the shed on to a solid surface such as concrete, asphalt or wood deck; use suitable
screws and plugs. (Screws and plugs are not supplied).
*Tighten all screws when completing assembly.
Do not tighten screws and nuts (411 & 466) until completion of assembly process.
These 2 icons indicate if screws'tightening is required or not.
A
Note: Anchoring this product to the ground is essential to its stability and rigidity.
It is required to complete this stage in order for your warranty to be valid.
_A
IMPORTANT
Veuillez lireattentivement ces instructions avant de debuter le montage du produit.
Veuillezsuivre les etapes dans l'ordre indique dans ces instructions.
Conservez ces instructions en lieu sur pour reference ulterieure.
Consignes de securite
Veuillez suivre les instructions telles que listees dans ce manuel.
Triez les pieces et controlez-les par rapport a la liste du contenu.
Pour des raisons de securite, nous recommandons vivement que le produit soit assemble par au moins deux
personnes.
Certaines pieces presentent des bords metalliques.Veuillez manipuler les composants avec precaution. Portez
des gants, des chaussures et des lunettes de securite tout au long de l'assemblage.
N'essayez pas d'assembler le produit en cas de vent ou de conditions humides.
Jetez precautionneusement tous les sacs plastiques -tenez-les hors de portee des enfants.
Tenez les enfants a distance de la zone de montage.
N'essayez pas d'assembler le produitsi vous etes fatigue, avez pris des medicaments ou
consommé de l'alcool, ou si vous etes enclin aux vertiges.
Si vous utilisez un escabeau ou des outils electriques,assurez-vous de respecter les consignes desecurite du
fabricant.
Ne montez pas sur le toit.
Les objets lourds ne devraient pas etre appuyes contre les poteaux.
Eliminez la neige, la terre et les feuilles du toit et des gouttieres.
Une lourde chargede neige sur le toit peut rendre dangereux le fait de se tenir debout en dessous ou a
proximite.
Ce produit a ete concu pour etre principalement utilise comme belvedere.
Ne vous appuyez pas contre le produit ou ne le poussez pas pendant sa construction.
Hot items such as recently used grills, blowtorchesetc. must not be stored inside the product.
Les objets brulants tels que les grils, les chalumeaux, etc. ne doivent pas etre stockes a l'interieur du produit.
Remarque : ce produit doit etre ancre sur une surface nivel& et une base solide pour assurer sa stabilite.
Assurez-vous que les vis et les ancrages sont compatibles avec les fondations.
Instructions de nettoyage
Pour nettoyer le produit, utilisez une solution detergente douce et rincez a l'eau claire froide.
N'utilisez pas d'acetone, de nettoyants abrasifs, ou autres detergents speciaux pour nettoyer les panneaux.
Nettoyez le produit une fois le montagetermine.
Avant l'Assemblee
Choisissez votre site avec soin avant de commencer l'assemblage.
La surface du sol doit etre parfaitement plate et nivel& et avoir une base solide telle que comme le beton,
l'asphalte, le pont, etc.
Completez la preparation du site avant de &bailer les parties et de commencer le montage.
Ordonnez les pieces et verifiez-les avec la liste des pieces contenues.
Les pieces doivent etre disposees a port& de main. Rangez toutes les petites pieces (vis, etc.) dans un bol
pour ne pas les egarer.
Veuillez consulter les autorites locales au cas oil des permis sont necessaires pour la construction du produit.
Pendant l'assemblage
Lorsque vous rencontrez ('icone Informations, veuillez vous referer a l'etape d'assemblage
pertinente afin d'obtenir davantagede commentaires et d'aide.
an.
Cette icone indique Cette icone indique que
que l'installateur doit 11 l'installateur doit etre
etre a l'interieur du produit en dehors du produit.
Atencion
Etape 2: Placez le panneau mural arriere sur le panneau de base de l'abri selon le numero de serie
(piece 7701).
Porte Assemblee
Etape 26, 27:Verifiez que les panneauxet les profiles sont relies dans la bonne direction et que les trous
des profiles sont places correctement, comme indique sur ('image.
Etape 29: placez le profils alu sur la piece #8439 et ensuite, utilisez la vis autoforage (#4045) pour
connecter le profile (schema b). II n'est pas necessaire de percer des trous au prealable.
Etape 34: Ancrez l'abri sur une surface solide comme du beton, l'asphalte ou de terrasse en bois;
utilisez des vis et des chevilles adaptees. (Les vis et les chevilles ne sont pas fournies).
*Serrez toutes les vis une fois l'assemblage termine.
Ne serrez pas les vis et les boulons (411 & 466)jusqu'a la fin du processus de montage.
Ces 2 icones indiquent s'il est necessaire de serrer les emus ou non.
A
Remarque: Cette etape 'ancrage du produit au sol est essentielle a sa stabilite et a sa rigidite,
elle est de plus necessaire pour assurer la validite de votre garantie.