Panasonic MK-F800 User manual

Food Processor (Household Use)
食物攪拌機(家庭用)
Pemproses Makanan (Kegunaan di Rumah)
Operating Instructions
操作說明
Buku Panduan
MK-F800
Model No.
型號
No. Model
Thank you for purchasing this Panasonic product.
• This product is intended for household use only.
• Please read these instructions carefully in order to use this product correctly and safely.
• Before using this product please give your special attention to the section “SAFETY PRECAUTIONS”
(Page 3-5).
• Please keep the Operating Instructions for future use.
謝謝你購買Panasonic的產品。
• 本產品隻限於家庭使用。
• 請仔細閱讀本使用說明書,以確保正確安全使用本產品。
• 使用本產品前,請您特別留意“安全注意事項”(33-35頁)。
• 請妥善保存本使用說明書,以備將來用途。
Terima kasih kerana membeli produck Panasonic.
• Produk ini hanya untuk kegunaan di rumah sahaja.
• Sila baca arahan-arahan ini dengan teliti untuk mengguna produk ini dengan betul dan selamat.
• Sebelum mengguna produk ini, sila memberi perhatian khusus kepada seksyen "LANGKAH KESELAMATAN"
(Mukasurat 63-65).
• Sila simpan Manual Operasi ini untuk kegunaan masa depan.

SAFETY PRECAUTIONS
PART NAMES
CIRCUIT BREAKER AND TEMPERATURE SENSOR PROTECTION
SAFETY LOCK
DISASSEMBLY & ASSEMBLY
(i) DISASSEMBLY FROM PACKAGED CONDITION
(ii) KNIFE BLADE • KNEADING BLADE • WHIPPING BLADE • GRATING BLADE
(iii) SLICING BLADES • SHREDDING BLADES • JULIENNE BLADE
(iv) CITRUS PRESS
(v) SALAD DRAINER
FOOD PROCESSOR
(i) KNIFE BLADE
‒ Preparation of Ingredients
‒ How to Use
(ii) SLICING BLADES • SHREDDING BLADES • JULIENNE BLADE
‒ Preparation of Ingredients
‒ How to Use
(iii) KNEADING BLADE
‒ Preparation of Ingredients
‒ How to Use
(iv) WHIPPING BLADE
‒ Preparation of Ingredients
‒ How to Use
(v) GRATING BLADE
‒ Preparation of Ingredients
‒ How to Use
(vi) SALAD DRAINER
‒ Preparation of Ingredients
‒ How to Use
(vii) CITRUS PRESS
‒ Preparation of Ingredients
‒ How to Use
BLENDER
(i) BLENDER
‒ Disassembly & Assembly
‒ Preparation of Ingredients
‒ How to Use
DRY MILL
(ii) DRY MILL
‒ Disassembly & Assembly
‒ Preparation of Ingredients
‒ How to Use
AFTER USE
TROUBLESHOOTING
SPECIFICATIONS
Page
..................................................................................................................................... 3 - 5
....................................................................................................................................................... 6 - 7
...................................................................... 8
........................................................................................................................................................... 8
............................................................................................ 9
.............................................. 9
................................................................. 10
............................................................................................................................................. 10
........................................................................................................................................... 11
......................................................................................................................................... 12 - 14
.......................................................... 15 - 16
........................................................................................................................................ 17
........................................................................................................................................18
.......................................................................................................................................... 19
.......................................................................................................................................... 20
............................................................................................................................................. 21
............................................................................................................................................... 22 - 23
................................................................................................................................................ 24 - 25
...................................................................................................................................................... 26 - 27
...................................................................................................................................... 28 - 29
................................................................................................................................................... 31
2
TABLE OF CONTENTS

3
SAFETY PRECAUTIONS (Make sure to follow these instructions)
The following indication indicates the degree of damage caused by incorrect operation.
In order to prevent accidents or injuries to the user, other people and damage to property, please follow the
instructions below.
This symbol indicates prohibition.
Indicates serious injury or
death.
This symbol indicates requirement that must be
followed.
Indicates risk of injury or
property damage.
The symbols are classified and explained as follows.
Do not damage the Cord or the Plug.
(It may cause electric shock, or fire caused by short circuit.)
Do not use the appliance if the Cord or the Plug is damaged or the Plug is loosely connected to
the outlet.
(It may cause electric shock, or fire caused by short circuit.)
a If the Cord is damaged, it must be replaced by the manufacturer, its service center or similarly qualified
person in order to avoid a hazard.
Do not plug or unplug the Plug with wet hands.
(It may cause electric shock.)
Do not exceed outlet voltage or use an alternate current other than that specified on the appliance.
(It may cause electric shock or fire.)
• Make sure the voltage supplied to the appliance is the same as your local supply.
• Plugging other devices into the same outlet may cause over-heating.
Do not immerse the Motor Housing in water or splash it with water.
(It may cause electric shock, or fire caused by short circuit.)
Do not dismantle, repair or modify the appliance.
(It may cause fire, electric shock or injury.)
a Please contact your service center for repairing.
Do not insert any objects into the vent or the gap.
(It may cause electric shock or malfunction.)
• Especially metal objects such as pins or wires.
Do not replace any parts of appliance with non-genuine spare parts.
(It may cause injury, electric shock or fire.)
Do not try to remove the Lid when the appliance is still operating.
(It may cause injury.)
Do not use hot water (over 60
°C) for cleaning purpose or fire to dry the appliance.
(It may cause burning or malfunction.)
Do not place hot ingredients (over 60
°C) into the Bowl or the Blender Jug.
(It may cause injury or malfunction.)
Do not operate without the Blender Lid in place correctly for the Blender Jug.
(It may cause injury.)
Do not put your finger or utensils such as spoon, fork etc. into the Bowl or the Blender Jug
during operation.
(It may cause injury, electric shock, or fire caused by short circuit.)
Do not push the Safety Pin and Safety Lever with any instruments, stick etc. as the appliance
might be on.
(It may cause injury.)
This appliance is not intended for use by persons (including children) with reduced physical,
sensory or mental capabilities, or lack of experience and knowledge, unless they have been given
supervision or instruction concerning use of the appliance by a person responsible for their safety.
Children should be supervised to ensure that they do not play with the appliance.
(It may cause burning, injury or electric shock.)
WARNING
WARNING
CAUTION

4
Insert the Plug firmly.
(Otherwise it may cause electric shock and fire caused by the heat that may generate around the Plug.)
Clean the Plug regularly.
(A soiled Plug may cause insufficient insulation due to moisture, and may cause fire.)
When abnormal operation or breaking down occurs, discontinue the appliance operation
immediately and unplug.
(It may cause smoke, fire or electric shock.)
e.g. during abnormal operation or breaking down.
• The Plug and the Cord becomes abnormally hot.
• The Cord is damaged or there has been a power failure.
• The Motor Housing is deformed or abnormally hot.
a Please unplug the appliance immediately and contact the service centre for advice or a repair.
Make sure to hold the Plug when unplugging the Plug, i.e. never pull on the Cord.
(Otherwise it may cause electric shock, or fire caused by short circuit.)
Be careful if hot liquid is poured into the Bowl or Blender Jug as it can be ejected out of the
appliance due to a sudden steaming.
(It may cause burning.)
Care should be taken when handling the sharp cutting blades, emptying the Bowl or Blender
Jug and cleaning. (e.g. Knife Blade, Slicing Blades and etc.)
(It may cause injury.)
Do not leave the appliance unattended when it is in operation.
(It may cause fire or burns.)
• When leaving the appliance unattended, turn the power off.
Do not use the appliance in the following places:
• Any uneven surface, on non-heat resistant carpet or table cloth etc.
(It may cause fire or injury.)
• In a location where there is risk of the appliance being splashed with water, or near a heat source.
(It may cause electric shock or current leakage.)
Do not place the appliance in the following places.
• In a location where the appliance being expose to excessive moisture, temperature or direct sunlight.
(It may cause malfunction.)
• Any high or low temperature location such as fridge, freezer, microwave or oven.
(It may cause malfunction or breakage.)
Do not process hard ingredients (e.g. hard meat, meat with bones) or viscous material.
(It may cause malfunction.)
Do not process more than the maximum capacity marked on each container respectively. Follow
the recommended ingredient amount for processing.
(It may cause vibration and malfunction.)
*Do not continue operation for a long time. It is recommended to rest the appliance after a certain
operating time.
(It may cause over-heating.)
Function Operating Time
(minutes)
Rest Time
(minutes)
Food Processor
Blender
Dry Mill
* With exception for the ingredient preparations stated.
2
2
1
4
2
2
WARNING
CAUTION

5
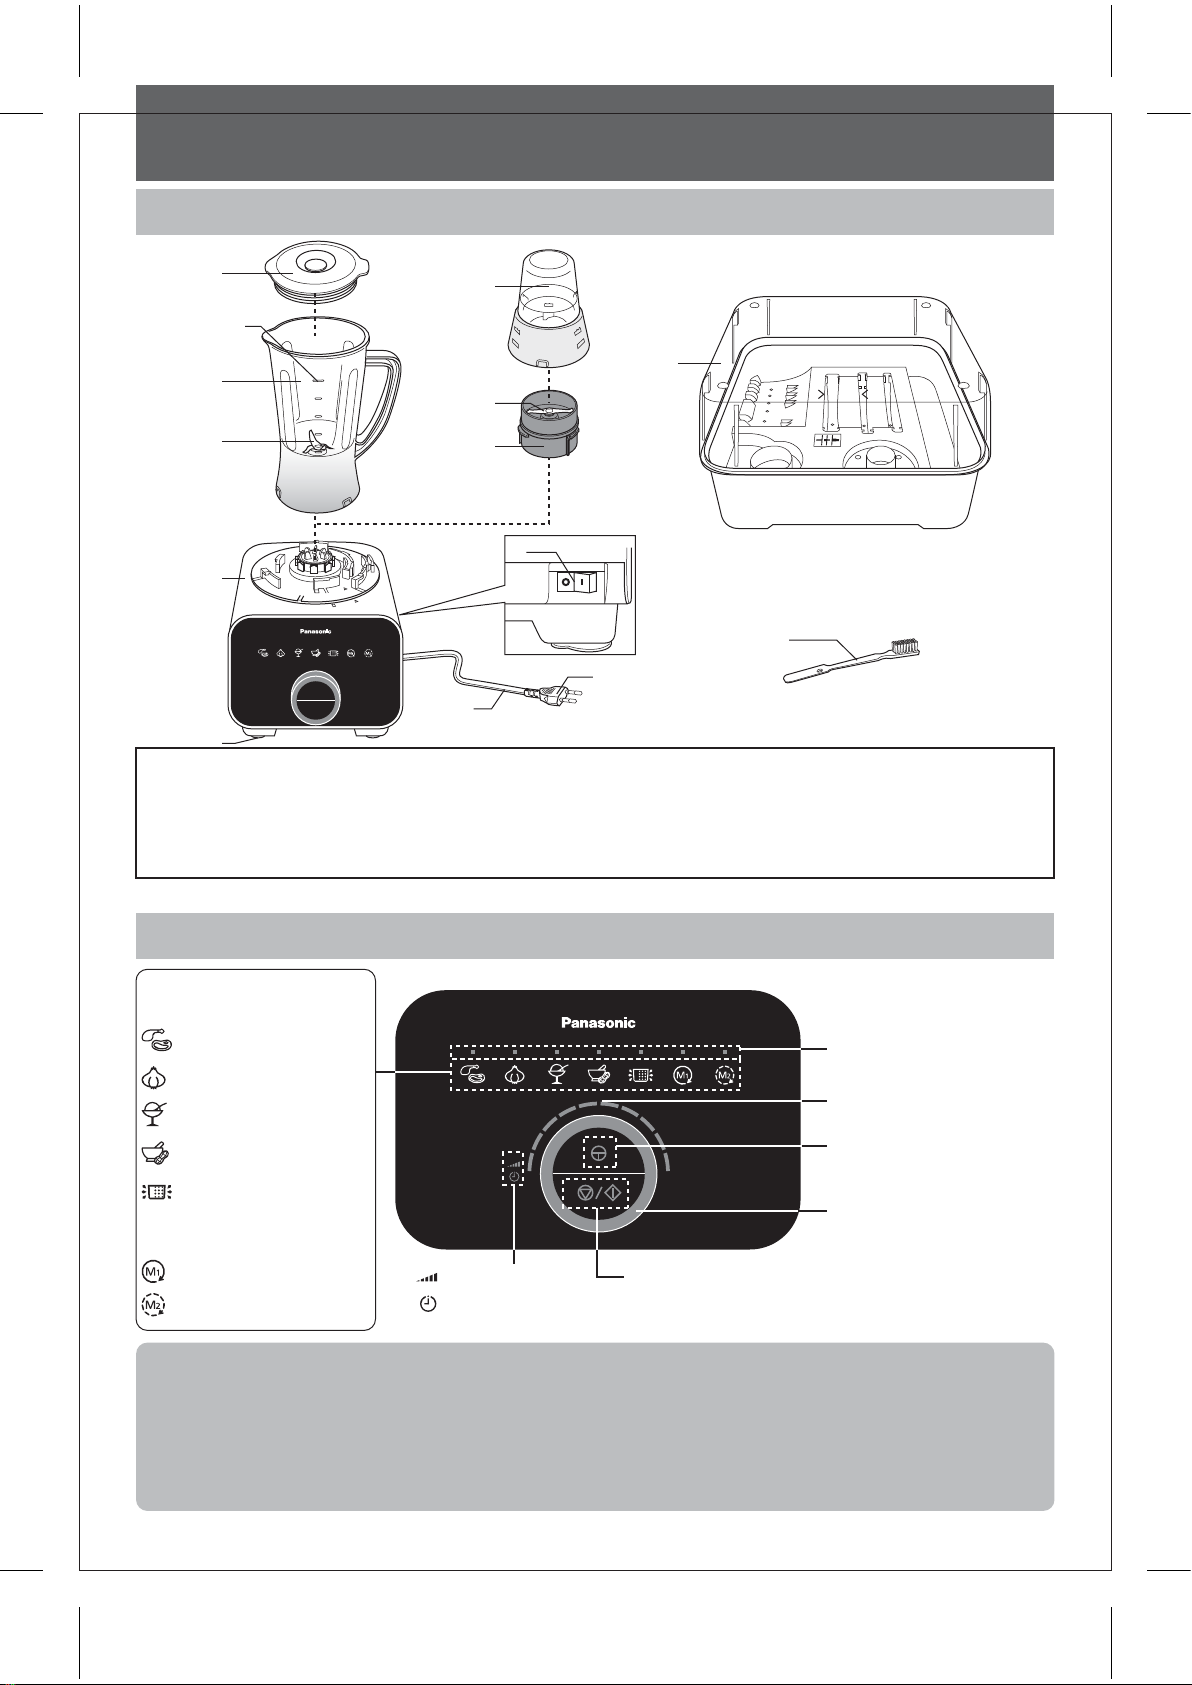
Unplug the Plug when the appliance is not in use.
(Otherwise it may cause electric shock, or fire caused by current leakage.)
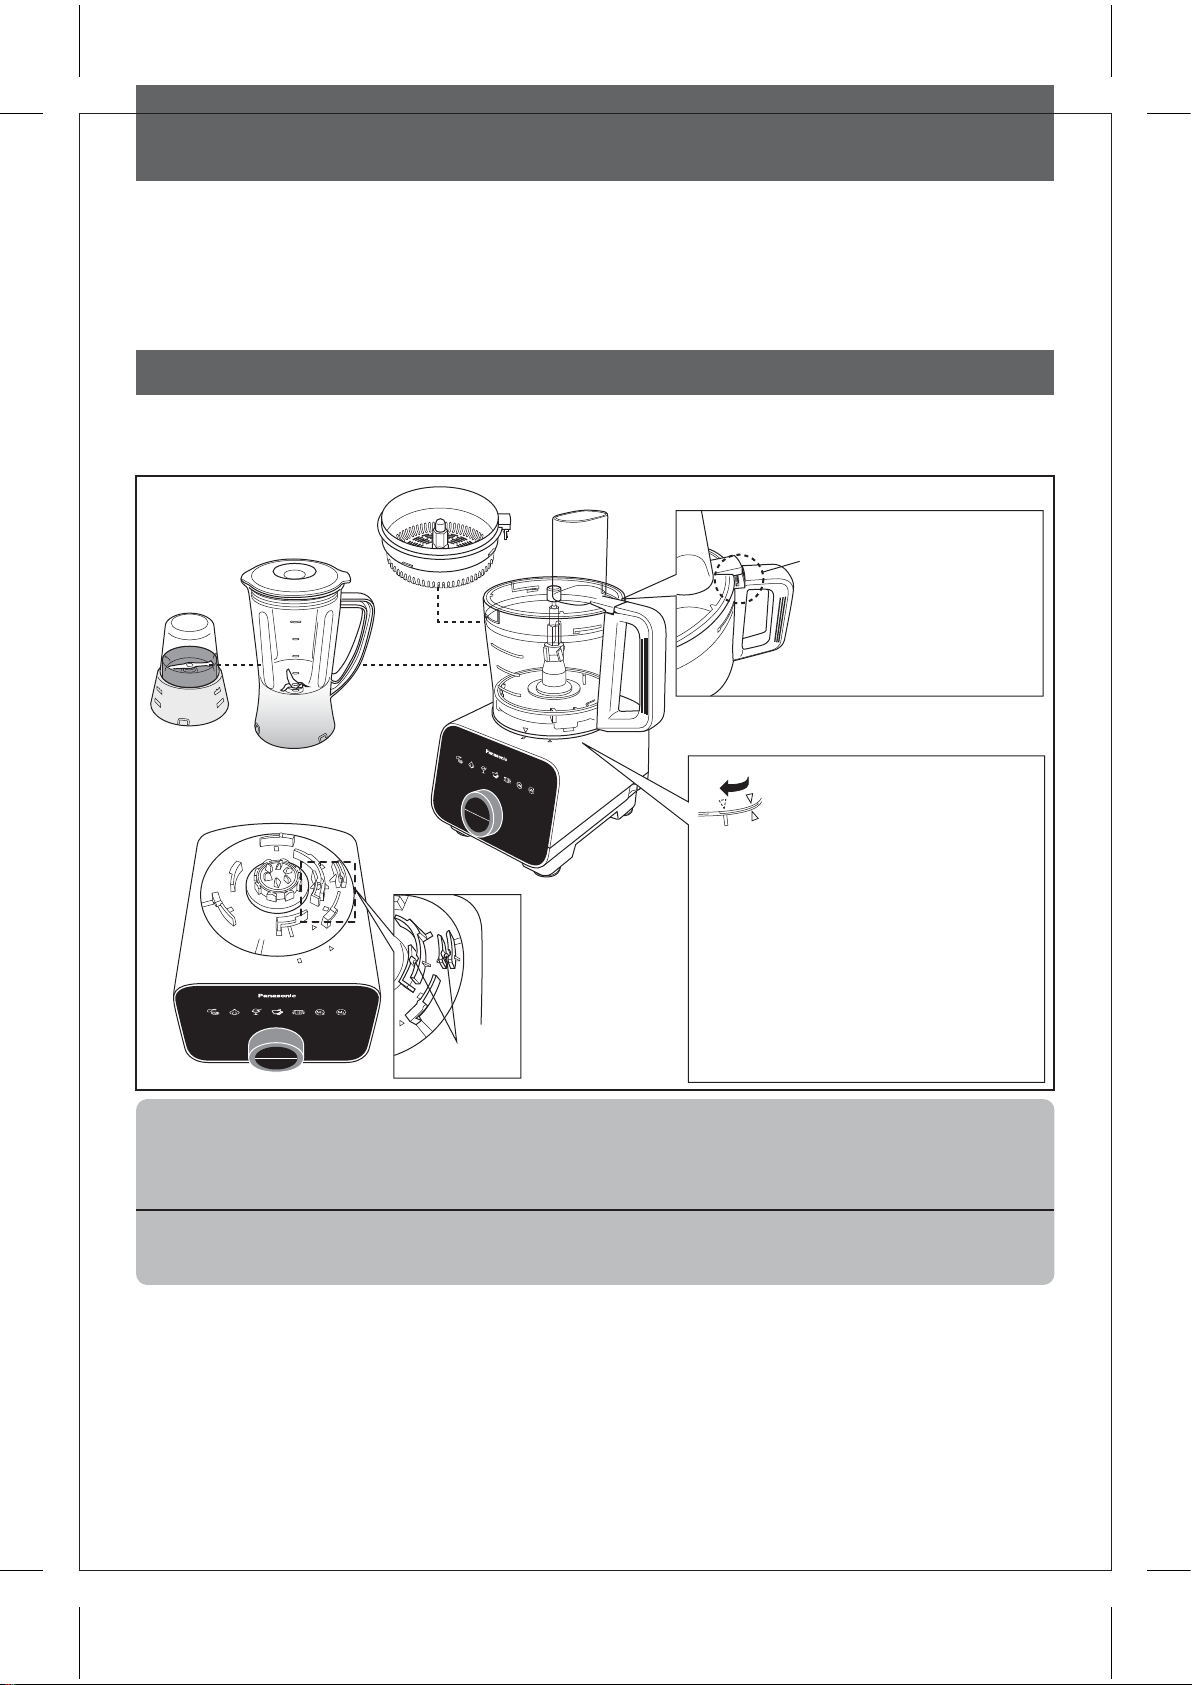
Remove the Bowl, the Blender Jug and the Mill Container before lift up the Motor Housing from the
table.
(It may cause injury.)
Switch off the appliance and disconnect it from power supply before changing accessories or
approaching parts that are moving during operation.
(It may cause injury.)
When carrying the appliance, be sure to hold the Motor Housing with both hands. Do not carry it
by holding only the Bowl or Blender Jug or Mill Container.
(It may cause injury.)
If the Blender Cutting Blade gets stuck, switch off the Blender, then unplug.
Do not insert your finger into the Blender Jug. Use a rubber spatula to remove the ingredients that
are blocking the Blender Cutting Blade.
(It may cause injury.)
Before Use:
Always operate the appliance on a clean, dry, flat, hard and smooth surface to ensure that the Rubber Foot suction
is at optimum performance.
Important Notes
Prohibited Ingredients:
Attachments
Knife Blade
Description
Hard ingredients, viscous ingredients, e.g. coffee beans, dried soyabeans, frozen
food, dried squid, and etc.
Grating Blade Viscous ingredients, ingredients with high hard fiber concentrations, ingredients that
are too small and thin, e.g. yam, celery, leek, pine nuts, and etc.
Salad Drainer Large chunky ingredients, ingredients that are soft and fragile, e.g. large carrot or
potato chunks, tomato, tofu, pasta, noodle, and etc.
Blender Hard ingredients, highly sticky ingredients, less moisture ingredients, e.g. turmeric,
dried soyabeans, frozen food, meat, fish, boiled potatoes, and etc.
Dry Mill Hard nuts, dried fruit, ingredients with high hard fiber concentration, moist ingredients,
e.g. various nuts, raisins, meat, vegetables, boiled egg, and etc.
Kneading Blade Ingredients not suited for dough making, e.g. meat, vegetables, nuts, sauces, spreads.
Slicing Blades,
Shredding Blades
and Julienne Blade
Ingredients with high hard fiber concentrations, viscous ingredients, ingredients that
are too soft, e.g. hard vegetables, frozen food, ham, turmeric, ginger, lettuce, tomato,
peach, chocolate and etc.
Whipping Blade Any other ingredients aside from egg whites and fresh cream.
Citrus Press Any other ingredients aside from citrus fruits, e.g. apple, kiwi and etc.
CAUTION

6
PART NAMES
1. Food Pusher
2. Feeding Tube
3. Bowl Lid
4. Knife Blade
5. Grating Blade
6. Kneading Blade
7. Whipping Blade
8. Drainer Cover
9. Salad Drainer
10. Blade Stand
11. Fine Shredding Blade
12. Coarse Shredding Blade
*The shape of the Plug may vary from illustration.
Working capacity: 1,500 mL
13. Thin Slicing Blade
14. Thick Slicing Blade
15. Julienne Blade
16. Citrus Cone
17. Citrus Strainer
18. Bowl
19. Drive Shaft
20. Motor Housing
21. Power Switch
22. Rubber Foot
23. Cord
24. *Plug
①
②
③
④
⑤
⑥
⑦
⑧
⑨ ⑩
⑪
⑫
⑬
⑭
⑮
⑯
⑲⑱
⑳
㉒
㉓
㉔
⑰
㉑
Food Processor

7
PART NAMES
Blender, Dry Mill & Accessories
1. Blender Lid
2. Blender Jug
3. Blender Cutting Blade
4. Mill Container
5. Mill Cutting Blade
Note:
• The program will time-out and reset itself after 10 seconds if no further action is done after a function is
selected.
• Turning the Rotary Dial clockwise will increase the number of lighted bars and vice versa.
• The default speed for the Continuous and Intermittent modes are at maximum, (level 10).
• The program will time-out and reset itself after 20 seconds if the program is paused during processing and no
further action is done.
Mode Selection
- Auto Menu -
- Manual Menu -
Mince Mode
Chop Mode
Frozen Mode
Paste Mode
Mode Indication L.E.D.
Speed & Driving Time
Indication L.E.D.
Pulse Switch
Driving Time Indication
Rotary Dial
Drainer Mode
Continuous Mode Speed Indication ON/OFF Switch
Intermittent Mode
*The shape of the Plug may vary from illustration.
6. Mill Container Base
7. Motor Housing
8. Rubber Foot
9. Power Switch
10. Cord
11. *Plug
12. Storage Case Unit
13. Brush
Control Panel
⑦
①④
⑫
⑬
⑤
⑥
②
③
⑧
⑩
⑪
⑨
Working
capacity: 1 L
SAN

8
CIRCUIT BREAKER AND TEMPERATURE SENSOR PROTECTION
SAFETY LOCK
When the Circuit Breaker or the Temperature Sensor automatically stops the motor due to overloading, turn off the
appliance and follow the instruction below:
1. Reduce the ingredients to less than half and resume operation.
2. If it still does not start, turn off the Power Switch at the side of Motor Housing and resume operation.
3. If the Temperature Sensor activates, an Error Mode Indication will be displayed. Let the appliance cool down
for a 30 minutes till the Error Mode Indication turns off, then resume operation.
4. If all else fails, please contact your nearest service center.
The Safety Pin is designed to prevent the appliance from switching on when
- The Bowl Cover or Citrus Strainer and the Bowl are not fully locked to each other.
- The Bowl, Blender Jug or Dry Mill are not fully locked to the Motor Housing.
Note:
• Do not push the Safety Pin and Safety Lever with any instrument, stick etc.
• Do not pour liquids or ingredient at the Safety Pin area and switch area.
• Keep the Safety Pin area clean to avoid foreign particles accumulate on the area.
Actions above will ensure the Safety Pin functions properly. If not followed, it will damage the parts
related to the Safety Pin.
The Safety Lever only
activates the Safety Pin if
the Bowl Lid or Citrus
Strainer is secured on the
Bowl.
Safety Pins
Fully locking steps :
For Bowl and Blender Jug, align the
triangle mark with the Motor Housing as
shown in position A. Turn it clockwise
until a 'click' sound is heard and the
triangular mark now aligns to position B.
For Dry Mill, place onto Motor Housing and
turn clockwise until a 'click' sound is
heard. To unlock, follow the locking steps
in reverse.
Position A : Unlock
Position B : Lock
A
B

9
FOOD PROCESSOR -DISASSEMBLY & ASSEMBLY-
1
1
4
2
3
22
1 2
Note:
Beware of the sharp edges of the Knife Blade when removing it from the Bowl.
Note:
For the Knife Blade, ensure that the
Drive Shaft is protruding from the Knife
Blade after insertion.
Note:
For the Grating Blade, place the ingredients on top
of the blade itself.
Assembly of Food Processor Attachments
Disassembly from Packaged Condition
Knife Blade · Kneading Blade · Whipping Blade · Grating Blade
Rotate the Bowl Lid anticlockwise and lift up from the
Bowl.
It is highly recommended to clean all attachments and accessories and dry well before using the appliance for the
first time, refer to page 26 and 27 for the cleaning method. Unplug when assembling the unit. Before plugging in,
ensure that the Power Switch is switched off. Please refer to page 27 under 'Storing' on how to re-position the
Motor Housing.
Hold the top of the Knife Blade and lift up to remove
from Bowl.
Place the Knife Blade (Kneading Blade or Whipping
Blade or Grating Blade) into the Bowl.
or
or
or
Put the ingredients into the Bowl.
Place the Bowl Lid on top of the Bowl and turn it
clockwise until a 'click' sound is heard. Insert the Food
Pusher into the Feeding Tube.
1
Top of the
Knife Blade

10
1 2
3 4
1 2
FOOD PROCESSOR -DISASSEMBLY & ASSEMBLY-
Note:
• Beware of the sharp edges on the blades while inserting into the Blade Stand.
• To remove the blade, turn over the Blade Stand and push down on the reverse side of the dimple on the
blade.
Note:
Ensure that the Drive Shaft is protruding from the
Blade Stand after insertion.
Assembly of Food Processor Attachments
Slicing Blades (Thick / Thin) · Shredding Blades (Coarse / Fine) · Julienne Blade
Fit the projected detent of the desired blade onto the
Blade Stand and ensure it is seated properly.
Projected Detent
Finger Holes
Push down on the dimple on the blade as seen above
until a 'snap' sound is heard.
Citrus Press
Place the Citrus Strainer onto the Bowl. Turn it
clockwise until a 'click' sound is heard.
Attach the Citrus Cone onto the Drive Shaft.
Insert finger and thumb into the finger holes to grip the
Blade Stand. Place the assembled Blade Stand into the
Bowl.
Place the Bowl Lid on top of the Bowl and turn it
clockwise until a 'click' sound is heard.
PUSH
1
2
1
2

PP
11
FOOD PROCESSOR -DISASSEMBLY & ASSEMBLY-
Assembly of Food Processor Attachments
To disassemble, follow the assembly steps in reverse.
1 2
3 4
Salad Drainer
Attaching the assembled units to the Motor Housing
Place the Salad Drainer into the Bowl. Insert the
ingredients into the Salad Drainer.
Place Drainer Cover on top of the Salad Drainer until
the mark aligns as shown in A. Turn the Drainer Cover
anticlockwise until the mark aligns as shown in B.
Place the Bowl Lid on top of the Bowl and turn it
clockwise until a 'click' sound is heard.
1.Place the Bowl on top of the Motor Housing until the
mark aligns as shown in A.
2.Turn the Bowl clockwise until a 'click' sound is heard.
Ensure that the triangle mark on the Bowl is aligned
with the rectangle mark on the Motor Housing as
seen in B.
Ensure that the Drive Shaft is protruding out of the
Salad Drainer after insertion.
2
1
121
2
2
1
A
B
A
B
PP

Continuous
Speed: Max
Slice soft bread into 6 to 8
pieces.
Cut into 2 ~ 3 cm cubes.
Do not over process.
2 ~ 3 cm ice cubes.
Cut into 2 ~ 3 cm cubes. Process
solids first. Fill liquid till total not
exceeding 1,500 mL.
Cut into 2 ~ 3 cm cubes. Process
solids first. Fill liquid till total not
exceeding 1,500 mL. Do not add
more than 10 pcs of ice cubes
during processing.
Remove peanut shell and skin.
Cut into 2 ~ 3 cm cubes.
100 ~ 400 g
~ 10 pcs
Boiled
Potato
Peanuts
Parmesan
Cheese
Mash
Ice Crush Ice Cubes
Grind
Crush
Intermittent
Speed: Max
10 ~ 200 g
10 ~ 200 g
12
FOOD PROCESSOR -KNIFE BLADE-
Ingredient Preparations
Mince
Function Ingredient Preparation Method
Remove all skin and bones,
cut into 2 ~ 3 cm cubes.
Peel skin, cut into 2 ~ 3 cm
cubes.
Remove peanut shell and skin.
Meat 50 ~ 400 g
50 ~ 500 g
150 ~ 500 g
250 ~ 450 g
100 ~ 500 g
Fish
Onion
Frozen
Banana
Roasted
Peanuts
10 ~ 50 sec
40 ~ 160 sec
~ 10 sec
15 ~ 30 sec
4 ~ 10 min
15 ~ 40 sec
5 ~ 15 sec
7 ~ 20 sec
10 ~ 40 sec
3 ~ 18 sec
5 ~ 30 sec
10 ~ 40 sec
5 ~ 40 sec
Initial setting is for 200 g(10 sec)
Initial setting is for 300 g(20 sec)
Initial setting is for 350 g(60 sec)
Initial setting is for 300 g(7 min)
3 ~ 15 sec
Quantity Operating Time (approx.)Mode
Auto
Auto
Auto
Auto
Chop
Frozen
Continuous
Speed: Max
Continuous
Speed: Max
Continuous
Speed: Max
Paste
Soft White
Bread
Crumb 10 ~ 200 g
Continuous
Speed: Max
Use for making confectionery
such as sweets and cakes.
~ 120 secFlourKnead ~ 300 g
Continuous
Speed: Max
1 ~ 2 cm width, half frozen
condition, i.e. toothpick can
pierce.
Peel skin.
Remove stalk.
Cut into 2 ~ 3 cm cubes.
Peel skin, cut into 2 ~ 3 cm
cubes.
Garlic
Carrot
Italian
Parsley
Mushroom
5 ~ 500 g
50 ~ 450 g
5 ~ 100 g
30 ~ 250 g
~ 120 sec
Fruit,
Liquid etc.
Juice
Make ~ 1,500 mL
Continuous
Speed: Max
~ 120 sec
Boiled
Vegetable,
Liquid etc.
Soup
Make
~ 1,500 mL
Continuous
Speed: Max

13
FOOD PROCESSOR -KNIFE BLADE-
Operating with Auto Menu
After completing the assembly steps, plug-in the plug
into the socket and turn on the Power Switch. The
Mode Indication L.E.D.s will light up and blink.
Select the required Auto Menu mode (except the Drainer
Mode). The selected Mode Indication L.E.D. will light up
and a beep sound will be heard. The Driving Time and
ON/OFF Switch Indication L.E.D. will light up and blink.
Each Auto Menu has a pre-programmed driving time.
*Each lighted bar represents 10 seconds of driving time.
Push the ON/OFF Switch to start the operation.
During operation, the Driving Time L.E.D. will turn off
one by one after every 10 second intervals until the set
duration is completed and 4 beep sounds will be heard.
The Mode Indication L.E.D.s will light up and blink.
After the processing is completed, switch off the Power
Switch and unplug from the socket.
Remove the Knife Blade from the Bowl before removing
the processed ingredients.
Note:
• Always ensure that the Knife Blade is inserted before adding ingredients into the Bowl.
• The Driving Time of the Auto Menu can be increased or decreased by adjusting the Rotary Dial if necessary.
• The operation of the Auto Menu can be stopped prematurely by pushing the ON/OFF Switch before the set
duration ends.
• *For Paste Auto Menu, each lighted bar represents 1 minute. The lighted bar will decrease at every 1 minute
interval.
• Depending on the speed and amount of ingredients used, there will be significant vibrations present. In that
case, hold down the Bowl Lid with both hands to support it during its operation.
1 2
3 4
5 6
1
2
2
1

14
FOOD PROCESSOR -KNIFE BLADE-
Operating with Manual Menu
After completing the assembly steps, plug-in the plug
into the socket and turn on the Power Switch. The
Mode Indication L.E.D.s will light up and blink.
Select the Continuous or Intermittent mode. The
selected Mode Indication L.E.D. will light up and a beep
sound will be heard. The Speed, ON/OFF Switch and
PULSE Switch Indication L.E.D. will light up and blink.
Adjust the desired speed with the Rotary Dial. The
more bars are lighted, the higher the speed. Push the
ON/OFF or PULSE Switch to start the operation.
During the driving operation, the ON/OFF Indication
L.E.D. will remain lit. The speed can be adjusted during
operation. Push the ON/OFF Switch to stop the driving
operation.
After the processing is completed, switch off the Power
Switch and unplug from the socket.
Remove the Knife Blade from the Bowl before removing
the processed ingredients.
Note:
• Always ensure that the Knife Blade is inserted before adding ingredients into the Bowl.
• Do not exceed the stated amount of ingredients for kneading as abnormal vibration may occur.
• Do not insert hot ingredients into the Bowl for processing. Always ensure that the ingredients are sufficiently
cooled before inserting, e.g. boiled potato.
• For Juice Make, fill in the solid ingredients first into the Bowl, followed by the liquid ingredients until the total
volume does not exceed 1,500 mL.
• Depending on the speed and amount of ingredients used, there will be significant vibrations present. In that
case, hold down on the Bowl Lid to support it during its operation.
• For kneading, do not reprocess after the dough has formed the first time.
1 2
3 4
1
2
5 6
2
1

15
FOOD PROCESSOR -SLICING BLADES • SHREDDING BLADES • JULIENNE BLADE-
Ingredient Preparations for Slicing Blades (Thick / Thin)
Cut ingredient till it is small
enough to fit into the Feeding
Tube. Do not use hard
ingredients such as Parmesan.
Slicing Blades (Thick / Thin)
- used for slicing ingredients
Shredding Blades (Coarse / Fine)
- used for shredding and grating
ingredients.
Julienne Blade
- used for making french fries and
shredding ingredients.
Slice
Function Ingredient Preparation Method
Cut ingredient till it is small
enough to fit into the Feeding
Tube.
Cucumber 700 g
Max
Single Use Operating Time (approx.)Mode
Continuous
Speed: Max
Onion 700 g
Carrot 600 g-
Potato 600 g
Cabbage 400 g
Ingredient Preparations for Shredding Blades (Coarse / Fine)
Shred
Shred
Function Ingredient Preparation Method
Cut ingredient till it is small
enough to fit into the Feeding
Tube.
Cucumber 650 g
Max
Single Use Operating Time (approx.)Mode
Continuous
Speed: Max
Carrot 500 g
Potato 650 g
-
Cheese 500 g
Ingredient Preparations for Julienne Blade
French Fry
Function Ingredient Preparation Method
Cut ingredient till it is small
enough to fit into the Feeding
Tube.
Potato 800 g
Max
Single Use Operating Time (approx.)Mode
Continuous
Speed: Max
Cabbage 500 g
-

16
FOOD PROCESSOR -SLICING BLADES • SHREDDING BLADES • JULIENNE BLADE-
Operating with Manual Menu
After completing the assembly steps, plug-in the plug
into the socket and turn on the Power Switch. The Mode
Indication L.E.D.s will light up and blink.
Select the Continuous mode. The selected Mode
Indication L.E.D. will light up and a beep sound will be
heard. The Speed, ON/OFF and PULSE Switch
Indication L.E.D. will light up and blink.
Adjust to the maximum speed with the Rotary Dial. The
more bars are lighted, the higher the speed. Push the
ON/OFF Switch or PULSE Switch to start the operation.
Insert the ingredients into the Feeding Tube and push
down with the Food Pusher.
During the driving operation, the ON/OFF Indication
L.E.D. will remain lit. Push the ON/OFF Switch to stop
the driving operation. After the processing is completed,
switch off the Power Switch and unplug from the socket.
Remove the Blade Stand from the Bowl before removing
the processed ingredients.
Figure 1 Figure 2
Note:
• When using soft and thin ingredients, place it
against the front wall of the feeding tube as
indicated in Figure 1, for support while in
operation to avoid uneven processing.
• Dispose of any remaining lumps of unprocessed
ingredients.
• Align high fibre ingredients as indicated in Figure
2 for a consistent processing result.
1
3
1 2
5
2
4
6
Front
Wall
1
2
2
1

17
FOOD PROCESSOR -KNEADING BLADE-
Operating with Manual Menu
After completing the assembly steps, plug-in the plug
into the socket and turn on the Power Switch. The Mode
Indication L.E.D.s will light up and blink.
Select the Continuous mode and adjust to the
appropriate speed with the Rotary Dial. The more bars
are lighted, the higher the speed. Push the ON/OFF
Switch to start the operation.
During the driving operation, the ON/OFF Indication
L.E.D. will remain lit. Observe the formation of the
dough ball. Push the ON/OFF Switch to stop the driving
operation once a firm dough ball is formed.
After the processing is completed, switch off the Power
Switch and unplug from the socket. Remove the dough
ball from the Bowl before removing the Kneading Blade.
Ingredient Preparations for Kneading Blade
Knead
Function Ingredient Preparation Method
Mix yeast with water and add during the
processing of dough (adding yeast directly
before processing may result in flaking and
premature rising). If dough mix still appears
flaky after initial processing, add 1 tsp of water
into the mix. When large vibrations occur due
to dough mix wrapping around the Drive Shaft,
add 1 tsp of flour. Do not reprocess the dough
after the process is complete, if the dough is
not satisfactory, knead by hand.
Bread Flour 300 g
Max
Single Use Operating Time (approx.)Mode
Continuous
Speed: Start
with level 1,
increase
every 1
second till
Max.
Liquid
160 ~ 200 mL
~ 120 sec
21
43
3
Note:
• Do not exceed the stated amount of ingredients for the Kneading Blade as abnormal vibration may occur.
• Depending on the speed and amount of ingredients used, there will be significant vibrations present. In that
case, hold down the Bowl Lid with both hands to support it during its operation.
• For kneading, do not reprocess after the dough has formed the first time.
1
2
2
1

18
Note:
• Do not over process the whipping cream, it may break down to form clumps of butter.
• Using different brands of whipping cream will have varying results. It is recommended to process until the
cream is sufficiently whipped.
FOOD PROCESSOR -WHIPPING BLADE-
Operating with Manual Menu
After completing the assembly steps, plug-in the plug
into the socket and turn on the Power Switch. The Mode
Indication L.E.D.s will light up and blink.
Select the Continuous mode and adjust to the maximum
speed with the Rotary Dial. The more bars are lighted,
the higher the speed. Push the ON/OFF Switch to start
the operation.
During the driving operation, the ON/OFF Indication
L.E.D. will remain lit. Observe the rising and formation
of the whipped ingredients. Push the ON/OFF Switch to
stop the driving operation once a desired texture is
formed.
After the processing is completed, switch off the Power
Switch and unplug from the socket. Carefully remove the
Whipping Blade together with the processed ingredients
from the Bowl.
Ingredient Preparations for Whipping Blade
1
2
2
1
21
43
3
Whip
Function Ingredient Preparation Method
Separate the egg white from the
yolk for a smooth meringue.
Use fresh cream of fat content
35% or higher at 5 °C
Egg White 1 ~ 6 pcs
Max
Single Use Operating Time (approx.)Mode
Continuous
Speed: Max
Cream
100 ~ 300 mL
25 sec ~ 5 min
15 sec ~ 3 min

19
FOOD PROCESSOR -GRATING BLADE-
Operating with Manual Menu
After completing the assembly steps, plug-in the plug
into the socket and turn on the Power Switch. The Mode
Indication L.E.D.s will light up and blink.
Select the Continuous mode and adjust to the maximum
speed with the Rotary Dial. The more bars are lighted,
the higher the speed. Push the ON/OFF Switch to start
the operation.
During the driving operation, the ON/OFF Indication
L.E.D. will remain lit. Push the ON/OFF Switch to stop
the driving operation.
After the processing is completed, switch off the Power
Switch and unplug from the socket. Remove the Grating
Blade from the Bowl before removing the ingredients.
Ingredient Preparations for Grating Blade
2
43
3
Grate
Function Ingredient Preparation Method
Cut into 2 ~ 3 cm cubes.
Carrot 200 g
Max
Single Use Operating Time (approx.)Mode
Continuous
Speed: Max
Apple 200 g
Cucumber 200 g
-
1
2
2
1
1
Note:
• Do not insert the ingredients through the Feeding Tube during operation of the Grating Blade.

3
20
Note:
• Maximum working capacity of the Salad Drainer: 200 g or till maximum height of Salad Drainer, whichever
comes first.
• Prohibited ingredients: large, chunky ingredients (such as whole tomatoes, large carrot chunks, and etc.)
• Ensure that the ingredients are spread evenly around the Salad Drainer before processing.
• Do not operate the Salad Drainer in Continuous Mode.
• Always ensure that the Drainer Cover is attached onto the Salad Drainer before operation, otherwise the
ingredients might come out and tear around the Bowl.
• Depending on the amount of ingredients used, there will be significant vibrations present. In that
case, hold down the Bowl Lid with both hands to support it during its operation.
FOOD PROCESSOR -SALAD DRAINER-
Operating with Auto Menu
After completing the assembly steps, plug-in the plug
into the socket and turn on the Power Switch. The Mode
Indication L.E.D.s will light up and blink.
Select the Drainer mode. The selected Mode Indication
L.E.D. will light up and a beep sound will be heard. The
Driving Time and ON/OFF Switch Indication L.E.D. will
light up and blink.
Each Auto Menu has a pre-programmed driving time.
Each lighted bar represents 10 seconds of driving time.
Push the ON/OFF Switch to start the operation.During
operation, the Driving Time L.E.D. will turn off one by
one after every 10 second intervals until the set duration
is completed and 4 beep sounds will be heard. The
Mode Indication L.E.D.s will light up and blink.
After the processing is completed, switch off the Power
Switch and unplug from the socket. Remove the Salad
Drainer from the Bowl.
Ingredient Preparations for Salad Drainer
1
2
21
43
Drainer
Function Ingredient Preparation Method
Cut into 3 ~ 5 cm slices.
Shredded into 1 ~ 3 mm.
Lettuce
Leaves
100 g
Max
Single Use Operating Time (approx.)Mode
Auto
Cabbage 200 g
20 ~ 40 sec
20 ~ 50 sec
2
1
Initial setting is for 50 g (20 sec)
Other manuals for MK-F800
3
Table of contents
Languages:
Other Panasonic Food Processor manuals

Panasonic
Panasonic MK-5070P User manual

Panasonic
Panasonic MK-8710P User manual

Panasonic
Panasonic MK-F500 User manual

Panasonic
Panasonic MK-5086M User manual

Panasonic
Panasonic MK-F300 User manual

Panasonic
Panasonic MK-F500 User manual

Panasonic
Panasonic MK-K51P User manual

Panasonic
Panasonic MK-F800 User manual

Panasonic
Panasonic MK-F800 User manual

Panasonic
Panasonic MK-F500WSD-HK User manual