manuals.online logo
Brands
  1. Home
  2. •
  3. Brands
  4. •
  5. panthera
  6. •
  7. Mobility Aid
  8. •
  9. panthera Bambino 3 User manual

panthera Bambino 3 User manual

Other manuals for Bambino 3

8

This manual suits for next models

1

Other panthera Mobility Aid manuals

panthera S3 User manual

panthera

panthera S3 User manual

panthera Bambino 3 User manual

panthera

panthera Bambino 3 User manual

panthera reTyre Traction User manual

panthera

panthera reTyre Traction User manual

panthera S3 User manual

panthera

panthera S3 User manual

panthera S3 User manual

panthera

panthera S3 User manual

panthera Bambino 3 User manual

panthera

panthera Bambino 3 User manual

panthera S3 User manual

panthera

panthera S3 User manual

panthera Bambino 3 User manual

panthera

panthera Bambino 3 User manual

Popular Mobility Aid manuals by other brands

Drive DeVilbiss GoLite 200 operating instructions

Drive DeVilbiss

Drive DeVilbiss GoLite 200 operating instructions

Invacare 8153-J user manual

Invacare

Invacare 8153-J user manual

Clearwell Mobility Brandon User instructions

Clearwell Mobility

Clearwell Mobility Brandon User instructions

Handicare 1100 user manual

Handicare

Handicare 1100 user manual

NRS Healthcare M11090 User instructions

NRS Healthcare

NRS Healthcare M11090 User instructions

Alber Scalamobil iQ operating instructions

Alber

Alber Scalamobil iQ operating instructions

Ferno CCT-PX user manual

Ferno

Ferno CCT-PX user manual

Medline MDS86835DSHEC User Instructions & Warranty

Medline

Medline MDS86835DSHEC User Instructions & Warranty

Guldmann Twin Turner II user manual

Guldmann

Guldmann Twin Turner II user manual

Ferno 35-ITA user manual

Ferno

Ferno 35-ITA user manual

Drive ROOMBA Operation manual

Drive

Drive ROOMBA Operation manual

Gate Balder operating instructions

Gate

Gate Balder operating instructions

Decon wheel TNS Notos Assembly instructions

Decon wheel

Decon wheel TNS Notos Assembly instructions

ExoAtlet ExoAtlet-II user manual

ExoAtlet

ExoAtlet ExoAtlet-II user manual

Invacare Storm Series parts catalog

Invacare

Invacare Storm Series parts catalog

Rhythm Healthcare B3800F manual

Rhythm Healthcare

Rhythm Healthcare B3800F manual

AMF-BRUNS PROTEKTOR installation manual

AMF-BRUNS

AMF-BRUNS PROTEKTOR installation manual

Drive DeVilbiss Healthcare OTTER Instructions for use

Drive DeVilbiss Healthcare

Drive DeVilbiss Healthcare OTTER Instructions for use

manuals.online logo
manuals.online logoBrands
  • About & Mission
  • Contact us
  • Privacy Policy
  • Terms and Conditions

Copyright 2025 Manuals.Online. All Rights Reserved.

Panthera AB, Gunnebogatan 26, SE-163 53 Spånga, Sweden, +46-8-761 50 40, www.panthera.se
Sid 1
ASSEMBLY INSTRUCTION
Art.nr. 8822137
Rev.2020-12
PUSHBAR BAMBINO 3
Assembly instructions for:
Pushbar Bambino 3
Art.nr. 4233000
Tools aquired:
Phillips screwdriver - small
Allen key 4 mm
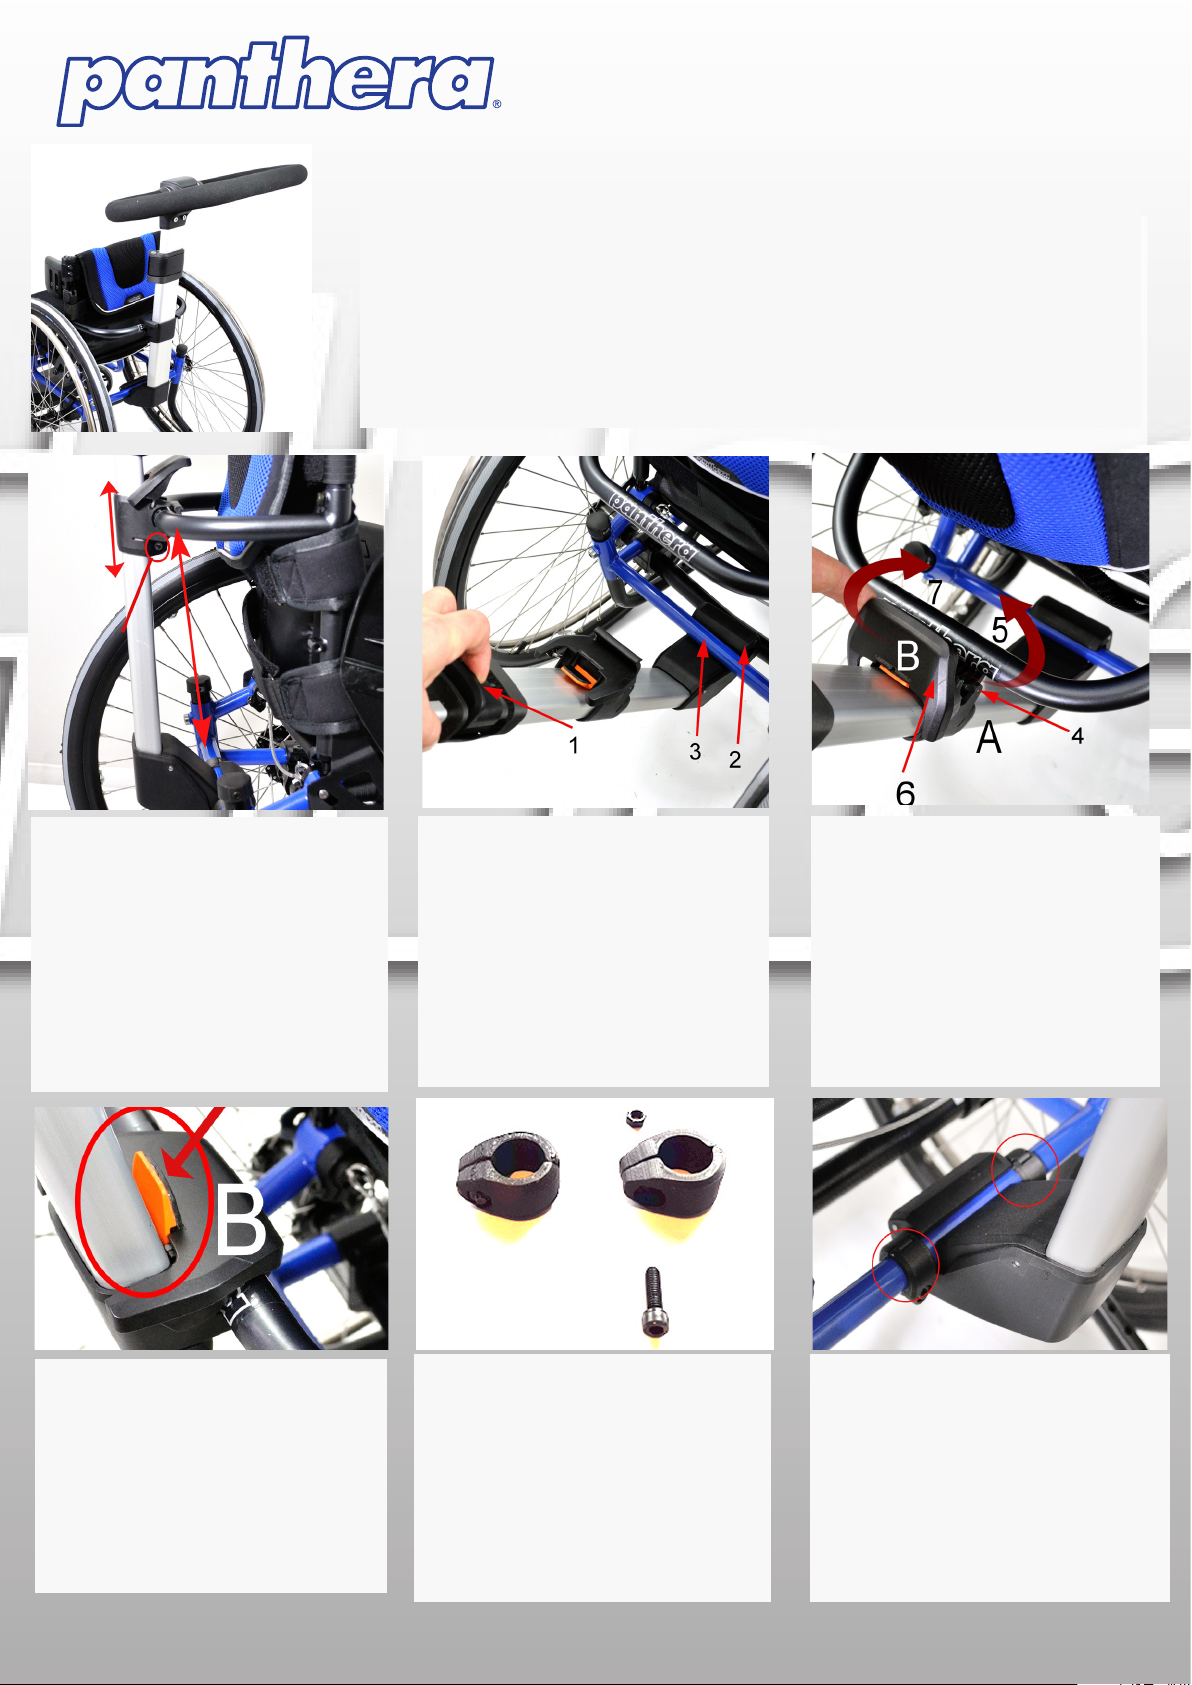
1) Height adjustment of the upper clamp
If the back angle changes, the distance bet-
ween the lower and upper clamps changes. To
adjust this, you can change the position of the
upper clamp as follows:
1. Loosen the screw marked on the illustration
with a Phillips screwdriver until you can slide
the upper clamp up or down.
2. Adjust the height of the upper clamp so
that it ts on the backrest tube.
3. Tighten the screw again
2) Mounting of the push bar. Picture 2, 3, 4
1. Snap on the lower clamp (2) onto the rear
chassis tube (3)
3)Mounting of the push bar cont. Picture 2,
3, 4
1. Open clamps A and B and place A under
and around the back arch (5).
2. Bring clamp B (6) forward over the back
frame and hook the front edge of clamp B
over the front edge of clamp A.
3. Press down clamp B at the rear edge so
that it locks around the back arch with a click
5) Stabilize the lower push bar clamp Picture
5 and 6.
To stabilize the lower clamp against lateral
movement, these two tube clamps are moun-
ted on each side of the bracket on the rear
chassis tube.
6) Stabilize the lower arch clamp cont. Figu-
res 5 and 6
1. Mount the push bar
2. Attach the two tube clamps around the rear
chassis tube on each side of the lower clamp.
Use 4 mm Allen key.
4) Mounting of push bar cont. Picture 2, 3, 4
Make sure that the orange latch locks se-
curely over clamp B.
A click should be heard
123
45
6
Panthera AB, Gunnebogatan 26, SE-163 53 Spånga, Sweden, +46-8-761 50 40, www.panthera.se
Sid 2
8) Settings of the pushbar
Height adjustment of the pushbar (step-
less):
1. Fold out the locking lever (1) on the back
of the pushbar.
2. Set the desired height and fold back the
locking lever.
Angle adjustment of the handle (xed
positions):
1.Press the large button (1) at the top of the
bow.
2.With the button (1) pressed, set the angle
of the push handle, release the button.
Pull the handle so that it clicks into a xed
position.
7) Disassembly of the pushbar Picture 7
and 2
Picture 7
1. Push the orange latch (1) against the post
of the push bar.
2. Fold up (2) clamp B at the rear edge.
3. Loosen clamp B at the front edge from
clamp A (3) which folds down so that it relea-
ses from the tube.
Picture 2
4. Squeeze the handle (1) in Fig. 2 to open
the clamp (2) so that it can be detached from
the tube (3)
5. Release the push bar from the wheelchair
by pushing it down.
78