Peg-Perego Navetta Elite User manual

IT Istruzioni d’uso
EN Instructions for use
FR Notice d’emploi
DE Gebrauchsanleitung
ES Instrucciones de uso
BR-PT Instruções para uso
NL Gebruiksaanwijzing
DK Brugsanvisning
FI Käyttöohjeet
CZ Návod na použití
SK Návod na použitie
HU Használati útmutató
SL Navodila za uporabo
RU Инструкции по пользованию
TR Kullanim kilavuzu
HR/SRB/MNE/BiH Upute za uporabu
EL Οδηγιεσ χρησεωσ
AR
Navetta Elite

1 2
3 4
PUSH

5 6
87

9
11 12
10

1413
15 16

T
17 18
19 20
12

Kit Auto
21 22
24
23

25 26
27
.
.AR

2
3
5
9
10
11
12
4
7
13
6
8
1
15
14
Navetta Elite
1) BCANEL•
2) BCONEL•
3) SOPA0156L50
4) SPST6647GL
5) SPST6643GR
6) BSANEL•
7) MMSP0038
MMSP0039
8) ITNA00•
9) SAPI6656GR
10) SPST5403R
11) SPST6658GL
12) SPST5274GL
13) BINNEL•
14) ARPI0798•
15) MMMO0025D
16) SAPI6649L31GL
IT• Ricambi disponibili in piú colori da specificare nella richiesta.
EN• Spare parts available in different colours to be specified when ordering.
FR• Pièces de rechange disponibles en plusieurs couleurs à spécifier dans la demande.
DE• Ersatzteile in mehr Farben vorhanden, die in der Anfrage spezifiziert werden müssen.
ES• Repuestos disponibles en otros colores que se especificarán en el pedido.
BR-PT• Peças de reposição disponíveis em cores alternativas a serem especificadas no pedido.
NL• Reserveonderdelen verkrijgbaar in meerdere kleuren, bij bestelling te specificeren.
DK• Reservedele kan leveres i flere farver som bør specificeres ved bestillingen.
FI• Varaosia saatavana eri värisinä: ilmoita väri tilauksessa.
CZ• U náhradních dílů, které jsou k dispozici ve více barvách, je nutné na objednávce specifikovat příslušnou barvu.
SK• Pri náhradných dieloch, ktoré sú k dispozícii vo viacerých farbách, je potrebné pri objednávke špecifikovať želanú farbu.
HU• A tartalék alkatrészek különböző színekben elérhetők, melyeket rendeléskor kell kiválasztani.
SL• Rezervni deli so na voljo v več barvah, ki jih je treba navesti pri naročilu.
RU• Запчасти имеются различных цветов, необходимый указать в запросе.
TR• Siparişte belirtilen değişik renklerdeki yedek parçalari mevcuttur.
HR/SRB/MNE/BiH•Zamjenski dijelovi dostupni u više boja što je potrebno specificirati u narudžbi.
EL• Ανταλλακτικά διαθέσιμα σε διάφορα χρώματα. Προσδιορίστε όταν παραγγείλετε.
.
.AR

10
Grazie per aver scelto un prodotto
Peg-Pérego.
Caratteristiche prodotto
Navetta Elite-auto, Gruppo 0,
categoria “Universale”
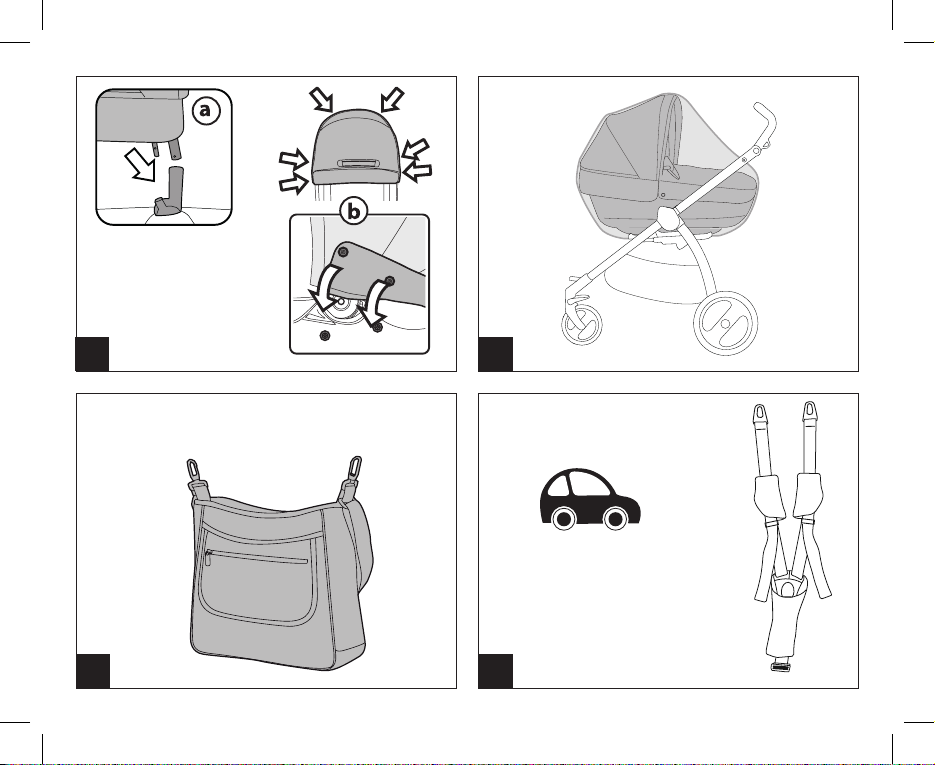
• Navetta Elite è omologata secondo il regolamento UN/
ECE R44/04 per bambini di peso da 0-10 kg. Adatto alla
maggior parte dei sedili delle autovetture, ma non a tutti.
• Navetta Elite può essere correttamente installata se nel
manuale d’uso e manutenzione del veicolo è indicata la
compatibilità con sistemi di ritenuta “Universali” di Gruppo 0.
• Navetta Elite è classificata “Universale” secondo criteri di
omologazione più severi rispetto ai modelli precedenti che
non dispongono di questa scritta.
• Il dispositivo può essere utilizzato solo su veicoli dotati di
sedile posteriore a 2 o 3 posti dotati di cinture di sicurezza
a 2 o 3 punti, omologate in conformità al regolamento UN/
ECE R16 o a normative equivalenti.
• In caso di dubbi, o per ulteriori informazioni sul fissaggio di
Navetta Elite su vetture specifiche, rivolgersi al costruttore
o al rivenditore.
IMPORTANTE
• “Navetta Elite”, gruppo 0, deve essere installata
perpendicolare al senso di marcia.
• Non installare Navetta Elite su sedili rivolti in direzione
opposta al senso di marcia o trasversalmente al senso
comune di marcia del veicolo.
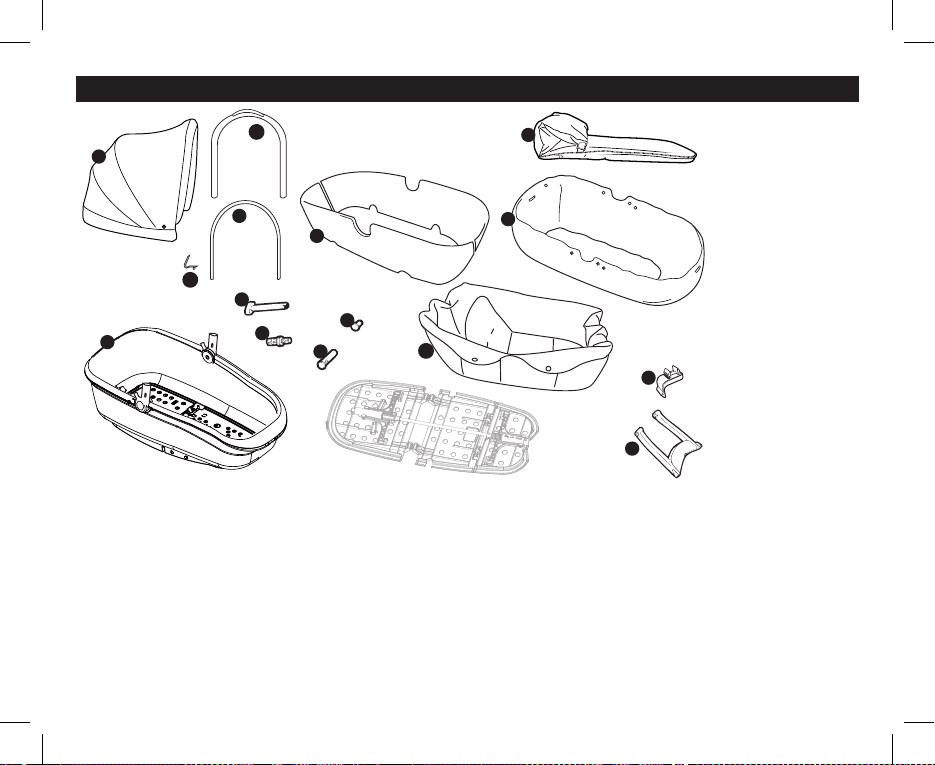
• Questo articolo è numerato progressivamente.
AVVERTENZA
IMPORTANTE: leggere attentamente queste istruzioni
e conservarle nell'apposita sede per tutta la vita del
prodotto. La sicurezza del bambino potrebbe essere
messa a rischio se non si eseguono queste istruzioni.
IT_Italiano • ATTENZIONE non lasciare mai il vostro bambino incustodito.
• Le operazioni di assemblaggio e preparazione dell'articolo
devono essere effettuate da adulti.
• Non utilizzate il prodotto se presenta parti mancanti o rotture.
• Prima dell’ uso assicurarsi che tutti i meccanismi di
aggancio siano fissati correttamente.
• Evitare di introdurre le dita nei meccanismi.
• Non utilizzare vicino a fonti di calore, fiamme libere od
oggetti pericolosi a portata delle braccia del bambino.
• Non utilizzare accessori non approvati dal costruttore.
• Assicurarsi che le cinghie per fissare la Navetta Elite al veicolo
siano sempre tese e regolare quelle che bloccano il bambino.
• Non attorcigliare mai le cinghie.
• Si raccomanda di sostituire il dispositivo nel caso sia stato
sottoposto a sollecitazioni eccessive durante un incidente
o abbia evidenti segni di rottura o deformazione.
• Il dispositivo di sicurezza non deve essere modificato in
nessun caso dall’utilizzatore.
• Seguire scrupolosamente le istruzioni fornite dal
fabbricante del sistema di tenuta del bambino.
• Non lasciare il bambino nella Navetta Elite in auto, senza
sorveglianza.
• Navetta Elite deve essere sempre fissata con le cinture
di sicurezza del veicolo, anche quando non è occupata
dal bambino. In caso di frenata improvvisa, potrebbe
provocare lesioni agli occupanti del veicolo.
• Durante i viaggi in auto non tenere mai in braccio il bambino
e non sistemarlo mai al di fuori di Navetta Elite. In caso di
frenata improvvisa, anche a bassa andatura, il bambino
verrebbe facilmente catapultato in avanti.
• Prestare particolare attenzione a bagagli o oggetti che
possono causare lesioni al bambino in Navetta Elite, in caso
di incidente.
• Non lasciare Navetta Elite nella vettura sotto l’esposizione
del sole, alcune parti potrebbero essersi surriscaldate e
nuocere alla pelle delicata del bambino, controllare prima
di collocare il bambino.
• Prestare attenzione che Navetta Elite non rimanga bloccata
da una parte mobile del sedile o da una portiera.
• Non utilizzare Navetta Elite senza il rivestimento di tessuto,
tale rivestimento non puó essere sostituito da uno non

11
approvato dal costruttore in quanto costituisce parte
integrante di Navetta Elite e della sicurezza. In caso di
sostituzione utilizzare un ricambio originale.
• Navetta Elite é stata progettata con dispositivo di
assorbimento d’urto in polistirolo, integrato direttamente
nella scocca, sotto l’imbottitura: non rimuovere.
• Questo prodotto è adatto solo a bambini che non si
possono mettere da soli in posizione seduta.
• Questo prodotto e' inteso per bambini dalla nascita fino a 9
kg di peso. Usato in auto inteso fino a 10 kg di peso.
• Durante l'impiego in auto utilizzare sempre il cinturino di
sicurezza. Per l'impiego a carrozzina rimuovere il cinturino e
riporlo nell'apposita tasca.
• Utilizzare solo su superfici dure, orizzontali ed asciutte.
• Non lasciare altri bambini a giocare incustoditi vicino alla
carrozzina.
• Prestare attenzione alla presenza del bambino quando
si effettuano operazioni di regolazione dei meccanismi
(maniglione, schienale).
• Controllare regolarmente il maniglione (o le maniglie) ed
il fondo della carrozzina e verificare l'assenza di segni di
rottura o danneggiamento.
• Nell'utilizzare la carrozzina con uno stand Peg Perego,
verificate la massima lunghezza della carrozzina specificata
sullo stand.
• La carrozzina è un sistema di trasporto pertanto non
sostituisce in casa l'uso del lettino.
• La testa del bambino nella Navicella non deve mai essere
inferiore al suo corpo.
• Non utilizzare questo prodotto dopo 7anni dalla data
di produzione indicata sulla scocca; a causa del naturale
invecchiamento dei materiali potrebbe non essere più
conforme ai sensi di norma.
Non aggiungere alcun materassino non approvato dal
costruttore.
Le immagini riferite ai dettagli tessili potrebbero
differire dalla collezione acquistata.
Istruzioni d’uso
Utilizzo Navetta Elite
1 CAPOTTINA: per sollevare la capottina tenderla fino al click,
per un apertura completa.
2 Per abbassare la capottina premere sulla maniglia e
contemporaneamente abbassarla.
3 la capottina è dotata di un inserto che permette di vedere
il bèbè da ogni posizione. E' necessario aprire le cerniere
come in figura e sollevare lo spicchio della capottina.
4 COPERTINA: per agganciarla correttamente: Sganciare il
bottone della capottina, posizionarla sulla navicella e
5 abbottonarla in sequenza come illustrato. Copertina
correttamente agganciata.
6 Agganciare i lacci in velcro come illustrato.
7 Grazie ai velcri è possibile agganciare la copertina alla
capottina garantendo al bambino maggior protezione
dalle interperie. Slacciare lateralmente la copertina
(freccia_a), risvoltarla verso l'alto (freccia_b) e agganciarla
col velcro alla capottina (freccia_c);
8 MANIGLIA DI TRASPORTO: il maniglione è integrato nella
capottina, per trasportare la navicella sollevare la capottina,
se abbassata, e afferrare la maniglia posta sopra la stessa.
• Prima di sollevare la navicella assicurarsi che la capottina sia
nella posizione corretta per il trasporto.
• Prima di sganciare e sollevare la navicella dal telaio,
regolare lo schienale nella posizione piu bassa (figura 11).
9 POSIZIONE DONDOLINO: la base di Navetta Elite ha una
speciale forma che, appoggiata su una superficie piana,
permette di dondolare il bambino.
12 POSIZIONE LETTINO: Navetta Elite diventa una culla non
dondolabile estraendo i due cavalletti posti sotto la base.
13 REGOLAZIONE SCHIENALE e POGGIAGAMBE: grazie al
sistema COMFORT SYSTEM schienalino e poggiagambe
si regolano simultaneamente. Tirare la manopola verso
l'esterno (fig_a) e ruotarla (fig_b) per alzare o abbassare
schienalino e poggiagambe.
12 SISTEMA QUATTRO STAGIONI: il prodotto sotto la base,
come illustrato, permette di regolare la circolazione dell’aria
interna per evitare la formazione di condense.
Per creare un ambiente fresco e arieggiato (in estate) aprire
i fori spostando le 4 levette verso l'esterno. Per limitare
l’entrata dell’aria spostare le levette verso l’interno (in
inverno).

12
Ganciomatic system
13 Ganciomatic System é il sistema pratico e veloce che
ti permette di agganciare Navetta Elite agli attacchi
Ganciomatic del passeggino o alla base del carrello.
Per agganciare Navetta Elite, posizionarla sul passeggino o
sul carrello e premere con entrambi le mani fino al click.
Azionare sempre il freno del passeggino o del carrello
prima di agganciare e sganciare Navetta Elite.
Verificare che la Navicella sia correttamente agganciata.
• Per sganciarla, alzare la leva della maniglia Ganciomatic
(freccia_a) e alzare Navetta Elite (freccia_b).
Sfoderabilità
14 SFODERABILITA' CAPOTTINA:
- Sganciare i bottoni sui laterali della navicella e sul retro
(fig_a) premere sugli attacchi della capotta (fig_b) e
sganciarla verso l'alto (fig_c).
15 Estrarre tessuto dalla maniglia per facilitare la sfoderabilità
(fig_d) e poi i coponenti rigidi della capotta (fig_e).
16 SFODERABILITA' TESSUTO INTERNO NAVETTA ELITE:
- sbottonare la copertina se agganciata e rimuoverla.
- sbottonare tutti i bottoni sul laterale della navicella,
- sollevare il tessuto interno dallo schienale e sfilare il tessuro
dall'alto.
17 SFODERABILITA' TESSUTO ESTERNO NAVETTA ELITE:
- sfilate tutti gli elastici come illustrato.
- sfilare tessuto esterno.
18
ATTENZIONE: nel rivestire il tessuto esterno sulla
navicella fare attenzione a calzarla correttamente
portando all'esterno i componeti esterni, quali:
anelli per aggancio kit auto (fig_a),
maniglia di regolazione schienale (fig_b),
maniglie di sgancio (fig_c),
19 Prestare attenzione, durante la vestizione della capottina,
al corretto inserimento dei supporti rigidi. Infilare il tubo,
dotato di maniglia di trasporto, nella sede anteriore della
capottina prestando attenzione a centrare la maniglia
(fig_a). Estrarre il lembo di tessuto dall'apertura sulla
capottina (fig_b) e infilarlo sotto alla maniglia (fig_c).
20 infine infilare il secondo sostegno metallico nella sede più
interna della capottina.
21 Infilare i supporti metallici della capottina negli appositi
supporti ed abbottonare i bottoni.
Manutenzione dell'imbottitura
Spazzolare le parti in tessuto per allontanare la polvere;
• Per il lavaggio attenersi all'etichetta cucita sulla sacca del
prodotto.
• non candeggiare al cloro;
• non stirare;
• non lavare a secco;
• non smacchiare con solventi e non asciugare a mezzo di
asciugabiancheria a tamburo rotativo.
Pulizia del prodotto
• Il vostro prodotto necessita un minimo di manutenzione.
Le operazioni di pulizia e manutenzione devono essere
effettuate solo da adulti.
• Si raccomanda di tenere pulite tutte le parti in movimento
e se occorre, lubrificarle con olio leggero.
• Periodicamente pulire le parti in plastica con un panno
umido, non usare solventi o altri prodotti simili.
• Spazzolare le parti in tessuto per allontanare la polvere.
• Non pulire il dispositivo di assorbimento d’urto in
polistirolo con solventi o altri prodotti simili.
• Proteggere il prodotto da agenti atmosferici, acqua,
pioggia o neve; l’esposizione continua e prolungata al sole
potrebbe causare cambiamenti di colore in molti materiali.
• Conservare il prodotto in un posto asciutto.
• Ricordarsi di arieggiare periodicamente l'interno della
navicella.
Accessori
22 RAIN COVER: Parapioggia copri-tutto trasparente.
23 BORSA: Borsa con materassino per il cambio del bebè,
agganciabile al carrello.
24 KIT AUTO: è possibile richiedere il Kit auto (omologato ECE
R44/04), contiene il necessario per montare la navicella sulla
macchina.

13
25 BASSINET STAND: base d'appoggio pratica e compatta.
26 COMPLETO TRASPIRANTE: materassino più cuscino.
Compatibile con il nostro kit auto a 3 punti.
Numeri di serie
27 Navetta Elite riporta sotto la base, informazioni relative alla
data di produzione della stessa.
• Nome del prodotto, data di produzione e numerazione seriale
dello stesso.
Queste informazioni sono indispensabili in caso di reclamo.
Come leggere l’etichetta di
omologazione
• In questo paragrafo vi spieghiamo come leggere l’etichetta
di omologazione (etichetta arancione).
• In alto all’etichetta c’è il marchio dell’azienda produttrice e
il nome del prodotto.
• 0-10 kg Y indica che il prodotto è omologato per bambini
dalla nascita fino a 10 kg di peso e che il dispositivo è
dotato di cintura a 3 punti.
• La lettera E in un cerchio: indica il marchio di
omologazione Europea e il numero definisce il paese che
ha rilasciato l’omologazione (1: Germania, 2: Francia, 3:
Italia, 4: Paesi Bassi, 11: Gran Bretagna e 24: Irlanda).
• Numero di omologazione: se inizia con 04 vuol dire che è
il quarto emendamento (quello attualmente in vigore) del
regolamento R44.
• Normativa di riferimento: UN/ECE R44/04.
• Numero progressivo di produzione: personalizza ogni
navicella, dal rilascio dell’omologazione ognuno è
contraddistinto dal proprio numero.
PEG-PÉREGO S.p.A.
Peg-Pérego S.p.A. è certificata ISO 9001. La
certificazione offre ai clienti e ai consumatori
la garanzia di una trasparenza e fiducia nel
modo di lavorare dell'impresa.
Peg Pérego potrà apportare in qualunque
momento modifiche ai modelli descritti in
questa pubblicazione, per ragioni di natura tecnica o
commerciale.Peg Pérego è a disposizione dei suoi
Consumatori per soddisfare al meglio ogni loro esigenza.
Per questo, conoscere il parere dei ns. Clienti, è per noi
estremamente importante e prezioso. Le saremo quindi
molto grati se, dopo aver utilizzato un ns. prodotto, vorrà
compilare il QUESTIONARIO SODDISFAZIONE
CONSUMATORE, segnalando eventuali osservazioni o
suggerimenti, che troverà nel nostro sito internet:
www.pegperego.com
Servizio assistenza Peg-Pérego
Se fortuitamente parti del modello vengono perse o
danneggiate, usare solo pezzi di ricambio originali Peg
Pérego. Per eventuali riparazioni, sostituzioni, informazioni
sui prodotti, vendita di ricambi originali e accessori,
contatta il Servizio Assistenza Peg Pérego indicando,
qualora fosse presente, il numero seriale del prodotto.
tel. 0039/039/60.88.213
numero verde: 800/147.414 (contattabile da rete fissa)
fax 0039/039/33.09.992
e-mail [email protected]
sito internet www.pegperego.com
Tutti i diritti di proprietà intellettuale relativi ai contenuti di
questo manuale d’istruzione appartengono a PEG PEREGO
S.p.A. e sono tutelati dalle leggi vigenti.

14
Thank you for choosing a
Peg-Pérego product.
Product characteristics
Navetta Elite-auto, Group 0,
“Universal” category
• The Navetta Elite is approved under regulation UN ECE
R44/04 for children weighing from 0-10 kg. It is suitable for
installation on the majority of vehicle seats, but not all.
• The Navetta Elite can be properly installed if the vehicle's
use and maintenance manual states that it is compatible
with “Universal” Group 0 restraint systems.
•
The Navetta Elite is classified as “Universal” in compliance with
stricter approval criteria than previous models that do not have this
label.
• The device can only be used on vehicles with 2 or 3 rear
seats fitted with 2- or 3-point safety belts, approved in
compliance with UN ECE R16 or equivalent regulations.
•
For any questions or further information on installing the Navetta
Elite in specific vehicles, contact the manufacturer or the retailer.
IMPORTANT
• “Navetta Elite” (Group 0) must be fitted perpendicular to
the vehicle’s normal direction of travel.
• Do not fit Navetta Elite on vehicle seats that face away or
sideways with respect to the normal direction of travel of
the vehicle.
• The item is given a serial number.
WARNING
IMPORTANT: Read these instructions carefully and
store them in the holder provided throughout the
lifecycle of the product. The child’s safety could be put
at risk if these instructions are not followed.
• WARNING Never leave your child unattended.
• Assembly and preparation of the item must be carried out
by adults.
• Do not use the product if there are missing or broken parts.
• Before use make sure that all of the attachment
EN_English mechanisms are connected properly.
• Do not insert fingers into the mechanisms.
• Do not use near heat sources, open flames or dangerous
objects that are within reach of the child.
• It could be dangerous to use accessories which are not
approved by the manufacturer.
• Make sure the belts fastening the Navetta Elite to the
vehicle are always taut and adjust the straps securing the
child.
• Never twist the belts.
• Replace the item if it undergoes significant strain in an
accident or shows clear signs of breakage or deformation.
• The safety device should not be modified by users in any
circumstances.
• Carefully follow the instructions supplied by the
manufacturer of the child restraint system.
• Never leave the child unattended in the Navetta Elite in a
vehicle.
• The Navetta Elite must always be secured with the vehicle’s
safety belts, even when the child is not present. In the event
of sudden braking, it could injure the occupants of the vehicle.
• When travelling in vehicles, never hold the child in your
arms and never put him/her anywhere but in the Navetta
Elite. In the event of sudden braking, even at low speeds,
the child would be flung forward.
• Take particular care to make sure that luggage or other
objects are not located where they may injure the child in
the Navetta Elite in the event of an accident.
• Do not leave the Navetta Elite in vehicles exposed to the
sun. Some parts might heat up and be harmful to the
delicate skin of the child – check before placing the child in
the seat.
• Make sure that the Navetta Elite is not obstructed by any
moving parts of the vehicle’s seat or by one of the doors.
• Do not use the Navetta Elite without its fabric covering,
which cannot be replaced with one not approved by the
manufacturer since it is an integral part of the Navetta Elite
and the safety system. If replacing it, use an official spare part.
• The design of the Navetta Elite features a polystyrene
shock absorption device built directly into the shell, below
the padding: do not remove it.

15
• This product is only suitable for children who are unable to
sit up by themselves.
• This product is designed for children from birth up to a
weight of 9 kg. When used in vehicles it is designed for
weights of up to 10 kg.
• During use in vehicles, always fasten the safety harness.
When using the product as a carriage, remove the harness
and place it in the special pocket.
• Only use the product on surfaces that are hard, horizontal
and dry.
• Do not leave other children playing unattended near the carriage.
• Take care when adjusting the mechanisms (handle,
backrest) with the child present.
• Regularly check the handle (or the handles) and the
bottom of the carriage to make sure that there are no signs
of breakage or damage.
• When using the carriage with a stand, check the maximum
length of the carriage specified on the stand.
• When using the pram with a Peg Perego stand, check the
maximum pram length allowed on the stand.
• The pram is intended for transportation purposes and
should not replace the cot at home.
• In the bassinet, the baby's head must never be lower than
its body.
• Do not use this product after 7 years from the date of
production indicated on the structure. The natural ageing
of the materials may mean that it is no longer compliant
with standards.
• Do not add any mattress are not approved by the
manufacturer.
The images referring to the textile details may differ
from the collection purchased.
Instructions for use
Using the Navetta Elite
1 HOOD: to lift the hood completely, pull it until it clicks.
2 To lower the hood, press the handle and push the hood
down simultaneously.
3 The hood comes with a mesh insert so that the baby can
be seen from any position. Pull the zippers as shown in the
picture and pull the hood further, to reveal the mesh insert.
4 FOOT MUFF: to secure it correctly:
Unfasten the hood button.
Position the foot muff in the bassinet.
5 Button the foot muff following the sequence as illustrated.
The foot muff in the figure is properly attached.
6 Fasten the velcro straps as illustrated.
7 The velcro straps can be used to fasten the foot muff to
the hood, so as to protect the child even more against the
elements. Unfasten the sides of the foot muff (arrow_a),
unfold it upwards (arrow_b) and fasten it to the hood with
the velcro straps (arrow_c);
8 CARRY HANDLE: this is built into the hood.
To carry the bassinet, lift the hood, if lowered, and hold the
handle placed above it.
• Before lifting the bassinet, make sure the hood is in the
correct position for transport.
• Before unfastening and lifting the bassinet from the frame,
adjust the backrest to its lowest position (figure 11).
9 ROCKING POSITION: The base of the Navetta Elite has a
special shape which allows you to rock the child when it is
placed on a flat surface.
10 COT POSITION: It is possible to make the Navetta Elite into a
non-rocking cot by opening out the two legs under the base.
11 ADJUSTING THE BACKREST and THE FOOTREST: with the
COMFORT SYSTEM, backrest and footrest can be adjusted
simultaneously. Pull the knob outwards (fig_a) while turning
it (fig_b) to raise or lower the backrest and the footrest.
12 FOUR SEASONS SYSTEM: as shown in the figure, it is
possible to adjust the product’s air circulation from the
base in order to prevent condensation.
To create a cool, well ventilated environment (in summer),
open the holes by moving the 4 levers outwards. To limit
the entry of air (in winter), move the levers inwards.
Ganciomatic system
13 Ganciomatic is the quick, practical system that allows you
to attach the Navetta Elite to the Ganciomatic clips of a
stroller or the base of a chassis.
To attach the Navetta Elite, put it on the stroller or the
chassis and press with both hands until it clicks into place.

16
Always apply the brakes on the stroller or chassis before
attaching and removing the Navetta Elite.
Check that the bassinet unit is properly attached.
• To release it, raise the lever of the Ganciomatic clip
(arrow_a) and lift up the Navetta Elite (arrow_b).
Removing the lining
14 REMOVING THE HOOD LINING:
- Release the buttons on the side and back of the bassinet
(fig_a)
- Press the hood's attachments (fig_b) and release it
upwards (fig_c).
15 Remove the fabric from the handle to facilitate removal
of the lining (fig_d), and then remove the hood's rigid
components (fig_e).
16 REMOVING THE NAVETTA ELITE INNER LINING:
- Unbutton the foot muff, if attached, and remove it.
- Unfasten all the buttons on the side of the bassinet.
- Lift the inner lining off the backrest and remove the fabric
from the top.
17 REMOVING THE NAVETTA ELITE OUTER LINING:
- Unfasten all the rubber bands as illustrated.
- Remove the outer fabric.
18 WARNING: when replacing the outer lining of the
bassinet, ensure you fit it on correctly with all external
components left on the outside, i.e.:
rings for fastening the vehicle kit (fig_a),
handle for adjusting the backrest (fig_b),
release handles (fig_c).
19 When placing the lining on the hood, ensure you insert the
rigid supports correctly. Insert the tube bearing the carry
handle into the hood’s front slot, ensuring the handle is
centred correctly (fig_a). Pull the flap of fabric out from the
opening on the hood (fig_b) and slide it under the handle
(fig_c).
20 Finally, slip the second metal support into the hood’s inner
slot.
21 Push the hood’s metal supports into the relevant slots and
fasten the buttons.
Padding cleaning instructions
Brush the fabric parts to remove dust.
• When washing, closely follow the instructions stated on
the label sewn into the cover.
• Do not use chlorine bleach.
• Do not iron.
• Do not dry clean.
• Do not remove stains with solvents and do not tumble dry.
Product cleaning
• This product requires a small amount of maintenance.
Cleaning and maintenance must only be carried out by adults.
• Keep all moving parts clean and if necessary lubricate
them with light oil.
• Clean the plastic parts periodically with a damp cloth. Do
not use solvents or similar substances.
• Brush the fabric parts to remove dust.
• Do not clean the polystyrene shock absorbing device with
solvents or other similar products.
• Protect the product from atmospheric agents: humidity,
rain or snow. Extended exposure to sunshine can cause
colour changes in many materials.
• Store the product in a dry environment.
• Remember to regularly ventilate the interior of the carrycot.
Accessories
22 COVER ALL RAIN CANOPY: made of clear.
23 BAG: satchel with pad for changing baby’s diaper. Fastens
to the chassis.
24 AUTO KIT: Request the auto kit (ECE R44/04 certified),
which contains everything you need for mounting the
bassinet unit in your car.
25 BASSINET STAND: Practical, compact support base.
26
COMPLETO TRASPIRANTE:
mattress plus cushion.
Compatible with our 3-point car kit.
Serial numbers
27 Information about the production date of Navetta Elite can
be found under the base.
• Product name, production date and serial number.
This information is required for any complaints.

17
How to read the approval label
• This paragraph explains how to interpret the approval label
(the orange one).
• The top of the label displays the trademark of the
manufacturing company and the name of the product.
• 0-10 kg Y means that the product is approved for children
from birth up to 10 kg in weight and that it is fitted with a
3-point safety harness.
• The letter E in a circle indicates the European approval
mark and the number indicates the country that issued the
approval (1: Germany, 2: France, 3: Italy, 4: Netherlands, 11:
Great Britain and 24: Republic of Ireland).
• Approval number: if it starts with 04, this indicates the fourth
amendment (the one currently in force) of Regulation R44.
• Reference standard: UN ECE R44/04.
• Production serial number: on issue of approval, each
bassinet unit is given its own unique number.
PEG-PÉREGO S.p.A.
Peg-Pérego S.p.A. is an ISO 9001 certified
company. This certification is a guarantee for
customers and consumers of the
transparency and trustworthiness of the
company's procedures and working
methods. Peg Pérego can make changes at
any time to the models described in this publication for
technical or commercial reasons. Peg Pérego is at the
disposal of its customers and consumers to ensure that all
their demands and queries are fully satisfied. It is a key part
of our policy to ensure we are always aware of our
customers' views and requirements. We would therefore
be very grateful if, after using a Peg Pérego product, you
take the time to fill in our CUSTOMER SATISFACTION
QUESTIONNAIRE, making a note of any comments or
suggestions you might have. You can find the
questionnaire on the Peg Pérego website: www.
pegperego.com
Peg-Pérego after-sales service
If any parts of the item get lost or damaged, only
use genuine Peg Pérego spare parts. For any repairs,
replacements, information on the products and sales of
genuine spare parts and accessories, contact the Peg
Pérego Assistance Service and state the serial number of
the product, if present.
tel. 0039/039/60.88.213 fax 0039/039/33.09.992
e-mail [email protected]
website www.pegperego.com
All intellectual property rights on the contents of this manual
are property of PEG PEREGO S.p.A. and are protected by the
laws in force.

18
Merci d’avoir choisi un produit
Peg-Pérego.
Caractéristiques du produit
Navetta Elite-auto, Groupe 0, catégorie
d’homologation « Universelle »
• Navetta Elite est homologuée conformément au
Règlement UN/ECE R44/04 pour le transport d’enfants
d'un poids de 0 à 10 kg. Il s’adapte à la plupart des sièges
d’automobiles mais pas à tous.
• Pour installer correctement Navetta Elite vérifier dans le
manuel d'utilisation et d'entretien de votre véhicule si ce
dernier peut recevoir des systèmes de fixation « Universels »
du Groupe 0.
• Navetta Elite a été classée dans la catégorie
d'homologation « Universelle » selon des critères
d’homologation plus sévères que ceux des modèles
antérieurs qui ne bénéficient pas de cette catégorie.
• Navetta Elite peut être utilisée uniquement sur des
véhicules munis de siège arrière à 2 ou 3 places dotés
de ceintures di sécurité 2 ou 3 points, homologués
conformément au règlement UN/ECE R16 ou normes
équivalentes.
• En cas de doute ou pour plus de renseignements sur
l’installation de Navetta Elite sur un véhicule particulier,
contacter le fabricant ou le revendeur.
IMPORTANT
• «Navetta Elite», groupe 0, doit être installée
perpendiculairement au sens de marche.
• Ne pas installer Navetta Elite sur un siège orienté
dans la direction opposée au sens de la marche ou
transversalement au sens de marche normale du véhicule.
• Cet article porte un numéro séquentiel de fabrication.
AVERTISSEMENT
IMPORTANT : lire attentivement ces instructions et les
conserver dans la poche prévue à cet effet pendant
toute la durée de vie utile du produit. Le non-respect
FR_Français de ces instructions pourrait compromettre la sécurité
de l’enfant.
• ATTENTION ne jamais laisser sans surveillance l’enfant.
• Les opérations d’assemblage et de préparation de l’article
doivent être effectuées par des adultes.
• Ne pas utiliser Navetta Elite s’il manque des pièces ou s'il
est endommagé.
• Avant d’utiliser Navetta Elite, vérifier si tous les mécanismes
de fixation sont correctement enclenchés.
• Ne pas mettre les doigts dans les mécanismes.
• Ne pas utiliser Navetta Elite près de sources de chaleur, de
flammes nues ou près d’objets dangereux et à la portée
des bras de l’enfant.
• L’emploi d’accessoires non approuvés par le fabricant peut
s’avérer dangereux.
• Vérifier si les sangles de fixation au véhicule de Navetta
Elite sont bien tendues et régler celles qui retiennent
l’enfant.
• Ne jamais entortiller les sangles.
• Il est recommandé de remplacer Navetta Elite s’il a été
soumis à des sollicitations excessives suite à un accident
ou s’il présente des signes de cassure ou de déformation
évidents.
• En aucun cas l’utilisateur ne doit modifier le dispositif de
sécurité.
• Suivre scrupuleusement les instructions fournies par le
fabricant de Navetta Elite.
• Ne jamais laisser l’enfant seul et sans surveillance dans
Navetta Elite en voiture.
• Navetta Elite doit toujours être fixée avec les ceintures de
sécurité du véhicule, même lorsqu'elle est vide car elle pourrait
blesser les occupants de la voiture en cas de coup de frein
brusque.
• Pendant les voyages en voiture, ne tenez jamais l’enfant
dans vos bras et installez-le toujours dans Navetta Elite car
même à petite vitesse, en cas de coup de frein brusque
l’enfant serait catapulté en avant.
• Prêter une attention particulière aux bagages ou autres
objets se trouvant dans l’habitacle car ils pourraient blesser
l’enfant en cas d’accident.
• Ne pas laisser Navetta Elite dans le véhicule exposé au

19
soleil ; certaines parties pourraient chauffer et brûler la
peau délicate de l'enfant. Vérifier la température de Navetta
Elite avant d'y installer l'enfant.
• Veiller à ce que Navetta Elite ne reste pas coincée dans une
partie mobile du siège de la voiture ou dans une portière.
• Ne pas utiliser Navetta Elite sans sa housse en tissu. Cette
housse ne peut être remplacée que par une autre housse
approuvée par le fabricant car elle fait partie intégrante
de Navetta Elite et est une garantie de sa sûreté. En cas de
remplacement, utiliser uniquement une housse originale du
fabricant.
• Navetta Elite a été conçue avec un dispositif en polystyrène
pour l’absorption des chocs, qui est incorporé directement
dans la coque, sous la housse : ne pas l‘ôter.
• Cet article ne convient qu’aux enfants qui ne savent pas
encore s’asseoir tout seul.
• Cet article a été conçu pour le transport des enfants à
partir de la naissance et jusqu’à un poids de 9 kg. Il a été
conçu pour utilisation en voiture jusqu’à un poids de 10 kg.
• Utiliser uniquement sur des surfaces dures, planes et sèches.
• Ne pas laisser d’autres enfants jouer sans surveillance près
du landau.
• En cas d’emploi dans une automobile, utiliser toujours la
ceinture de sécurité. En cas d’utilisation comme landau,
enlever la ceinture et la ranger dans la pochette spéciale.
• Tenir compte de la position de l’enfant pendant les
opérations de réglage des mécanismes (poignée, dossier).
• Contrôler régulièrement la poignée centrale (ou les
poignées de transport) et le fond du landau. Vérifier s’il
présente des signes de cassure ou d’endommagement.
• Si le landau est utilisé avec un stand, vérifier la longueur
maximale du landau indiquée sur le stand.
• “Conforme aux exigences de securite”.
• Norme NF S 54-001.
• Quand le couffin est utilisé avec un stand Peg Perego,
vérifier la longueur maximale du couffin spécifié sur le
stand.
• Le landau est un système de transport et ainsi il ne saurait
se substituer à un berceau.
• La tête de l’enfant dans la Nacelle ne doit jamais être située
plus bas que son corps.
• Ne plus utiliser ce produit au bout de 7 ans à compter de la
date de fabrication indiquée sur la coque : du fait de l’usure
naturelle des matériaux, il pourrait ne plus être conforme
aux normes en vigueur.
• Ne pas ajouter de matelas qui ne soit pas approuvé par le
fabricant.
Les images relatives aux détails textiles pourraient
différer de la collection achetée.
Mode d’emploi
Utilisation de Navetta Elite
1 CAPOTE: pour soulever la capote, la tendre jusqu’à ce qu’il
y ait un déclic, pour une ouverture complète.
2 Pour baisser la capote, appuyer sur la poignée et la baisser
simultanément.
3 La capote est dotée d’un empiècement permettant de
voir le bébé dans toutes les positions. Il est nécessaire
d’ouvrir les fermetures à glissière comme sur la figure et de
soulever le pan de la capote.
4 TABLIER: pour l’accrocher correctement: Décrocher le
bouton de la capote, le positionner sur la Nacelle et
5 le boutonner selon la séquence illustrée. Tablier accroché
correctement.
6 Accrocher les attaches velcro comme sur l’illustration.
7 Grâce au velcro il est possible d’accrocher le tablier à la
capote, ce qui garantit une meilleure protection de l’enfant
en cas d’intempéries. Décrocher latéralement le tablier
(flèche_a), le tourner vers le haut (flèche_b) et l’accrocher à
la capote au moyen du velcro (flèche_c);
8 POIGNÉE DE TRANSPORT: l’anse est intégrée dans la
capote, pour transporter la nacelle soulever la capote, si
elle est baissée, et saisir la poignée située au-dessus d’elle.
• Avant de soulever la nacelle, vérifier que la capote soit dans
la position correcte pour le transport.
• Avant de décrocher et de soulever la nacelle du châssis,
régler le dossier dans la position la plus basse (figure 11).
9 POSITION BASCULE : la forme spéciale de la base de
Navetta Elite permet de bercer l’enfant lorsque la base est
placée sur une surface plane.
10 POSITION PETIT LIT : Navetta Elite se transforme en berceau

20
non basculant après avoir fait sortir les pieds situés sous la
base.
11 RÉGLAGE DU DOSSIER et DU REPOSE-PIEDS : grâce au
système COMFORT SYSTEM, on peut régler en même
temps le dossier et le repose-pieds. Tirer la poignée vers
l'extérieur (fig_a) et la tourner (fig_b) pour soulever ou
abaisser le dossier et le repose-pieds.
12 SYSTÈME QUATRE SAISONS : le produit sous la base,
comme illustré, permet de régler la circulation de l’air à
l’intérieur pour éviter la formation de buée.
Pour créer une ambiance fraîche et aérée (en été) dégager
les orifices en déplaçant les 4 leviers vers l'extérieur. Pour
limiter l’entrée d’air, déplacer les leviers vers l’intérieur (en
hiver).
Ganciomatic system
13 Le Système Ganciomatic, pratique et rapide, permet
d'accrocher Navetta Elite aux fixations Ganciomatic de la
poussette ou à la base du châssis.
Pour accrocher Navetta Elite, la positionner sur la poussette
ou sur le châssis et appuyer des deux mains jusqu’au déclic.
Toujours actionner le frein de la poussette ou du châssis
avant d’accrocher et de décrocher Navetta Elite.
Vérifier que la nacelle est correctement accrochée.
• Pour la décrocher, relever le levier de la poignée
Ganciomatic (flèche_a) et soulever Navetta Elite (flèche_b).
Déhoussage
14 DÉHOUSSAGE DE LA CAPOTE:
- Décrocher les boutons sur les côtés de la nacelle et à
l'arrière (fig_a), appuyer sur les fixations de la capote (fig_b)
et la décrocher vers le haut (fig_c).
15 Sortir le tissu de la poignée pour faciliter le déhoussage
(fig_d) puis les composants rigides de la capote (fig_e).
16 DÉHOUSSAGE DU TISSU À L’INTÉRIEUR DE LA NAVETTA
ELITE:
- déboutonner le tablier s’il est accroché et l’enlever;
- déboutonner tous les boutons sur le côté de la nacelle;
- soulever le tissu à l’intérieur du dossier et sortir le tissu par
le haut.
17 DÉHOUSSAGE DU TISSU À L’EXTÉRIEUR DE LA NAVETTA
ELITE:
- sortir tous les élastiques comme cela est montré sur la
figure;
- sortir le tissu extérieur.
18 ATTENTION : lorsqu’on remet le tissu extérieur sur
la nacelle, faire attention à l’enfiler correctement
en amenant à l’extérieur les composants extérieurs
comme: les anneaux pour accrocher le kit auto (fig_a),
la poignée de réglage du dossier (fig_b), les poignées
de décrochage (fig_c).
19 Veiller à insérer correctement les supports rigides quand
on remet la housse de la capote. Enfiler le tube, muni de la
poignée de transport, dans le logement avant de la capote
en veillant à centrer la poignée (fig_a). Sortir le morceau de
tissu par l’ouverture sur la capote (fig_b) et l’enfiler sous la
poignée (fig_c).
20 Pour finir, enfiler le second support métallique dans le
logement plus interne de la capote.
21 Enfiler les supports métalliques de la capote dans les
supports prévus à cet effet et boutonner les boutons.
Entretien des parties en tissu
brosser les éléments en tissu pour éliminer la poussière.
• Pour le lavage, suivre les instructions figurant sur l’étiquette
cousue sur la sacoche du produit.
• ne pas utiliser de chlore;
• ne pas repasser;
• ne pas laver à sec;
• ne pas détacher à l’aide de solvants et ne pas sécher dans
un sèche-linge à tambour rotatif.
Nettoyage du produit
• Ce produit requiert un entretien minimum. Les opérations
de nettoyage et d’entretien doivent être effectuées
uniquement par des adultes.
• Il est recommandé de nettoyer régulièrement les parties
mobiles et, si nécessaire, de les lubrifier avec de l’huile légère.
• Nettoyer périodiquement les parties en plastique avec un linge
humide ; ne pas utiliser de solvants ou tout produit similaire.
• Épousseter les éléments en tissu pour chasser la poussière.
• Ne pas nettoyer le dispositif d’absorption des chocs en
Table of contents
Languages:
Other Peg-Perego Accessories manuals

Peg-Perego
Peg-Perego Primo Viaggio User manual

Peg-Perego
Peg-Perego ride with me board User manual

Peg-Perego
Peg-Perego seggiolino pop-up User manual

Peg-Perego
Peg-Perego TEAM User manual

Peg-Perego
Peg-Perego Primo Viaggio Adapter For Tak User manual

Peg-Perego
Peg-Perego Culla Pop-Up User manual

Peg-Perego
Peg-Perego Double adapters User manual

Peg-Perego
Peg-Perego kit pramette tak User manual

Peg-Perego
Peg-Perego YPSI/Z4 User manual

Peg-Perego
Peg-Perego Book User manual