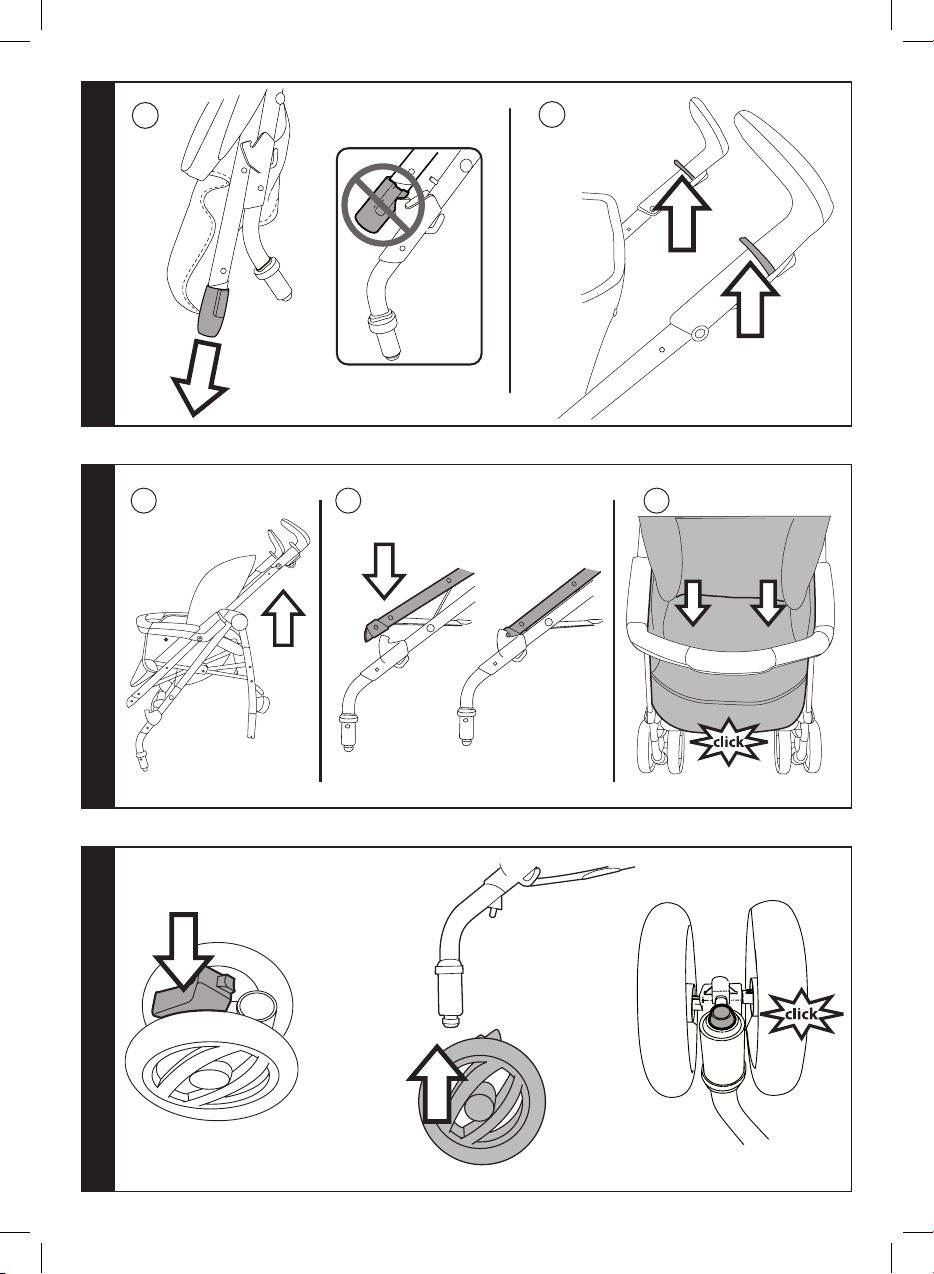
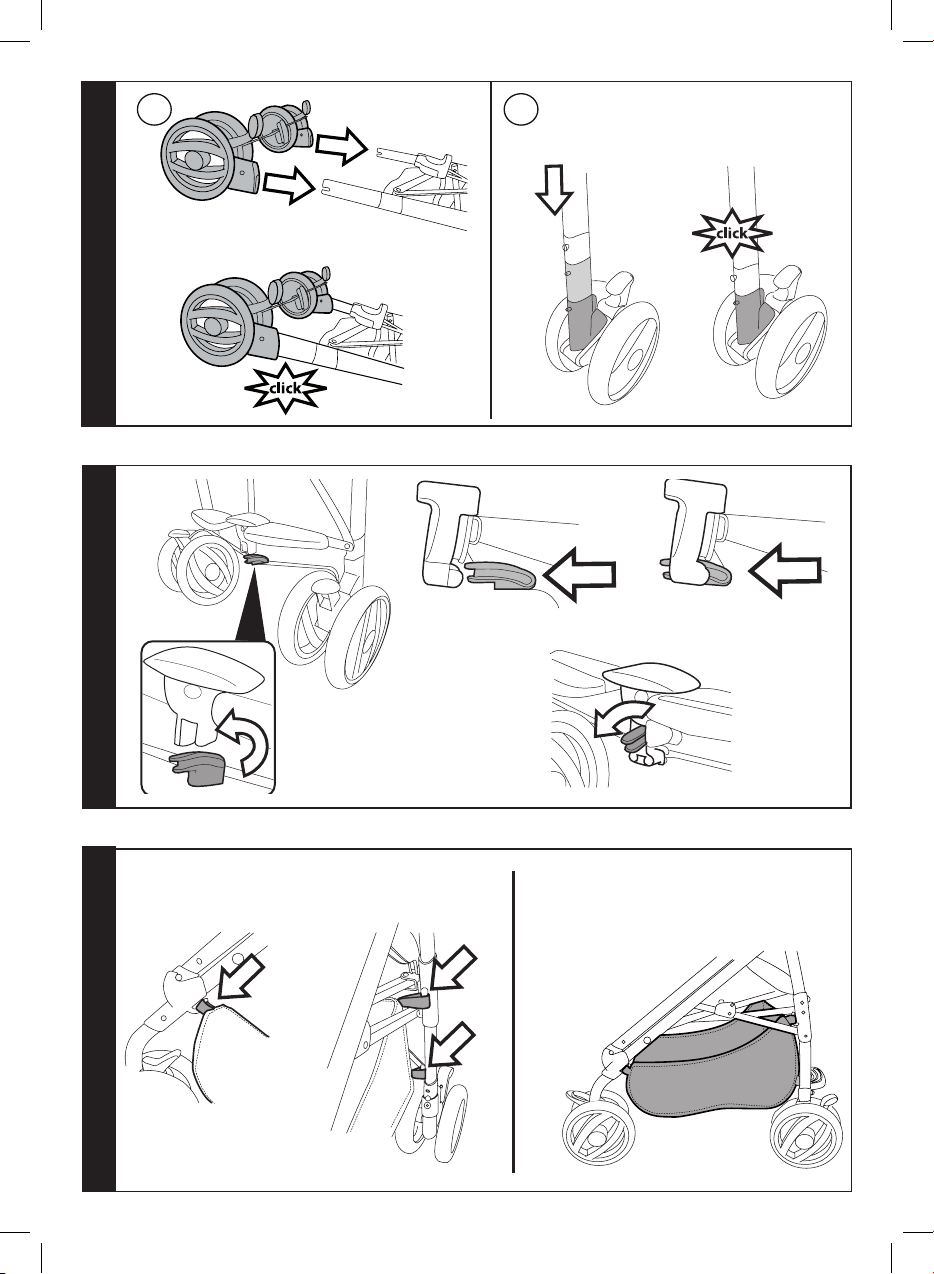
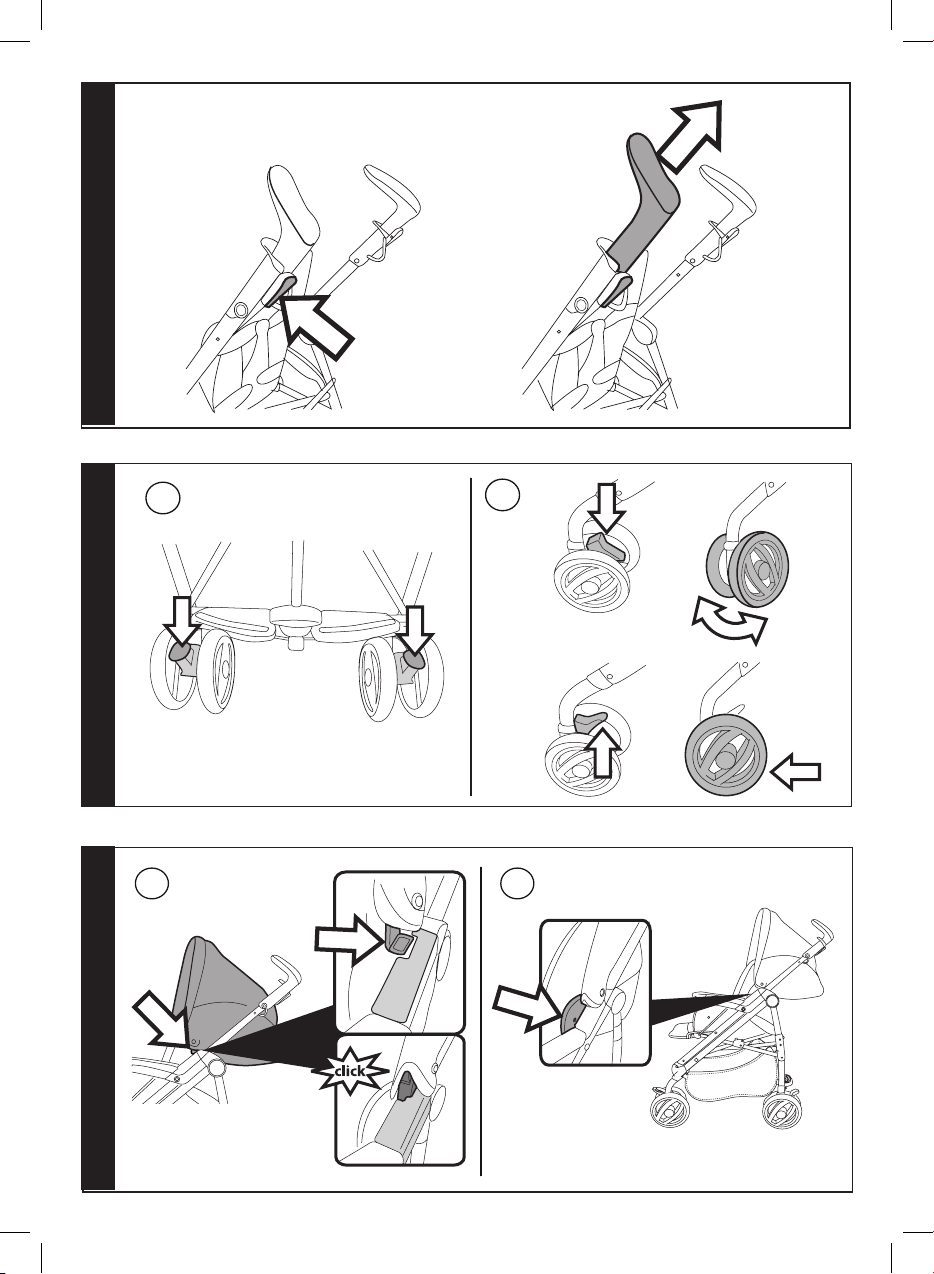
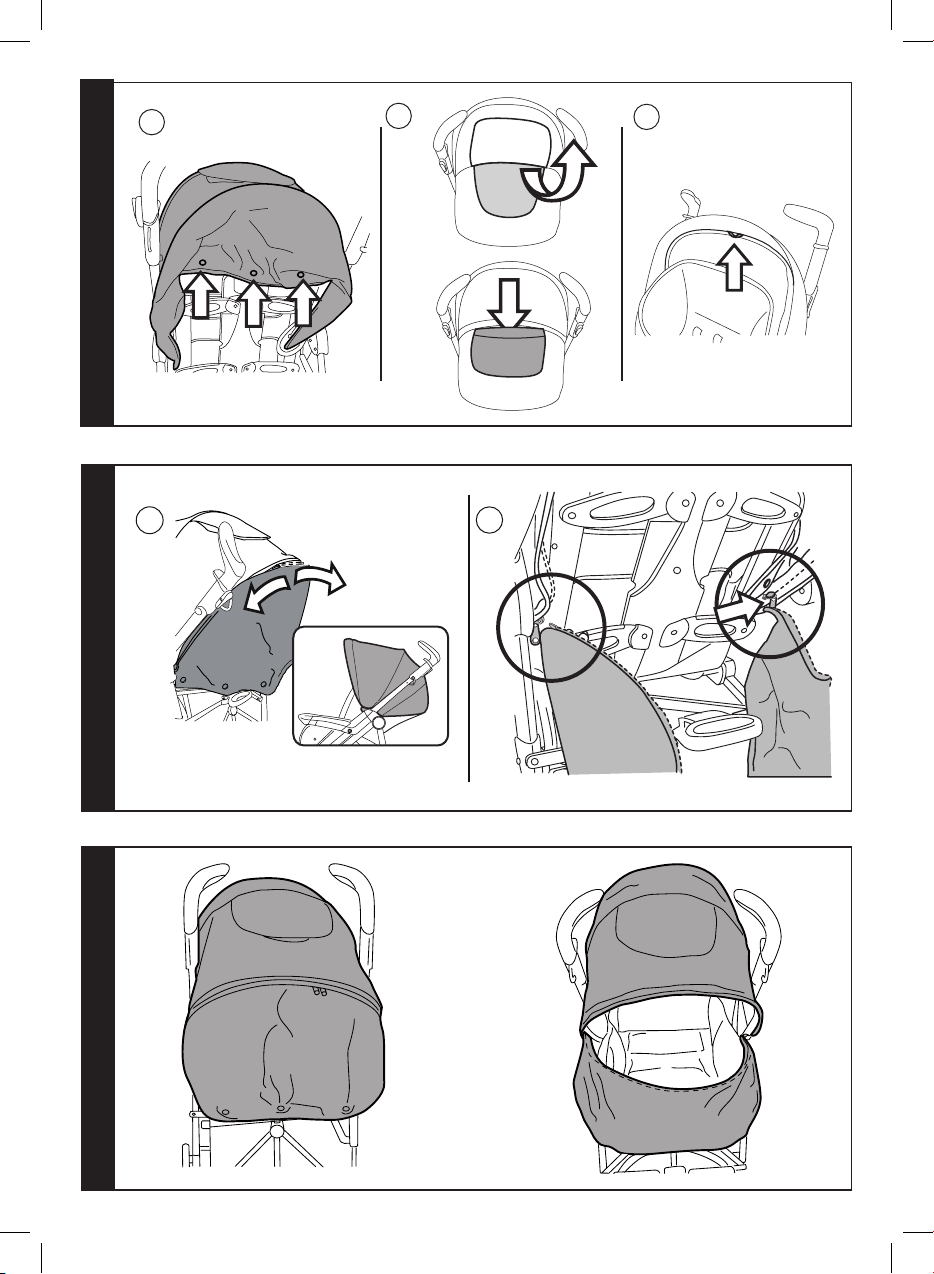
Peg-Perego pliko p3 compact User manual

pliko p3 compact
IT Istruzioni d’uso
EN Instructions for use
FR Notice d’emploi
DE Gebrauchsanleitung
ES Instrucciones de uso
BR-PT Instruções para uso
NL Gebruiksaanwijzing
DK Brugsanvisning
FI Käyttöohjeet
CZ Návod na použití
SK Návod na použitie
HU Használati útmutató
SL Navodila za uporabo
RU Инструкции по пользованию
TR Kullanim klavuzu
HR/SRB/MNE/BiH Upute za uporabu
EL Οδηγίες χρήσεως
AR

B
A
1
A
B
3
E
OK
D
C
2

B
A
4
3
2
1
4
A
B
C
A
B
C
5
6

B
1
2
A
8
9
B
A
2
1
7

E
D
C
10
11
B
A
12

A
BB
C
DD
F
B
CD
E
A
14
15
13

1
2
3
17
18
16
B
A

B
A
1
1
2
2
AB
3
2
1
20
21
19

2
1
B
3
4
A
B
A
23
24
22

4
6
B
5
A
1
3
2
1
2
B
A
2
1
26
27
25

GM
Ganciomatic
System
AB
B
A
29
30
28

C
B
A
BC
A
32
31

- 13 -
1
2
4
5
7
6
8
10
9
12
13
16
15
17
18
19 20
21
22
23
14
11
3
25
24
PLIKO P3 COMPACT

- 14 -
1) SAPI6832NGL
2) ARPI0441NPEG
3dx) SPST7048DN
3sx) SPST7048SN
4dx) SPST7006D*
4sx) SPST7006S*
5dx) SPST7007DNPEG
5sx) SPST7007SNPEG
6dx) SPST7002JWD*
6sx) SPST7002JWS*
7) SPST6991*
8) SAPI7038NPEG
9) SAPI6994JL31N*
10dx) ASPI0116DN*
10sx) ASPI0116SN*
11dx) ASPI0127DGL
11sx) ASPI0127SGL
12) MUCI5P22N
13) IRSHPK00-
NY01RE53M
14) SAPI5368JKN*
1%) MMRP0812
16) SAPI7020NN
17) SPST7031N*
18) SAPI6099KL31N*
19) ARPI0582L31N
20) SPST4023N
21) ITP3CQ00NL31*
22) SOFF0302L31
23) RSEP3N--NL01
24) BCAPLK*
25) BSAPLK*
PLIKO P3 COMPACT IT_Italiano
Grazie per aver acquistato un prodotto Peg-Pérego.
AVVERTENZA
_ IMPORTANTE: leggere attentamente queste
istruzioni e conservarle per un futuro utilizzo. La
sicurezza del bambino potrebbe essere messa a
rischio se non si eseguono queste istruzioni.
_ Questo articolo è stato progettato per il trasporto di
1 bambino nella seduta ed 1 bambino in piedi sulla
pedanetta posteriore.
_ Non utilizzare questo articolo per un numero di
occupanti superiori a quanto previsto dal costruttore.
_ Questo articolo è omologato per bambini dalla
nascita, fino a 15 kg di peso nella seduta. La pedanetta
posteriore è omologata per il trasporto di un secondo
bambino fino a 20 kg di peso.
_ Questo articolo e' stato progettato per essere usato in
combinazione con i prodotti Peg Perego Ganciomatic:
seggiolino auto "Primo Viaggio" (gruppo 0+) o Navetta
(gruppo 0).
_ Prestare attenzione alla presenza del bambino quando
si effettuano operazioni di regolazione dei meccanismi
(maniglione, schienale).
_ Azionare sempre il freno quando si è fermi e durante le
operazioni di carico e scarico del bambino.
_ Le operazioni di assemblaggio, preparazione
dell’articolo, di pulizia e manutenzione devono essere
effettuate solo da adulti.
_ Non utilizzate questo articolo se presenta parti
mancanti o rotture.
_ Evitare di introdurre le dita nei meccanismi.
_ Ogni carico appeso al maniglione o alle maniglie può
rendere instabile l'articolo; seguire le indicazioni del
costruttore riguardo ai massimi carichi utilizzabili.
_ Non introdurre nel cestello carichi per un peso
superiore a 5 kg. Non inserire nei portabibite pesi
superiori a quanto specificato nel portabibite stesso
e mai bevande calde. Non inserire nelle tasche delle
capotte (se presenti) pesi superiori a 0.2 Kg.
_ Il frontalino non è progettato per reggere il peso del
bambino; il frontalino non è disegnato per mantenere
il bambino nella seduta e non sostituisce il cinturino di
sicurezza.
_ Non utilizzare l'articolo in vicinanza di scale o gradini;
non utilizzare vicino a fonti di calore, fiamme libere od
oggetti pericolosi a portata delle braccia del bambino.
_ Potrebbe essere pericoloso utilizzare accessori non
approvati dal costruttore.
_ ATTENZIONE Non utilizzare il parapioggia (se
presente) in ambienti chiusi e controllare sempre che il
bambino non sia accaldato; non collocare mai vicino a
fonti di calore e fare attenzione alle sigarette.
Il parapioggia non deve essere utilizzato su un
passeggino in assenza di capotta o parasole in grado
di accoglierlo. Usare la capottina parapioggia solo
sotto la supervisione di un adulto. Assicurarsi che il
parapioggia non interferisca con nessun meccanismo
in movimento del carrello o passeggino; togliere
sempre il parapioggia prima di chiudere il vostro
carrello o passeggino.
_ quando si utilizza il passeggino con due bambini,
IT• Ricambi disponibili in piú colori da specificare nella richiesta.
EN• Spare parts available in different colours to be specified when
ordering.
FR• Pièces de rechange disponibles en plusieurs couleurs à spécifier
dans la demande.
DE• Ersatzteile in mehr Farben vorhanden, die in der Anfrage
spezifiziert werden müssen.
ES• Repuestos disponibles en otros colores que se especificarán en
el pedido.
BR-PT• Peças de reposição disponíveis em cores alternativas a serem
especificadas no pedido.
NL• Reserveonderdelen verkrijgbaar in meerdere kleuren, bij
bestelling te specificeren.
DK• Reservedele kan leveres i flere farver som bør specificeres ved
bestillingen.
FI• Varaosia saatavana eri värisinä: ilmoita väri tilauksessa.
CZ• U náhradních dílů, které jsou k dispozici ve více barvách, je
nutné na objednávce specifikovat příslušnou barvu.
SK• Pri náhradných dieloch, ktoré sú k dispozícii vo viacerých
farbách, je potrebné pri objednávke špecifikovať želanú farbu.
HU• A tartalék alkatrészek különböző színekben elérhetők, melyeket
rendeléskor kell kiválasztani.
SL• Rezervni deli so na voljo v več barvah, ki jih je treba navesti pri
naročilu.
RU• Запчасти имеются различных цветов, необходимый указать в
запросе.
TR• Siparişte belirtilen değişik renklerdeki yedek parçalari
mevcuttur.
HR/SRB/MNE/BiH•Zamjenski dijelovi dostupni u više boja što je
potrebno specificirati u narudžbi.
EL• Ανταλλακτικά διαθέσιμα σε διάφορα χρώματα. Προσδιορίστε
όταν παραγγείλετε.
•AR

- 15 -
non lasciarli mai da soli e non permettere al secondo
bambino di salire sulla pedanetta posteriore con il
passeggino vuoto.
_ Non utilizzare le maniglie di sgancio per trasportare o
alzare il passeggino con dentro il bambino.
_ ATTENZIONE Non aggiungere qualsiasi materassino
non approvato dal costruttore.
_ Prima dell’ uso assicurarsi che i prodotti peg-
pérego ganciomatic siano correttamente agganciati
all'articolo.
_ ATTENZIONE non lasciare mai il vostro bambino
incustodito.
_ Utilizzare sempre la cintura di sicurezza a cinque punti,
agganciare sempre il cinturino girovita al cinturino
spartigambe.
_ Prima dell’ uso assicurarsi che tutti i meccanismi di
aggancio siano ingaggiati correttamente.
_ ATTENZIONE: Questo prodotto non è adatto per
correre o pattinare.
_ Nelle operazioni di apertura e chiusura, assicurarsi che
il bambino sia a debita distanza per evitare ferimenti.
_ Non consentire al bambino di giocare con questo
prodotto.
ISTRUZIONI D'USO
1• APERTURA: prima di aprire il carrello occorre togliere
i due tappi di protezione dei ganci, altrimenti non
verrà correttamente aperto (Fig.a). Per aprire il carrello,
occorre tirare verso l’alto le due leve sui manici (Fig.b);
2• contemporaneamente sollevare il carrello che si aprirà
automaticamente (Fig.c).
Per verificare che il passeggino sia correttamente
aperto, controllare i due ganci laterali (Fig.d).
Se i ganci non si fossero agganciati correttamente, fare
pressione sulla seduta (fig_e) fino al click di aggancio.
3• ASSEMBLAGGIO: per montare le ruote anteriori,
abbassare la leva A e infilare la ruota B, fino al click.
4• Per montare le ruote posteriori unite dalla barra freno,
posizionarle tenendo il freno esterno (fig_a).
ATTENZIONE controllare che l'aggancio sia avvenuto
correttamente, fino al click, come in figura (Fig.b).
5• Infine agganciare l'elemento centrale sulla barra freno
al telaio, controllando che l'aggancio sia avvenuto
correttamente, come in figura.
6• CESTELLO: per montare il cestello, infilare le asole ai
ganci anteriori A e ai ganci posteriori B e C.
La figura mostra il cestello agganciato.
7• REGOLAZIONE MANICI: i manici sono regolabili in
altezza in 3 posizioni. Per la posizione alta, premere
il pulsante e contemporaneamente alzare il manico
verso l’alto. Per abbassarlo agire in senso contrario.
8• FRENO: per frenare il passeggino, abbassare col piede
le leve posizionate sulle ruote posteriori (Fig.a).
Per sbloccare i freni, agire in senso contrario.
Da fermi, azionare sempre i freni.
RUOTE PIROETTANTI: per rendere le ruote anteriori
piroettanti (Fig.b), occorre abbassare la leva come la
freccia 1.
RUOTE FISSE: per renderle fisse, agire sulla leva in
senso contrario, come la freccia 2 .
9• CAPOTTINA: per montarla, agganciare gli attacchi
laterali della capottina nelle sedi del telaio verso
l'esterno, fino al click (Fig.a);
abbottonarla all’interno del bracciolo (Fig.b),
10• e allo schienale del passeggino (Fig.c).
La capottina è dotata:
di una finestra per osservare il bambino, di una tasca
pratica e capiente (Fig.d) e di una laccetto, a cui è
possibile agganciare dei giochini (Fig.e).
Per togliere la capottina: sganciare gli attacchi laterali
della capottina dal telaio, premendo in senso opposto
verso l'interno, sbottonarla dall'interno del bracciolo e
dallo schienale del passeggino.
11• Slacciando la zip è possibile staccare la parte
posteriore del tessuto, utilizzando la capottina
anche come parasole (Fig.a). Per riattaccare la parte
posteriore del tessuto, unire la cerniera (Fig.b).
12• Abbassando lo schienale del passeggino la capottina
posteriore si allunga e grazie alla zip con doppio
cursore è possibile creare una finestra per far passare
maggior aria e osservare il bambino quando dorme.
13• CINTURA DI SICUREZZA 5 PUNTI: per agganciarle,
inserire le due fibbie del cinturino girovita (con bretelle
agganciate freccia a) nel cinturino spartigambe fino
al click (freccia b). Per sganciarle premere il pulsante
posto centralmente alla fibbia (freccia c) e tirare verso
l’esterno il cinturino girovita (freccia d).
14• Per stringere il cinturino girovita tirare, da entrambi i
lati, nel senso della freccia, per allentarlo agire in senso
contrario.
15• Per regolare l'altezza delle cinture di sicurezza è
necessario sganciare sul retro dello schienale le due
fibbie.
Tirare verso di se le bretelle (freccia a) fino a sganciare
la fibbie e infilarle nelle asole dello schienale (freccia
b). Sfilare le bretelle dalla sacca (freccia c) e infilarle
nell'asola più idonea (freccia d), infine riagganciare
le due fibbie dietro lo schienale (freccia e). Il corretto
aggancio delle fibbie è determinato dal click (fig f).
16• REGOLAZIONE POGGIAGAMBE: il poggiagambe
é regolabile in tre posizioni. Per abbassare il
poggiagambe, tirare le due levette laterali verso il
basso e contemporaneamente abbassarlo. Per alzare il
poggiagambe, spingerlo verso l’alto fino al click.
17• REGOLAZIONE SCHIENALE: lo schienale é reclinabile in
quattro posizioni. Per abbassare lo schienale, sollevare
la maniglia e contemporaneamente abbassare lo
schienale, bloccandolo nella posizione desiderata. Per
alzarlo, spingere lo schienale verso l’alto.
18• FRONTALINO: per agganciare il frontalino, inserire le
due estremità del frontalino nei braccioli fino al click.
19• É possibile aprire il frontalino solo da un lato per
facilitare l’entrata e l’uscita del bambino quando é
più grande. Per aprire, premere il pulsante posto
sotto il bracciolo e contemporaneamente tirare
il frontalino verso l’esterno (Fig.a).Per togliere il
frontalino premere i due pulsanti posti sotto i braccioli
e contemporaneamente tirare il frontalino verso
l’esterno (Fig.b).
20• Quando si toglie il frontalino inserire i tappi in
dotazione per chiudere i braccioli del telaio.
21• PEDANETTA POSTERIORE: la pedanetta posteriore
agevola la mamma nel superare piccoli dislivelli e in
più può trasportare il secondo bambino (fig_a).
SEQUENZA DI CARICO: per utilizzare il PLIKO
P3 COMPACT con due bambini (fig_b), occorre
inizialmente frenare il passeggino, successivamente
posizionare il bambino più piccolo nella seduta e
agganciare la cintura di sicurezza (1). Impugnare
i manici (2) e fare salire il secondo bambino sulla
pedanetta (3).
• Non lasciate mai soli i vostri bambini.

- 16 -
• Non permettete al bambino di salire sulla pedanetta
posteriore con il passeggino vuoto.
22• CHIUSURA: prima di chiudere PLIKO P3 COMPACT,
è necessario sganciare la Navetta XL o il seggiolino
auto Primo Viaggio Tri-Fix. É possibile chiudere il
passeggino con una sola mano: tirare verso l’alto prima
una leva e poi l’altra fino allo scatto.
23• Impugnare la maniglia centrale e tirarla verso l’alto fino
alla chiusura (fig_a). Verificare la corretta chiusura del
carrello dal gancio di sicurezza (fig_b).
Il carrello chiuso rimane in piedi da solo .
24• TRASPORTO: Il PLIKO P3 COMPACT si può trasportare
comodamente (tenendo le ruote anteriori fisse)
impugnando la maniglia centrale (fig_a). Si può
trasportare anche grazie alla maniglia laterale, (fig_b).
25• SFODERABILITÀ: per sfoderare il passeggino:
. sganciare gli attacchi della sacca dai braccioli in
sequenza come indicato (fig_a);
. sganciare il bottone della sacca lateralmente;
. estrarre la sacca dal poggiagambe;
. sfilare lo spartigambe del cinturino da sotto la seduta
(fig_b);
26• sganciare i bottoni della sacca, dalla seduta;
. svitare il cinturino (solo da un lato) tenendo il dito
sotto al dado;
. sfilarla dall’alto.
GANCIOMATIC SYSTEM
Ganciomatic System é il sistema pratico e veloce che
ti permette di agganciare, la Navetta XL, il seggiolino
auto Primo Viaggio (gruppo 0+), alla Base Ganciomatic
del passeggino con un solo gesto.
Appoggiarli alla Base Ganciomatic e premere sul
prodotto con entrambe le mani, fino al click.
Azionare sempre il freno del telaio o passeggino prima
di agganciare e sganciare i prodotti (consultare i
rispettivi manuali istruzioni).
Verificare che l'elemento di trasporto del bambino sia
correttamente agganciato.
27• ATTACCHI GANCIOMATIC DEL PASSEGGINO :
per alzare gli attacchi Ganciomatic , tirare verso
l’esterno la levetta e contemporaneamente ruotare
verso l’alto i due attacchi fino al click (fig_a).
Per abbassare gli attacchi Ganciomatic, tirare verso
l’esterno la levetta e contemporaneamente, ruotare
verso il basso gli attacchi, (fig_b).
• PLIKO P3 COMPACT + Navetta XL :
per agganciare la Navetta XL occorre :
- frenare PLIKO P3 COMPACT;
- alzare gli attacchi Ganciomatic del telaio;
- togliere il frontalino (Punto 19); inserire i tappi in
dotazione per chiudere i braccioli del telaio.
- alzare il poggiagambe nella posizione più alta;
- impugnare il maniglione della Navetta;
28• posizionare la Navetta sugli attacchi Ganciomatic del
passeggino, tenendo il lato della testa della navicella
dalla parte opposta ai manici del passeggino;
- premere con entrambe le mani sui lati di Navetta fino
al click; (fig_a).
- Per sganciare la Navetta dal carrello e per maggiori
informazioni, consultare il suo manuale d'uso.
• PLIKO P3 COMPACT + Primo Viaggio (gruppo 0+):
per agganciare il seggiolino auto occorre :
- frenare il telaio;
- alzare gli attacchi Ganciomatic del telaio;
- posizionare il seggiolino auto verso la mamma e
spingerlo verso il basso fino al click, (fig_b)
- E' importante non rimuovere il frontalino dal
passeggino, quando si aggancia il seggiolino auto (per
l'aggancio del frontalino consultare il punto 18);
- Per sganciare il seggiolino auto dal passeggino
consultare il suo manuale d'uso.
NUMERI DI SERIE
29•PLIKO P3 COMPACT, riporta dietro lo schienale,
informazioni relative: nome del prodotto, data di
produzione e numerazione seriale dello stesso.
Queste informazioni sono indispensabili in caso di
reclamo.
ACCESSORI
30• PARAPIOGGIA: applicabile alla capottina (fig_a).
ZANZARIERA: applicabile alla capottina (fig_b).
31• BORSA: borsa con materassino per il cambio del bebè,
applicabile al passeggino (fig_a).
BORSA VIAGGIO: Pratica borsa per il trasporto aereo
del passeggino (fig_b).
OMBRELLINO: pratico ombrellino coordinato (fig_c).
32• PORTABIBITE: agganciabile al funghetto presente sul
telaio del prodotto (fig_a).
BABY CUSHION: per seggioloni e passeggini Peg
Perego. Lato inverno in tessuto jersey matelassé, lato
estate 100% cotone (fig_b).
VARIO FOOT MUFF: sacco piuma multiuso caldo,
leggero e morbido. Pratico come fasciatoio e sacca,
regolabile in 3 altezze (fig_c).
PULIZIA E MANUTENZIONE
MANUTENZIONE DELL'ARTICOLO: proteggere da
agenti atmosferici: acqua, pioggia o neve; l’esposizione
continua e prolungata al sole potrebbe causare
cambiamenti di colore in molti materiali; conservare
questo articolo in un posto asciutto. Eseguire controlli
ed interventi di manutenzione sulle parti principali
ad intervalli regolari.
PULIZIA DEL TELAIO: periodicamente pulire le parti in
plastica con un panno umido senza utilizzare solventi
o altri prodotti simili; mantenere asciutte tutte le
parti in metallo per prevenire la ruggine; mantenere
pulite tutte le parti in movimento (meccanismi di
regolazione, meccanismi di aggancio, ruote...) da
polvere o sabbia e se occorre, lubrificarle con olio
leggero.
PULIZIA DEL PARAPIOGGIA: lavare con una spugna e
dell'acqua saponata, senza utilizzare detersivi.
PULIZIA DELLE PARTI IN TESSUTO: spazzolare le parti
in tessuto per allontanare la polvere e lavare a mano
a una temperatura massima di 30° non torcere; non
candeggiare al cloro; non stirare; non lavare a secco;
non smacchiare con solventi e non asciugare a mezzo
di asciugabiancheria a tamburo rotativo.

- 17 -
PEG-PÉREGO S.p.A.
Peg-Pérego S.p.A. è certificata ISO 9001.
La certificazione offre ai clienti e ai
consumatori la garanzia di una
trasparenza e fiducia nel modo di
lavorare dell'impresa.
Peg Pérego potrà apportare in qualunque momento
modifiche ai modelli descritti in questa pubblicazione,
per ragioni di natura tecnica o commerciale.
Peg Pérego è a disposizione dei suoi Consumatori per
soddisfare al meglio ogni loro esigenza. Per questo,
conoscere il parere dei ns. Clienti, è per noi
estremamente importante e prezioso. Le saremo
quindi molto grati se, dopo aver utilizzato un ns.
prodotto, vorrà compilare il QUESTIONARIO
SODDISFAZIONE CONSUMATORE, segnalando
eventuali osservazioni o suggerimenti, che troverà nel
nostro sito internet: www.pegperego.com
SERVIZIO ASSISTENZA PEG-PÉREGO
Se fortuitamente parti del modello vengono perse
o danneggiate, usare solo pezzi di ricambio originali
Peg Pérego. Per eventuali riparazioni, sostituzioni,
informazioni sui prodotti, vendita di ricambi originali
e accessori, contatta il Servizio Assistenza Peg Pérego
indicando, qualora fosse presente, il numero seriale del
prodotto.
tel. 0039/039/60.88.213
numero verde: 800/147.414 (contattabile da rete fissa)
fax 0039/039/33.09.992
sito internet www.pegperego.com
EN_English
Thank you for choosing a Peg-Pérego product.
WARNING
_ IMPORTANT: read these instructions carefully and
keep them for future use. The child’s safety could
be at risk if these instructions are not followed.
_ This item was designed for the transport of 1 child
in the seat and 1 one child standing on the rear
footboard.
_ Do not use this item for a number of occupants
greater than that intended by the manufacturer.
_ This item is approved for children from birth up to
a weight of 15 kg in the seat. The rear footboard is
approved for the transport of a second child up to a
weight of 20 kg.
_ This item has been designed for use with the Peg
Perego Ganciomatic products: "Primo Viaggio" car seat
(0+ group) or Navetta (0 group).
_ Be careful not to hurt the child when adjusting the
mechanisms (handlebar, backrest).
_ Always apply the brake when stopped and when
positioning the child in the seat or when removing the
child from the seat.
_ Assembly and preparation of the product, plus
cleaning and maintenance operations, must be carried
out exclusively by adults.
_ Do not use this item if there are parts missing or signs
of breakage.
_ Do not insert fingers into the mechanisms.
_ Any load hanging on the handlebar or the handles
can make the stroller/carriage unstable; follow the
manufacturer’s instructions for max load capacity.
_ Do not place loads over 5 kilos in the basket. Do not
place in the bottle holder weights heavier than stated
or hot drinks. Do not place in the hood pockets (if
applicable) weights over 0.2 Kg.
_ The front bar is not designed to support the child’s
weight. It is not designed to keep the child in the seat
and does not substitute for the waist belt.
_ Do not use the item near to stairs or steps, heat
sources, naked flames or dangerous objects within
reach of the child.
_ The use of accessories not approved by the
manufacturer could be dangerous.
_ WARNING Don't use the rain cover (if present)
on a product without a hood or parasol that can
hold it. Always use the rain cover only under adult
supervision. Don't use the rain cover indoors and
check to ensure the child is not to warm; do not
park the vehicle close to heat sources and keep well
away from the lighted cigarettes. Ensure that the rain
cover is not interfering with any moving parts of the
carriage/stroller. Always remove the rain cover before
folding your carriage/stroller.
_ When using the stroller with two children, never leave
them unattended and do not allow the second child
to climb onto the rear ledge with the stroller empty.
_ Do not use the release levers to move or lift the stroller
when the child is in it.
_ WARNING Do not add any mattress are not approved
by the manufacturer.

- 18 -
_ Before use check that the peg-pérego ganciomatic
products are correctly fixed to the item.
_ WARNING Never leave your child unattended.
_ Always use the 5-point harness and attach the waist
strap to the leg divider strap.
_ WARNING This product is not suitable for running or
skating
_ Before use check that all the attachment mechanisms
are correctly engaged.
_ To avoid injury ensure that your child is kept away
when unfolding and folding this product.
_ Do not let your child play with this product.
INSTRUCTIONS FOR USE
1•
OPENING: before opening the chassis remove the two
safety caps from the hooks, otherwise it will be impossible
to open it correctly (Fig.a). To open the chassis, pull the
two levers on the handlebars upwards (Fig.b);
2• at the same time, lift the chassis and it will open
automatically (Fig.c). To make sure that the stroller is
correctly open, check the two side hooks (Fig.d).
If the straps are not fasten correctly, press onto the
seat (fig_e) until it clicks into place.
3• ASSEMBLING: to mount the front wheels, lower lever A
and slip wheel B on until it clicks into place.
4• To mount the rear wheels connected by the brake cable,
place them with the brake facing externally (fig_a).
WARNING: ensure the hooks have clicked into place, as
in figure b.
5• Finally, hook the central element of the brake cable
onto the chassis, ensuring it clicks into place, as in the
figure.
6• BASKET: to mount the basket, slip the loops over
the front hooks A and rear hooks B and C. The figure
shows the attached basket.
7•
ADJUSTING THE HANDLEBARS: The height of the two
handlebars can be adjusted to 3 positions. For the higher
position, press the button while pulling the handlebars
upwards. To lower it, do the opposite .
8• BRAKE: to set the brakes on the stroller, lower the
levers on the rear wheels with your foot (Fig.a). To
release the brakes, lift the lever.
Always set the brakes when the stroller is not
moving.
SWIVEL WHEELS: to swivel the front wheels lower the
levers as shown in arrow 1 (Fig.b).
WHEELS IN STATIONARY POSITION: To make them
stationary, push the lever in the opposite direction, as
indicated by arrow 2.
9• HOOD: to mount the hood, fasten the attachments
which are situated on the sides of the hood onto
those on the chassis, pushing outwards until the hood
clicks into place (Fig.a); fasten it onto the inside of the
armrest (Fig.b),
10• and onto the backrest of the stroller (Fig.c). The hood
has a window enabling you to observe your child, a
large and practical pocket (Fig.d) and a cord which
games can be hung on (Fig.e).
To remove the hood: unhook the hood’s side
attachments from the chassis by pulling inwards,
unbutton it from the inside of the armrest and from
the backrest of the stroller.
11• You can detach the back part of the fabric by
unzipping it and use the hood also as a sun canopy
(Fig.a). To reattach the back part of the fabric, close the
zipper (Fig.b).
12• By lowering the stroller backrest, the rear hood
extends and through the double zipper a window can
be created to allow more air to circulate and watch the
child when sleeping.
13• 5-POINT SAFETY HARNESS: to fasten, insert the two
buckles of the waist strap (with attached shoulder
straps, arrow a) into the leg divider strap until they
click into place (arrow b). To unfasten them, press the
button which is situated in the centre of the fastener
(arrow c) and pull the waist strap outwards (arrow d).
14• To tighten the waist strap, pull on both sides in the
direction of the arrow.To loosen it do the opposite.
15• To adjust the height of the safety harnesses, release
the two buckles on the rear of the backrest.
Pull the shoulder straps towards you (arrow a) until the
buckles are released and insert them in the backrest
loops (arrow b). Remove the shoulder straps from the
sack (arrow c) and insert them in the most appropriate
buckle (arrow d), then reattach the two buckles
behind the backrest (arrow e). The buckles are securely
attached when a click is heard (fig f).
16• ADJUSTING THE FOOTREST: the footrest can be
adjusted to three positions. To lower the footrest, pull
the two side levers downwards while lowering the
footrest. To lift the footrest, pull it upwards until it
clicks into place.
17• ADJUSTING THE BACKREST: the backrest reclines to
four different positions. To lower the backrest, lift the
handle while lowering the backrest, locking it in the
desired position. To raise it, pull the backrest upwards.
18• FRONT BAR: to fasten the front bar, slip both ends of
the front bar into the armrests until it clicks into place.
19• The front bar can be opened to one side only to allow
the child to get in and out of the stroller easier when
he or she is older. To open the front bar, press the
button under the armrest while pulling out the front
bar (Fig.a). To remove the front bar, press the two
buttons under the armrests while pulling out the front
bar (Fig.b).
20• When removing the front bumper, insert the plugs
provided to close the armrests of the chassis.
21• REAR LEDGE: the rear ledge helps the mother
overcome small bumps and can also be used to carry a
second child (fig_a).
LOADING SEQUENCE: to use the PLIKO P3 COMPACT
with two children (fig_b), first set the brakes on the
stroller, then place the smaller child in the seat and
fasten the safety harness (1). Hold the handlebars (2)
and have the second child stand on the ledge (3).
• Never leave your children unattended.
• Do not allow a child to stand on the rear ledge when
the stroller is empty.
22• FOLDING UP: before folding up PLIKO P3 COMPACT,
remove the Navetta XL or the PrimoViaggio car
seat. The stroller can be folded up using one hand
only: pull first one lever upwards and then the other,
until they click.
23• Hold the central handlebar and pull it upwards until
the stroller folds up (fig_a). Check the correct closure
of the chassis from the safety hook (fig_b).
When folded, the chassis will stand upright .
24• CARRYING: PLIKO P3 COMPACT can be conveniently
carried by the central handle (with the front wheels set
on stationary) (fig.a). It can also be carried by the side
handle (fig_b).
25• REMOVABLE LINING: To remove the lining from the
stroller:. unhook the sack attachments from the
armrests in the order indicated (fig_a);. unfasten the
sack button at the sides;. remove the sack from the
footrest;. slide the leg divider part of the strap from
under the seat (fig_b);

- 19 -
26• unfasten the sack buttons from the seat;. unscrew the
strap (only on one side),by keeping your finger under
the nut; slide it downwards
GANCIOMATIC SYSTEM
Ganciomatic is the quick and practical system that
allows you to attach the Navetta XL or the Primo
Viaggio (0+ group) which are also equipped with the
Ganciomatic system, to the Pliko P3 in stroller format,
thanks to its Ganciomatic connectors.
27• THE STROLLER GANCIOMATIC FASTENERS:
to raise the Ganciomatic connectors on the stroller, lift
the fabric covering at the corners of the seat, pull the
lever outwards and at the same time swivel the two
connectors upwards until they click (fig_a).
To lower the stroller Ganciomatic fasteners, pull
the lever outwards and at the same time rotate the
fasteners downwards (fig_b).
PLIKO 3 COMPACT + Navetta XL:
To attach the carrycot to you must:
- block the PLIKO P3 COMPACT
- lift the Ganciomatic clasps in the frame
- remove the bumper bar (step 19) and insert the tops
into the chassis armrests.
- raise the footrest to its highest position;
- hold the Navetta by its handlebar;
28• place the Navetta on the Ganciomatic hooks on the
stroller, keeping the head of the bassinet unit on the
opposite side from the stroller handlebars;
- press down with both hands on the sides of the
Navetta, until it clicks into place (fig_a);
- to remove the Navetta from the chassis and for more
information, please refer to the instruction manual.
PLIKO P3 COMPACT + Primo Viaggio (0+ group):
To attach the car seat you must:
- block the chassis
- lift the Ganciomatic clasps in the frame
- put the car seat in face-mum position and push it
downwards until it clicks (fig_b)
- Do not remove the bumper bar from the pushchair
when you attach the car seat (please read step 18 for
information on how to put on the bumper bar)
- Remove the car seat according to the car seat’s
instructions
SERIAL NUMBERS
29• Behind the PLIKO P3 COMPACT backrest information
relating to product name, date of manufacture and
serial number of the product are provided. This
information is required for any complaints.
ACCESSORIES
30• RAIN COVER: can be fastened to the hood (fig_a).
MOSQUITO NETTING: can be fastened to the hood (fig_b).
31• BAG: diaper-changing bag with pad for changing
baby’s diaper. Attaches to the stroller (fig_a).
TRAVEL BAG: practical duffle bag for transporting the
stroller by plane (fig_b).
PARASOL: practical umbrella to match (fig_c).
32• CUP HOLDER: may be attached to the mushroom
button on the frame of the stroller (fig. a).
BABY CUSHION for Peg Perego high chairs and strollers.
Winter side made with cozy matelassé jersey and
summer side made with 100% cotton (fig_b).
VARIO FOOT MUFF: a warm, light and soft multi-
purpose foot muff. Can be used as a changing mat
and adjusted to 3 sizes (fig_c).
CLEANING AND MAINTENANCE
PRODUCT MAINTENANCE: protect from the weather:
water, rain, or snow; prolonged and continuous
exposure to bright sunlight may give rise to colour
changes of various different materials; store this product
in a dry place.The maintenance have to be regularly.
CLEANING THE CHASSIS: periodically clean all plastic parts
with a damp cloth. Do not use solvent or similar cleaning
products; keep all metal parts dry to prevent rusting; keep
moving parts clean (adjustment mechanisms, locking
mechanisms, wheels, ...) and free of dust and sand and, if
necessary, lubricate with light machine oil.
CLEANING THE RAIN CANOPY: wash with a sponge and
soapy water; do not use detergents.
CLEANING FABRIC PARTS: brush fabric parts to remove
dust and wash by hand at a maximum temperature of
30°C; do not wring; do not use chlorine bleach, do not
iron; do not dry clean; do not apply solvent-based stain
removers and do not dry in a tumble dryer.
PEG-PÉREGO S.p.A.
Peg-Pérego S.p.A. is an ISO 9001 certified
company. This certification is a guarantee
for customers and consumers of the
transparency and trustworthiness of the
company's procedures and working
methods. Peg Pérego can make changes
at any time to the models described in this publication
for technical or commercial reasons. Peg Pérego is at
the disposal of its customers and consumers to ensure
that all their demands and queries are fully satisfied. It
is a key part of our policy to ensure we are always
aware of our customers' views and requirements. We
would therefore be very grateful if, after using a Peg
Pérego product, you take the time to fill in our
CUSTOMER SATISFACTION QUESTIONNAIRE, making a
note of any comments or suggestions you might have.
You can find the questionnaire on the Peg Pérego
website: www.pegperego.com
PEG-PÉREGO AFTER-SALES SERVICE
If any parts of the item get lost or damaged, only
use genuine Peg Pérego spare parts. For any repairs,
replacements, information on the products and sales
of genuine spare parts and accessories, contact the
Peg Pérego Assistance Service and state the serial
number of the product, if present.
tel. 0039/039/60.88.213
fax 0039/039/33.09.992
e-mail [email protected]
website www.pegperego.com

- 20 -
FR_Français
Merci d’avoir choisi un produit Peg-Pérego.
AVERTISSEMENT
_ IMPORTANT : lire ces instructions avec attention et
les conserver pour toute référence future. La sécurité
de l’enfant pourrait être menacée si ces instructions
ne sont pas suivies.
_ Cet article a été conçu pour transporter 1 enfant dans
le siège et 1 enfant debout sur le marchepied arrière.
_ Ne pas utiliser lorsque le nombre d’occupants est
supérieur aux prescriptions du fabricant.
_ Cet article est homologué pour des enfants dans le
siège de la naissance jusqu’à un poids de 15 kg. Le
marchepied arrière est homologué pour transporter un
second enfant dont le poids n’excède pas 20 kg.
_ Cet article a été conçu pour être utilisé en combinaison
avec les produits Peg Perego Ganciomatic: Siège auto
"Primo Viaggio" (groupe 0+) ou Navetta (groupe 0).
_ Prêter attention à la position de l’enfant lors des
opérations de réglage des éléments mobiles (poignée,
dossier).
_ Toujours actionner le frein lorsque l’article est à l’arrêt et
pendant l’installation ou la sortie de l’enfant.
_ Les opérations d’assemblage, de préparation de l’article,
de nettoyage et d’entretien doivent être réalisées
uniquement par des adultes.
_ Ne pas utiliser cet article si des pièces sont manquantes
ou cassées.
_ Éviter de mettre les doigts dans les mécanismes.
_ Toute charge suspendue aux poignées peut déstabiliser
le produit, suivre les recommandations du fabrication sur
les charges maximales admises.
_ Ne pas utiliser le panier pour transporter des charges
dont le poids dépasse 5 kg. Ne pas introduire dans le
porte-boisson des charges supérieures à celles indiquées
sur le porte-boisson lui-même et ne jamais introduire de
boissons chaudes. Ne pas introduire dans les poches de
la capote (lorsqu'elles sont présentes) des objets dont le
poids dépasse 0.2 kg.
_ La main courante n’a pas été conçue pour supporter le
poids de l’enfant; elle n’a pas non plus été conçue pour
maintenir l’enfant en position assise et ne remplace pas la
sangle de sécurité.
_ Ne pas utiliser l’article à proximité d’escaliers ou de
marches; ne pas l’utiliser à proximité de sources de
chaleur, de flammes directes ou d’objets dangereux se
trouvant à la portée de l’enfant.
_ L’utilisation d’accessoires n’ayant pas été approuvés par
le fabricant peut se révéler dangereuse.
_ ATTENTION Ne pas utiliser l’habillage pluie dans des
lieux clos et contrôler régulièrement que l’enfant n’a
pas trop chaud; ne jamais l’installer à proximité de
sources de chaleur et faire attention aux cigarettes.
L'habillage pluie ne doit pas être utilisé sur une
poussette sans capote en mesure de le recevoir.
Toujours utiliser l’habillage pluie sous la surveillance
d’un adulte. S’assurer que l’habillage pluie n'empêche
pas le bon fonctionnement du châssis ou de la
poussette ; toujours retirer l’habillage pluie avant de
refermer le châssis ou la poussette.
_ Lorsque la poussette est utilisée avec deux enfants, ne
jamais les laisser seuls et ne pas laisser le second enfant
monter sur le marchepied arrière tandis que la poussette
est vide.
_ Ne pas se servir des poignées de décrochage pour
transporter ou soulever la poussette alors que l’enfant est
installé à bord.
_ ATTENTION Ne pas ajouter de matelas qui ne soit pas
approuvé par le fabricant.
_ Conforme aux exigences de sécurité.
_ Avant chaque utilisation, s’assurer que les articles peg-
pérego ganciomatic sont correctement accrochés sur
le châssis.
_ ATTENTION ne jamais laisser sans surveillance l’enfant.
_ Toujours utiliser la ceinture de sécurité à cinq points;
toujours accrocher la sangle ventrale à la sangle
d’entrejambes.
_ Avant l’utilisation, s’assurer que tous les mécanismes
de fixation sont correctement enclenchés.
_ ATTENTION Ce produit ne convient pas pour faire du
jogging ou des promenades en rollers.
_ Lors des opérations d'ouverture et de fermeture,
s'assurer que l'enfant se trouve à une distance
nécessaire pour éviter qu'il ne se blesse.
_ Interdire à l'enfant de jouer avec ce produit.
INSTRUCTIONS D’UTILISATION
1• OUVERTURE : Avant d’ouvrir le châssis, il faut enlever
les deux bouchons de protection des crochets, sinon il
ne sera pas correctement ouvert (Fig.a). Pour ouvrir le
châssis, il faut tirer vers le haut les deux leviers sur les
poignées (Fig.b);
2• soulever, en même temps, le châssis qui s’ouvrira
automatiquement (Fig.c). Pour vérifier que la poussette
est correctement ouverte, contrôler les deux crochets
latéraux (Fig.d).
Si les crochets ne sont pas fixés correctement,
faire pression sur l’assise (fig_e) jusqu’au déclic
d’accrochage.
3• MONTAGE : Pour monter les roues avant, abaisser le
levier A et enfiler la roue B, jusqu’au déclic.
4• Pour monter les roues arrière unies par la barre frein,
les positionner en tenant le frein extérieur (fig_a).
ATTENTION s’assurer que l’opération a correctement
été réalisée, jusqu’au déclic, comme sur la figure (Fig.b).
5• Enfin, accrocher l’élément central sur la barre frein au
châssis, en s’assurant que l’opération a correctement
été réalisée comme sur la figure.
6• PANIER : Pour monter le panier, enfiler les
boutonnières aux crochets avant A et aux crochets
arrière B et C. La figure montre le panier fixé.
7• RÉGLAGE DES POIGNÉES : Le poignées sont réglables
en hauteur en 3positions. Pour la position haute,
appuyer sur le bouton et en même temps lever la
poignée vers le haut. Pour l’abaisser, agir dans le sens
inverse.
8• FREIN : Pour freiner la poussette, baisser avec le pied
les leviers situées sur les roues arrière (Fig.a). Pour
débloquer les freins, agir dans le sens inverse.A l’arrêt,
utiliser toujours les freins.
ROUES PIVOTANTES : Pour rendre les roues avant
pivotantes (Fig.b), il faut baisser le levier comme la
flèche 1.
Other manuals for pliko p3 compact
4
Table of contents
Languages:
Other Peg-Perego Baby Carrier manuals

Peg-Perego
Peg-Perego Pliko P3 User manual

Peg-Perego
Peg-Perego Primonido Elite User manual

Peg-Perego
Peg-Perego Culla Futura User manual

Peg-Perego
Peg-Perego Pliko Switch User manual

Peg-Perego
Peg-Perego Navetta XL User manual

Peg-Perego
Peg-Perego Navetta S User manual

Peg-Perego
Peg-Perego Navetta XL User manual

Peg-Perego
Peg-Perego Culla Elite User manual

Peg-Perego
Peg-Perego Navetta XL User manual

Peg-Perego
Peg-Perego Baby carriage User manual