Peg-Perego Culla Futura User manual

IT Istruzioni d’uso
EN Instructions for use
FR Notice d’emploi
DE Gebrauchsanleitung
ES Instrucciones de uso
BR-PT Instruções para uso
NL Gebruiksaanwijzing
DK Brugsanvisning
FI Käyttöohjeet
CZ Návod na použití
SK Návod na použitie
HU Használati útmutató
SL Navodila za uporabo
RU Инструкции по пользованию
TR Kullanim kilavuzu
HR/SRB/MNE/BiH Upute za uporabu
PL Instrukcja obsługi
UA Інструкція з використання
EL Οδηγίες χρήσεως
Culla Futura

PUSH
2
1
click
1
4
2
3
PULL 2
1

1
2
56
7 8
1
ab
2

10
11 12
2
1
11
2
3
9

13 14
15 16

17
Culla Futura
IT• Ricambi disponibili in piú colori da specificare nella richiesta.
EN• Spare parts available in different colours to be specified when ordering.
FR• Pièces de rechange disponibles en plusieurs couleurs à spécifier dans la demande.
DE• Ersatzteile in mehr Farben vorhanden, die in der Anfrage spezifiziert werden müssen.
ES• Repuestos disponibles en otros colores que se especificarán en el pedido.
BR-PT•
Peças de reposição disponíveis em cores alternativas a serem especificadas no pedido.
NL• Reserveonderdelen verkrijgbaar in meerdere kleuren, bij bestelling te specificeren.
DK• Reservedele kan leveres i flere farver som bør specificeres ved bestillingen.
FI• Varaosia saatavana eri värisinä: ilmoita väri tilauksessa.
CZ• U náhradních dílů, které jsou k dispozici ve více barvách, je nutné na objednávce
specifikovat příslušnou barvu.
SK• Pri náhradných dieloch, ktoré sú k dispozícii vo viacerých farbách, je potrebné pri
objednávke špecifikovať želanú farbu.
HU• A tartalék alkatrészek különböző színekben elérhetők, melyeket rendeléskor kell
kiválasztani.
SL• Rezervni deli so na voljo v več barvah, ki jih je treba navesti pri naročilu.
RU• Запчасти имеются различных цветов, необходимый указать в запросе.
TR• Siparişte belirtilen değişik renklerdeki yedek parçalari mevcuttur.
HR/SRB/MNE/BiH•Zamjenski dijelovi dostupni u više boja što je potrebno specificirati u narudžbi.
PL• Części zamienne gondolki są dostępne w różnej kolorystyce.
UA• Частини доступні в декількох кольорах, які будуть вказані в запит
EL• Ανταλλακτικά διαθέσιμα σε διάφορα χρώματα. Προσδιορίστε όταν παραγγείλετε.
1 • BCANCF00*
2 • ASPI0252L89N
3 • SOPA0156L50
4 • MMMO0281
5 • ITNA12*
6 • MMSP0114
7 • BMANCF00*
8 • BINNCF00*
9 • BSANCF00*
10 • BCONCF00*
.
•AR
.•FA

7
Grazie per aver scelto un prodotto
PegPerego.
ATTENZIONE
IMPORTANTE: leggere
attentamente le istruzioni prima
dell'uso e conservarle per futuro
riferimento. La sicurezza del
bambino potrebbe essere messa
a rischio se non si eseguono
queste istruzioni.
• ATTENZIONE: questo prodotto è
adatto solo per un bambino che
non riesce a stare seduto da solo.
• ATTENZIONE: Questo prodotto
è adatto per bambini che non
si possono mettere da soli in
posizione seduta, girarsi e fare leva
su mani e ginocchia. Peso massimo
del bambino: 9 kg.
• ATTENZIONE: usare soltanto
su una superficie stabile,
orizzontale, piana e asciutta.
• ATTENZIONE: Non lasciare che
altri bambini giochino senza
sorveglianza vicino alla navicella.
• ATTENZIONE: non utilizzare il
prodotto se una parte è rotta,
IT_Italiano strappata o mancante.
• Utilizzare unicamente le parti di
ricambio fornite o consigliate dal
produttore/distributore.
• Non utilizzare l’articolo in vicinanza
di scale o gradini, non utilizzare
vicino fonti di calore, fiamme libere
o oggetti pericolosi che sono alla
portata del bambino.
• Assemblaggio e preparazione del prodotto
devono essere effettuati da adulti.
• ATTENZIONE: prima dell’ uso
assicurarsi che tutti i meccanismi
di aggancio siano fissati
correttamente.
• Non inserire le dita nei meccanismi.
• Non utilizzare accessori non
approvati dal costruttore.
• Questo prodotto è progettato per i
bambini dalla nascita fino a un peso
di 9 kg.
• ATTENZIONE: Per evitare lesioni o
ferimenti assicurarsi che il bambino
sia a debita distanza durante le
operazioni di apertura e chiusura
del prodotto.
• ATTENZIONE: Quando sdraiato,
assicurarsi che la testa del bambino
non sia mai al di sotto rispetto al
suo corpo.
• Prima dell'uso, ispezionare le

8
maniglie di trasporto e il fondo della
culla per verificare la presenza di
segni di danneggiamento e usura.
• Assicurarsi che il maniglione sia nella
corretta posizione di impiego, prima
di effettuare il sollevamento della
culla.
• Il presente prodotto è progettato per
contenere il neonato quando dorme.
• Non aggiungere o utilizzare
materassini diversi da quello
originale.
IN ABBINAMENTO AL TELAIO:
• Questo prodotto è compatibile
con i seguenti prodotti originali
PegPerego: Carrello Book, Scout,
Classico, Team, Duette Piroet, Carrello
Futura.
• ATTENZIONE: Controllare che
i dispositivi di aggancio siano
correttamente fissati prima dell’uso.
• ATTENZIONE: Non lasciare mai il
bambino incustodito.
IN ABBINAMENTO ALLO STAND:
• ATTENZIONE: questo prodotto è
compatibile con i seguenti prodotti
originali PegPerego: Bassinet Stand.
• ATTENZIONE: Non utilizzare se
una qualsiasi parte del supporto
è rotta, strappata o mancante.
• ATTENZIONE: Non lasciare che
altri bambini giochino senza
sorveglianza vicino alla navicella ed
al supporto
Le immagini riferite ai dettagli tessili potrebbero
differire dalla collezione acquistata.
Per maggiori informazioni consultare il nostro sito
internet: www.pegperego.com
Istruzioni d’uso
1 CAPOTTINA: per sollevare la capottina tenderla fino al click,
per un apertura completa.
2 Per abbassare la capottina premere sulla parte superiore
della stessa e contemporaneamente abbassarla (fig_a).
La capottina è dotata di aletta parasole. Estrarre l’aletta
parasole dal lembo anteriore della capottina (fig_b).
3 COPERTINA: per agganciarla correttamente posizionarla
sulla culla e abbottonarla lateralmente su entrambi i lati.
Copertina correttamente agganciata (fig_a).
Grazie alle calamite è possibile agganciare la copertina
alla capottina garantendo al bambino maggior protezione
dalle interperie. Risvoltare la copertina verso l’alto e
agganciarla alle calamite posizionate all’interno della
capottina (fig_b).
4 MANIGLIONE DI TRASPORTO: il maniglione è integrato nella
capottina, per trasportare la culla, se abbassata, sollevare la
capottina fino al click e afferrare il maniglione.
• Prima di sollevare la culla assicurarsi che il maniglione
integrato sia correttamente agganciato.
• Prima di sollevare la culla assicurarsi che la capottina sia
nella posizione corretta per il trasporto.
5 POSIZIONE DONDOLINO: la base di Culla Futura ha una
speciale forma che, appoggiata su una superficie piana,
permette di dondolare il bambino.
Ganciomatic system
6 Ganciomatic System é il sistema pratico e veloce che

9
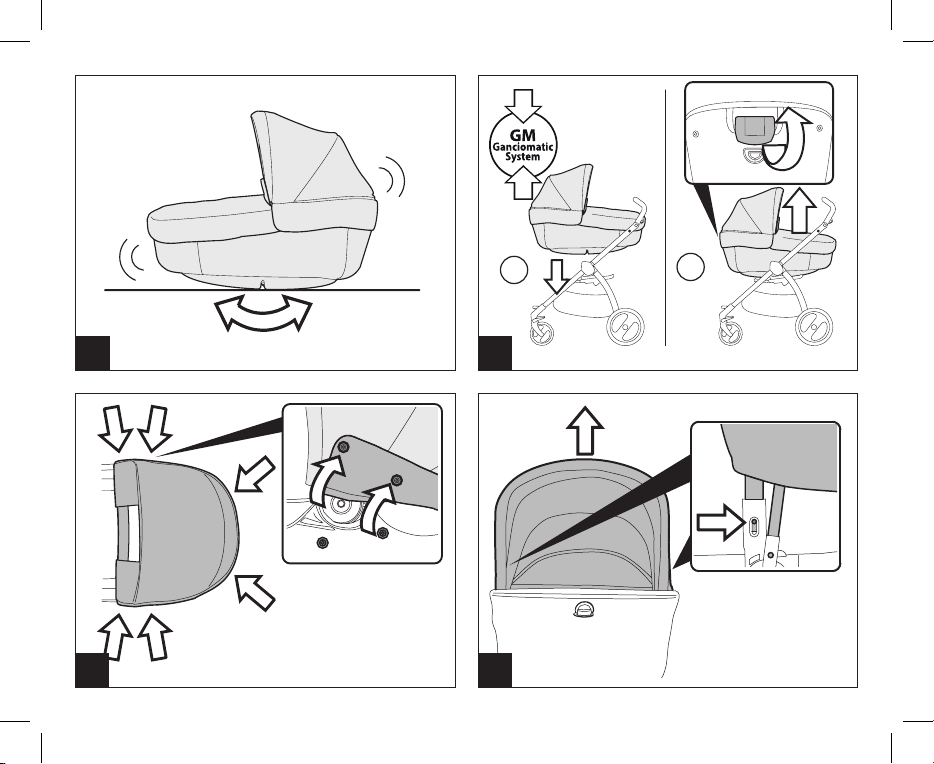
ti permette di agganciare Culla Futura agli attacchi
Ganciomatic del passeggino o alla base del carrello.
Per agganciare la culla, posizionarla sul passeggino o sul
carrello e premere con entrambi le mani fino al click.
Azionare sempre il freno del passeggino o del carrello
prima di agganciare e sganciare.
Verificare che la culla sia correttamente agganciata.
• Per sganciarla, alzare la leva della maniglia Ganciomatic
(freccia_a) e alzare (freccia_b).
Sfoderabilità
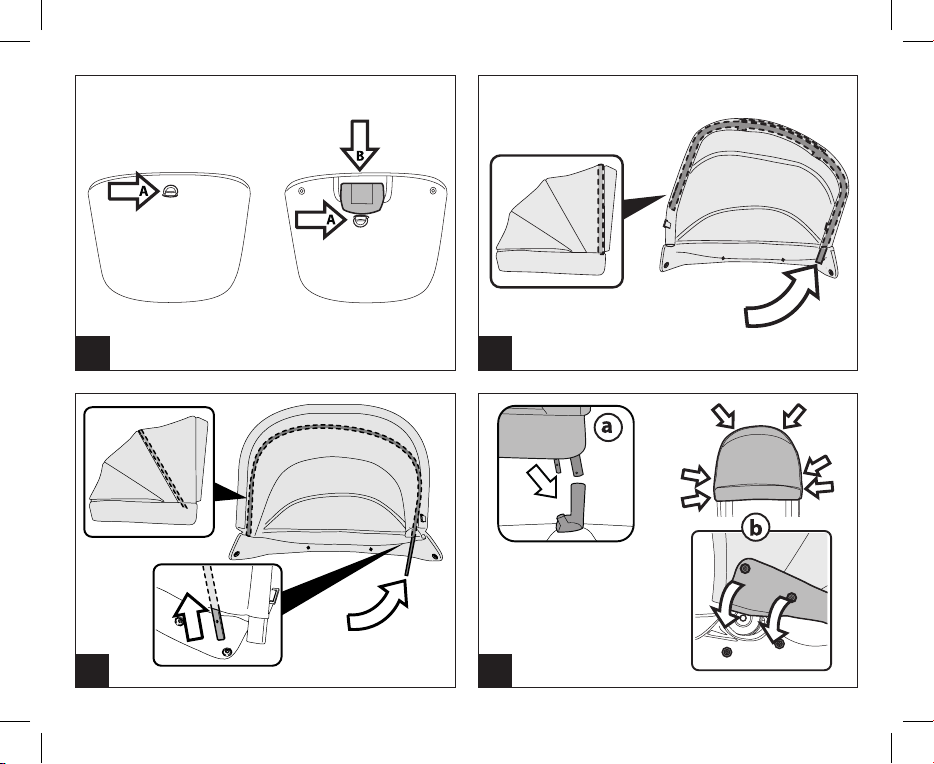
7 SFODERABILITA' CAPOTTINA:
Per sfoderare la capottina sbottonare i 6 bottoni presenti
sul profilo inferiore.
8 Premere i pulsanti sui due attacchi e sfilare la capottina.
9 sfilare i due supporti rigidi.
10 SFODERABILITA’TESSUTO INTERNO:
Estrarre il materassino.
11 Rimuovere il tessuto interno slacciando le due zip presenti
sul bordo della culla
12 SFODERABILITA’TESSUTO ESTERNO:
- sfilate tutti gli elastici come illustrato.
- sfilare tessuto esterno.
13 ATTENZIONE: nel riposizionare il tessuto esterno,
fare attenzione a calzarlo correttamente, facendo
fuoriuscire i seguenti componenti:
anelli per aggancio kit auto (freccia_a),
maniglia di sgancio (freccia_b).
14 Prestare attenzione, durante la vestizione della capottina,
al corretto inserimento dei supporti rigidi. Infilare il tubo,
nella sede anteriore della capottina facendo attenzione a
centrare la maniglia.
15 Infine infilare il secondo sostegno metallico nella sede più
interna della capottina.
16 Agganciare la capottina negli appositi supporti ed
abbottonare i 6 bottoni.
Manutenzione dell'imbottitura
Spazzolare le parti in tessuto per allontanare la polvere;
• Per il lavaggio attenersi all'etichetta cucita sulla sacca del
prodotto.
• non candeggiare al cloro;
• non stirare;
• non lavare a secco;
• non smacchiare con solventi e non asciugare a mezzo di
asciugabiancheria a tamburo rotativo.
Pulizia del prodotto
• Il vostro prodotto necessita un minimo di manutenzione.
Le operazioni di pulizia e manutenzione devono essere
effettuate solo da adulti.
• Si raccomanda di tenere pulite tutte le parti in movimento
e se occorre, lubrificarle con olio leggero.
• Periodicamente pulire le parti in plastica con un panno
umido, non usare solventi o altri prodotti simili.
• Spazzolare le parti in tessuto per allontanare la polvere.
• Non pulire il dispositivo di assorbimento d’urto in
polistirolo con solventi o altri prodotti simili.
• Proteggere il prodotto da agenti atmosferici, acqua,
pioggia o neve; l’esposizione continua e prolungata al sole
potrebbe causare cambiamenti di colore in molti materiali.
• Conservare il prodotto in un posto asciutto.
• Ricordarsi di arieggiare periodicamente l'interno della culla.
Kit auto Culla Elite
• Culla Futura può essere installata in auto acquistando Kit
Auto Culla Elite.
• Utilizzare solo ed esclusivamente Kit Auto Culla Elite per
poter agganciare correttamente Culla Futura in auto.
The Original Accessory PegPerego
• Gli accessori PegPerego sono stati concepiti come utile e
pratico supporto per semplificare la vita dei genitori. Scopri
tutti gli accessori dedicati al tuo prodotto PegPerego su
www.pegperego.com
Numeri di serie
17 Culla Futura riporta sotto la base, informazioni relative alla
data di produzione della stessa.
• Nome del prodotto, data di produzione e numerazione
seriale dello stesso.

10
Queste informazioni sono indispensabili in caso di reclamo.
PegPerego S.p.A.
PegPerego S.p.A. è un azienda con sistema di gestione
qualità certificato da TÜV Italia Srl, in accordo alla norma
ISO 9001.
PegPerego potrà apportare in qualunque momento
modifiche ai modelli descritti in questa pubblicazione, per
ragioni di natura tecnica o commerciale.
Servizio assistenza PegPerego
Se fortuitamente parti del modello vengono perse o
danneggiate, usare solo pezzi di ricambio originali
PegPerego. Per eventuali riparazioni, sostituzioni,
informazioni sui prodotti, vendita di ricambi originali
e accessori, contatta il Servizio Assistenza PegPerego
indicando, il numero seriale del prodotto.
tel. 0039/039/60.88.213
numero verde: 800/147.414
e-mail [email protected]
sito internet www.pegperego.com
Tutti i diritti di proprietà intellettuale relativi ai contenuti di
questo manuale d’istruzione appartengono a PegPerego
S.p.A. e sono tutelati dalle leggi vigenti.
Thank you for choosing a PegPerego
product.
WARNING
IMPORTANT: read the instructions
carefully before use and keep
for future reference. Your child's
safety could be at risk if you do
not follow these instructions.
• WARNING: this product is only
suitable for a child who cannot sit
up unaided.
• WARNING: this product is suitable
for children who cannot sit unaided,
cannot roll and are unable to raise
themselves on their hands and knees.
Maximum weight of child: 9 kg.
• WARNING: only use on a firm,
horizontal level and dry surface.
• WARNING: Do not let other children
play unattended near the carry cot.
• WARNING: do not use the product
if a part is broken, torn or missing.
• Only replacement parts supplied or
recommended by the manufacturer/
distributor shall be used.
• Do not use the item near stairs or
steps, near heat sources, open flames
EN_English

11
or dangerous objects that are within
reach of the child.
• Assembly and preparation of the
product must be carried out by adults.
•
WARNING: before use make
sure that all of the attachment
mechanisms are connected properly.
• Do not insert fingers into the
mechanisms.
• Do not use accessories which are not
approved by the manufacturer.
• This product is designed for children
from birth up to the weight of 9 kg.
• WARNING: To avoid injury ensure
that the child is kept away when
unfolding and folding this product.
• WARNING: When lying, ensure that the
baby's head is not below the body.
• Before use, inspect handles and the
bottom of the carry cot for checking
presence of signs of damage and wear
• Make sure the handle is in the correct
position before lifting the carrycot.
• This product is designed to hold a
sleeping baby.
• Do not add or use mattresses
different from the original one.
COMBINED WITH CHASSIS:
• This product is compatible with
the following original PegPerego
products: Carrello Book, Scout,
Classico, Team, Duette Piroet, Carrello
Futura.
• WARNING: make sure all the
attachment devices are correctly
secured before use.
• WARNING: never leave the child
unattended.
COMBINED WITH STAND:
• WARNING: this product is compatible
with the following original
PegPerego products: Bassinet stand.
• WARNING: Do not use if any part
of the stand is broken, torn or
missing.
• WARNING: Do not let other children
play unattended near the carry cot
and stand.
The images referring to the textile details may
differ from the collection purchased.
For more information, consult our website:
www.pegperego.com.
Instructions for use
1 HOOD: to lift the hood completely, pull it until it clicks.
2 To lower the hood, press down on the upper part of same
and, at the same time, lower it (fig_a).
The hood comes with a sun visor. Pull the sun visor out
from the front edge of the hood (fig_b).
3 COVER: to secure the cover correctly, position it on the
carrycot and fasten the buttons on both sides. Cover
correctly fastened (fig_a).
The magnets can be used to fasten the cover to the hood,

12
to protect the child yet further against the elements. Fold
the cover upwards and fasten it to the magnets positioned
inside the hood (fig_b) .
4 CARRY HANDLE: the handle is built into the hood; to carry
the bassinet, raise the hood - if lowered - until it clicks and
hold onto the handle.
• Before lifting the carrycot, make sure the built-in
handle is correctly attached.
• Before lifting the carrycot, make sure the handle is in the
carrying position.
5 ROCKING POSITION: The base of the Culla Futura has a
special shape which allows you to rock the child when it is
placed on a flat surface.
Ganciomatic system
6 Ganciomatic is the quick, practical system that allows you
to attach the Culla Futura to the Ganciomatic clips of a
stroller or the base of a chassis.
To fasten the carrycot, position it on the stroller or chassis
and press down with both hands until it clicks.
Always enable the brake on the stroller or chassis before
fastening and unfastening the carrycot.
Ensure the carrycot is properly fastened.
• To release it, lift the lever on the Ganciomatic handle
(arrow_a) and lift the carrycot (arrow_b).
Removing the lining
7 REMOVING THE HOOD LINING:
To remove the hood, unbutton the 6 buttons on the lower
edge.
8 Press the buttons on the two attachments and remove the
hood.
9 remove the two rigid supports.
10 REMOVING THE INNER LINING:
Remove the mattress.
11 Remove the inner lining by opening the two zips on the
edge of the Culla Futura.
12 REMOVING THE OUTER LINING:
- Unfasten all the rubber bands as illustrated.
- Remove the outer fabric.
13 WARNING: when repositioning the outer lining, be sure
to pull the following elements out through the slots:
rings for fastening the vehicle kit (arrow_a),
release handle (arrow_b).
14 When placing the lining on the hood, ensure you insert the
rigid supports correctly. Insert the tube into the front edge
of the hood; ensure you centre the handle correctly.
15 Finally, slip the second metal support into the hood’s inner
slot.
16 Fasten the hood to the appropriate supports and fasten
the 6 buttons.
Padding cleaning instructions
Brush the fabric parts to remove dust.
• When washing, closely follow the instructions stated on
the label sewn into the cover.
• Do not use chlorine bleach.
• Do not iron.
• Do not dry clean.
• Do not remove stains with solvents and do not tumble dry.
Product cleaning
• This product requires a small amount of maintenance.
Cleaning and maintenance must only be carried out by adults.
• Keep all moving parts clean and if necessary lubricate
them with light oil.
• Clean the plastic parts periodically with a damp cloth. Do
not use solvents or similar substances.
• Brush the fabric parts to remove dust.
• Do not clean the polystyrene shock absorbing device with
solvents or other similar products.
• Protect the product from atmospheric agents: humidity,
rain or snow. Extended exposure to sunshine can cause
colour changes in many materials.
• Store the product in a dry environment.
• Remember to regularly ventilate the interior of the carrycot.
Culla Elite car kit
• Culla Futura can be installed in your vehicle by purchasing
the Culla Elite Car Kit.
• Only the Culla Elite Car Kit should be used to fasten to Culla
Futura to your vehicle securely.

13
The Original Accessory PegPerego
PegPerego accessories are designed as a useful, practical
means of simplifying the lives of parents. Discover all your
product’s accessories on www.pegperego.com.
Serial numbers
17 Information about the production date of Culla Futura can
be found under the base.
• Product name, production date and serial number.
This information is required for any complaints.
PegPerego S.p.A.
PegPerego S.p.A. adopts a quality management system
certified by TÜV Italia Srl in accordance with the ISO 9001
standard. PegPerego can make changes at any time to
the models described in this publication for technical or
commercial reasons.
PegPerego after-sales service
If any parts of the item get lost or damaged, only
use genuine PegPerego spare parts. For any repairs,
replacements, information on the products and sales
of genuine spare parts and accessories, contact the
PegPerego Assistance Service and state the serial number
of the product.
tel. 0039/039/60.88.213
e-mail [email protected]
website www.pegperego.com
All intellectual property rights on the contents of this
manual are property of PegPerego S.p.A. and are protected
by the laws in force.
Merci d’avoir choisi un produit
PegPerego.
AVERTISSEMENTS !
IMPORTANT : llire les instructions
suivantes attentivement avant
utilisation et les conserver pour les
besoins ultérieurs de référence. La
sécurité de l’enfant pourrait être
menacée si ces instructions ne sont
pas suivies.
• AVERTISSEMENT : cet article convient
pour un enfant qui ne sait pas
s'asseoir seul.
• AVERTISSEMENT : Ce produit est
adapté pour les enfants qui ne
peuvent pas s’asseoir, se tourner et
s’appuyer sur les mains et les genoux
seuls. Poids maximal de l’enfant : 9 kg.
• AVERTISSEMENT : ne poser que
sur une surface plane, horizontale,
ferme et sèche.
• AVERTISSEMENT : Ne pas laisser
d'autres enfants jouer sans
surveillance à proximité de la nacelle.
• AVERTISSEMENT : ne pas utiliser le
produit si l’une de ses parties est
cassée, déchirée ou manquante.
FR_Français

14
• N’utiliser que les pièces de rechange
fournies ou conseillées par le
fabricant/distributeur.
•
Ne pas utiliser l’article à proximité
d’escaliers ou de marches ; ne pas l’utiliser
à proximité de sources de chaleur, de
flammes nues ou d’objets dangereux se
trouvant à la portée de l’enfant.
•
Le montage et la préparation du produit
doivent être effectués par des adultes.
• AVERTISSEMENT: Avant d’utiliser
Culla Elite, vérifier si tous les
mécanismes de fixation sont
correctement enclenchés.
• Ne pas mettre les doigts dans les
mécanismes.
• Ne pas utiliser d'accessoires non
approuvés par le fabricant.
• Ce produit est conçu pour les enfants de
la naissance jusqu'à un poids de 9 kg.
•
AVERTISSEMENT : Pour éviter toute
blessure, maintenir l’enfant à l’écart lors
du dépliage et du pliage du produit.
• AVERTISSEMENT : Quand l'enfant est
couché, s'assurer que sa tête ne soit
jamais plus basse que son corps.
• Avant d'utiliser le produit, contrôler
les poignées de transport et le fond
du berceau pour vérifier la présence
de dommages et d'usure.
• S'assurer que l'anse est dans la
bonne position d'utilisation, avant de
soulever le couffin.
• Ce produit est conçu pour contenir
le nouveau-né quand il dort.
• Ne pas ajouter ou utiliser des matelas
différents que l'original.
ASSOCIÉ AU CHÂSSIS :
• Ce produit est compatible avec
les produits PegPerego originaux
suivants : Carrello Book, Scout,
Classico, Team, Duette Piroet, Carrello
Futura.
• AVERTISSEMENT : Contrôler que
les dispositifs d’accrochage soient
correctement fixés avant utilisation.
• AVERTISSEMENT : Ne jamais
laisser un enfant sans surveillance.
EN ASSOCIATION À STAND :
• AVERTISSEMENT : ce produit est
compatible avec les produits
PegPerego originaux suivants:
Bassinet Stand.
• AVERTISSEMENT : Ne pas utiliser si
l'un des éléments du support est
cassé, déchiré ou manquant.
• AVERTISSEMENT : Ne pas laisser
d'autres enfants jouer sans surveillance
à proximité de la nacelle et du support.

15
Les images relatives aux détails textiles pourraient
différer de la collection achetée.
Pour plus d'informations, consulter notre site
internet : www.pegperego.com
Mode d’emploi
1 CAPOTE: pour soulever la capote, la tendre jusqu’à ce qu’il
y ait un déclic, pour une ouverture complète.
2 Pour baisser la capote, appuyer sur la partie supérieure de
celle-ci et la baisser simultanément (fig_a).
La capote est équipéed’une ailette pare-soleil. Sortir
l’ailette pare-soleil du rabat avant de la capote (fig_b).
3 COUVERTURE: pour la fixer correctement, la placer sur
le landau et la boutonner latéralement des deux côtés.
Couverture accrochée correctement (fig_a).
Grâce aux aimants, il est possible d’accrocher la couverture
à la capote, ce qui garantit une meilleure protection de
l’enfant en cas d’intempéries. Retourner la couverture vers
le haut et l’accrocher aux aimants positionnés à l’intérieur
de la capote (fig_b).
4 ANSE DE TRANSPORT: l’anse est intégrée dans la capote,
pour transporter le couffin, si elle est baissée, soulever la
capote jusqu’au déclic puis saisir l’anse.
• Avant de soulever le couffin, s’assurer que l’anse
intégrée soit correctement accrochée.
• Avant de soulever le couffin, vérifier que la capote soit
dans la position correcte pour le transport.
5 POSITION BASCULE : la forme spéciale de la base de Culla
Futura permet de bercer l’enfant lorsque la base est placée
sur une surface plane.
Ganciomatic system
6 Le Système Ganciomatic, pratique et rapide, permet
d'accrocher Culla Futura aux fixations Ganciomatic de la
poussette ou à la base du châssis.
Pour fixer le couffin, le placer sur la poussette ou sur le
châssis et appuyer des deux mains jusqu'au déclic.
Toujours enclencher le frein de la poussette ou du châssis
avant de le mettre et de l'enlever.
Vérifier que le couffin est bien fixé.
• Pour le décrocher, soulever le levier de la poignée
Ganciomatic (flèche_a) et soulever (flèche_b).
Déhoussage
7 DÉHOUSSAGE DE LA CAPOTE :
Pour déhousser la capote déboutonner les 6 boutons
présents sur le profil inférieur.
8 Appuyer sur les boutons sur les deux fixations et enlever la
capote.
9 déboîter les deux supports rigides.
10 DÉHOUSSAGE DU TISSU INTÉRIEUR:
Sortir le matelas.
11 Enlever le tissu intérieur en détachant les deux fermetures
éclair présentes sur le bord du berceau Culla.
12
DÉHOUSSAGE DU TISSU EXTÉRIEUR:
- sortir tous les élastiques comme cela est montré sur la
figure;
- sortir le tissu extérieur.
13 ATTENTION: lorsqu’on remet le tissu extérieur, veiller
à l’enfiler correctement, en faisant sortir les éléments
suivants :
les anneaux pour accrocher le kit auto (flèche_a),
poignée de décrochage (flèche_b).
14 Veiller à insérer correctement les supports rigides au
moment de remettre la housse de la capote. Enfiler le tube
dans le logement avant de la capote en veillant à centrer la
poignée .
15 Pour finir, enfiler le second support métallique dans le
logement situé le plus à l’intérieur de la capote.
16 Accrocher la capote dans les supports prévus à cet effet et
boutonner les 6 boutons.
Entretien des parties en tissu
Brosser les éléments en tissu pour éliminer la poussière.
• Pour le lavage, suivre les instructions figurant sur l’étiquette
cousue sur la sacoche du produit.
• ne pas utiliser de chlore;
• ne pas repasser;
• ne pas laver à sec;
• ne pas détacher à l’aide de solvants et ne pas sécher dans
un sèche-linge à tambour rotatif.

16
Nettoyage du produit
• Ce produit requiert un entretien minimum. Les opérations
de nettoyage et d’entretien doivent être effectuées
uniquement par des adultes.
• Il est recommandé de nettoyer régulièrement les parties
mobiles et, si nécessaire, de les lubrifier avec de l’huile légère.
• Nettoyer périodiquement les parties en plastique avec un linge
humide ; ne pas utiliser de solvants ou tout produit similaire.
• Épousseter les éléments en tissu pour chasser la poussière.
• Ne pas nettoyer le dispositif d’absorption des chocs en
polystyrène avec des solvants ou autres produits similaires.
• Protéger le produit des agents atmosphériques (eau, pluie
ou neige) ; une exposition continue et prolongée au soleil
peut provoquer la décoloration de nombreux matériaux.
• Conserver le produit dans un endroit sec.
• Ne pas oublier d’aérer régulièrement l’intérieur de la nacelle.
Kit auto Culla Elite
• Le berceau Culla Futura peut être installé dans une voiture
en achetant le Kit Auto Culla Elite.
• Utiliser uniquement et exclusivement le Kit Auto Culla Elite
pour pouvoir fixer correctement le berceau Culla Futura
dans la voiture.
The Original Accessory PegPerego
Les accessoires PegPerego ont été conçus en tant que
support utile et pratique pour simplifier la vie des parents.
Découvrez tous les accessoires consacrés à votre produit
PegPerego sur le site www.pegperego.com
Numéros de série
17 Des informations telles que la date de production sont
reportées sous la base de Culla Futura.
• Nom du produit, date de production et numéro de série.
Ces informations sont indispensables en cas de
réclamation.
PegPerego S.p.A.
PegPerego S.p.A. adopte un système de gestion de la
qualité certifié par TÜV Italia Srl conformément à la norme
ISO 9001. PegPerego se réserve le droit de procéder à tout
moment à des modifications sur les modèles décrits dans
cet ouvrage, pour des raisons de nature technique ou
commerciale.
Service d’assistance PegPerego
En cas de perte de pièces ou de rupture de l'une d'elles,
utiliser exclusivement des pièces de rechange originales
PegPerego. Pour toute réparation, remplacement,
informations sur les produits, vente de pièces détachées
d’origine et accessoires, contactez le service après-vente
PegPerego en indiquant, le numéro de série du produit.
tél. 0039/039/60.88.213
Numéro vert pour le SAV en France 0 800 913 540
e-mail assistenza@pegperego.com
site Internet www.pegperego.com
Tous les droits de propriété intellectuelle relatifs au
contenu de ce manuel appartiennent à PegPerego S.p.A. et
sont protégés par la loi.

17
Vielen Dank, dass Sie sich für ein
Produkt PegPerego entschieden
haben.
WARNUNG
WICHTIG: Anleitungen für spätere
Rückfragen aufbewahren. Die
Sicherheit des Kindes könnte
gefährdet werden, sollten diese
Anweisungen ni cht beachtet
werden.
• WARNUNG: Dieses Produkt ist nur
für ein Kind geeignet, das sich noch
nicht selbst aufsetzen kann.
• WARNUNG: Dieses Produkt ist nur
Kinder geeignet, die sich noch nicht
selbst aufsetzen, umdrehen und auf
Hände und Knie stützen können.
Höchstgewicht des Kindes: 9 kg.
•WARNUNG: Nur auf einem
festen, waagerechten, trockenem
Untergrund verwenden.
• WARNUNG: Lassen Sie andere Kinder
nicht unbeaufsichtigt in der Nähe
der Tragetasche spielen.
• WARNUNG: Produkt nicht
verwenden, wenn ein Teil kaputt,
zerrissen ist oder fehlt.
DE_Deutsch • Verwenden Sie ausschließlich vom
Hersteller/Händler gelieferte oder
empfohlene Ersatzteile.
• Verwenden Sie den Artikel nicht in der
Nähe von Treppen oder Stufen oder in
der Nähe von Wärmequellen, offenem
Feuer und gefährlichen Gegenständen
in der Reichweite des Kindes.
• Die Montage und Vorbereitung
des Produkts muss durch einen
Erwachsenen erfolgen.
• WARNUNG: Vergewissern Sie
sich vor Gebrauch, dass alle
Haltevorrichtungen korrekt
befestigt sind.
• Nicht mit den Fingern in die
Mechanismen fassen.
• Verwenden Sie keine nicht vom
Hersteller genehmigten Zubehörteile.
• Dieses Produkt ist für Kinder ab der
Geburt bis zu einem Gewicht von 9
kg ausgelegt.
• WARNUNG: Vergewissern Sie sich,
dass das Kind beim Aufklappen
und Zusammenklappen des
Wagens außer Reichweite ist, um
Verletzungen zu vermeiden.
• WARNUNG: Wenn das Kind im
Wagen liegt, sollte der Kopf nie
niedriger als der Körper liegen.

18
• Vor Gebrauch Tragebügel und
Boden der Kinderwagenwanne
auf Beschädigungen oder
Gebrauchsspuren überprüfen.
• Vergewissern Sie sich, dass der
Tragebügel sich in der korrekten
Position befindet, bevor die
Kinderwagenwanne angehoben wird.
• Dieses Produkt wurde als
Schlafgelegenheit für Neugeborene
konzipiert.
• Keine Matratzen außer der originalen
verwenden oder hinzufügen.
IN VERBINDUNG MIT DEM
GESTELL:
• Dieses Produkt darf nur mit den
folgenden Originalprodukten von
PegPerego verwendet werden:
Carrello Book, Scout, Classico, Team,
Duette Piroet, Carrello Futura.
• WARNUNG: Kontrollieren Sie vor dem
Gebrauch, dass die Anbringungen
korrekt befestigt sind.
• WARNUNG: Lassen Sie das Kind
nie unbeaufsichtigt.
IN VERBINDUNG MIT DEM STÄNDER:
• WARNUNG: Dieses Produkt
darf nur mit den folgenden
Originalprodukten von PegPerego
verwendet werden: Bassinet Stand.
• WARNUNG: Verwenden Sie
den Ständer nicht, wenn Teile
gebrochen oder eingerissen sind
oder fehlen.
• WARNUNG: Lassen Sie andere Kinder
nicht unbeaufsichtigt in der Nähe
der Tragetasche und des Ständers
spielen.
Die Abdeckung kann je nach gewählter Kollektion
unterschiedliche Details aufweisen.
Weitere Informationen finden Sie auf unserer
Internetseite: www.pegperego.com
Gebrauchsanweisung
1 VERDECK: Um das Verdeck zu heben, dieses nach oben
ziehen, bis es einhakt, damit es vollständig geöffnet ist.
2 Um das Verdeck zu senken, auf den Griff drücken und
gleichzeitig das Verdeck herunterklappen (Abb_a).
Das Verdeck ist mit einem Sonnenvisier ausgestattet. Das
Sonnenvisier vorne aus dem Verdeck ziehen (Abb_b).
3 ABDECKUNG: Für eine ordnungsgemäße Befestigung die
Abdeckung auf der Kinderwagenwanne platzieren und
seitlich auf beiden Seiten festknöpfen. Richtig befestigte
Abdeckung (Abb_a).
Die Abdeckung kann mit dem Magnetverschluss ganz
einfach am Verdeck angebracht werden, was einen
besseren Schutz des Kindes vor Witterungseinflüssen
garantiert. Dazu den Windschutz der Abdeckung nach
oben klappen und an den Magneten im Inneren des
Verdecks befestigen (Abb_b).
4 TRANSPORTGRIFF: Der Transportgriff ist in das Verdeck
integriert. Falls das Verdeck zurückgeklappt ist, dieses zuerst
bis zum Klicken anheben und die Kinderwagenwanne
dann am Transportgriff hochheben.

19
•Vergewissern Sie sich, dass der integrierte Tragebügel
richtig fest ist, bevor die Kinderwagenwanne
angehoben wird.
• Bevor die Kinderwagenwanne hochgehoben wird
sicherstellen, dass das Verdeck für den Transport richtig
positioniert ist.
5 SCHAUKELPOSITION: Wird die Culla Futura auf eine ebene
Fläche gestellt, kann das Kind dank der abgerundeten
Unterseite der Babyschale geschaukelt werden.
Ganciomatic system
6 Das Ganciomatic System ermöglicht die schnelle
und praktische Befestigung der Culla Futura an den
Ganciomatic-Verbindungsstücken des Sportwagens oder
am Kinderwagengestell.
Um die Kinderwagenwanne auf das Gestell zu setzen, diese
auf dem Kinderwagen oder Buggy positionieren und mit
beiden Händen bis zum Klicken andrücken.
Stets die Bremse des Kinderwagens oder Buggys betätigen,
bevor sie angebracht oder gelöst wird.
Vergewissern Sie sich, dass die Kinderwagenwanne korrekt
befestigt ist.
• Um diese zu lösen, den Hebel des Ganciomatic-Griffs (Pfeil
a) nach oben ziehen und die Kinderwagenwanne anheben
(Pfeil b).
Abnehmen des Bezugs
7 ABNEHMEN DES BEZUGS:
Um den Bezug des Verdecks abzuziehen, die 6 Knöpfe am
unteren Rand lösen.
8 Die Tasten auf den beiden Befestigungen drücken und das
Verdeck abziehen.
9 die beiden Stangen entfernen.
10 ABNEHMBARER INNENBEZUG:
Matratze herausnehmen.
11 Die beiden Reißverschlüsse am Rand der
Kinderwagenwanne öffnen und den inneren Bezug
abnehmen.
12 ABNEHMBARER AUSSENBEZUG:
- Alle Gummibänder wie dargestellt abziehen.
- Den Oberstoff abziehen.
13 ACHTUNG: Wenn der Außenbezug wieder befestigt
wird, auf eine korrekte Position achten, sodass folgende
Teile durchkommen:
Befestigungsring zum Einhaken am Autokit (Pfeil a)
Lösegriff (Pfeil b).
14 Darauf achten, dass die Stangen beim Beziehen des
Verdecks korrekt eingesetzt werden. Die Stange in den
vorderen Stangensitz des Verdecks einführen und dabei
darauf achten, den Tragegriff mittig anzuordnen.
15 Dann die zweite Metallstange in den weiter innen liegenden
Stangensitz des Verdecks einsetzen.
16 Das Verdeck an den dafür vorgesehenen Halterungen
anbringen und die 6 Knöpfe anknöpfen.
Pflege der Polsterung
Die Stoffteile abbürsten, um Staub zu entfernen.
• Zum Waschen beachten Sie bitte das in den Produktbezug
eingenähte Etikett.
• nicht mit Bleichmittel behandeln;
• nicht bügeln;
• keine Trockenwäsche anwenden
• nicht mit Fleckenlöser behandeln und nicht im
Drehtrommeltrockner trocknen.
Reinigung
• Ihr Produkt braucht nur geringe Wartung. Reinigung
und Wartung dürfen nur von Erwachsenen durchgeführt
werden.
• Alle beweglichen Teile unbedingt sauber halten und bei
Bedarf mit einem leichten Öl schmieren.
• Regelmäßig die Kunststoffteile mit einem feuchten Tuch
reinigen, keine Lösungsmittel oder ähnliche Produkte
verwenden.
• Stoffteile mit einer Bürste von Staub befreien.
• Den Stoßdämpfer aus Styropor nie mit Lösungsmitteln oder
anderen ähnlichen Produkten reinigen.
• Das Produkt vor Witterung schützen, vor Wasser, Regen oder
Schnee; wird das Produkt wiederholt und über längere Zeit
der Sonne ausgesetzt, können die Farben vieler Materialien
verblassen.
• Das Produkt trocken aufbewahren.

20
• Denken Sie daran, das Innere der Babyschale regelmäßig
zu lüften.
Kit auto Culla Elite
• Die Kinderwagenwanne Culla Elite kann mit dem Auto-Kit
Culla Futura im Auto verwendet werden.
• Zur ordnungsgemäßen Befestigung der
Kinderwagenwanne Elite im Fahrzeug darf ausschließlich
das Auto-Kit Culla Futura verwendet werden.“
The Original Accessory PegPerego
Zubehörteile von PegPerego sind nützliche und praktische
Hilfsmittel, die Eltern das Leben leichter machen.
Entdecken Sie alle speziellen Zubehörteile für Ihr Produkt
unter www.pegperego.com
Seriennummern
17 Auf der Unterseite der Babyschale Culla Futura finden Sie
die Herstellungsdaten.
• Produktname, Herstellungsdatum und Seriennummer der
Babyschale.
Diese Informationen sind unerlässlich im Falle von
Reklamationen.
PegPerego S.p.A.
Das Unternehmen PegPerego SpA wendet ein
Qualitätsmanagementsystem an, das von TÜV Italia Srl
nach der Norm ISO 9001 zertifiziert wurde. PegPerego kann
zu jedem beliebigen Zeitpunkt Änderungen an den in
dieser Veröffentlichung beschriebenen Modellen sowohl
aus technischen, als auch aus kommerziellen Gründen
vornehmen.
Kundendienst PegPerego
Sollten Teile des Modells verloren gehen oder beschädigt
werden, ersetzen Sie diese bitte ausschließlich durch
originale PegPerego Teile. Für Reparaturen, Ersatzteile,
Produktinformationen und Anbieter von originalen
Ersatzteilen und Zubehör wenden Sie sich bitte an
den PegPerego Kundendienst. Halten Sie hierfür, die
Seriennummer des betreffenden Produktes bereit.
Tel. 0039/039/60.88.213
E-Mail [email protected]
Webseite www.pegperego.com
Alle Rechte geistigen Eigentums bezüglich der Inhalte
dieser Bedienungsanleitung gehören PegPerego S.p.A. und
werden von den geltenden Bestimmungen geschützt.
Table of contents
Languages:
Other Peg-Perego Baby Carrier manuals

Peg-Perego
Peg-Perego Culla Elite User manual

Peg-Perego
Peg-Perego Navetta XL User manual

Peg-Perego
Peg-Perego Baby carriage User manual

Peg-Perego
Peg-Perego Pliko P3 User manual

Peg-Perego
Peg-Perego pliko p3 compact User manual

Peg-Perego
Peg-Perego Pliko Switch User manual

Peg-Perego
Peg-Perego Navetta S User manual

Peg-Perego
Peg-Perego Navetta XL User manual

Peg-Perego
Peg-Perego Navetta XL User manual

Peg-Perego
Peg-Perego Primonido Elite User manual