Peg-Perego Navetta XL User manual

Navetta XL
U.S.A./CANADA
EN Instructions for use
ES Instrucciones de uso
FR Notice d’emploi
All manuals and user guides at all-guides.com
all-guides.com

1 2
3 4
All manuals and user guides at all-guides.com

5
7 8
6
All manuals and user guides at all-guides.com

109
11 12
All manuals and user guides at all-guides.com

13 14
All manuals and user guides at all-guides.com

6
3
5
7
8
910
4
11
6
12
Navetta XL
1) BCANXL•
2) BCONXL•
3) SPST6642GR
4) SPST6647GL
5) SPST6643GR
6) ITNAVANANFGR
7) SAPI6656GR
8) SPST5403R
9) SPST6658GL
10) SPST5274GL
11) IIENXANA•
EN• Spare parts available in different colours to be specified when ordering.
ES• Repuestos disponibles en otros colores que se especificarán en el pedido.
FR• Pièces de rechange disponibles en plusieurs couleurs à spécifier dans la demande.
All manuals and user guides at all-guides.com
all-guides.com

7
EN_English
Thank you for choosing a Peg-Pérego product.
WARNING
READ THESE INSTRUCTIONS
CAREFULLY AND STORE THEM IN THE
HOLDER PROVIDED THROUGHOUT THE
LIFECYCLE OF THE PRODUCT. FAILURE
TO FOLLOW THESE WARNINGS AND
INSTRUCTIONS COULD RESULT IN
SERIOUS INJURY OR DEATH.
• DO NOT USE THIS BASSINET IF YOU
CANNOT EXACTLY FOLLOW THE
ACCOMPANYING INSTRUCTIONS.
• DO NOT USE THIS BASSINET FOR A
CHILD WHO CAN ROLL OVER OR WHO
HAS REACHED THE MANUFACTURER’S
RECOMMENDED WEIGHT LIMIT.
• THIS PRODUCT IS DESIGNED FOR
CHILDREN FROM BIRTH UP TO A
WEIGHT OF 20 LBS (9 KG).
• FALL HAZARD: DO NOT USE THIS
BASSINET WHEN THE INFANTS BEGINS
TO PUSH UP ON HANDS OR KNEES OR
HAS REACHED 20 LBS.
•
SUFFOCATION HAZARD: INFANTS HAVE
SUFFOCATED IN GAPS BETWEEN EXTRA
PADDING AND SIDE OF THE BASSINET/
CRADLE OR ON SOFT BEDDING. USE ONLY
THE PAD PROVIDED BY MANUFACTURER.
NEVER ADD A PILLOW, COMFORTER, OR
ANOTHER MATTRESS FOR PADDING.
•
NEVER LEAVE YOUR CHILD UNATTENDED.
• TO REDUCE THE RISK OF SIDS, PLACE
THE INFANTS ON HIS BACK TO SLEEP.
•
USE OF STAND: THIS PRODUCT IS
DESIGNED TO BE USED IN CONJUNCTION
WITH A STAND. ALWAYS USE ONLY
PEGPEREGO SPECIFIC STAND. MAKE SURE
THIS BASSINET IS CORRECTLY ATTACHED
TO THE STAND BEFORE USE.
•
DO NOT USE NEAR HEAT SOURCES,
OPEN FLAMES OR DANGEROUS OBJECTS
THAT ARE WITHIN REACH OF THE CHILD.
• ONLY USE THE PRODUCT ON
SURFACES THAT ARE HARD,
HORIZONTAL AND DRY.
• DO NOT LEAVE OTHER CHILDREN
PLAYING UNATTENDED NEAR THE
CARRIAGE.
• BEFORE PLACING THE CHILD IN THE
All manuals and user guides at all-guides.com

8
BASSINET, MAKE SURE THAT EVERY PART
IS PROPERLY AND SECURELY IN PLACE.
• ASSEMBLY AND PREPARATION OF THE
ITEM MUST BE CARRIED OUT BY ADULTS.
• DO NOT USE THE PRODUCT IF THERE
ARE MISSING OR BROKEN PARTS.
• BEFORE USE MAKE SURE THAT ALL OF
THE ATTACHMENT MECHANISMS ARE
CONNECTED PROPERLY.
• DO NOT INSERT FINGERS INTO THE
MECHANISMS.
• IT COULD BE DANGEROUS TO USE
ACCESSORIES WHICH ARE NOT
APPROVED BY THE MANUFACTURER.
• DO NOT USE THE NAVETTA XL
WITHOUT ITS FABRIC COVERING,
WHICH CANNOT BE REPLACED
WITH ONE NOT APPROVED BY THE
MANUFACTURER.
• TAKE CARE WHEN ADJUSTING THE
MECHANISMS (HANDLE, BACKREST)
WITH THE CHILD IN THE PRODUCT.
• IF A SHEET IS USED, CHECK THAT
DIMENSIONS FIT THE DIMENSIONS OF
THIS BASSINET.
• STRINGS CAN CAUSE STRANGULATION!
DO NOT PLACE ITEMS WITH A STRING
AROUND A CHILD’S NECK, SUCH AS
HOOD STRINGS OR PACIFIER CORDS.
DO NOT SUSPEND STRINGS OVER A
BASSINET OR CRADLE OR ATTACH
STRINGS TO TOYS.
• DO NOT PLACE THIS BASSINET NEAR A
WINDOW OR A PATIO DOOR WHERE A
CHILD COULD REACH THE CORD OF A
BLIND OR CURTAIN AND BE STRANGLED.
NOTICE
THIS ARTICLE MEETS OR EXCEEDS ALL
REQUIREMENTS COVERED IN ASTM F
2194 STANDARD AND LATEST REVISIONS.
instructions for use
using the Navetta XL
1• HOOD: To attach the hood, fasten the clips (fig_a)
and then the buttons on the sides (fig_b) and, if
present, the back (fig_c).
2• There is a special section in the hood that allows
you to see the child from any angle.
3• COVER: Put the cover in place and button it on
both sides.
4• It is possible to attach the cover to the hood, thus
providing the child with greater protection from
the elements. Unfasten the cover at the sides
All manuals and user guides at all-guides.com

9
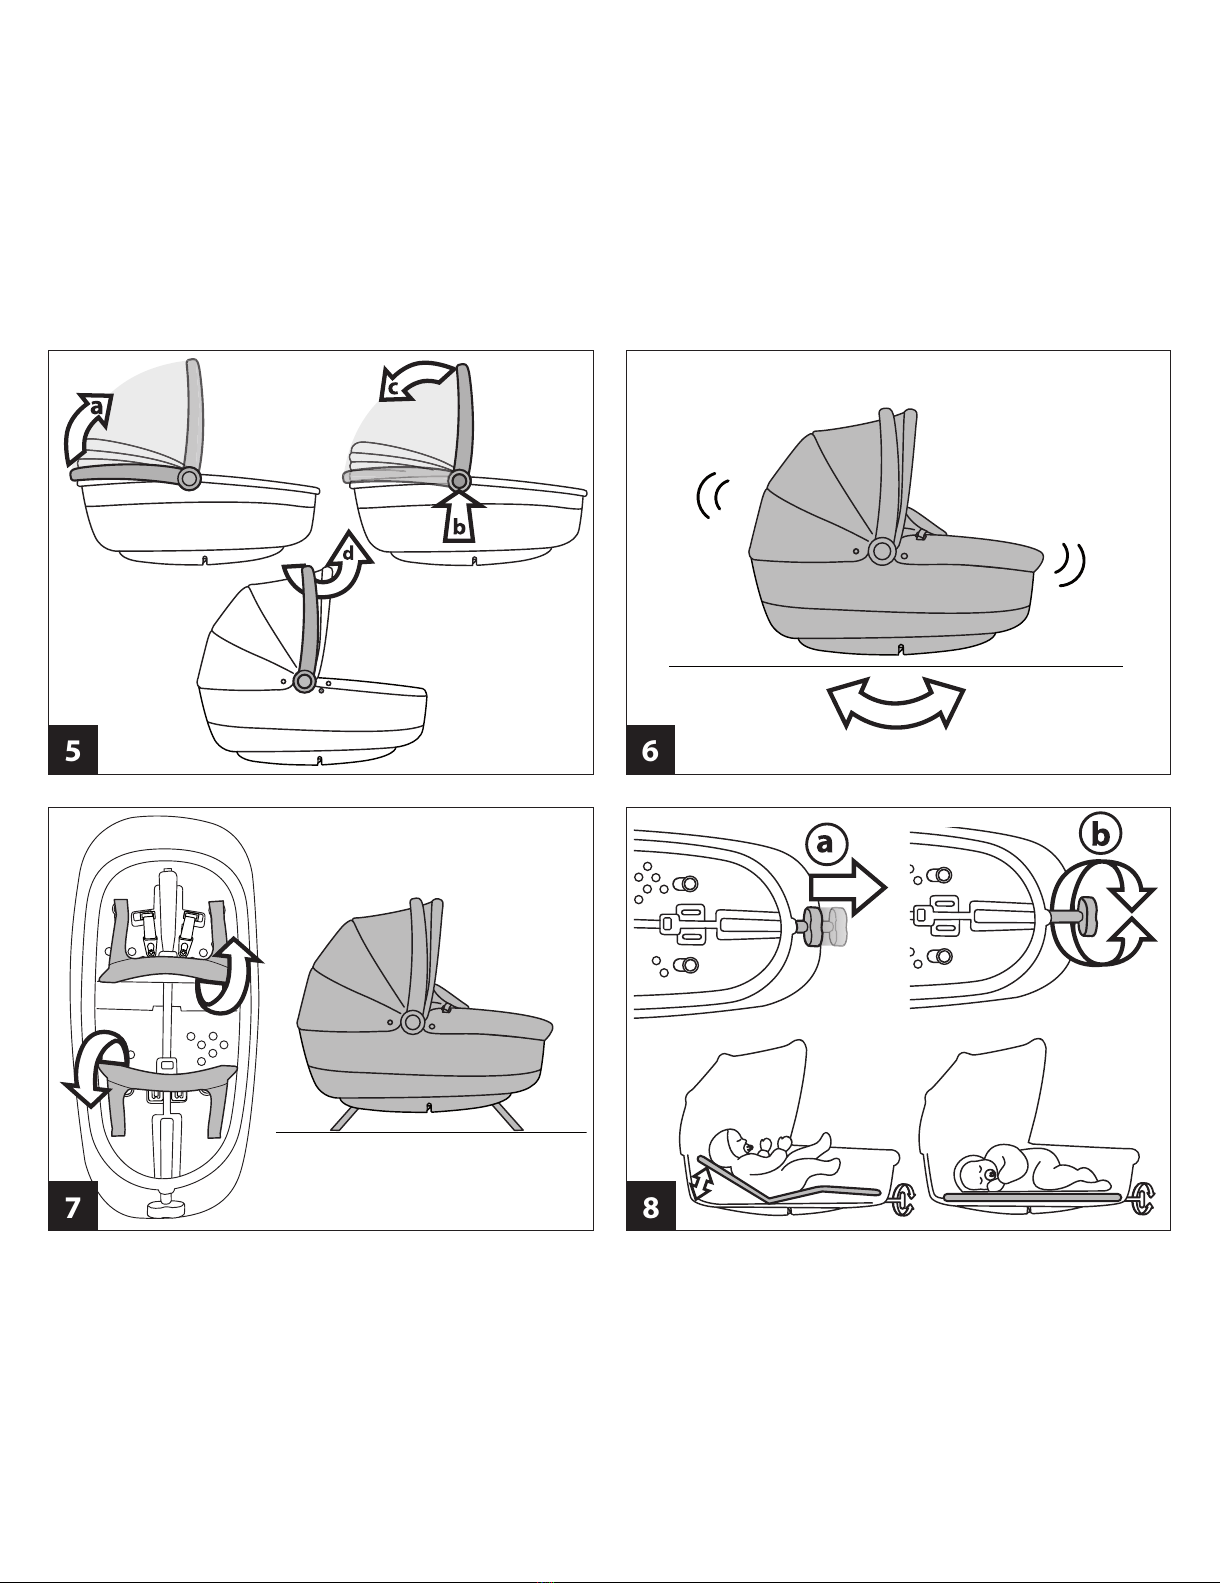
(arrow_a), fold it up (arrow_b) and fasten it to the
hood with the Velcro (arrow_c).
5•
HANDLE: Rotate the handle upwards until it clicks
into place (arrow_a). The handle is only locked in
place when it is in the vertical position. To lower the
handle, press the two round buttons at the same
time (arrow_b) and rotate it downwards (arrow_c).
The handle is useful for carrying the Navetta XL
(fig_d) and for fitting it to chassis and strollers.
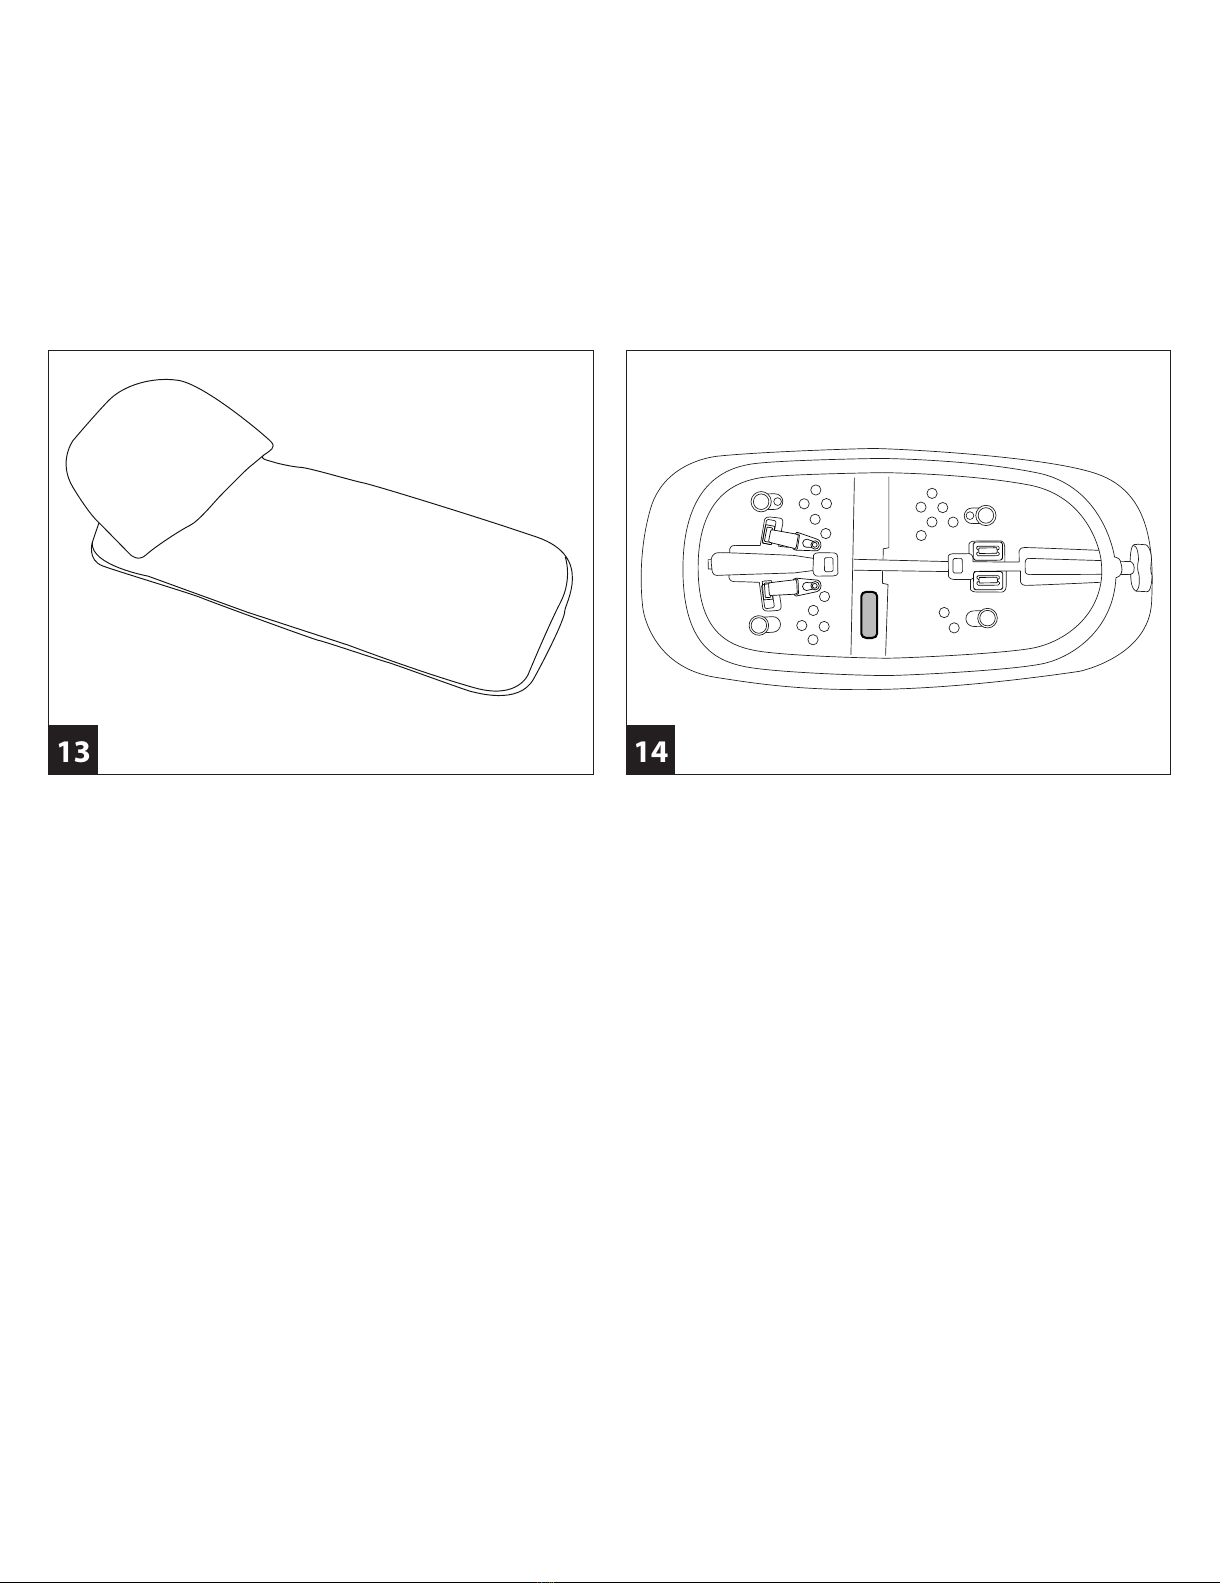
6• ROCKING POSITION: The base of the Navetta XL
has a special shape which allows you to rock the
child when it is placed on a flat surface.
7• COT POSITION: It is possible to make the Navetta XL
into a non-rocking cot by opening out the two legs
under the base.
8• ADJUSTING THE BACKREST and THE FOOTREST:
with the COMFORT SYSTEM, backrest and footrest
can be adjusted simultaneously. Pull the knob
outwards (fig_a) while turning it (fig_b) to raise or
lower the backrest and the footrest.
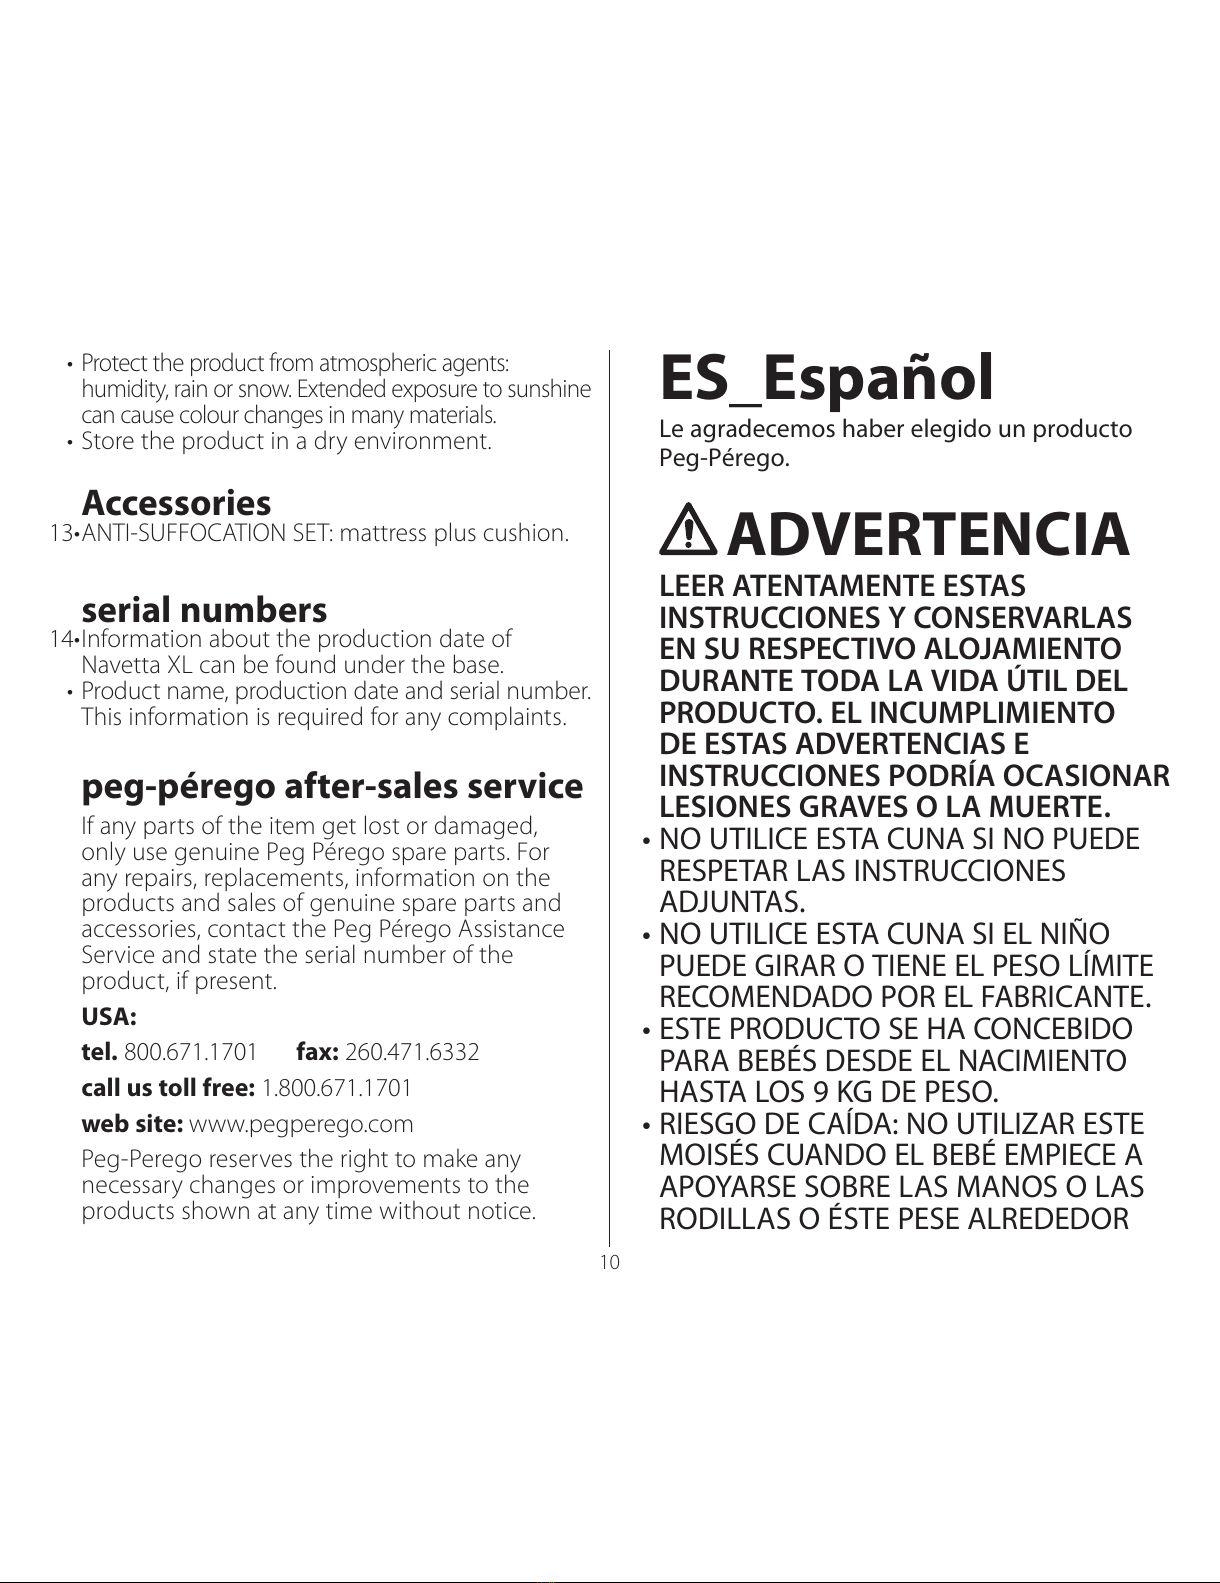
9• FOUR SEASONS SYSTEM: There are holes under
the base of the Navetta XL which can be opened
or closed to adjust the air circulation inside it.
To open the holes, move the 4 levers outwards.
ganciomatic system
10• Ganciomatic is the quick, practical system that
allows you to attach the Navetta XL to the chassis.
To attach the Navetta XL, put it on the chassis and
press with both hands until it clicks into place.
Always apply the brakes on the chassis before
attaching and removing the Navetta XL.
Check that the bassinet unit is properly attached.
•
To release it, raise the lever of the Ganciomatic clip
(arrow_a) and lift up the Navetta XL (arrow_b).
removing the lining
11• REMOVING THE LINING OF THE NAVETTA XL:
Unbutton the hood on the sides and the back
(fig_a), press down on the clips to release them
(fig_b) and pull the hood upwards to remove it.
12• Unbutton the cover and remove it (fig_a), raise
the backrest, detach the inner lining (fig_b) and
pull it upwards to remove it (fig_c).
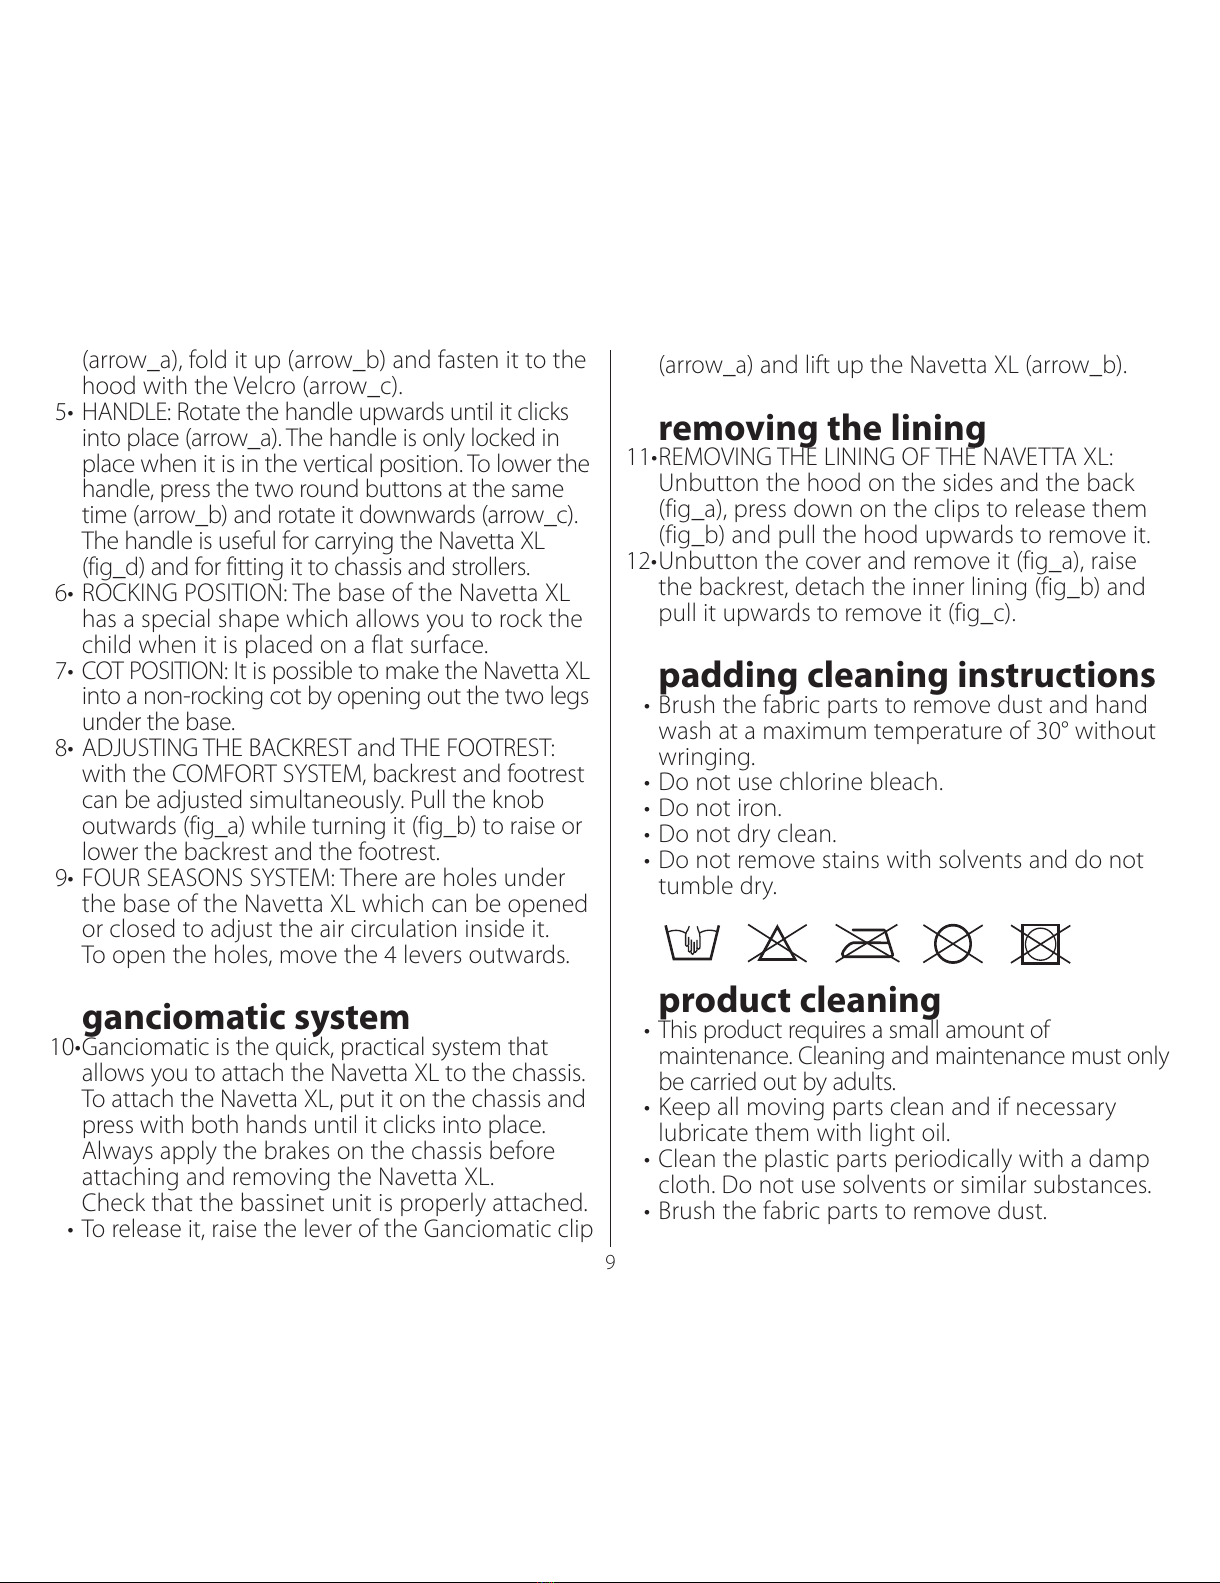
padding cleaning instructions
• Brush the fabric parts to remove dust and hand
wash at a maximum temperature of 30° without
wringing.
• Do not use chlorine bleach.
• Do not iron.
• Do not dry clean.
• Do not remove stains with solvents and do not
tumble dry.
product cleaning
• This product requires a small amount of
maintenance. Cleaning and maintenance must only
be carried out by adults.
• Keep all moving parts clean and if necessary
lubricate them with light oil.
• Clean the plastic parts periodically with a damp
cloth. Do not use solvents or similar substances.
• Brush the fabric parts to remove dust.
All manuals and user guides at all-guides.com

10
ES_Español
Le agradecemos haber elegido un producto
Peg-Pérego.
ADVERTENCIA
LEER ATENTAMENTE ESTAS
INSTRUCCIONES Y CONSERVARLAS
EN SU RESPECTIVO ALOJAMIENTO
DURANTE TODA LA VIDA ÚTIL DEL
PRODUCTO. EL INCUMPLIMIENTO
DE ESTAS ADVERTENCIAS E
INSTRUCCIONES PODRÍA OCASIONAR
LESIONES GRAVES O LA MUERTE.
• NO UTILICE ESTA CUNA SI NO PUEDE
RESPETAR LAS INSTRUCCIONES
ADJUNTAS.
• NO UTILICE ESTA CUNA SI EL NIÑO
PUEDE GIRAR O TIENE EL PESO LÍMITE
RECOMENDADO POR EL FABRICANTE.
• ESTE PRODUCTO SE HA CONCEBIDO
PARA BEBÉS DESDE EL NACIMIENTO
HASTA LOS 9 KG DE PESO.
• RIESGO DE CAÍDA: NO UTILIZAR ESTE
MOISÉS CUANDO EL BEBÉ EMPIECE A
APOYARSE SOBRE LAS MANOS O LAS
RODILLAS O ÉSTE PESE ALREDEDOR
•
Protect the product from atmospheric agents:
humidity, rain or snow. Extended exposure to sunshine
can cause colour changes in many materials.
• Store the product in a dry environment.
Accessories
13• ANTI-SUFFOCATION SET: mattress plus cushion.
serial numbers
14• Information about the production date of
Navetta XL can be found under the base.
• Product name, production date and serial number.
This information is required for any complaints.
peg-pérego after-sales service
If any parts of the item get lost or damaged,
only use genuine Peg Pérego spare parts. For
any repairs, replacements, information on the
products and sales of genuine spare parts and
accessories, contact the Peg Pérego Assistance
Service and state the serial number of the
product, if present.
USA:
tel. 800.671.1701 fax: 260.471.6332
call us toll free: 1.800.671.1701
web site: www.pegperego.com
Peg-Perego reserves the right to make any
necessary changes or improvements to the
products shown at any time without notice.
All manuals and user guides at all-guides.com

11
DE 9 KG.
• PELIGRO DE ASFIXIA: HA HABIDO
CASOS DE ASFIXIA DE BEBÉS EN
ESPACIOS ENTRE ACOLCHADOS
AÑADIDOS Y EL COSTADO DEL
MOISÉS O LA CUNA, O SOBRE ROPA
DE CAMA BLANDA. UTILICE SÓLO EL
ACOLCHADO SUMINISTRADO POR EL
FABRICANTE. NO AÑADA NUNCA UNA
ALMOHADA, UN EDREDÓN U OTRO
COLCHÓN.
• NO DEJAR NUNCA AL NIÑO SIN
VIGILANCIA.
• PARA REDUCIR EL RIESGO DE
SÍNDROME DE MUERTE SÚBITA EN
LACTANTES, COLOCAR AL BEBÉ BOCA
ARRIBA PARA DORMIR.
• USO DE BASE: ESTE PRODUCTO SE
HA DISEÑADO PARA USARSE JUNTO
CON UNA BASE. UTILIZAR SÓLO LA
ESPECÍFICA BASE DE PEGPEREGO.
CERCIORARSE DE QUE EL CAPAZO
ESTÉ CORRECTAMENTE ENGANCHADO
A LA BASE ANTES DE USARSE.
• NO UTILIZAR CERCA DE FUENTES DE
CALOR, LLAMAS LIBRES U OBJETOS
PELIGROSOS QUE ESTÉN AL ALCANCE
DE LOS BRAZOS DEL BEBÉ.
• UTILIZAR ÚNICAMENTE EN
SUPERFICIES DURAS, HORIZONTALES Y
SECAS.
• NO DEJAR QUE OTROS NIÑOS
JUEGUEN SIN VIGILANCIA CERCA DEL
COCHECITO.
• "ANTES DE COLOCAR AL BEBÉ EN
EL MOISÉS, ASEGÚRESE DE HABER
MONTADO CORRECTAMENTE TODAS
LAS PIEZAS".
• LAS OPERACIONES DE MONTAJE Y DE
PREPARACIÓN DEL ARTÍCULO DEBEN
EFECTUARSE POR ADULTOS.
• NO UTILIZAR EL PRODUCTO SI EXISTEN
RUPTURAS O LE FALTAN PIEZAS.
• ANTES DEL USO, CERCIORARSE DE
QUE TODOS LOS MECANISMOS DE
ENGANCHE ESTÉN ENGANCHADOS
CORRECTAMENTE.
• EVITAR INTRODUCIR LOS DEDOS
DENTRO DE LOS MECANISMOS.
• PODRÍA SER PELIGROSO UTILIZAR
ACCESORIOS NO APROBADOS POR EL
FABRICANTE.
• NO UTILIZAR NAVETTA XL SIN SU
FORRO DE TEJIDO, EL CUAL NO
PUEDE REEMPLAZARSE POR OTRO NO
APROBADO POR EL FABRICANTE
All manuals and user guides at all-guides.com
all-guides.com

12
• PRESTAR ESPECIAL ATENCIÓN A LA
PRESENCIA DEL BEBÉ CUANDO SE
REALICEN OPERACIONES DE AJUSTE
DE LOS MECANISMOS (MANILLAR,
RESPALDO).
• SI SE UTILIZA UNA SÁBANA,
COMPROBAR QUE SUS DIMENSIONES
SE AJUSTEN A LAS DEL MOISÉS.
• ¡LAS CORREAS PUEDEN
ESTRANGULAR! NO CUELGUE DEL
CUELLO DEL NIÑO OBJETOS QUE
TENGAN CORDONES O CORREAS,
COMO GORROS O CHUPETES. NO
CUELGUE CORREAS DEL MOISÉS O DE
LA CUNA Y NO ATE CORDONES A LOS
JUGUETES.
• NO COLOQUE ESTA CUNA CERCA DE
UNA VENTANA O PUERTA DONDE EL
NIÑO PUEDA ALCANZAR EL CABLE
DE UNA PERSIANA O CORTINA Y
ESTRANGULARSE.
AVISO
ESTE ARTÍCULO CUMPLE O
EXCEDE TODOS LOS REQUISITOS
CONTEMPLADOS POR LAS NORMAS
ASTM F 2194 Y POR LAS ÚLTIMAS
REVISIONES.
instrucciones de uso
uso de Navetta XL
1• CAPOTA: Para enganchar la capota, introducir los
enganches en sus correspondientes alojamientos
(fig_a), abrochar los laterales (fig_b) y también los
botones traseros (fig_c).
2• la capota dispone de una inserción que permite
ver el bebé desde cualquier posición.
3• CUBREPIÉS: Colocar el cubrepiés y abrocharlo
lateralmente.
4• Se puede enganchar el cubrepiés a la capota
garantizándole al bebé una mayor protección
frente a la intemperie. Desatar lateralmente
el cubrepiés (flecha_a), plegarlo hacia arriba
(flecha_b) y engancharlo con el velcro a la capota
(flecha_c).
5• MANILLAR: Levantar el manillar girándolo hacia
arriba hasta oír el clic (flecha_a). El manillar sólo
se bloquea en posición vertical. Para bajar el
manillar, pulsar simultáneamente sobre los dos
botones redondos (flecha_b) y girarlo hacia
abajo (flecha_c). El manillar facilita el transporte
(flecha_d) y el acoplamiento de Navetta XL a
carritos y sillas de paseo.
6• POSICIÓN BALANCEO: La base de Navetta
XL tiene una forma especial que permite el
balanceo del bebé cuando está apoyada sobre
una superficie plana.
7• POSICIÓN CUNA: Navetta XL se transforma en
cuna sin balanceo al extraerse los dos caballetes
colocados debajo de la base.
8• REGULACIÓN DEL RESPALDO y EL
APOYAPIERNAS: gracias al sistema COMFORT
SYSTEM el respaldo y el apoyapiernas se regulan
All manuals and user guides at all-guides.com

13
simultáneamente. Tire el asa hacia fuera (fig_a)
y gírela (fig_b) para subir o bajar el respaldo y el
apoyapiernas.
9•
SISTEMA CUATRO ESTACIONES: Navetta XL dispone
de orificios debajo de su base que al cerrarlos o
abrirlos regulan la circulación del aire interior.
Para abrir los orificios, mover las 4 palancas hacia
fuera.
ganciomatic system
10• Ganciomatic System es el sistema práctico y
rápido que permite enganchar Navetta XL a la
base del carrito.
Para enganchar Navetta XL, colocarlo sobre la
silla del carrito y presionar con ambas manos
hasta oír el clic.
Accionar siempre el freno de la silla del carrito
antes de enganchar y desenganchar Navetta XL.
Comprobar que el capazo esté correctamente
enganchado.
• Para desengancharlo, levantar la palanca del asa
Ganciomatic (flecha_a) y levantar Navetta XL
(flecha_b).
desenfundar
11• DESENFUNDAR NAVETTA XL: Desabrochar la
capota lateralmente y por detrás (fig_a), presionar
sobre sus enganches para desengancharla (fig_b)
y quitarla por arriba;
12• Desabrochar el cubrepiés y quitarlo (fig_a), levantar
el respaldo, extraer el acolchado (fig_b) y sacarlo por
arriba (fig_c).
mantenimiento del acolchado
• cepillar las partes de tejido para retirar el polvo y
lavar a mano a una temperatura máxima de 30º;
• no estrujar;
• no planchar;
• no lavar en seco;
• no eliminar manchas con solventes y no secar en
secadora de tambor rotativo.
limpieza del producto
• Este producto requiere de un mantenimiento
mínimo. Las operaciones de limpieza y
mantenimiento sólo deben realizarse por adultos.
• Se aconseja mantener limpias todas las partes
móviles y, en caso necesario, lubricarlas con
aceites ligeros.
• Limpiar asiduamente las partes de plástico con
un trapo húmedo sin usar disolventes ni otros
productos similares.
• Cepillar las partes de tejido para eliminar el polvo.
• Proteger el producto contra agentes atmosféricos
(agua, lluvia o nieve). Una exposición continua y
prolongada al sol puede causar cambios de color
de muchos materiales.
• Conservar el producto en un lugar seco.
Accesorios
13• COMPLETO ANTI AHOGAMIENTO: colchoncito
más cojín.
All manuals and user guides at all-guides.com

14
FR_Français
Merci d’avoir choisi un produit Peg-Pérego.
AVERTISSEMENT
LIRE ATTENTIVEMENT CES
INSTRUCTIONS ET LES CONSERVER
DANS LA POCHE PRÉVUE À CET
EFFET PENDANT TOUTE LA DURÉE
DE VIE UTILE DU PRODUIT LE NON
RESPECT DE CES AVERTISSEMENTS
ET INSTRUCTIONS PEUT ENTRAÎNER
DES BLESSURES GRAVES OU MÊME
LA MORT.
• NE PAS UTILISER LE MOΪSE À MOINS
D’ÊTRE EN MESURE DE SUIVRE
PRÉCISÉMENT LES INSTRUSTIONS QUI
L’ACCOMPAGNENT.
• NE PAS UTILISER LE MOΪSE SI L’ENFANT
EST CAPABLE DE SE RETOURNER
OU A ATTEINT LE POIDS MAXIMAL
RECOMMANDÉ PAR LE FABRICANT.
• CET ARTICLE A ÉTÉ CONÇU POUR LE
TRANSPORT DES ENFANTS À PARTIR
DE LA NAISSANCE ET JUSQU’À UN
POIDS DE 9 KG.
Números de serie
14• Bajo la base de Navetta XL figuran las
informaciones relativas a su fecha de fabricación.
• Nombre del producto, fecha de fabricación y
numeración de serie del mismo.
Estas informaciones son indispensables en caso
de reclamación.
servicio de asistencia
peg-pérego
Si se pierden o dañan algunas partes del modelo,
utilizar únicamente repuestos originales Peg
Pérego. Para cualquier reparación, sustitución,
información acerca de los productos, venta de
repuestos originales y accesorios, contactar al
Servicio al Cliente Peg Pérego indicando, en caso
fuere presente, el número de serie del producto.
USA:
tel.: 800.225.1558 (Español)
fax: 260.471.6332
Número de teléfono gratis: 1.800.225.1558
(Español)
sito internet: www.pegperego.com
Peg-Perego se reserva el derecho para hacer
cambios necesarios o mejorar los productos al
cualquier tiempo sin notificación.
All manuals and user guides at all-guides.com

15
• RISQUE DE CHUTE : NE PAS UTILISER
LA NACELLE LORSQUE L’ENFANT
COMMENCE À S’AIDER DE SES
MAINS OU DE SES GENOUX POUR SE
REDRESSER OU QU'IL PÈSE 20 LB (9
KG) OU PLUS.
• RISQUE D’ÉTOUFFEMENT : LE
NOURRISSON PEUT S’ÉTOUFFER DANS
LES INTERSTICES SITUÉS ENTRE LE
REMBOURRAGE SUPPLÉMENTAIRE ET
LE CÔTÉ DU COUFFIN/BERCEAU OU
SUR UNE LITERIE MOLLE. N’UTILISER
QUE LE CAPITONNAGE FOURNI
PAR LE FABRICANT. NE JAMAIS
AJOUTER D'OREILLER, D’ÉDREDON NI
D’AUTRE MATELAS POUR CRÉER UN
REMBOURRAGE.
• NE LAISSEZ JAMAIS VOTRE ENFAN
TOUT SEUL.
• POUR RÉDUIRE LE RISQUE DE MORT
SUBITE DU NOURRISSON, FAIRE
DORMIR L'ENFANT SUR LE DOS.
• UTILISATION DU SUPPORT : CE
PRODUIT A ÉTÉ CONÇU POUR UNE
UTILISATION AVEC UN SUPPORT.
TOUJOURS UTILISER UN SUPPORT
PEG-PEREGO SPÉCIFIQUE. AVANT
TOUTE UTILISATION, S’ASSURER QUE
LA NACELLE EST CORRECTEMENT
FIXÉE AU SUPPORT.
• NE PAS UTILISER NAVETTA XL PRÈS DE
SOURCES DE CHALEUR, DE FLAMMES
NUES OU PRÈS D’OBJETS DANGEREUX
ET À LA PORTÉE DES BRAS DE
L’ENFANT.
• UTILISER UNIQUEMENT SUR DES
SURFACES DURES, PLANES ET SÈCHES.
• NE PAS LAISSER D’AUTRES ENFANTS
JOUER SANS SURVEILLANCE PRÈS DU
LANDAU.
• “AVANT D’INSTALLER L’ENFANT DANS
LE COUFFIN, VEUILLEZ VÉRIFIER QUE
CHAQUE PIÈCE EST BIEN PLACÉE ET
FIXÉE CORRECTEMENT"
• LES OPÉRATIONS D’ASSEMBLAGE
ET DE PRÉPARATION DE L’ARTICLE
DOIVENT ÊTRE EFFECTUÉES PAR DES
ADULTES.
• NE PAS UTILISER NAVETTA XL S’IL
MANQUE DES PIÈCES OU S'IL EST
ENDOMMAGÉ.
• AVANT D’UTILISER NAVETTA XL,
VÉRIFIER SI TOUS LES MÉCANISMES
All manuals and user guides at all-guides.com

16
DE FIXATION SONT CORRECTEMENT
ENCLENCHÉS.
• NE PAS METTRE LES DOIGTS DANS LES
MÉCANISMES.
• L’EMPLOI D’ACCESSOIRES NON
APPROUVÉS PAR LE FABRICANT PEUT
S’AVÉRER DANGEREUX.
• NE PAS UTILISER NAVETTA XL SANS SA
HOUSSE EN TISSU. CETTE HOUSSE NE
PEUT ÊTRE REMPLACÉE QUE PAR UNE
AUTRE HOUSSE APPROUVÉE PAR LE
FABRICANT.
• TENIR COMPTE DE LA POSITION DE
L’ENFANT PENDANT LES OPÉRATIONS
DE RÉGLAGE DES MÉCANISMES
(POIGNÉE, DOSSIER).
• SI UN DRAP EST UTILISÉ, VÉRIFIER QUE
SES DIMENSIONS SONT ADAPTÉES À
CELLES DE LA NACELLE.
• LES CORDES PEUVENT PROVOQUER LA
STRANGULATION ! NE PAS PLACER LES
ÉLÉMENTS POSSÉDANT UNE CORDE
AUTOUR DU COU D’UN ENFANT,
COMME LE CORDON D'UNE CAPUCHE
OU CELUI D’UNE TÉTINE. NE PAS
SUSPENDRE DE CORDE AU-DESSUS
D'UN COUFFIN OU D'UN BERCEAU
ET NE PAS ATTACHER DE CORDE AUX
JOUETS.
• NE PAS PLACER LE MOΪSE PRÈS D’UNE
FENÊTRE OU D’UNE PORTE-FENÊTRE
OÙ L’ENFANT POURRAIT SE SAISIR DES
CORDES D’UN STORE OU D’UN RIDEAU
ET S’ÈTRANGLER.
REMARQUE
CET ARTICLE RESPECTE TOUTES LES
DISPOSITIONS DES NORMES ASTM
F833 ET ASTM F2194 ET DERNIÈRES
MODIFICATIONS ET VA MÊME AU-DELÀ.
mode d’emploi
utilisation de Navetta XL
1• CAPOTE : pour accrocher la capote, enfiler les
fixations dans leurs logements (fig_a), boutonner
les côtés (fig_b) et l’arrière (si des boutons y sont
présents) (fig_c).
2• La capote est munie d’un élément transparent
qui permet d’observer le bébé depuis toutes les
positions.
3• TABLIER : mettre le tablier en place et le
boutonner des deux côtés.
4• Il est possible d’accrocher le tablier à la capote,
assurant ainsi une meilleure protection de l’enfant
en cas d’intempéries. Défaire le côté du tablier
All manuals and user guides at all-guides.com
all-guides.com

17
(flèche_a), le déplier vers le haut (flèche_b) et
l’accrocher avec le velcro à la capote (flèche_c).
5• POIGNÉE : relever la poignée en la faisant
pivoter vers le haut jusqu’au déclic (flèche_a).
La poignée n’est bloquée que lorsqu’elle est
en position verticale. Pour abaisser la poignée,
appuyer simultanément sur les deux boutons
ronds (flèche_b) et la faire pivoter vers le bas
(flèche_c). La poignée facilite le transport (fig_d)
et l’installation de Navetta XL sur les châssis et les
poussettes.
6• POSITION BASCULE : la forme spéciale de la base
de Navetta XL permet de bercer l’enfant lorsque
la base est placée sur une surface plane.
7• POSITION PETIT LIT : Navetta XL se transforme en
berceau non basculant après avoir fait sortir les
pieds situés sous la base.
8• RÉGLAGE DU DOSSIER et DU REPOSE-PIEDS :
grâce au système COMFORT SYSTEM, on peut
régler en même temps le dossier et le repose-
pieds. Tirer la poignée vers l'extérieur (fig_a) et
la tourner (fig_b) pour soulever ou abaisser le
dossier et le repose-pieds.
9• SYSTÈME QUATRE SAISONS : Navetta XL est
munie de trous sous la base, qui permettent,
en les ouvrant ou en les fermant, de réguler la
circulation interne de l’air.
Pour ouvrir les trous, pousser les 4 petits leviers vers
l’extérieur.
ganciomatic system
10• Le Système Ganciomatic, pratique et rapide,
permet d'accrocher Navetta XL aux fixations
Ganciomatic de la base du châssis.
Pour accrocher Navetta XL, la positionner sur
le châssis et appuyer des deux mains jusqu’au
déclic.
Toujours actionner le frein du châssis avant
d’accrocher et de décrocher Navetta XL.
Vérifier que la nacelle est correctement
accrochée.
• Pour la décrocher, relever le levier de la poignée
Ganciomatic (flèche_a) et soulever Navetta XL
(flèche_b).
déhoussage
11• ENLEVER LA HOUSSE DE NAVETTA XL :
déboutonner les côtés et l’arrière de la capote
(fig_a), appuyer sur ses fixations pour la
décrocher (fig_b) et l’enlever par le haut.
12• Déboutonner le tablier et l’enlever (fig_a), relever
le dossier, déboutonner la housse interne (fig_b)
et l’enlever (fig_c).
entretien des parties en tissu
• brosser les éléments en tissu pour retirer la
poussière et laver à la main à une température
maximale de 30° ; ne pas tordre;
• ne pas utiliser de chlore;
• ne pas repasser;
• ne pas laver à sec;
• ne pas détacher à l’aide de solvants et ne pas
sécher dans un sèche-linge à tambour rotatif.
All manuals and user guides at all-guides.com

18
nettoyage du produit
• Ce produit requiert un entretien minimum. Les
opérations de nettoyage et d’entretien doivent
être effectuées uniquement par des adultes.
• Il est recommandé de nettoyer régulièrement les
parties mobiles et, si nécessaire, de les lubrifier avec
de l’huile légère.
• Nettoyer périodiquement les parties en plastique
avec un linge humide ; ne pas utiliser de solvants ou
tout produit similaire.
• Épousseter les éléments en tissu pour chasser la
poussière.
• Protéger le produit des agents atmosphériques
(eau, pluie ou neige) ; une exposition continue
et prolongée au soleil peut provoquer la
décoloration de nombreux matériaux.
• Conserver le produit dans un endroit sec.
Accessoires en option
13• KIT ANTI-ETOUFFEMENT: comprenant un matelas
plus coussin.
numéros de série
14• Des informations telles que la date de production
sont reportées sous la base de Navetta XL.
• Nom du produit, date de production et numéro de
série.
Ces informations sont indispensables en cas de
réclamation.
service d’assistance peg-pérego
En cas de perte de pièces ou de rupture de
l'une d'elles, utiliser exclusivement des pièces
de rechange originales Peg-Pérego. Pour toute
réparation, remplacement, informations sur les
produits, vente de pièces détachées d’origine et
accessoires, contactez le service après-vente Peg
Pérego en indiquant, si présent, le numéro de
série du produit.
CANADA:
tel.: 905.839.3371
fax: 905.839.9542
numéro sans frais: 1.800.661.5050
site internet: www.pegperego.com
Peg-Pérego se réserve le droit d’apporter à tout
moment des modifications aux modèles décrits
dans le présent ouvrage, pour des raisons de
nature technique ou commerciale.
All manuals and user guides at all-guides.com

Declaration of conformity
Product name
NAVETTA XL
Product reference number
INNX00NA*
Reference Standards (origin)
ASTM F-2194
Declaration of conformity
PegPerego S.p.A. declares, under its own
responsibility, that the item in question
has undergone a series of internal tests
and has been certied by external
independent laboratories, in compliance
with current legislation.
Date and place of issue
Arcore, July 2013
PegPerego S.p.A.
via De Gasperi, 50
20862 Arcore (MB), ITALY
EN_English ES_Español FR_Français
Declaration du conformitè
Denomination du produit
NAVETTA XL
Identication du produit
INNX00NA*
Standard du referiment (origin)
ASTM F-2194
Declaration du conformitè
La société PegPerego S.p.A. déclare sous
sa responsabilité que l’article en question
a fait l’objet d’essais de réception internes
et qu’il est certié par des laboratoires
externes et indépendants conformément
à la réglementation en vigueur.
Date et lieu du publication
Arcore, Juillet 2013
PegPerego S.p.A.
Via De Gasperi, 50
20862 Arcore (MB), ITALY
declaración de conformidad
Denominación del producto
NAVETTA XL
Código de identicación del producto
INNX00NA*
Normativas de referencia (origen)
ASTM F-2194
Declaración de conformidad
PegPerego S.p.A. declara bajo su propia
responsabilidad que el artículo
considerado ha sido sometido a ensayos
propios y ha sido certicado por
laboratorios externos e independientes
de conformidad con las normas vigentes.
Fecha y lugar de expedición
Arcore,
Julio 2013
PegPerego S.p.A.
Via De Gasperi, 50
20862 Arcore (MB), ITALIA
19
All manuals and user guides at all-guides.com

Navetta XL
Navetta XL
FINA1301I137
11/11/2013
PEG PEREGO S.p.A. VIA DE GASPERI 50 20862 ARCORE MB ITALIA
tel. 0039•039•60881 - fax 0039•039•615869-616454
Servizio Post Vendita/After Sale: tel. 0039•039•6088213 - fax: 0039•039•3309992
PEG PEREGO U.S.A. Inc.
3625 INDEPENDENCE DRIVE FORT WAYNE INDIANA 46808
phone 260 482 8191 fax 260 484 2940
Call us toll free: 1 800 671 1701
PEG PEREGO CANADA Inc.
585 GRANITE COURT PICKERING ONTARIO CANADA L1W3K1
phone 905 839 3371 fax 905 839 9542
Call us toll free: 1 800 661 5050
www.pegperego.com
All of the intellectual property rights for the contents of this instruction manual belong to
PEG PEREGO S.p.A. and are protected by the laws in force.
Todos los derechos de propiedad intelectual sobre los contenidos de este manual de
instrucciones pertenecen a PEG PEREGO S.p.A. y están protegidos por las leyes vigentes.
Tous les droits de propriété intellectuelle relatifs au contenu de ce manuel appartiennent à
PEG PEREGO SpA et sont protégés par la loi.
All manuals and user guides at all-guides.com
Other manuals for Navetta XL
4
Table of contents
Languages:
Other Peg-Perego Baby Carrier manuals

Peg-Perego
Peg-Perego Navetta XL User manual

Peg-Perego
Peg-Perego Pliko P3 User manual

Peg-Perego
Peg-Perego Navetta S User manual

Peg-Perego
Peg-Perego Culla Futura User manual

Peg-Perego
Peg-Perego Culla Elite User manual

Peg-Perego
Peg-Perego Primonido Elite User manual

Peg-Perego
Peg-Perego Baby carriage User manual

Peg-Perego
Peg-Perego Pliko Switch User manual

Peg-Perego
Peg-Perego Kit Auto User manual

Peg-Perego
Peg-Perego pliko p3 compact User manual