Peg-Perego Kit Auto User manual

kit auto
IT Istruzioni d’uso
EN Instructions for use
FR Notice d’emploi
DE Gebrauchsanleitung
ES Instrucciones de uso
PT Instruções para uso
NL Gebruiksaanwijzing
DK Brugsanvisning
FI Käyttöohjeet
CZ Návod na použití
SK Návod na použitie
HU Használati útmutató
SL Navodila za uporabo
RU Инструкции по пользованию
TR Kullanim klavuzu
HR/SRB/MNE/BiH Upute za uporabu
EL Οδηγίες χρήσεως

1
2
NO
NO
O
N
NO
O
UNIVERSAL CATEGORY

3 4
5 6

7 8
B
A
109
CD

11 12
13 14

16
15
17 18

19
20

8
Grazie per aver scelto un prodotto
Peg-Pérego.
Caratteristiche prodotto
Navicella auto, Gruppo 0, categoria
“Universale”
• La navicella auto è omologata secondo il regolamento UN/
ECE R44/04 per bambini di peso da 0-10 kg. Adatto alla
maggior parte dei sedili delle autovetture, ma non a tutti.
• La navicella auto può essere correttamente installata se nel
manuale d’uso e manutenzione del veicolo è indicata la
compatibilità con sistemi di ritenuta “Universali” di Gruppo 0.
• La navicella auto è classificata “Universale” secondo criteri di
omologazione più severi rispetto ai modelli precedenti che
non dispongono di questa scritta.
• Il dispositivo può essere utilizzato solo su veicoli dotati di
sedile posteriore a 2 o 3 posti dotati di cinture di sicurezza
a 2 o 3 punti, omologate in conformità al regolamento UN/
ECE R16 o a normative equivalenti.
• In caso di dubbi, o per ulteriori informazioni sul fissaggio
della Navicella auto su vetture specifiche, rivolgersi al
costruttore o al rivenditore.
IMPORTANTE
• “Navicella auto”, gruppo 0, deve essere installata
perpendicolare al senso di marcia.
• Non installare Navicella auto su sedili rivolti in direzione
opposta al senso di marcia o trasversalmente al senso
comune di marcia del veicolo.
• Questo articolo è numerato progressivamente.
AVVERTENZA
IMPORTANTE: leggere attentamente queste istruzioni
e conservarle nell'apposita sede per tutta la vita del
prodotto. La sicurezza del bambino potrebbe essere
messa a rischio se non si eseguono queste istruzioni.
• Potrebbe essere pericoloso lasciare il vostro bambino
IT_Italiano incustodito.
• Le operazioni di assemblaggio e preparazione dell'articolo
devono essere effettuate da adulti.
• Non utilizzate il prodotto se presenta parti mancanti o rotture.
• Prima dell’ uso assicurarsi che tutti i meccanismi di
aggancio siano fissati correttamente.
• Evitare di introdurre le dita nei meccanismi.
• Non utilizzare vicino a fonti di calore, fiamme libere od
oggetti pericolosi a portata delle braccia del bambino.
• Potrebbe essere pericoloso utilizzare accessori non
approvati dal costruttore.
• Assicurarsi che le cinghie per fissare la Navicella auto al
veicolo siano sempre tese e regolare quelle che bloccano il
bambino.
• Non attorcigliare mai le cinghie.
• Si raccomanda di sostituire il dispositivo nel caso sia stato
sottoposto a sollecitazioni eccessive durante un incidente
o abbia evidenti segni di rottura o deformazione.
• Il dispositivo di sicurezza non deve essere modificato in
nessun caso dall’utilizzatore.
• Non utilizzare in auto con lo schienale in posizione rialzata.
• Seguire scrupolosamente le istruzioni fornite dal
fabbricante del sistema di tenuta del bambino.
• Non lasciare il bambino nella Navicella auto in auto, senza
sorveglianza.
• Navicella auto deve essere sempre fissata con le cinture
di sicurezza del veicolo, anche quando non è occupata
dal bambino. In caso di frenata improvvisa, potrebbe
provocare lesioni agli occupanti del veicolo.
• Durante i viaggi in auto non tenere mai in braccio il bambino
e non sistemarlo mai al di fuori della Navicella auto. In caso
di frenata improvvisa, anche a bassa andatura, il bambino
verrebbe facilmente catapultato in avanti.
• Prestare particolare attenzione a bagagli o oggetti che
possono causare lesioni al bambino nella Navicella auto, in
caso di incidente.
• Non lasciare Navicella auto nella vettura sotto l’esposizione
del sole, alcune parti potrebbero essersi surriscaldate e
nuocere alla pelle delicata del bambino, controllare prima
di collocare il bambino.
• Prestare attenzione che Navicella auto non rimanga
bloccata da una parte mobile del sedile o da una portiera.

9
• Non utilizzare Navicella auto senza il rivestimento di tessuto,
tale rivestimento non puó essere sostituito da uno non
approvato dal costruttore in quanto costituisce parte
integrante di Navicella auto e della sicurezza. In caso di
sostituzione utilizzare un ricambio originale.
• Navicella auto é stata progettata con dispositivo di
assorbimento d’urto in polistirolo, integrato direttamente
nella scocca, sotto l’imbottitura: non rimuovere.
• Questo prodotto è adatto solo a bambini che non si
possono mettere da soli in posizione seduta.
• Questo prodotto e' inteso per bambini dalla nascita fino a 9
kg di peso. Usato in auto inteso fino a 10 kg di peso.
• Utilizzare solo su superfici dure, orizzontali ed asciutte.
• Non lasciare altri bambini a giocare incustoditi vicino alla
carrozzina.
• Prestare attenzione alla presenza del bambino quando
si effettuano operazioni di regolazione dei meccanismi
(maniglione, schienale).
• Controllare regolarmente il maniglione (o le maniglie) ed
il fondo della carrozzina e verificare l'assenza di segni di
rottura o danneggiamento.
• Nell'utilizzare la carrozzina con uno stand, verificate la
massima lunghezza della carrozzina specificata sullo stand.
Istruzioni d’uso
Kit Auto
Come montare il cinturino di sicurezza
IMPORTANTE: durante il trasporto in auto, è possibile
utilizzare il nostro materassino a tre punti.
IMPORTANTE: in auto tenere sempre lo schienale in
posizione orizzontale.
1• Posizionare la navicella auto con schienale e capottina
abbassate e, se presente, maniglione alzato.
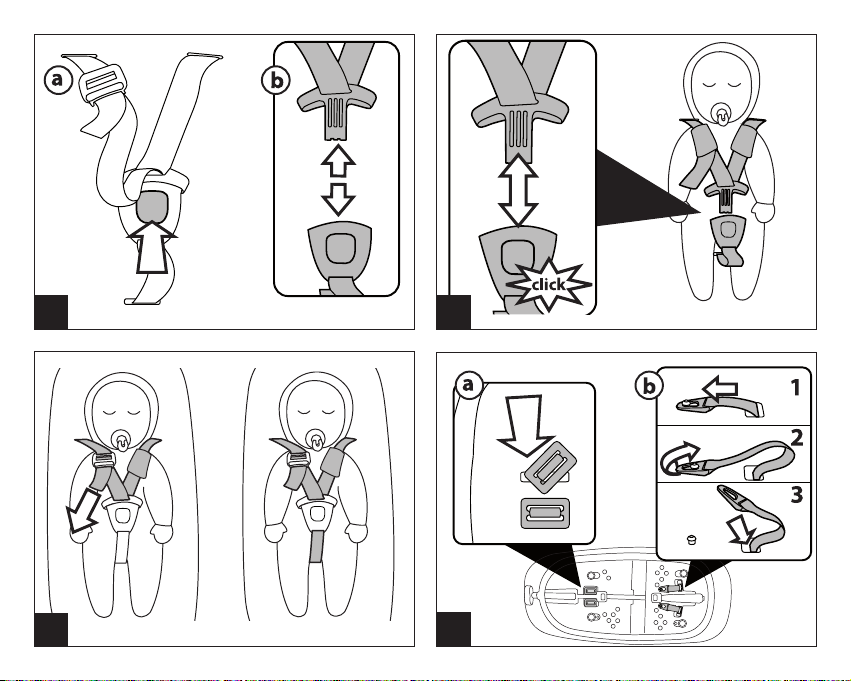
2•
CINTURINO A 3 PUNTI: Infilare il cinturino spartigambe nella
fessura del materassino (fig_a) e nelle fessure della scocca
(fig_b) fino ad oltrepassarla (fig_c).
3•
Infilare le due estremità delle bretelle nelle fessure del
materassino e della scocca (fig_a) e agganciarli ai perni (fig_b).
4•
Cinturini aggangiati sotto la scocca (fig_a) e internamente a
Navicella auto (fig_b).
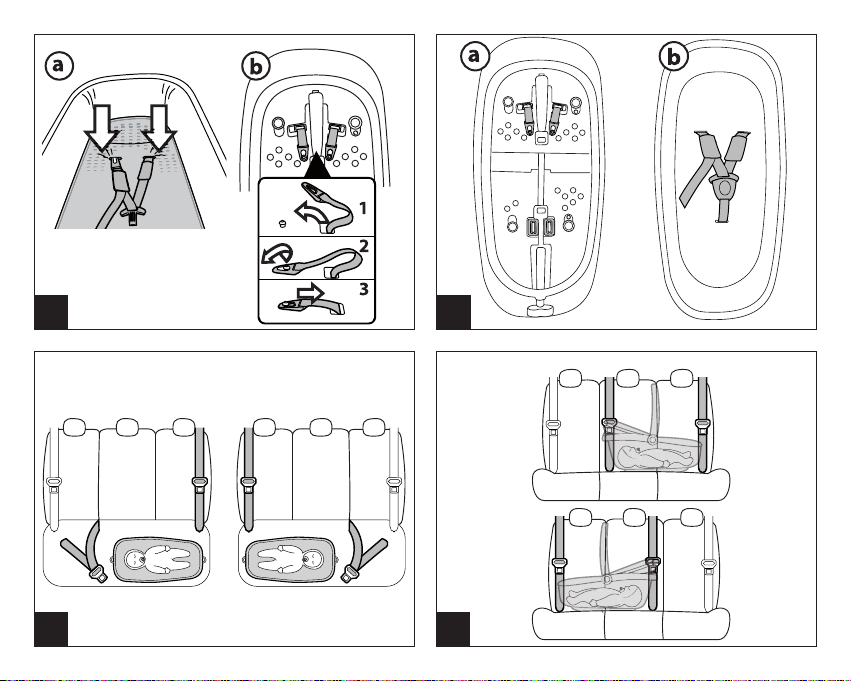
Aggancio in auto con cinture di sicurezza
AGGANCIO DELLA NAVICELLA IN AUTO: Il sedile posteriore
dell'auto (a 3 posti) ha 3 cinture di sicurezza e quella
centrale può essere dorsale o ventrale, in entrambi i casi è
possibile procedere all’aggancio della navicella in auto.
Consigliamo di posizionare la navicella sul sedile posteriore
lasciando il lato della testa in corrispondenza del sedile
centrale.
5• Navicella auto posizionata in auto con cintura ventrale.
6• Navicella auto posizionata in auto con cintura a 3 punti.
7• Navicella auto, è posizionabile anche centralmente al sedile
posteriore a 3 posti, utilizzando le due cinture di sicurezza
più esterne (fig_a) Navicella auto non è posizionabile come
in fig_b perchè può essere fissata in auto solo con cinture
orientate in senso opposto.
8• Posizionamento di Navicella auto su sedile posteriore a
2 posti. Navicella auto può essere rivolta con la parte dei
piedi del bambino sia da un lato che dall'altro.
Se il sedile dell’auto non è in piano ma inclinato si può
renderlo orizzontale con degli asciugamani.
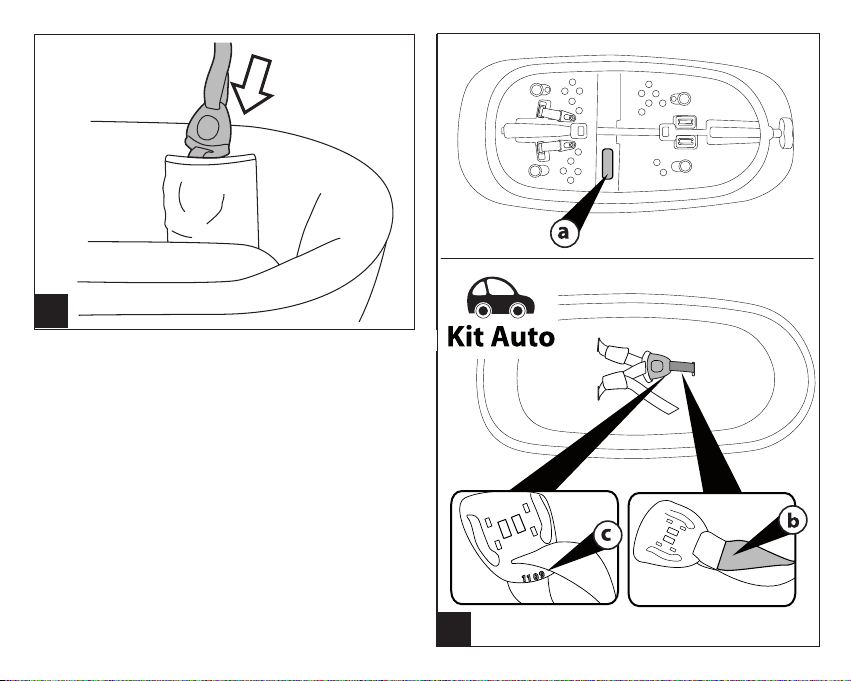
9• Prendere la cintura del sedile posteriore, piegarla come
in figura (freccia_a) e infilarla nella fessura della fibbia
metallica del kit auto (freccia_b).
10• Infilare la leva rossa della fibbia metallica del kit auto
all'interno della cintura ripiegata (freccia_c).
Avvicinare la fibbia metallica in più possibile al sedile per
facilitare poi l'aggancio alla Navicella (freccia_d).
11• Agganciare il connettore del kit auto all'anello della
Navicella e tendere la cintura con forza per far aderire
maggiormente la Navicella al sedile .
• Ripetere le stesse operazione dall'altro lato della Navicella.
12• Navicella auto agganciata in auto.
13• SGANCIO DELLA NAVICELLA DALL' AUTO:
premere il pulsante di regolazione sul connettore, come
in figura per allentare le cinture. Sganciare il gancio del
connettore del kit auto, dall'anello della Navicella.
IMPORTANTE: il kit auto può rimanere sempre
agganciato alle cinture della nostra auto. Con un
semplice gesto basterà solo agganciare o sganciare la
fibbia del kit auto dall'anello della Navicella (punto 13).
IMPORTANTE: non lasciare il kit auto agganciato alla

10
cintura di sicurezza del veicolo, se quest’ ultima è
utilizzata da un adulto.
Come accomodare il bambino sulla
Navicella auto
14• CINTURA DI SICUREZZA 3 PUNTI: allentare le bretelle,
premendo sulla fibbia (fig_a) e allungarle (fig_b).
15• premere il pulsante rosso (fig_a) e sganciare le bretelle
dallo spartigambe (fig_b).
16• Posizionare il bambino all'interno della Navicella auto e
inserire la fibbia delle bretelle nel cinturino spartigambe
fino ad agganciarlo.
17• Il bambino all'interno della Navicella auto deve essere ben
legato. Se i cinturini sono allentati, ridurre la lunghezza
delle bretelle tirando l'estremità del cinturino.
Le cinture devono essere tensionate il più possibile per
la sicurezza del bambino in caso di incidente. Lasciare un
minimo di gioco (lo spessore di un dito tra la cintura e il
torace del bambino).
18• RIMUOVERE I CINTURINI: per rimuovere i cinturini dalla
scocca di Navicella auto, infilare le fibbie dello spartigambe
nelle fessure poste sotto la scocca e sfilare (fig_a). Per sfilare
gli attacchi delle bretelle da sotto la scocca, sganciarli dai
perni e infilarli nelle proprie fessure (fig_b).
19• Riporre il cinturino sganciato nell'apposita tasca.
Numeri di serie
20• Navicella auto riporta sotto la base, informazioni relative
alla data di produzione della stessa.
• Nome del prodotto, data di produzione e numerazione seriale
dello stesso (fig_a).
Kit Auto:
• Etichetta di omologazione (fig_b);
• Data di produzione del cinturino (fig_c);
Questi elementi sono utili al consumatore nel caso in cui il
prodotto dovesse presentare delle problematiche.
Pulizia del prodotto
• Il vostro prodotto necessita un minimo di manutenzione.
Le operazioni di pulizia e manutenzione devono essere
effettuate solo da adulti.
• Si raccomanda di tenere pulite tutte le parti in movimento
e se occorre, lubrificarle con olio leggero.
• Periodicamente pulire le parti in plastica con un panno
umido, non usare solventi o altri prodotti simili.
• Spazzolare le parti in tessuto per allontanare la polvere.
• Non pulire il dispositivo di assorbimento d’urto in
polistirolo con solventi o altri prodotti simili.
• Proteggere il prodotto da agenti atmosferici, acqua,
pioggia o neve; l’esposizione continua e prolungata al sole
potrebbe causare cambiamenti di colore in molti materiali.
• Conservare il prodotto in un posto asciutto.
Come leggere l’etichetta di
omologazione
• In questo paragrafo vi spieghiamo come leggere l’etichetta
di omologazione (etichetta arancione).
• In alto all’etichetta c’è il marchio dell’azienda produttrice e
il nome del prodotto.
• 0-10 kg Y indica che il prodotto è omologato per bambini
dalla nascita fino a 10 kg di peso e che il dispositivo è
dotato di cintura a 3 punti.
• La lettera E in un cerchio: indica il marchio di
omologazione Europea e il numero definisce il paese che
ha rilasciato l’omologazione (1: Germania, 2: Francia, 3:
Italia, 4: Paesi Bassi, 11: Gran Bretagna e 24: Irlanda).
• Numero di omologazione: se inizia con 04 vuol dire che è
il quarto emendamento (quello attualmente in vigore) del
regolamento R44.
• Normativa di riferimento: UN/ECE R44/04.
• Numero progressivo di produzione: personalizza ogni
navicella, dal rilascio dell’omologazione ognuno è
contraddistinto dal proprio numero.
PEG-PÉREGO S.p.A.
Peg-Pérego S.p.A. è certificata ISO 9001. La
certificazione offre ai clienti e ai consumatori
la garanzia di una trasparenza e fiducia nel
modo di lavorare dell'impresa.
Peg Pérego potrà apportare in qualunque
momento modifiche ai modelli descritti in

11
questa pubblicazione, per ragioni di natura tecnica o
commerciale.Peg Pérego è a disposizione dei suoi
Consumatori per soddisfare al meglio ogni loro esigenza.
Per questo, conoscere il parere dei ns. Clienti, è per noi
estremamente importante e prezioso. Le saremo quindi
molto grati se, dopo aver utilizzato un ns. prodotto, vorrà
compilare il QUESTIONARIO SODDISFAZIONE
CONSUMATORE, segnalando eventuali osservazioni o
suggerimenti, che troverà nel nostro sito internet:
www.pegperego.com
Servizio assistenza Peg-Pérego
Se fortuitamente parti del modello vengono perse o
danneggiate, usare solo pezzi di ricambio originali Peg
Pérego. Per eventuali riparazioni, sostituzioni, informazioni
sui prodotti, vendita di ricambi originali e accessori,
contatta il Servizio Assistenza Peg Pérego indicando,
qualora fosse presente, il numero seriale del prodotto.
tel. 0039/039/60.88.213
numero verde: 800/147.414 (contattabile da rete fissa)
fax 0039/039/33.09.992
sito internet www.pegperego.com
Tutti i diritti di proprietà intellettuale relativi ai contenuti di
questo manuale d’istruzione appartengono a PEG PEREGO
S.p.A. e sono tutelati dalle leggi vigenti.
Thank you for choosing a
Peg-Pérego product.
Product characteristics
Car bassinet unit-auto, Group 0,
“Universal” category
• The Car bassinet unit is approved under regulation UN ECE
R44/04 for children weighing from 0-10 kg. It is suitable for
installation on the majority of vehicle seats, but not all.
• The Car bassinet unit can be properly installed if the
vehicle's use and maintenance manual states that it is
compatible with “Universal” Group 0 restraint systems.
• The Car bassinet unit is classified as “Universal” in
compliance with stricter approval criteria than previous
models that do not have this label.
• The device can only be used on vehicles with 2 or 3 rear
seats fitted with 2- or 3-point safety belts, approved in
compliance with UN ECE R16 or equivalent regulations.
• For any questions or further information on installing
the Car bassinet unit in specific vehicles, contact the
manufacturer or the retailer.
IMPORTANT
• “Car bassinet unit” (Group 0) must be fitted perpendicular
to the vehicle’s normal direction of travel.
• Do not fit Car bassinet unit on vehicle seats that face away
or sideways with respect to the normal direction of travel
of the vehicle.
• The item is given a serial number.
WARNING
IMPORTANT: Read these instructions carefully and
store them in the holder provided throughout the
lifecycle of the product. The child’s safety could be put
at risk if these instructions are not followed.
• It could be dangerous to leave your child unattended.
• Assembly and preparation of the item must be carried out
EN_English

12
by adults.
• Do not use the product if there are missing or broken parts.
• Before use make sure that all of the attachment
mechanisms are connected properly.
• Do not insert fingers into the mechanisms.
• Do not use near heat sources, open flames or dangerous
objects that are within reach of the child.
• It could be dangerous to use accessories which are not
approved by the manufacturer.
• Make sure the belts fastening the Car bassinet unit to the
vehicle are always taut and adjust the straps securing the
child.
• Never twist the belts.
• Replace the item if it undergoes significant strain in an
accident or shows clear signs of breakage or deformation.
• The safety device should not be modified by users in any
circumstances.
• Do not use in vehicles with the backrest in the raised
position.
• Carefully follow the instructions supplied by the
manufacturer of the child restraint system.
• Never leave the child unattended in the Car bassinet unit
in a vehicle.
• The Car bassinet unit must always be secured with the
vehicle’s safety belts, even when the child is not present. In
the event of sudden braking, it could injure the occupants
of the vehicle.
• When travelling in vehicles, never hold the child in your
arms and never put him/her anywhere but in the Car
bassinet unit. In the event of sudden braking, even at low
speeds, the child would be flung forward.
• Take particular care to make sure that luggage or other
objects are not located where they may injure the child in
the Car bassinet unit in the event of an accident.
• Do not leave the Car bassinet unit in vehicles exposed to
the sun. Some parts might heat up and be harmful to the
delicate skin of the child – check before placing the child in
the seat.
• Make sure that the Car bassinet unit is not obstructed by
any moving parts of the vehicle’s seat or by one of the
doors.
• Do not use the Car bassinet unit without its fabric covering,
which cannot be replaced with one not approved by the
manufacturer since it is an integral part of the Car bassinet
unit and the safety system. If replacing it, use an official
spare part.
• The design of the Car bassinet unit features a polystyrene
shock absorption device built directly into the shell, below
the padding: do not remove it.
• This product is only suitable for children who are unable to
sit up by themselves.
• This product is designed for children from birth up to a
weight of 9 kg. When used in vehicles it is designed for
weights of up to 10 kg.
• Only use the product on surfaces that are hard, horizontal
and dry.
• Do not leave other children playing unattended near the
carriage.
• Take care when adjusting the mechanisms (handle,
backrest) with the child present.
• Regularly check the handle (or the handles) and the
bottom of the carriage to make sure that there are no signs
of breakage or damage.
• When using the carriage with a stand, check the maximum
length of the carriage specified on the stand.
Instructions for use
Car Kit
How to fit the safety harness
IMPORTANT: during car travel, our mattress with a
3-point harness can be used.
IMPORTANT: In vehicles, always keep the backrest in
the horizontal position.
1• Position the car bassinet unit with the backrest and hood
lowered and the handle raised, if present.
2• 3-POINT SAFETY HARNESS: Pass the leg divider straps
through the slot in the mattress pad (fig_a) and the slots
in the shell (fig_b) so that they come out on the other side
(fig_c).
3• Pass the two ends of the shoulder straps through the slots
in the mattress pad and the shell (fig_a), then clip them to
the pins (fig_b).
4• Straps attached under the shell (fig_a) and inside the Car

13
bassinet unit (fig_b).
Attachment in vehicles with safety belts
ATTACHING THE BASSINET UNIT IN VEHICLES: It is possible
to install the bassinet unit in cars if there are 3 rear seats
with 3 safety belts. The central one can be 3-point or a lap
belt.
We recommend positioning the bassinet unit on the
vehicle’s rear seats with the end for the child’s head above
the central seat.
5• Car bassinet unit fitted in a vehicle with a lap belt.
6• Car bassinet unit fitted in a vehicle with a 3-point belt.
7• The Car bassinet unit can also be positioned in the centre
of a 3-person rear seat, using the two outer safety belts
(fig_a). It cannot be positioned as in fig_b because it can
only be secured in vehicles using safety belts that come
from opposite sides.
8• Position of the Car bassinet unit on a 2-person rear seat.
The Car bassinet unit can be positioned with the child’s
feet on either side of the vehicle. If the seat of the vehicle
inclines, towels can be used to provide a horizontal surface.
9• Take the rear seat belt, fold it as shown in the figure
(arrow_a) and insert it in the slot of the car kit's metal
fastener (arrow_b).
10• Insert the red lever on the metal fastener of the car kit
inside the folded belt (arrow_c).
Move the metal fastener as near as possible to the seat in
order to enable it to be fastened to the Carrycot (arrow_d).
11• Hook the car kit connector to the ring on the Carrycot and
pull firmly on the belt to ensure the Carrycot fits as well as
possible to the seat.
• Repeat the same operations on the other side of the
Carrycot.
12• Car Carrycot installed in the car.
13• UNFASTENING THE CARRYCOT FROM THE CAR:
press the control button on the connector to loosen the
belts, as shown in the figure. Unhook the fastener of the
car kit connector from the ring on the Carrycot.
IMPORTANT: the car kit can remain fastened to the
seat belts of your car. The car kit fastener can easily be
attached to or removed from the ring on the Carrycot
(point 13).
IMPORTANT: do not leave the car kit fastened onto
the vehicle’s safety belt when this is being used by an
adult.
How to put the child in the Car
bassinet unit
14• 3-POINT SAFETY HARNESS: Slacken the straps by pressing
on the buckle (fig_a) and lengthen them (fig_b).
15• Press the red button (fig_a) and release the straps from the
leg divider (fig_b).
16• Place the child in the Car bassinet unit then buckle
together the straps and the leg divider.
17• The child must be securely fastened in the Car bassinet
unit. If the straps are loose, tighten them by pulling on the
end.
The straps must be as tight as possible to protect the child
in the event of an accident. Leave a minimal amount of
play (the width of a finger between the harness and the
child’s chest).
18• REMOVE THE STRAPS: To remove the straps from the shell
of the Car bassinet unit, pass the buckles of the leg divider
through the slots under the shell and pull them through
(fig_a). To remove the strap fasteners from under the shell,
release them from the clips and pass them through the
slots (fig_b).
19• Put the harness back in its pocket once it has been
removed.
Serial numbers
20• Information about the production date of Car bassinet unit
can be found under the base.
• Product name, production date and serial number (fig_a).
Car Kit:
• Approval label (fig_b).
• Harness production date (fig_c).
In the event of problems with the product, these details
will be of use to customers.
Product cleaning
• This product requires a small amount of maintenance.

14
Cleaning and maintenance must only be carried out by
adults.
• Keep all moving parts clean and if necessary lubricate
them with light oil.
• Clean the plastic parts periodically with a damp cloth. Do
not use solvents or similar substances.
• Brush the fabric parts to remove dust.
• Do not clean the polystyrene shock absorbing device with
solvents or other similar products.
• Protect the product from atmospheric agents: humidity,
rain or snow. Extended exposure to sunshine can cause
colour changes in many materials.
• Store the product in a dry environment.
How to read the approval label
• This paragraph explains how to interpret the approval label
(the orange one).
• The top of the label displays the trademark of the
manufacturing company and the name of the product.
• 0-10 kg Y means that the product is approved for children
from birth up to 10 kg in weight and that it is fitted with a
3-point safety harness.
• The letter E in a circle indicates the European approval
mark and the number indicates the country that issued the
approval (1: Germany, 2: France, 3: Italy, 4: Netherlands, 11:
Great Britain and 24: Republic of Ireland).
• Approval number: if it starts with 04, this indicates
the fourth amendment (the one currently in force) of
Regulation R44.
• Reference standard: UN ECE R44/04.
• Production serial number: on issue of approval, each
bassinet unit is given its own unique number.
PEG-PÉREGO S.p.A.
Peg-Pérego S.p.A. is an ISO 9001 certified
company. This certification is a guarantee for
customers and consumers of the
transparency and trustworthiness of the
company's procedures and working
methods. Peg Pérego can make changes at
any time to the models described in this publication for
technical or commercial reasons. Peg Pérego is at the
disposal of its customers and consumers to ensure that all
their demands and queries are fully satisfied. It is a key part
of our policy to ensure we are always aware of our
customers' views and requirements. We would therefore
be very grateful if, after using a Peg Pérego product, you
take the time to fill in our CUSTOMER SATISFACTION
QUESTIONNAIRE, making a note of any comments or
suggestions you might have. You can find the
questionnaire on the Peg Pérego website: www.
pegperego.com
Peg-Pérego after-sales service
If any parts of the item get lost or damaged, only
use genuine Peg Pérego spare parts. For any repairs,
replacements, information on the products and sales of
genuine spare parts and accessories, contact the Peg
Pérego Assistance Service and state the serial number of
the product, if present.
tel. 0039/039/60.88.213
fax 0039/039/33.09.992
website www.pegperego.com
All intellectual property rights on the contents of this
manual are property of PEG PEREGO S.p.A. and are
protected by the laws in force.

15
Merci d’avoir choisi un produit
Peg-Pérego.
caractéristiques du produit
Nacelle auto-auto, Groupe 0, catégorie
d’homologation « Universelle »
• Nacelle auto est homologué conforme au Règlement UN/
ECE R44/04 pour le transport d’enfants d'un poids de 0 à
10 kg. Il s’adapte à la plupart des sièges d’automobiles mais
pas à tous.
• Pour installer correctement Nacelle auto vérifier dans le
manuel d'utilisation et d'entretien de votre véhicule si ce
dernier peut recevoir des systèmes de fixation « Universels
» du Groupe 0.
• Nacelle auto a été classé dans la catégorie d'homologation
« Universelle » selon des critères d’homologation
plus sévères que ceux des modèles antérieurs qui ne
bénéficient pas de cette catégorie.
• Nacelle auto peut être utilisé uniquement sur des
véhicules munis de siège postérieur à 2 ou 3 places dotés
de ceintures di sécurité 2 ou 3 points, homologuées
conformes au règlement UN/ECE R16 ou normes
équivalentes.
• En cas de doute ou pour plus de renseignements sur
l’installation de Nacelle auto sur un véhicule particulier,
contacter le fabricant ou le revendeur.
IMPORTANT
• «Nacelle auto», groupe 0, doit être installé
perpendiculairement au sens de marche.
• Ne pas installer Nacelle auto sur un siège orienté
dans la direction opposée au sens de la marche ou
transversalement au sens de marche normal du véhicule.
• Cet article porte un numéro séquentiel de fabrication.
AVERTISSEMENT
IMPORTANT : lire attentivement ces instructions et les
FR_Français conserver dans la poche prévue à cet effet pendant
toute la durée de vie utile du produit. Le non-respect
de ces instructions pourrait compromettre la sécurité
de l’enfant.
• Ne pas laisser l’enfant seul et sans surveillance.
• Les opérations d’assemblage et de préparation de l’article
doivent être effectuées par des adultes.
• Ne pas utiliser Nacelle auto s’il manque des pièces ou s'il
est endommagé.
• Avant d’utiliser Nacelle auto, vérifier si tous les mécanismes
de fixation sont correctement enclenchés.
• Ne pas mettre les doigts dans les mécanismes.
• Ne pas utiliser Nacelle auto près de sources de chaleur, de
flammes nues ou près d’objets dangereux et à la portée
des bras de l’enfant.
• L’emploi d’accessoires non approuvés par le fabricant peut
s’avérer dangereux.
• Vérifier si les sangles de fixation au véhicule de Nacelle
auto sont bien tendues et régler celles qui retiennent
l’enfant.
• Ne jamais entortiller les sangles.
• Il est recommandé de remplacer Nacelle auto s’il a été
soumis à des sollicitations excessives suite à un accident
ou s’il présente des signes de cassure ou de déformation
évidents.
• En aucun cas l’utilisateur ne doit modifier le dispositif de
sécurité.
• Ne pas utiliser en voiture avec le dossier en position
redressée.
• Suivre scrupuleusement les instructions fournies par le
fabricant de Nacelle auto.
• Ne jamais laisser l’enfant seul et sans surveillance dans
Nacelle auto en voiture.
• Nacelle auto doit toujours être fixé avec les ceintures de
sécurité du véhicule, même lorsqu’il est vide car il pourrait
blesser les occupants du véhicule en cas de coup de frein
brusque.
• Pendant les voyages en voiture, ne tenez jamais l’enfant
dans vos bras et installez-le toujours dans Nacelle auto car
même à petite vitesse, en cas de coup de frein brusque
l’enfant serait catapulté en avant.

16
• Prêter une attention particulière aux bagages ou autres
objets se trouvant dans l’habitacle car ils pourraient blesser
l’enfant en cas d’accident.
• Ne pas laisser Nacelle auto dans le véhicule exposé au
soleil ; certaines parties pourraient chauffer et brûler la
peau délicate de l'enfant. Vérifier la température de Nacelle
auto avant d'y installer l'enfant.
• Veiller à ce que Nacelle auto ne reste pas coincé dans une
partie mobile du siège de la voiture ou dans une portière.
• Ne pas utiliser Nacelle auto sans sa housse en tissu. Cette
housse ne peut être remplacée que par une autre housse
approuvée par le fabricant car elle fait partie intégrante
de Nacelle auto et est une garantie de sa sûreté. En cas de
remplacement, utiliser uniquement une housse originale
du fabricant.
• Nacelle auto a été conçu avec un dispositif en polystyrène
pour l’absorption des chocs, qui est incorporé directement
dans la coque, sous la housse : ne pas l‘ôter.
• Cet article ne convient qu’aux enfants qui ne savent pas
encore s’asseoir tout seul.
• Cet article a été conçu pour le transport des enfants à
partir de la naissance et jusqu’à un poids de 9 kg. Il a été
conçu pour utilisation en voiture jusqu’à un poids de 10 kg.
• Utiliser uniquement sur des surfaces dures, planes et
sèches.
• Ne pas laisser d’autres enfants jouer sans surveillance près
du landau.
• Tenir compte de la position de l’enfant pendant les
opérations de réglage des mécanismes (poignée, dossier).
• Contrôler régulièrement la poignée centrale (ou les
poignées de transport) et le fond du landau. Vérifier s’il
présente des signes de cassure ou d’endommagement.
• Si le landau est utilisé avec un stand, vérifier la longueur
maximale du landau indiquée sur le stand.
• “Conforme aux exigences de securite”.
• Norme NF S 54-001.
Mode d’emploi
Kit Auto
Comment monter la ceinture de sécurité
IMPORTANT : lors du transport en voiture, il est
possible d’utiliser notre matelas réducteur trois points.
IMPORTANT : en voiture, toujours garder le dossier en
position horizontale.
1• Positionner la nacelle auto avec la capote et le dossier
abaissés et, le cas échéant, la poignée relevée.
2• CEINTURE À 3 POINTS: Insérer la sangle d’entrejambes dans
le passant du matelas (fig_a) et dans ceux de la coque
(fig_b) jusqu’à ce qu’elle soit complètement passée (fig_c).
3• Insérer les deux extrémités des bretelles dans les passants
du matelas et de la coque (fig_a) et les accrocher aux
fixations (fig_b).
4• Les ceintures sont maintenant accrochées sous la coque
(fig_a) et à l’intérieur de Nacelle auto (fig_b).
Installation avec les ceintures de
sécurité du véhicule
FIXATION DE LA NACELLE DANS LA VOITURE : le siège
arrière de la voiture (à 3 places) est doté de 3 ceintures
de sécurité et la ceinture du milieu peut être dorsale ou
ventrale. Dans les deux cas, il est possible de fixer la nacelle
dans la voiture.
Nous conseillons de placer la nacelle sur le siège arrière
avec le côté tête vers le siège central.
5• Nacelle auto installé dans la voiture avec la ceinture
ventrale.
6• Nacelle auto installé dans la voiture avec la ceinture 3
points.
7• Nacelle auto peut aussi être placé au milieu du siège
arrière à 3 places en utilisant les deux ceintures de sécurité
les plus externes (fig_a). Nacelle auto ne peut pas être
installé comme illustré sur la fig_b parce qu’il ne peut être
fixé dans la voiture que si les ceintures sont orientées dans
le sens opposé.
8• Installation de Nacelle auto sur un siège arrière à 2 places.
Nacelle auto peut être orienté avec le côté pieds placé
d’un côté ou de l'autre.
Si le siège de la voiture n’est pas horizontal mais incliné, on
peut y remédier en intercalant des serviettes.
9• Prendre la ceinture du siège arrière, la plier comme sur la
figure (flèche_a) et l'enfiler dans la fente de la boucle en
métal du kit auto (flèche_b).

17
10•Enfiler le levier rouge de la boucle en métal du kit auto à
l'intérieur de la ceinture repliée (flèche_c).
Approcher la boucle en métal le plus près possible du
siège pour l'accrocher ensuite plus facilement à la Nacelle
(flèche_d).
11•Clipper le connecteur du kit auto à l'anneau de la Nacelle et
tendre la ceinture énergiquement pour bien faire adhérer
la Nacelle au siège.
• Répéter les mêmes opérations de l'autre côté de la Nacelle.
12• Nacelle auto fixée à la voiture.
13• DÉCLIPPAGE DE LA NACELLE DE LA VOITURE :
appuyer sur la touche de réglage sur le connecteur,
comme sur la figure pour desserrer les ceintures. Déclipper
la fixation du connecteur du kit auto, de l'anneau de la
Nacelle.
IMPORTANT : Le kit auto peut rester fixé au ceintures
de la voiture de manière permanente. Un simple geste
suffira pour clipper ou déclipper la boucle du kit auto
de l'anneau de la Nacelle (point 13).
IMPORTANT : ne pas laisser le kit auto accroché à la
ceinture de sécurité du véhicule si celle-ci est utilisée par
un adulte.
Comment installer l’enfant sur Nacelle
auto
14• CEINTURE DE SÉCURITÉ 3 POINTS : desserrer les bretelles en
appuyant sur la boucle (fig_a) puis les allonger (fig_b).
15• Appuyer sur le bouton rouge (fig_a) et décrocher les
bretelles d’entrejambes (fig_b).
16• Installer l’enfant dans Nacelle auto et introduire la boucle
des bretelles dans la sangle d’entrejambes jusqu’à ce qu’elle
s’enclenche.
17• L’enfant doit être bien attaché dans Nacelle auto. Si les
sangles sont détendues, raccourcir les bretelles en tirant
l'extrémité de la sangle.
Les ceintures doivent être tendues le plus possible pour
assurer la sécurité de l’enfant en cas d’accident. Laisser un
minimum de jeu (l’épaisseur d’un doigt entre la ceinture et
le buste de l’enfant).
18• ÔTER LES SANGLES: pour ôter les sangles de la coque de
Nacelle auto, enfiler les boucles d’entrejambes dans les
fentes situées sous la coque et tirer (fig_a). Pour décrocher
les fixations des bretelles du dessous de la coque, les
décrocher des axes et les faire passer dans leurs propres
fentes (fig_b).
19• Lorsque la ceinture est décrochée, la replacer dans la
poche prévue à cet effet.
Numéros de série
20• Des informations telles que la date de production sont
reportées sous la base de Nacelle auto.
• Nom du produit, date de production et numéro de série
(fig_a).
Kit Auto :
• Étiquette d’homologation (fig_b) ;
• Date de production de la ceinture (fig_c) ;
Ces informations sont utiles au client au cas où des
problèmes sur le produit apparaîtraient
Nettoyage du produit
• Ce produit requiert un entretien minimum. Les opérations
de nettoyage et d’entretien doivent être effectuées
uniquement par des adultes.
• Il est recommandé de nettoyer régulièrement les parties
mobiles et, si nécessaire, de les lubrifier avec de l’huile
légère.
• Nettoyer périodiquement les parties en plastique avec un
linge humide ; ne pas utiliser de solvants ou tout produit
similaire.
• Épousseter les éléments en tissu pour chasser la poussière.
• Ne pas nettoyer le dispositif d’absorption des chocs en
polystyrène avec des solvants ou autres produits similaires.
• Protéger le produit des agents atmosphériques (eau, pluie
ou neige) ; une exposition continue et prolongée au soleil
peut provoquer la décoloration de nombreux matériaux.
• Conserver le produit dans un endroit sec.
Comment lire l'étiquette
d'homologation
• Ce paragraphe explique les inscriptions figurant sur
l'étiquette d'homologation (étiquette orange).

18
• En haut de l'étiquette figurent la marque du fabricant et le
nom de l’article.
• 0-10 kg Y indique que le produit est homologué conforme
pour le transport d’enfants de la naissance à 10 kg et que le
dispositif est doté de ceinture 3 points.
• La lettre E au milieu d’un cercle indique la marque
d’homologation européenne tandis que le numéro se
réfère au pays qui a délivré l’homologation (1 : Allemagne,
2 : France, 3 : Italie, 4 : Pays Bas, 11 : Grande Bretagne et 24 :
Irlande).
• Numéro d'homologation : s'il commence par 04, il se réfère
au quatrième amendement (celui qui est actuellement en
vigueur) du règlement R44.
• Norme de référence : UN/ECE R44/04.
• Numéro séquentiel de fabrication : ce numéro personnalise
chaque nacelle ; lorsque l'homologation est délivrée,
chaque produit est caractérisé par un numéro qui lui est
propre.
PEG-PÉREGO S.p.A.
Peg-Pérego S.p.A. est certifiée ISO 9001. La
certification offre à la clientèle une garantie
de transparence et représente un gage de
confiance dans la façon de travailler de
l’entreprise. Peg-Pérego se réserve le droit de
procéder à tout moment à des modifications
sur les modèles décrits dans cet ouvrage, pour des raisons
de nature technique ou commerciale. Peg-Pérego est à la
disposition de sa clientèle pour satisfaire au mieux chacune
de ses exigences. En cela, il est très important et précieux
pour nous de connaître l’opinion de notre clientèle. Nous
vous saurions donc gré, après avoir utilisé un de nos
produits, de remplir le QUESTIONNAIRE DE SATISFACTION
CLIENT, en nous faisant part de toute observation ou
suggestion éventuelle. Vous trouverez ce questionnaire sur
notre site Internet, à l'adresse www.pegperego.com
Service d’assistance Peg-Pérego
En cas de perte de pièces ou de rupture de l'une d'elles,
utiliser exclusivement des pièces de rechange originales
Peg-Pérego. Pour toute réparation, remplacement,
informations sur les produits, vente de pièces détachées
d’origine et accessoires, contactez le service après-vente
Peg Pérego en indiquant, si présent, le numéro de série du
produit.
tél. 0039/039/60.88.213
fax 0039/039/33.09.992
site Internet www.pegperego.com
Tous les droits de propriété intellectuelle relatifs au
contenu de ce manuel appartiennent à PEG PEREGO SpA
et sont protégés par la loi.

19
Vielen Dank, dass Sie sich für ein
Produkt Peg-Pérego entschieden
haben.
Produkteigenschaften
Autobabyschale-auto, Gruppe 0,
„Universal“
• Autobabyschale ist gemäß europäischer Prüfnorm UN/
ECE R44/04 für Kinder mit einem Gewicht von 0 bis 10 kg
zugelassen. Geeignet für die meisten Autositze, jedoch
nicht für alle.
• Autobabyschale kann in allen Fahrzeugen korrekt befestigt
werden, in deren Beschreibungs- bzw. Wartungshandbuch
die Kompatibilität mit Rückhaltesystemen der Kategorie
„Universal“ der Gruppe 0 angegeben wird.
• Autobabyschale ist als „Universal“ eingestuft. Die
Prüfkriterien hierfür sind strenger als bei den
Vorgängermodellen ohne diese Zulassung.
• Die abnehmbare Babyschale darf nur in Fahrzeugen
mit einem Rücksitz für 2 oder 3 Personen verwendet
werden, der mit Zwei- oder Drei-Punkt-Sicherheitsgurten
ausgestattet ist, die gemäß europäischer Prüfnorm UN/ECE
R16 oder gleichbedeutender Vorschriften zugelassen sind.
• Bei Fragen oder für nähere Informationen zur Befestigung
der Autobabyschale in den einzelnen Fahrzeugtypen
wenden Sie sich bitte an den Hersteller oder Händler.
WICHTIG
• Autobabyschale, Gruppe 0, muss quer zur Fahrtrichtung
befestigt werden.
• Autobabyschale darf nicht auf Autositzen befestigt
werden, die entgegengesetzt oder längs zur Fahrtrichtung
ausgerichtet sind.
• Dieser Artikel ist mit einer laufenden Seriennummer
gekennzeichnet.
DE_Deutsch WARNUNG
WICHTIG: Lesen Sie diese Anweisungen aufmerksam
durch und bewahren Sie sie für die gesamte
Verwendungsdauer des Produktes am dafür
vorgesehenen Platz auf. Wenn Sie diese Anweisungen
nicht beachten, könnte die Sicherheit Ihres Kindes
gefährdet sein.
• Es kann gefährlich sein, Ihr Kind unbeaufsichtigt zu lassen.
• Montage und Voreinstellung des Produktes müssen von
Erwachsenen durchgeführt werden.
• Verwenden Sie das Produkt nicht, wenn es unvollständig ist
oder Schäden aufweist.
• Vergewissern Sie sich vor Gebrauch, dass alle
Haltevorrichtungen korrekt befestigt sind.
• Achten Sie darauf, die Finger nicht zwischen den Bauteilen
einzuklemmen.
• Nicht in der Nähe von Wärmequellen, offenem Feuer oder
gefährlichen Gegenständen verwenden, die in Reichweite
des Kindes sind.
• Es kann gefährlich sein, Zubehörteile zu verwenden, die
nicht vom Hersteller zugelassen sind.
• Vergewissern Sie sich, dass die Gurte, mit denen die
Babyschale Autobabyschale im Fahrzeug befestigt
wird, immer straff gespannt sind, und stellen Sie die
Sicherheitsgurte für das Kind immer genau ein.
• Die Gurte dürfen keinesfalls verdreht sein.
• Bitte tauschen Sie die Babyschale nach übermäßiger
Beanspruchung durch einen Unfall oder wenn sie sichtbar
beschädigt oder verformt ist, aus.
• Das Sicherheitssystem darf unter keinen Umständen vom
Benutzer verändert werden.
• Im Auto nicht mit Rückenlehne in angehobener Position
verwenden.
• Folgen Sie genauestens den vom Hersteller des
Kinderrückhaltesystems mitgelieferten Anweisungen.
• Lassen Sie das Kind im Auto nicht unbeaufsichtigt in der
Babyschale Autobabyschale.
• Auch wenn kein Kind darin sitzt, muss die Babyschale
Autobabyschale mit den Sicherheitsgurten des Fahrzeugs
befestigt sein. Andernfalls könnten mitfahrende Personen bei
plötzlichem, scharfen Bremsen verletzt werden.

20
• Das Kind nie auf den Arm nehmen oder außerhalb der
Babyschale setzen, wenn das Fahrzeug in Bewegung ist.
Andernfalls könnte das Kind bei plötzlichem Bremsen, dies
gilt auch für sehr geringe Fahrgeschwindigkeiten, nach
vorn geschleudert werden.
• Achten Sie besonders darauf, dass das Kind in der
Autobabyschale bei einem Unfall nicht von Gepäckstücken
oder anderen Gegenständen verletzt werden kann.
• Lassen Sie die Babyschale nicht unter direkter
Sonneneinstrahlung im Fahrzeug, da einige Teile
überhitzen und die empfindliche Kinderhaut verletzen
könnten. Überprüfen Sie dies, bevor Sie das Kind in die
Babyschale legen.
•
Achten Sie darauf, dass die Babyschale nicht durch bewegliche
Teile des Autositzes oder einer Autotür blockiert ist.
• Die Babyschale nicht ohne Bezug verwenden.
Der Bezug kann nur gegen ein vom Hersteller
zugelassenes Produkt ausgetauscht werden, da er fester
Bestandteil der Babyschale und der entsprechenden
Sicherheitseinrichtungen ist. Beim Austausch von Teilen
nur original Ersatzteile verwenden.
• Autobabyschale ist zur Dämpfung von Stößen mit einem
Aufprallschutz aus Polystyrol ausgestattet, der unter der
Polsterung direkt in die Kunststoffschale integriert ist. Er
darf nicht entfernt werden.
• Das Produkt ist nur für Kinder geeignet, die sich noch nicht
allein aufrichten können.
• Das Produkt ist für Kleinkinder von der Geburt bis zu einem
Gewicht von 9 kg vorgesehen. Im Auto kann es für Kinder
von bis zu 10 kg genutzt werden.
• Nur auf stabilen, horizontalen und trockenen Oberflächen
verwenden.
• Andere Kinder dürfen nicht unbeaufsichtigt in der Nähe
des Kinderwagens spielen.
• Montage und Voreinstellung des Autobabyschale müssen
von Erwachsenen durchgeführt werden.
• Verwenden Sie das Produkt nicht, wenn es unvollständig ist
oder Schäden aufweist.
• Verwenden Sie nur vom Hersteller zugelassene
Kinderwageneinlagen. Achtung, verwenden Sie die
Kinderwageneinlagen nicht im Auto.
• Versichern Sie sich vor Gebrauch, dass alle
Haltevorrichtungen korrekt befestigt sind.
• Achten Sie immer auf das Kind, wenn Sie Teile des
Kinderwagens (Griff, Rückenlehne) verstellen.
• Überprüfen Sie regelmäßig den Griff (oder die Griffe) und
die Unterseite des Kinderwagens und vergewissern Sie
sich, dass keine Anzeichen für Risse oder sonstige Schäden
vorliegen.
• Wenn Sie die Babyschale auf einem Ständer verwenden,
beachten Sie die Maximallänge der Babyschale, die auf
dem Ständer angegeben ist.
Gebrauchsanweisung
Auto-Ausstattung
Befestigen des Sicherheitsgurtes
WICHTIG: während des Transports kann unsere
3-Punkt-Auflage verwendet werden.
WICHTIG: Die Rückenlehne im Auto stets in
waagerechter Position halten.
1• Befestigen Sie die Babyschale mit abgesenkter
Rückenlehne, heruntergeklapptem Verdeck und
gegebenenfalls mit angehobenem Tragebügel.
2• DREI-PUNKT-SICHERHEITSGURT: Ziehen Sie den
Schrittgurt durch die Öffnung in der Einlage (Abb_a) und
anschließend durch die Öffnungen der Kunststoffschale
(Abb_b) vollständig hindurch (Abb_c).
3• Ziehen Sie die Enden der Schultergurte durch die
Öffnungen der Einlage und der Kunststoffschale (Abb_a)
und haken Sie sie in die Verschlüsse ein (Abb_b).
4• Die befestigten Sicherheitsgurte an der Unterseite der
Kunststoffschale (Abb_a) und in der Autobabyschale
Babyschale (Abb_b).
Befestigung im Auto mit
Sicherheitsgurten
BEFESTIGUNG DER BABYSCHALE IM AUTO: Der Rücksitz
des Fahrzeugs (für 3 Personen) ist mit 3 Sicherheitsgurten
ausgestattet, von denen der mittlere entweder ein Becken-
oder ein Schultergurt sein kann. In beiden Fällen kann die
Babyschale im Fahrzeug befestigt werden.
Other manuals for Kit Auto
1
Table of contents
Languages:
Other Peg-Perego Baby Carrier manuals

Peg-Perego
Peg-Perego Culla Futura User manual

Peg-Perego
Peg-Perego Baby carriage User manual

Peg-Perego
Peg-Perego Navetta XL User manual

Peg-Perego
Peg-Perego Navetta XL User manual

Peg-Perego
Peg-Perego Primonido Elite User manual

Peg-Perego
Peg-Perego Pliko P3 User manual

Peg-Perego
Peg-Perego Navetta S User manual

Peg-Perego
Peg-Perego Culla Elite User manual

Peg-Perego
Peg-Perego Navetta XL User manual

Peg-Perego
Peg-Perego pliko p3 compact User manual