23215 Early Ave. • Torrance, CA 90505 USA
Tel (310) 326-4700 • FAX (310) 326-3311 • www.pelican.com
10221-184th Street • Edmonton, Alberta T5S 2J4 Canada
Tel (780) 481-6076 • FAX (780) 481-9586 • www.pelican.ca
002783-0312-000 5-15291 Rev B AU/15 © PELICAN PRODUCTS 2015
All trademarks are registered and/or unregistered trademarks
of Pelican Products, Inc., its subsidiaries and/or afliates.
CON LA GARANTÍA LIMITADA DE EXCELENCIA
DE POR VIDA DE PELICAN
Pelican Products, Inc., ofrece una garantía de por vida en sus linternas contra
roturas o defectos de fabricación. Esta garantía no cubre la lámpara ni las
pilas. Las reclamaciones de garantía de cualquier clase se considerarán
nulas en caso de que el producto haya sufrido alteraciones, daños o modi-
caciones físicas de cualquier tipo, se haya hecho un uso incorrecto, abusivo o
negligente o haya sufrido accidentes. Para obtener toda la información relativa
a la garantía, véase http://www.pelican.com/warranty.
GARANTIE D’EXCELLENCE À VIE LIMITÉE DE PELICAN
Pelican Products, Inc. garantit à vie ses torches contre la casse et les
défauts de fabrication. Cette garantie ne couvre pas l’ampoule ou les piles.
Toute demande de prise en charge sous garantie, de quelque nature que ce
soit, sera refusée si le produit a été transformé, endommagé ou physiquement
modié d’une façon ou d’une autre, ou encore sujet à un traitement abusif,
une mauvaise utilisation, une négligence ou un accident. Pour une version
complète et détaillée de la garantie, voir http://www.pelican.com/warranty.
PELICAN LIMITED LIFETIME GUARANTEE OF EXCELLENCE
Pelican Products, Inc. guarantees its lights for a lifetime against
breakage or defects in workmanship. This guarantee does not cover
the lamp or batteries. All warranty claims of any nature are barred
if the product has been altered, damaged or in any way physically
changed, or subjected to abuse, misuse, negligence or accident.
For complete warranty details, see http://www.pelican.com/warranty.
In Australia: The benets provided to you under this warranty are
in addition to your rights and remedies as a consumer under the
Competition and Consumer Act 2010 (Cth).
Nothing in this warranty limits the rights or obligations of a party
under provisions of the Competition and Consumer Act 2010 (Cth) in
relation to the supply to consumers of goods which cannot be limited,
modied or excluded. If applicable, our goods come with guarantees
that cannot be excluded under the Australian Consumer Law.
You are entitled to a replacement or refund for a major failure and
compensation for any other reasonably foreseeable loss or damage.
You are also entitled to have the goods repaired or replaced if the
goods fail to be of acceptable quality and the failure does not amount
to a major failure. If you are not a consumer under the Competition
and Consumer Act 2010 (Cth), then your rights may be limited. To
make a warranty claim, the purchaser must contact Pelican Products
Australia, Suite 2.33, West Wing, Platinum Bldg., Erina NSW 2250,
Tel: +612 4367 7022. Any warranty claims shall be made by the
purchaser as soon as practicable. The purchaser must obtain a
return authorization number from Pelican Customer Service prior
to returning any product, and is responsible for paying for all war-
ranty freight costs. If Pelican determines that any returned product
is not defective, within the terms of this warranty, the purchaser
shall pay Pelican all costs of handling, return freight and repairs at
Pelican’s prevailing rates. In the event that Pelican determines that
any returned product is defective, within the terms of this warranty,
Pelican shall pay the purchaser all reasonable costs of the purchaser
in making claim under this warranty.
Lifetime Guarantee does not cover Roto Molded cases, RALS
products or fabric portion of backpacks. Refer to www.pelican.com/
warranty for full details.
PELICAN PRODUCTS ULC
Silver Triangle
Markings
Battery Safety Information
WARNING: HANDLE AND STORE BATTERIES PROPERLY
TO AVOID INJURY OR DAMAGE. BATTERIES CAN BE DANGEROUS!
Most battery issues arise from improper handling of batteries, and particularly from the use of damaged
or counterfeit batteries. Please review the information below to avoid serious injury and/or damage to
your property.
Rechargeable Batteries
1. Hazardous location safety approvals for explosive environments are only valid for the Pelican
battery pack that is supplied with the light.
2. For replacement battery packs only use the approved Pelican battery pack for the model of the
light that you are using. The use of other battery packs will invalidate the safety approval.
3. Lights should only be charged in a non-hazardous location.
4. Lights should only be charged using the Pelican charger base that is supplied with the light.
5. Lights should be charged and operated between the temperatures shown:
Charge Temperature: 0°C to 45°C (32°F to 113°F)
Operating Temperature: -20°C to 60°C (-4°F to 140°F)
6. Do not charge with alkaline batteries installed in the light. Attempting this can cause internal gas or heat
generation resulting in venting, explosion or possibly re.
7. Deep discharge of the rechargeable battery may cause batteries to
vent potentially dangerous gasses and electrolytes.
Always dispose of all batteries properly at an approved battery recycling center.
Información sobre seguridad de las pilas
AVISO: MANIPULAR Y GUARDAR LAS PILAS CON PRECAUCIÓN
PARA EVITAR DAÑOS LAS PILAS PUEDESER PELIGROSAS.
La mayoría de los problemas relacionados con las pilas surgen al utilizarlas incorrectamente
y, sobre todo, al emplear pilas falsas o en mal estado. Consultar la información siguiente para
evitar daños personales o en el producto.
Pilas recargables
1. Los certicados de seguridad para zonas peligrosas en entornos explosivos solo se
aplican al paquete de pilas Pelican que se suministra con la linterna.
2. Para cambiar los paquetes de pilas utilizar únicamente las pilas Pelican
homologadas para el modelo de linterna correspondiente. El uso de otros paquetes
de pilas anulará el certicado de seguridad.
3. No cargar la linterna en zonas peligrosas.
4. Cargar la linterna únicamente en la base de cargador Pelican que se suministra con la
linterna.
5. Las linternas deben cargarse y utilizarse en el rango de temperaturas que aparece:
Temperatura de carga: 0°C to 45°C (32°F to 113°F)
Temperatura de funcionamiento: -20°C to 60°C (-4°F to 140°F)
6. No cargar la linterna con las pilas alcalinas dentro; podría generarse gas o calor
en el interior, que podría emanar y provocar una explosión o un incendio.
7. Si las pilas recargables se descargan demasiado rápido pueden originarse
fugas de gases peligrosos y electrolitos.
Desechar las pilas en un centro de reciclado homologado.
Informations relatives à la sécurité des piles
AVERTISSEMENT : MANIPULER ET RANGER CORRECTEMENT
LES PILES, AFIN D’ÉVITER TOUT RISQUE DE LÉSION CORPORELLE
OU DE DOMMAGE MATÉRIEL LES PILES PEUVENT ÊTRE
DANGEREUSES !
La plupart des problèmes liés aux piles sont dus à une manipulation incorrecte, en particulier à
l’utilisation de piles endommagées ou contrefaites. Lire attentivement les informations ci-dessous,
an d’éviter tout risque de lésion corporelle et/ou de dommage matériel de vos produits.
Piles rechargeables
1. Les agréments de sécurité de sites dangereux pour les environnements explosifs sont
valables uniquement pour le bloc-piles Pelican fourni avec le système d’éclairage.
2. Pour remplacer le bloc-piles, utiliser uniquement un bloc-piles Pelican homologué pour le
modèle du système d’éclairage utilisé. L’utilisation d’autres piles risque d’invalider l’agrément
de sécurité.
3. Le système d’éclairage doit être rechargé uniquement dans un site non dangereux.
4. Le système d’éclairage doit être rechargé uniquement à l’aide de la base-chargeur Pelican
fournie avec le système d’éclairage.
5. Les torches doivent être chargées et utilisées dans la plage des températures:
Température de charge: 0°C to 45°C (32°F to 113°F)
Température d’utilisation: -20°C to 60°C (-4°F to 140°F)
6. Ne pas recharger lorsque des piles alcalines sont installées dans le système d’éclairage.
Dans le cas contraire, cela pourrait entraîner une production interne de gaz ou de chaleur,
provoquant un dégazage, une explosion ou éventuellement un incendie.
7. Un déchargement important des piles rechargeables peut provoquer un dégazage
potentiellement dangereux et une fuite de l’électrolyte.
Toujours mettre au rebut toutes les piles correctement dans un centre
de recyclage des piles agréé.
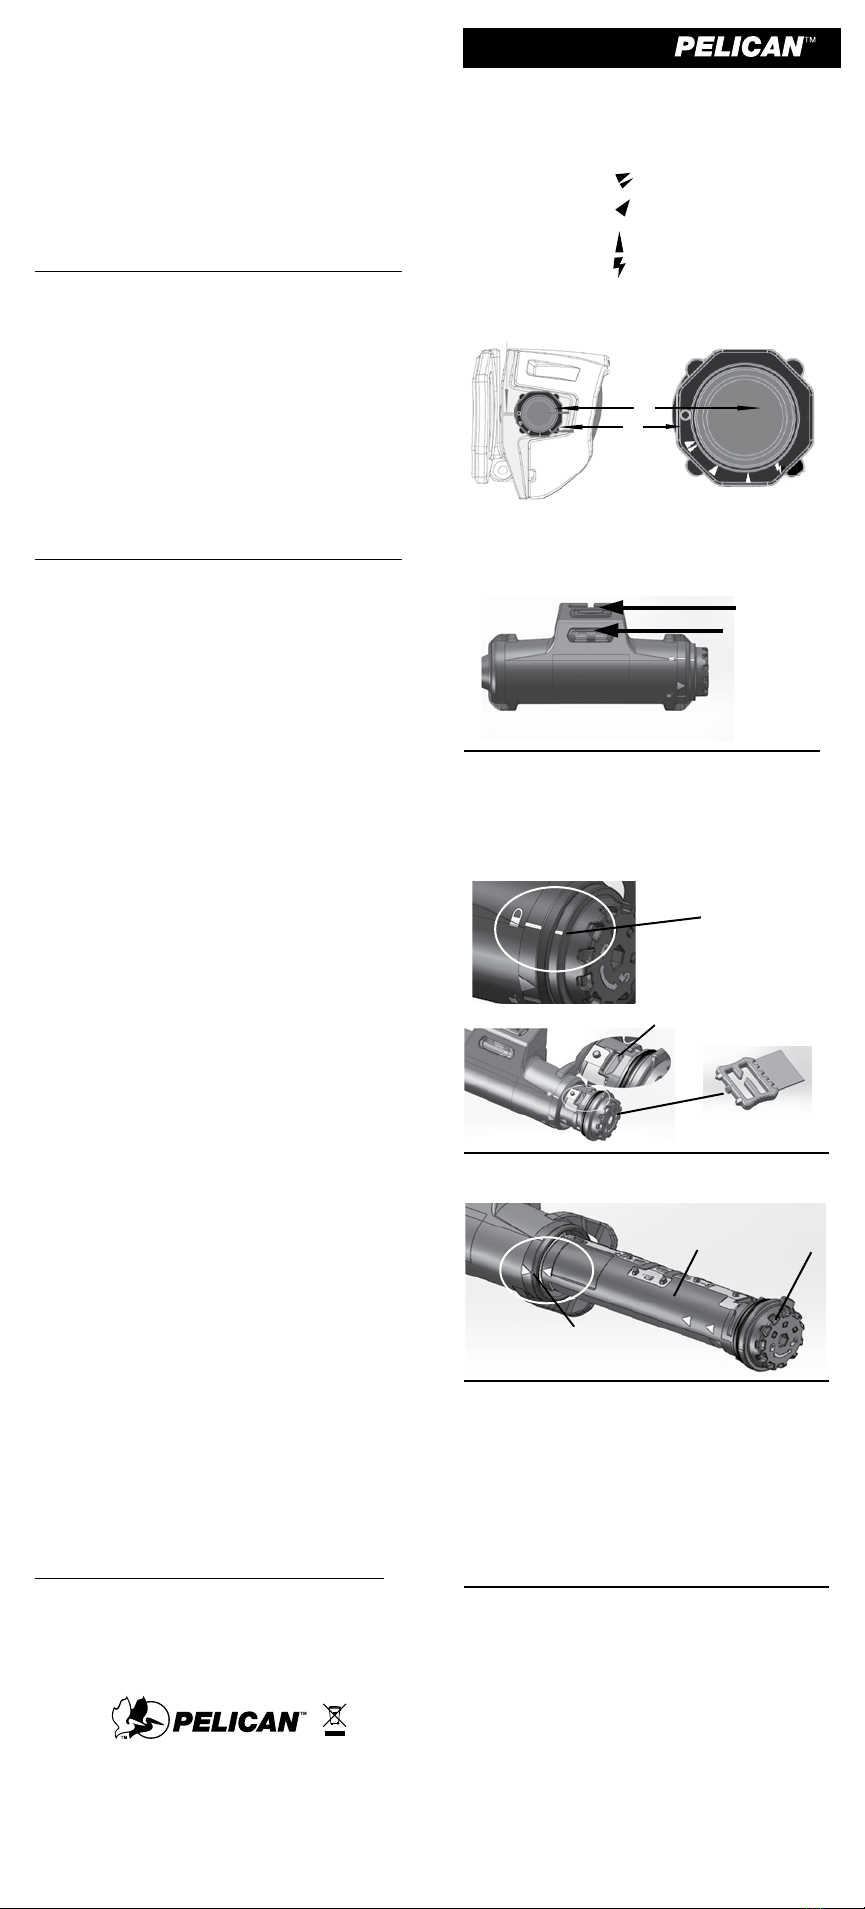
Battery Tray
Align Markings
2780R LED
Instructions
LED Head Modes :
Rotate the side knob A to to turn on both
main and downcast leds.
Rotate the side knob A to to turn on
downcast led only.
Rotate the side knob A to to turn on main led only.
Rotate the side knob A to for flashing.
To adjust brightness
At any position, press the center blue button on the side knob B
to adjust brightness from 100%, 50%, 10% except on flashing mode.
Red LED on battery pack
To activate the rear mounted RED LED, press the switch one time.
For flashing, press the switch twice within 1 second.
To turn off from either mode, press the switch after 2 seconds.
Charging
- Rotate the knob counter clockwise (symbol on the knob) with
the tool on the strap as shown and the battery tray will pop out
automatically (or pull gently)
- Connect the USB cable provided to the battery tray
- The Battery status indicator will blink indicating the battery level
- All three blue LEDS will illuminate when fully charged.
- When finished charging push the battery tray all the way in and
rotate the knob clockwise until the two(2) silver lines align.
To replace and install the Li-Ion battery
(use only Pelican approved battery)
- Rotate the battery knob counter clockwise
until the battery tray pops out automatically
- Pull the tray out
- Remove the battery by lifting the end of the battery (the negative end)
- To install the battery tray, align the silver triangle
marking on the tray to the housing (see image)
- Push the battery tray all the way in and rotate clockwise
until the silver markings align
Battery status indicator
- 75% to 100%, 3 blue solid LEDS
- 50% to 75%, 2 blue solid LEDS
- 25% to 50%, 1 blue solid LED
- 25% or below, 1 blue blinking LED
Battery status indicator while charging
- 3 blue blinking LEDS, charging 0% to 25%
- 1 blue blinking LED, charging 25% to 50%
- 1 solid blue LED,
and 1 blue blinking LED, charging 50% to 75%
- 2 solid blue LEDS,
and 1 blue blinking LED, charging 75% to 100%
- 3 solid blue LEDS, fully charged
Battery tray tool is
attached to the strap
USB
A
B
LED SWITCH
RED LED
Battery
Status
Indicator


