Pella V784840 User manual

Installation Instructions for Typical Wood Frame Construction.
These instructions were developed and tested for use with typical wood frame wall construction in
a wall system designed to manage water. These instructions are not to be used with any other
construction method. Installation instructions for use with other construction methods may be
obtained from Pella®Corporation or a local Pella retailer. Building designs, construction methods,
building materials, and site conditions unique to your project may require an installation method
different from these instructions and additional care. Determining the appropriate installation method
is the responsibility of you, your architect, or construction professional.
Handling and Storage:
Provide full support under the framework while storing, moving and installing this product. DO
NOT lift the product by the head member only. Remove the plastic shipping material prior to storing
or installing the product. DO NOT store in direct sunlight. Allow sufficient spacing between products
for ventilation.
REMEMBER TO USE APPROPRIATE
PERSONAL PROTECTIVE EQUIPMENT.
Always read the Vinyl Window and Door Limited Warranty before purchasing or
installing Vinyl Windows and Doors manufactured by Pella Corporation. By installing this product,
you are acknowledging that this Limited Warranty is part of the terms of the sale. Failure to comply
with all Pella installation and maintenance instructions may void your Pella product warranty. See
Limited Warranty for complete details at http://warranty.pella.com.
INSTALLATION INSTRUCTION - INSTRUCCIONES DE INSTALACION
FOR DOUBLE-HUNG VENT REPLACEMENT WINDOW
Part Number: V784840
©Pella Corporation 2007
Vinyl Windows and Doors
Manufactured by Pella Corporation
Lea las instrucciones en español en el reverso.
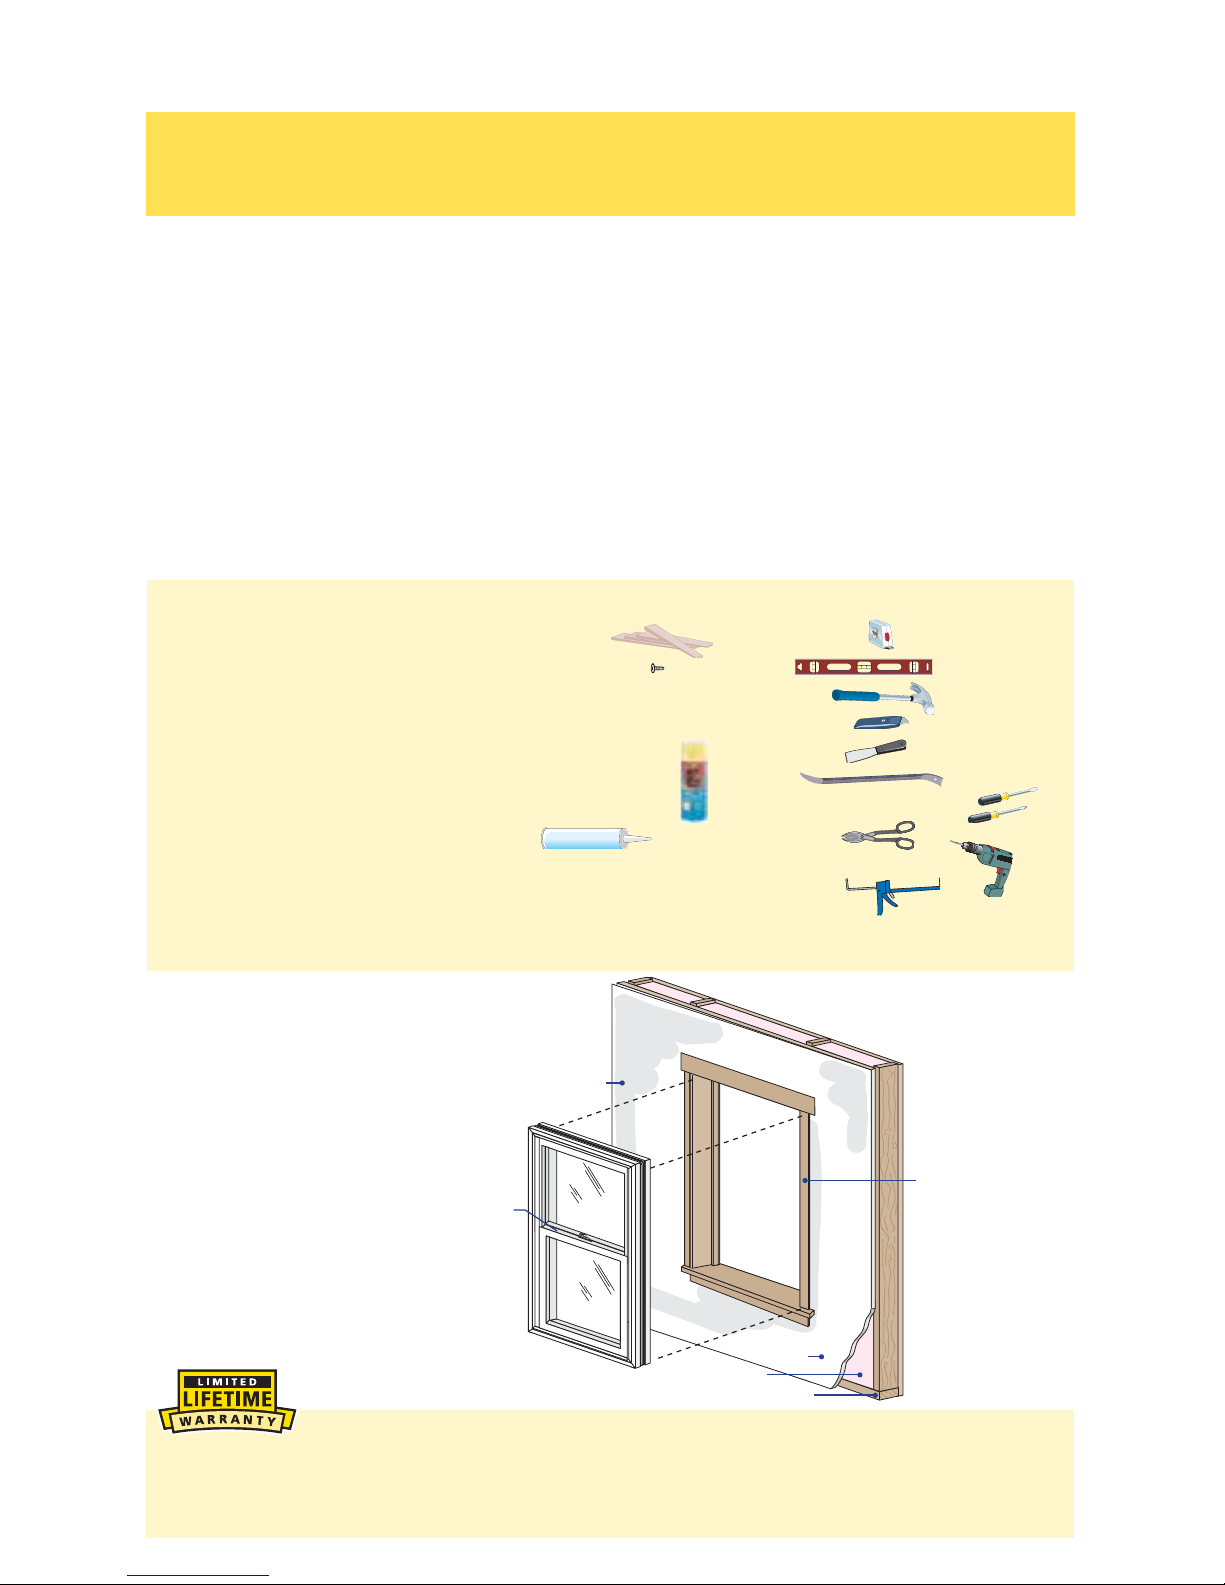
*OUFSJPS
%SZXBMM
&YJTUJOHXBMM
DPOTUSVDUJPO
&YJTUJOH
XJOEPX
GSBNF
*OTVMBUJPO
'SBNJOH
$IFDLSBJM
YOU WILL NEED TO SUPPLY: TOOLS REQUIRED:
s#EDAROR)MPERVIOUSSHIMSSPACERSTO
sXSHEETMETALSCREWSFORHEADEXPANDER
s'REAT3TUFF™Window and Door Insulating Foam
Sealant by the Dow Chemical Company or equivalent
LOWPRESSUREPOLYURETHANEWINDOWANDDOORFOAM
$/./4USEHIGHPRESSUREORLATEXFOAMS
s(IGHQUALITYEXTERIORGRADEPOLYURETHANEOR
SILICONESEALANTTUBEPERWINDOW
s,OOSElLLlBERGLASSINSULATION
s4APEMEASURE
s,EVEL
s(AMMER
s5TILITYKNIFE
s0UTTYKNIFE
s0RYBAR
s3CREWDRIVER&LAT0HILLIPS
s3IDECUTTERS
s$RILLWITHvDRILLBIT
s3EALANTGUN
Installation will require two or
more persons for safety reasons.
&OR(IGH0ERFORMANCE)NSTALLATIONSONLY
sXmATHEADCORROSIONRESISTANTWOODSCREWS
sXPINEFORINTERIORFRAMESTOPS
SEALANT
SEALANT

A. Score paint or varnish along
interior sash stops with a sharp
utility knife. Carefully remove
INTERIORSASHSTOPSATJAMBSSIDES
ANDHEADTOPUSINGPUTTYKNIFE
and prybar. Set aside to reuse.
B. Cut the balance cords on the
bottom sash and lift out the sash.
Allow weights to fall to the bottom
of the weight pocket.
C. Remove the parting stops. There
may be a small wedge of wood at
the bottom of the upper sash that is
NEXTTOTHEPARTINGSTOPS4OMAKE
it easier to remove the parting stop,
use a chisel to knock off the wedge.
D. Lower the top sash and cut the
balance cords allowing the balance
weights to fall into the weight
pocket. Remove the top sash. Be
CAREFULNOTTODAMAGETHEEXTERIOR
blind stop.
E. Remove the balance cord pulleys.
Unscrew and remove balance cord
pulleys. If they cannot be removed
easily, drive them into the jamb
using a hammer.
1REMOVING EXISTING SASH
Caution: Many windows in older homes are painted with lead-based paint. Removal of old
windows may disturb this paint. Proper precautions must be taken to minimize exposure to dust
and debris. Consult state or local authorities for more information. Use appropriate personal
protective equipment.
A. Inspect the existing window frame and repair or replace any defective or rotted wood parts.
-AKESURETHEEXTERIORBLINDSTOPSARESOUND
B. Insulate the weight pocket with loose fill insulation.
Note: Use of expanding/aerosol foam insulation is not recommended.
C. If applicable,INSTALLPRElNISHEDMETALmASHINGORTRIMTOCOVEREXISTINGFRAMESILLANDTHE
EXTERIORTRIMATTHEHEADANDJAMBS
D. Clean the openingOFANYDIRTDEBRISOREXCESSOLDPAINTBEFOREPROCEEDING
Note: Many windows in older homes are painted with lead-based paint. See caution note
in Step 1.
2OPENING PREPARATION
*OUFSJPS
TBTITUPQ
&YUFSJPS
CMJOE
TUPQ
1BSUJOH
TUPQ
#PUUPN
TBTI
5PQTBTI
#PUUPN
TBTI
XFJHIU
5PQ
CBMBODF
DPSE
#BMBODF
DPSEQVMMFZT
5PQTBTI
XFJHIU
#PUUPN
CBMBODF
DPSET
*/5&3*03
*OUFSJPS
TBTITUPQ
1BSUJOHTUPQ
&YUFSJPS
CMJOETUPQ
E. Ensure existing sill is level.
Note: If shimming of the sill is necessary, use a continuous shim that extends across the
entire width of the sill.

{
i i
4SEALING AND FASTENING THE WINDOW
3PREPARE THE WINDOW FOR INSTALLATION
A. Remove packing materials from the window.
Note: Check product for any cracks or
penetrations in the frame. DO NOT install
damaged windows.
4JMMBDDFTTPSZ
HSPPWF
4JMMBEBQUFS
Î
B. Install the sill adapter in the sill
accessory groove.
Note: Use a rubber mallet to drive
the sill adapter into the sill accessory
groove. The vertical leg of the sill
adapter may be cut to accommodate
different sill angles.
A. Test fit the window in the opening. With the window closed and locked, set the bottom
of the window into the opening, then tilt the top into position.
B. Ensure the window is resting against the interior surface of the blind stops and the sill
adapter meets the original sill.
Note: The height of the window frame can be
increased by as much as 3/8" by applying the
head expander (included) to the window
frame. If more than 3/8" height adjustment
is required, install a continuous shim at
the sill.
DO NOT use the head expander in High
Performance installations.
C. Apply the head expander (if required). For installation
USINGTHEHEADEXPANDERGOTO).34!,,!4)/.
).3425#4)/.3(%!$%80!.$%2LATERINTHISBOOKLET
F. Verify that the installation jamb screws will fasten into solid wood. If not, insert
solid filler at screw locations.
Note: Raise the lower sash to access the lower
installation holes. There will be four or six
installation holes in each jamb, depending on
the window frame size.
High Performance Installations: Using a
DRILLBITPREDRILLDEEPANDINSERT
XmATHEADEXTERIORGRADEWOODSCREWSIN
ALLTHEEXTERIORBLINDSTOPS3CREWSSHOULDBE
PLACEDFROMEACHENDANDNOTMORETHAN
ONCENTER
&95&3*03
&YUFSJPS
CMJOETUPQ
w
D. Drill two 1/4weep holesINTHESILLADAPTER,OCATETHEHOLESvFROMEACH
end. The bottom of the weep hole must be at the bottom of the vertical leg of
the sill adapter.

*OUFSJPS
{
E. Apply a 1/4to 3/8continuous bead of sealant to the
INTERIORFACEOFTHEEXISTINGBLINDSTOPSATTHEHEADANDBOTH
jambs. Also apply a bead of sealant across the sill, connecting
with the sealant at the jambs.
F. Place a bead of sealantWHERETHEEXISTINGSTOOLMEETSTHE
EXISTINGFRAMESILLANDJAMBS
*OUFSJPS
{
'Insert the replacement windowFROMTHEINTERIOR
in the opening by setting the bottom of the window
in first, then tilting the top into place. Make sure the
window rests against the interior surface of the blind
STOPSANDTHESILLADAPTERWILLCONTACTTHEEXISTINGSILL
(Place a shim near the top of one jamb, in line with the
TOPPREDRILLEDHOLEINTHEWINDOWFRAME0ARTIALLYINSERT
AXPANHEADSCREWPROVIDED2EPEATPROCESSFOR
other jamb.
*OUFSJPS
4IJN
TDSFX
{
I. Continue placing shims at each pre-drilled installation
screw holes in jambs as needed to plumb and square the
window. Check window for squareness by making sure
diagonal measurement from corner to corner is within
INBOTHDIRECTIONS
*OUFSJPS
{
J Pre-drill 1/16" diameter holes in the shims.)NSERTA
XPANHEADWOODSCREWPROVIDEDINTOEACHPREDRILLED
hole in the frame. Finish inserting the top screw in each
jamb. Minor adjustments may be made at the checkrail
using the jamb adjustment screws located in the lower sash
channel, just above the checkrail.
Note: Ensure the jamb adjustment screws are flush
or just below flush with the sash track so they do not
interfere with the travel of the balances.

&YUFSJPS
{
K. Seal the window to the exterior stops. Place a corner
bead of sealant around the perimeter of the window frame
where the new frame contacts the original window frame.
Also place a bead of sealant between the sill adapter and
THEBOTTOMOFTHEEXISTINGWINDOWSILL4HISBEADSHOULD
connect to the jamb sealant beads. Tool the sealant beads.
Note: When corner beading sealant around the
perimeter of the window frame, be careful not to cover
the weep holes at the sill.
A. Apply insulating foam sealant. From the interior,
INSERTTHENOZZLEOFTHEAPPLICATORAPPROXIMATELY
deep into the space between the window and the
ROUGHOPENINGANDAPPLYADEEPBEADOFFOAM
4HISWILLALLOWROOMFOREXPANSIONOFTHEFOAMAND
will minimize squeeze out. If using foam other than
'REAT3TUFF™Window and Door Insulating Foam
Sealant by the Dow Chemical Company, allow the
FOAMTOCURECOMPLETELYUSUALLYTOHOURS
BEFOREPROCEEDINGTOTHENEXTSTEP
Note: It may be necessary to squeeze the end of
the tube with pliers to be able to insert into the
space between the new and existing window
frame. DO NOT completely fill the space from the
back of the blind stops to the interior face of the
opening.
5INTERIOR SEAL
Caution: Ensure use of low pressure polyurethane window and door insulating foams
and strictly follow the foam manufacturer’s recommendations for application. Use of high
pressure foams or improper application of the foam may cause the window frame to bow
and hinder operation.
B. Check window operation by opening and closing the window.
Note: If the window does not operate correctly, check to make sure it is still plumb, level,
square and that the sides are not bowed. If adjustments are required, remove the foam
with a serrated knife. Adjust the shims and reapply the insulating foam sealant.
*OUFSJPS
x
6INTERIOR TRIM
A. Reinstall existing interior sash stops or new trim as desired.
High Performance Installations:)NSTALLNEWXINTERIORSASHSTOPSATHEADJAMBS
ANDSILL0REDRILLFORANDINSERTXmATHEADCORROSIONRESISTANTSCREWS3CREWSSHOULDBE
PLACEDFROMEACHENDANDNOTMORETHANONCENTER
Table of contents
Other Pella Household Appliance manuals

Pella
Pella 812WO100 User manual

Pella
Pella 80GZ0102 User manual

Pella
Pella 801P0101 User manual

Pella
Pella 80YV0102 Guide

Pella
Pella 80YW0102 Guide

Pella
Pella 816G0101 User manual

Pella
Pella HURRICANESHIELD 80GY0102 User manual

Pella
Pella 812W0100 User manual

Pella
Pella 802Q0101 User manual

Pella
Pella 807X0101 Guide

Pella
Pella 80WW0101 Guide

Pella
Pella 808F0105 User manual

Pella
Pella 350 Series User manual

Pella
Pella 81470102 User manual

Pella
Pella 80AT0102 User manual

Pella
Pella 802X0104 User manual

Pella
Pella 801U0103 User manual

Pella
Pella 81CP0101 User manual

Pella
Pella HURRICANESHIELD 80ED0101 User manual

Pella
Pella 802Q0102 User manual