Pennsylvania Scale Company 7600 User manual

7600 Technical Manual
For Tech Support Manuals and How To Videos go to: pascale.com/resource-library/ or email us at: sales@pascale.com
Page 2of 53
Table of Contents
Unpacking and Setup
3
Counting Operation
4
7600 Advanced Operation, Alternate Counting Methods, Setpoint
Value Entry, Accumulation and Piece Weight Database
5 –7
Specifications
8
Load Cell and RS-232 Connections
9
Calibration/Configuration Access, Selecting/Changing Parameters
Navigating the Menus
10
Menu Layout
11
Configuration and Calibration Menus
12 –22
Option Configuration Menus
22 –31
Special Data Input/Output Emulations
32 –35
Remote Serial Display Configuration
35
Scale Remote Command Formats
36 –37
Option Boards Connections
38 –39
High Resolution Load Cell Calibration
40
Wired Ethernet and Wi-Fi Option
41 –50
Scale Status and Error Codes
51
Replacement Parts List
52

7600 Technical Manual
For Tech Support Manuals and How To Videos go to: pascale.com/resource-library/ or email us at: sales@pascale.com
Page 3of 53
Unpacking and Startup
Unpack the Scale
•DO NOT LIFT SCALE BY THE TOP
SPIDER OR SUB PLATFORM!
•Remove the molded foam top from
the carton. On 2 lb. and 5 lb. capacity
scales the platform is packaged on
top of this foam. Gently lift and
remove the stainless-steel platform
cover only.
•Remove any options which may be
packed with the scale.
•Carefully remove scale from the
packaging by grasping both sides of
the base.
Scale Setup
•Place the scale on a stable, level
surface for operation.
•Adjust the corner leveling feet until
the level bubble indicates the unit is
level.
•Firmly tighten hex jam nuts on the
leveling feet. (Any time the scale is
relocated, it should be leveled.)
•Remove the protective plastic wrap
from the platform and place the
platform on the spider.
•Plug the scale into 110/120 VAC
Scale Operation
•Press the ZERO button to zero the
scale
•Press the UNITS button to cycle
through units of measure
•Press the PRINT button to send scale
data to a printer or connected
software
•Press SAMPLE SET to Create a Piece
Weight and Count
•Press TARE or KEYPAD TARE to enter a
tare weight

7600 Technical Manual
For Tech Support Manuals and How To Videos go to: pascale.com/resource-library/ or email us at: sales@pascale.com
Page 4of 53
Basic Counting Operation
✓If a container will be used to hold
items being counted, place it on
the platform.
✓Press the SAMPLE SET button,
press repeatedly to scroll to the
desired sample size. OR key in the
sample size and press ENTER
✓Place the sample quantity on the
scale platform all at once
✓Piece weight is calculated, and
count displayed. All the remaining
parts may now be added to the
scale and counted.

7600 Technical Manual
For Tech Support Manuals and How To Videos go to: pascale.com/resource-library/ or email us at: sales@pascale.com
Page 5of 53
7600 Advanced Operation.
See the 7600 Technical Manual for detailed configuration and setup information
Advanced Counting Operations
•Auto Sample Update (In CAL 10, EnH 15 select YES and in CFG 50, YPR 57
select P Err or P Acc to enable.) After the initial sample and piece weight
calculation placing additional parts on the scale platform at a quantity less than the
original sample size results in the scale recalculating the piece weight resulting in a
higher % off accuracy or lower % of error.
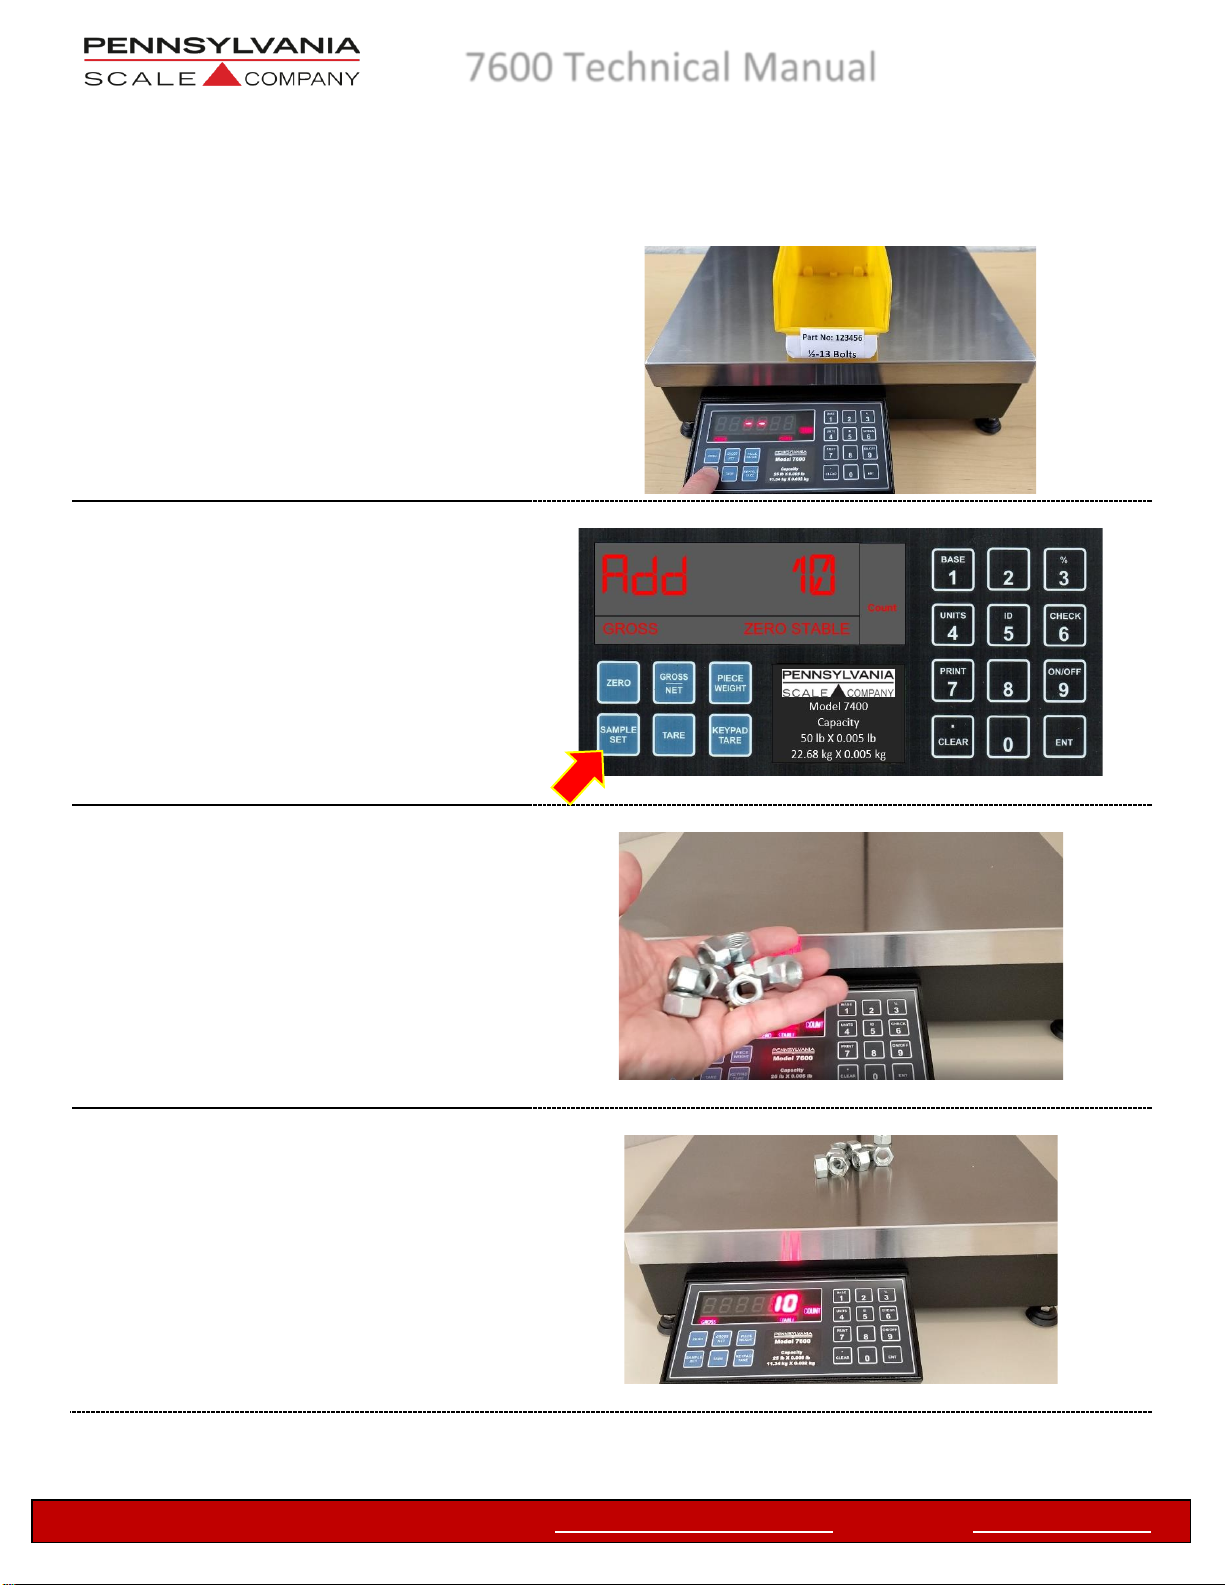
•2 Step Counting (In CFG 50,2S 56 select YES to enable.) Press the
button and place a sample quantity of the items to be counted on the scale platform.
Key in the number of pieces and press the button. Piece weight is calculated, and
scale will display count.
•Counting with A Piece Weight and Tare Weight Press the button, key in the
piece weight and press the button. Press the button, key in the tare
weight and press the button OR place the empty container (or representative
container) on the scale platform and press the button. This information may
also be scanned into the scale with a barcode scanner and barcode that has the input
piece weight and input tare weight commands embedded.
•Negative Counting (In CFG 50,2S 56 select YES and nEG 59 select YES to
enable.) Negative counting allows a negative or count out of a full container. Place the
container and parts on the scale, press the button and remove a sample
quantity from the container. Key in the number of pieces and press the button.
Piece weight is calculated, and scale will display count removed as a negative number.
•Top End Counting (In CFG 50,2S 56 select YES and nEG 59 select No to
enable.) Top end counting is an easy way to determine the count of a container of parts
without having to remove them from the container. Place the container and parts on
SAMPLE
SET
ENT
PIECE
WEIGHT
ENT
KEYPAD
TARE
ENT
TARE
SAMPLE
SET
ENT

7600 Technical Manual
For Tech Support Manuals and How To Videos go to: pascale.com/resource-library/ or email us at: sales@pascale.com
Page 6of 53
•the scale, Press the button, key in the tare weight and press the button
and remove a sample quantity from the container. Key in the number of pieces and
press the button. Piece weight is calculated, and scale will display count of the
parts in the container.
•Auto Sample to Bulk (In CFG 50,ASb 58 select YES to enable.) This counting
method is designed for a two-scale base system. Sampling occurs on the light capacity
higher resolution scale base for improved piece weight calculation accuracy then
automatically switches to the second heavier capacity base for bulk counting.
•Product ID and Piece Weight Database Store and Recall (In CFG 10,Str 16 select
Ato enable.). Press the button, key in the product ID and press the button.
If this product ID is not in memory the scale will go to the piece weight calculation
function and display ADD XX. Perform a sample by scrolling to the desired sample size
and placing the parts on the scale platform. The scale will calculate the piece weight and
store it with the product ID in memory. Perform counting functions as needed for this
part. Repeat the above steps for each new product ID and piece weight to store in
memory. You can store a total of 250 pieces. To recall an ID and Piece Weight from
memory press the button, key in the product ID and press the button.
Product ID and piece weight will be loaded and scale will be in count mode ready to
count this part. This may also be configured to enter a piece weight instead of using the
sample process to establish a piece weight. In CFG 10,Str 16 select Bto enable.
KEYPAD
TARE
SAMPLE
SET
ENT
ID
ENT
ID
ENT

7600 Technical Manual
For Tech Support Manuals and How To Videos go to: pascale.com/resource-library/ or email us at: sales@pascale.com
Page 7of 53
Accumulation
•The accumulation function will keep a running total of what has been weighed or
counted. As an example, if you're weighing 10 boxes that each have a piece count of
100, the accumulation feature would allow you to see the total of 100 pieces for each
box and a total of 1000 pieces for all the boxes. Additionally, when using a printer in the
above scenario an individual box label showing a quantity of 100 and a pallet label
showing 10 boxes of 100 for a total of 1000. The 7600 can be set up for:
oManual Accumulation press the button to accumulate. In CAL 1, ACC
6,select Pri to enable manual accumulation of weight or CAL 1, ACC 6,
select Cnt to enable manual accumulation of count
oAuto Accumulation occurs on first stable non-zero weight. In CAL 1, ACC 6,
select A-Pri to enable auto accumulation of weight or CAL 1, ACC 6,
select A-Cnt to enable auto accumulation of count
•To clear the accumulation, register press and hold the button. The display will
flash CLr.ACC and nO. press the button to select YES and the button
to clear the accumulation totals.
•When using accumulation and with the optional printer the system can be configured to
print a box label and pallet label.
Setpoint Entry
•When the setpoint relay option is installed enter the setpoint values by pressing and
holding the button, keying in values and press the button
2
2
UNIT
4
ENT
SAMPLE
SET
ENT

7600 Technical Manual
For Tech Support Manuals and How To Videos go to: pascale.com/resource-library/ or email us at: sales@pascale.com
Page 8of 53
SPECIFICATIONS
•LOAD CELL A/D CONVERTER
•TYPE: 24-bit delta sigma (1:16,777,216)
•EXCITATION: 5 VDC, 120 mA max.
•SIGNAL INPUT: 16 mv
•SENSITIVITY: 0.1 Uv/grad
•UPDATE RATE: 30 update/second
•DISPLAY: Six (6) Digits, 0.6-inch LED
•KEYPAD: Full numeric plus controls
•POWER INPUT: 117/217 VAC, 50-60 HZ, 20 watts, fuse 0.50 A Slo-Blow.
•SERIAL PORTS: RS232C
•ENCLOSURE: Cast Aluminum Chassis and Load Cell Spider, Stainless Steel Platter.
•NTEP: Class III/IIIL, 10,000 divisions CoC 91-149A7
•MEASUREMENT CANADA: MAL-AM-4869
•OPTIONS:
oANALOG OUTPUT: 0-10v, 4-20ma (16-bit D/A).
oETHERNET TCP/IP
oREMOTE DISPLAY MINI TOWER
oAC/DC OPERATION WITH BUILT IN RECHARGEABLE BATTERY

7600 Technical Manual
For Tech Support Manuals and How To Videos go to: pascale.com/resource-library/ or email us at: sales@pascale.com
Page 9of 53
Connections:
RS‑232 PIN ASSIGNMENTS AND IMPLEMENTED FUNCTIONS
Connection to the Serial Port is made via a DB‑9 female connector found in the
access area under the scale. Internal Instrument connection is on the main board,
TB2-1,2,3.
PIN FUNCTION
5 Signal Ground
2 Transmit Data
3 Receive Data

7600 Technical Manual
For Tech Support Manuals and How To Videos go to: pascale.com/resource-library/ or email us at: sales@pascale.com
Page 10 of 53
Calibration/Configuration Access, Selecting/Changing Parameters Navigating the Menus
To access instrument configuration, calibration:
Press and Hold the ZERO button for 5 seconds
- 5 seconds
The Audit Trail counters [ P X C X] are
displayed first followed by access code request
[AC ?]. Key in 0000 until 0000 is displayed
then press the ENT button
7600 Keypad access functions:
Scroll through fixed selections
Enter the Selection
Key in Values or Selection
Example: To enter [ 150], use the keypad to key in 150 and the button to enter
ZERO
ENT
0
UNIT
S
ENT
ENT

7600 Technical Manual
For Tech Support Manuals and How To Videos go to: pascale.com/resource-library/ or email us at: sales@pascale.com
Page 11 of 53
Menu Layout
•Configuration/Calibration Main Blocks: 10, 20, 30, etc. can be stepped to directly by
keying in the main block number and “ENT(enter)”.
•The sub parameters need to step through to the next “main” before a direct change.
•From any “main” point, exit by changing to [CAL 0] and “ENT(enter)”.
oA [SAVE No] will need to be changed to [SAVE YES] by using the UNITS button
scroll then “ENT(enter)”. to save any changes and exit.
•Changing to [CAL 0] from within [CAL 40] allows exit prior to adjusting span.
EXAMPLE: To go directly to Load Cell calibration [CAL 40] from [CAL 10] key in “40” then
to enter.
NOTE: During the setup procedure each step will be printed to any device
interfaced to the RS-232 port. If options are not present, steps will not appear.
CAL 10
Capacity, Zero Tracking, Counting Functions
CAL 20
Capacity, Resolution, Zero Range, Units, Print, Overrange
CAL 30
Secondary Resolution and Setup
CAL 40
Filter Settings, Load Cell Zero/Deadload and Span Calibration
CAL 50
Counting Configuration
CFG 60
RS232 Configuration: Baud Rate, Word, Stop, Parity, Echo, Address
CFG 70
Battery Operation and Time/Date Configuration
CFG 80
Formatted Data Output
CAL 0
Save and Exit Calibration
CAL 1
Options: Dual / Triple Range, Peak Hold, Remote Inputs, Setpoints, UPS
WorldShip, Accumulate, Analog Output
Cal 200
Remote Serial Display Set Up
ENT

7600 Technical Manual
For Tech Support Manuals and How To Videos go to: pascale.com/resource-library/ or email us at: sales@pascale.com
Page 12 of 53
Configuration Calibration Menus
CAL 10 Calibration setting entry point. Use to enter this menu and enter selections
STEP
Parameter
Description
CAP 11
Full capacity of the scale
Standard capacities are 2, 5, 10, 20, 50, 100, 150
and 200 lbs.
YES, NO
Auto configuration. Use the UNITS button
to select YES or NO. If YES, the scale will
jump to Cnt 14, EnH, Prt 25 and CAL 40
storing the factory defaults. If NO is selected the
scale will proceed to the next step.
A-O 13
YES, NO
Select if scale is to auto zero when first
turned on. Use the UNITS button to select YES or
NO
Cnt 14
YES, NO
Turn the counting function on or off. Use the
UNITS button to select YES or NO.
EnH 15
YES, NO
Enhanced mode enables Auto Sample Update
and % error or accuracy. Select YES to turn on or
NO to disable
Str 16
OFF, A, B
Enable Product ID and Piece Weight Database
Store and Recall. Select A to enable sampling to
establish and save Piece Weight, B to manually
enter a piece weight or OFF to disable
ENT

7600 Technical Manual
For Tech Support Manuals and How To Videos go to: pascale.com/resource-library/ or email us at: sales@pascale.com
Page 13 of 53
CAL 20 Calibration setting entry point. Use to enter this menu and enter selections
STEP
Parameter
Description
22
Displayed resolution or
count by, rounded up to
nearest 1, 2 or 5
Default entry is scale capacity divided by 10,000
as a bench scale, 5,000 as indicator with most
bases and floor scales. (NTEP –Legal for trade
configuration). In some applications and
environments up to 20,000 divisions of capacity
may be possible non legal for trade
-0- 23
1 –99
Zero Range ‑Input the Zero Range in
% of full scale. The amount of weight
the scale can Zero.
UnS 24
1, 2, 3, 4, 5, 6, 7, 8, 9, 10,
11, 12, 13, 14,
Select the primary weighing unit by
keying in a number :1 = lb.*, 2 = kg,
3 = g, 4 = oz t, 5 = lb. t, 6 = g, 7 = dwt,
8 = oz, 9 = c, 10 = oz f, 12 = l,
11 = ml, 13 = tons, 14 = lb. –oz
Prt 25
Stable, First, Unstbl,
ntEP, Auto, Prn-1
Select whether the scale will respond to a data
output/print request when stable, first (positive)
stable, any time (unstable), or NTEP.
Auto: Data output/print when stable and min 10
grads above zero, prints again with min 25 grad
change from last print. Does not need to return
to zero data output/print again.
Stable: Single stable data output/print, must
return to zero to data output/print again.
Cnd 26
YES, NO
Measurement Canada legal for trade overrange
configuration: Select YES (9d) or NO (105%) *
0-t 27
0.00 –5.00
Zero tracking value entered as a
percent of display resolution. Entering a
0.25* equals 25% of one display
graduation. “0” disables the zero
tracking feature.
SBl 28
OFF, 1, 3, 5, 10
Stable/Motion configuration in grads/sec.
ENT

7600 Technical Manual
For Tech Support Manuals and How To Videos go to: pascale.com/resource-library/ or email us at: sales@pascale.com
Page 14 of 53
CAL 30 Secondary units, resolution. Use to enter this menu and enter selections
STEP
Parameter
Description
2Un 31
1, 2, 3, 4, 5, 6, 7, 8, 9,
10, 11, 12, 13, 14,
Select the secondary weighing unit by
keying in a number :1 = lb.*, 2 = kg,
3 = g, 4 = oz t, 5 = lb. t, 6 = g, 7 = dwt,
8 = oz, 9 = c, 10 = oz f, 12 = l,
11 = ml, 13 = tons, 14 = lb. –oz
32
Displayed resolution or
count by, rounded up
to nearest 1, 2 or 5
Default entry is scale capacity divided by 5,000
(NTEP –Legal for trade configuration). In some
applications and environments up to 20,000
divisions of capacity may be possible non legal
for trade
Pud 39
PrI, SEC, SEC On,
COUnt, SELECt
Power up: Primary units, Secondary
units, Secondary units only (Locks out Primary
Units) and Count, Count.
ENT

7600 Technical Manual
For Tech Support Manuals and How To Videos go to: pascale.com/resource-library/ or email us at: sales@pascale.com
Page 15 of 53
CAL 40 Load Cell Calibration. Use to enter this menu and enter selections
STEP
Parameter
Description
FIL 41
1-15
Response time: 0-9 selects conversions
to average directly. 11-15 correspond to
25, 30, 35, 40, & 50 conversions for
extended filtering.
NO, YES, 11 Pnt
Use SAMPLE SET button
to select
Select yes to enter calibration. Select “11 Pnt”
when optional high resolution load cell is
installed. See page 38 for details
Nol 42
Zero/Dead Weight
Calibration
With the platform in place but no weight on the
scale, press PRINT. Display will indicate ------
and advance to Span Calibration if successful
NOTE: Dead Load Zero can be updated without changing span by keying in a “0” and ENTER
to jump back to starting point (Cal 40) and repeating to exit. Note on exit to change [Save
No] to [Save Yes] with UNITS key before ENTER to save changes.
HLF 43
Span Calibration
Apply a half capacity weight to the platform and
Press ENTER. If ½-capacity weight is unavailable,
place a substitute weight on the platform and
key in the amount of weight being used and
press ENTER. *
Display will indicate ------ and advance to
Span Calibration if successful.
FUL 44
Span Calibration
Apply a full capacity weight to the platform and
press ENTER. If a full-capacity weight is
unavailable, place a substitute weight on the
platform, key in the amount of weight being
used and press ENTER. * Weight used in 43 can
be keyed in again.
NOL 45
Remove all weight from the platform and enter,
or just use ENTER to skip this step.
ENT

7600 Technical Manual
For Tech Support Manuals and How To Videos go to: pascale.com/resource-library/ or email us at: sales@pascale.com
Page 16 of 53
CFG 50 Counting Configuration Use to enter this menu and enter selections
STEP
Parameter
Description
SS1 51
10 (Or the value to use
for the first preset
sample size)
Key in the value, use “0” to disable counting
press the ENTER button enter
SS2 52
20 (Or the value to use
for the second preset
sample size)
Key in the value, press the ENTER button enter
SS3 S3
50 (Or the value to use
for the third preset
sample size)
Key in the value, press the ENTER button enter
SS4 54
100 (Or the value to use
for the fourth preset
sample size)
Key in the value, press the ENTER button enter
PCT 55
YES, NO
Enable Piece Weight displayed X1000. Use the
UNITS key to select then ENTER
EnH 55
YES, NO
Select YES for enhanced counting mode Use the
UNITS key to select then ENTER
2S 56
YES, NO
Enable 2 Step Counting Use the UNITS key to
select then ENTER
Pr 57
P Err, P Acc, Disable
Enable % of error, % of accuracy or disable Use
the UNITS key to select then ENTER
ASb 59
YES, NO
Enable Auto Sample to Buk operation Use the
UNITS key to select then ENTER
nEG 59
YES, NO
Select YES to enable negative counting mode Use
the UNITS key to select then ENTER
ENT

7600 Technical Manual
For Tech Support Manuals and How To Videos go to: pascale.com/resource-library/ or email us at: sales@pascale.com
Page 17 of 53
CFG 60 RS-232 Port Configuration. Use to enter this menu and enter selections
STEP
Parameter
Description
Bau 61
300,600,1200,2400,
4800, 9600, 19200,
38400
Baud Rate Setting. Use UNITS button to select.
Len 62
7, 8
Word Length 7 or 8 bits. Use UNITS button to
select.
SPb 63
1, 2
Stop Bits 1 or 2. Use UNITS button to select.
Par 64
None, Odd, Even
Parity None, Even, Odd. Use UNITS button to
select.
Ech 65
No Ech, Ech
No Echo or Echo Use UNITS button to select.
Cdr 66
0 –255
Address, Key in a number from 0* to 255, 0
disables this feature.
ENT

7600 Technical Manual
For Tech Support Manuals and How To Videos go to: pascale.com/resource-library/ or email us at: sales@pascale.com
Page 18 of 53
CAL 70 OPTIONAL when the unit has the built-in rechargeable battery or clock. Use
to enter this menu and enter selections
STEP
Parameter
Description
StF 71
0, 1, 2, 3
Select type of clock: 0 = Time and date
OK, skip to SLP 74, 1 = 24-hour clock, 2 =
12-hour clock, currently AM, 3 = 12 hour
clock, currently PM.
Td1 72
7, 8
Enter the current time as HHMMSS.
Based on the type of clock selected in
step 71. Clock will begin with the pressing of the
ENTER button
td2 73
1, 2
Enter the current date as MMDDYY.
SLP 74
0, .5 - 12
NOTE: is dependent on the battery being
enabled by parameter "bat 1.". For AC/DC
versions of the scale, enter the amount of time
the display is to remain on before going into the
battery saver sleep mode. The time is entered in
number of minutes, from .5 to 12. Entering a
zero will disable the sleep mode for AC only
scales.
ENT

7600 Technical Manual
For Tech Support Manuals and How To Videos go to: pascale.com/resource-library/ or email us at: sales@pascale.com
Page 19 of 53
CAL 80 Programmable data output. Use to enter this menu and enter selections
Building a programable data output.
The user programmable data output feature is the string of information sent from the RS-232
port (Or optional Ethernet, Wi-Fi and USB) when the PRINT button is pressed, scale is setup to
auto output or the scale receives an SRP command from a computer or terminal. Select the
format of this string by entering two-digit print codes into the 30 available data output slots,
PSL 81 through PSL 119. When finished entering data to construct the programable data
output, “99”is entered to mark the end of print formatting.
Example: To build a programable data output to send to a printer the following print codes
could be entered
PSL
Data Output Code
Description
PSL81
30
Gross Weight with Prefix, Data and Suffix
PSL82
65
Carriage Return Line Feed
PSL83
03
Date (Optional on 7300 & 7500)
PSL84
65
Carriage Return Line Feed
PSL85
99
End
Would print the following:
Or send a data string to a program to a program:
Gross(sp)(sp)100.55(sp)lb.(cr)(lf)04/12/2020(cr)(lf)
Special Data Output Codes
Code
Description
50
Continuous output. Data output will be sent continuously while the scale is turned
on.
51
Toggled continuous output. The data output will be sent continuously after the
PRINT button is pressed or an SRP command is received by the scale. Pressing the
PRINT or sending SRP a second time will turn off the continuous output.
52
Status Character. May be used by a computer to determine the condition
of the scale at any given moment.
53
ABO Checksum. May be used in building a continuous output compatible
with other Pennsylvania Scales.
54
Select Leading Zeros for weight and count data. Example, “7.00 lbs.” on scale data
outputted is “007.00”
ENT
Gross 100.55 lb.
04/13/2020

7600 Technical Manual
For Tech Support Manuals and How To Videos go to: pascale.com/resource-library/ or email us at: sales@pascale.com
Page 20 of 53
58
Entering this data output code at the beginning of on the data string will transmit
the Gross, Net, Tare and Count values with leading zeros and no decimal place.
Example: 75.00 Gross Weight is transmitted as 0007500
95
70
Special date output code. Date is outputted as mm/dd/yy (08/18/20)
95
71
Special date output code. Date is outputted as mm/dd/yyyy (08/18/2020)
95
72
Special date output code. Date is outputted as month/dd/yy (August 18, 2020)
95
73
Special date output code. Date is outputted as mmddyy (081820)
95
2
Special time output code, time is outputted without the colon separator hhmmss
(034513)
Data Output Codes
Data Output
Code
Description
Data Output
Code
Description
02
OPTIONAL time
03
OPTIONAL date
04
Unit of measure suffix label
05
“Gross” prefix
06
“Tare” prefix
07
“Net” prefix
08
“Count” prefix
09
“Piece Weight” prefix
10
“Sample Size” prefix
11
“% Error” or “% Accuracy”
prefix
14
FR”F1” for use with Barcode
Printer programming
15
? for use with Barcode
Printer programming
16
P1 for use with Barcode
Printer programming
19
“Pieces” prefix
20
Gross weight data
21
Tare Weight data
22
Net or Peak weight data
23
Count data
24
Piece Weight data
25
Sample Size data
26
% of Error or Accuracy data
27
Base Number in Ise
28
ID Number
30
Gross weight, prefix, data,
and suffix
31
Tare weight, prefix, data, and
suffix
32
Net weight, prefix, data, and
suffix
33
Count, prefix, data, and suffix
34
Piece weight, prefix, data,
and suffix
Other manuals for 7600
2
Table of contents
Other Pennsylvania Scale Company Scale manuals

Pennsylvania Scale Company
Pennsylvania Scale Company 7800 User manual

Pennsylvania Scale Company
Pennsylvania Scale Company 7600 Manual

Pennsylvania Scale Company
Pennsylvania Scale Company 7800 User manual

Pennsylvania Scale Company
Pennsylvania Scale Company 7500 Series User manual

Pennsylvania Scale Company
Pennsylvania Scale Company 6500 Series User manual

Pennsylvania Scale Company
Pennsylvania Scale Company SS6600 MAX-LT User manual

Pennsylvania Scale Company
Pennsylvania Scale Company 7600 User manual

Pennsylvania Scale Company
Pennsylvania Scale Company MDL64 ABS User manual

Pennsylvania Scale Company
Pennsylvania Scale Company 7700 Use and care manual