Plaque de communication
Toma de comunicación
Passerelle
Puente
Réducteur de tension
Brida del cordón
1
2
3
4
5
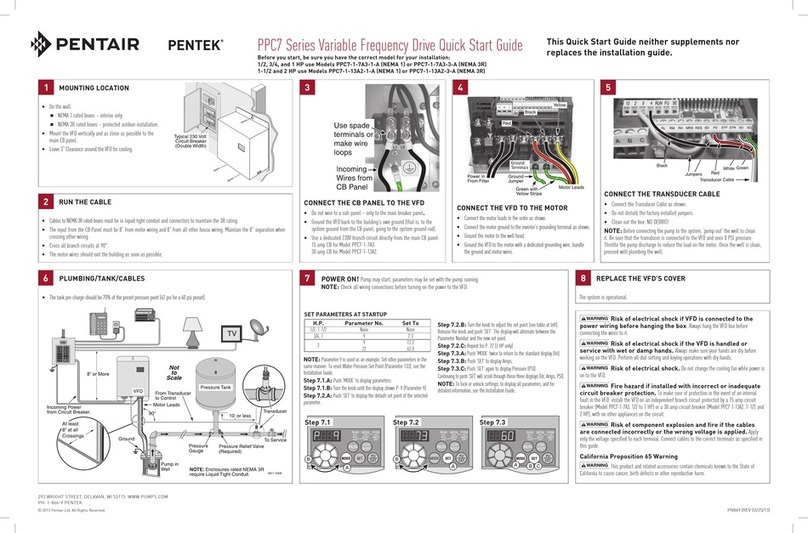
Contenu de la boîte / Qué hay en la caja
TM
1
Ouvrir une session à www.mylink2o.com pour
terminer l’installation.
1a. Créer un nouveau compte. Voir autre côté pour le signalétique
de l’appareil. -OU-
1b. Ouvrir une session et ajouter à un compte existant.
Après la création de votre compte en ligne, procéder à l’étape 2.
2Retirer le couvercle du PID.
2a. Couper l’alimentation du PID. [Attendre 5 minutes pour
permettre aux condensateurs de se mettre hors tension.]
2b. Séparer le couvercle et la plaque de fixation.
2c. S’assurer qu’il y a un espace entre le couvercle et la plaque de
fixation.
2d. Tirer la partie inférieure du couvercle et retirer.
3Connecter la plaque de communication Pentek®
au PID.
3a. Repérer les bornes P et N dans la zone de connexions Entrée/Sortie.
3b. Installer le réducteur de tension au bas du PID. Retirer une entrée
défonçable, au besoin. Passer le câble à l’intérieur du réducteur de
tension.
3c. Connecter le fil rouge à la borne P et le fil noir à la borne N.
4Brancher et raccorder la passerelle.
4a. Raccorder le câble Cat5e entre la passerelle et le routeur.
4b. Brancher l’adaptateur sur la passerelle et une prise de courant
standard.
5
Reposer le couvercle du PID et rétablir l’alimentation à
ce dernier.
5a. Remettre le couvercle sur la plaque de fixation, l’abaisser pour le
mettre en place et pousser le couvercle pour combler le vide.
5b. Brancher l’adaptateur sur la plaque de communication Pentek.
5c. Brancher l’adaptateur sur une prise de courant standard.
5d. Lorsque le voyant DEL sur la plaque de communication devient
vert fixe, l’installation est terminée.
Tout changement ou modification non expressément
autorisé par la partie responsable de la conformité pourrait annuler
l’autorisation de l’utilisateur à utiliser cet appareil.
REMARQUE : Cet appareil a été mis à l’essai et les résultats démontrent
qu’il respecte les limites établies pour un appareil numérique de classe
B, conformément à la partie 15 du règlement de la Commission fédérale
des communications des États-Unis (FCC). Ces limites visent à procurer
une protection raisonnable contre le brouillage préjudiciable dans une
installation résidentielle. Cet appareil produit, utilise et peut émettre de
l’énergie radiofréquence et, s’il n’est pas installé et utilisé conformément
aux présentes directives, il peut causer un brouillage préjudiciable des
communications radio. Toutefois, rien ne garantit l’absence de brouillage
dans une installation particulière. Si cet appareil cause un brouillage
préjudiciable à la réception des signaux de radio ou de télévision, ce qui
peut être déterminé en allumant et en éteignant l’appareil, on encourage
l’utilisateur à essayer de corriger ce brouillage par un ou plusieurs des
moyens suivants : Réorienter ou déplacer l’antenne de réception. Augmenter
la distance séparant l’appareil du récepteur. Brancher l’appareil sur une prise
reliée à un circuit différent de celui du récepteur. Communiquer avec le
revendeur ou un technicien radio/télévision qualifié pour obtenir de l’aide.
1
Inicie sesión en www.mylink2o.com para comenzar la
instalación.
1a. Establezca una cuenta nueva. Vea el otro lado para el
identificación del aparato. -O-
1b. Inicie sesión y añada a una Cuenta existente
Después de crear su cuenta en línea, continúe con el paso 2.
2Retire la cubierta del accionador
2a. Corte la alimentación al accionador. [Espere 5 minutos para
permitir la desactivación de los capacitores.]
2b. Separe la cubierta y la placa posterior
2c. Verifique que haya un espacio entre la cubierta y la placa
posterior
2d. Jale de la parte inferior de la cubierta y sáquela.
3Conecte la toma de comunicación Pentek®al
accionador
3a. Ubique los bornes P y N en el área de conexión I/O.
3b. Instale la brida del cordón en la parte inferior del accionador. Si es
necesario, retire un recorte. Pase el cable por la brida del cordón.
3c. Conecte el hilo Rojo al borne P y el hilo Negro al borne N.
4Enchufe y conecte el puente
4a. Conecte el cable Cat5e entre el puente y el enrutador.
4b. Enchufe el adaptador en el puente y en un tomacorriente
estándar.
5
Vuelva a colocar la cubierta del accionador y
restablezca la corriente al accionador
5a. Enganche la cubierta en la placa posterior, bájela a la posición
correcta y luego empuje la cubierta hacia atrás para cerrar el
espacio.
5b. Enchufe el adaptador en la toma de comunicación Pentek.
5c. Enchufe el adaptador en un tomacorriente estándar.
5d. Cuando el diodo LED en la toma de comunicación se vuelva de
color verde firme, se habrá completado la instalación.
Todo cambio o modificación que no haya sido
expresamente aprobada por la parte responsable del cumplimiento, puede
invalidar la autorización del usuario de operar el equipo.
NOTA: Este aparato ha pasado pruebas y se ha encontrado que cumple
con los límites para dispositivos digitales de Clase B, conforme a la parte
15 de las Reglas de la FCC. Estos límites están diseñados para proporcionar
una protección razonable contra interferencias perjudiciales en una
instalación residencial. Este aparato genera, usa y puede irradiar energía de
radiofrecuencia y, si no se instala y se utiliza conforme a las instrucciones,
puede provocar interferencias perjudiciales a las radiocomunicaciones.
Sin embargo, no se puede garantizar que no haya interferencia en una
instalación en particular. Si este equipo provoca una interferencia perjudicial
a la recepción de radio o televisión, la cual se puede determinar apagando
y encendiendo el aparato, se le recomienda al usuario que trate de corregir
la interferencia mediante una o más de las siguientes medidas: Cambie la
orientación o la ubicación de la antena receptora. Aumente la separación
entre el aparato y el receptor. Conecte el aparato a un tomacorriente en
un circuito diferente al que esté conectado el receptor. Consulte con el
concesionario o con un técnico de radio/TV con experiencia para obtener
ayuda.
2b
2c
2d
3a
3b 3c
4b
5b
5c
4a
5d
1b
1a
with
Adaptateur de courant (2)
Adaptador de energía x2
Câble Cat5e
Cable Cat5e
Guide de démarrage rapide
Avant de commencer toute installation, examiner le manuel
d’utilisation du Pentek Intellidrive™pour toutes les directives
et les avertissements. Ce guide n’est pas un complément au
manuel d’utilisation ni ne le remplace.
Guía de inicio rápido
Antes de comenzar cualquier instalación, consulte el
Manual del Propietario del Pentek Intellidrive
™
para obtener
instrucciones y advertencias completas. Esta guía no
complementa ni reemplaza al Manual del Propietario.
5a
2a
