Peri CB 160 Operator's manual

CB 160
Climbing Formwork
Instructions for Assembly and Use – Standard Configuration
Edition 04 l 2014


B3 Formwork utilisation
Utilisation of adjusting unit 44
Formwork alignment 45
Inclination adjustment 46
Horizontal movement – VARIO 46
B4 Moving the units
Preparation 47
Moving procedure 48
Securing the unit 49
C1 Planning and work preparation
Static system 50
Platform dimensioning 51
Anchoring verification 51
Platform decking 54
Handrails and guardrails 55
Connecting VARIO GT 24 formwork 56
Connecting TRIO formwork 58
Moving the units 60
Ladder access 61
Drawings and plans 61
Use on circular structures 62
Corner platforms 63
Use as working and safety scaffold 64
Components
Components 66
Instructions for Assembly and Use – Standard Configuration
Content
Introduction
Overview, Main Components 1
Standard Configuration 3
Intended Use 3
Safety Instructions 4
General 4
Load Models 5
Standard work flow 6
A1 Assembly of the CB 160 platforms
Required resources 8
Assembly of Console Bracket CB 160 9
Assembly of girders 10
Assembly of Adjusting Unit CB 160 12
Assembly of Guardrail Post CB 12
Assembly of decking 13
Assembly of guardrails 14
A2 Other assembly work
Assembly of end guardrail posts 16
Assembly of hinged hatch cover 17
Assembly of finishing platform 18
Finishing tasks 19
B1 Work on the construction site
Anchoring 20
Mounting the climbing platform CB 160 26
Mounting the finishing platform CB 160 28
Assembly of wind bracing 31
Removal of the climbing cones 33
Dismantling 33
Ladder assembly 34
B2 Assembly of formwork elements
VARIO GT 24 element 36
TRIO element 40
CB 160 Climbing Formwork
Key
Safety instructions Note Visual check Tip Load-bearing point

1Instructions for Assembly and Use – Standard Configuration
Introduction
CB 160 Climbing Formwork
Overview, Main Components
Climbing Formwork CB 160
with VARIO GT 24 girder wall
formwork
– concreting height 3.60 m
– extended suspension of finishing
platform
– Tension Anchor with Tie Rod
DW 15 as wind bracing
Climbing Formwork CB 160
with TRIO panel formwork
– concreting height 3.60 m
– extended suspension of finishing
platform
– Tension Belt as wind bracing
*Formwork height = concreting height + formwork projection (max. 5.40 m)
*Formwork height hs
Concreting height
*Formwork height hs
Concreting height
Concreting platform Concreting
platform
Working platform Working platform
Finishing platform Finishing platform
5
10
4
3
2
51
11
68
7
9
5
10
3
2
8
1
11
7
6
9
5
4
1 Working platform with Climbing
Bracket CB 160
2 Adjusting Unit CB 160
3 Adjustable Brace CB 164-224
4 Strongback CB 270 or CB 380
5 Anchoring and Leading Anchor
6 Bracing Shoe Wall CB M 24
7 Wind bracing with tension belt
or tie rod
8 Finishing Platform with Platform
Beam CB
9 Suspension of finishing platform
10 VARIO GT 24 or TRIO formwork
with concreting scaffold
11 Bracing with scaffold tubes

2Instructions for Assembly and Use – Standard Configuration
CB 160 Climbing Formwork
Introduction
Anchoring to the building structure
Variant 1
5.4 Threaded Anchor Plate DW 15*
5.5 Tie Rod DW 15*, Z-12.4-70
L1= h – 8 cm
or Tie Rod B15*, Z-12.5-82
5.3 Climbing Cone 2 M24/DW 15
5.6 Scaffold Mounting Ring M24, galv.
5.7 Hex. Bolt
M24 x 120 ISO 4014-10.9
5.8 Spacer Tube DR 22* (optional)
L2= h – 18.5 cm (tolerance 0 to
+5 mm)
Anchoring depth h = variable,
min. 18.5 cm
* Not re-usable
With PVC spacer tube, the tie rod (5.5)
is reusable.
Variant 2
5.2 Threaded Anchor Plate DW 20*
5.1 Screw-On Cone 2 M24/DW 20
5.6 Scaffold Mounting Ring M24, galv.
5.7 Hex. Bolt M24 x 120
ISO 4014-10.9
Anchoring depth h = 15.5 cm.
* Not re-usable
L1
L2
5.2 5.1 5.75.6
5.4 5.5 5.65.3 5.7
h = 15.5 cm
Ø 10 cm
h ≥ 18.5 cm
Ø 8 cm
Overview,
Main Components
5.8


3Instructions for Assembly and Use – Standard Configuration
The working platform can be supple-
mented with:
– clamping unit, strongback and adjust-
able braces for accommodating the
VARIO and TRIO formwork systems.
– a height-adjustable finishing platform
complete with access ladder which is
attached to posts.
– end-to-end guardrails on the working
and finishing platforms in accordance
with EN 12811.
– a tension anchor which prevents tip-
ping inwards.
Technical Data:
– width of bracket: 1.60 m
– static height: 1.80 m
– max. formwork height: 5.40 m
General
The CB 160 climbing formwork is normally
used as shoring in order to support an-
chored wall formwork in accordance
with EN 12812.The formwork is firmly
connected with the scaffolding and is
moved as a single unit suspended on a
crane.
The system can also be used as work-
ing scaffold only.
The working platform for operating the
formwork consists of planking, platform
beams and two fixed climbing brackets.
These transfer the loads deriving from
the dead weight, live loads and prevail-
ing wind loads via the anchorage and
bottom pressure point into the structure.
CB 160 Climbing Formwork
Introduction
Standard Configuration
Intended Use
1. PERI products have been designed
for use in the industrial and commercial
sectors only by suitably trained personnel.
2. These instructions for assembly and
use serve as basis for the project-related
risk assessment and the instructions
for the provision and use of the system
by the contractor (user). However, they
don’t replace them.
3. Only PERI original components may
be used. The use of other products and
spare parts represents a misapplication
with associated safety risks.
4. The components are to be inspected
before each use to ensure that they are
in perfect condition and that they fun-
tion correctly.
5. Changes to PERI components are
not permitted and represent a misappli-
cation with associated safety risks.
6. Safety instructions and permissible
loads must be observed at all times.
7. Components provided by the contractor
must conform with the characteristics
required in these instructions for
assembly and use as well as with all valid
construction guidelines and standards.
In particular, the following applies if
nothing else is specified:
– Timber components: Strength Class
C24 for Solid Wood EN 338.
– Scaffold tubes: galvanised steel tubing
with minimum dimensions
Ø 48.3 x 3.2 mm according to
EN 12811-1:2003 4.2.1.2.
– Scaffold tube couplings according to
EN 74.
8. Deviations from the standard config-
uration may only be carried out after a
separate risk assessment has been
completed by the contractor (user). On
this basis, appropriate measures for the
working safety and stability are to be
implemented.

4Instructions for Assembly and Use – Standard Configuration
CB 160 Climbing Formwork
Introduction
Safety Instructions
General
1. Deviations from the standard configu-
ration and/or intended use present a
potential safety risk.
2. All country-specific laws, standards
and other safety regulations are to be
taken into account whenever our prod-
ucts are used.
3. During unfavourable weather condi-
tions, suitable precautions and meas-
ures are to be taken in order to ensure
both working safety and stability.
4. The contractor (user) must ensure
the stability throughout all phases of
construction. He must ensure and veri-
fy that all loads occuring are safely
transferred.
5. The contractor (user) has to provide
safe working areas for site personnel
which can be safely accessed. Areas of
risk must be cordoned off and clearly
marked. Hatches and openings on
accessible working areas must be kept
closed during working operations.
6. For better comprehensibility, detailed
drawings are partly incomplete. The
safety installations which have possibly
not been featured in these detailed
drawings must nevertheless be available.
Storage and Transportation
1. Do not drop the components.
2. Store and transport components en-
suring that no unintentional change in
their position is possible. Detach lifting
gear from the lowered units only if they
are in a stable position and no uninten-
tional change is possible.
3. When moving the components, make
sure they are lifted and set down in a
way that any unintentional tilting over,
falling apart, sliding or rolling away is
prevented.
4. Use only suitable load-carrying equip-
ment to move the components as well
as the designated load-bearing points.
5. During the lifting and moving proce-
dure, ensure that all loose parts are re-
moved or secured.
6. During the moving procedure always
use a guide rope.
7. Move components on clean, flat and
sufficiently load-bearing surfaces only.
System-specific
1. Retract components only when the
concrete has sufficiently hardened and
the person in charge has given the ap-
proval for striking to take place.
2. Anchoring is to take place only if the
anchorage has sufficient concrete
strength.
3. It is the responsibility of the contrac-
tor (user) to inspect all anchors and as-
sociated components.
4. Enclosure of the platform or mount-
ing of additional surfaces which are ex-
posed to the influences of the wind
changes the stability and must there-
fore be checked. If necessary, addition-
al measures must be implemented.
5. The platforms are to be inspected for
signs of damage by authorised person-
nel at regular intervals. Dirt which af-
fects the functionality is to be removed
immediately.
6. As a result of the moving procedure,
falling edges are formed between the
platforms. Corresponding areas are to
be secured.
7. Site personnel, construction materi-
als or tools may not be transported
while the scaffold unit is being moved
with the crane. Exceptions to this can
be determined through the operational
working and instructions for assembly
and use.
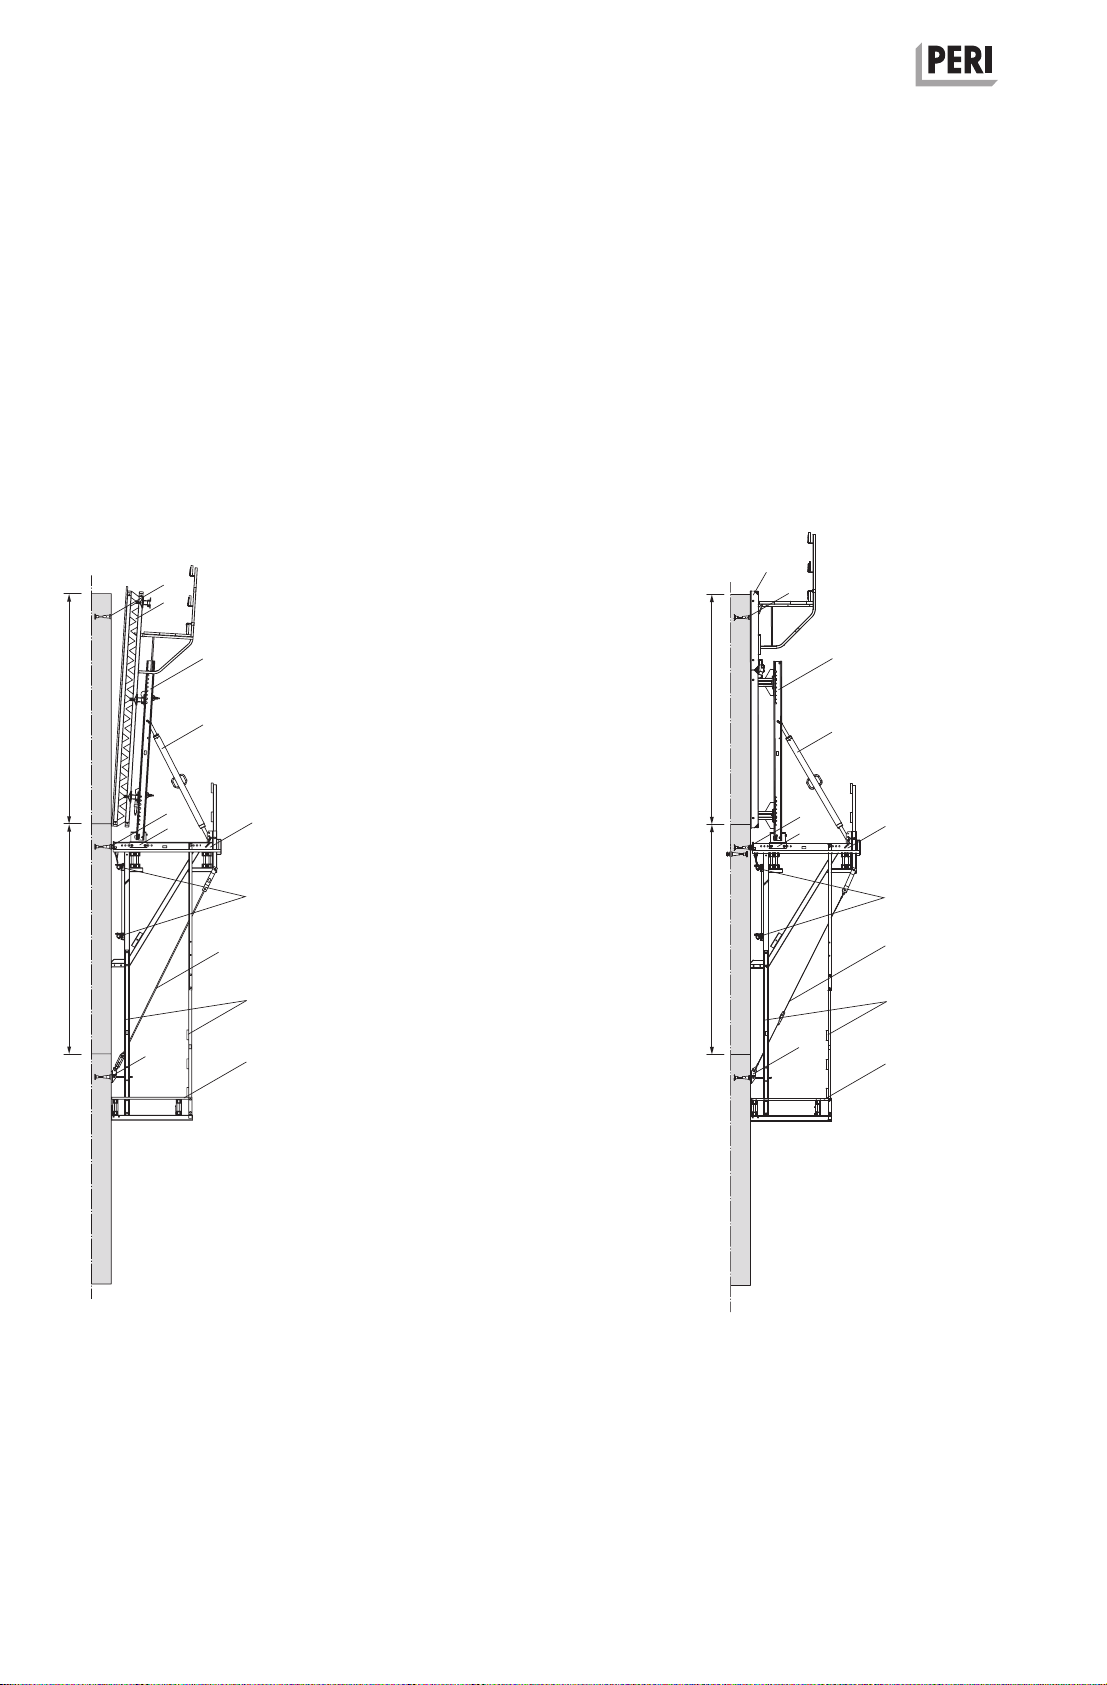
The assemblies shown in these PERI
Instructions for Assembly and Use are
only examples which feature only one
component size. They are valid for all
component sizes contained in the
standard configuration.
Additional PERI product information
– Type Test CB 160
– Brochure “Climbing System CB 240
and CB 160”
– Instructions of Use for the Crane
Splice 24
General
– Instructions for Use: Lifting Hook
MAXIMO 1.5 t
– PERI Design Tables for Formwork
Technology

5Instructions for Assembly and Use – Standard Configuration
CB 160 Climbing Formwork
Introduction
Concreting
platform
150 kg/m2
Load Class 2
Concreting
platform
150 kg/m2
Load Class 2
Working
platform
200 kg/m2
Load Class 3
Working
platform
200 kg/m2
Load Class 3
Finishing
platform
75 kg/m2
Load Class 1
Finishing
platform
75 kg/m2
Load Class 1
Load Models
Working position
The area-related live loads correspond
to EN 12811.
Concreting position
The area-related live loads
correspond to EN 12811.

6Instructions for Assembly and Use – Standard Configuration
CB 160 Climbing Formwork
Introduction
Preparation
1. Assemble wall formwork.
2. Assemble platforms.
3. Assemble finishing platform.
To moving procedure:
– Do not transport persons!
– Do not transport any loose parts or
other loads!
Standard work flow
10. Place formwork on climbing plat-
form and secure.
11. Clean formwork and adjust if neces-
sary.
12. Reinforce second wall section.
13. Mount leading anchor and close
formwork.
14. Place formwork anchor.
15. Pour second wall section.
16. Remove advancing bolts and retract
formwork.
17. Mount scaffold mounting rings.
Initial use
1. Position wall formwork for first wall
section.
2.Add reinforcement to first wall
section.
3.Mount leading anchor and close form-
work.
4.Place formwork anchor.
5.Pour first wall section.
6.Remove advancing bolts and strike.
7. Mount scaffold mounting rings.
8.Attach climbing platforms.
9.Assemble tension anchor if necessary.

7Instructions for Assembly and Use – Standard Configuration
CB 160 Climbing Formwork
Introduction
28.Remove advancing bolts and retract
formwork.
29.Mount scaffold mounting rings.
30.Remove climbing cones from previ-
ous wall section.
31. Move Climbing Formwork to next
wall section.
Continue with standard cycle.
32.Dismantle Climbing Formwork.
18. Attach finishing platform.
19. Move Climbing Formwork to second
wall section.
20.Bolt on finishing platform and attach
guardrails.
21. If necessary, mount ladder.
Standard cycle
22.Mount wind bracing if required.
23.Clean formwork and adjust.
24.Install reinforcement to wall.
25.Mount leading anchor and close
formwork.
26.Place formwork anchor.
27 Pour wall section.

8Instructions for Assembly and Use – Standard Configuration
CB 160 Climbing Formwork
A1 Assembly of the CB 160 platforms
Required resources
Equipment and tools
Hammer, wire pins, plumb line,
4 screw clamps with 300 mm clamping
length, circular saw, electric drill, HSS
drill Ø 6 mm, Ø 8 mm,
min. L = 180 mm.
072180 Ratchet Wrench 1/2”
102784 Socket SW 24 - 1/2”
Wrench SW 24
029620 Socket SW 19 - 1/2”
Wrench SW 19.
072170 Socket SW 13 - 1/2”
072150 Electric Power Wrench
(recommended)
072080 Electric Screw Driver
072090 Bit Holder
072120 Magnetic Holder
072140 Bit Points TX 30
031480 Socket Wrench SW 36
027212 Allen Kew SW 14
031080 Drill Bit Ø 25 mm
Flat assembly surface
Width: approx. 3.50 m
Length: maximum platform width + 2.0 m
Attach stop bars and support.
(Fig. A1.01)
Aids
– Locating block (0.1)
12 plywood blocks 21 x 80 x 80 mm
– Support h = approx. 24 cm,
e.g. GT 24 (0.2)
L = max. bracket spacing + 1.0 m
– Stop bars
1 plank 40 x 120 mm (0.3)
1 plank 80 x 80 mm
L = max. bracket spacing + 1.0 m
– Gauge for bracket spacing C
1 plank 40 x 120 mm (0.4)
L = bracket spacing + max. 1.0 m
plywood blocks (0.1) ( Fig. A1.02)
– Diagonal bracing for securing bracket
1 plank 40 x 120 mm, L = 2.0 m (0.5)
(Fig. A1.03)
Are the stop bars and support
mounted in parallel?
0.5
0.2
0.2
24
8
4
12
95
80 1.905 m 8
82 mm 82 mm
1.0 m
2.0 m
3.5 m
62 mm
62 mmC
0.1 0.2
0.1
0.3
Fig. A1.03
Fig. A1.01
approx. 0.50 m 2 stop bars
Support
Centre line of
bracket
Centre line of
bracket
0.1
82 82
C
0.4
Fig. A1.02
Fig. A1.01a
Section A-A
A
A

9Instructions for Assembly and Use – Standard Configuration
CB 160 Climbing Formwork
A1 Assembly of the CB 160 platforms
Assembly of Console
Bracket CB 160
Assembly
1. Check centre-to-centre spacing if re-
garding the planned measurement, or
measure spacing of climbing cones
already cast in concrete.
2. Adjust centre-to-centre spacing of
brackets to the support (0.2).
(Fig. A1.04)
3. Fix locating blocks (0.1).
(Fig. A1.05)
For spacings see (Fig. A1.02)
4. Lift first bracket (1.1) vertically
into the stops and then align.
5. Fix together with the diagonal
bracing (0.5).
(Fig. A1.06)
6. Lift in second bracket and align using
bracket spacing gauge (0.4).
Fix gauge using screw clamps. Check
bracket spacing.
(Fig. A1.06)
7. Fix two scaffold tubes (11.1) to screw
couplings (1.3) in a parallel position to
provide support.
8. Brace with diagonal scaffold tube
(11.2) and two swivel couplings (11.3).
(Fig. A1.07)
The bracket axes form a right-angle
to the stops and support.
The scaffold tubes should project at
least 100 mm from the couplings.
The brackets are now aligned.
Fig. A1.04
Fig. A1.05
Fig. A1.06
Fig. A1.07
11.311.211.1
1.3
1.3
0.40.5
1.1
0.2
0.1

10 Instructions for Assembly and Use – Standard Configuration
CB 160 Climbing Formwork
A1 Assembly of the CB 160 platforms
Assembly of girders
When using PERI GT 24 girders,
strengthen them on both sides in the
area of the brackets with plywood
strips (13.2). (Fig. A1.08)
In order to avoid the risk of lifting in
the case of large cantilevers, timber
blocks must be placed on the oppo-
site side in-between the bracket
cross-beams and girders. Fix to the
girders by means of wood screws.
Dimensions: thickness/width/height
27 x 120 x 300 mm
Fixing: Torx TSS 6 x 60
Assembly
1. Fix girder (13.1) by means of screw
clamps.
2.Fix diagonals to the fixing plates
using two hex. wood screws 6 x 80
(13.3) in each case.
(Fig. A1.08)
Alternatively:
F. H. Bolts M6 x 100, washer or for
double girders M6 x 180 (13.4).
(Fig. A1.08a)
– If no girders have been included in
the planning, these can be deter-
mined from C1 Platform deckings.
– Pre-drill girders when using F. H.
Bolts.
– Use F. H. Bolts for longer
girder cantilevers.
– Timbers must be fixed accordingly.
Fig. A1.08a
Fig. A1.08
13.2 + 13.4
13.1
13.3

11
Instructions for Assembly and Use – Standard Configuration
CB 160 Climbing Formwork
A1 Assembly of the CB 160 platforms
Single girder position
– plywood or 3-ply board (13.2)
– hex. wood screw 6 x 80 (13.3)
– timber 8/16 (13.6)
– GT 24 lattice girder (13.7)
(Fig. A1.09 + A1.10)
Double girder position
– plywood or 3-ply board (13.2)
– hex. wood screw 6 x 80 (13.3)
– timber 8 x 16 (2x) or 16 x 16 (1x)
(13.6)
– F. H.Bolt M6 x 180 (13.4)
– GT 24 lattice girder (13.7)
(Fig. A1.11 + A1.12)
These drawings conform to Appendix
K15 of the type test issued by the State
Structural Inspectorate, Düsseldorf, test
certificate no. P31 - 95/91 and may only
be used in accordance with the afore-
mentioned type test.
Assembly as working scaffold
For operating the securing bolts from
above, a spacing of x ≥ 23 cm is re-
quired.
1. Bolt on two Platform Connections
CB 160 (1.4) per bracket.
(Fig. A1.13)
2. For supporting the decking, fix tim-
bers h = 16 cm (13.6) with hex. wood
screws 6 x 80 (13.3).
Fig. A1.09
Fig. A1.11
Fig. A1.10
Fig. A1.12
Fig. A1.13
13.7
13.6
13.213.2
1.4 13.3, 13.6
13.3, 13.6
x ≥ 23 cm
13.6
13.3 13.4
16
13.3
13.2
13.3
13.4
GT 24 Girder Timber

12
24
Instructions for Assembly and Use – Standard Configuration
CB 160 Climbing Formwork
A1 Assembly of the CB 160 platforms
Assembly of
Adjusting Unit CB 160
Assembly
When using TRIO or VARIO GT 24, the
Adjusting Unit CB 160 (2) has to be
assembled with Hex. Bolts M20 x 150
(2.3), SW 30. Bolts M20 x 150 (2.3),
SW30.
The Adjusting Bolt (2.2) points to the
guardrail side.
(Fig. A1.14)
Another position may be predefined in
the plan.
Assembly of
Guardrail Post CB
Assembly
1. Loosen bolt (1.6) and take out SW 24,
and guardrail post (1.2).
2.Insert guardrail post in the holder.
3.Fix with Bolt (1.6) and self-securing
nut.
4.Proceed in the same way with the
second guardrail post.
(Fig. A1.15 or A1.16).
Arrangement of the girder below: top
hole (a) in the guardrail post.
(Fig. A1.15)
Arrangement of the girder above: bot-
tom hole (b) in the guardrail post
(Fig. A1.16)
Fig. A1.14
Fig. A1.15
Fig. A1.16
SW 30
2
2.2
2.3
1.2
1.6
1.6 (a)
1.6 (b)
16
27
0.705 m
1.025 m
1.2
1.6

13
x
Instructions for Assembly and Use – Standard Configuration
Assembly of decking
Climbing Platform, Working Platform
Assembly
1. Cut planking at right angles. Length
according to decking requirements.
(Fig. A1.17 + A1.18)
2.At platform ends, fix each plank flush
to the girders (13.1 / 13.6). Planking is
flush with bracket front edge on the
wall side.
Mounting: Torx TSS 6 x 80 (13.5)
2 x per girder support.
Alternatively: nails 38 x 100.
3.For accurate positioning, use plumb
line.
4.Fix remaining planking.
5.Cut out for securing bolt (1.5).
(Fig. A1.17a)
– If no girders have been included in
the planning, they can be determined
from C1 platform deckings.
– For girders positioned above, dimen-
sion x of the planning is to be used.
The decking can be pre-assembled
with girders placed in position and
then fixed.
– For operating the securing bolts (1.5)
from above, a spacing of x ≥ 23 cm is
required.
– Decking made of other materials
must be sized to the same dimen-
sions and then fixed.
– The installation of the hinged hatches
is described in A2 assembly of hinged
hatch cover.
– Gaps in the decking ≤ 2 cm.
Fig. A1.17
Fig. A1.17a
Fig. A1.18
13.1
13.5
13.6
13.5
1.5
80 60
80
160
1.636
1.521
View A
25
A

14 Instructions for Assembly and Use – Standard Configuration
CB 160 Climbing Formwork
A1 Assembly of the CB 160 Platforms
Assembly of guardrails
Guardrail Post CB
1. Cut handrail boards (12.1) to match
platform width.
2.Attach handrail boards to guardrail
post with screw clamps. Height:
depends on decking design.
(Fig. A1.19a + A1.19b)
3.Fix handrail boards (12.1) with two
round head bolts M8 x 100 (12.5).
Pre-drill boards!
4.Depending on the design of the deck-
ing, fix Toe Board (12.2) to the guard-
rail posts by means of F. H. Bolts
M8x 100 (12.5) (Fig. A1.19b) or fix to
the support bracket with Torx 6 x 40
(12.10). (Fig. A1.19a)
– If no guardrail has been included in
the planning, this can be determined
from C1 Handrails and Guardrails.
– With larger cantilevers of the guard-
rail boards, the ends are to be con-
nected with a vertically-positioned
plank.
Handrail boards flush with the planking.
Fig. A1.19a
12.1
12.5
1.8
12.2
12.10
12.1
12.5
12.2
12.5
Fig. A1.19b
1.0 m
max. 47
max. 47
min. 15
1.025 m
max. 47
min. 15
x ≥ 23 cm
max. 47

15Instructions for Assembly and Use – Standard Configuration
CB 160 Climbing Formwork
A1 Assembly of the CB 160 Platforms
Assembly of guardrails
End Guardrail Post
For longer cantilevers, it is necessary to
additionally support the handrail boards
with one or more end guardrail posts.
1. Mark the outside edge of the end
guardrail post (12.3) on the handrail
boards (12.1 + 12.2).
2.Align end guardrail post and fix to
girder (13.1) with screw clamp.
3.Use wood screws (6x) 6 x 80 (12.8)
for fixing to girder.
4.Mount the pre-drilled handrail boards
using F. H. Bolts M 8x 125 (12.5) on
fillers.
(Fig. A1.20a + A1.20b)
If no span is specified in the planning,
this can be determined from Part C1
Handrails and Guardrails.
Fig. A1.20a
12.1
12.3
Fig. A1.20b
12.3
12.5
12.5
12.5
12.8

16 Instructions for Assembly and Use – Standard Configuration
CB 160 Climbing Formwork
A2 Other assembly work
Fig. A2.01
Assembly of
end guardrail posts
Required materials:
– 2 end guardrail posts
– 2 handrail boards 4 x 12 cm
– 1 toe board 4 x 12 cm
Assembly
1. Fix end guardrail post (12.4) to girders
with wood screws 6 x 80 (5x) (12.8).
2.Fix handrail boards and toe board
with F. H. Bolts M 8 x 100 (12.5).
(Fig. A2.01 + A2.01a)
12.4
12.4
Fig. A2.01a
A
View A
12.8
12.4
12.5
Other manuals for CB 160
1
Table of contents
Other Peri Construction Equipment manuals

Peri
Peri LPS Screen Operator's manual

Peri
Peri VST Operator's manual

Peri
Peri Trio Operator's manual

Peri
Peri RCS P Operator's manual

Peri
Peri SKYMAX Operator's manual

Peri
Peri RCS-2 Guide

Peri
Peri SKYDECK Operator's manual

Peri
Peri RCS-2 Guide

Peri
Peri MULTIPROP Operator's manual

Peri
Peri SB Brace Frame Operator's manual