Permobil ROHO DRY FLOATATION Cushions User manual

shape fitting technology
®
ROHO®DRY FLOATATION®Cushions Operation Manual
Single Compartment, Sensor Ready, ENHANCER, Quadtro SELECT, Contour SELECT

ROHO DRY FLOATATION Cushions Operation Manual - Single Compartment, Sensor Ready, ENHANCER, Quadtro SELECT, Contour SELECT
Contents
Intended Use
Important Safety Information
2-3
Parts Detail
Product Specications
4
Cushion Setup 4-6
Troubleshooting 7
Cleaning and Disinfecting 7-8
Storage, Transport, Disposal and Recycling
Limited Warranty
8
Español 9 Čeština 101
Français 17 Eesti 109
Deutsch 29 Ελληνικά 117
Italiano 37 magyar 125
Nederlands 45 Íslenska 133
Dansk 53 Lietuviškai 141
Svenska 61 Polski 149
Norsk 69 Română 157
Suomi 77 Slovenčina 165
Português 85 Slovenščina 173
hrvatski 93 Türkçe 181
Contact Information
ROHO, Inc.
1501 South 74th St.
Belleville, IL 62223 U.S.A.
U.S.A.:
800-851-3449
Fax 888-551-3449
Customer Support:
Outside the U.S.A.:
618-277-9150
Fax 618-277-6518
permobil.com
Please Note
Supplier: This manual must be given to the user of this product.
Operator (Individual or Caregiver): Before using this product, read the
instructions and save for future reference.
Products may be covered by one or more U.S. and foreign patents
and trademarks, including CONTOUR SELECT®, DRY FLOATATION®,
ENHANCER®, HIGH PROFILE®, ISOFLO®, LOW PROFILE®, MID
PROFILE®, QUADTRO SELECT®, ROHO®, Sensor Ready®, shape tting
technology®, Smart Check®and Yellow Rope®. Zytel®is a registered
trademark of DuPont.
Product information is changed as needed; current product information
is available at permobil.com. Contact Customer Support for previous
versions of product information.
ROHO, Inc. is part of Permobil.
© 2007, 2021 Permobil
Rev. 2021-04-20
The following products are featured in this operation manual:
ROHO LOW PROFILE Single Compartment Cushion
ROHO HIGH PROFILE Single Compartment Cushion
ROHO HIGH PROFILE Single Compartment Cushion with Sensor Ready Technology
ROHO ENHANCER Cushion
ROHO CONTOUR SELECT Cushion
ROHO QUADTRO SELECT LOW PROFILE Cushion
ROHO QUADTRO SELECT MID PROFILE Cushion
ROHO QUADTRO SELECT HIGH PROFILE Cushion
Warning
Indicates that not following the specied procedure could lead to
potentially hazardous conditions resulting in serious injury.
Caution
Indicates that not following the specied procedure could lead to
potentially hazardous conditions resulting in minor to moderate injury or
damage to the equipment or other property.
Incident Reporting
In the event of a serious incident or injury, contact Customer Support.
Symbols Glossary
Manufacturer Fits Size (width x depth x height) Front of product
Date of manufacture Model number Weight limit Back of product
Consult instructions for use Serial number Medical Device Bottom of product
DO NOT use the ISOFLO Memory Control
as a handle; the product may tear. Quantity Authorized representative in the European Community

2
ROHO DRY FLOATATION Cushions Operation Manual - Single Compartment, Sensor Ready, ENHANCER, Quadtro SELECT, Contour SELECT
Intended Use
Each ROHO DRY FLOATATION product in this manual is an adjustable, air-lled, cellular-design wheelchair support surface. There is no weight
limit, yet the cushion must be properly sized to the individual.
Each of the following products utilizes DRY FLOATATION Technology and is intended to conform to an individual's seated shape to provide skin/
soft tissue protection, positioning, and an environment to facilitate wound healing.
SELECT and ENHANCER Cushions:
ROHO QUADTRO SELECT LOW PROFILE Cushion (QUADTRO SELECT LOW PROFILE)
ROHO QUADTRO SELECT MID PROFILE Cushion (QUADTRO SELECT MID PROFILE)
ROHO QUADTRO SELECT HIGH PROFILE Cushion (QUADTRO SELECT HIGH PROFILE)
ROHO CONTOUR SELECT Cushion (CONTOUR SELECT)
ROHO ENHANCER Cushion (ENHANCER)
Each of the following products utilizes DRY FLOATATION Technology and is intended to conform to an individual's seated shape to provide skin/
soft tissue protection and an environment to facilitate wound healing.
Single Compartment Cushions:
ROHO LOW PROFILE Single Compartment Cushion (LOW PROFILE Single Compartment Cushion)
ROHO HIGH PROFILE Single Compartment Cushion (HIGH PROFILE Single Compartment Cushion)
ROHO HIGH PROFILE Single Compartment Cushion with Sensor Ready Technology (HIGH PROFILE Sensor Ready Cushion)
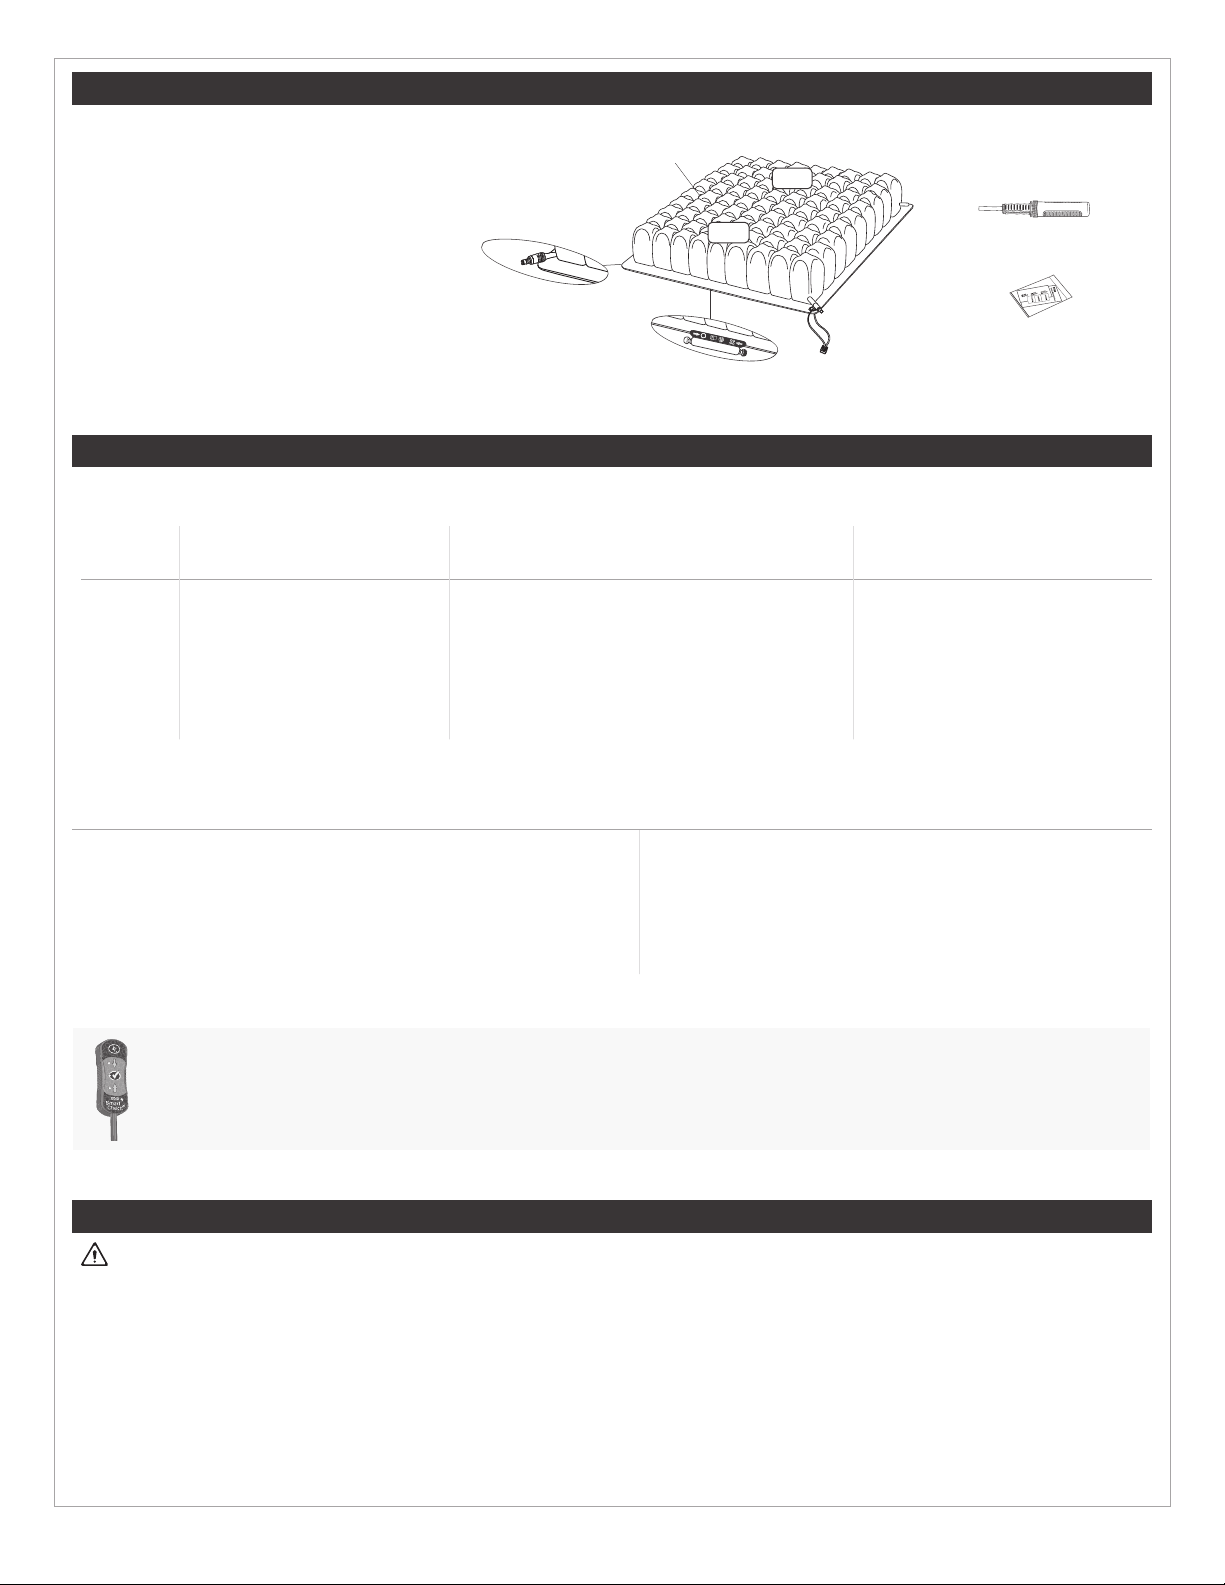
The Sensor Ready Cushion is compatible with the Smart Check Cushion Monitoring Device.
Contraindication: Based on clinical, scientic or engineering evidence, these products may not be suitable for individuals who require
accommodation of pelvic asymmetry greater than is specied below, per product:
1 in. (2.5cm) - QUADTRO SELECT LOW PROFILE, ENHANCER, CONTOUR SELECT, LOW PROFILE Single Compartment Cushion
2 in. (5cm) - QUADTRO SELECT MID PROFILE
3 in. (7.5cm) - QUADTRO SELECT HIGH PROFILE, HIGH PROFILE Sensor Ready Cushion, HIGH PROFILE Single Compartment Cushion
A clinician who is experienced in seating and positioning should determine whether the product is appropriate for the individual’s particular seating
needs. The product’s intended use statement alone should not be relied upon to make that determination.
The medical products featured in this document are intended to be only one part of an overall care regimen that includes all seating and mobility
equipment and therapeutic interventions. A clinician who is experienced in seating and positioning should identify this care regimen after
evaluating the individual’s physical needs and overall medical condition.
A clinician should also evaluate for visual, reading, and cognitive impairment to determine the need for caregiver assistance or the need for other
assistive technology, such as large-print instructions, to ensure proper product use.
Important Safety Information
Warnings:
- Skin/soft tissue breakdown can occur due to a number of factors,
which vary by individual. Check skin frequently, at least once a
day. Redness, bruising, or darker areas (when compared to normal
skin) may indicate supercial or deep tissue injury and should be
addressed. If there is any discoloration to skin/soft tissue, STOP
USE immediately. If the discoloration does not disappear within 30
minutes after disuse, immediately consult a healthcare professional.
- DO NOT place obstructions between the individual and the cushion.
The cushion and the cover MUST be compatible sizes and MUST
be used as directed in this manual. Except for the compatible
covers listed in "Product Specications" in this manual, placement
of any items between the individual and the cushion: 1) may reduce
or eliminate the benets of the cushion, increasing the risk to skin
or to other soft tissue, and 2) may cause the individual to become
unstable and vulnerable to falling.
- DO NOT use the cushion on top of, or in conjunction with, any other
products or materials, except as indicated in this manual. Using
non-compatible products or materials, whether inside or outside
the cover: 1) may reduce or eliminate the benets of the cushion,
increasing the risk to skin or to other soft tissue, and 2) may cause
the individual to become unstable and vulnerable to falling.
Warnings, continued:
- If you are unable to perform any tasks described in this manual,
seek assistance by contacting the clinician, equipment provider,
distributor, or Customer Support.
- DO NOT expose the cushion to high heat, open ames or hot
ashes. Testing or certication claims, including for ammability,
may no longer apply to this device when it is combined with other
products or materials. Check testing and certication claims for all
products used in combination with this device.
- The cushion surface will acclimate to the surrounding temperature.
Take appropriate precautions, especially when the cushion will
contact unprotected skin.
- Use caution when handling the cushion: Metal grommets on the
corners may be a finger trap hazard.
- DO NOT use the cushion as a water otation device (e.g., a Life
Preserver). It will NOT support you in water.

3
ROHO DRY FLOATATION Cushions Operation Manual - Single Compartment, Sensor Ready, ENHANCER, Quadtro SELECT, Contour SELECT
Important Safety Information, continued
Cautions:
- Keep the cushion away from sharp objects.
- Changes in altitude may require adjustment to the cushion.
- If the cushion has been in temperatures lower than 32°F (0°C)
and exhibits unusual stiffness, allow the cushion to warm to room
temperature.
- DO NOT use a pump, cover, or repair kit other than those
compatible with the product.
- DO NOT modify the cushion or any components. Doing so may
result in damage to the product and will void the warranty.
- DO NOT allow the cushion to come into contact with oil-based
lotions or lanolin. They may degrade the material.
- Prolonged exposure to ozone may degrade materials used in the
cushion, affect the performance of the cushion, and void the product
warranty.
- Periodically, check the cover and components for damage and
replace if necessary. See "Troubleshooting".
- DO NOT use any of the following as a handle for carrying or
pulling the cushion: ination valve(s), hose(s), quick disconnect
(Sensor Ready Cushion), or the ISOFLO Memory Control (SELECT
Cushion). Carry the cushion by the cushion base or by the
carrying handle on the Standard/SELECT Cover. Using any other
components to carry or pull the cushion may damage the product.
Warnings - Motor Vehicle Transportation:
- Failure to pay attention to these warnings could result in severe
injury to the individual in the wheelchair or to others.
- Whenever possible, transfer out of the wheelchair and into a
manufacturer-installed vehicle seat without the cushion, and use the
vehicle’s crash-tested occupant restraint system.
- The cushion must be correctly and securely installed, used, and
maintained according to the instructions and warnings provided by
the cushion manufacturer.
- When the wheelchair is used as the vehicle seat, the cushion
should only be used with wheelchair frames that are equipped with
securement points specied in ANSI/RESNA WC-4:2017, section
19 (WC19) or ISO 7176-19, and that have been successfully crash
tested on a wheelchair in the forward-facing position.
- The wheelchair with the cushion must be used with an effective
wheelchair securement system and a properly positioned, crash-
tested pelvic and shoulder-belt restraint, or Wheelchair Tiedown and
Occupant Restraint System (WTORS), following the manufacturer’s
instructions.
- If the cushion has been involved in an accident during transport,
check the cushion for damage and replace if necessary. See the
“Troubleshooting” section in this manual.
- For more information about safely transporting wheelchair users,
refer to: http://wctransportation-safety.umtri.umich.edu/ridesafe-
brochure.
- A ROHO QUADTRO SELECT Cushion was included in a
wheelchair seating system that was dynamically tested by a
third-party testing facility for use in a motor vehicle. The system
tested meets all applicable criteria for wheelchair seating systems
proposed in Section 5.1 of ANSI/RESNA WC-4:2017 Section 20
“Wheelchair Seating Systems for Use in Motor Vehicles.
- Test results apply to seating systems intended for use by adults
and children with a total body mass greater than 23 kg (51 lb, or
approximately 6 years of age) who are transported facing forward in
their wheelchairs in all types of motor vehicles.
- To determine whether motor vehicle third-party testing has been
performed with a specic seating system combination, refer to all
provided equipment operation manuals or contact the equipment
manufacturer.

4
ROHO DRY FLOATATION Cushions Operation Manual - Single Compartment, Sensor Ready, ENHANCER, Quadtro SELECT, Contour SELECT
Parts Detail
Package contents: cushion, cover*; repair kit,
hand pump, operation manual, limited warranty
supplement, product registration card.
* Instructions are provided with the cover.
To order replacement parts, contact the product
provider or Customer Support.
The serial number label is located on the
bottom of the cushion.
Hand Pump
Repair Kit
Yellow Rope
Air Cells
Inflation Valve
Cushion
ISOFLO Memory Control
(SELECT Cushions)
Quick Disconnect
(Sensor Ready Cushions)
Front
Back
Product Specications
Cushion Dimensions and Weights
SINGLE COMPARTMENT Cushions QUADTRO SELECT Cushions Contoured Cushions
LOW PROFILE HIGH PROFILE** LOW PROFILE MID PROFILE HIGH PROFILE CONTOUR SELECT ENHANCER
Height 2¼ in. (5.5cm) 4¼ in. (10.5cm) 2¼ in. (5.5cm) 3¼ in. (8.5cm) 4¼ in. (10.5cm) 2¼ to 4¼ in. (5.5 to 10.5cm) 2¼ to 4¼ in. (5.5 to 10.5cm)
Average Weight* 2.5 lbs. (1.1 kg) 3.25 lb. (1.5 kg) 2.5 lbs. (1.1 kg) 3.0 lbs. (1.4 kg) 3.25 lb. (1.5 kg) 3.5 lbs. (1.6 kg) 3.5 lbs. (1.6 kg)
Min. Width 6 cells; 11½ in. (29cm) 6 cells; 11½ in. (29cm) 5 cells; 11 in. (28cm) 8 cells; 16 in. (41cm) 6 cells; 12¾ in. (32.5cm) 7 cells; 14½ in. (36.5cm) 8 cells; 14¾ in. (37.5cm)
Min. Depth 6 cells; 11½ in. (29cm) 6 cells; 11½ in. (29cm) 6 cells; 11¾ in. (30cm) 8 cells; 15¼ in. (38.5cm) 6 cells; 11¾ in. (30cm) 8 cells; 15¼ in. (38.5cm) 8 cells; 14¾ in. (37.5cm)
Max. Width 13 cells; 23½ in. (59.5cm) 15 cells; 26¾ in. (68cm) 13 cells; 24½ in. (62.5cm) 11 cells; 21¼ in. (54cm) 14 cells; 26¼ in. (67cm) 13 cells; 24½ in. (62.5cm) 11 cells; 20 in. (50.5cm)
Max. Depth 11 cells; 20 in. (50.5cm) 14 cells; 23½ in. (59.5cm) 12 cells; 22 in. (56cm) 11 cells; 20¼ in. (51.5cm) 14 cells; 23¾ in. (60cm) 12 cells; 22 in. (56cm) 11 cells; 20 in. (50.5cm)
* based on 9 x 9 cell cushions: 16½ in. x 16½ in. (42cm x 42cm)
1 in. = 2.54 cm = 25.4 mm
* * applies to the Sensor Ready HIGH PROFILE Cushion, except Max. Depth is 12 cells; 21¾ in (55cm).
Note: Contact Customer Support for specic cushion sizes.
Covers and Accessories Compatible with ROHO DRY FLOATATION Cushions:
Not available in all markets. Contact Customer Support.
Cushion materials: cushion: neoprene rubber, made without latex;
inflation valve: Zytel; ISOFLO Memory Control: polypropylene,
polycarbonate, aluminum; Quick Disconnect: acetal
Cover materials - Refer to the care label on the cover.
Cushion expected lifetime: 5 years
- ROHO Heavy Duty Cushion Cover
- ROHO Standard Cushion Cover
- ROHO SELECT Cushion Cover
- ROHO Planar Solid Seat Insert
- ROHO Contour Base
IF YOU OWN A SMART CHECK: The Sensor Ready Cushion is equipped with Sensor Ready Technology and can be used with Smart Check, which is
a cushion feedback system. Smart Check can be used to nd the individual’s ination level and help check their cushion. For more information, contact
Customer Support.
Note: If you own Smart Check, STOP HERE and refer to the cushion setup instructions provided with Smart Check.
Cushion Setup
Warnings:
- DO NOT use a product that is underinated or overinated, because 1) the product benets will be reduced or eliminated, resulting in an increased risk to skin
and other soft tissue, and 2) the individual may become unstable and vulnerable to falling. Carefully follow the instructions for ination, placement and hand
check. If the product does not appear to be holding air, or if you are not able to inate or deate the product, see "Troubleshooting". Immediately contact the
equipment provider, distributor, or Customer Support if the problem persists.
- When possible, use hook and loop fasteners to further secure the cushion to the seating surface. Hook fasteners are available upon request.
- After setting up the cushion the rst time, perform a hand check frequently, at least once a day. When the cushion is used by a different individual or in a
different wheelchair, repeat cushion setup. Follow the hand check instructions in this manual.
Cushion Setup is continued on the next page.

5
ROHO DRY FLOATATION Cushions Operation Manual - Single Compartment, Sensor Ready, ENHANCER, Quadtro SELECT, Contour SELECT
Cushion Setup, continued
Inate, cover, and transfer.
IMPORTANT - For SELECT Cushions:
Before inflating, you must unlock the ISOFLO Memory Control so that
all of the air cells will inflate. Push the green knob to unlock the ISOFLO
Memory Control.
Note: The ISOFLO can be accessed through an opening in the front of the
ROHO SELECT Cushion Cover (if used). GREEN KNOB: Unlock RED KNOB: Lock
1Inate: Slide the hand pump nozzle over the ination valve. Open the ination valve. Inate the
cushion until all of the air cells feel rm.
Close the ination valve until it comes to a stop. Remove the hand pump. Make sure the
ination valve is closed. Repeat for all ination valves.
Note: To open, turn the ination valve at least one full rotation. The ination valve will spin
freely when open. Close
Open
2Cover: Place the cushion inside the cover. Refer to the instructions provided with the cover.
Note: Keeping a cover on the cushion will help to protect the cushion components.
Fig. 1
Fig. 2
3Transfer:
a. Place the cushion on the wheelchair with the air cells facing up and the non-skid surface of
the cover facing down. The symbol showing the seated gure on the cover may be used to
help orient cushion. (Fig.1)
Note: Consult the prescriber about alternate positions of ination valve(s) and ISOFLO
Memory Control (for SELECT Cushions).
b. The individual should transfer to the wheelchair and sit in their usual sitting position. Make
sure that the cushion is centered underneath the individual. The ination valve should be in
the front, on the left side of the seated individual. (Fig. 2)
Perform a hand check.
4To perform a hand check, use the width of your ngers to check the amount of air in the
cushion. When the cushion has the correct amount of air*, the individual is both immersed in
the cushion and supported by air:
a. Slide your hand between the cushion and the individual, and feel for the lowest bony
prominences. Suggestion: To help locate the bony prominences while performing a hand
check, lift and lower the leg.
b. Refer to the Hand Check Guide below to adjust the cushion.
IMPORTANT! Perform cushion setup with all valves. SELECT and ENHANCER Cushions may
require additional positioning and adjustment. See additional instructions on the next page.
* The recommended distance between the lowest
bony prominence and the seat surface is
½ - 1 in. (1.5 - 2.5 cm).
HAND CHECK GUIDE
UNDERINFLATED!
Not able to move fingers.
Not enough air in the cushion.
Risk: Not supported by air.
OVERINFLATED!
Can move fingers too freely.
Too much air in the cushion.
Risk: Not immersed in the
cushion.
CORRECT AMOUNT OF AIR!
Able to slightly move fingers.
Immersed in the cushion and
supported by air.
If the cushion is UNDERINFLATED:
Add some air. Close the inflation valve. Perform
a hand check again. Repeat until the cushion has
the correct amount of air.
If the cushion is OVERINFLATED:
Remove some air. Close the inflation valve.
Perform a hand check again. Repeat until the
cushion has the correct amount of air.
If the cushion has the CORRECT AMOUNT OF
AIR, it is ready to use.

6
ROHO DRY FLOATATION Cushions Operation Manual - Single Compartment, Sensor Ready, ENHANCER, Quadtro SELECT, Contour SELECT
Cushion Setup, continued
ENHANCER
1Follow the instructions on the previous page for Cushion Setup. Explanation of ination valves:
AB
"A" - ination valve for outer cells/abductor (air
cells shown in white)
"B" - ination valve for posterior contour
section (air cells shown in gray)
2Make sure that both ination valves are closed when setup is complete.
SELECT Cushion Adjustment for a Fixed or Flexible Pelvic Obliquity or Tilt
Warnings - SELECT Cushions:
-Consult with the prescriber or a clinician about adjustment of inflation levels in SELECT Cushion compartments.
-After adjusting the SELECT Cushion, lock the ISOFLO as instructed. If the ISOFLO is not locked, the inflation level in each compartment will change.
Fixed Pelvic Obliquity or Tilt:
To adjust the QUADTRO SELECT Cushion or the CONTOUR SELECT Cushion to accommodate a xed pelvic
obliquity or a xed posterior pelvic tilt:
GREEN KNOB: Unlock
RED KNOB: Lock
1Follow the Cushion Setup instructions on the previous page to make sure the cushion has the correct amount of air.
2The individual should sit in their normal position while the air transfers through the ISOFLO Memory Control. When the
air transfer is complete, push the red knob toward the locked position.
3Perform a hand check for each compartment of the cushion again, as instructed on the previous page.
Flexible Pelvic Obliquity or Tilt:
To adjust the QUADTRO SELECT Cushion to correct a exible pelvic obliquity or a exible posterior pelvic tilt:
1Follow the Cushion Setup instructions on the previous page to make sure the cushion has the correct amount of air.
2Make sure the ISOFLO Memory Control is in the unlocked position
3Follow the instructions below.
Flexible pelvic obliquity:
a) Manually correct to the desired pelvic position. (For example, if the left
side of the pelvis is lower than the right side, either have the individual
lean toward the right, or place downward pressure on the right hip until
the desired position is achieved.)
b) Push the red knob toward the locked position.
c) Perform a hand check as instructed on the previous page.
Flexible posterior pelvic tilt:
a) Check to make sure there is approximately 1" (2.5 cm) of space between the
individual's bony prominences and the seating surface. Add more air if needed.
b) Lift both of the individual's knees to put more downward pressure on the pelvis
and to force air to the front of the cushion. This will create a "well" (a lower,
concave area) for the pelvis and will help prevent the pelvis from sliding forward.
c) Push the red knob toward the locked position.
d) Perform a hand check as instructed on the previous page.

7
ROHO DRY FLOATATION Cushions Operation Manual - Single Compartment, Sensor Ready, ENHANCER, Quadtro SELECT, Contour SELECT
Troubleshooting
For additional assistance, contact the equipment provider, distributor, or Customer Support.
The cushion is not holding air. Inate the cushion. Inspect the quick disconnect (Sensor Ready Cushion), the ination valve(s), and hose(s) for damage.
Conrm that the ination valve(s) are completely closed. Look for holes in the cushion. If very small holes or no holes are
visible, follow the instructions in the Repair Kit provided with the product. For damage to the ination valve, quick disconnect,
or hose, or for large holes or leaks in the cushion, see the Limited Warranty supplement, or contact Customer Support.
Not able to inate or deate the
cushion.
Conrm that the ination valve(s) are open. Inspect the ination valve(s) and hose(s) for damage. When inating SELECT
Cushions: Conrm that the green knob of the ISOFLO Memory Control is pushed toward the center of the ISOFLO in the
UNLOCKED position so that all chambers will inate. For the Sensor Ready Cushion: also check the quick disconnect for
damage.
The cushion is uncomfortable or
unstable.
- Make sure that the cushion is not underinated or overinated (See Cushion Setup).
- The cushion cells and the top of the cover should face up.
- The cushion should be centered beneath the individual.
- The cushion should be properly sized to the individual and the wheelchair.
Allow the individual at least one hour to adjust to the cushion.
The cushion slides on the
wheelchair.
Make sure that the non-skid bottom of the cushion cover faces away from the individual. Use directional labels on the
cushion and on the cover to orient the cushion. When possible, use hook and loop fasteners to further secure the cushion to
the wheelchair. Hook fasteners are available upon request. Refer to the instructions provided with the cover.
A component is damaged. Contact Customer Support for a replacement.
Cleaning and Disinfecting
Note: For cover care instructions, refer to the manual provided with the cover.
Warnings:
- DO NOT allow water or cleaning solution to enter the cushion. Make sure the inflation valve(s) are closed.
- Sensor Ready Cushion: Make sure the Smart Check is detached from the cushion. Water in a cushion with Sensor Ready (SR) technology can result in
damage to the Smart Check and cause a false reading when using Smart Check.
- Cleaning and disinfecting are separate processes. Cleaning must precede disinfection. If the product becomes soiled, or between use by different individuals:
clean, disinfect, and check the product for proper functioning.
- Clean the product regularly and when it becomes soiled.
- Follow all manufacturer bleach container and germicidal disinfectant safety guidelines.
- Note about sterilization: High temperatures accelerate aging and will damage the product assembly. The products featured in this manual are not packaged
in a sterile condition, nor are they intended or required to be sterilized prior to use. If institution protocol demands sterilization: First, follow the cleaning and
disinfecting instructions; then, open the ination valve(s) and use the lowest possible sterilizing temperature, but not to exceed 70°C (158°F), for the shortest
time possible. DO NOT autoclave.
Cautions:
- Use of the following may cause damage to the cushion: abrasives (steel wool, scouring pads); caustic, automatic dishwasher detergents; cleaning products
that contain petroleum or organic solvents, including acetone, toluene, Methyl Ethyl Ketone (MEK), naphtha, dry cleaning fluid, adhesive remover; oil-based
lotions, lanolin, ozone gas; ultraviolet light cleaning methods.
- DO NOT expose to direct sunlight.
Recommendation: When washing by hand, use room-temperature water.
Note: Deated air cells may be easier to thoroughly clean. To deate the air cells: with the ination valve(s) open, roll up and/or compress the cushion, and then
completely close the ination valve(s).
Hand Wash and Hand Disinfect the Cushion (Preferred Method)
Hand Wash the Cushion: Remove the cover, close the inflation valve(s), and place in a large sink. Hand wash, using mild liquid hand soap,
hand dishwashing liquid, laundry detergent, or a multipurpose detergent (follow product label instructions). Gently scrub all cushion surfaces,
using a soft plastic bristle brush, a sponge or a cloth. Rinse with clean water. Air dry.
Hand Disinfect the Cushion: Follow the hand wash instructions, using 1 part household liquid bleach per 9 parts water. Keep
the product wet with the bleach solution for 10 minutes. Rinse thoroughly with clean water. Air dry.
Caution: Rinse thoroughly. Detergent residue may cause air cells to stick together.
1:9
+

8
ROHO DRY FLOATATION Cushions Operation Manual - Single Compartment, Sensor Ready, ENHANCER, Quadtro SELECT, Contour SELECT
Cleaning and Disinfecting, continued
Machine Wash and Disinfect the Cushion
IMPORTANT: Machine washing can cause wear and damage, including cuts and tears to the cushion and the detachment of required product information.
Washing and disinfecting the cushion by hand and air drying is strongly recommended.
Warnings:
- DO NOT allow water or cleaning solution to enter the cushion. Make sure the inflation valve(s) are closed.
- Sensor Ready Cushion: Make sure the Smart Check is detached from the cushion. Water in a cushion with Sensor Ready (SR) technology can result in
damage to the Smart Check and cause a false reading when using Smart Check.
- High water temperature may cause cushion discoloration and label detachment.
- DO NOT expose cushions to temperatures above 70°C (158°F), which may damage cushion components.
- For machine washing or disinfecting, make sure the washing machine capacity is sufficient. A washing machine that isn’t large enough may not remove all soil
or contaminants from a cushion.
- Using a damaged cushion will reduce or eliminate the benefits of the cushion and increase risk to skin and other soft tissue.
Prepare the Cushion for Machine Cleaning:
1) Remove the cover and close the ination valve(s). Examine the cushion for damage, and patch any holes (refer to Repair Kit instructions provided
with the product).
2) Remove stains or odors as needed: Place the cushion in warm water and a disinfectant cleaning agent. Gently scrub, using a soft plastic bristle
brush, and rinse with clean water.
3) Deate the cushion: Open the ination valve and roll up the cushion, starting at the corner opposite the valve. After you have removed as much air
as possible, close the ination valve.
4) Inspect for any sharp edges in the washing machine that may damage the cushion.
Machine Wash the Cushion:
Place the cushion in a laundry bag and then into the washing machine. When folding the cushion, make sure the air cells face outward.
Use warm water (85º - 105ºF / 30º - 40ºC) and laundry detergent or machine- and cushion-safe cleaner/biocide, placed in the detergent dispenser.
Gentle cycle: Use a machine setting that does not include a high-speed spin cycle.
40C
Machine Disinfect the Cushion: Follow the machine washing instructions and use hot water 60°C (140°F). Use biocide (refer to the manufacturer
instructions). Rinse with clean water.
60C
Caution: Rinse thoroughly. Detergent residue may cause air cells to stick together.
Drying the Cushion: Remove the cushion from the laundry bag and air dry. For faster drying, use a hand-held hair dryer, hold no closer than
6 in. (15 cm) from the cushion, and use a sweeping motion.
Warning: Overheating the neoprene rubber can cause permanent product damage.
Care Symbols
Hand wash. Line dry in the shade.
1:9
Bleach (1 part bleach: 9 parts water).
40C
Machine wash, warm, gentle.
60C
Machine wash hot, normal, at
the temperature shown. Use a handheld dryer.
Storage, Transport, Disposal and Recycling
Storage or Transport: Clean and disinfect the product. Open the inflation valve(s). Deflate the product. Place in a container that protects the product from
moisture, contaminants and damage. After storing or transporting, inspect the product to ensure it was not damaged (see "Troubleshooting"), and follow
instructions to prepare the product for use.
Disposal: The components of the products in this manual are associated with no known environmental hazards when properly used and when disposed
of in accordance with all local/regional regulations. At the end of its useful life, treat as healthcare waste and dispose of according to local healthcare-waste
guidelines. Incinerate with other healthcare waste. Incineration must be performed by a qualified, licensed waste management facility.
Recycling: Contact a local recycling agency to determine recycling options for the product.
Limited Warranty
Limited Warranty Term from the date the product was originally purchased: SELECT Cushions: 36 months; all other DRY FLOATATION products: 24 months. The
warranty does not apply to punctures, tears, burns, or misuse. See also the Limited Warranty supplement provided with the product, or contact Customer Support.

1501 South 74th St.
Belleville, IL 62223 USA
permobil.com
EUROPE
Permobil
Box 120
861 23 Timrå, Sweden
+46 60 59 59 00
permobil.com
T20200 Rev. 2021-04-20
Print Date: Qty:
Table of contents
Other Permobil Mobility Aid manuals

Permobil
Permobil 2 Series User manual

Permobil
Permobil Explorer Mini User manual

Permobil
Permobil K300 PS Junior User manual

Permobil
Permobil ROHO AirLITE User manual

Permobil
Permobil Permolock C User manual

Permobil
Permobil ROHO AGILITY Active Aluminum Back Series User manual

Permobil
Permobil Explorer Mini User manual

Permobil
Permobil 1825813 User manual

Permobil
Permobil ROHO User manual

Permobil
Permobil BodiLink Head Support User manual