6
Maintenance (recommended at least once per year)
Check that Action
General
The walker feels firm/free from play.
The walker does not rattle during manoeuvres.
The walker is level and all of its castors are in
contact with the floor.
The walker is not dirty.
Arm rests
Arm rests are intact and clean.
Arm rest widening is functional.
Handle
Grips are not damaged/dirty.
Handle adjustment is functional.
Battery
Check that the charging cable is connected
to the control box.
Check that the remote control is connected to
the control box.
Check that connections are made according to
the wiring diagram.
Check that the battery, actuators and control box
are not loose.
Height adjustment
Raising and lowering are functional.
The walker feels stable at maximum settings.
There is no play between the vertical frame and
bottom frame.
Height adjustment clamps lock.
The electric actuator fitting must be free from play.
Height adjustment via remote control is functional. The
electric actuator must run smoothly at a constant speed.
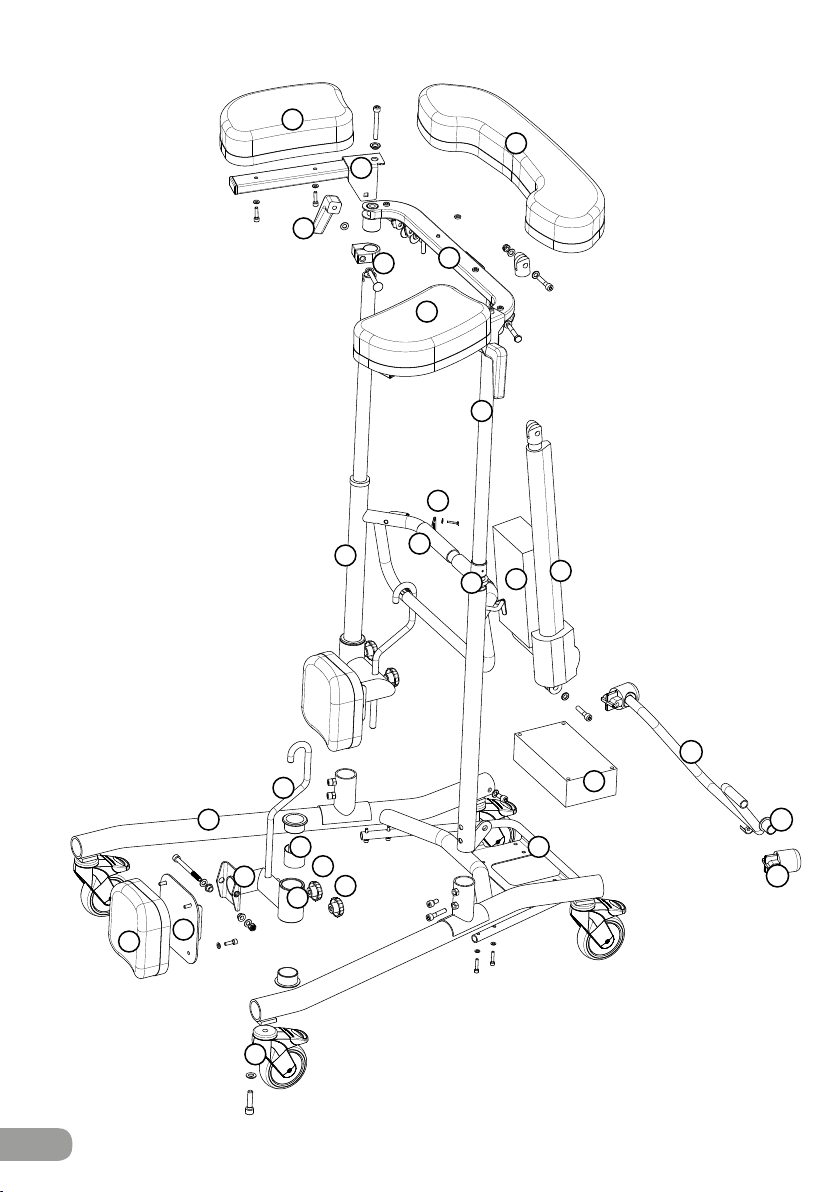
Frame parts
There is no mechanical damage.
There are no scratches.
End plugs/lower frame fitted.
Castors/brakes
Castors roll easily.
Tread not damaged.
The castors are tightly fastened to the lower frame.
Castor brakes functional on all castors.
Handbrake functional.
Harness
Belts, seams and Velcro fasteners are whole/
intact.
The walker lock tabs (green) are intact.
Clean with lukewarm soap solution
(no petroleum products).
Clean; replace if damaged.
Replace lock knob.
Clean with lukewarm soap solution
(no petroleum products).
Replace handle grips.
Fit lock knobs/plates as required.
Fit new cable; this must always be connected to the
control box (IP65 classification).
Connect or fit new remote control as required.
Refer to the wiring diagram in the Technical manual.
Tighten; replace with new fasteners as required.
Fit new guide sleeves (in frame) or end plugs
(in chrome tubes) as required.
Tighten all lock bolts.
Replace clamps.
Tighten the attachment fitting concerned; replace bolts/
lock nuts as necessary.
Check that the battery/remote control/actuator are
connected in accordance with the wiring diagram.
Charge the battery. Contact customer services.
If damage is present, contact GATE’s customer services.
Touch up as necessary.
Fit new end plugs.
Clean or replace castors (NOTE! Castors are always fixed
to the lower frame with thread locker or lock nuts. The
castors are sealed and we do not recommend their
dismantling; instead, replace the whole castor assembly.
Tighten the castor bolt and fit locking nut or use thread
locker (depends on model).
Replace castor assembly.
Adjust the brake or fit new castors.
Replace harness. Available in four sizes (S, M, L, XL).
Change lock tab.
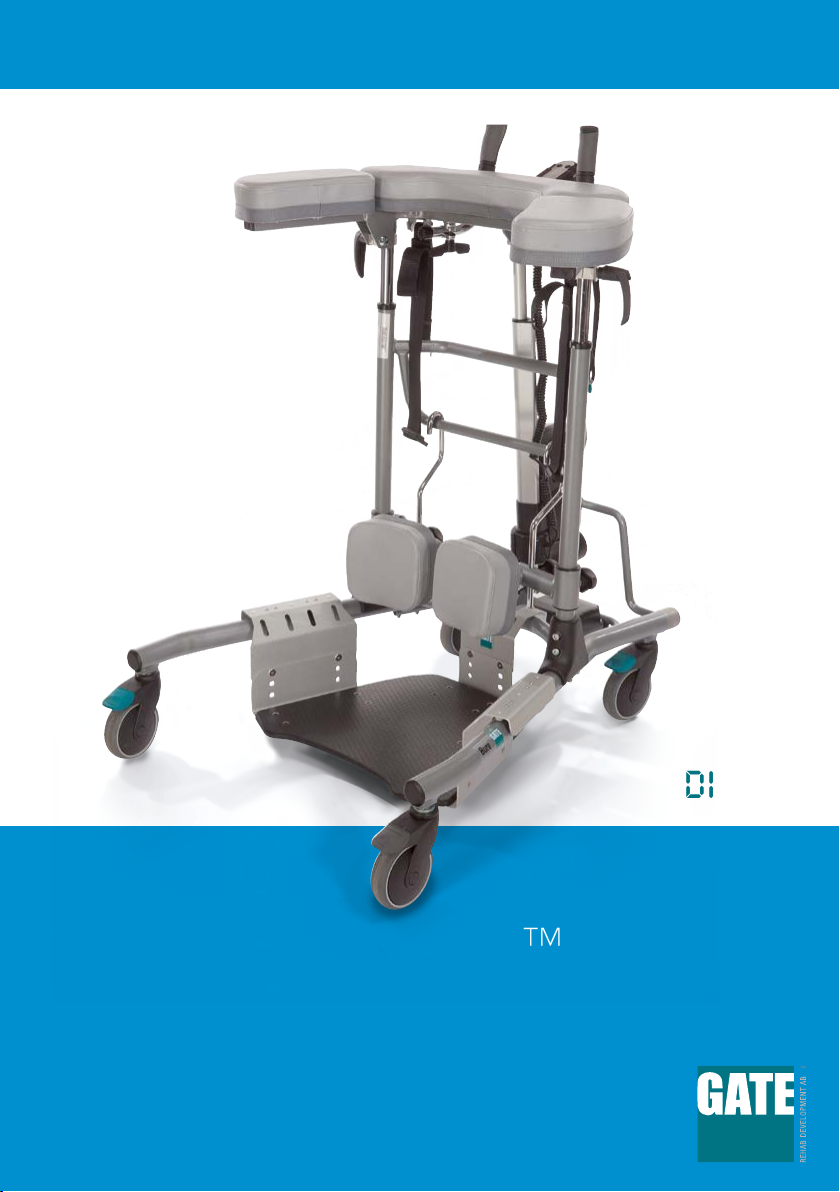
Bruksanvisning Bure
Justering av handtag
Handtagen justeras till önskad position genom att:
Ratt lossas, justera in handtag
Ratt låses
Upp
Ned
Min
Max
Höjning/sänkning
av stativ (El)
Önskad höjd justeras med hjälp
av fjärrkontrollen
Pil <UPP> resp. Pil <NED>
Breddning av stativ
(endast Bure Double)
Önskad bredd (max/min) justeras
med hjälp av fjärrkontrollen:
Håll in Pil <vänster> = Minimal
breddning av benstativ.
Håll in Pil <höger>
= Maximal breddning av
benstativ.
Justering av armstödsplattor (Hö/Vä)
För optimalt stöd kan Armstödsplattor breddjusteras:
Ratt lossas, armstödsplattas läge justeras. Ratt låses
Låsning av hjul
Hjulen låses genom att fotbroms aktiveras.
Upplåsning av hjul
För att lossa bromsen – återställ.
1. Uttag för batterikontakt
2. Uttag för stickpropp
(OBS! För att IP-klassning ska gälla så ska
stickpropp ALLTID vara ansluten till styrbox)
3. Uttag för fjärrkontroll
4. Uttag för ställdon - höj/sänk
5. Uttag för ställdon - breddning (Endast Bure Double)
OBS! Var noga med att kontakter ansluts till rätt uttag eftersom detta annars
kan skada ställdon.
Laddning av batteri ska ske då gåbordet inte används.
(Batteriet kan aldrig överladdas.) Laddning görs genom
att stickpropp ansluts till eluttag.
Innan första användningen så bör batteriet
laddas 24 timmar.
Kopplingsschema Styrbox
(Bure El/Bure Double/Bure Extra)
Laddning av batteri
(Bure El/Bure Double/Bure Extra)
2
3
4
1
5


 Gas User manual")