Permobil Tru-Shape User manual

Tru-Shape®
OPERATION MANUAL


Tru-Shape Operation Manual
Contents
Intended Use
Important Safety Information - General
2
Before Use
Parts Detail and Product Specications
3
Healthcare Provider Instructions 4
User / Caregiver Instructions 5
ROHO Air Insert Setup
ROHO Air Insert Removal and Replacement
6-7
Cleaning and Disinfecting
Maintenance
8-9
Troubleshooting
Storage, Transport, Disposal and Recycling
10
Warranty 11
Français 12
Contact Information
The Comfort Companies, LLC
1960 South Calhoun Road
New Berlin, WI 53151 USA
USA: 800-736-0925
Outside the USA: 262-432-0830
Fax: 406-522-8563
Customer Support:
permobil.com
WARNING: Indicates not following the
specied procedure could lead to potentially
hazardous conditions resulting in serious injury.
CAUTION: Indicates not following the specied
procedure could lead to potentially hazardous
conditions resulting in minor to moderate injury or
damage to the equipment or other property.
Incident Reporting
In the event of a serious incident or injury, contact
Customer Support.
Symbols Glossary
Manufacturer Date of manufacture Consult instructions for use
Please Note
Supplier: These instructions must be given to the user of this product.
Operator (Individual or Caregiver): Before using this product, read the instructions and save for future reference.
Products may be covered by one or more U.S. and foreign patents and trademarks, including COMFORT-TEK®,
Breathe 4™,ROHO®, STRETCH-AIR®and Tru-Shape®.
Zytel®is a registered trademark of DuPont.
Product information is changed as needed; current product information is available at permobil.com.
The Comfort Companies, LLC is a part of Permobil.
© 2019, 2021 Permobil
Rev. 2021-06-18
Thank you for choosing Tru-Shape

Tru-Shape Operation Manual
2
Important Safety Information - General
WARNINGS:
- DO NOT REUSE. This product is designed to be
uniquely shaped to its user. DO NOT use this
product for another individual.
- DO NOT use the components of this product
separately. Assemble and use this product only as
instructed in this manual.
- Altering the seating system or using any hardware
or components other than those supplied by
The Comfort Company / Permobil may result in
product damage and may void the warranty.
- Follow all instructions and safety information
provided with the seating system and provided
by the manufacturer of the wheelchair or other
accessories.
- Skin/soft tissue breakdown can occur due to a
number of factors, which vary by individual. Check
skin frequently, at least once a day. Redness,
bruising, or darker areas (when compared to
normal skin) may indicate superficial or deep
tissue injury and should be addressed. If there
is any discoloration to skin/soft tissue, STOP
USE immediately. If the discoloration does
not disappear within 30 minutes after disuse,
immediately consult a healthcare professional.
- If skin irritation and/or skin reddening occur,
consult the qualified personnel who adapted and
adjusted the product. Do not continue using the
product without consultation.
- Leaning too far forward or to the side may lead to
instability and tipping.
WARNINGS, continued:
- DO NOT expose the product to high heat, open flames
or hot ashes. Testing or certification claims, including
flammability, may no longer apply to this device once it
is combined with other products and materials. Check
testing and certification claims for all products used in
combination with this device.
- If you are unable to perform any tasks described in
this manual, seek assistance by contacting a clinician,
equipment provider, distributor, or Customer Support.
WARNINGS - MOTOR VEHICLE TRANSPORTATION:
- Failure to pay attention to these warnings could result
in severe injury to the individual in the wheelchair or to
others.
- The Permobil Tru-Shape has not been tested for use in a
motor vehicle.
- Transfer out of the wheelchair installed with the custom
seating system and into a manufacturer-installed
vehicle seat, and use the vehicle’s crash-tested occupant
restraint system.
- If the seating system has been involved in an accident
during transport, see the “Maintenance” section in this
manual.
CAUTIONS:
- Periodically, check the cover and components for
damage and wear, and replace if necessary.
- Keep the seating system away from sharp objects.
Intended Use
The Tru-Shape is a custom-made seating system that is made specifically for a wheelchair and designed to meet
the needs of a specific user.
The Tru-Shape is high-quality urethane foam carved to create an intimate fit with the user for optimal contact
surface area and improved pressure redistribution. Tru-Shape can be designed as a complete seat and back
system or as separate seat or back components.
A clinician who is experienced in seating and positioning, along with a full risk assessment and program of care, should
determine whether the product is appropriate for the individual’s particular seating needs. The product’s intended use
statement alone should not be relied upon to make that determination.
The medical products featured in this document are intended to be only one part of an overall care regimen that
includes all seating and mobility equipment and therapeutic interventions. A clinician who is experienced in seating
and positioning should identify this care regimen after evaluating the individual’s physical needs and overall medical
condition.
A clinician should also evaluate for visual, reading, and cognitive impairment to determine the need for caregiver
assistance or the need for other assistive technology, such as large-print instructions, to ensure proper product use.

Tru-Shape Operation Manual
3
Parts Detail and Product Specications
Package Contents:
- Tru-Shape
- Operation Manual
Product Options:
- Mounting Base
- Mounting Hardware
- Removable Cover
- T-Nuts (¼-20 or 10-32 mm)
- ROHO Air Insert (includes a
hand pump and repair kit)
Note: Some options are not
included with all systems.
Tru-Shape Back
Tru-Shape Seat
ROHO Air Insert
(Mid Prole shown)
Repair Kit
HP45 Hand Pump
Materials*:
Seating System: urethane foam
Vinyl Spray Coating: low-volatile vinyl-based coating;
made without latex
Mounting Surface: plywood, ABS plastic or hook and
loop fasteners
Mounting Hardware: aluminum and/or steel
depending on variation ordered
ROHO Air Insert: neoprene rubber (made without
latex); Zytel ination valve
Removable Textile Cover: Refer to product labels for
material content and for compliance to ammability
requirements.
* This is a made-to-order product. Materials will vary.
Covers Compatible with Tru-Shape:
Not available in all markets. Contact Customer Support.
- COMFORT-TEK Cover
- STRETCH-AIR Cover
- Neoprene Cover
- Spacer Fabric Cover
- Breathe 4 Cover
Product expected lifetime: 5 Years
Before Use
The custom seating system featured in this document is intended to be only one part of an overall care regimen
that includes all seating and mobility equipment and therapeutic interventions.
This product may only be selected and adapted by trained qualied personnel. The qualied personnel is
responsible for making sure that the user and/or caregiver has understood the proper adjustment, use,
maintenance and care of the seating system. Discuss the daily operation and preventative maintenance with the
caregiver along with all manufacturer’s instructions and safety information.
Permobil cannot be held responsible for damages or injury due to misuse of the product or failure to follow
the instructions provided in this manual. Please contact us if you require further assistance in understanding
cautions, warnings, or instructions for using or maintaining the product.

Tru-Shape Operation Manual
4
Healthcare Provider Instructions
Important Safety Information
IMPORTANT! See also the warnings in "Important Safety Information - General" in this manual.
WARNINGS:
- Qualified personnel are responsible for individual
positioning and assembly of the seating system to
the wheelchair.
- Follow all manufacturer’s instructions for proper
application and adjustment of positioning and
support devices to prevent the user from sliding
into a hazardous position.
- When fitting a seating system to the wheelchair,
ensure the user is not seated in it. Follow all
manufacturer’s instructions for attachment to the
wheelchair. Once fitted, firmly pull on the seating
system to confirm it is correctly fitted and fully
secured before the user is seated.
- After installing any seating into a wheelchair,
always check that the user’s sitting position and the
wheelchair’s center of gravity are appropriate for
the intended use and the user’s abilities. Work with
the user to find the optimal sitting position.
- During the first few hours of use, a healthcare
professional should be available to observe the
skin condition and assess the likelihood of skin
breakdown. During this introductory period,
gradually increase the time spent in the seating
system and regularly check the skin for signs of
marking and abrasion. It is not uncommon to find
some marking with a new seat, as the user may
be in contact on an area previously unsupported.
Careful monitoring is required over the first few
weeks to ensure the user adjusts to the new shape.
WARNINGS, continued:
- For seating systems with vinyl spray coating, residual
volatiles can build up in the packaging during shipping.
It is recommended to remove the product from the
packaging and allow it to air in a well-ventilated room
for 24 hours before fitting the user in the system. In
rare cases where the user has a special sensitivity to the
residual smell of the vinyl spray coating, the user should
transfer from the system; contact the manufacturer for
alternative solutions.
- Make sure that the equipment is securely mounted to
a wheelchair system and is adjusted properly. Check all
hardware for wear, breakage, and tightness. Re-tighten
loose screws/bolts. DO NOT continue to use the seating
system if any part is broken, cannot be tightened or is
not functioning properly.
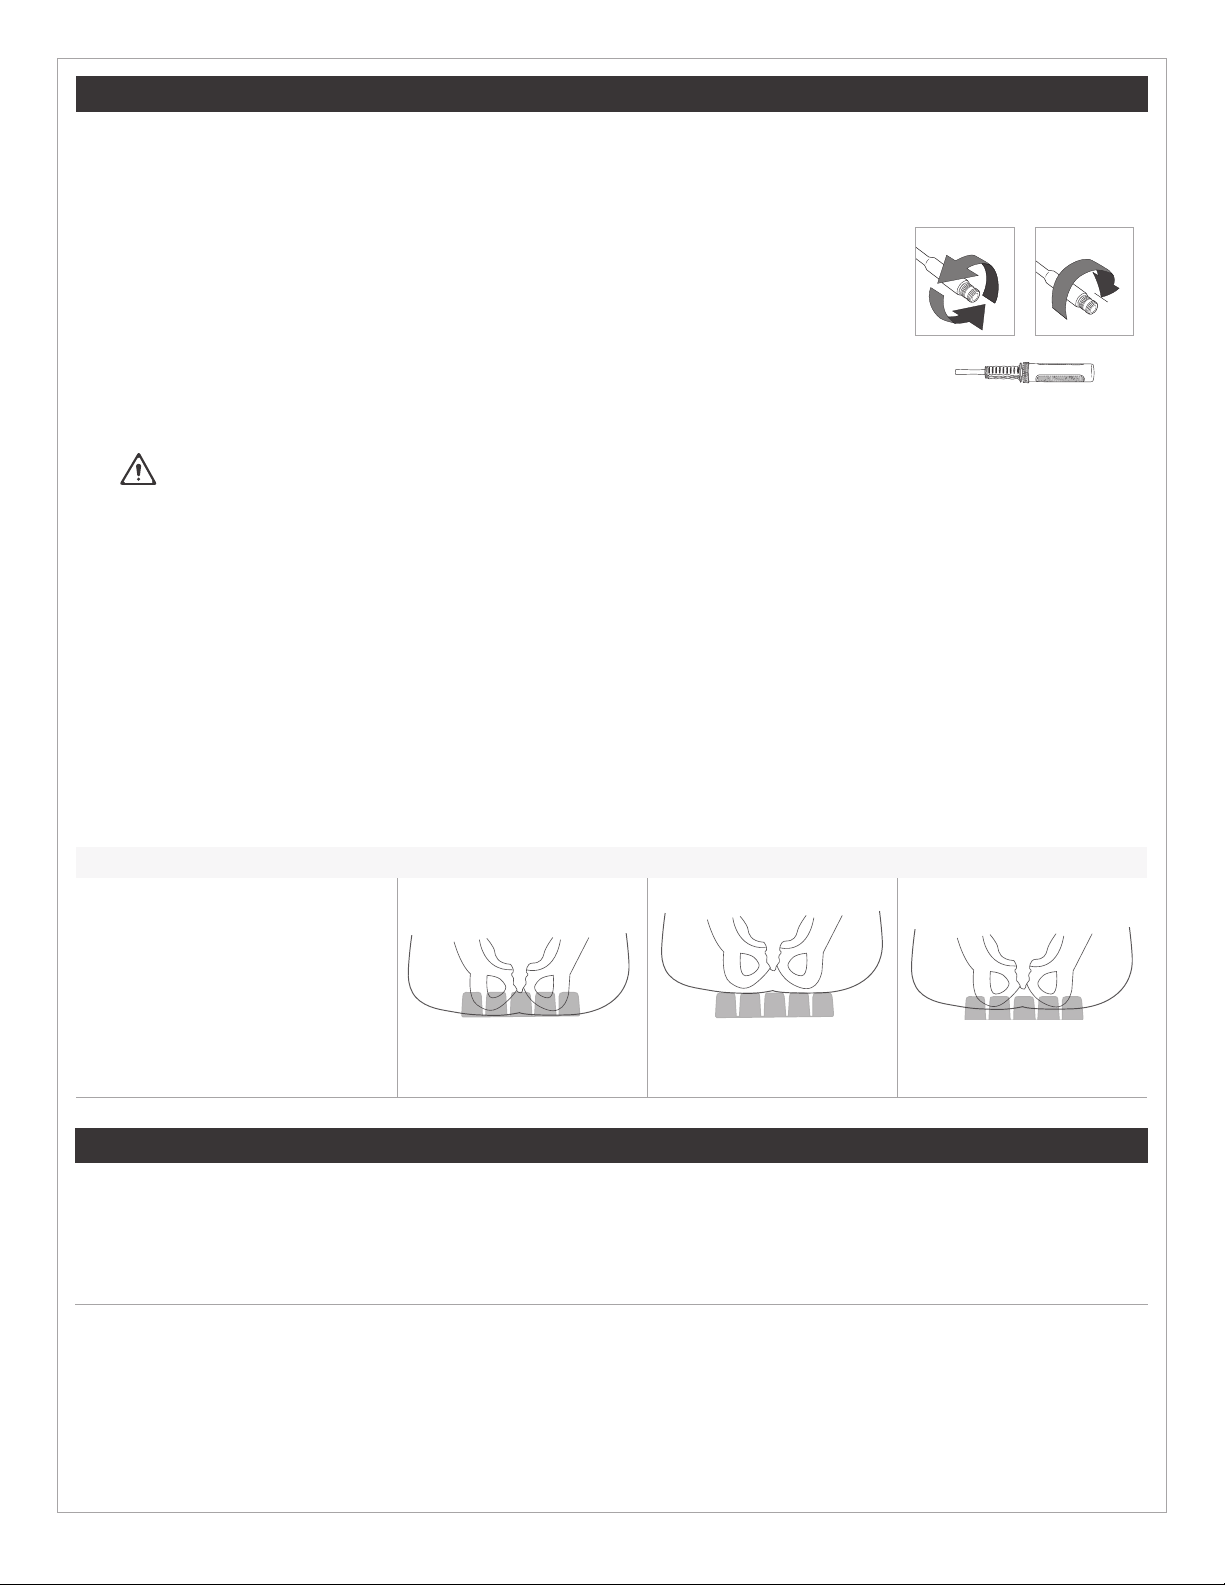
- Make sure that all screws of the mounting elements are
properly tightened until snug + one quarter turn, after
any adjustments are completed and ensure stability of
the wheelchair is checked. Do not over tighten screws
to avoid damaging components.
- For foam options only, make sure to mount screw
connections at a distance from the body to avoid any
risk of injury to the user by protruding screws.
- Any combination of the seating system with
unapproved options or add-on parts, especially
wheelchairs and seat frames from manufacturers other
than Permobil, is the responsibility of and must be
tested by the specialist / dealer / combiner.
Preparation For Use
1If a cover is being used, place it over the custom
seating system.
2Install all positioning elements appropriate for
the needs of the user. Follow manufacturer’s
instructions and warnings for all devices. Provide
the user manuals to the user and/or caregiver after
installation.
3Check all connections to conrm they are not loose
and that there are no protruding edges or points
that could come in contact with the user. All screws
of mounting elements should be tightened until
snug + one quarter turn.
4Follow the wheelchair manufacturer instructions
and warnings when installing the seating system in
the wheelchair.
5Instruct the user and/or caregiver in the proper use
of the seating system.
Positioning the User In the Seating System
1Ensure the seating system is securely attached to
the wheelchair.
2Ensure the wheel locks and anti-tippers are engaged
on the wheelchair.
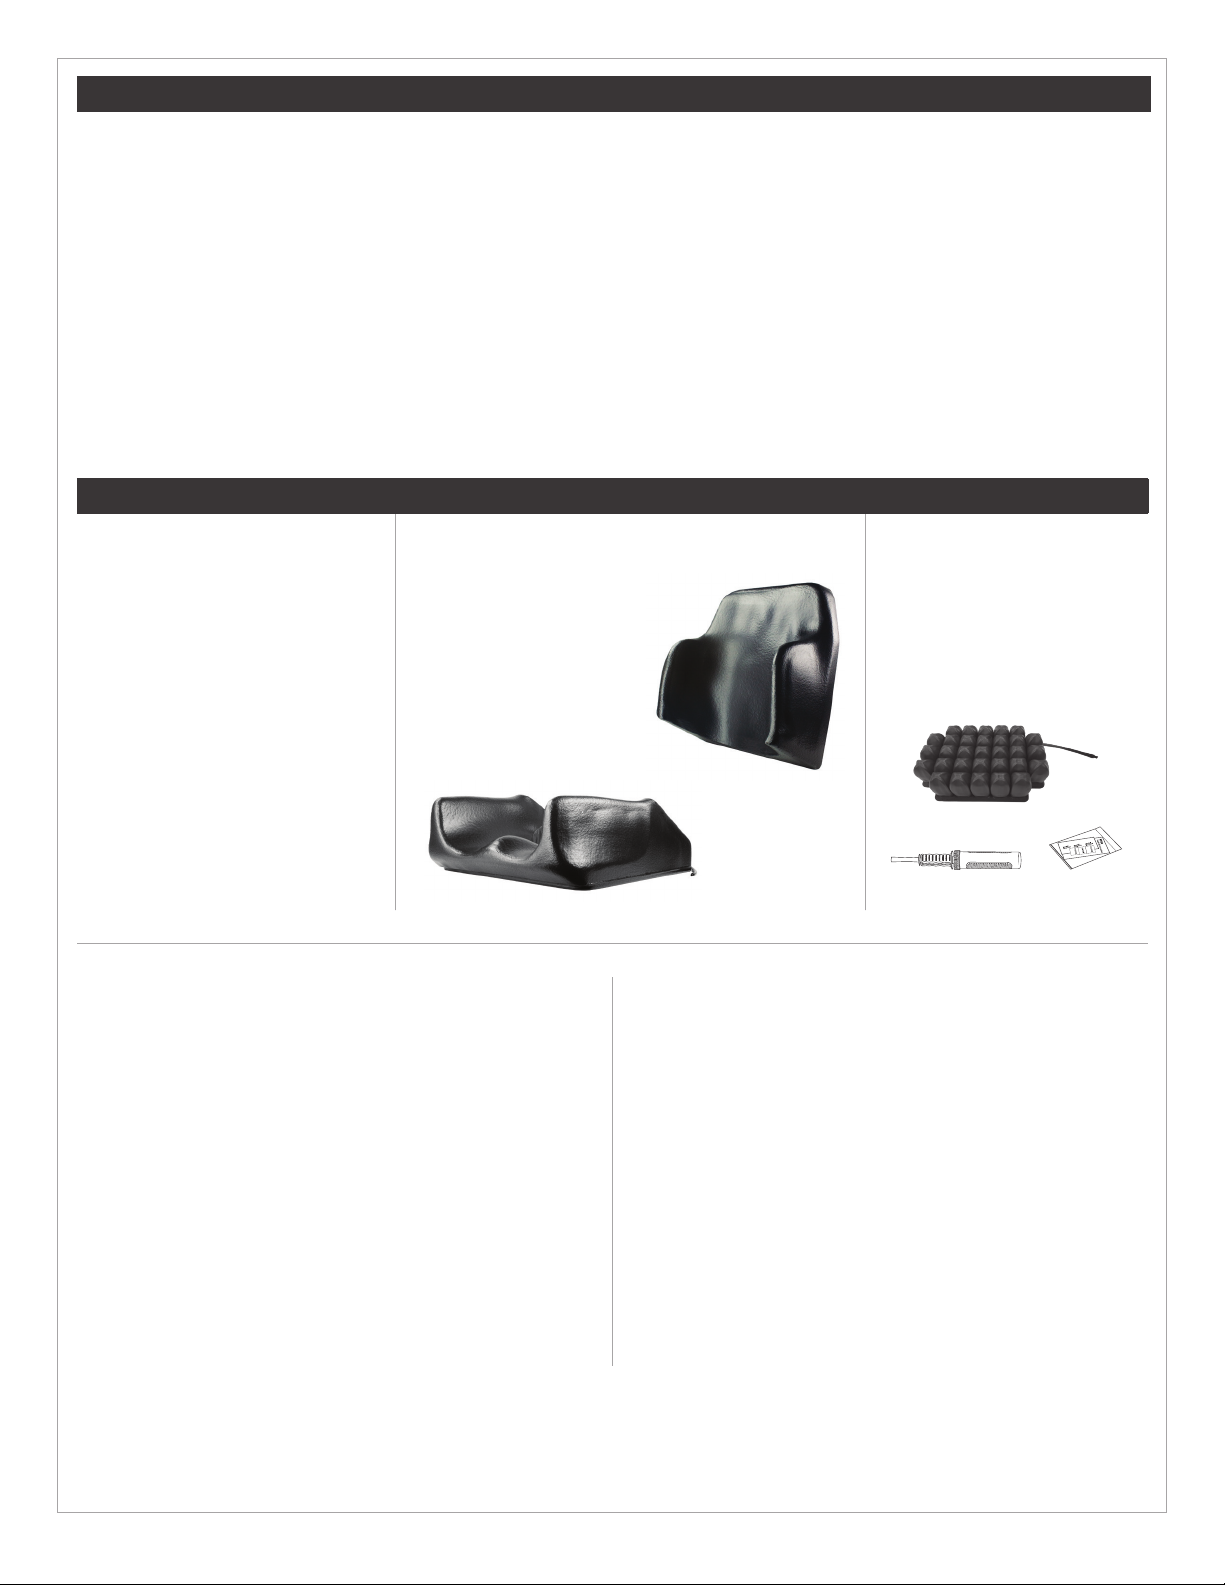
IMPORTANT! If the ROHO Air Insert is included in the
seating system, see also the air insert setup instructions in
this manual before transferring to the seating system.
3Carefully transfer the user to the seating system.
4Allow the user to sit in the seating system for about
one hour. Use clinical judgment if they appear
anxious or agitated.
5Plan, together with caregivers, an appropriate
schedule for allowing the user to adapt to the
seating system. Start with multiple short periods of
use and gradually increase time when no adverse
eects are noted.

Tru-Shape Operation Manual
5
User / Caregiver Instructions
Important Safety Information
IMPORTANT! See also the warnings in "Important Safety Information - General" in this manual.
WARNINGS:
- DO NOT use the seating system unless it has been
adjusted by a suitably qualied or experienced
person.
- Before long-term use of the seating system, and
for the rst few weeks, the user should sit for
shorter, introductory periods of time, and ONLY
under supervision. During introductory sitting, the
skin should be carefully monitored while the user
adjusts to the new shape and positioning.
- Immediately consult qualied personnel if there are
any signs of user discomfort or fear associated with
using the seating system.
- Additional materials placed on top of the seating
system may reduce the eectiveness of the product
and increase risk factors for skin breakdown and
instability.
- Installing alternate parts on a wheelchair may
aect the intended structure and function of the
equipment. Consult your healthcare provider to
assess the need for additional safety features for
your wheelchair, such as anti-tip bars or other
options for maintaining stability during use,
especially during transfers, including the use of a
hoist. Use this manual in conjunction with the user
manual that came with your wheelchair to ensure
safety guidelines are being met.
WARNINGS, continued:
- In rare cases where the user has a special sensitivity to
the residual smell of the vinyl spray coating, the user
should transfer from the seating system; contact the
healthcare provider.
- Make sure that the seating system is securely mounted
to the wheelchair and is adjusted properly each time it
is in use. Check all hardware for wear, breakage, and
tightness weekly. Re-tighten any screws of mounting
elements until snug + one quarter turn.
- Weekly, check the seating system and components for
damage and replace if necessary.
- DO NOT continue to use the seating system if any part
is broken, cannot be tightened or is not functioning
properly. Periodically, the seating system should be
thoroughly inspected by a qualied professional or
healthcare provider.
- DO NOT modify this product. Doing so will void the
warranty and may lead to personal injury or alter the
eectiveness of the product by increasing the risk
factors for skin breakdown and/or instability.
- Use a cover on the seating system for those who have
“picking” behaviors that could result in picking o and
ingesting pieces of the seating system.
- Use a uid-resistant cover if the seating system is
expected to come into contact with liquid.
Tru-Shape Instructions - Read Before Use
WARNING - BEFORE USE: If the seating system includes a ROHO Air Insert, follow the air insert setup
instructions in this manual.
Check the function of the seating system before each use, especially the connection between the seating system
and the wheelchair.
Weekly, inspect for damage and note signs of wear on seams, pads, straps, and the mounting materials. Contact
Customer Support to order replacement parts or for warranty information.
Identify any accessories that were included with the seating system and make sure you know how to adjust
them. If you are not sure about any aspect of the seating system, contact the healthcare provider.

Tru-Shape Operation Manual
6
ROHO Air Insert Setup
Note: Read these warnings and follow the instructions on the next page if a ROHO Air Insert is included with the product.
Important Safety Information
WARNINGS:
- The air insert MUST be correctly installed in the foam
base.
- DO NOT use an under-inflated or over-inflated air
insert because 1) the product benefits will be reduced
or eliminated, resulting in an increased risk to skin
and other soft tissue, and 2) the individual may
become unstable and vulnerable to falling. Carefully
follow the instructions for inflation and hand check.
- After setting up the air insert for the first time, check
inflation frequently, at least once a day. Follow the
hand check instructions in this manual.
- DO NOT use the air insert on top of, or in conjunction
with, any other products or materials, except as
indicated in this manual. Using non-compatible
products or materials, whether inside or outside the
cover: 1) may reduce or eliminate the benefits of the
air insert, increasing the risk to skin or to other soft
tissue, and 2) may cause the individual to become
unstable and vulnerable to falling.
- DO NOT place obstructions between the individual
and the air insert. The components and the cover
MUST be compatible sizes and MUST be used as
directed in this manual. Except for the compatible
covers listed in "Product Specifications" in this
manual, placement of any items between the
individual and the air insert: 1) may reduce or
eliminate the benefits of the product, increasing the
risk to skin or to other soft tissue, and 2) may cause
the individual to become unstable and vulnerable to
falling.
WARNINGS, continued:
- If the air insert does not appear to be holding air,
or if you are not able to inflate or deflate the air
insert, see “Troubleshooting”. Immediately contact
the equipment provider or Customer Support if the
problem persists.
- DO NOT use the air insert as a water flotation device
(e.g., a Life Preserver). It will NOT support you in
water.
- The air insert surfaces will acclimate to the
surrounding temperature. Take appropriate
precautions, especially when the air cells will contact
unprotected skin.
CAUTIONS:
- Periodically, check the air insert for damage and wear,
and replace if necessary.
- DO NOT use a pump, cover or repair kit other than
those compatible with the product.
- DO NOT allow the air insert to come into contact with
oil-based lotions or lanolin. They may degrade the
material.
- Prolonged exposure to ozone may degrade materials
used in the air insert, affect performance, and void the
warranty
- Changes in altitude may require adjustment to the air
insert.
- DO NOT expose the air insert to temperatures
above 70°C (158°F), which may damage air insert
components.
- If the air insert has been in temperatures lower than
32°F (0°C) and exhibits unusual stiffness, allow to
warm to room temperature.
Follow the instructions for air insert setup on the next page.

Tru-Shape Operation Manual
7
ROHO Air Insert Setup, continued
Note: Before following these instructions, read the safety information on the previous page. See also the instructions in
this manual for removing or replacing the air insert.
1Inate the air insert:
Suggestion: transfer o the air insert before inating.
a. To access the ination valve, remove or move the cover (if used).
b. Slide the hand pump nozzle over the ination valve. Open the ination valve, at
least one full rotation.
c. Inate until all of the air cells feel rm.
d. Close the ination valve completely. Remove the hand pump. Make sure the
ination valve is closed.
Note: To open, turn the ination valve at least one full rotation. The ination valve will
spin freely when open.
Close
Open
2Transfer - Warnings:
- Before the user transfers to the product, the air insert must be securely installed on the Tru-Shape seating
surface. A cover, if used, should be correctly installed.
- Before performing a Hand Check, the user must transfer to the product in their usual sitting position.
3 Perform a Hand Check:
During a Hand Check, you will use the width of the ngers to see if the air cells
are properly inated*. When the air cells are properly inated, the user is both
immersed in the air cells and supported by the air cells.
a. Slide your hand between the air cells and the user, and feel for the user's
lowest bony prominences**.
b. Refer to the Hand Check Guide below to adjust the air insert.
**Suggestion: To help locate the bony prominences while performing a hand check, lift
and lower the leg.
* The recommended
distance between the
lowest bony prominence
and the seating surface is
½ - 1 in. (1.5 - 2.5 cm).
ROHO Air Insert Removal and Replacement
To remove the air insert:
1If a cover is being used, remove it from the seating system.
2Gently pull the ination tubing through the hole, located in the back of the foam base.
3Remove the air insert from the foam base.
To replace the air insert:
1Line up the hook and loop fastener strips and refer to directional labels to correctly place the air insert into
the foam base. Press to attach securely.
2Insert the ination tubing through the hole, located in the back of the foam base.
3Check ination. If adjustment is needed, follow the air insert setup instructions.
4If a cover is being used, replace it on the seating system.
Hand Check Guide
Place a hand beneath the
lowest bony prominences (ITs)
and make sure there is at least
½ in. (1.5 cm) of air.
If the air cells are not properly
inflated, add or remove a small
amount of air. Repeat until the
air cells are properly inflated.
Underinflated Overinflated Proper Inflation
½ - 1 in. (1.5 - 2.5 cm)

Cleaning and Disinfecting
WARNINGS:
- Follow all manufacturer bleach container and germicidal disinfectant safety guidelines.
- Cleaning and disinfecting are separate processes. Cleaning must precede disinfection. If the product becomes
soiled: clean, disinfect, and check the product for proper functioning.
- Clean the product regularly and when it becomes soiled.
Covers
CAUTIONS:
- Remove the cover from the foam before cleaning or disinfecting.
- Frequent heat drying and bleaching will cause fabric to break down. Air drying and cleaning without bleach are
recommended, whenever possible, to help extend the life of the cover.
- DO NOT wash or tumble dry covers with hook and loop fasteners or other materials that could snag the fabric.
Doing so could pull at the fabrics, causing changes in the appearance of the fabrics.
Surface Cleaning for COMFORT-TEK Fabric Only: Spray with common household or
commercial antibacterial cleansers or disinfectants. Wipe with a damp, water-only cloth after
disinfecting. Let dry completely before use.
Cleaning: When possible, hand wash in warm water with mild soap, rinse thoroughly with
clean water, and line dry. Let dry completely before use.
Or
Machine wash using common laundry detergent and tumble dry low.
40C
OR
Disinfecting: Hand wash the cover with water and bleach using 1 part household liquid
bleach per 8 parts warm 40°C/104°F water. Rinse thoroughly with clean water, and line dry.
Let dry completely before use.
Or
Machine wash hot using common laundry detergent and tumble dry low.
60C
OR
Foam Components WITHOUT Vinyl Coating
WARNING: Disinfectants are NOT eective on porous surfaces such as foam that is NOT coated with a
water-repellent vinyl. DO NOT use if the foam or foam components become soiled or contaminated. Replace all
soiled or contaminated foam or foam components.
CAUTIONS: DO NOT submerge any foam components in water. DO NOT use soap. DO NOT expose to
direct sunlight.
If a cover is being used, remove it. Wipe lightly with a damp cloth. DO NOT use soap. Air dry completely
before use. If a cover is being used, replace only after the foam is completely dry.
Foam Components WITH Vinyl Coating
CAUTIONS: DO NOT submerge any foam components in water. DO NOT expose to direct sunlight.
Cleaning: If a cover is being used, remove it. Wipe gently with a damp cloth and a household
detergent, then wipe again with a clean, slightly damp cloth. Air dry completely before use. If a cover is
being used, replace only after the foam is completely dry.
Disinfecting: Hand wash the vinyl with water and bleach using 1 part household liquid bleach per 9
parts warm (40°C/104°F) water. Rinse thoroughly with clean water. Air dry completely before use. If a
cover is being used, replace only after the foam is completely dry.
Tru-Shape Operation Manual
8

Cleaning and Disinfecting, continued
Hardware
CAUTION: Before cleaning or disinfecting, remove the cover and the support pad from the hardware.
Cleaning: Hand wash in warm (40°C/104°F) water with soap and a sponge. Rinse with clean water
and wipe dry with a clean cloth. Dry completely before use.
Disinfecting: Wipe gently with a cloth dampened with a household disinfectant. Rinse with clean,
warm water. Wipe dry with a clean cloth. Dry completely before use.
ROHO Air Insert
WARNINGS:
- Cleaning and disinfecting are separate processes. Cleaning must precede disinfection. If the product becomes
soiled, clean, disinfect, and check the product for proper functioning.
- DO NOT allow water or cleaning solution to enter the air insert. Make sure the ination valve is closed.
- Remove the air insert from the foam base before cleaning or disinfecting.
CAUTIONS: Use of the following may cause damage to the air insert: abrasives (steel wool, scouring pads);
caustic, automatic dishwasher detergents; cleaning products that contain petroleum or organic solvents,
including acetone, toluene, Methyl Ethyl Ketone (MEK), naphtha, dry cleaning uid, adhesive remover, oil-based
lotions, lanolin; ozone gas; ultraviolet light cleaning methods. DO NOT expose to sunlight.
Cleaning: Remove the air insert from the foam base. Close the ination valve and place in a large
sink. Hand wash, using mild liquid hand soap, hand dish-washing liquid, laundry detergent, or a
multipurpose detergent (follow product label instructions). Gently scrub all surfaces, using a soft
plastic bristle brush, a sponge or a cloth. Rinse thoroughly with clean water. Let dry completely before
use.
Disinfecting: Follow the hand wash instructions, using 1 part household liquid bleach per 9
parts water. Keep the product wet with the bleach solution for 10 minutes. Rinse thoroughly
with clean water. Let dry completely before use.
Care Symbols
Wipe with a damp
cloth. Hand wash. Dry at. Line dry.
Hand wash warm. Tumble dry low. Bleach (1 part bleach: 8
parts water). Dry at in the shade.
40C
Machine wash
warm, gentle.
60C
Machine wash hot, normal, at
the temperature shown.
Bleach (1 part bleach: 9
parts water).
Tru-Shape Operation Manual
9
Maintenance
WARNING: DO NOT continue to use the seating system if any part is broken, cannot be tightened or is not
functioning properly. Periodically, the seating system should be thoroughly inspected by a qualified professional
or healthcare provider.
Weekly, inspect all components of the equipment.
Check and tighten all fasteners and adjustment points on the mounting hardware.
Inspect all materials for wear, such as stretching, fraying, fractures, and bends.
Components that show excessive wear should be replaced. For information on replacements, refer to the
“Warranty” section in this manual.

Troubleshooting
For additional assistance, contact the equipment provider or Customer Support.
Tru-Shape
The user experiences a
reaction to the odor of
the vinyl spray coating.
The user should transfer from the seating system. The seating system should be stored
in a well-ventilated area. Contact the healthcare provider.
A component is
damaged.
Contact Customer Support for a replacement.
ROHO Air Insert
The air insert is not
holding air.
Inate the air insert. Inspect the ination valve and hose for damage. Conrm that
the ination valve is completely closed. Look for holes in the air insert. If very small
holes are visible, follow the instructions in the repair kit provided with the product.
For ination valve or hose damage, or for large holes or leaks in the air insert, contact
Customer Support.
Not able to inate or
deate the air insert.
- Conrm that the ination valve is open.
- Inspect the ination valve and hose for damage.
The air insert is
uncomfortable or
unstable.
- Confirm that the air insert has the correct amount of air (See “Inflation Instructions”).
- Make sure that the air insert is correctly placed in the foam base.
- Confirm that the air insert is positioned correctly in the foam base.
After checking all of the above, allow the individual at least one hour to adjust to the air
insert.
The air insert slides in
the foam base.
Make sure the hook and loop fastener strips are lined up correctly. For correct
orientation, use the directional labels on the air insert.
A component is
damaged.
Contact Customer Support for a replacement.
Tru-Shape Operation Manual
10
Storage, Transport, Disposal and Recycling
Storage or Transport: Clean and disinfect the product. Open the ination valve. Place in a container that protects
the product from moisture, contaminants and damage. After storing or transporting, inspect the product to
ensure it was not damaged (see "Troubleshooting"), and follow instructions to prepare the product for use.
Disposal: The components of the products in this manual are associated with no known environmental hazards
when properly used and when disposed of in accordance with all local/regional regulations. At the end of its
useful life, treat as healthcare waste and dispose of according to local healthcare-waste guidelines. Incineration
must be performed by a qualied, licensed waste management facility.
Recycling: Contact a local recycling agency to determine recycling options for the product.

Tru-Shape Operation Manual
11
Warranty
Listed below are the applicable warranty periods from the original invoice date:
Tru-Shape Seat and Back: 2 years
Covers: 90 days
Hardware: 1 year
ROHO Air Insert: 2 years
Comfort Power Mount Bracket: Limited Lifetime Warranty
What is covered? Defects related to materials and workmanship.
What is not covered? Any seating system that has been misused, damaged by an accident or damage from
an “act of Nature” (e.g., ood, tornado, earthquake, re, etc.). Any substitutions of the supplied accessories or
modication to the seating system may void the warranty.
Remake Policy
Note: A remake is dened as a product that did not meet the customer’s expectations and/or did not meet the user's
needs. Anything else would be considered a warranty issue.
Within the rst 180 days of the original invoice date: If, for any reason, except for errors made by the
customer during the scanning/ordering process, the seating system outcome is not satisfactory, Permobil will
work to modify and adjust the product to remedy the deciency. If these modications and adjustments are
unsuccessful, the customer will be contacted for advisement by Permobil who will determine whether a remake
is appropriate and, if so, will initiate the Remake Request Process.
A Remake Request Form, completed by the ordering ATP is required to begin the remake process.
Any approved remake request for an improperly t product that is 6-12 months from the original invoice date
will result in a charge equal to 50% of the original invoice amount. This remake policy does not extend beyond 12
months from the original invoice date.
Return authorization must be obtained prior to returning any product. Permobil will not process any item
without a valid return authorization number.
The customer is responsible for all return shipping costs associated with any remake. If Permobil determines the
product does not need to be returned, the customer must either ll out and return a certicate of destruction to
Permobil, or the product must be returned to Permobil and the customer will be responsible for any associated
shipping costs.

FR - Tru-Shape — Mode d’emploi
12
Contenu
Utilisation prévue
Informations importantes relatives à la
sécurité — Généralités
13
Avant l’utilisation
Détails des pièces et caractéristique du
produit
14
Instructions pour les professionnels de la
santé
15
Instructions pour les utilisateurs et les
soignants
16
Installation de l’insert à air ROHO
Retrait et remise en place de l’insert à air
ROHO
17-18
Nettoyage et désinfection
Entretien
19-20
Dépannage
Entreposage, transport, élimination et
recyclage
21
Garantie 22
Coordonnées
The Comfort Companies, LLC
1960South Calhoun Road
New Berlin, WI53151 – États-Unis
États-Unis: 800-736-0925
À l’extérieur des États-Unis: 262-432-0830
Télécopieur: 406-522-8563
Service à la clientèle:
permobil.com
AVERTISSEMENT : Indique que le non-respect
de la procédure spéciée peut conduire à des
conditions potentiellement dangereuses entraînant
des blessures graves.
MISE EN GARDE : Indique que le non-respect
de la procédure spéciée peut conduire à des
conditions potentiellement dangereuses entraînant
des blessures légères à modérées, ou des
dommages à l’équipement ou à d’autres biens.
Signalement des incidents
En cas d’incident grave ou de blessure,
communiquer avec le service à la clientèle.
Glossaire des symboles
Fabricant Date de fabrication Consulter le mode d’emploi
Remarque
Fournisseur: les présentes instructions doivent être remises à l’utilisateur de ce produit.
Opérateur (individuel ou soignant): avant d’utiliser ce produit, lire les instructions et les conserver pour
référence ultérieure.
Les produits peuvent être couverts par un ou plusieurs brevets et marques de commerce américains ou
étrangers, notamment COMFORT-TEKMD, Breathe4MC,ROHOMD, STRETCH-AIRMD et Tru-ShapeMD.
ZytelMD est une marque de commerce de DuPont.
Les renseignements sur les produits sont modiés au besoin. Les renseignements mis à jour sur les produits
sont disponibles sur permobil.com.
The Comfort Companies, LLC fait partie de Permobil.
© 2019, 2021 Permobil
Rév. 18/06/2021
Merci d’avoir choisi Tru-Shape

FR - Tru-Shape — Mode d’emploi
13
Informations importantes relatives à la sécurité — Généralités
AVERTISSEMENTS :
- NE RÉUTILISEZ PAS. Ce produit est conçu pour
avoir une forme unique adaptée à son utilisateur.
Ce produit NE DOIT PAS être utilisé pour une autre
personne.
- N’utilisez PAS les composants de ce produit
séparément. Assemblez et utilisez ce produit
uniquement selon les instructions présentées dans ce
mode d’emploi.
- La modification du système d’assise ou l’utilisation
de toute quincaillerie ou de tout composant non
fournis par The Comfort Company/Permobil peut
endommager le produit et annuler la garantie.
- Suivez toutes les instructions et les consignes de
sécurité fournies avec le système d’assise ainsi que
celles fournies par le fabricant de fauteuil roulant ou
d’autres accessoires.
- Une lésion cutanée et du tissu mou peuvent avoir
lieu en raison d’un grand nombre de facteurs qui
varient d’une personne à l’autre. Vérifiez la peau
fréquemment, au moins une fois par jour. Des
rougeurs, des contusions ou des zones plus foncées
(en comparaison à une peau normale) peuvent
indiquer une blessure superficielle ou profonde
des tissus et doivent être traitées. En cas de
décoloration de la peau et des tissus mous, ARRÊTEZ
L’UTILISATION immédiatement. Si la décoloration
ne disparaît pas dans les 30 minutes après l’arrêt
de l’utilisation, consultez immédiatement un
professionnel de la santé.
- En cas d’irritation et de rougeur de la peau, consultez
le personnel qualifié qui a adapté et réglé le
produit. Ne continuez pas d’utiliser le produit sans
consultation.
- Se pencher trop en avant ou sur le côté peut
entraîner une instabilité et un basculement.
AVERTISSEMENTS (suite) :
- N’exposez PAS le produit à des températures élevées, à des
flammes nues ou à des cendres chaudes. Des déclarations
d’essai ou de certification, y compris l’inflammabilité,
peuvent ne plus s’appliquer à cet appareil lorsqu’il est
combiné à d’autres produits ou matériaux. Vérifiez les
déclarations d’essai et de certification pour tous les
produits utilisés en combinaison avec cet appareil.
- Si vous ne parvenez pas à effectuer les tâches décrites dans
ce mode d’emploi, demandez de l’aide en communiquant
avec un clinicien, un fournisseur d’équipement, un
distributeur ou le service à la clientèle.
AVERTISSEMENTS — TRANSPORT EN VÉHICULE
MOTORISÉ :
- Le fait de ne pas prêter attention à ces avertissements peut
entraîner des blessures graves pour la personne dans le
fauteuil roulant ou les autres.
- Tru-Shape de Permobil n’a pas été testé pour une utilisation
dans un véhicule motorisé.
- Sortez l’utilisateur du fauteuil roulant équipé du système
d’assise personnalisé pour l’installer dans un siège de
véhicule installé par le fabricant, et utilisez le système de
retenue des occupants du véhicule testé en cas d’accident.
- Si le système d’assise a été impliqué dans un accident
pendant le transport, consultez la section « Entretien » de
ce mode d’emploi.
MISES EN GARDE:
- Vérifiez périodiquement que la housse et les composants
ne sont pas endommagés ou usés et les remplacer au
besoin.
- Gardez le système d’assise à l’écart d’objets tranchants.
Utilisation prévue
Tru-Shape est un système d’assise personnalisé, fabriqué spécialement pour un fauteuil roulant et conçu pour
répondre aux besoins d’un utilisateur spécifique.
Tru-Shape contient une mousse d’uréthane de haute qualité profilée pour permettre à l’utilisateur d’obtenir une
surface de contact optimale et une meilleure redistribution de la pression. Tru-Shape peut être conçu comme un
système complet de siège et de dossier, ou comme siège ou dossier séparé.
Un clinicien expérimenté en assise et positionnement, conjointement avec une évaluation complète des risques et un
programme de soins, devrait déterminer si le produit est approprié aux besoins particuliers de l’individu. Il ne faut pas
uniquement se fier à la déclaration d’utilisation prévue pour faire cette détermination.
Les produits médicaux inclus dans le présent document ont pour but d’être seulement une partie d’un régime de soins
incluant tous les assises et équipements de mobilité ainsi que des interventions thérapeutiques. Un clinicien expérimenté en
assise et positionnement devrait identier ce régime de soins après avoir évalué les besoins physiques de la personne, ainsi
que son état médical général.
Un clinicien devrait aussi évaluer les handicaps visuels, cognitifs et de lecture an de déterminer la nécessité d’assistance
par un soignant ou le besoin en technologie fonctionnelle comme des instructions à gros caractères pour assurer la bonne
utilisation du produit.

FR - Tru-Shape — Mode d’emploi
14
Détails des pièces et caractéristique du produit
Contenu de l’emballage :
- Tru-Shape
- Mode d’emploi
Options de produit :
- Base de montage
- Quincaillerie de montage
- Housse amovible
- Écrous en T (¼-20 ou 10-32 mm)
- Insert à air ROHO (comprend
une pompe manuelle et une
trousse de réparation)
Remarque : Certaines options ne
sont pas incluses avec tous les
systèmes.
Dossier Tru-Shape
Siège Tru-Shape
Insert à air ROHO
(Prol médian présenté)
Trousse de
réparation
Pompe
manuelle HP45
Matériaux* :
Système d’assise : mousse d’uréthane
Revêtement en vinyle pulvérisé : revêtement à base
de vinyle à faible volatilité; fabriqué sans latex
Surface de montage : contreplaqué, plastique ABS ou
crochet et bandes autoagrippantes
Quincaillerie de montage : aluminium et/ou acier,
selon la version commandée
Insert à air ROHO : caoutchouc néoprène (sans latex);
valve de gonage en Zytel
Housse amovible en tissu : consultez les étiquettes
des produits pour connaître le contenu des matériaux
et la conformité aux exigences d’inammabilité.
* Le produit est fabriqué sur commande. Les matériaux
varieront.
Housses compatibles avec Tru-Shape :
Non offertes sur tous les marchés. Communiquez avec le
service à la clientèle.
- Housse COMFORT-TEK
- Housse STRETCH-AIR
- Housse en néoprène
- Housse en tissu Spacer
- Housse Breathe 4
Durée de vie prévue du produit : 5 ans
Avant l’utilisation
Le système d’assise sur mesure présenté dans ce document a pour but d’être seulement une partie d’un régime
de soins global, incluant tous les équipements d’assise et de mobilité, et les interventions thérapeutiques.
Ce produit ne peut être choisi et adapté que par un personnel qualié et formé. Le personnel qualié est chargé
de s’assurer que l’utilisateur et le soignant ont compris le réglage, l’utilisation, la maintenance et l’entretien
appropriés du système d’assise. Discutez avec le soignant du fonctionnement quotidien, de l’entretien préventif
et de tous les renseignements et instructions de sécurité du fabricant.
Permobil ne peut être tenu responsable des dommages ou des blessures causés par la mauvaise utilisation du
produit ou le non-respect des instructions fournies dans ce mode d’emploi. Veuillez communiquer avec nous si
vous nécessitez une aide pour la compréhension des mises en garde, des avertissements, ou des instructions
d’utilisation ou d’entretien du produit.

FR - Tru-Shape — Mode d’emploi
15
Instructions pour les professionnels de la santé
Informations importantes relatives à la sécurité
IMPORTANT! Consultez également les avertissements de la section « Renseignements importants sur la sécurité —
Généralités » de ce mode d’emploi.
AVERTISSEMENTS :
- Le personnel qualifié est responsable du positionnement
individuel et du montage du système d’assise sur le fauteuil
roulant.
- Suivez toutes les instructions du fabricant pour l’application
et le réglage corrects des dispositifs de positionnement et
de soutien, afin d’empêcher l’utilisateur de glisser dans une
position dangereuse.
- Lors du montage d’un système d’assise sur le fauteuil
roulant, veillez à ce que l’utilisateur ne soit pas assis
dedans. Suivez toutes les instructions du fabricant
concernant la fixation au fauteuil roulant. Une fois fixé, tirez
fermement sur le système d’assise pour confirmer qu’il
est correctement fixé et entièrement sécurisé avant que
l’utilisateur ne s’y installe.
- Après avoir installé une assise dans un fauteuil roulant,
vérifiez toujours que la position assise de l’utilisateur
et le centre de gravité du fauteuil roulant sont adaptés
à l’utilisation prévue et aux capacités de l’utilisateur.
Communiquez avec l’utilisateur pour trouver la position
assise optimale.
- Pendant les premières heures d’utilisation, un professionnel
de la santé doit être présent pour observer l’état de la peau
et évaluer la probabilité d’une lésion cutanée. Pendant
cette période d’introduction, augmentez progressivement
le temps passé dans le système d’assise et vérifiez
régulièrement que la peau ne présente pas de signes de
marquage ou d’abrasion. Il n’est pas rare de constater un
certain marquage avec un nouveau siège, car l’utilisateur
peut être en contact avec une zone qui n’était pas soutenue
auparavant. Une surveillance attentive est nécessaire
au cours des premières semaines pour s’assurer que
l’utilisateur s’adapte à la nouvelle forme d’assise.
AVERTISSEMENTS (suite) :
- Pour les systèmes de siège avec revêtement en vinyle
pulvérisé, des substances volatiles résiduelles peuvent
s’accumuler dans l’emballage pendant l’expédition. Il est
recommandé de retirer le produit de son emballage et
de le laisser s’aérer dans une pièce bien ventilée pendant
24 heures avant que l’utilisateur commence à utiliser le
système d’assise. Dans les rares cas où l’utilisateur montre
une sensibilité particulière à l’odeur résiduelle du revêtement
en vinyle pulvérisé, il ne doit pas utiliser le système de
siège; communiquez avec le fabricant pour trouver d’autres
solutions.
- Assurez-vous que l’équipement est solidement installé
à un système de fauteuil roulant et qu’il est correctement
réglé. Vérifiez l’usure, la rupture et le serrage de la
quincaillerie. Resserrez les vis ou boulons desserrés.
Ne continuez PAS d’utiliser le système d’assise si une
pièce est cassée, ne peut être serrée ou ne fonctionne pas
correctement.
- Après avoir effectué tous les réglages et vérifié la stabilité
du fauteuil roulant, veillez à ce que toutes les vis des
éléments de fixation soient bien serrées avec un quart de
tour supplémentaire. Ne serrez pas trop les vis pour éviter
d’endommager les composants.
- Pour les options en mousse uniquement, veillez
à monter les raccords à vis à une certaine distance du corps
afin d’éviter tout risque de blessure pour l’utilisateur par des
vis saillantes.
- Toute combinaison du système d’assise avec des options ou
des pièces supplémentaires non approuvées, surtout des
fauteuils roulants et des cadres de siège provenant d’autres
fabricants que Permobil, est la responsabilité du spécialiste/
revendeur/combinateur et doit être testée par eux.
Préparation à l’utilisation
1Si une housse est utilisée, placez-la sur le système
d’assise sur mesure.
2Installez tous les éléments de positionnement pour qu’ils
correspondent aux besoins de l’utilisateur. Suivez les
instructions et les avertissements du fabricant pour tous
les appareils. Remettez le mode d’emploi à l’utilisateur et
au soignant après l’installation.
3Vériez toutes les xations pour conrmer qu’elles ne
sont pas desserrées et qu’il n’y a pas de bords ou de
points saillants qui pourraient entrer en contact avec
l’utilisateur. Toutes les vis des éléments d’installation
doivent être serrées jusqu’à ce qu’elles soient bien
serrées avec un quart de tour supplémentaire.
4Suivez les instructions et les avertissements du fabricant
du fauteuil roulant lors de l’installation du système
d’assise dans le fauteuil roulant.
5Apprenez à l’utilisateur et/ou au soignant l’utilisation
correcte du système d’assise.
Positionnement de l’utilisateur dans le système d’assise
1Assurez-vous que le système d’assise est bien xé au
fauteuil roulant.
2Assurez-vous que les roues se verrouillent et que le
dispositif antibascule est activé sur le fauteuil roulant.
IMPORTANT! Si l’insert à air ROHO est inclus dans le système
d’assise, consultez également dans ce mode d’emploi les
instructions d’installation de l’insert à air avant de le transférer
sur le système d’assise.
3Transférez avec précaution l’utilisateur vers le système
d’assise.
4Laissez l’utilisateur s’asseoir dans le système d’assise
pendant environ une heure. Utilisez votre jugement
clinique s’il semble anxieux ou agité.
5Élaborez, en collaboration avec le soignant, un calendrier
approprié permettant à l’utilisateur de s’adapter au
système d’assise. Commencez par plusieurs périodes
courtes d’utilisation et augmentez progressivement la
durée lorsqu’aucun eet indésirable n’est constaté.

FR - Tru-Shape — Mode d’emploi
16
Instructions pour les utilisateurs et les soignants
Informations importantes relatives à la sécurité
IMPORTANT! Consultez également les avertissements de la section « Renseignements importants sur la sécurité
— Généralités » de ce mode d’emploi.
AVERTISSEMENTS :
- N’utilisez PAS le système d’assise sauf s’il est réglé
par une personne qualiée ou expérimentée.
- Avant l’utilisation à long terme du système d’assise,
et pendant les premières semaines, l’utilisateur
doit s’asseoir pendant des périodes plus courtes et
UNIQUEMENT sous surveillance. Pendant la séance
d’introduction, surveillez attentivement la peau de
l’utilisateur pendant son adaptation à la nouvelle
forme et au nouveau positionnement.
- Consultez immédiatement une personne qualiée
si l’utilisateur n’est pas confortablement assis ou
a peur pendant l’utilisation du système d’assise.
- Les matériaux supplémentaires placés sur le
système d’assise peuvent réduire l’ecacité du
produit et augmenter les risques d’instabilité et de
lésion cutanée.
- L’installation de pièces alternatives sur un fauteuil
roulant peut modier la structure et la fonction
prévues de l’équipement. Consultez votre
professionnel de la santé pour évaluer la nécessité
de fonctionnalités de sécurité supplémentaires
pour le fauteuil roulant, telles que des barres
antibascule ou d’autres options an de maintenir
la stabilité pendant l’utilisation, et en particulier
pendant les transferts, notamment l’utilisation d’un
lève-personne. Utilisez ce manuel conjointement
avec le mode d’emploi livré avec le fauteuil roulant
pour s’assurer que les consignes de sécurité sont
respectées.
AVERTISSEMENTS (suite) :
- Dans les rares cas où l’utilisateur montre une
sensibilité particulière à l’odeur résiduelle du
revêtement en vinyle pulvérisé, il ne doit pas utiliser le
système d’assise; communiquez avec le professionnel
de la santé.
- Assurez-vous que le système d’assise est xé de façon
sécuritaire sur le fauteuil roulant et qu’il est réglé
correctement chaque fois qu’il est utilisé. Vériez
chaque semaine l’usure, la cassure et le serrage
de la quincaillerie. Resserrez les vis des éléments
d’installation jusqu’à ce qu’elles soient bien serrées
avec un quart de tour supplémentaire.
- Vériez chaque semaine que le système d’assise et ses
composants ne sont pas endommagés et remplacez-
les au besoin.
- Ne continuez PAS d’utiliser le système d’assise si une
pièce est cassée, ne peut être serrée ou ne fonctionne
pas correctement. Le système d’assise doit être
inspecté périodiquement de manière approfondie par
un professionnel qualié ou un professionnel de la
santé.
- NE modiez PAS ce produit. Cela entraîne l’annulation
de la garantie et peut conduire à des blessures
corporelles ou modier l’ecacité du produit en
augmentant les risques d’instabilité et de lésion
cutanée.
- Utilisez une housse sur le système d’assise pour
les personnes ayant un comportement dicile qui
pourrait mener à l’arrachement et l’ingestion de
morceaux provenant du système d’assise.
- Utilisez une housse résistante aux liquides si le
système d’assise est susceptible d’entrer en contact
avec du liquide.
Instructions Tru-Shape : lire avant utilisation
AVERTISSEMENT — AVANT UTILISATION : Si le système d’assise comprend un insert à air ROHO, suivez les
instructions d’installation de l’insert à air présentées dans ce mode d’emploi.
Vériez avant chaque utilisation le fonctionnement du système d’assise, en particulier la xation du système
d’assise sur le fauteuil roulant.
Vériez chaque semaine s’il y a des dommages et notez les signes d’usure sur les coutures, les rembourrages, les
sangles et les matériaux de xation. Communiquez avec le service à la clientèle pour commander des pièces de
rechange ou pour obtenir des renseignements sur la garantie.
Identiez tous les accessoires inclus avec le système d’assise et assurez-vous de comprendre leur réglage. Si vous
n’êtes pas sûr d’un aspect quelconque du système d’assise, communiquez avec le professionnel de la santé.

FR - Tru-Shape — Mode d’emploi
17
Installation de l’insert à air ROHO
Remarque: Lisez ces AVERTISSEMENTS et suivez les instructions de la page suivante si un insert à air ROHO est inclus
avec le produit.
Informations importantes relatives à la sécurité
AVERTISSEMENTS :
- L’insert à air DOIT être correctement installé dans la
base en mousse.
- N’utilisez pas un insert à air sous-gonflé ou surgonflé,
car 1) les avantages du produit seront réduits ou
éliminés, entraînant un risque accru pour la peau et
les autres tissus mous, et 2) la personne peut perdre
sa stabilité et tomber. Suivez attentivement les
instructions pour le gonflage et le contrôle manuel.
- Après avoir installé l’insert à air pour la première
fois, vérifiez fréquemment le gonflage, au moins une
fois par jour. Suivez les instructions de vérification
manuelle présentées dans ce mode d’emploi.
- N’utilisez PAS l’insert à air au-dessus d’autres produits
ou matériaux ou conjointement avec eux, sauf tel
qu’indiqué dans ce mode d’emploi. L’utilisation de
produits ou de matériaux non compatibles, que ce
soit à l’intérieur ou à l’extérieur de la housse : 1) peut
réduire ou éliminer les avantages de l’insert à air,
augmentant ainsi le risque pour la peau ou d’autres
tissus mous, et 2) la personne peut perdre sa stabilité
et tomber.
- Ne placez AUCUNE obstruction entre la personne et
l’insert à air. Les composants et la housse DOIVENT
être de tailles compatibles et DOIVENT être utilisés
comme indiqué dans ce manuel. À l’exception des
housses compatibles énumérées dans la section
« Caractéristiques du produit » de ce manuel, le
placement de tout article entre la personne et l’insert
à air : 1) peut réduire ou éliminer les avantages du
produit, augmentant ainsi le risque pour la peau ou
d’autres tissus mous, et 2) la personne peut perdre sa
stabilité et tomber.
AVERTISSEMENTS (suite) :
- Si l’insert à air ne semble pas retenir l’air, ou si vous
ne pouvez pas le gonfler ou le dégonfler, consultez
la section « Dépannage ». Si le problème persiste,
veuillez communiquer immédiatement avec le
fournisseur de l’équipement ou le service à la clientèle.
- N’utilisez PAS cet insert à air comme un dispositif de
flottaison sur l’eau (p. ex. comme gilet de sauvetage).
Il ne vous soutiendra PAS dans l’eau.
- Les surfaces de l’insert à air s’ajusteront à la
température ambiante. Prenez des précautions
appropriées, surtout lorsque les cellules de l’insert
à air touchent directement la peau.
MISES EN GARDE :
- Vérifiez périodiquement que l’insert à air n’est pas
endommagé et usé, et remplacez-le au besoin.
- N’utilisez PAS d’autres pompes, housses ou trousses
de réparation que celles compatibles avec le produit.
- Ne laissez PAS l’insert à air entrer en contact avec des
lotions à base d’huile ou de la lanoline. Ces produits
peuvent détériorer le matériau.
- Une exposition prolongée à l’ozone peut détériorer
le matériau utilisé dans l’insert à air, modifier ses
performances ou annuler la garantie du produit.
- Des changements d’altitude peuvent nécessiter
le réglage de l’insert à air.
- N’exposez PAS l’insert à air à des températures
supérieures à 70 °C (158 °F), car cela pourrait
endommager ses composants.
- Si l’insert à air a été exposé à des températures
inférieures à 0 °C (32 °F) et présente une rigidité
inhabituelle, laissez-le se réchauffer à la température
de la pièce.
Suivez les instructions pour l’installation de l’insert à air à la page suivante.

FR - Tru-Shape — Mode d’emploi
18
Installation de l’insert à air ROHO, suite
Remarque : Avant de suivre ces instructions, consultez les consignes de sécurité se trouvant à la page précédente.
Consultez également les instructions de ce mode d’emploi pour le retrait ou le remplacement de l’insert à air.
1Gonage de l’insert à air :
Suggestion : transférez l’insert à air avant de le goner.
a. Pour accéder à la valve de gonage, retirez ou déplacez la housse (le cas
échéant).
b. Glissez l’embout de la pompe à main par-dessus de la valve de gonage.
Ouvrez la valve de gonage en eectuant au moins une rotation complète.
c. Gonez jusqu’à ce que toutes les cellules d’air soient fermes.
d. Fermez complètement la valve de gonage. Retirez la pompe à main.
Assurez-vous que la valve de gonage est fermée.
Remarque : Pour ouvrir, tournez la valve de gonage d’au moins un tour complet.
La valve de gonage tourne librement lorsqu’elle est ouverte.
Fermée
Ouverte
2Transfert — Avertissements :
- Avant le transfert de l’utilisateur vers le produit, l’insert à air doit être installé de façon sécuritaire sur
la surface du siège Tru-Shape. Une housse, le cas échéant, doit être correctement installée.
- Avant d’eectuer une vérication manuelle, l’utilisateur doit s’installer sur le produit dans sa position
assise habituelle.
3Vérication manuelle :
Lors d’une vérication manuelle, utilisez la largeur des doigts pour voir si
les cellules d’air sont correctement gonées*. Lorsque les cellules d’air sont
correctement gonées, l’utilisateur est à la fois immergé dans les cellules d’air
et soutenu par elles.
a. Glissez la main entre les cellules d’air et l’utilisateur et trouvez les
proéminences osseuses les plus basses de l’utilisateur**.
b. Reportez-vous au guide de vérication manuelle ci-dessous pour régler l’insert
à air.
**Suggestion: Pour aider à localiser les proéminences osseuses lors d’une vérication
manuelle, soulevez et abaissez la jambe.
* La distance
recommandée entre
la proéminence osseuse
la plus basse et la
surface du siège est de
1,5 à 2,5cm (½ à 1po).
Retrait et remise en place de l’insert à air ROHO
Pour retirer l’insert à air:
1Si une housse est utilisée, retirez-la du système d’assise.
2Tirez délicatement le tube de gonage à travers le trou, situé à l’arrière de la base en mousse.
3Retirez l’insert à air de la base en mousse.
Pour remettre en place l’insert à air :
1Alignez les bandes de xation autogrippante et reportez-vous aux étiquettes directionnelles pour placer
correctement l’insert à air dans la base en mousse. Appuyez pour xer de façon sécuritaire.
2Insérez le tube de gonage dans le trou situé à l’arrière de la base en mousse.
3Vériez le gonage. Si un ajustement est nécessaire, suivez les instructions d’installation de l’insert à air.
4Si une housse est utilisée, remettez-la sur le système d’assise.
Guide de vérication manuelle
Placez une main sous les
proéminences osseuses les plus
basses et assurez-vous qu’il y a au
moins 1,5cm (½po) d’air.
Si les cellules d’air ne sont pas
correctement gonflées, ajoutez
ou retirez une petite quantité
d’air. Répétez l’opération jusqu’à
ce que les cellules d’air soient
correctement gonflées.
Sous-gonflage Surgonflage Gonflage correct
1,5 à 2,5cm (½ à 1po)
Table of contents
Languages:
Other Permobil Personal Care Product manuals

Permobil
Permobil COMFORT ACTA-BACK User manual

Permobil
Permobil ROHO DRY FLOATATION Mattress Overlay User manual

Permobil
Permobil ROHO Hybrid Select User manual

Permobil
Permobil ROHO AGILITY User manual

Permobil
Permobil VISCO BACK User manual

Permobil
Permobil ROHO Hybrid Elite User manual

Permobil
Permobil ROHO LTV User manual