manuals.online logo
Brands
  1. Home
  2. •
  3. Brands
  4. •
  5. Phoenix
  6. •
  7. Lock
  8. •
  9. Phoenix R3 User manual

Phoenix R3 User manual

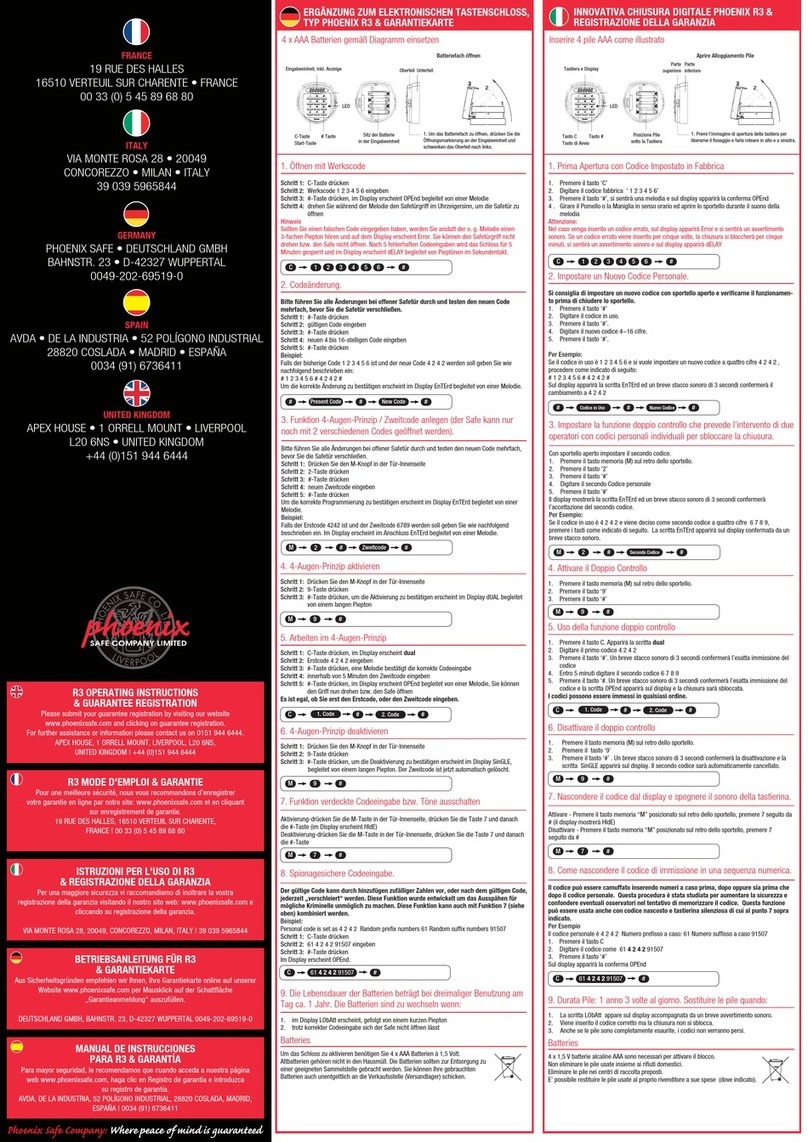
Advanced Phoenix Digital Lock R3
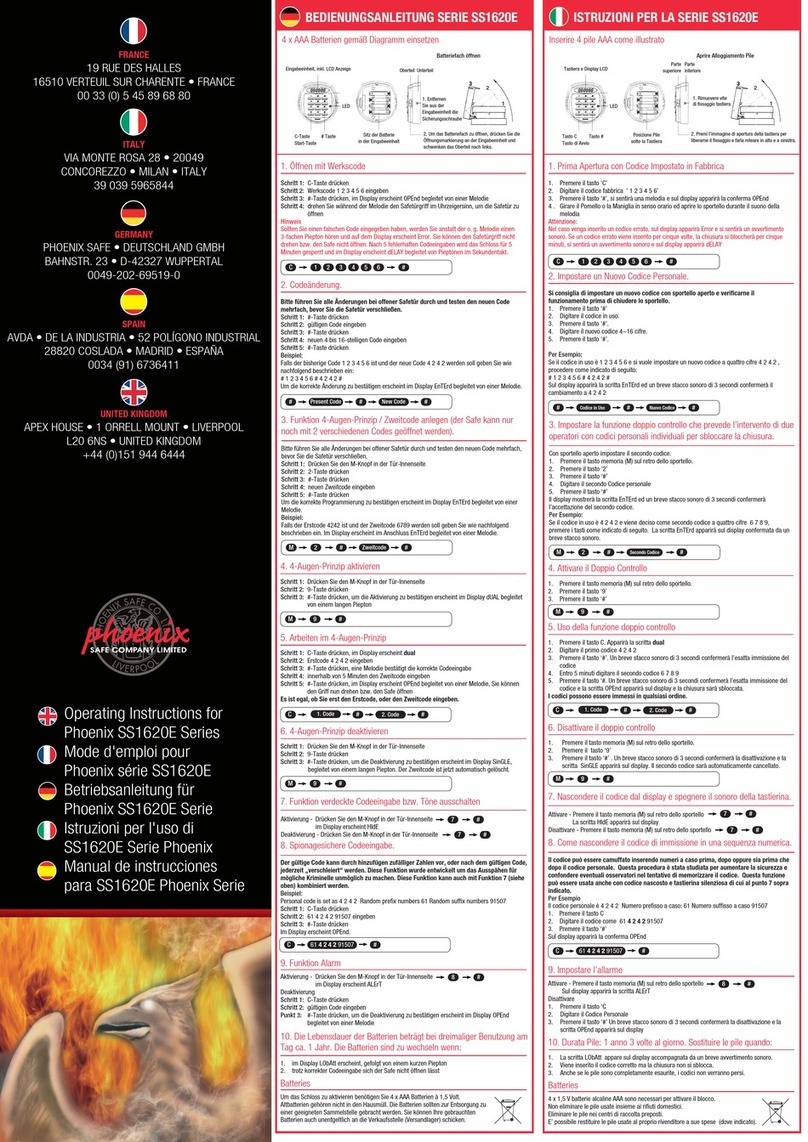
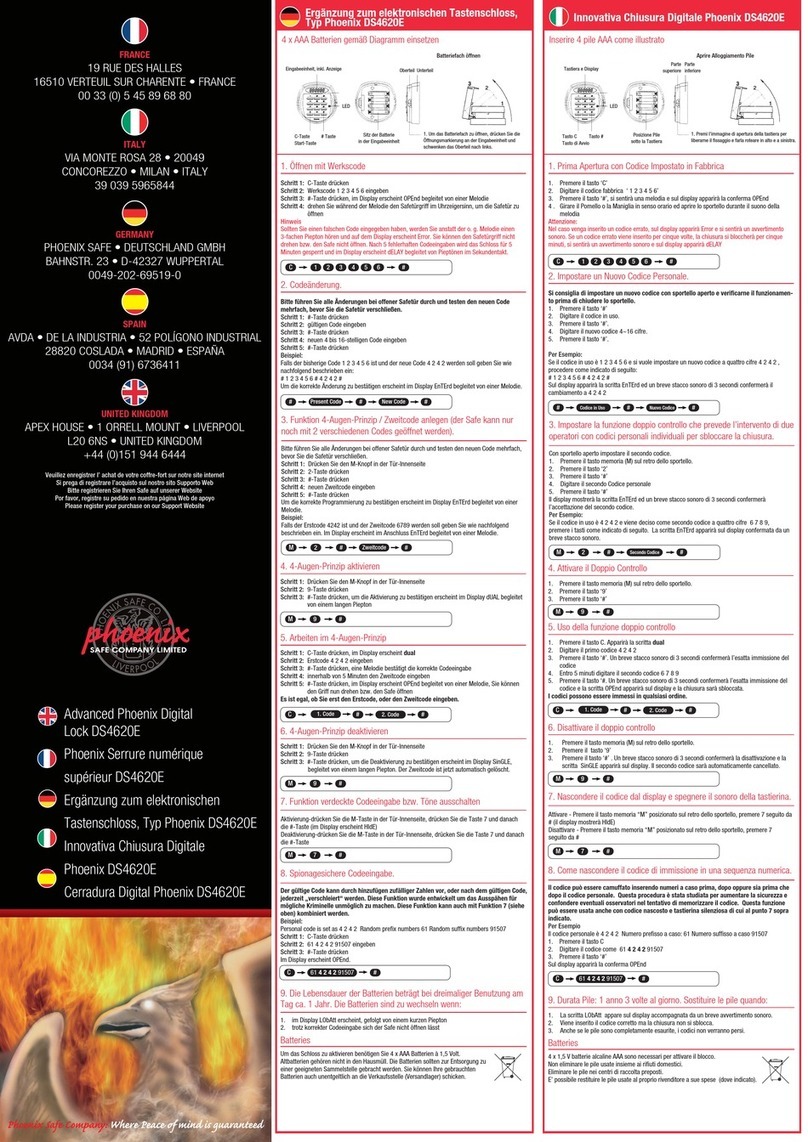
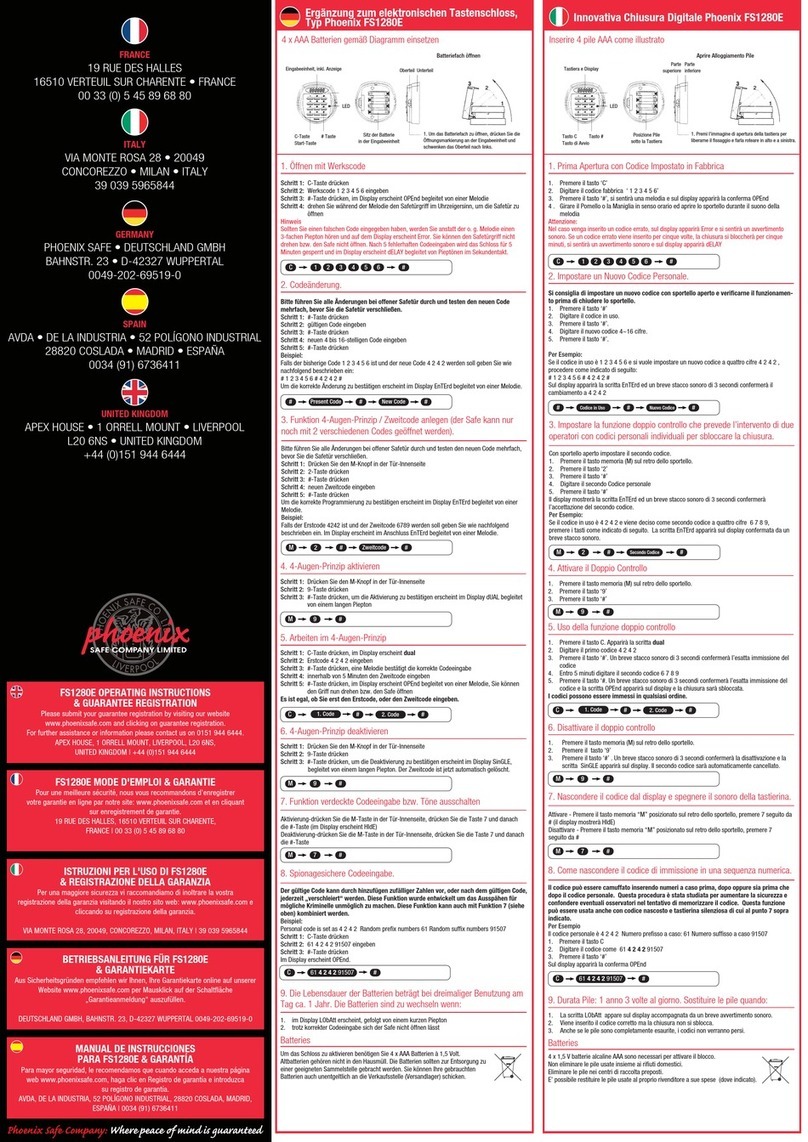
1. First Opening on Factory Default Code
Step 1 Press ‘C’ button
Step 2 Press factory code ‘ 1 2 3 4 5 6’
Step 3 Press ‘#’ button, a melodic tone will sound and the display confirms
OPEnd
Step 4 Turn Knob or Handle clockwise and open the door while the tone is
sounding
Caution
If an incorrect code is entered, Error will appear in the display panel and a
short warning tone will sound.
If an incorrect code is entered five times the lock will cease to operate for
five minutes, a warning tone will sound and the display will indicate dELAY
3. Setting the dual control function where two operators with
individual personal codes are required to open the lock.
With the door in the open position set the second code.
Step 1 Press the “M” memory button recessed into the back of the door.
Step 2 Press ‘2’ button
Step 3 Press ‘#’ button
Step 4 Enter 2nd Personal code
Step 5 Press ‘#’ button
EnTErd will be indicated in the display and a short 3 second tone will sound,
to confirm the 2nd code entry.
For Example:
If the present code is 4 2 4 2 and a second new four digit code is decided
as 6 7 8 9 press buttons as below. EnTErd will appear in the display
accompanied by a short tone to confirm M 2 # 6 7 8 9 #
4. To Activate Dual Control
Step 1 Press the “M” memory button recessed into the back of the door.
Step 2 Press ‘9’ button
Step 3 Press ‘#’ button
2. Setting a New Personal Code.
It is advisable to set a new code with the door open and test the new
code before closing the door.
Step 1 Press ‘#’ button
Step 2 Enter the Present Code.
Step 3 Press ‘#’ button.
Step 4 Enter New 4~16 digit Code.
Step 5 Press ‘# button.
For Example:
If the present code is 1 2 3 4 5 6 and a new four digit code is decided as
4 2 4 2 press buttons as below.
# 1 2 3 4 5 6 # 4 2 4 2 #
EnTErd will be indicated in the display and a short 3 second tone will sound
to confirm the change to 4 2 4 2
5. To operate with the dual control function
Step 1 Press C button dual will appear in the display.
Step 2 Enter the first code 4 2 4 2
Step 3 Press ‘#’ button. a short 3 second tone will sound to confirm correct
code
Step 4 Within 5 minutes enter the second code 6 7 8 9
Step 5 Press ‘# button. a short 3 second tone will sound to confirm correct
code and OPEnd will appear in the display and the lock will be open.
Either code can be entered first or second.
C 1 2 3 4 5 6 #
# # #
Present Code New Code
M # #
2nd Code
2
Keypad and LCD Display Window
Battery Position
under Keypad
C Button
Start Button
# Button 2. Press the keypad opening mark, to release the
retaining arm and swing the keypad up and left,
to open.
Upper
part
Lower
part
LED
1. Remove keypad
retaining screw
Battery Installation – 4 x LR03 AAA Alkaline (supplied)
Opening Battery Compartment
Advanced Phoenix Digital Lock R3
6. To deactivate dual control
Step 1 Press the “M” memory button recessed into the back of the door.
Step 2 Press ‘9’ button
Step 3 Press ‘#’ button a short 3 second tone will sound to confirm
deactivation and SinGLE will appear in the display. The second code
will be automatically erased.
7. To hide code in the display and turnoff keypad sound.
Activate - Press the “M” memory button recessed into the back of
the door (HIdE appears in the display)
Deactivate - Press the “M” memory button recessed into the back of
the door
8. To hide code entry in a number sequence.
The code can be disguised by inserting random numbers either before,
after or both before and after, the personal code. This procedure is
designed to increase security and to confuse a potential observer
attempting to memorise the code. This feature can be also be used with
hidden code display and silent keypad as at 7 above.
For Example
Personal code is set as 4 2 4 2 Random prefix numbers 61 Random suffix
numbers 91507
Step 1 Press C button
Step 2 Enter Code as 61 424291507
Step 3 Press ‘#’ button
The display will confirm OPEnd
9. Alarm setting
Activate - Press the “M” memory button recessed into the back of
the door (ALErT appears in the display)
Deactivate
Step 1 Press ‘C button
Step 2 Enter Personal Code
Step 3 Press ‘#’ button a short 3 second tone will sound to confirm
deactivation and OPEnd will appear in the display
10. Battery Life: 1 year 3 times a day. Battery replacement
is required when:
1) LObAtt appears in display accompanied by a short one second warning
tone.
2) Correct code is entered but lock will not open.
3) Even if batteries are completely exhausted, the codes are not lost.
#7
Batteries
4 x 1.5 V AAA Alkaline Batteries are required to activate the lock.
Used batteries should not be disposed of with normal domestic
waste. These should be disposed of at approved collection points.
You may also return used batteries to your Retailer at their expense (where
applicable).
#8
#7

Other Phoenix Lock manuals

Phoenix SS1620E Series User manual

Phoenix

Phoenix SS1620E Series User manual

Phoenix FS1510E Series User manual

Phoenix

Phoenix FS1510E Series User manual

Phoenix SELO-A User manual

Phoenix

Phoenix SELO-A User manual

Phoenix R3 User manual

Phoenix

Phoenix R3 User manual

Phoenix Titan Aqua FS1290 Series User manual

Phoenix

Phoenix Titan Aqua FS1290 Series User manual

Phoenix SELO-B User manual

Phoenix

Phoenix SELO-B User manual

Phoenix FS0440E Series User manual

Phoenix

Phoenix FS0440E Series User manual

Phoenix FS1510E User manual

Phoenix

Phoenix FS1510E User manual

Phoenix PS310 User manual

Phoenix

Phoenix PS310 User manual

Phoenix FS1280E User manual

Phoenix

Phoenix FS1280E User manual

Phoenix DS2500E Series User manual

Phoenix

Phoenix DS2500E Series User manual

Phoenix FS 2250E User manual

Phoenix

Phoenix FS 2250E User manual

Phoenix FS1300 Product information sheet

Phoenix

Phoenix FS1300 Product information sheet

Phoenix FS1900E Series User manual

Phoenix

Phoenix FS1900E Series User manual

Phoenix FS1290 Series User manual

Phoenix

Phoenix FS1290 Series User manual

Phoenix FS0352C Product information sheet

Phoenix

Phoenix FS0352C Product information sheet

Phoenix DS4620E User manual

Phoenix

Phoenix DS4620E User manual

Phoenix Solar User manual

Phoenix

Phoenix Solar User manual

Phoenix SS1180 User manual

Phoenix

Phoenix SS1180 User manual

Phoenix SS0990E Series User manual

Phoenix

Phoenix SS0990E Series User manual

Phoenix PS210 User manual

Phoenix

Phoenix PS210 User manual

Phoenix KS0002C Series User manual

Phoenix

Phoenix KS0002C Series User manual

Popular Lock manuals by other brands

hd EZ lock Universal HDMI Quick start installation guide

hd EZ lock

hd EZ lock Universal HDMI Quick start installation guide

ROFU 2400 Kit installation instructions

ROFU

ROFU 2400 Kit installation instructions

LOCKEY E-DIGITAL user manual

LOCKEY

LOCKEY E-DIGITAL user manual

nedis LOCKBTB10xx quick start guide

nedis

nedis LOCKBTB10xx quick start guide

Steren SEG-010 user manual

Steren

Steren SEG-010 user manual

COMPX MFW 29078 Dimensional drawing

COMPX

COMPX MFW 29078 Dimensional drawing

Ross 1000 Series operating instructions

Ross

Ross 1000 Series operating instructions

SECO-LARM E-941SA-600 manual

SECO-LARM

SECO-LARM E-941SA-600 manual

Rottner PS310/E01 instructions

Rottner

Rottner PS310/E01 instructions

Ossur Icelock lanyard 631 Instructions for use

Ossur

Ossur Icelock lanyard 631 Instructions for use

Kiramek SL30H manual

Kiramek

Kiramek SL30H manual

National Cabinet Lock C8075 Dimensional drawing

National Cabinet Lock

National Cabinet Lock C8075 Dimensional drawing

Edwards Signaling 1509 Series installation instructions

Edwards Signaling

Edwards Signaling 1509 Series installation instructions

Ideal Security Decibel Ultra HD SL3001 quick start guide

Ideal Security

Ideal Security Decibel Ultra HD SL3001 quick start guide

Igloohome Smart Mortise Installer/user guide

Igloohome

Igloohome Smart Mortise Installer/user guide

Dorma Duo OFFICE 712 installation manual

Dorma

Dorma Duo OFFICE 712 installation manual

Tilvision QL-G001 manual

Tilvision

Tilvision QL-G001 manual

Targus DEFCON TL manual

Targus

Targus DEFCON TL manual

manuals.online logo
manuals.online logoBrands
  • About & Mission
  • Contact us
  • Privacy Policy
  • Terms and Conditions

Copyright 2025 Manuals.Online. All Rights Reserved.