Picberm PB2312 User manual

User Manual
of
Picberm Centrifugal Juicer
PB2312
Printing Version: M

Contents
Chapter I. Precautions for Safe Operation................1
Chapter II. Parts and Functions.................................4
Chapter III. Method of Operation.............................6
Chapter IV. How to Assemble...................................6
Chapter V. Tips for Ingredients Selection..................9
Chapter VI. Maintenance and Preservation..............12
Chapter VII. Trouble Shooting.................................14
Chapter VIII. Applicable Standard...........................15

Read the instructions below carefully before use.
Before using the Juicer, please check the consistency between actual
voltage with its rated voltage (110-130V~/60Hz).
Appliances can be used by persons with reduced physical, sensory or
mental capabilities or lack of experience and knowledge if they have
been given supervision or instruction concerning use of the appliance
in a safe way and if they understand the hazards involved.
Children shall not play with the appliance.
Warning: Potential injury from misuse. Care shall be taken when
handling the sharp cutting blades, emptying the bowl and during
cleaning.
This appliance shall not be used by children. Keep the appliance and
its cord out of reach of children.
If the supply cord is damaged, it must be replaced by the manufacturer,
its service agent or similarly qualified persons in order to avoid a
hazard.
Always disconnect the appliance from the supply if it is left
unattended and before assembling, disassembling or cleaning.
This appliance is intended for household use and similar applications,
such as the following:
1
Chapter I. Precautions for Safe Operation

- staff kitchen areas in shops, offices and other working
environments;
- farm houses;
- by clients in hotels, motels and other residential-type environments;
- breakfast-type environments.
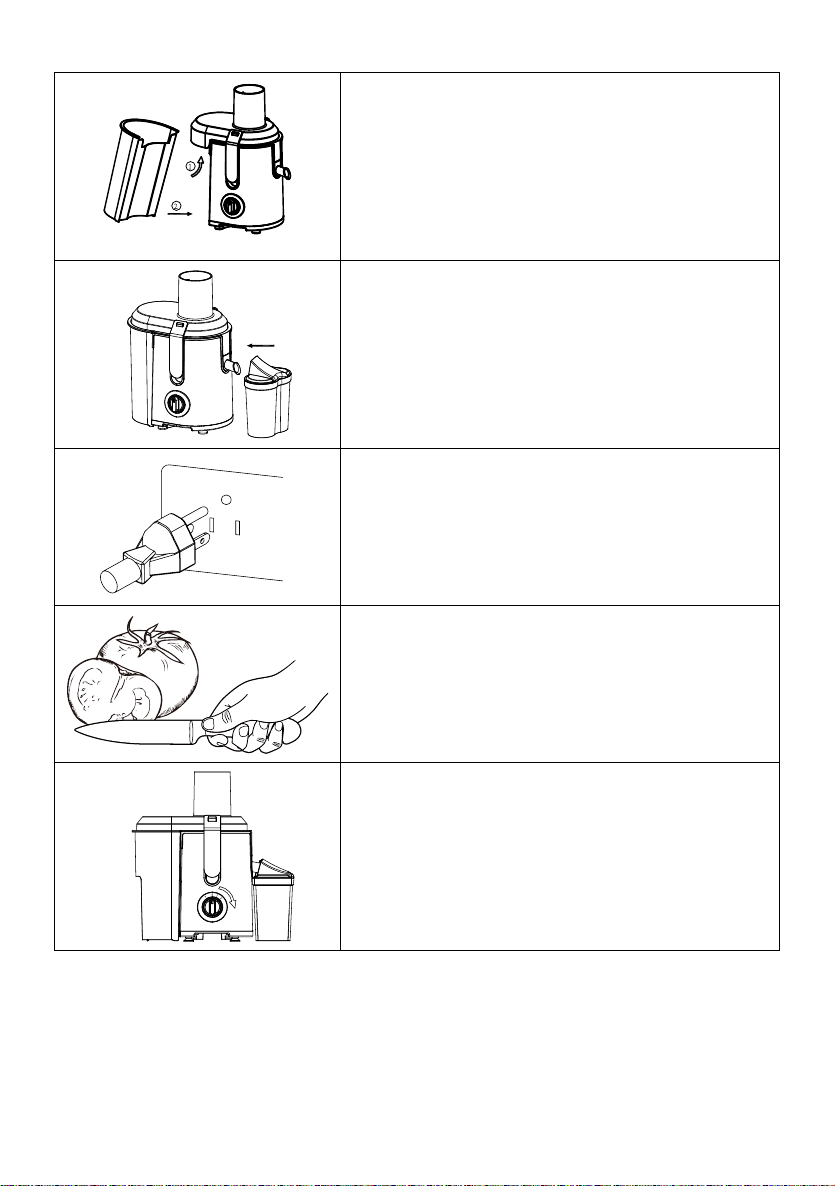
Before power on, please ensure that detachable parts, such as juicing
sieve and top cap, are put in place and fully fastened; if juicing sieve
is damaged, please stop using the Juicer.
During operating, do not put hand or sharp object into feed inlet. It is
strictly prohibited to use any other thing as a pusher. Keep your eyes
away from the feed inlet in case of accidents.
During operating, do not touch parts such as juicing sieve and motor
wheel with operator’s body or other hard foreign matters in case of
injury or damage to the Juicer.
When using and completing juicing, please ensure that the motor
stops running and power is cut before removing its detachable parts.
Fruits and vegetables shall have pits, hard seeds, thick skin or hard
cores removed before processing.
It is strictly prohibited to sterilize all accessories with hot water
beyond 80℃ or to microwave in case of thermal deformation and
damage.
2

Do not directly put the Juicer body into water or flush it with water in
case of failure. Before wiping the Juicer body, power must be
disconnected.
Do not clean the Juicer with steel wool, abrasive cleaners or corrosive
liquid (e.g., gasoline, acetone).
Please operate it in strict accordance with rated working time: time of
continuous working shall not exceed 1 min; each cycle must be
stopped for 2 mins after completing functions; it must be stopped for
15-20 min after continuously working 3 cycles, and then restarted
after motor has cooled. This method is helpful to extend its lifetime.
Non-professionals are not allowed to randomly remove its detachable
parts as it may cause electric shock; if the Juicer fails, please send it to
a specified maintenance station for service.
Upon completion, please disconnect the power cord. If damaged, the
power cord must be replaced by a professional from the manufacturer,
its maintenance department or a similar department to prevent any
danger.
This Juicer is for household use only. It is inadvisable to use it for
commercial purposes.
FOR FOOD CONTACT USE
3

No.
Part Name
Description and Function
1Pusher
When putting the ingredients in it, tenderly
pushes and presses the ingredients to ensure full
contact with juicing sieve so as to improve
juicing efficiency.
4
Chapter II. Parts and Functions

2 Top cap
Connects with the body. Exists as a major part of
the juicing process and serves as a safety
protection.
3 Juicing sieve
Cuts the ingredients with cutter on its bottom,
filters juice and separates pomace with side
sieve.
4
Center ring
Gets and exports juice separated by juicing sieve.
5
Juice outlet
Fruit juice comes out from it through center ring.
6 Motor wheel
Used to connect juicing sieve to make the sieve
realize self-centering for easy pick and place.
7
Cup Lid
Filters fruit juice bubble and guard against dust.
8 Juice cup
Gets and collects fruit juice separated by juicing
sieve.
9 Main body
Major part of the Juicer, with internal motor and
other parts.
10 Clamp
Controls connection between top cap and the
body.
11 Rotary
switch
Controls the Juicer's working status: pulse (P),
stop (0), low-speed gear (1)and high-speed gear
(2).
12 Power cord Connects power source (110-130V~/60Hz)
13
Pomace
container
Gets and collects pomace separated by juicing
sieve.
14 Microswitch
(Safety
switch)
Safety protection so power source won’t get
though when th
e microswitch isn’t depressed by
the top cap. This means the juicer won’t work if
it hasn’t been assembled tightly.
5

Before initial use of the Juicer, please thoroughly clean the parts in contact
with the ingredients.
Rotary Switch Operation Overview
Position“P”: Rapid and momentary rotation.
Position “0”: Close and shut off.
Position“1”: Low-speed gear, applied to
process soft fruits and vegetables, such as
orange, tomato, cucumber, strawberry.
Position“2”: High-speed gear, applied to
processing all fruits and vegetables.
Refer to “Tips for Ingredients Selection” for
detail instructions for selection of fruits and
vegetables.
The Juicer is designed with a double safety system and can start working
only after all parts are installed correctly.
Please install and use the Juicer as follows:
6
Chapter III. Method of Operation
Chapter IV. How to Assemble

1. Turn the body's switch into position “0”
and put the center ring into the body
2. Put the juicing sieve into the center ring
and ensure that the juicing sieve is
installed correctly on the motor wheel
(check the completeness of juicing sieve
before use; if damaged, do not use it).
3. Put the top cap into the body from the
right above and install it in the direction
indicated on the top cap.
4. Put and press the clamp to two lugs on
the top cap. It is correctly installed with a
cluttering sound, or the Juicer will not
work.
7

5. a. Slightly tilt and put the pomace
container under outlet of center ring;
b. Push the pomace container bottom to
the body to install it.
6. Put the juice cup under the juice outlet
and press down the juice outlet.
7. Connect power source and prepare for
startup. The working time shall be ≤1 min.
(Before connecting power, please ensure
the switch is off.)
8. Clean, peel (shell) and pit fruits and
vegetables, then cut them into pieces of
suitable size for feed inlet.
9. Start switch and select suitable tap
position according to type of fruits (refer to
“Tips for Ingredients Selection”). To
extend the Juicer's lifetime, it is advisable
to let it run continuously for less than
1min.
8

10. Put cut fruits and vegetables into feed
inlet on top cap, and push it gently with the
pusher. Do not push or press the fruits and
vegetables with too much pressure on the
pusher, since this would affect the quality
of the end result.
a. If the pomace outlet is blocked or the
pomace container and juice cup is full after
processing a period of time, disconnect the
power source and clean them before use.
b. Do not put fingers or other objects
into feed inlet!
11. After ingredient processing is
completed, if no more juices come out
from the Juice Outlet, switch the Juicer off
and disconnect the power source. Then,
wait until the motor and Juicing Sieve has
stopped rotating before taking Juice Cup
away from the Juice Outlet. (Fresh fruit
juice shall be drunk immediately, since
its taste and nutritional value will be
affected if exposed to air for a while.)
1. Use fresh fruits and vegetables, since they contain more fluid. Specific
preferred fruits are the following: pineapple, beetroot, celery stick, apple,
9
Chapter V. Tips for Ingredients Selection

cucumber, carrot, spinach, melons, tomato, mandarin orange, grape, etc.
2. It is unnecessary to remove thin peels and skins. Only thick peels (e.g.,
those of oranges, pineapples or beetroots) need to be removed. Seeds (e.g.,
those of oranges) shall also be removed.
3. When extracting apples, the fruit density depends on the variety of
selected apple. For apples with more fluid, the fruit will be denser. Thus,
you can select the apple variety according to your requirements on fruit
density.
4. As fresh apple juice will quickly turn brown, you can add a few drops of
lemon juice to slow down this discoloring process.
5. Leaves and stems (e.g., lettuce) could be extracted in the Juicer for
juice.
6. It is inadvisable to put fruits containing starch, such as banana, pawpaw,
avocado, fig, and mango, into the Juicer for juice extraction.
The typical nutrient ingredient contained in fruits/vegetables are shown
below:
10
Fruit/Vegetable
Vitamin/Mineral
kcal
Apple Vitamin C
200 gram = 150 kJ (36 kcal)
Apricot Dietary fiber and potassium
30 gram = 85 kJ
(
20 kcal
)
Beet
Folic acid, dietary fiber,
Vitamin Cand potassium
160 gram = 190 kJ(45 kcal)
Blueberry Vitamin C
125 gram = 295 kJ(70 kcal)
Brussels Sprouts
Vitamins C, B, B6 and E, folic
acid
and dietary fiber
100 gram = 110
kJ(26 kcal)

11
Cabbage
Vitamin C, folic acid,
potassium,Vitamin B6 and
dietary fiber
100 gram = 110 kJ(26 kcal)
Carrot Vitamins A, C and B6, and
dietary fiber 100 gram=110 kJ (26 kcal)
Celery Vitamin C and potassium 80 gram = 55 kJ(13 kcal)
Cucumber Vitamin C
280 gram = 120 kJ(29 kcal)
Fennel Vitamin C and dietary fiber
300 gram = 145 kJ(35 kcal)
Grape
Vitamins C and B6, and
potassium
125 gram = 355 kJ(85 kcal)
Carambola Vitamin C and potassium
100 gram = 100 kJ(24 kcal)
Muskmelon
Vitamins C andA, folic acid
and dietary fiber
200 gram = 210 kJ(50 kcal)
Nectarine
Vitamins C and B3, potassium
and
dietary fiber
180 gram = 355 kJ(85 kcal)
Peach
Vitamins C and B3, potassium
and
dietary fiber
150 gram = 205 kJ(49 kcal)
Pear
Dietary fiber
150 gram = 250 kJ(60 kcal)
Pineapple Vitamin C
150 gram = 245 kJ(59 kcal)
Raspberry
Vitamin C, iron, potassium
and magnesium
125gram=130kJ(31kcal
)

1. Put this Juicer in a dry and ventilated place for long-term storage to
prevent the motor from being affected by damp air, which threatens
appliance safety.
2. It is easy and convenient to clean the Juicer immediately after use. It is
strictly prohibited to directly put the body in water or flush it with water.
Power must be disconnected before wiping the body with a dry cloth.
Parts other than the body can be washed in water.
3. Do not wash the detachable parts with water hotter than 80℃, or
sterilize it in a high temperature disinfection cabinet. It is proper to add
cleaner into the warm water and clean it with a cleaning brush, then, rinse
it with clean water.
4. Clean detachable parts in accordance with the following steps:
a. Take pomace container out.
b. Take pusher out.
12
Chapter VI. Maintenance and Preservation

c. Pull open the clamps of both sides to
open the top cap.
d. Take the top cap, the juicing sieve and
the center ring down in sequence.
Note: When cleaning the juicing sieve,
add cleaner in the water. Use cleaning
brush to clean juicing sieve and then
rinse it with clean water; other parts will
be cleaned directly through rinse.
e. Method of taking juicing sieve and
center ring down:
1. Grab the edge with both hands and lift it
up to remove the juicing sieve.
2. Grab both sides of the center ring with
both hands and rapidly lift it up (do not
overexert on it).
13

Common failure Cause analysis Solution
After power
connecting, switch
it on and the Juicer
doesn’t work.
1.Center ring was not
installed in place.
2. Top cap was not installed in
place.
3. Microswitch is broken.
1. Put the center ring in
place.
2. Put the top cap in place.
3. Replace top cap.
4. Put all parts in place.
Motor gives out
disguising smell
during the first few
times of use
Normal phenomenon
If the smell remains after
using for several times,
please contact us via email.
Stop during
operation
1. The voltage is below level.
2. Ingredients are excessive.
3. Exert excessive pressure to
press the pusher.
4. When the motor is
overheating, the motor will
have protection.
1. Check if the voltage is
too low.
2. Disconnect power source
and take redundant
ingredients out.
3. Lightly press the pusher.
4.Switch it off for 20-30
minutes before use it again.
Fruit contains much
pomace
1. Juicing sieve is broken.
2. Too much pomace
accumulated in the center
ring.
1. Replace the broken
juicing sieve.
2. Replace the center ring.
Only a little fruit
juice comes out
1. Too much pomace
accumulated in the center ring
2. Exerted large pressure on
the pusher.
1. Clean the center ring.
2. Lightly press the pusher.
14
Chapter VII. Trouble Shooting

Abnormal vibration
or loud noise
1. Juicing sieve was not
installed in an even position.
2. The Juicier was not placed
smoothly and steadily or its
foot pad came off.
3. Voltage is too high.
4. Ingredients are excessive.
1. Put the juicing sieve in
place.
2. Put the Juicer smoothly
and steadily in place or put
the foot pad in place.
3.Check if the voltage is
too high.
4. Disconnect the power
and take excessive
ingredients out.
Obstructed cutter Cutter was twined by
ingredients or deadly locked.
Disconnect the power, take
ingredients out and cut
them into smaller pieces.
Model No.
PB2312
Rated Voltage
110-130V~
Rated Frequency
60Hz
Rated Power
800W
Continuous Operating Time
≤1 minute
Interval Time
≥2 minutes
15
Chapter VII. Applicable Standard
Table of contents
Other Picberm Juicer manuals