Pitsco Education DRONE ARENA User manual

45980
DRONE ARENA
User Guide

Written by Terry Carter.
Content advising by Paul Uttley, Katlie Brynds, Pamela Scifers, and Tim Lankford.
Desktop publishing and photography by Todd McGeorge.
©2020 Pitsco, Inc., 915 E. Jefferson, Pittsburg, KS 66762
All rights reserved. This product and related documentation are protected by copyright and are distributed under licenses
restricting their use, copying, and distribution. No part of this product or related documentation may be reproduced in any
form by any means without prior written authorization of Pitsco, Inc.
All other product names mentioned herein might be the trademarks of their respective owners. V1.0
01/20
45980

Cautionary and Warning Statements
• This product is intended for indoor use.
• Adult supervision is required while drones are operated inside the arena.
• While drones are in operation, students should not be inside the arena;
students should stay at least three feet away from the arena.
• Do not allow students to hang or climb on netting.
• Do not hang heavy objects from the structural members of the arena or
from the net.
• Students should enter and exit through only the netted door of the arena.
Disclaimer
Pitsco, Inc. is not responsible for bodily injury or property damage that results
from misuse of its products. Follow all directions and standard safety procedures
to ensure student safety.
Warranty
Pitsco provides a one-year limited warranty against defects in manufacturing
on all items purchased. In a warranty situation, Pitsco will arrange for the return
of defective items for evaluation. Qualified Pitsco staff will determine warranty
coverage and notify the customer. Items under warranty will be repaired or
replaced at Pitsco’s discretion. Customers will be billed for all costs associated
with non-warranty items.
Drone Arena User Guide
1

Overview
The Pitsco Drone Arena is a portable indoor solution for testing, training, and
competing with drone technologies. It can be assembled quickly and easily
with the use of a 6' to 10' step ladder. Although the arena was designed with
drones in mind, feel free to incorporate other elements such as robotics in
competition designs. It is possible for one person to assemble the arena, but it is
recommended that two or more people assemble it.
Components of the 10' x 10' x 10' Arena
• 44 pipes (1" x 5')
• 8 three-way elbow connectors
• 4 cross connectors
• 10 T connectors
• 6 four-way corner connectors
• 3 couplers
• Netting (10' x 10' x 10')
• 50 bungee cord ties (4")
Components of the 10' x 10' x 20' Arena
• 66 pipes (1" x 5')
• 8 three-way elbow connectors
• 8 cross connectors
• 10 T connectors
• 12 four-way corner connectors
• 3 couplers
• Netting (10' x 10' x 20')
• 100 bungee cord ties (4")
Note: In each arena kit, some extra pieces are included. Save them in case you
need them for future use.
Additional bungee cord ties can be used to attach curriculum field elements to
the arena.
Items Needed (not included)
• Stepladder (6' to 10', depending on height of installer)
Pipes
Three-way elbow connectors
Cross connectors
T connectors
Four-way corner connectors
Couplers
Netting
Bungee cord ties
Drone Arena User Guide
2
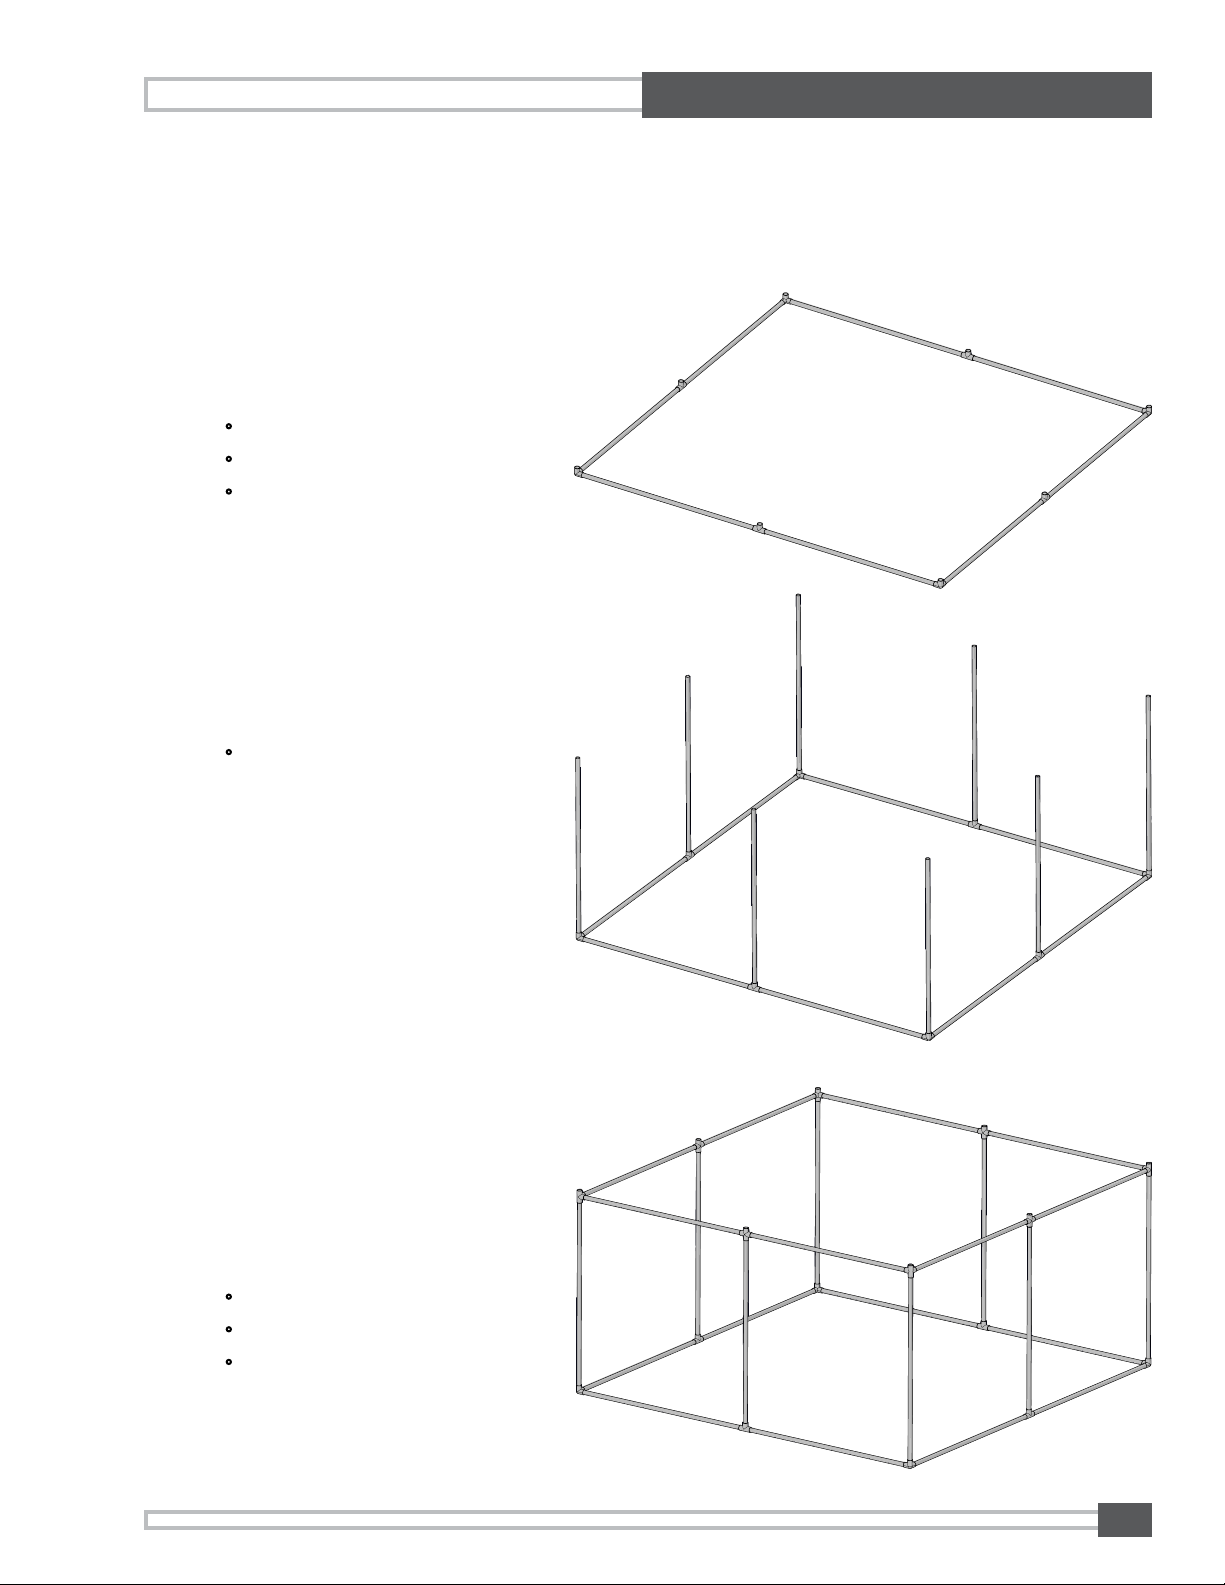
3. Construct a square middle band using two
pipes for each side. Connect sections of the
frame by using four-way corner connectors
in the corners and cross connectors in the
sides. Note: Each connector should have a
receptacle facing up.
• Components needed:
• 4 four-way corner connectors
• 4 cross connectors
• 8 pipes
Setup Instructions (10' x 10' x 10')
1. Lay out pipes to form a square base. Each side is made up of
two pipes. Connect the corners using four three-way elbow
connectors and connect each side using four T connectors.
Note: Each connector should have a receptacle facing up.
Most pieces will t snugly together. If a connection is loose, a
small piece of tape can be added to the end of a pipe to tighten
the t.
• Components needed:
• 4 three-way elbow connectors
• 4 T connectors
• 8 pipes
2. Place eight pipes rmly into the receptacles of the connectors on
the base.
• Components needed:
• 8 pipes
Drone Arena User Guide
3

4. Place eight pipes rmly into the receptacles of the
connectors on the middle band.
• Components needed:
• 8 pipes
5. Using a ladder, connect the pipes to make the
square top band. Firmly attach the corners using
three-way elbow connectors. Connect the pipes of
two opposite sides using T connectors. Connect the
pipes of the other two opposite sides using four-way
corner connectors.
• Components needed:
• 4 three-way elbow connectors
• 2 T connectors
• 4 four-way corner connectors
• 8 pipes
6. Use two pipes and a coupler to create a brace
between the two four-way corner connectors on
the top section. Note: The frame might feel a little
wobbly at this point. It will become more stable after
the netting is added and tension is increased.
• Components needed:
• 2 pipes
• 1 coupler
Three-way
elbow
connectors
Four-way
corner
connectors T connectors
Drone Arena User Guide
4

7. Take the netting out of the box and place it inside the frame structure. The
four corners of the netting are tied together. There is a tag that indicates
the location of the door. Orient the netting so the door is on the side you
want. Remove the tie and take the four corners to their respective areas of
the arena.
8. Use a ladder to attach each of the four net corners to the
frame with with two bungee cord ties as shown in the
image. Starting at the top of the arena, use bungee cord
ties to attach the netting to the frame at the positions
indicated in red. As you attach the netting, you should
notice the frame becoming more stable from the
tension and weight of the netting.
9. Use additional bungee cord ties to secure the
netting to the frame using one bungee cord
tie at each location. Suggested locations for
bungee cord ties are shown in red. You can
use fewer or more as needed.
Drone Arena User Guide
5

Tear-Down Instructions
1. When ready to disassemble the arena, it is recommended to
reverse the setup process. After the arena is totally empty,
remove the bungee cord ties from the netting. Start with the
lower cords and progress to the upper levels, leaving the top four
corners attached.
2. Remove the bungee cord ties from the top four corners. Bring
the four corner pieces to the center of the netting and use one
bungee cord tie to tie them together.
3. Fold the netting and place back in the box.
4. Using a ladder, start at the top and take all the pipes and
connectors apart and place them back in their boxes. Note: If
some connections have become too tight to remove by hand,
use a rubber mallet to tap them apart. Do not use any tools with
hard surfaces as this might damage or break your framing pieces.
Drone Arena User Guide
6

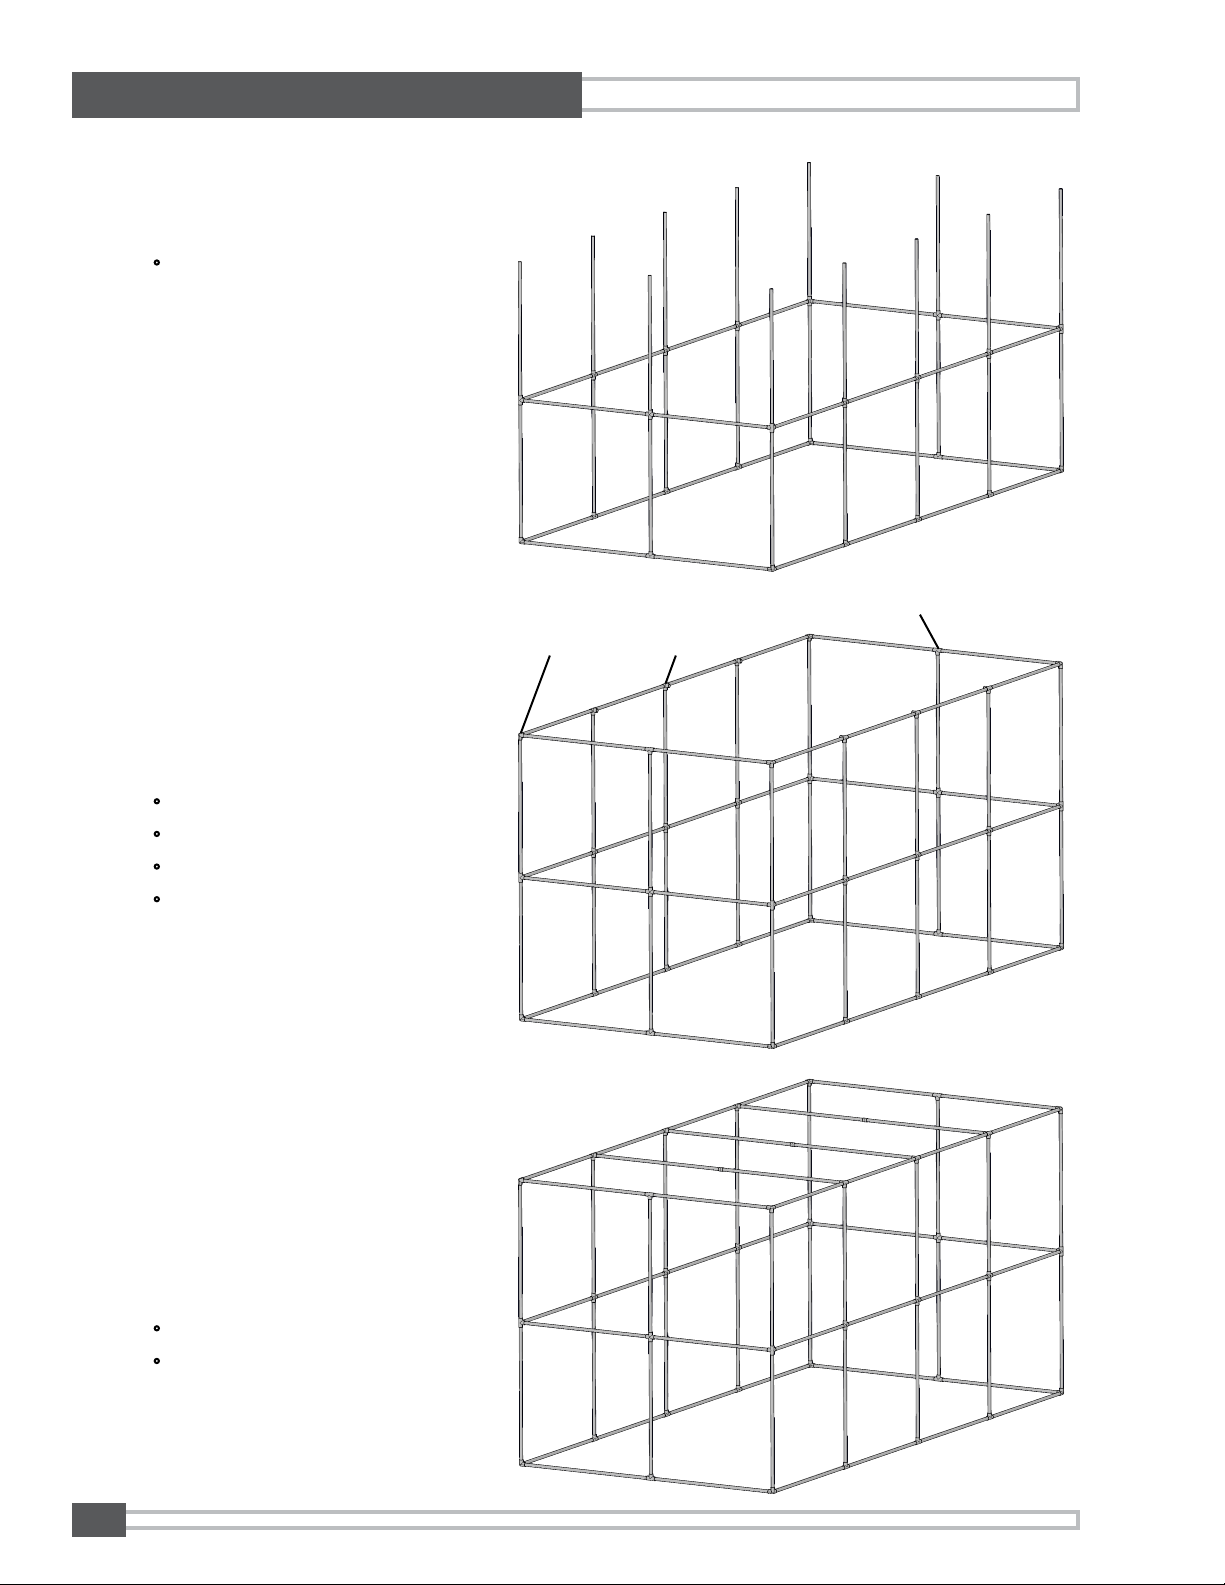
3. Construct a rectangular middle band using four pipes for each
long side and two pipes for each short side. Connect sections of
the frame by using four-way corner connectors in the corners
and cross connectors in the sides. Note: Each connector should
have a receptacle facing up.
• Components needed:
• 4 four-way corner connectors
• 8 cross connectors
• 12 pipes
2. Place 12 pipes rmly into the receptacles of the connectors on
the base.
• Components needed:
• 12 pipes
Setup Instructions (10' x 10' x 20')
1. Lay out pipes to form a rectangular base. Each long side is
made up of four pipes. Each short side is made up of two pipes.
Connect the corners using four three-way elbow connectors and
connect each side pipe using eight T connectors. Note: Each
connector should have a receptacle facing up.
Most pieces will t snugly together. If a connection is loose, a
small piece of tape can be added to the end of a pipe to tighten
the t.
• Components needed:
• 4 three-way elbow connectors
• 8 T connectors
• 12 pipes
Drone Arena User Guide
7
4. Place 12 pipes rmly into the receptacles of the
connectors on the middle band.
• Components needed:
• 12 pipes
5. Using a ladder, connect the pipes to make
the rectangular top band. Firmly attach the
corners using three-way elbow connectors.
Connect the pipes on each short side using T
connectors. Connect the pipes on each long
side by using four-way corner connectors.
• Components needed:
• 6 four-way corner connectors
• 4 three-way elbow connectors
• 2 T connectors
• 12 pipes
6. Use six pipes and three couplers to create
braces between the six four-way elbow
connectors on the top section. Note: The
frame might feel a little wobbly at this point.
It will become more stable after the netting is
added and tension is created.
• Components needed:
• 6 pipes
• 3 couplers
Three-way
elbow
connectors
Four-way
corner
connectors
T connectors
Drone Arena User Guide
8
Table of contents
Other Pitsco Education Educational Equipment manuals

Pitsco Education
Pitsco Education Wind Gen Plus Kit User manual

Pitsco Education
Pitsco Education Desk Jockey User manual

Pitsco Education
Pitsco Education TETRIX MAX User manual

Pitsco Education
Pitsco Education Wheel Lathe User manual

Pitsco Education
Pitsco Education FLO User manual

Pitsco Education
Pitsco Education R2K Rocket Kit User manual

Pitsco Education
Pitsco Education BUILDERSPACES SPACEPORT User manual

Pitsco Education
Pitsco Education TETRIX MAX R/C Motor Controller User manual


