V7-0715
FEATURES AND SPECIFICATIONS (continued)
INSPECTION
CARE AND MAINTENANCE
RETIREMENT
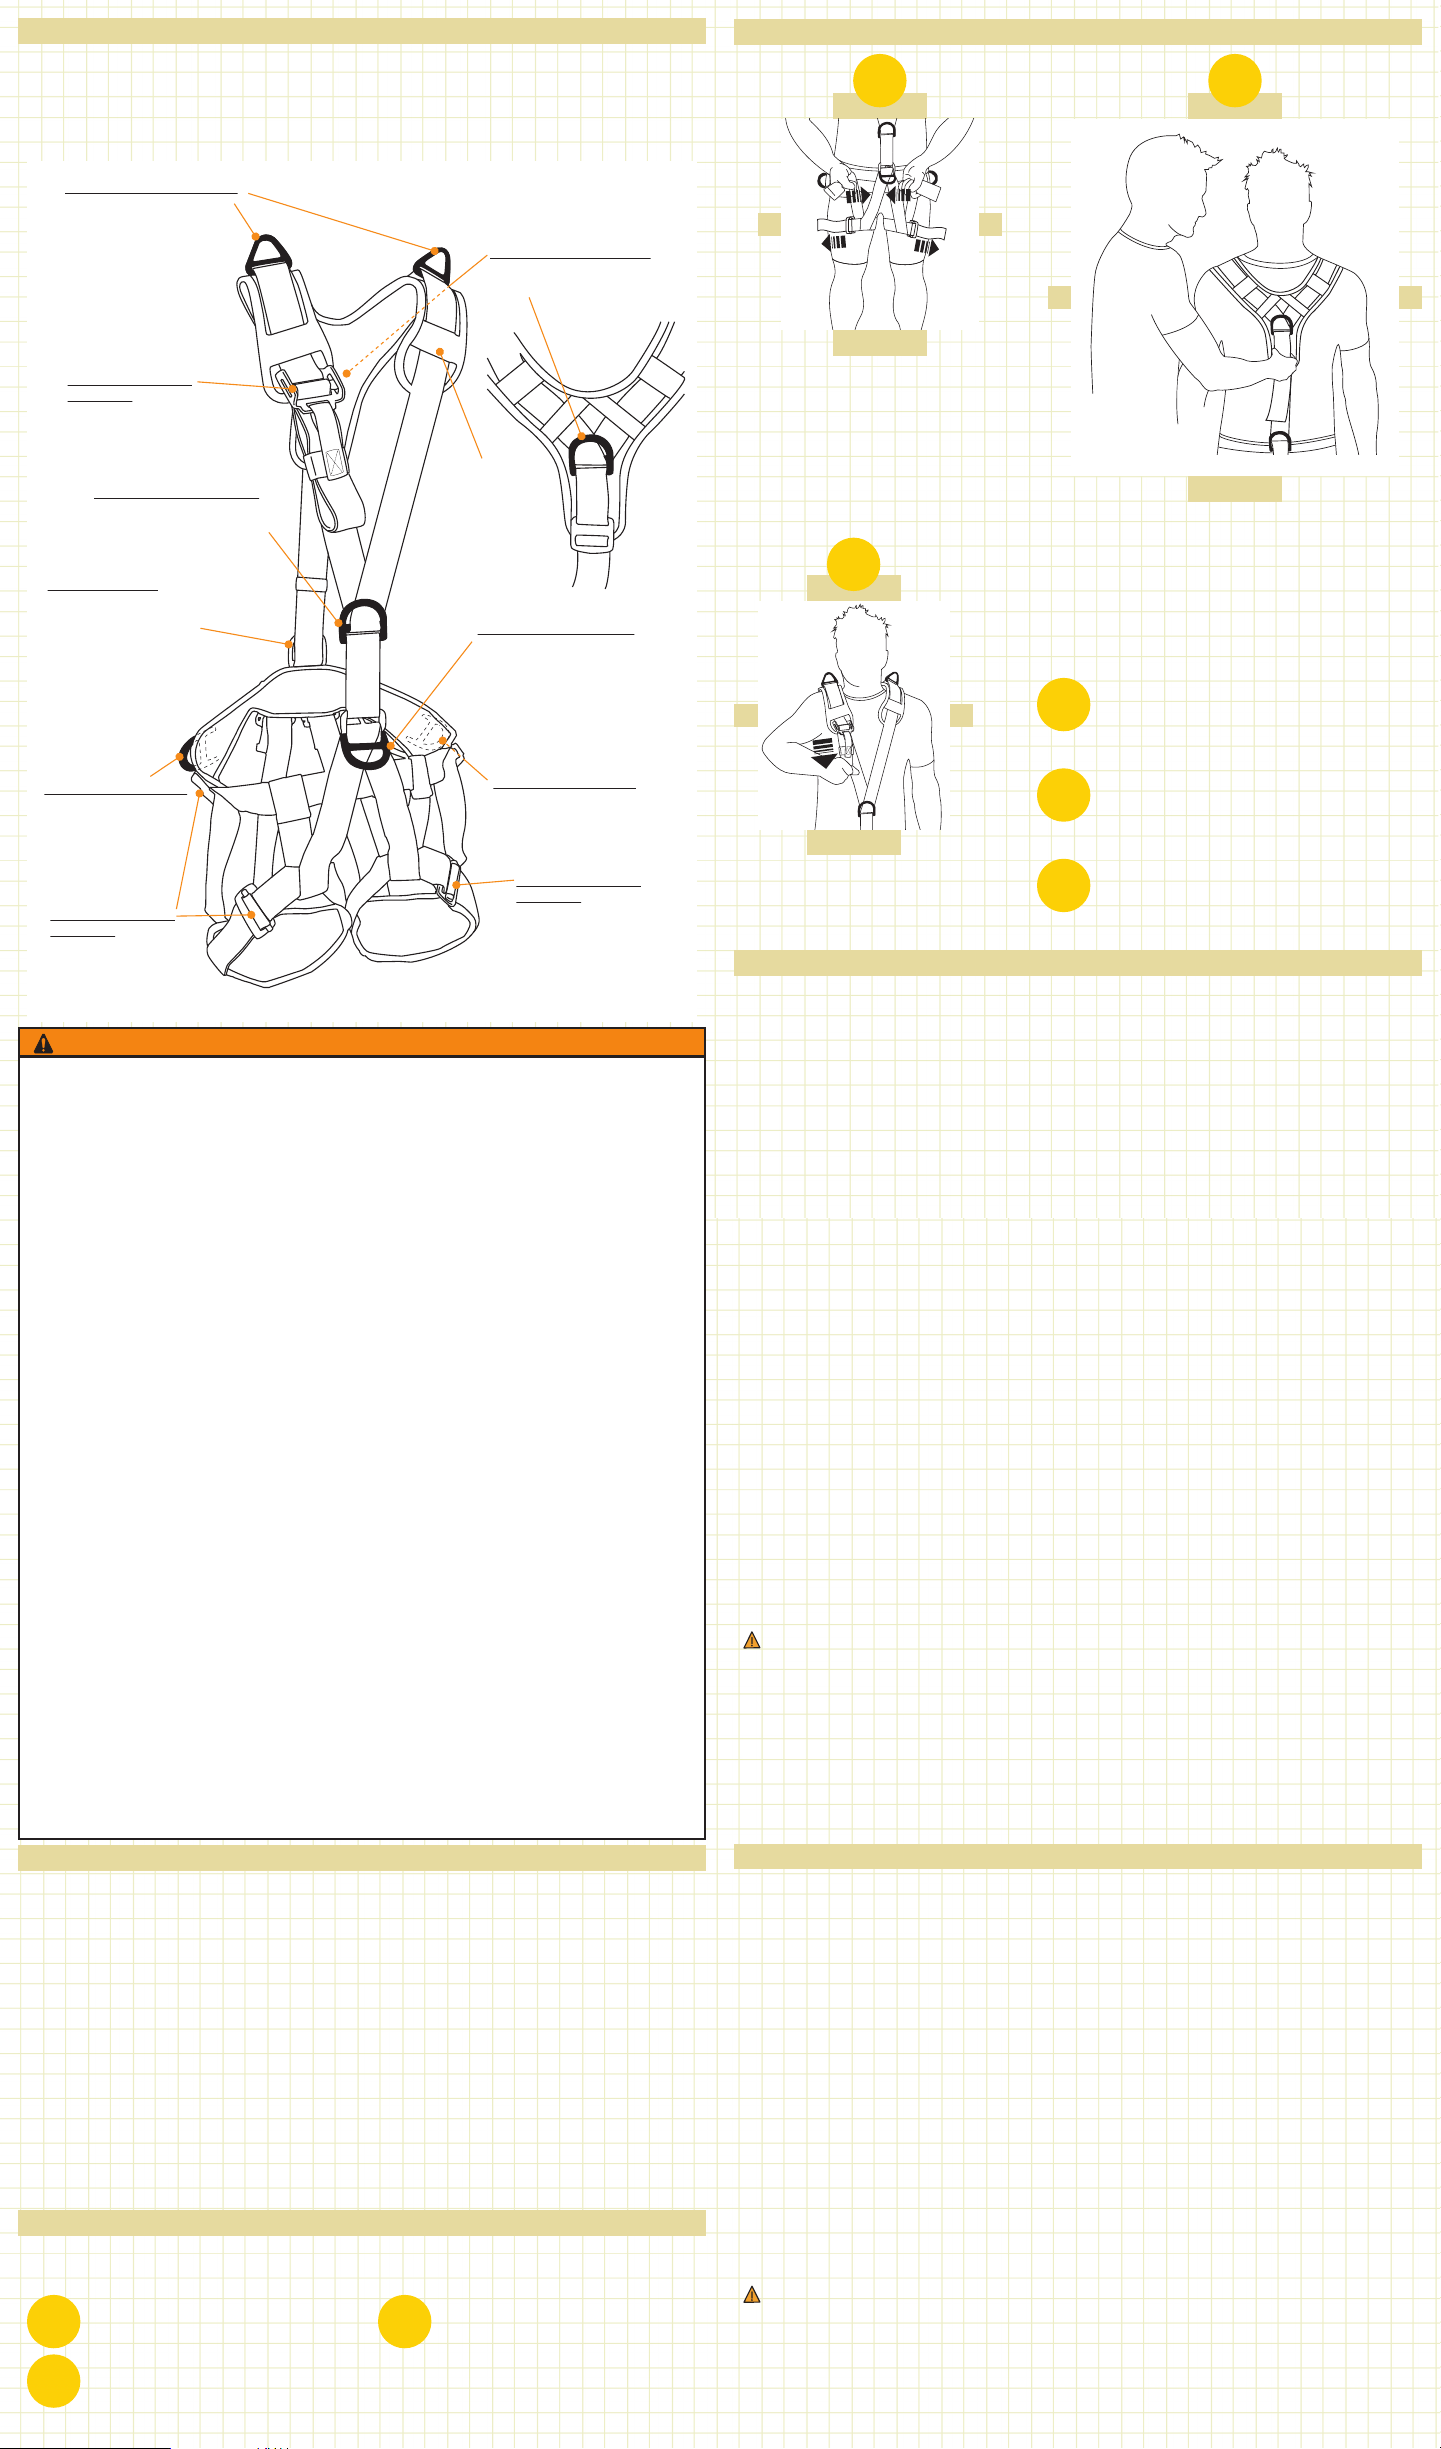
Shoulder Attachment Points
Designed for use as a
pair for positioning only
IAW ANSI Z359.1 or
NFPA 1983
Meets fall-arrest IAW ANSI Z359.1
or positioning IAW NFPA 1983.
Adjustable shoulder strap
Meets fall-arrest IAW ANSI Z359.1
or positioning IAW NFPA 1983.
Meets fall-arrest IAW ANSI Z359.1
or positioning IAW NFPA 1983.
Designed for use as a pair for
positioning only IAW ANSI Z359.1
or NFPA 1983."
Designed for use as a
pair for positioning only
IAW ANSI Z359.1 or
NFPA 1983."
Note: Accessory loops located behind the side
positioning D-rings are NOT for life safety use.
Rear waist D-Ring
Side Positioning D-Ring
Rear waist D-Ring designed for positioning
only IAW ANSI Z359.1 or NFPA 1983.
Sternal Attachment D-Ring
Side Positioning D-Ring
Waist Attachment D-Ring
Dorsal Attachment D-Ring
Quick Adjust Sliding
Bar Buckle
Certification label
can be found under
shoulder strap.
Adjustable waist and leg
straps
Quick Adjust Sliding
Bar Buckle Adjustable leg straps
Quick Adjust Sliding
Bar Buckle
Have a partner adjust the back adjustment
strap that is attached to the dorsal D-ring
until the dorsal D-ring is positioned
between the shoulder blades. Once this
adjustment is made, it should not need to
be changed if the same person is using the
harness.
5
6
Tighten the shoulder straps until
the upper harness section is
snug on the shoulders by pulling
on the tail end of the webbing
as shown in the diagram above.
Have a partner perform a secondary
safety check of all connectors and
buckles.
9
7Secure all loose ends of straps in their
respective holders.
8Double-check all connectors and
buckles.
Tighten the waist by pulling the waist
straps towards the center D-ring
which should be centered on your
waist.
Secure the leg loops by tightening
the leg loop buckles until snug
and ensure that the leg loops are
not twisted so that they have a
comfortable t.
4
ADJUSTING THE HARNESS (continued)
ADJUSTING THE HARNESS
To ensure a good t, the user must try on and adjust appropriately prior to use.
Follow the instructions for connecting the specic chest harness to make a full body
harness before adjusting the harness.
“ADJUSTING THE HARNESS” continued on next page...
Key Features:
•8 attachment points when used with the Diamond chest harness
•Dorsal, sternal, waist, hip, shoulder, and lumbar attachments
•Fully adjustable rear leg risers and chest harness
•Available in two sizes to t 30”- 61” waists
•Ergonomic padding
•Interchangeable, removable chest harness
Your harness should be thoroughly inspected before each use. Any harness that
does not pass inspection should be immediately retired from service and discarded/
destroyed. Detailed inspection criteria must be established by the user according to
his needs. Inspections should include at a minimum:
•Examination of all load-bearing components for signs of damage.
•Inspection of all stitching for signs of wear, fraying, breaks, loosened/pulled
threads, or cuts.
•Inspection of webbing for signs of cuts, burns, discoloration, broken bers, hard/
soft sections, or excessive wear.
•Examination of buckles and attachment points for proper function.
•Examination of all metal components for corrosion, damage or sharp edges.
•Inspection of webbing rigging and buckles to ensure that harness has been
properly assembled.
•Inspection for any signs of damage from heat, chemical exposure, or other or
other environmental concerns specic to the environment where used.
•Inspection of date of manufacture and date placed in service to determine if
retirement of harness is needed (See “Retirement Criteria” section).
•Inspections should be recorded and maintained in an Equipment Inspection Log. A
sample is provided in these instructions.
Inspections should be recorded and maintained in an inspection log. A sample
inspection log is provided on back of instructions.
Maintaining your harness properly will provide a longer service life and ensure the
highest level of safety during use. The following maintenance guidelines should be
followed:
•Store harness loosely packed in a clean, dry environment.
•Thoroughly air dry a wet harness before storing it; never dry in a heated dryer.
•Keep your harness away from exposure to direct ame or high temperatures such
as in a hot car.
•Prevent exposure of your harness to chemicals or other damaging substances.
•DO NOT attempt to alter, make any modications to or attempt to repair this
harness. Any attempt to do so will void the warranty and the safety of the
harness could be compromised.
Washing: Cleaning Your Harness - If your harness is dirty, you can wash it by hand
or in a front-loading commercial washing machine. Use a PMI® Laundry bag for
keeping the harness from getting tangled/damaged when washing in a machine.
Wash harness by using cool to warm water <30°C (<86°F) with a mild soap. PMI
recommends using PMI® Rope Soap; otherwise non-detergent soaps are best. Soap
used should not contain any bleaching agents.
DO NOT:
•DO NOT use top loading washing machines with agitators because they tangle/
damage the harness severely and can cause damage to the machine.
•DO NOT use a commercial dryer to dry the harness.
•DO NOT leave a wet harness on a surface where contaminants may leach (such
as concrete).
•DO NOT expose the harness to exhaust fumes.
Disinfecting - Disinfection of a harness may occasionally become necessary, such
as when exposed to bloodborne pathogens. To disinfect a harness from suspected
bloodborne pathogens, PMI recommends following the NFPA standard for cleaning
rescue gear of bloodborne pathogens. Keeping in mind that undiluted household
bleach is known to damage nylon, NFPA calls for using a diluted solution of
household bleach to clean rescue gear. Add 60 ml of household bleach per 4 liters
of tap water. That’s about one quarter (1/4) cup of bleach per gallon of water. Be
aware that some commercial bleach solutions are stronger than the recommended
1.5% that is typical for household bleach. Soak the gear in the diluted solution for
ten minutes, then rinse thoroughly with tap water. The rinsing cycle is critical to
prevent any damage to the nylon from the bleach. It is good to soak the gear in tap
water for the same amount of time it soaked in the bleach solution. Never store gear
while it is wet.
WARNING
The use of bleach over a long period of time, in repeated uses, can cause damage
to bers such as nylon. Disinfection of the harness using bleach should be used
sparingly and only when needed.
Drying - Dry your harness in a clean, dry area out of direct sunlight. For best results,
it should be hung up to air dry in a low-humidity environment. DO NOT leave a wet
harness on a surface where contaminants may leach (such as concrete).
Write It Down - Remember to record the cleaning on the Equipment Log.
Keep It Clean - Store your harness in a clean, dark, dry environment, away from
exposure to acids, other harmful chemicals, noxious fumes or other abuse.
Retiring your harness is a judgment that is the responsibility of the user and should
be based largely on results of frequent inspections, environment and use history. If
you have any questions regarding retirement of your harness you can contact PMI.
Use the following Retirement Criteria as guidelines for retiring your harness:
•RETIRE IMMEDIATELY any harness where the stitching is cut, torn, excessively
worn or visibly damaged.
•RETIRE IMMEDIATELY if harness has been in service for 5 years or more, it must
be retired even if a visual inspection reveals no concerns.
•RETIRE IMMEDIATELY any harness whose strength may have been compromised
during use.
•RETIRE IMMEDIATELY any harness which is subjected to a major fall or
uncontrolled or excessive loading.
•RETIRE IMMEDIATELY any harness with a manufacture date which is greater than
10 years old, regardless of history and usage.
•RETIRE IMMEDIATELY any harness whose history and past usage you are
uncertain about.
•RETIRE IMMEDIATELY any harness that has been exposed to excessive heat,
direct ame or excessive abrasion.
•
•RETIRE IMMEDIATELY any harness that has been exposed to liquids, solids,
gases, mists, or vapors of any chemical or other substance that can deteriorate
the harness materials.
•RETIRE IMMEDIATELY any harness that does not pass inspection.
•RETIRE IMMEDIATELY any harness that does not pass inspection when following
the inspection procedures in these instructions, both before and after each use.
WARNING
CUT ANY RETIRED HARNESS to discourage future use and discard it entirely. A
retired harness should not be stored, kept or maintained in such a way that it could
inadvertently be used again.
ABOUT YOUR PERSONAL SAFETY
•Failure to follow these stated warnings may result in serious injury or death.
•You are responsible for your own safety and decisions while using this product.
•Activities involving the use of this product are inherently dangerous; you must
understand and accept the risks involved.
•Special training and knowledge are required to use this product. These
instructions are not an acceptable substitute for appropriate training by a qualied
instructor. The techniques employed in the safe and proper use of this equipment
may only be learned through training from an instructor who is well qualied
in all phases of vertical rope work. Such instruction will include evaluation of
your comprehension of, and ability to perform, the task required to safely and
efciently use this equipment. Never attempt to use this product until you have
received appropriate instruction and are approved to be competent by your
instructor.
•Harness should not be used near moving machinery, electrical hazards, sharp
edges, or abrasive surfaces without proper additional safety equipment in place.
In addition, harness should be carried where it will be protected, as the harness
could melt or burn and fail if exposed to ame or high temperature.
•All webbing tails should be properly secured before use.
•This harness is tted with safety buckles that ensure no slip performance when
properly rigged. If not used properly, the buckle will not hold and can result in
injury or death. Inspect the buckle on receipt and before use to ensure that the
two part buckle design is functioning properly.
•The user must have a rescue plan prepared and the means available to implement
it while wearing this harness.
•For any safety information regarding this harness refer to all Manufacturer’s/User
Instructions that shall remain available before and after use of this product.
•Use and inspect this product only in accordance with the manufacturer’s
instructions.
•The main attachment D-rings (sternal, dorsal, and waist) are for attaching to full
strength anchors used to support life-safety loads. Equipment such as life safety
lanyards, descenders, ascenders, and fall arrest systems are to be attached to
these points in accordance with applicable standards and regulations.
•The side D-rings are for work positioning only and designed to be used as a pair
with an appropriate work positioning lanyard. The side D-rings are NOT to be used
as life safety attachment points.
•The accessory loops are designed to attach equipment only and should NEVER be
used for life safety applications such as belaying, anchoring a person, or tying in
to a life safety system.
•Do not alter this product in any way.
•Keep these Manufacturer’s Instructions, all product labels and the Equipment
Inspection Log WITH the equipment so that any potential user can read them prior
to use and make entries after use.
•PMI is not responsible or liable in any way for damages of any kind, injury or
death resulting from direct or indirect incidents related to the use of its products.
•If in doubt about this use of this product or for any additional questions, please
contact PMI at 706-764-1437 before using this product.
S
1Loosen waist belt, leg loops,
and front chest strap. 2Step through waist belt,
inserting a leg into each loop.
3Flip chest harness forward, over your head, placing head between straps.


