POLLOGEN GENEO+ U User manual

USER MANUAL
THE FIRST
SMARTOUCH
MICRODERMABRASION
SYSTEM

CONTENTS PAGE NO.
1. ABOUT GENEO+ U3
2. SAFETY INSTRUCTIONS & CONTRAINDICATIONS 3
3. GENEO+ U KIT CONTENT LIST 6
4. TECHNICAL SPECIFICATIONS AND LABELING 7
5. GENEO+ U ASSEMBLY 8
6. OXYGENEO USER APPLICATION 10
7. CARE & MAINTENANCE 17
8. TROUBLESHOOTING 18
9. WARRANTY TERMS & CUSTOMER SUPPORT 20
Read the User Manual thoroughly prior to use. Always adhere to all warnings and cautions.
As with any electrical device, you should observe certain precautions to ensure your safety.

3
1. ABOUT GENEO+ U
geneO+ U is a microdermabrasion system providing safe, effective and simple solutions.
Microdermabrasion is a mechanical process based on the concept of removing the uppermost layer of dead skin cells (stratum
corneum). During this process the body interprets this activity as a mild injury to the skin and will begin to produce healthy new skin cells
to replace the lost ones.
geneO+ U also includes a massager head providing a more vibrant appearance and leaving the complexion with a fresher and more toned look.
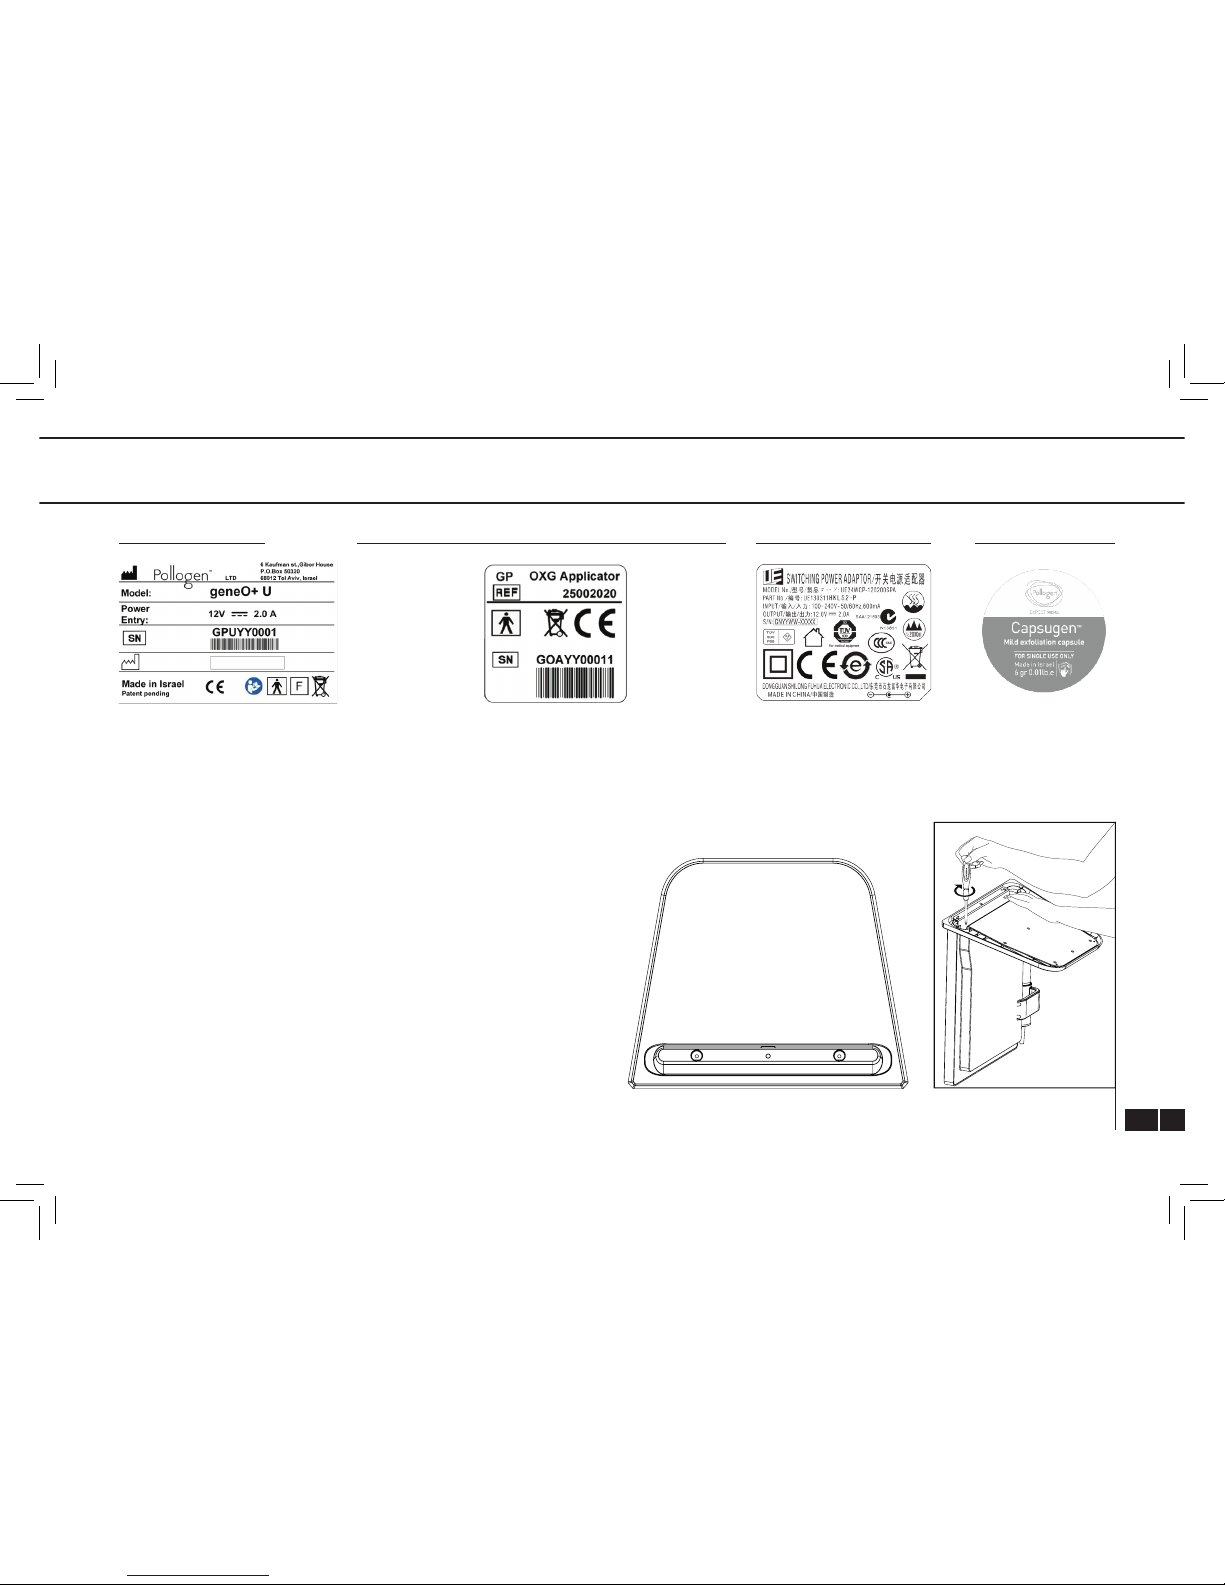
geneO+ U consists of 6 main parts: Body Unit (1), Base Unit (2), OxyGeneo Applicator (3), Power Supply (4) Massager Head (5), Capsugen (6).
For detailed description and illustrations, please refer to sec. 3.
2. SAFETY INSTRUCTIONS & CONTRAINDICATIONS
This is an electrical device. To reduce the risk of serious injury:
• Only qualied personnel are allowed to operate the geneO+ U. In order to protect the system from use by unqualied personnel, turn it
OFF when not in use.
• Use this system for its intended purpose only, as described in this user manual. The manufacturer cannot be held responsible for
damage or injury resulting from improper or careless use.
• Do not operate, place or store geneO+ U near any water source.
• Do not touch the device should it fall into water. Unplug the power cord immediately with dry hands.
• Before cleaning or maintenance, rst turn the geneO+ U OFF, then unplug the power supply from electrical outlet.
• Use geneO+ U for its intended purpose only, as described in this user manual. The manufacturer cannot be held responsible for damage
or injury resulting from improper or careless use.
• Use geneO+ U only with the original supplied electric cord, power supply and Applicators
• No modication of this equipment is allowed!
• Only qualied personnel who have been trained by Pollogen Ltd., are authorized to service to the geneO+ U system.
• When the geneO+ U system is plugged in, never leave it unattended.
• Before use, ensure that the system and its accessories show no visible damage. Do not operate if electric cord is damaged or the system
is disassembled
• In the event of defects or malfunctioning, switch off the device immediately.
• Switch off the system before moving it.

4
2. SAFETY INSTRUCTIONS & CONTRAINDICATIONS
• Before connecting the power supply cord, make sure that the ON/OFF switch is in the OFF position.
• Repairs to geneO+ U should only be carried out by an authorized customer service center. Do not try to repair the system yourself!
• Do not pull on the power supply cord or the system to unplug the electrical outlet.
• Keep out of reach of children.
• Hands should be completely dry when using the system and power supply.
• Do not use device on any of the following areas: breasts, groin, genitals, armpit, below the eyebrow, over the eye lids or eyeballs.
• High voltage is present inside the geneO+ U system. Always take proper precautions as described in this manual, while making sure to
constantly be aware of the possible dangers.
• Do not touch the inner parts of the system; only authorized customer service centers are certied to repair the geneO+ U system.
• Do not operate the unit in the presence of electromagnetic interference. Electromagnetic interference may be caused by electro surgery,
diathermy, magnetic resonance imaging or other type equipment.
• Portable and mobile are considered RF communication equipment & may affect operation of the geneO+ U system.
• Do not come in contact with the USB connector during treatment.
FIRE HAZARDS
• Do not use the system in the presence of explosive or highly ammable materials like alcohol, methanol, acetone, etc.
• Do not have ammable substances in the treatment room while preparing the skin for treatment.
• If alcohol is used for disinfecting, it should be allowed to dry thoroughly before the geneO+ U is used and then set at a distance
from the system.

5
2. SAFETY INSTRUCTIONS & CONTRAINDICATIONS
CONTRAINDICATIONS
Patients having the following conditions should not be treated:
• Current or history of skin cancer or pre-malignant moles.
• Pregnant or nursing.
• Any active skin conditions within the applied area, such as sores, eczema, rash, fragile, swollen, burnt or injured skin, active acne,
rosacea, dermatitis, psoriasis, or active Herpes Simplex.
• Take precaution when treating over areas of active acne, avoid areas of severe active acne.
When treating patients with predisposition to acne, occasional and transit acne eruptions may occur, which should be cared with acne
treatment products.
• Excessive fresh skin tan (within the last few days).
• Vascular disorders such as: telangiectasia, varicose veins, thrombosis, phlebitis in the applied area.
• Severe concurrent disease such as: un-controlled diabetes, nervous diseases, cardiac disorder and cancer. In such cases, consult the
treating physician.
• If any aesthetic procedure have been performed recently in treated area such as mesotherapy, peeling, resurfacing or recent use of
products such as Accutane or Retin A, consult the treating physician before using geneO+.
• Known allergies to cosmetics or other products, or experienced severe allergic reactions like hives
POSSIBLE SIDE EFFECTS
The following side effects are rare; however if they do occur, they are usually temporary. If any of the following conditions appear and
excessively and signicantly last more than 24 hours, the client should contact his/her treating physician: excessive redness or swelling,
itching, irritated skin, scratches, visible capillaries, sensitivity to touch or change of pigmentation.
POST SESSION CARE
It is highly recommended to use sun protecting hydrating mask or cream post session.

6
3. GENEO+ U KIT CONTENT LIST
1. geneO+U Body Unit (Fig. 1)
2. geneO+ U Base Unit (Fig. 2)
3. OxyGeneo Applicator (Fig. 3)
4. geneO+U Power Supply (Fig. 4)
5. Massager Head (Fig. 5)
6. Screwdriver and Screws (Fig. 6)
7. Capsugen (Fig.7) (Fig. 1) (Fig. 2)
(Fig. 6)
(Fig. 4)
(Fig. 3)
(Fig. 7)
(Fig. 5)

7
4. TECHNICAL SPECIFICATIONS AND LABELING
GENEO+ TECHNICAL SPECIFICATIONS
Weight: ~4.4 Kg
Overall Dimensions: 380mm x 382mm x 282mm (H x W x D)
Power Output: Vibration - Frequency 5 – 30Hz
Inlet voltage of Power Supply: 100-240V~50/60Hz,600mA
Input Power Rating of Power Supply: 12VDC, 2.0A
Environmental Conditions for Operation:
Operating Temperature: 5 – 30°C
Operating Humidity: 20 – 80% RH
Atmospheric Pressure: 80 - 106 KPa
Conditions for Transportation & Storage:
Transport and Storage Temperature: -20 – 60°C
Transport and Storage Humidity: 5 – 90% RH
Atmospheric Pressure: 50 - 106 KPa
Electrical Safety: IEC 60601-1 Classication – Class II power supply, reinforce double isolation

8
4. TECHNICAL SPECIFICATIONS AND LABELING
SYMBOLS & LABELS
This section describes the symbols used throughout this User Manual
(Table 1). It is recommended that users review the meaning of these
labels for everyday usage and service.
Table 1: SYMBOLS USED IN THIS USER MANUAL
No. Symbol Description
1 SEE INSTRUCTIONS FOR USE
2 FLOATING CONNECTION
3 TYPE BF APPLIED PART
4 CE MARK
5 WASTE OF ELECTRICAL AND ELECTRONIC
EQUIPMENT (WEEE) COMPLIANCE SYMBOL
6 MANUFACTURER
7 DATE OF MANUFACTURING
8AUTHORIZED REPRESENTATIVE IN THE
EUROPEAN UNION

9
4. TECHNICAL SPECIFICATIONS AND LABELING 4. TECHNICAL SPECIFICATIONS AND LABELING
OXYGENEO APPLICATOR SERIAL NUMBER LABEL POWER SUPPLY LABEL CAPSUGEN LABELDEVICE S/N LABEL
Unpack geneO+ U and verify that the system is intact and that all
components are present. It is recommended to save the packaging
box and materials for future transport.
Assemble the geneO+ U by connecting the Body Unit to the Base Unit
using the provided screws and the screw driver. Plug in the Applicator
cable into the appropriate connector on the back of the geneO+ U
system. Verify that you hear a click. Place the Applicator in the
Applicator cradle
Place the geneO+U on a stable rigid surface and connect the supplied
Power Supply into the system. Plug in the Power Supply’s electric
cord into the electrical outlet.
5. GENEO+ U ASSEMBLY
(Fig. 8) (Fig. 9)
Base Unit top view Assembly Illustration
XXX
* XXX - Will be determined according to wrrent model.

10
5. GENEO+ U ASSEMBLY
OXYGENEO APPLICATOR
OxyGeneo Applicator includes a unique vibration algorithm.
Intensity of vibration can be adjusted according to the clients
preference by using the “+ or –” button on the applicator (Fig.10A).
When Applicator vibration reaches its maximum and the “+” is
pressed or when it is at its minimum and the “-“ is pressed, the
green light on the Applicator blinks shortly.
Pressing the Light button on the Applicator turns the Session
Indicator Light OFF and back ON (Fig.10B).
Light color is illuminated according to the following sessions:
NeoMassage: red, NeoRevive: red, NeoBright: yellow.
Attach the proper head to the Applicator before commencing
a session.
CAPSUGEN
Capsugen contents is 0.01lb. 6 gr. e
Ingredients: Sodium Bicarbonate, Citric Acid, Magnesium Stearate.
Warnings:
• For professional use
• For single use only
• A sensitivity test is recommended 3 days prior to rst use in a
concealed area. If no irritation or inammation apparent, it may be
assumed that no hyper sensitivity to the product exists.
• For external use only.
• Avoid contact with eyes. If contact occurs, ush immediately with
cool water.
• Keep out of reach of children.
• Store in cool, dry place, below 30°c.
• Not to be used on acne or sensitive skin.
Capsugen Instructions:
Cleanse the skin thoroughly. Once the skin is clean, massage
Capsugen on wet clean skin at least once a week.
MASSAGER HEAD
• For professional use
• For multiple use (See cleaning instructions in section 6)
• For external use only.
Massager Instructions:
Massage the massager head on the skin.
A
B
(Fig. 10)

11
5. GENEO+ U ASSEMBLY 6. OXYGENEO USER APPLICATION
POWER UP SEQUENCE AND SYSTEM CHECK
Before turning the geneO+ U on, verify that the power supply
is connected to the system inlet on the back panel and to the
power outlet. The system should only be used with the supplied
power supply.
Switch the ON/OFF control to the ON position on the back panel
(Fig.12).
NOTE: After the ‘geneO+ U by Pollogen’ uploads, the touch
screen will become white and then black with SCREEN TEST
heading as part of the system’s self-system check. Verify that
the screen is in good quality during these rst few seconds of
the system upload.
Following system check, the ‘Pollogen Expect More’ animation
will appear.
Once you have reached the home screen, the system is ready
for use.
TURNING THE GENEO+U OFF
Switch the ON/OFF control at the back of the system (Fig.12).
Remove Power Supply from electrical outlet and disconnect
from the geneO+ U.
Store your geneO+ U and its accessories in a cool, dry place.
(Fig.11)
(Fig.12)
A

12
6. OXYGENEO USER APPLICATION
HOME SCREEN
Home Screen includes the following:
• Run – Commence sessions
• Info – Training and marketing resources
• Settings – Adjustable system parameters
The Home Icon - Located at the top right side of most screens.
Returns the operator to “Home Screen”.
Help Icon - Available at the top of selected screens. Use this
icon to get detailed information on how to use these screens.
Back Icon - Located at bottom left side of most screens. Returns
the operator one screen back.
Time, day and date appear on the bottom right hand corner of
each screen.
SELECT APPLICATION
Tap RUN and select the highlighted OxyGeneo key Select Session
and reach the session screen, tap : NeoRevive, NeoBright or
NeoMassage.

13
6. OXYGENEO USER APPLICATION 6. OXYGENEO USER APPLICATION
OXYGENEO SESSION SCREEN
Each session has default parameters which can be edited
before commencing the session.
Intensity - Each session has a default power intensity. Use the
slider on the screen to adjust session power or the “+” and “-“
buttons on the applicator.
Duration - Each session has a default duration. Use the slider
on the screen to adjust session duration before starting the
treatment.
Run - Tap RUN to start a session
End - Tap END to end a session
Edit – to edit session parameters after commencing a session
pause the session using the ON/OFF button on the applicator
and tap EDIT on the "pop up" message. This will enable the
keys and you will be able to edit the session parameters. To
resume treatment press RUN and then the ON/OFF button on
the applicator.
Session technique – move the applicator in circular and
linear movements across the entire area using very mild
pressure. You may also stay for a short while on selected
areas to optimize effect. Adjust intensity (increase or decrease)
according to treatment area and patient tolerance and comfort.
In case there is no Disk On Key or DOK has a wrong/corrupted
le on it, the system will indicate: "No valid le found. Please
check DOK. No system boot.

14
6. OXYGENEO USER APPLICATION
INFO SCREEN
All available technologies will appear by tapping INFO.
Select the relevant technology – a list of contents will appear:
• Video
• User Manual
• Quick Reference Guide
Select the desired resource.
The video module offers 3 options:
• Treatment video
• Marketing video
• Training video

15
6. OXYGENEO USER APPLICATION 6. OXYGENEO USER APPLICATION
SETTINGS SCREEN
Languages – Select your desired language
Date and date format – Set date and date format
Time and time format – Set time and time format
Software update – Select this option to update the system SW.
Touch panel calibration – Select to calibrate touch panel
Technician – Used for system technical information (authorized
technician only)
Pay per use – Future option (currently disabled)
Brightness - Adjust screen brightness using the “+” and “-“
icons or the slider.
Volume – Adjust beeps and alerts sounds using the “+” and “-“
icons or the slider.
LANGUAGE SCREEN
Select the desired language and press ”DONE”.

16
DATE AND DATE FORMAT SCREEN
Enables the operator to select between date formats: DD.MM.YY
or MM.DD.YY.
To set the date:
Select current date and press “DONE”.
TIME AND TIME FORMAT SCREEN
Enables the operator to select between time formats: 24 hour clock or
12 hour clock.
To set the time:
Select current time and press “DONE”.
SOFTWARE UPDATE SCREEN
View current SW versions (GUI, Linux & Applicator).
To update the system SOFTWARE insert the Disk On Key to any of
the USB ports at the back of the platform and tap the “SOFTWARE
UPDATE” key.
First indication you will get is: “SW update, please wait”.
If SOFTWARE was successfully installed the system will indicate: “SW
successfully updated, system will restart now”. Verify the updated
software version on the screen: GUI version.
After tapping OK, the system will restart itself, please wait for
HOMESCREEN to appear.
If SOFTWARE was not successfully installed for any reason, the
system will indicate: “Please make sure you have connected the Disk
On Key to any of the USB ports”.
In case of wrong or incomplete program upload while uploading a
program version using a USB plug, restart the system.
6. OXYGENEO USER APPLICATION

17
6. OXYGENEO USER APPLICATION 6. OXYGENEO USER APPLICATION
TOUCH PANEL CALIBRATION
For screen calibration touch the calibration symbol (+) and ensure
that you are touching the center of the calibration symbol.
TECHNICIAN
TO BE USED BY POLLOGEN AUTHORIZED TECHNICIAN ONLY!
Used for system technical information, a code is required to
proceed.
PAY PER USE
Future option (currently disabled).

18
7. CARE AND MAINTENANCE
CARE AND MAINTENANCE
Clean the geneO+ U at least once a week. Turn the system OFF and wipe down all surfaces with a soft, damp, non-abrasive cloth. Be
careful not to spill any liquids on the geneO+ U.
Ensure that water never enters the inside of the system. Make sure the system is completely dry before next use.
After every treatment using the Massager Head, clean and disinfect the Massager Head according to the following procedure:
1. Disconnect the Massager Head silicone top cover from its plastic base.
2. Clean with water and detergent solution until it is visually clean.
3. Use a soft, dry cloth to dry the Head.
4. Use a soft cloth, moistened with 70% alcohol available in local pharmacies, to disinfect the Head for at least 1 minute.
5. Use a soft, dry cloth to dry the Massager Head.
The Capsugen is for single use. Care and Maintenance are not required.

19
8. TROUBLESHOOTING
Failure Possible Cause of Failure Action
geneO+ U doesn’t turn on. Verify the power supply is
connected to the device and to
a working wall outlet
Verify the ON/OFF switch on
the device is turned on.
Switch to another wall outlet.
If this still doesn’t work call
service.
Communication error
message.
Verify that the applicator is
connected and locked
Verify that a green led is
illuminated on the applicator.
If applicator is connected and
green led is on but still there is
a communication error, switch
applicator to the alternative
inlet and recheck. If it doesn’t
help call service.
Can’t start session. After pressing RUN verify the
green led on the applicator has
changed from a constant green
to blinking green.
If green led stays constant,
shutdown device, disconnect
applicator and reconnect to
alternative inlet and recheck. If
it doesn’t help call service
If green led blinks, and you
pressed the ON/OFF button on
the applicator and session still
doesn’t start, call service.
Can’t export les to DOK.
For certied service personnel
only.
DOK is not formatted.
DOK is write protected.
Format DOK and try again.
Disable write protect feature
on DOK.

20
Failure Possible Cause of Failure Action
Software can’t be updated. Verify only Pollogen DOK is
connected to the device
Verify that you are attempting
to upgrade a higher software
version.
If a valid DOK is connected
with a higher version than
one already installed, but still
upgrade is not preformed,
switch DOK to another port
and retry. If it doesn’t help, call
service.
Display failure TOUCH SCREEN fault, Partial
data displayed on the TOUCH
SCREEN.
Switch OFF the system and
then switch ON again.
If display still does not operate
properly, call service.
System cannot be switched off ON/OFF switch failure, System
cannot be switched off.
Unplug the device and call
service.
No Green LED indication on the
Applicator
Green LED not operating,
No ON/OFF indication of the
applicator.
Verify applicator connection to
the system.
In case of green LED not
operating, call service.
8. TROUBLESHOOTING
Other manuals for GENEO+ U
1
Table of contents
Other POLLOGEN Personal Care Product manuals

POLLOGEN
POLLOGEN TriPollar Stop VX User manual

POLLOGEN
POLLOGEN TriPollar Stop X User manual

POLLOGEN
POLLOGEN Intelligent Biology STOP X User manual

POLLOGEN
POLLOGEN GENEO+ U User manual

POLLOGEN
POLLOGEN Geneo Personal User manual

POLLOGEN
POLLOGEN TRIPOLLAR STOP EYE User manual

POLLOGEN
POLLOGEN Geneo Personal User manual