Prestan Professional AED Trainer PLUS 4-Pack User manual
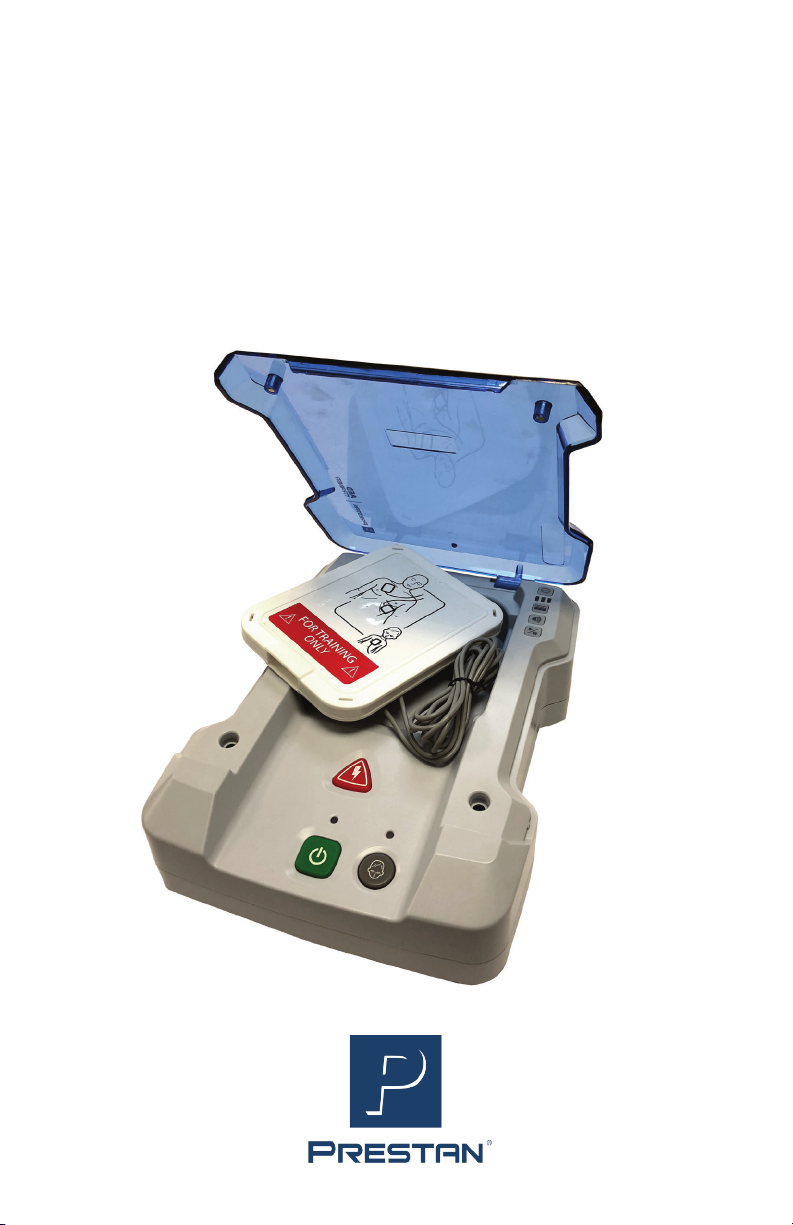
Prestan Professional
AED Trainer
PLUS

Professional AED Trainer PLUS Professional AED Trainer PLUS
COPYRIGHT© 11/30/2018 PRESTAN PRODUCTS, LLC - #12319 Page 2
Prestan Professional
AED Trainer PLUS
Model PP-AEDT2-101 —> Prestan
Professional AED Trainer PLUS
preprogrammed with English and a
secondary language, four (4) ‘C’ batteries
(pre-installed), one set of adult/child training
pads with hard storage case, two (2) sets of
pad connector pins (one (1) set is a spare)
and a carry bag.
Model PP-AEDT2-401 —> Prestan
Professional AED Trainer PLUS 4-Pack -
Four (4) AED units preprogrammed with English
and a secondary language, sixteen (16) ‘C’
batteries (pre-installed), four (4) sets of adult/
child training pads with hard storage cases,
eight (8) sets of pad connector pins (four (4)
sets are spares) and a 4-pack carry bag.
START HERE - GENERAL INFORMATION
• Use this instruction sheet as a reference for the Prestan Professional AED Trainer PLUS
andAccessories.Pleasereadthroughinstructionsbeforerstuse.
• Warning: The Prestan Professional AED Trainer PLUS is intended for training purposes
only.ItisNOTanAutomatedExternalDebrillator(AED)andwillnotdeliverashock.
Toavoidconfusion,itshouldNEVERbekeptinthesameareawithAEDs.
• Owner’s information – For future reference, make note of the Prestan Authorized
Distributor where you purchased your AED Trainer. Contact your Distributor for product
questions, reordering parts/accessories, and/or warranty issues.
• For information on Prestan’s Authorized Distributors, help guides, resources and more,
pleasevisitthePrestanwebsiteatwww.prestanproducts.com.
Purchase Information:
_______________________________________________________ _____________
Distributor Name and Phone Number Purchase Date

Professional AED Trainer PLUS Professional AED Trainer PLUS
COPYRIGHT© 11/30/2018 PRESTAN PRODUCTS, LLC - #12319 Page 3
FEATURES OF THE PRESTAN
PROFESSIONAL AED TRAINER PLUS
• Adult / Child selection buttons
• Brightly illuminated shock button
- Flasheswhenshockisadvised
• On/Obuttonwithlightedindicatorand
program pause option
• Sturdy,ip-uplid
- Durable translucent lid & hinge
- opening lid does not turn unit on
• Fivetrainingscenarios
• Clear&calmvoiceprompts
• Chest compression rate metronome
- Metronomecanbeturnedonoro
- Metronome audible count reminders at
ten (10), twenty (20) and thirty (30)
compressions
• Automatic OR Semi-Automatic shock
delivery
• Programming option to either include
or not include time for breaths after
compression cycle
• RemoteControlAvailable(soldseparately)
- Controls multiple units
• Long Battery Life
- Lowbatteryvoicepromptwarning
- Automaticshut-oforextended
battery life
• Programming is compliant with current
AHA Guidelines (2015)
- Easy to replace language module if
guidelines change
HIGH-PERFORMANCE TRAINING PADS
Start by installing your training pads onto the unit’s pre-installed
cables. See page 6 for full instructions.
• Patented Pad Sensing System automatically
advancesthescenarioprogrammingwhenit
detectsthepadshavebeenconnectedtoany
manikin
• Pads last approximately 100 uses (depending on
care and use conditions)
• Long-lifeadhesiveleavesnomessyresidueand
adheres well to any CPR manikin
• Pads cable is pre-connected to the AED Trainer
• Dual graphics allow for adult and child training and shows anatomical placement
• Unique pad connector with locking connector pin
• Padsarestoredinaconvenienthardcaseforadhesiveandsensorprotection
Professional AED Trainer PLUS Professional AED Trainer PLUS
COPYRIGHT© 11/30/2018 PRESTAN PRODUCTS, LLC - #12319 Page 4
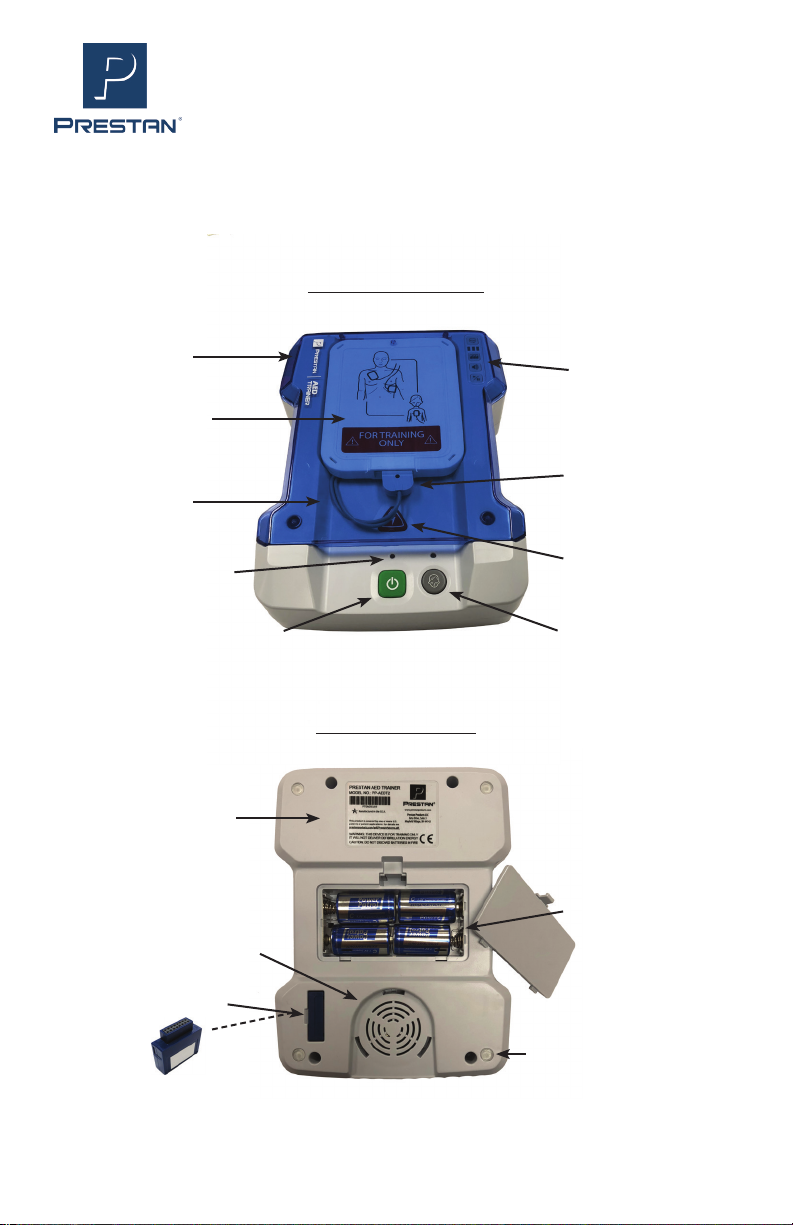
AED TRAINER PLUS FEATURE GUIDE
FLIP-TOP LID
PAD CABLES
SHOCK BUTTON
CHILD BUTTON
FOUR (4) “C”
BATTERIES (PRE-
INSTALLED IN UNIT)
TRAINING PADS
STORAGE CASE
ON / OFF / PAUSE BUTTON
PRODUCT INFORMATION
LABEL (MODEL / SERIAL
NUMBER)
BATTERY
COMPARTMENT
NON-MARKING SILICONE
PROTECTIVE FOOT (4)
SPEAKER
CONTROL PANEL
LANGUAGE MODULE
FRONT OF UNIT
BACK OF UNIT
TRAINING PADS
CONNECTOR
ON / OFF STATUS
INDICATOR LIGHTS

Professional AED Trainer PLUS Professional AED Trainer PLUS
COPYRIGHT© 11/30/2018 PRESTAN PRODUCTS, LLC - #12319 Page 5
ACTION BUTTONS
ON / OFF BUTTON
• Push green button to start program / the indicator
lightabovethebuttonwillturnon
• When unit is running, push and hold the button for
three(3)secondstoshutounit
CHILD BUTTON
• Afterpoweristurnedon,theprogrammingoers
an audible option to select the Child Button
• IndicatorlightabovetheChildButtonwilllightup
when the Child option has been selected and is
active
• Indicatorlightturnsoiftheprogramispaused,
but turns back on when the program is resumed
SHOCK BUTTON
• RedShockButtonwillashwhenprograminstructs
todelivershock
• In Semi-Automatic mode, pushing the Shock Button
whileitisashingwillsimulatedeliveringashock
andwillstoptheashingandresumetheprogram
• InAutomaticmode,theShockButtonwillash
approximately six (6) times before simulating auto-
shock and resuming the program
Child Button
On/O Button
Shock Button

Professional AED Trainer PLUS Professional AED Trainer PLUS
COPYRIGHT© 11/30/2018 PRESTAN PRODUCTS, LLC - #12319 Page 6
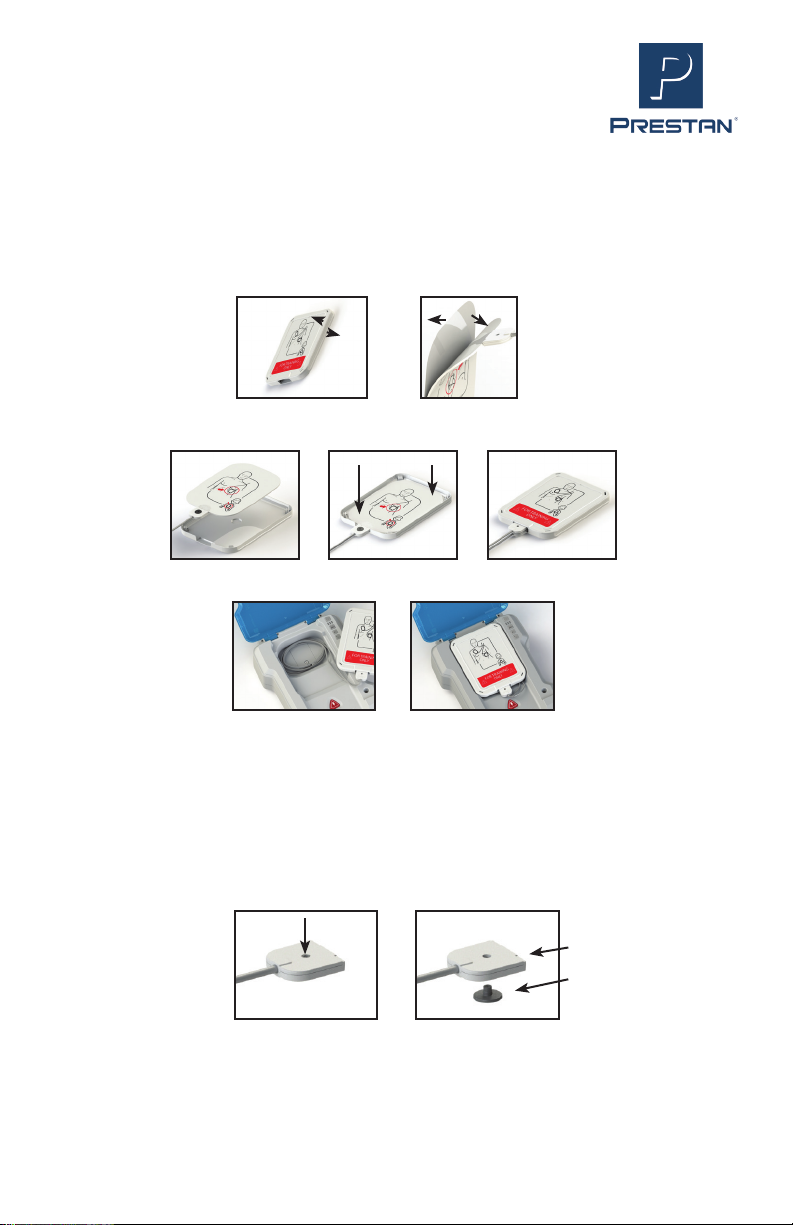
1. Setasidethetrainingpads(attopofbox)andremovethecardboardtrayfromthe
shipping container
2. RemovethePRESTANPROFESSIONALAEDTRAINERPLUSfromthebox
3. UnzipthePRESTANPROFESSIONALAEDTRAINERPLUScarryingcaseandremovethe
plastic package containing the module and connector pins
4. RemovethePRESTANPROFESSIONALAEDTRAINERPLUSfromthecarryingcase
5. Insert the LANGUAGE MODULE into the back of the unit on the lower left-hand corner
6. Pad Assembly
a. OpentheplasticpackageandremovethePrestanProfessionalTrainingPads
b. Find the ends of the AED Trainer cables that are not connected to the unit
c. Insert each pad into a cable connector (pad tab may need to be wiggled into
placeiftissnug)andlineuptheholeinthetabofthepadwiththeholeinthe
connector. Ensure pads are not installed upside down (see step e. below)
d. Lock pads in place by pushing connector pins into holes, making sure the pin rests
in the indentation in the cable connector
e. Ensure pads are not installed upside down (pad graphics should be on same side as
the large head of the connector pin)
ASSEMBLY, SETUP AND USE
CONNECTOR PIN
CABLE CONNECTOR
- continued on next page -
UPSIDE DOWN
Professional AED Trainer PLUS Professional AED Trainer PLUS
COPYRIGHT© 11/30/2018 PRESTAN PRODUCTS, LLC - #12319 Page 7
1. Prestan training pads will generally last approximately 100 uses (depending on use
and care conditions)
2. When needed, it is good practice to replace both pads at the same time
3. Release the existing pads from the gray cable connectors by popping out the black
pad connector pins from the small side with the tip of a ball point pen
4. Slide the used pads out from the cable connectors
5. RefertoStep#6(PadAssembly)onpreviouspagetocompletetheinstallation
f. Open the white plastic pad carrying case found in the unit
g. TurnpadoverandremovetheclearplasticlinerfromtheAEDPadbygently
pushing down on the tab end of the pad, causing the liner to separate
h. THROW THE CLEAR PLASTIC LINER AWAY (re-using the liner does not extend the
lifeoftheadhesiveandmayimpactpadsensingability)
i. Adhere the pads to the INSIDE lids of the white plastic Pad Case, close the case
j. CoiltheCables,placetheminthewellandcoverthemwiththePadCase
TRAINING PAD REPLACEMENT
CONNECTOR PIN
CABLE CONNECTOR
Assembly, Setup and Use - continued
Professional AED Trainer PLUS Professional AED Trainer PLUS
COPYRIGHT© 11/30/2018 PRESTAN PRODUCTS, LLC - #12319 Page 8
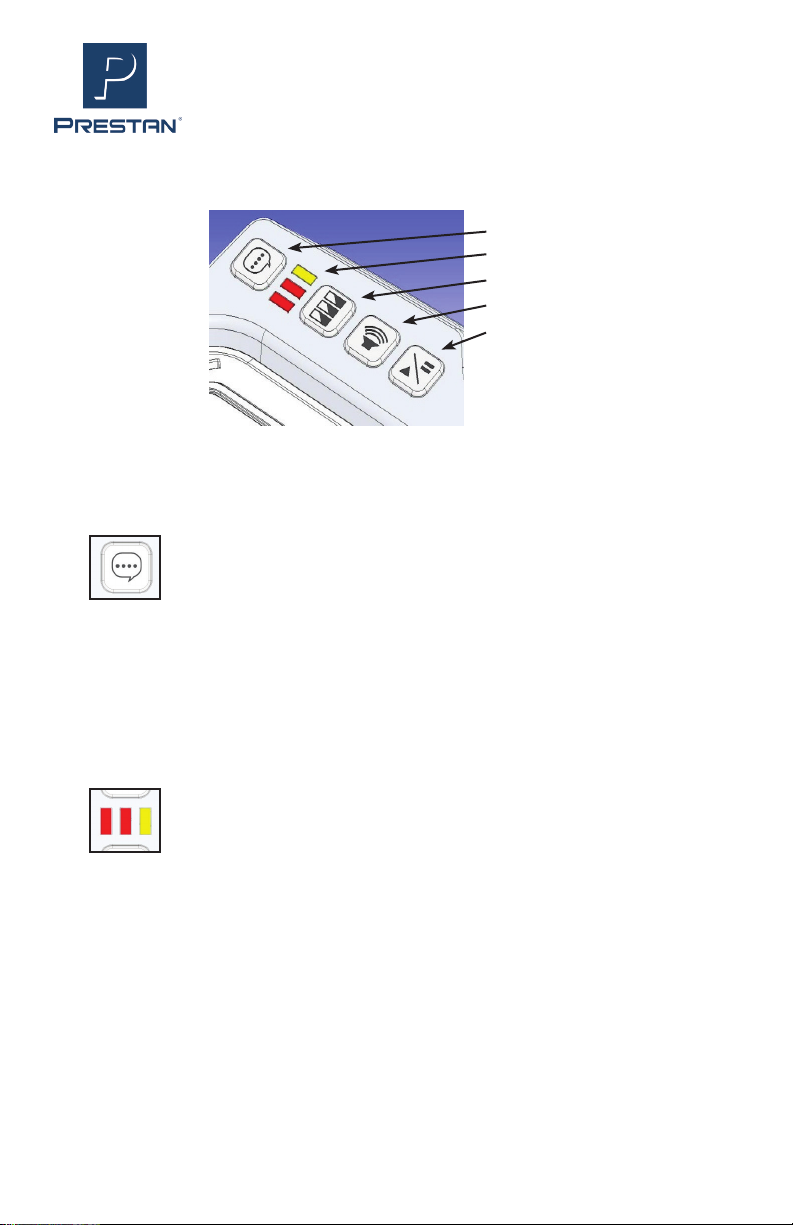
CONTROL PANEL
LANGUAGE SELECTION BUTTON
The LANGUAGE SELECTION BUTTON, located at the top of all the buttons on the
ProfessionalAEDTrainerPLUSUnit,willtogglebetweenthelanguagesavailable.
• Press the button to toggle between the languages
• The last language selected will remain the default until the language button is pressed
again to select another language
SELECTION INDICATOR LIGHTS
The SELECTION INDICATOR LIGHTS are below the Language Selection button. The
SELECTION INDICATOR LIGHTS are used during the setup of the unit. They indicate
settingssuchasautomaticorsemi-automaticshockmode,ventilationsmodes,and
metronome.
• Indicator lights are read left to right
LANGUAGE SELECTION BUTTON
PAUSE/PLAY BUTTON
VOLUME BUTTON
SCENARIO SELECTION BUTTON
SELECTION INDICATOR LIGHTS
- continued on next page -
The following information is a guide for customizing your AED Trainer. The unit may
becustomizedwhileONorOFF.Theunitwillbeeptoconrmandshutdown(ifON)
to reset when a language or scenario selection has been changed.
Professional AED Trainer PLUS Professional AED Trainer PLUS
COPYRIGHT© 11/30/2018 PRESTAN PRODUCTS, LLC - #12319 Page 9
SCENARIO SELECTION BUTTON
The SCENARIO SELECTION BUTTON is located under the Indicator Lights.
• The SCENARIO SELECTION BUTTONisusedtoselectoneoftheve(5)scenarios
availableontheunit:
- ▌A red indicator means ‘shock’
- ▌A yellow indicator means ‘no shock’
• ▌▌▌The factory default is for three (3) cycles, all of which are for ‘shock’
• Continuously pressing the SCENARIO SELECTION BUTTON will cycle through the
ve(5)availablescenarios:
- Scenario 1 ▌▌▌ shock; no shock; no shock
- Scenario 2 ▌▌▌shock; no shock; shock
- Scenario 3 ▌▌▌shock; shock; no shock
- Scenario 4 ▌▌▌ no shock; no shock; no shock
- Scenario 5 ▌▌▌ shock; shock; shock
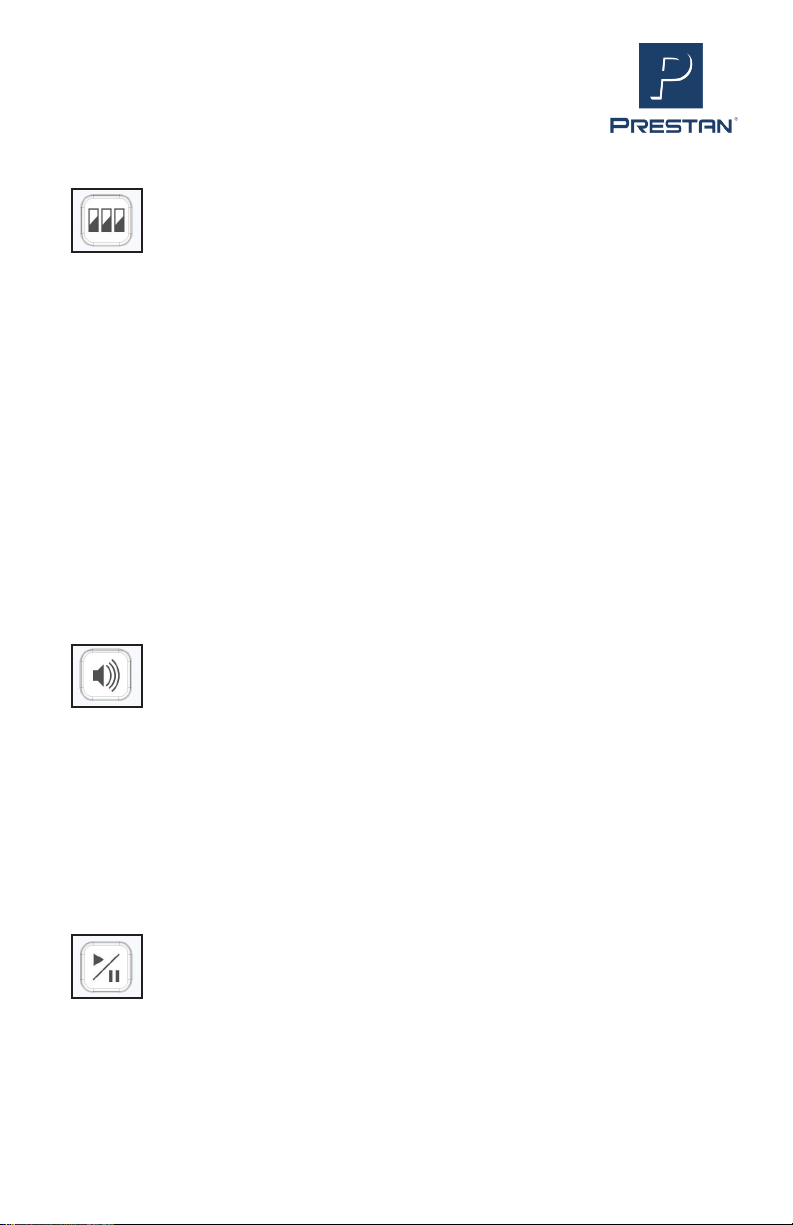
VOLUME BUTTON
• Therearethree(3)volumelevelsontheunit
• BypressingtheVOLUMEBUTTON,youcanincreaseordecreasethevolumeoftheunit
depending on need
• The indicator lights will light up to indicate
- ▌LowVolume
- ▌▌MediumVolume
- ▌▌▌HighVolume
PAUSE/PLAY BUTTON
• When the PAUSE/PLAY BUTTON is pushed, the unit will pause the scenario
• When in pause mode, three (3) yellow selection indicator lights ▌▌▌will blink
• Press the PAUSE/PLAY BUTTON again to resume the scenario
Control Panel - continued

Professional AED Trainer PLUS Professional AED Trainer PLUS
COPYRIGHT© 11/30/2018 PRESTAN PRODUCTS, LLC - #12319 Page 10
AUTOMATIC / SEMI-AUTOMATIC
ThePrestanProfessionalAEDTrainerPLUScanbesettoautomaticallydeliverasimulated
shock without depressing the Shock button.
• The Prestan Professional AED Trainer PLUS is preset from the factory in Semi-
AutomaticMode–thesimulatedshockisdeliveredmanuallybypressingthered
ShockButtonwheninstructedandbuttonisashing
• To change this mode:
- WiththeAEDTrainero,holddowntheOn/OButtonuntiltwo(2)beepsare
heard (about 7-10 seconds) then release
»therstbeepisfortestmodesowaitforthesecondbeep
»theShockButtonwillbeashingonando
- Look at the Selection Indicator Lights:
»Three (3) yellow lights – ▌▌▌ – mode will be Semi-Automatic
»Three (3) red lights – ▌▌▌– mode will be Automatic
- To change the mode, push the Shock Button
• Toexitandsave,presstheOn/OButton
PROGRAMMING OPTIONS
VENTILATIONS ON / OFF
The Prestan Professional AED Trainer PLUS can allow time for administering breaths
betweencompressionrounds.Thisoptioncanbetoggledonoro.
• TheAEDTrainerispresetfromthefactorywithventilationsON
• To change this mode:
- WiththeAEDTrainero,holddowntheOn/OButtonuntiltwo(2)beepsare
heard (about 7-10 seconds) then release
»therstbeepisfortestmodesowaitforthesecondbeep
»theShockButtonwillbeashingonando
- Look at the Selection Indicator Lights - there will be three (3) lit up in red or yellow
depending on your Automatic/Semi-Automatic preference
- Press the Scenario Selection Button belowthelightsuntilonlythersttwo
(2) lights are lit
»Two (2) yellow lights – ▌▌–theventilationssettingmodewillbeON
»Two (2) red lights – ▌▌–theventilationssettingmodewillbeOFF
- To change the mode, push the Shock Button
• Toexitandsave,presstheOn/OButton
Use combinations of buttons as directed below to program preferred settings for the unit.
- continued on next page -

Professional AED Trainer PLUS Professional AED Trainer PLUS
COPYRIGHT© 11/30/2018 PRESTAN PRODUCTS, LLC - #12319 Page 11
METRONOME ON / OFF
When doing compressions, the Prestan Professional AED Trainer PLUS will count by tens
(10s)asaguidetotherateof100compressionsperminute.Programmingalsooersan
audiblemetronometick(foreachcompression).Thisoptioncanbetoggledonoro.
• The AED Trainer is preset from the factory with metronome ON
• To change this mode:
- WiththeAEDTrainero,holddowntheOn/OButtonuntiltwo(2)beepsare
heard (about 7-10 seconds) then release
»therstbeepisfortestmodesowaitforthesecondbeep
»theShockButtonwillbeashingonando
- Look at the Selection Indicator Lights - there will be three (3) lit up in red or yellow
depending on your Automatic/Semi-Automatic preference
- Press the Scenario Selection Button belowthelightstwiceuntilonlytherst
lights are lit
»One (1) yellow light – ▌– the metronome setting mode will be ON
»One (1) red light – ▌– the metronome setting mode will be OFF
- To change the mode, push the Shock Button
• Toexitandsave,presstheOn/OButton
Programming Options - continued

Professional AED Trainer PLUS Professional AED Trainer PLUS
COPYRIGHT© 11/30/2018 PRESTAN PRODUCTS, LLC - #12319 Page 12
FEATURE SETTINGS
Ventilations On Ventilations O
CPR Metronome On
1. Program begins with analyzing
patientandadvisingshockorno
shock based on user scenario
setting.
2. Audible prompt “BEGIN CPR” starts
compression cycle.
3. Metronome beats and audible
prompt notes “TEN”, “TWENTY”, and
“THIRTY” compression counts.
4. After thirty (30) compression
tones, the metronome pauses
foranaudiblepromptto“GIVE2
BREATHS”.
5. Compression tones and breaths
continueforve(5)cycles(two(2)
minutes).
6. Unit analyzes patient.
7. Cyclesrepeatindenitelyfollowing
scenario shock pattern until unit is
manuallyshuto.
1. Program begins with analyzing
patientandadvisingshockorno
shock based on user scenario
setting.
2. Audible prompt “BEGIN CPR” starts
compression cycle.
3. Compression tones with audible
promptto“CONTINUECPR”every
twenty-four (24) seconds (x4).
4. Compression tones continue for two
(2) minutes.
5. Unit analyzes patient.
6. Cyclesrepeatindenitelyfollowing
scenario shock pattern until unit is
manuallyshuto.
CPR Metronome O
1. Program begins with analyzing
patientandadvisingshockorno
shock based on user scenario
setting.
2. Audible prompt “BEGIN CPR” starts
compression cycle.
3. Audible prompt notes “TEN”,
“TWENTY”, and “THIRTY”
compression counts.
4. After time for thirty (30)
compressions, the metronome
pauses for an audible prompt to
“GIVE2BREATHS”.
5. Compression tones and breaths
continueforve(5)cycles(two(2)
minutes).
6. Unit analyzes patient.
7. Cyclesrepeatindenitelyfollowing
scenario shock pattern until unit is
manuallyshuto.
1. Program begins with analyzing
patientandadvisingshockorno
shock based on user scenario
setting.
2. Audible prompt “BEGIN CPR” starts
compression cycle.
3. Silence except for audible prompt to
“CONTINUECPR”everytwenty-four
(24) seconds (x4).
4. Cycle stops at two (2) minutes.
5. Unit analyzes patient.
6. Cyclesrepeatindenitelyfollowing
scenario shock pattern until unit is
manuallyshuto.

Professional AED Trainer PLUS Professional AED Trainer PLUS
COPYRIGHT© 11/30/2018 PRESTAN PRODUCTS, LLC - #12319 Page 13
WARRANTY
Three (3) Year Limited Warranty
Prestanprovidesathree(3)yearlimitedwarrantyforitscoreproductline.Warrantydoes
notcoverconsumableitems.Forfullwarrantydetailsthatareapplicabletothisproduct,visit
the Resources section of www.prestanproducts.com.
CARE AND CLEANING INSTRUCTIONS
1. Store the Prestan Professional AED Trainer PLUS in its case and in a cool, dry area.
2. Always return the training pads to the inside lids of the plastic storage case. This protects
theadhesiveandsensor.Italsoallowsthesensortoresettheprogrammingfornextuse.
3. Starterbatterieshavebeeninstalledforimmediateuseoftheunit.Starterbatteries
should be replaced with quality alkaline batteries within a month of purchase. If the unit
willbestoredforlongerthanamonth,removebatteriestoprotectagainstcorrosion.
4. Neverpickuporcarrytheunitbythecables.
5. The Prestan Professional AED Trainer PLUS should be kept clean. If it becomes soiled,
simply wipe with a clean, slightly damp, soft cloth. If the Trainer is extremely dirty,
commoncleanerscanbeusedcautiously.DONOTUSEABRASIVEMATERIALSOR
CLEANING PRODUCTS ON THE UNIT. DO NOT SUBMERGE THE UNIT IN WATER.
TROUBLESHOOTING / TEST MODE
Is the unit programming not progressing past “place pads on patient”? Enter TEST MODE to
determine if your pads or cables need to be replaced. Make sure the training pads are stored
in the pad storage case before starting the test.
1. WiththeAEDTrainero,holddowntheOn/OButtonuntilone(1)beepisheard(about
4-6 seconds) then release
- if you reach two (2) beeps, that is programming mode - turn unit OFF and start again
- theShockButtonwillbeashingonando
2. Removeatrainingpadfromthecaseandlightlysqueezethesensor(rounddiskincenter
ofadhesive)
3. If a beep is heard - that pad and cable is in good working condition
4. RepeatSteps2and3abovewiththeothertrainingpad
5. If a beep is not heard - replace the pad with a known working pad (see Training Pad
Replacement section on page 7) and try again
- If a beep is now heard - the original pad needed replacing
- If a beep is still not heard - new cables are needed
6. PressOn/OButtontoquitTestMode

Professional AED Trainer PLUS Professional AED Trainer PLUS
COPYRIGHT© 11/30/2018 PRESTAN PRODUCTS, LLC - #12319 Page 14
SYMPTOM POSSIBLE ISSUES OR
COMMENTS SOLUTIONS
Unit does not turn on • Unit must be manually turned ON
• Batteries are not properly
installed
• Batteries are missing, batteries
are dead or battery contacts may
be corroded
• Language Module is not installed
• Push green power button
• Re-orient batteries properly
• Replace batteries and check
condition of battery contacts
• Insert language module into
backside of unit
Both pads attached
tomanikinbutdevice
willnotadvanceto
analysis
Note: Entering TEST
MODEmayprovidethe
answer(seeprevious
page for instructions)
• Operational solution
• Pad is inserted backwards in the
cable connector
• Padoradhesivewornoutor
adhesiveisdirty
• Insure pads are pressed on
rmlysothatthesensorin
thecenteroftheadhesiveis
atlytouchingasurface(press
down on pad center)
• Push out black connector pin,
ippadaroundandre-secure
with black connector pin (see
Training Pad Replacement
instructions on Page 7)
• Replace pad (pads last
approximately 100 uses with
proper care)
Deviceproceedsto
analyzing before both
padshavebeenplaced
on the manikin
• Pads not properly positioned
in pad case prior to starting
program
• Re-position pads in case to lay
completelyatandsensoris
positioned in recessed area of
pad case
Devicedeliversshock
before shock button is
pressed
• DeviceisInAutomaticmode • Change back to Semi-
Automatic Mode (see
instructions on Page 10)
Deviceprompts
“Replace Batteries”
• Devicewillrunten(10)ormore
hours with low batteries
• Replace batteries within ten
(10) hours
Devicesuddenlyshuts
downorvoiceprompts
are distorted
• Batteriesareverylow,almost
dead
• Install new batteries
Pad pulls out from pad
connector
• Black pad connector pin may be
missing
• Install new black connector pin
Pad will not stick to
the manikin
• Adhesiveiswornoutormay
havebecomedirty • Replace pads (pads last
approximately 100 uses with
proper care)
TROUBLESHOOTING GUIDE
Contact your Prestan Authorized Distributor for Warranty Assistance

Professional AED Trainer PLUS Professional AED Trainer PLUS
COPYRIGHT© 11/30/2018 PRESTAN PRODUCTS, LLC - #12319 Page 15
PARTS & ACCESSORIES
Contact your Prestan Authorized Distributor for Pricing and Ordering
11401
Single Carry Bag for the
Professional AED Trainer PLUS
PP-APAD2-1
Single set of Adult/Child Training Pads
for the Professional AED Trainer PLUS
PP-APAD2-4
Four (4) sets of Adult/Child Training Pads
for the Professional AED Trainer PLUS
RPP-AEDT2-CABLE
Set of Replacement Cables
for the Professional AED
Trainer PLUS
PP-ACASE2-1
Replacement Pad Storage
Case for the Professional
AED Trainer PLUS
PP-AEDT2-101-M English/Spanish
PP-AEDT2-102-M English/French
Language Module for the
Professional AED Trainer PLUS.
Additionallanguagesavailablebasedon
distributor-represented geographic area.
PP-AEDT2-100-R
Remote Control for the
Professional AED Trainer PLUS
Comes with two (2) ‘AA’ batteries
installed. Optional Remote allows
control of multiple units at a time.
Features“padson/o”and“push
harder” prompts.
11402
4-Pack Carry Bag for the
Professional AED Trainer PLUS

www.prestanproducts.com
This manual suits for next models
3
Table of contents
Other Prestan Educational Equipment manuals


