Princess 519000 User manual

Cordless hair straightener
Article 519000
©Princess 2008
• Gebruiksaanwijzing • User's instructions • Mode d'emploi
• Bedienungsanleitung • Instrucciones de uso • Istruzioni per l'uso
• Bruksanvisning • Brugsanvisning • Bruksanvisning • Käyttöohje
• Instruções de uso • ȅįȘȖȓİȢ ȤȡȒıȘȢ •
ϡΪΨΘδϤϟ ϞϴϟΩ

Nederlands 1
English 6
Français 11
Deutsch 16
Español 21
Italiano 26
Svenska 31
Dansk 35
Norsk 39
Suomi 43
Português 47
ǼȜȜȘȞȚțȐ 52
57
ΓΪΤΘϤϟ ΔϜϠϤϤϟ

1
1
2
87
54
3
6
9
10

2

1
Article 519000 Cordless Hair Straightener
Algemeen
Met deze Princess Cordless Hair
Straightener kunt u gekruld haar steil
maken, maar kunt u steil haar ook wat
extra zwier geven door lokken en slagen te
maken.
Het apparaat is voorzien van twee
verwarmingsplaten die zijn bedekt met een
keramische, toermalijnen en nanozilveren
coating. Het keramische materiaal geeft
uw haar een mooie, glanzende look en het
toermalijn maakt uw haar antistatisch,
waardoor het eenvoudig te behandelen is.
De nanozilveren coating heeft een
zuiverend effect op uw haar. Wanneer u dit
apparaat regelmatig gebruikt, blijft uw haar
zacht, glanzend, flexibel en gezond.
Het apparaat wordt gevoed met vier
oplaadbare batterijen. Hierdoor is het
apparaat eenvoudig te gebruiken zonder
onhandig netsnoer.
De temperatuur kan eenvoudig worden
afgesteld van 80 °C tot maximaal 200 °C.
Gebruik en bediening
Zie ook figuur 1.
Het apparaat bestaat uit de volgende
onderdelen:
1 Vergrendelknop
2 Verwarmingsplaten (2x)
3 Knop voor verhoging van de
temperatuurafstelling
4 Knop voor verlaging van de
temperatuurafstelling
5 Aan-/uitknop
6 Digitaal display
7 Oplaadaansluiting
8 Spiegels met beschermende laag (2x)
9 Adapter
10 Opbergtas
Voor het eerste gebruik
1 Haal het apparaat uit de verpakking en
verwijder alle verpakkingsmaterialen.
2 Verwijder de beschermende laag van
de spiegels.
3 Reinig het apparaat (zie “Onderhoud en
reiniging“).
4 Het apparaat wordt geleverd met een
geopend batterijcompartiment en apart
verpakte oplaadbare batterijen.
Plaats de batterijen zoals is
aangegeven op het apparaat (zie
afbeelding 3).
5 Sluit het batterijcompartiment.
6 Laad de batterijen volledig op (zie
‘Batterijen opladen’).
Gebruik
1 Sluit het apparaat en vergrendel het in
die positie door de vergrendelknop in
de vergrendelde positie te schuiven.
Houd het apparaat tijdens opwarmen in
de gesloten positie om onnodig
warmteverlies te voorkomen.
2 Houd de Aan-/uitknop ongeveer
1 seconde ingedrukt om het apparaat in
te schakelen.
Er klinkt een korte piep en op het
display wordt de huidige temperatuur
van de verwarmingsplaten
weergegeven. Normaalgesproken ziet
u de temperatuur van de
verwarmingsplaten toenemen.
De standaardinstelling voor de
temperatuur is 180 °C.
3 Pas de ingestelde temperatuur aan.
Wanneer u op een van de
afstelknoppen voor de temperatuur
drukt, wordt op het display kort de
ingestelde temperatuur getoond.
Pas de ingestelde temperatuur aan met
de afstelknoppen voor de temperatuur.
Wanneer u een afstelknop voor de
temperatuur ingedrukt houdt, wordt de
ingestelde temperatuur snel verhoogd/
verlaagd.
Druk op de afstelknoppen voor de
temperatuur om de ingestelde
temperatuur te verhogen/verlagen met

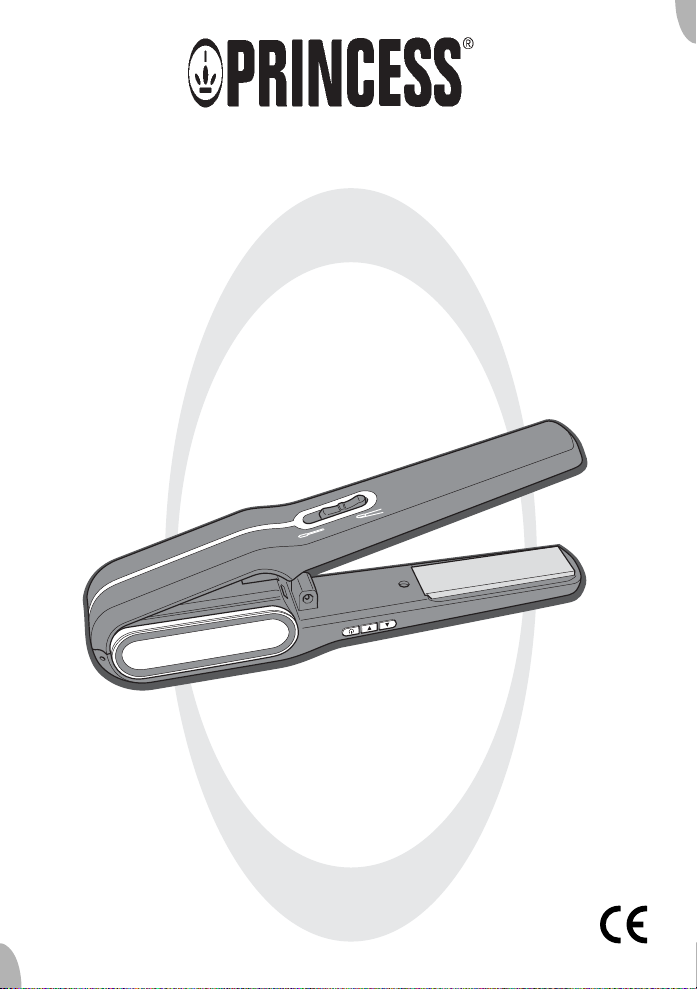
2Article 519000 Cordless Hair Straightener
stappen van 1 °C.
Wanneer de ingestelde temperatuur is
gekozen, wordt na ongeveer 1 seconde
de huidige temperatuur van de
verwarmingsplaten weer getoond.
• Wanneer u deze straightener voor de
eerste keer gebruikt, moet u een
geschikte temperatuurinstelling voor
uw haar zien te vinden. Begin met een
lage temperatuur en verhoog de
temperatuur in kleine stappen totdat u
het gewenste resultaat krijgt.
• Wanneer u het apparaat uitschakelt,
wordt de ingestelde temperatuur
opgeslagen. De volgende keer dat u
het apparaat inschakelt, wordt deze
temperatuurinstelling weer gebruikt.
4 Wanneer de temperatuur van de
verwarmingsplaten gelijk is aan de
ingestelde temperatuur, is de
straightener gereed voor gebruik.
5 Schuif de vergrendelknop in de
geopende positie om de vergrendeling
op te heffen en de straightener te
openen.
• Raak de verwarmingsplaten niet aan,
deze zijn erg heet.
6 Neem een haarlok vlakbij uw hoofdhuid
en plaats deze tussen de
verwarmingsplaten en sluit de
straightener.
7 Trek de straightener in een langzame,
soepele beweging weg van uw hoofd,
naar het einde van de haarlok. Hierbij
haalt u het haar tussen de
verwarmingsplaten door.
Zorg ervoor dat het haar gelijkmatig
verdeeld is tussen de
verwarmingsplaten.
Maak niet te veel haar tegelijkertijd
steil.
8 Herhaal stap 6 en 7 totdat uw haar de
gewenste styling heeft.
9 Borstel uw haar wanneer u klaar bent.
Gebruik, indien nodig,
haarstylingproducten voor een beter
resultaat.
10 Wanneer u klaar bent, schakelt u het
apparaat uit door de Aan-/uitknop
ongeveer 1 seconde ingedrukt te
houden.
Er klinkt een korte piep en het display
wordt gedimd.
Laat het apparaat helemaal afkoelen.
11 Maak het apparaat na gebruik schoon
(zie hoofdstuk ‘Onderhoud en
reiniging’).
12 Laad de batterijen op voor de volgende
keer (zie ‘Batterijen opladen’).
• Borstel eventueel klittend haar uit
voordat u de straightener gebruikt.
• Maak uw haar handdoekdroog.
• Door de straightener iets schuin te
houden, krijgt u krullen en golven in
uw haar.
• Gebruik de straightener niet wanneer
uw haar in model is gebracht met
haarcrème of andere
haarstylingproducten. Deze producten
kunnen schade veroorzaken aan de
verwarmingselementen.
• Gebruik de straightener niet wanneer
er recentelijk een permanent in uw
haar is ingebracht. Wanneer de
chemische stoffen in uw haar worden
verwarmd, kunnen deze letsel aan uw
hoofdhuid veroorzaken.
Wacht na de permanentbehandeling
ongeveer drie dagen.
• Gebruik het apparaat alleen voor het
krullen of steil maken van haar.
• Schakel het apparaat uit als er tijdens
het gebruik een storing optreedt,
voordat u het apparaat reinigt en
voordat u het apparaat opbergt.
• Laat het apparaat tijdens gebruik nooit
onbeheerd achter.

3
Article 519000 Cordless Hair Straightener
Onderhoud en
reiniging
Reinigen
1 Zorg ervoor dat het apparaat is
uitgeschakeld en volledig is afgekoeld.
2 Reinig het apparaat met een zachte,
vochtige doek. Gebruik, indien nodig,
een mild reinigingsmiddel.
3 Wrijf het apparaat droog met een
schone, droge doek.
• Reinig het apparaat na gebruik
grondig.
• Zorg ervoor dat het apparaat niet is
aangesloten op de oplaadadapter
wanneer u het gaat schoonmaken.
• Let op dat er geen vocht bij de
elektrische onderdelen van het
apparaat komt.
• Dompel het apparaat en/of de adapter
nooit onder in water of andere
vloeistoffen.
• Gebruik om het apparaat te reinigen
nooit harde of schurende
schoonmaakproducten of scherpe
voorwerpen (zoals messen of harde
borstels).
Batterijen opladen
1 Na gebruik laat u de batterijen afkoelen
voordat u deze oplaadt.
2 Sluit de adapter aan op het apparaat en
steek de adapter in het stopcontact.
Het display wordt verlicht en hierop
worden enkele C’s getoond, waarvan er
een knippert.
Met het aantal ‘C’s wordt het
laadniveau van de batterijen
aangegeven. Het maximum is 4 ‘C’s.
3 Wanneer op het display ‘FUL’ wordt
weergegeven, zijn de batterijen volledig
opgeladen.
4 Neem de adapter uit het stopcontact en
ontkoppel deze van het apparaat.
5 Laat de batterijen afkoelen voordat u
het apparaat gebruikt.
• Wanneer de straightener tijdens het
opladen begint te piepen, zijn de
batterijen incorrect geplaatst.
Open het batterijcompartiment en
plaats de batterijen op correcte wijze
(zie ‘Batterijen vervangen’)
• Gebruik het apparaat niet tijdens het
opladen van de batterijen.
Batterijen vervangen
Afhankelijk van het gebruik van het
apparaat, verliezen de oplaadbare
batterijen na verloop van tijd hun
capaciteit. Wanneer de batterijen volledig
opgeladen zijn en de werktijd te kort wordt,
of wanneer de ingestelde temperatuur niet
meer wordt bereikt, zijn de batterijen
waarschijnlijk versleten en moeten deze
worden vervangen.
1 Houd het apparaat zoals aangegeven
in afbeelding 2 (met de
vergrendelknoppen omhoog gericht),
met uw duim en wijsvinger op beide
spiegels en trek het
batterijcompartiment open.
2 Verwijder de batterijen uit het
compartiment.
3 Vervang de batterijen door nieuwe
oplaadbare batterijen. Plaats de
batterijen zoals is aangegeven op het
apparaat (zie afbeelding 3).
4 Sluit het batterijcompartiment.
• Gebruik alleen nieuwe oplaadbare
batterijen van hetzelfde type en met
dezelfde capaciteit als de originele
batterijen (NI-MH-batterijen, type AA,
1,2 V, 2400 mAh)
Gebruik geen ander type oplaadbare
batterijen.
• Gebruik alleen oplaadbare batterijen.
Wanneer u probeert om niet-
oplaadbare batterijen op te laden,
worden de batterijen warm, gaan ze

4Article 519000 Cordless Hair Straightener
lekken en kunnen ze exploderen.
Hierdoor raakt het apparaat
beschadigd.
• Batterijen bevatten metalen en zuren
die schadelijk zijn voor het milieu.
Gooi batterijen niet in de vuilnisbak.
Breng batterijen naar een inzamelpunt
voor gevaarlijke stoffen.
OPBERGEN
1 Zorg ervoor dat het apparaat is
uitgeschakeld en volledig is afgekoeld.
2 Laad de batterijen op zodat de
straightener de volgende keer werkt.
3 Sluit het apparaat en vergrendel het in
die positie door de vergrendelknop in
de vergrendelde positie te schuiven.
4 Doe het apparaat in de opbergtas.
5 Bewaar het apparaat en de adapter op
een droge en vorstvrije plaats.
• Bewaar het apparaat nooit met lege
batterijen. Hierdoor neemt de
levensduur van de batterijen af.
• Wanneer u het apparaat gedurende
lange tijd niet zult gebruiken, wordt u
geadviseerd om de batterijen uit het
apparaat te halen en deze apart te
bewaren.
Veiligheid
Algemeen
• Lees deze instructies en voer ze
nauwkeurig uit. Bewaar deze
handleiding als naslagwerk.
• Het apparaat mag alleen
overeenkomstig deze instructies
worden gebruikt.
• Het apparaat is alleen bestemd voor
huishoudelijk gebruik.
• Het gebruik van dit apparaat kan
gevaarlijk zijn voor kinderen of voor
personen met een lichamelijke,
zintuiglijke, geestelijke, psychische of
motorische handicap of voor
personen met gebrek aan kennis en
ervaring. Personen die
verantwoordelijk zijn voor de
veiligheid van dergelijke personen
moeten duidelijke instructies geven of
toezien op het gebruik van het
apparaat.
• Houd het apparaat buiten het bereik
van kinderen en van personen die het
apparaat misschien niet veilig kunnen
bedienen.
• Laat reparaties uitvoeren door een
gekwalificeerde monteur. Probeer het
apparaat nooit zelf te repareren.
• Gebruik alleen de door de leverancier
aanbevolen accessoires. Het gebruik
van andere accessoires kunnen
schade aanbrengen aan het apparaat
en daarmee een risico vormen voor de
gebruiker.
• Houd brandbare materialen zoals
gordijnen, handdoeken en papier uit
de buurt van het apparaat.
Elektriciteit en warmte
• Wanneer u de adapter uit het
stopcontact neemt, trekt u aan de
adapter en niet aan het snoer.
• Gebruik het apparaat niet wanneer het
apparaat of de adapter beschadigd is.
Laat een gekwalificeerde elektricien
het stroomsnoer vervangen.
• Zorg ervoor dat het apparaat en de
adapter niet in aanraking komen met
hittebronnen, zoals een hete
kookplaat of open vuur.
• Zorg ervoor dat het apparaat en de
adapter niet in aanraking komen met
water, andere vloeistoffen of
chemicaliën.

5
Article 519000 Cordless Hair Straightener
• Het apparaat en de onderdelen
kunnen tijdens het gebruik heet
worden. Om brandwonden te
voorkomen, moet u voorzichtig zijn
als u het apparaat en de onderdelen
aanraakt.
• Wikkel het adaptersnoer niet rond het
apparaat.
Milieu
U dient het verpakkingsmateriaal, zoals
plastic en dozen, in de hiervoor
aangewezen afvalbakken weg te gooien.
Een nog goed werkend of een eenvoudig
te repareren apparaat kunt u recyclen.
Aan het eind van de levensduur dient u het
apparaat op een verantwoorde manier af
te voeren, waardoor het hergebruik van het
apparaat of de onderdelen daarvan
verzekerd is. Zet het apparaat niet bij
ongesorteerd afval. Lever het in bij de
winkel of breng het naar een erkend
inzamelpunt. Neem voor informatie over
het inzamelsysteem in uw regio contact op
met de gemeente.
CE-conformiteit
De van toepassing zijnde Europese
regelgeving:
2002/95/EC
2002/96/EC

6Article 519000 Cordless Hair Straightener
General
This Princess Cordless Hair Straightener
can straighten curled hair, but it can also
give extra looks to straight hair by creating
hair locks and waves.
The appliance is equipped with two heating
plates that are covered with ceramic,
tourmaline and a nano silver coating. The
ceramic material gives your hair a nice
shiny look while the tourmaline makes your
hair anti-static resulting in easy pliable hair.
The nano silver coating has a cleansing
effect on your hair. Regular use of this
appliance will keep your hair soft, shiny,
pliable and healthy.
The appliance is powered by four
rechargeable batteries. This makes the
appliance easy to use without inconvenient
power leads.
The temperature is easily adjustable from
80 °C until maximum 200 °C.
Operation and
controls
See Figure 1.
The appliance is equipped with the
following features:
1 Lock button
2 Heating plates (2x)
3 Button to increase the temperature
adjustment
4 Button to decrease the temperature
adjustment
5 On/off button
6 Digital display
7 Recharge connection
8 Mirrors with protective film (2x)
9 Adaptor
10 Storage bag
Before first use
1 Take the appliance out of the packaging
and remove all packaging materials.
2 Remove the protective film from the
mirrors.
3 Clean the appliance (see ‘Maintenance
and cleaning’).
4 The appliance is shipped with an
opened battery compartment and
separately packed rechargeable
batteries.
Make sure you position the batteries as
indicated on the appliance (see
figure 3).
5 Close the battery compartment.
6 Recharge the batteries completely (see
‘Recharging batteries’).
Use
1 Close the appliance and lock it in that
position by shifting the lock button to
the locked position.
Keep the appliance in the closed
position during heating up to avoid
unnecessary heat losses.
2 Press for about one second on the on/
off button to switch on the appliance.
A short beep will be heard and the
display will show the present
temperature of the heating plates.
Normally you will see an increasing
temperature of the heating plates.
The default temperature setting is
180 °C.
3 Adjust the set temperature.
When one of the temperature
adjustment buttons is pushed, the
display will shortly show the set
temperature.
Adjust the set temperature with the
temperature adjustment buttons.
Holding a temperature adjustment
button depressed will result in a rapidly
increasing/decreasing set temperature.
Press the temperature adjustment
buttons shortly to increase/decrease
the set temperature in steps of 1 °C.
When the set temperature is set, after
about 1 second the present

7
Article 519000 Cordless Hair Straightener
temperature of the heating plates will
be displayed again.
• When you use this hair straightener
for the very first time, you will have to
find a suitable temperature setting for
your hair. Start with a low temperature
and increase the temperature in small
steps until you get the desired result.
• The set temperature will be stored
when the appliance is switched off.
The next time when you switch on the
appliance, this temperature setting
will be used again.
4 When the temperature of the heating
plates are the same as the set
temperature, the hair straightener is
ready for use.
5 Shift the lock button to the open
position, to release the lock and open
the hair straightener.
• Do not touch the heating plates, they
are very hot.
6 Place a lock of hair near the head
between the heating plates and close
the hair straightener.
7 Pull the hair straightener in one slow
gentle move away from your head to
the end of the lock of hair, moving the
hair between the heating plates.
Make sure the hair is evenly distributed
between the heating plates.
Do not straighten too much hair at
once.
8 Repeat steps 6 and 7 until your hair is
styled as wished.
9 Brush your hair when finished.
If necessary use hair styling products to
improve the result.
10 When ready, switch off the appliance by
pushing on the on/off button for about
one second.
A small beep will be heard and the
display will dim.
Have the appliance cool down
completely.
11 Clean the appliance after each use (see
‘Maintenance and cleaning’).
12 Recharge the batteries for next time
use (see ‘Recharging batteries’).
• Brush any knots out of your hair
before using the straightener.
• Make sure your hair has been towel
dried.
• By holding the straightener somewhat
inclined, curls and waves will occur in
your hair.
• Do not use the straightener when your
hair is styled using hair cream or other
hair styling products. These products
can damage the heating elements.
• Do not use the straightener when your
hair has recently been provided with
permanent. When heated, the
chemicals in your hair can cause
injury to your head skin.
Wait about three days after the
treatment with permanent.
• Use the appliance only for curling or
straightening hair.
• Switch off the appliance in the event
of a malfunction during use, before
cleaning the appliance and before
storing the appliance after use.
• Never leave the appliance unattended
when in use.
Maintenance and
cleaning
Cleaning
1 Make sure the appliance is switched off
and cooled down completely.
2 Clean the appliance with a soft, damp
cloth. If necessary, use a mild cleaning
product.

8Article 519000 Cordless Hair Straightener
3 Wipe the appliance dry with a clean dry
cloth.
• Clean the appliance thoroughly after
use.
• Make sure the appliance is not
connected with the recharge adaptor
when you are going to clean it.
• Make sure no moisture comes into
contact with the appliance’s electrical
parts.
• Never immerse the appliance and/or
the adaptor in water or other liquids.
• Never use aggressive or scouring
cleaning products or sharp objects
(such as a knife or a hard brush) to
clean the appliance.
Recharging batteries
1 After use, allow the batteries to cool
before recharging.
2 Connect the adapter with the appliance
and put the adaptor in the wall socket.
The display will light up showing you a
number of ‘C’s from which one is
blinking.
The number of ‘C’s indicate the battery
charge. The maximum is 4 ‘C’s.
3 When the display shows ‘FUL’, the
batteries are charged completely.
4 Remove the adaptor from the wall
socket and disconnect it from the
appliance.
5 Allow the batteries to cool before using
the appliance.
• When the hair straightener starts
beeping during recharging, the
batteries are positioned incorrectly.
Open the battery compartment and
position batteries correctly (see
‘Replace batteries’).
• Do not use the appliance during
recharging the batteries.
Replace batteries
Depending on the use of the appliance, the
rechargeable batteries will loose their
capacity after some time. When with fully
charged batteries, the functioning time of
the appliance becomes too short or when
the set temperature is not reached
anymore, most probably the batteries are
worn down and must be replaced.
1 Hold the appliance as indicated in
figure 2 (with the lock button upwards)
and with thumb and index finger on
both mirrors, pull open the battery
compartment.
2 Remove the batteries from the
compartment.
3 Replace the batteries by new
rechargeable batteries. Make sure you
position them as indicated on the
appliance (see figure 3).
4 Close the battery compartment.
• Use new rechargeable batteries of the
same type and with the same capacity
as the original batteries (NI-MH
batteries, type AA, 1.2 V, 2400 mAh).
Do not use other types of
rechargeable batteries.
• Use rechargeable batteries only.
Trying to recharge not-rechargeable
batteries, the batteries will become
hot, causing leaking and sometimes
exploding batteries. This will cause
damage to the appliance.
• Batteries contain metals and acids
that are hazardous for the
environment. Do not throw used
batteries in the trash.
Collect them to take to hazardous
material collection locations.
STORAGE
1 Make sure the appliance is switched off
and cooled down completely.
2 Recharge the batteries to prepare the
hair straightener for the next time.
3 Close the appliance and lock it in that
position by shifting the lock button to
the locked position.

9
Article 519000 Cordless Hair Straightener
4 Put the appliance in the storage bag.
5 Store the appliance and the adaptor in a
dry and frost free location.
• Never store the appliance with
discharged batteries. This will lead to
a decreasing life expectancy of the
batteries.
• When it is expected that the appliance
is not going to be used for a longer
period, it is advised to remove the
batteries and store them separately.
Safety
General
• Read and follow these instructions
carefully. Keep this manual for future
reference.
• Use this appliance only in accordance
with these instructions.
• This appliance is intended solely for
domestic use.
• The use of this appliance by children
or persons with a physical, sensory,
mental or motor disability or with a
lack of the necessary knowledge and
experience may cause a hazard.
Persons responsible for the safety of
such people must give explicit
instructions or supervise the use of
the appliance.
• Keep the appliance out of the reach of
children, and of persons who may not
be able to operate it safely.
• Have the appliance repaired only by a
qualified electrician. Never try to
repair the appliance yourself.
• Only use accessories recommended
by the supplier. The use of other
accessories may result in damage to
the appliance, thereby creating
hazards for the user.
• Keep the appliance away from
inflammable materials, such as
curtains, a towel or paper.
Electricity and heat
• When you remove the adaptor from
the wall socket, pull the adaptor and
not the power cord.
• Do not use the appliance if the
appliance or the adaptor is damaged.
Have a damaged power cord replaced
by a qualified electrician.
• Make sure that the appliance and the
adaptor do not come in contact with
sources of heat such as a hot hob or
naked flame.
• Make sure that the appliance and the
adaptor do not come in contact with
water, other fluids or chemicals.
• The appliance and its parts become
hot while the appliance is in use. To
avoid being burnt, take care when
touching the appliance and its parts.
• Do not wrap the adapter cord around
the appliance.

10 Article 519000 Cordless Hair Straightener
The Environment
Dispose of packaging material, such as
plastic and boxes, in the appropriate waste
containers.
If you wish to dispose of the appliance
whilst it still works properly or can be easily
repaired, then ensure that the appliance is
recycled.
When the appliance reaches the end of its
useful life, it should be disposed of in a
responsible manner, thereby ensuring the
reuse of the appliance or its parts. Do not
dispose of the appliance with unsorted
refuse; hand it in at the store, or take it to a
recognized collection point. Contact your
municipality for information about the
reception and collection systems in your
area.
CE Conformity
Applicable European guideline:
2002/95/EC
2002/96/EC

11
Article 519000 Cordless Hair Straightener
Généralités
Votre Cordless Hair Straightener Princess
est fait pour lisser les cheveux frisés, mais
il est également capable de créer
ondulations et boucles dans les cheveux
lisses.
L'appareil a deux plaques chauffantes
revêtues de céramique, de tourmaline et
d'un nanorevêtement argenté. Le matériau
céramique donne un fini brillant à vos
cheveux, et la tourmaline a un effet
antistatique, pour une chevelure docile. Le
nanorevêtement argenté a un effet
nettoyant. Utilisez régulièrement cet
appareil pour des cheveux doux, brillants,
dociles et sains.
L'appareil est alimenté par quatre piles
rechargeables. Ainsi, l'appareil est aisé à
manipuler, sans cordons gênants.
La température, facilement réglable, va de
80°C à un maximum de 200°C.
Fonctionnement et
utilisation
Voir la figure 1.
L'appareil est équipé des fonctions
suivantes :
1 Bouton de verrouillage
2 Plaques chauffantes (2x)
3 Bouton pour augmenter la température
4 Bouton pour diminuer la température
5 Interrupteur marche/arrêt
6 Affichage numérique
7 Connecteur de recharge
8 Miroirs avec film de protection (2x)
9 Adaptateur
10 Sac de rangement
Avant la première utilisation
1 Sortez l'appareil de son emballage et
enlevez tout l'emballage.
2 Retirez des miroirs les films
protecteurs.
3 Nettoyez l'appareil (voir « Entretien et
nettoyage »).
4 Lors de l'expédition, le compartiment
des piles de l'appareil est ouvert et les
piles rechargeables sont emballées
séparément.
Veillez à bien positionner les piles
comme indiqué sur l'appareil (figure 3).
5 Fermez le compartiment des piles.
6 Chargez complètement les piles (voir «
Recharge des piles »).
Utilisation
1 Fermez l'appareil et verrouillez-le en
mettant le bouton de verrouillage en
position bloquée.
L'appareil restera fermé pendant que
vous le préchauffez, pour éviter des
pertes de chaleur inutiles.
2 Enfoncez l'interrupteur marche/arrêt
pendant environ une seconde pour
mettre l'appareil sous tension.
Un petit bip se fait entendre et
l'affichage indique la température
actuelle des plaques chauffantes.
Normalement, vous verrez les valeurs
de la température s'élever
progressivement.
La valeur par défaut de la température
est de 180 °C.
3 Réglez la température désirée.
Lorsque vous appuyez sur l'un de
boutons de réglage de la température,
l'affichage indique brièvement la
température préréglée.
Réglez la température à obtenir au
moyen des boutons de réglage de la
température.
Maintenez l'un des boutons de réglage
de la température enfoncé pour une
augmentation/diminution rapide de la
température préréglée.
Enfoncez brièvement l'un des boutons
de réglage de la température pour une

12 Article 519000 Cordless Hair Straightener
augmentation/diminution rapide de la
température préréglée par incréments
de 1°C.
Une fois que la température à obtenir
est préréglée, l'affichage montrera de
nouveau la température actuelle des
plaques chauffantes, au bout de
1 seconde environ.
• Lors de la toute première utilisation, il
vous faudra déterminer quelle est la
température qui convient le mieux à
vos cheveux. Commencez par une
température faible et augmentez-la
peu à peu, jusqu'à obtenir le résultat
voulu.
• La température préréglée est
mémorisée quand vous éteignez
l'appareil. Lorsque vous le rallumez, il
reprendra cette température
préréglée.
4 Le fer à défriser est prêt à l'emploi dès
que la température des plaques
chauffantes a atteint la température
préréglée.
5 Débloquez le bouton de verrouillage et
ouvrez le fer à défriser.
• Ne touchez pas les plaques
chauffantes, vous vous brûleriez.
6 Placez une mèche de cheveux entre
les plaques chauffantes et fermez le fer.
7 Faites glisser le fer, emprisonnant la
mèche, d'un mouvement lent et
régulier, de la tête vers le bout de la
mèche.
Veillez à distribuer régulièrement les
cheveux entre les plaques chauffantes.
N'essayez pas de défriser de trop
grosses mèches en une fois.
8 Répétez les étapes 6 et 7 jusqu'à ce
que vos cheveux soient lissés comme
vous le souhaitez.
9 Quand vous avez fini, brossez-vous les
cheveux.
Utilisez selon le besoin d'autres
produits de coiffure pour obtenir le
résultat voulu.
10 Quand vous avez fini, éteignez
l'appareil en enfonçant l'interrupteur
marche/arrêt pendant environ une
seconde.
Un petit bip se fait entendre et
l'affichage s'éteint.
Laissez l'appareil se refroidir
complètement.
11 Nettoyez l'appareil après chaque
utilisation (voir « Entretien et
nettoyage »).
12 Chargez complètement les piles en vue
de l'utilisation suivante (voir « Recharge
des piles »).
• Démêlez entièrement vos cheveux
avant d'utiliser le fer à défriser.
• Séchez vos cheveux au préalable avec
une serviette seulement.
• Inclinez légèrement le fer pour créer
des ondulations ou des boucles
lâches dans vos cheveux.
• N'utilisez pas le fer à défriser sur des
cheveux dans lesquels vous avez déjà
mis une crème ou mousse à coiffer, ou
autre produit similaire. Ces produits
endommagent les plaques
chauffantes.
• N'appliquez pas le fer à défriser sur
des cheveux récemment
permanentés. Les résidus des
produits utilisés pour la permanente,
chauffés par le fer, sont dangereux
pour la peau.
Attendez au moins trois jours après
une permanente.
• Cet appareil doit être utilisé
uniquement pour défriser ou boucler
des cheveux.
• Éteignez l'appareil en cas de problème
durant l'utilisation, pour le nettoyage,
et pour le rangement quand vous avez
fini de l'utiliser.
• Ne laissez pas l'appareil sans
surveillance pendant l'utilisation.

13
Article 519000 Cordless Hair Straightener
Nettoyage et entretien
Nettoyage
1 L'appareil doit être éteint et refroidi.
2 Nettoyez l'appareil avec un chiffon doux
humide. Si nécessaire, utilisez un peu
de détergent doux.
3 Essuyez avec un chiffon doux sec.
• Nettoyez soigneusement l'appareil
après l'utilisation.
• Assurez-vous que l'appareil n'est pas
branché sur l'adaptateur de recharge
au moment où vous commencez à le
nettoyer.
• Ne laissez pas d'humidité pénétrer
jusqu'aux connections électriques de
l'appareil.
• N'immergez jamais l'appareil ni
l'adaptateur dans l'eau ou tout autre
liquide.
• N'utilisez pas de détergent agressif ou
récurant, ni d'objets tranchants (tels
que couteaux ou brosses dures) pour
le nettoyage.
Recharge des piles
1 Après l'utilisation, laissez les piles
refroidir avant de les recharger.
2 Branchez l'adaptateur sur l'appareil
d'une part et sur la prise d'alimentation
d'autre part.
L'affichage s'allume, montrant une
rangée de C dont l'un clignote.
Le nombre de C correspond à la charge
présente dans la pile. Le maximum est
4 C.
3 L'affichage indique FUL quand les piles
sont entièrement chargées.
4 Débranchez l'adaptateur de l'appareil
d'une part et de la prise d'alimentation
d'autre part.
5 Laissez les piles refroidir avant de
réutiliser l'appareil.
• Si le fer à défriser fait entendre un bip
durant la recharge, les piles sont mal
positionnées.
Ouvrez le compartiment des piles et
mettez les piles bien en place (voir
« Remplacement des piles »).
• N'utilisez pas l'appareil pendant que
piles sont en train de se recharger.
Remplacement des piles
Les piles rechargeables perdent leur
efficacité au bout d'un certain temps, qui
varie selon l'utilisation de l'appareil.
Lorsque la durée de fonctionnement de
l'appareil devient trop courte, même avec
des piles entièrement chargées, ou
lorsque l'appareil ne parvient plus à
atteindre la température préréglée, il est
probablement temps de remplacer les
piles.
1 Saisissez l'appareil comme à la figure 2
(bouton de verrouillage vers le bas) et
avec le pouce et l'index sur les deux
miroirs, et ouvrez le compartiment des
piles.
2 Sortez les piles du compartiment.
3 Remplacez les piles par de nouvelles
piles rechargeables. Veillez à bien
positionner les piles comme indiqué sur
l'appareil (figure3).
4 Fermez le compartiment des piles.
• Utilisez des piles rechargeables
neuves dont la capacité et le type sont
identiques aux piles d'origine (piles
Ni-MH, type AA, 1.2 V, 2400 mAh).
N'utilisez jamais de piles d'un autre
type.
• Utilisez toujours des piles
rechargeables. Si vous tentez de
recharger des piles non
rechargeables, ces piles s'échauffent,
ce qui cause des fuites et même des
explosions. Ceci endommagera votre
appareil.

14 Article 519000 Cordless Hair Straightener
• Les piles contiennent des métaux
lourds et des acides, et sont nocives
pour l'environnement. Ne mettez pas
les piles aux ordures ménagères.
Portez-les dans une centre de collecte
pour les faire recycler.
RANGEMENT
1 L'appareil doit être éteint et refroidi.
2 Rechargez les piles pour que le fer à
défriser soit prêt à l'emploi.
3 Fermez l'appareil et verrouillez-le en
mettant le bouton de verrouillage en
position bloquée.
4 Placez l'appareil dans son sac de
rangement.
5 Rangez l'appareil et l'adaptateur dans
un endroit sec et protégé du gel.
• Ne rangez pas l'appareil avec des piles
déchargées. Ceci diminue la durée de
vie des piles.
• Si vous prévoyez de ne pas utiliser
l'appareil pendant un certain temps, il
vaut mieux retirer les piles et les
ranger séparément.
Sécurité
Généralités
• Lisez et suivez soigneusement ces
instructions. Conservez le manuel afin
de pouvoir vous y référer à l'avenir.
• Quand vous utilisez l'appareil,
respectez toujours les instructions.
• L'appareil est destiné uniquement à
l'utilisation domestique.
• Si l'appareil est utilisé par des enfants,
ou par des personnes ayant un
handicap physique, sensoriel, mental
ou moteur, ou par des personnes
n'ayant pas les connaissances et
l'expérience nécessaires, ceci peut
entraîner un danger. Les responsables
de la sécurité de telles personnes
doivent donner des instructions
claires et suffisantes et/ou surveiller
l'utilisation de l'appareil.
• Tenez l'appareil hors de la portée des
enfants ou des personnes incapables
de l'utiliser correctement.
• Faites effectuer les réparations
uniquement par un technicien qualifié.
Ne tentez jamais de réparer vous-
même l'appareil.
• Utilisez uniquement des accessoires
que recommande le fabricant de
l'appareil. L'utilisation d'accessoires
non homologués peut endommager
l'appareil et entraîner des risques pour
l'utilisateur.
• Maintenez une distance de sécurité
pour éviter tout contact avec des
matériaux inflammables (rideaux,
torchons, papier).
Électricité et chaleur
• Lorsque vous débranchez
l'adaptateur, saisissez l'adaptateur lui-
même ; ne tirez pas sur le cordon.
• N'utilisez pas l'appareil si celui-ci ou
l'adaptateur est endommagé. Faites
remplacer le cordon endommagé par
un technicien qualifié.
• Assurez-vous que ni l'appareil, ni
l'adaptateur n'entre en contact avec
une source de chaleur telle qu'une
plaque électrique chaude ou une
flamme.
• Assurez-vous que ni l'appareil,
l'adaptateur n'entre en contact avec de
l'eau, d'autres liquides ou des
produits chimiques.
• L'appareil et ses composants peuvent
s'échauffer pendant qu'il est allumé.
Soyez prudents afin de ne pas vous

15
Article 519000 Cordless Hair Straightener
brûler quand vous touchez l'appareil
ou ses composants.
• N'enroulez pas le cordon de
l'adaptateur autour de l'appareil.
Environnement
Jetez le matériel d'emballage, tel que le
plastique et les cartons, dans les
conteneurs prévus à cet effet.
Si vous souhaitez vous débarrassez de
l'appareil alors qu'il fonctionne toujours ou
peut être réparé facilement, assurez-vous
qu'il sera recyclé.
Lorsque l'appareil ne peut plus servir, il doit
être retraité, de façon à pouvoir être
recyclé au moins partiellement. Ne mettez
pas l'appareil aux ordures ménagères,
mais portez-le chez le vendeur ou dans un
centre de collecte agréé. Les autorités de
votre commune vous renseigneront sur le
centre de collecte le plus proche.
Conformité CE
Directive européenne applicable :
2002/95/CE
2002/96/CE

16 Article 519000 Cordless Hair Straightener
Allgemein
Mit diesem Princess Cordless Hair
Straightener können Sie lockiges Haar
glätten, aber auch glattem Haar mit Locken
und Wellen einen tollen Look verleihen.
Das Gerät ist mit zwei Heizplatten
ausgestattet, die mit einer Keramik-,
Turmalin- und Nanosilberbeschichtung
versehen sind. Das Keramikmaterial
verleiht Ihrem Haar Glanz, während das
Turmalin dafür sorgt, dass sich Ihr Haar
nicht statisch auflädt und geschmeidig
bleibt. Die Nanosilberbeschichtung hat
eine reinigende Wirkung. Die regelmäßige
Verwendung dieses Geräts sorgt dafür,
dass Ihr Haar weich, glänzend,
geschmeidig und gesund bleibt.
Das Gerät wird mit vier Akkus betrieben.
Damit lässt sich das Gerät einfach
bedienen, ohne störende Stromkabel.
Die Temperatur lässt sich problemlos von
80 °C bis max. 200 °C einstellen.
Betrieb und
Steuerelemente
Siehe Abbildung 1.
Das Gerät ist mit den folgenden
Merkmalen ausgestattet:
1Sperrknopf
2 Heizplatten (2 x)
3 Knopf zur Erhöhung der
Temperaturregulierung
4 Knopf zur Absenkung der
Temperaturregulierung
5 Ein/Aus-Knopf
6 Digitalanzeige
7 Aufladeverbindung
8 Spiegel mit Schutzfilm (2 x)
9 Adapter
10 Aufbewahrungstasche
Vor der ersten Verwendung
1 Nehmen Sie das Gerät aus der
Verpackung heraus und entfernen Sie
das gesamte Verpackungsmaterial.
2 Entfernen Sie den Schutzfilm von den
Spiegeln.
3 Reinigen Sie das Gerät (siehe
"Wartung und Reinigung").
4 Das Gerät wird mit einem offenen
Batteriefach und separat verpackten
Akkus geliefert.
Stellen Sie sicher, dass Sie die Akkus
entsprechend der Anzeige auf dem
Gerät einlegen (siehe Abbildung 3).
5 Schließen Sie das Batteriefach.
6 Laden Sie die Akkus vollständig auf
(siehe „Akkus aufladen“).
Verwendung
1 Schließen Sie das Gerät und arretieren
Sie es in dieser Position, indem Sie den
Sperrknopf auf die Arretierposition
schieben.
Lassen Sie das Gerät während der
Aufheizphase in geschlossenem
Zustand, um unnötigen Wärmeverlust
zu vermeiden.
2 Drücken Sie zum Einschalten des
Geräts ca. eine Sekunde die Ein-/Aus-
Taste.
Es ertönt ein kurzer Piepton und in der
Anzeige erscheint die aktuelle
Temperatur der Heizplatten.
Normalerweise können Sie eine
ansteigende Temperatur der
Heizplatten beobachten.
Die Standardeinstellung ist 180 °C.
3 Regulieren Sie die eingestellte
Temperatur.
Wird einer der
Temperaturregulierknöpfe gedrückt,
erscheint in der Anzeige kurz die
eingestellte Temperatur.
Regulieren Sie die eingestellte
Temperatur mit den
Temperaturreguliertasten.
Wenn Sie die Temperaturreguliertaste
gedrückt halten, steigt/sinkt die
eingestellte Temperatur sehr schnell.
Table of contents
Languages:
Other Princess Styling Iron manuals