Princess S+ARCK 6002 User manual

3-IN-1 CURLING IRON SET
Model 6002
Starck_6002_IB_22-3-04 3/22/04 3:34 PM Page 1

2
Starck_6002_IB_22-3-04 3/22/04 3:34 PM Page 2

Gebruiksaanwijzing . . . . . . . . . . . . . . . . . . . . . . . . . . . . . . . 4
Instructions for use . . . . . . . . . . . . . . . . . . . . . . . . . . . . . . . 6
Mode d’emploi . . . . . . . . . . . . . . . . . . . . . . . . . . . . . . . . . . . . . 9
Anleitung . . . . . . . . . . . . . . . . . . . . . . . . . . . . . . . . . . . . . . . . . . 12
Instrucciones de Uso . . . . . . . . . . . . . . . . . . . . . . . . . . . . 14
Istruzioni d’uso . . . . . . . . . . . . . . . . . . . . . . . . . . . . . . . . . . 17
Bruksanvisning . . . . . . . . . . . . . . . . . . . . . . . . . . . . . . . . . . . 20
Brugsanvisning . . . . . . . . . . . . . . . . . . . . . . . . . . . . . . . . . . . 22
Bruksanvisning . . . . . . . . . . . . . . . . . . . . . . . . . . . . . . . . . . . 25
Käyttöohje . . . . . . . . . . . . . . . . . . . . . . . . . . . . . . . . . . . . . . . . 27
Instruções de utilização . . . . . . . . . . . . . . . . . . . . . . . . 30
GARANTIEKAART/GUARANTEE CARD/CARTE DE GARANTIE/ GARANTIEKARTE
CERTIFICADO DI GARANTÍA/CARTOLINA DI GARANZIA/GARANTIKORT/
GARANTIBEVIS/GARANTIKORT/TAKUUTODISTUS . . . . . . . . . . . . . . . . . 33-34
OKTOBER 2003
NL
UK
F
D
E
I
S
DK
N
SF
P
Starck_6002_IB_22-3-04 3/22/04 3:34 PM Page 3

4
S+ARCK 3-IN-1 CURLING IRON SET ART. 6002
ONDERHOUDSINSTRUCTIES
Om uw krultang in goede staat te houden, dient u deze gebruiksaanwijzing zorgvuldig te lezen en
te bewaren om later nog eens te kunnen raadplegen.
WAARSCHUWING: Zorg ervoor dat de krultang is afgekoeld voordat u het reinigt.
1. Zorg ervoor dat de stekker uit het stopcontact gehaald is, voordat u de buitenkant van het
apparaat reinigt. Plastic delen afvegen met een vochtige spons. Bij intensief gebruik kan de kop
van uw krultang stoffig worden of vuil door de natuurlijke vetten in uw haar of uw
haarproducten. Gebruik een sopje met een beetje shampoo om de kop te reinigen. Laat de
krultang goed drogen voordat u hem weer gaat gebruiken. NIET IN WATER ONDERDOMPELEN.
Om de kop langer schoon te houden, moet u oppassen dat u geen haarspray direct op de
krultang spuit.
2. Dit product is alleen bestemd voor huishoudelijk gebruik; de onderdelen kunnen niet door de
gebruiker worden gerepareerd.
3. Als u de krultang niet gebruikt, berg het apparaat en de opzetstukken dan op in de originele
verpakking of op een schone, droge plek waar ze niet beschadigd kunnen raken.
4. Wikkel het snoer nooit om het apparaat.
EERSTE KENNISMAKING MET UW 3-IN-1 HAARKRULSET
(Product kan ietwat afwijken van afbeelding)
1. Cool tip
2. Controlelampje
3. Ontgrendelingsknop
4. Aan-/uitschakelaar
5. Handgreep
6. Stroomindicatielampje
7. Sluitring
8. Medium kruller
9. Grote kruller
10. Spiraalkruller
GEBRUIK VAN UW OPZETSTUKKEN
Gebruik de opbergdoos/houder voor de opzetstukken.
BELANGRIJK:
Wanneer u het apparaat voor het eerst gebruikt, kunt u de eerste paar minuten wat rook en een
lichte geur waarnemen. Dit is normaal en verdwijnt snel.
WAARSCHUWING: De kop van deze krultang wordt heet. Wees voorzichtig tijdens het gebruik.
•Zorg dat het apparaat niet in contact komt met de huid. Raak de kop niet met de vingers aan.
•Plaats bij korter haar een dun plastic kammetje tussen de hoofdhuid en de krultang, zodat
contact met de hoofdhuid wordt vermeden.
•Probeer de krultang eerst uit op een klein plukje haar.
OPZETSTUKKEN VERVANGEN
ZORG ERVOOR DAT DE KRULTANG AFGEKOELD IS VOORDAT U OPZETSTUKKEN VERVANGT.
Draai de sluitring in de richting van de pijl. Vervang het opzetstuk door een andere in het handvat
te plaatsen. Draai het handvat een slag om hem vast te zetten.
Starck_6002_IB_22-3-04 3/22/04 3:34 PM Page 4

5
OPZETSTUKKEN GEBRUIKEN
Kies het opzetstuk waarmee u uw haar in model wilt brengen afhankelijk van het effect dat u wilt
bereiken. Als u uw haar volledig wilt stylen moet het schoon, droog en vrij van haarspray, gel enz.
zijn. (Dit apparaat kan ook worden gebruikt om het haar even snel bij te werken.)
VOORVERWARMEN
Laat de krultang in de stander op een glad, warmtebestendig en egaal oppervlak staan. Steek de
stekker van het apparaat in een stopcontact van 230V AC. Zet de ON-/OFF-knop op de ON-stand en
laat het apparaat opwarmen. Wanneer het stroomindicatielampje begint te branden, weet u dat het
apparaat aanstaat. Wanneer het apparaat koud is, is het controlelampje op de ontgrendelaar zwart.
Wanneer het apparaat heet is, is het lampje rood.
1. Stroomindicatielampje
2. Wanneer het apparaat heet is, is het lampje rood
3. Wanneer het apparaat is afgekoeld, zal het lampje doven.
STYLEN
Verdeel het haar in plukken van niet meer dan 5 centimeter breedte.
Houd de haarpluk glad door er deze te borstelen of kammen, terwijl u het uiteinde vasthoudt met
uw andere hand. Neem een pluk per keer, leg het uiteinde van het haar op de krultang met de klem
open. Doe de klem daarna dicht en zorg ervoor dat het uiteinde een beetje uit de klem steekt. Pak
de cool tip vast met uw andere hand. Houd de pluk haar strak terwijl u het om de hete krultang
wikkelt door langzaam met het handvat te draaien. Draai de tang zo ver u wilt naar uw hoofdhuid
toe, zonder uw hoofdhuid aan te raken met de hete kop.
Houd de tang 8 tot 12 seconden op zijn plaats als u stevige krullen wilt of wanneer het haar moeilijk
te krullen is. Doe dit korter wanneer het haar gemakkelijk te krullen is of wanneer u alleen losse
krullen of golvend haar wilt. Als u de tang lang genoeg om zijn plek heeft gehouden, ontrol de tang
voor ongeveer de helft (bij lang haar een beetje meer) en druk op de klemontgrendelaar. Nu het
apparaat voorzichtig weghalen uit het midden van de krul. Laat de krul rustig afkoelen en kam het
haar daarna in de door u gewenste stijl.
TIP: Als u meer veerkrachtige, springende krullen wilt, moet u de klem aan de ONDERZIJDE en de
kop aan de BOVENZIJDE van de haarpluk houden wanneer u begint met krullen. Als u een
pagekopje wilt, moet u de klem aan de BOVENZIJDE en de kop aan de ONDERZIJDE van de haarplug
houden wanneer u begint met krullen.
Voor een warrig en nonchalant kapsel: Maak nonchalante, warrige golven door elke pluk haar in
een willekeurige richting te krullen. Buig uw hoofd daarna naar voren, schud en maak uw haar in de
war met uw vingers. Houd uw hoofd weer recht en herhaal voor optimaal volume bovenstaande
handelingen.
Pijpenkrullen: Als u stevige krullen wilt of als uw haar moeilijk krult, moet u een strook haar
opwikkelen en 8 tot 12 secondes verticaal houden. Als uw haar makkelijk krult, kunt u dit ook korter
doen. Als u klaar bent, wikkelt u de krul langzaam af en haal de kop langzaam weg van het midden
van de krul. Laat de krul rustig afkoelen, terwijl u op dezelfde manier doorgaat met de rest van uw
haar.
BELANGRIJKE VEILIGHEIDSVOORSCHRIFTEN
Bij het gebruik van elektrische apparaten, met name in de buurt van kinderen, moeten altijd
veiligheidsvoorschriften in acht worden genomen, zoals de volgende:
ALLE INSTRUCTIES LEZEN VOOR GEBRUIK.
UIT DE BUURT VAN WATER HOUDEN.
Starck_6002_IB_22-3-04 3/22/04 3:34 PM Page 5

6
PAS OP: Zoals bij de meeste apparaten, zijn de elektrische onderdelen geladen, zelfs wanneer de
schakelaar op uit staat.
Zo voorkomt u een elektrische shock:
1. Stekker altijd uit het stopcontact halen na gebruik van het apparaat
2. Niet gebruiken wanneer u in bad zit
3. Apparaat niet neerzetten of opbergen op een plek waar het kan vallen of in een badkuip of
wasbak. terecht kan komen
4. Niet in water of een andere vloeistof onderdompelen of laten vallen
5. Als het apparaat in het water valt, onmiddellijk de stekker uit het stopcontact halen. Niet uw
hand in het water steken.
WAARSCHUWING: OM BRANDWONDEN, ELEKTROCUTIE, BRAND OF
VERWONDINGEN TE VOORKOMEN:
1. Het apparaat niet zonder toezicht laten wanneer de stekker in het stopcontact zit of het
apparaat aanstaat.
2. Goed toezicht houden wanneer het apparaat wordt gebruikt door of in de nabijheid van
kinderen of gehandicapten.
3. Het apparaat alleen gebruiken voor het in deze instructies beschreven doel. Geen accessoires
gebruiken die de fabrikant niet heeft aanbevolen.
4. Het apparaat nooit gebruiken wanneer het snoer of de stekker beschadigd is, wanneer het
apparaat niet goed werkt, wanneer het is gevallen of beschadigd of wanneer het in het water
is gevallen. Breng het apparaat naar de dichtstbij zijnde, erkende servicedienst voor onderzoek
en reparatie.
5. Snoer niet op hete of verwarmde oppervlakken leggen. Snoer niet om apparaat wikkelen.
6. Het apparaat nooit gebruiken wanneer u slaperig of suf bent.
7. Nooit een voorwerp in een opening van het apparaat laten vallen of steken.
8. Nooit buitenshuis gebruiken of in de nabijheid van spuitbussen. Niet gebruiken wanneer
zuurstof wordt toegevoegd.
9. Dit apparaat wordt heet bij gebruik. Zorg dat contact met de ogen of andere gevoelige delen
van het gelaat wordt vermeden.
10. Plaats het apparaat niet rechtstreeks op oppervlakten terwijl nog heet is of aanstaat. Gebruik
de bijgeleverde stander.
11. Geen verlengsnoer gebruiken voor het apparaat.
DEZE INSTRUCTIES GOED BEWAREN.
ALLEEN VOOR HUISHOUDELIJK GEBRUIK.
LET OP:
Als u het apparaat in de badkamer gebruikt, adviseren wij u de stekker meteen na gebruik uit het
stopcontact te halen. Als u het apparaat namelijk laat vallen in de nabijheid van water, kan dit
gevaar opleveren. Voor extra veiligheid raden wij u aan een aardlekschakelaar van 30mA in uw
badkamer te laten installeren. Raadpleeg eventueel uw installateur.
S+ARCK 3-IN-1 CURLING IRON SET ART. 6002
USER MAINTENANCE INSTRUCTIONS
To keep your Curling Irons in good condition, be sure to read these instructions carefully and save
them for future reference.
WARNING: Always be sure curling iron is cool before cleaning.
1. To clean the outside of the Curling Iron, make sure the unit is unplugged. Then wipe plastic
surfaces with a damp sponge. With extended use, the barrel of your curling iron may get dusty
or dirty from your hair’s natural oils or conditioners. To clean the barrel, use a sponge with a
small amount of shampoo. Let the Curling Iron dry thoroughly before you use it again. DO NOT
IMMERSE IN WATER! To keep the barrel clean longer, do not spray hairspray directly on the barrel.
2. This product is for household use only and contains no user serviceable parts.
3. When not in use, store the Curling Iron and Interchangeable Wands in the original box or in a
clean, dry place where it will not become damaged.
4. Never wrap the cord around the appliance.
Starck_6002_IB_22-3-04 3/22/04 3:34 PM Page 6

7
GETTING TO KNOW YOUR 3-IN-1 CURLING IRON SET
(Product may vary slightly from illustration)
1. Cool Safety Tip
2. Ready Dot
3. Clamp Release Lever
4. On/Off switch
5. Handle
6. Power Indicator Light
7. Locking Ring
8. Medium Iron
9. Large Iron
10. Spiral Iron
HOW TO USE YOUR INTERCHANGEABLE CURLING IRON WANDS
Use the Storage Box / Stand to keep your Curling Iron Wands at your convenience.
IMPORTANT:
During the first few minutes of initial use, you may notice smoke and a slight odour. This is normal
and will quickly disappear.
WARNING: The barrel of this curling iron is hot. Care should be taken when using.
•Keep unit away from contact with all skin areas. Do not touch iron barrel with fingertips.
•For shorter hair, place a thin plastic comb between scalp and Curling Iron barrel to avoid
touching scalp.
•Test on a small section of hair before using.
TO CHANGE CURLING IRON WANDS
ALWAYS BE SURE CURLING IRON IS COOL BEFORE CHANGING WANDS.
Turn the locking ring in the direction of the arrow shown to release iron. Replace iron by inserting
iron into the handle, and turning the handle to lock.
TO USE CURLING IRON WANDS
Choose the particular wand you wish to style your hair with, depending on the effect you wish to
achieve. For a complete styling, hair should be clean, dry and free from dirt, hair spray, creams, etc.
(This iron can also be used for quick touch-ups at any time.)
PRE-HEAT
Rest the Curling Iron in its stand, on a smooth, and heat resistant, flat surface. Plug the unit into a
230V AC electrical outlet. Slide the ON/OFF button to the ON position and allow iron to heat. The
power indicator light will come on, letting you know the unit is operating. When cool, the READY
dot on the clamp release lever ‘tongue tip’ will be black. When hot, the dot will glow red.
1. power indicator light
2. when hot, the READY dot is red
3. when cool, the READY dot is black
Starck_6002_IB_22-3-04 3/22/04 3:34 PM Page 7

8
STYLING
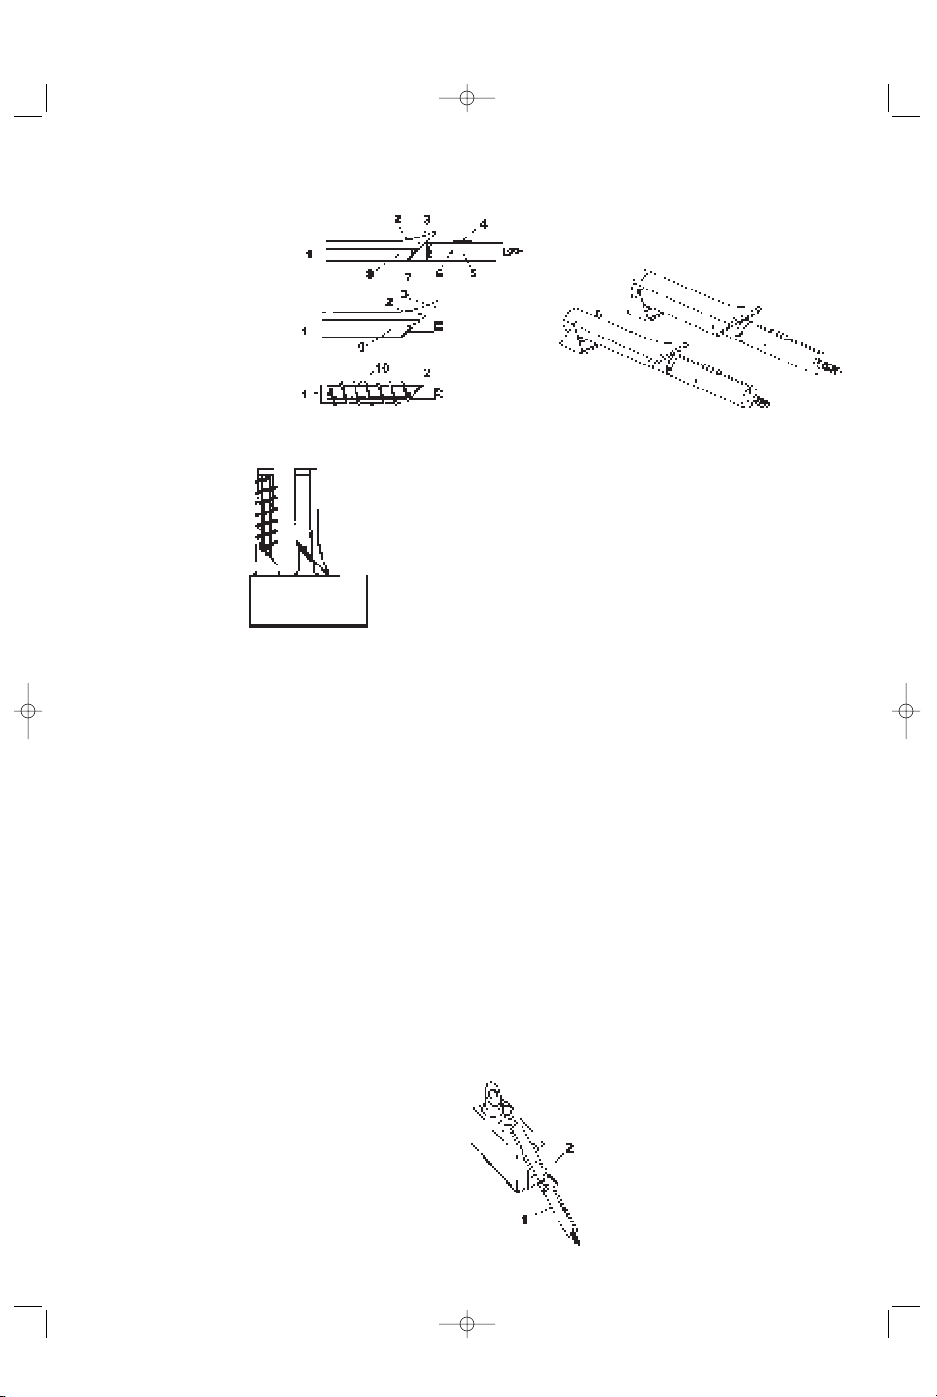
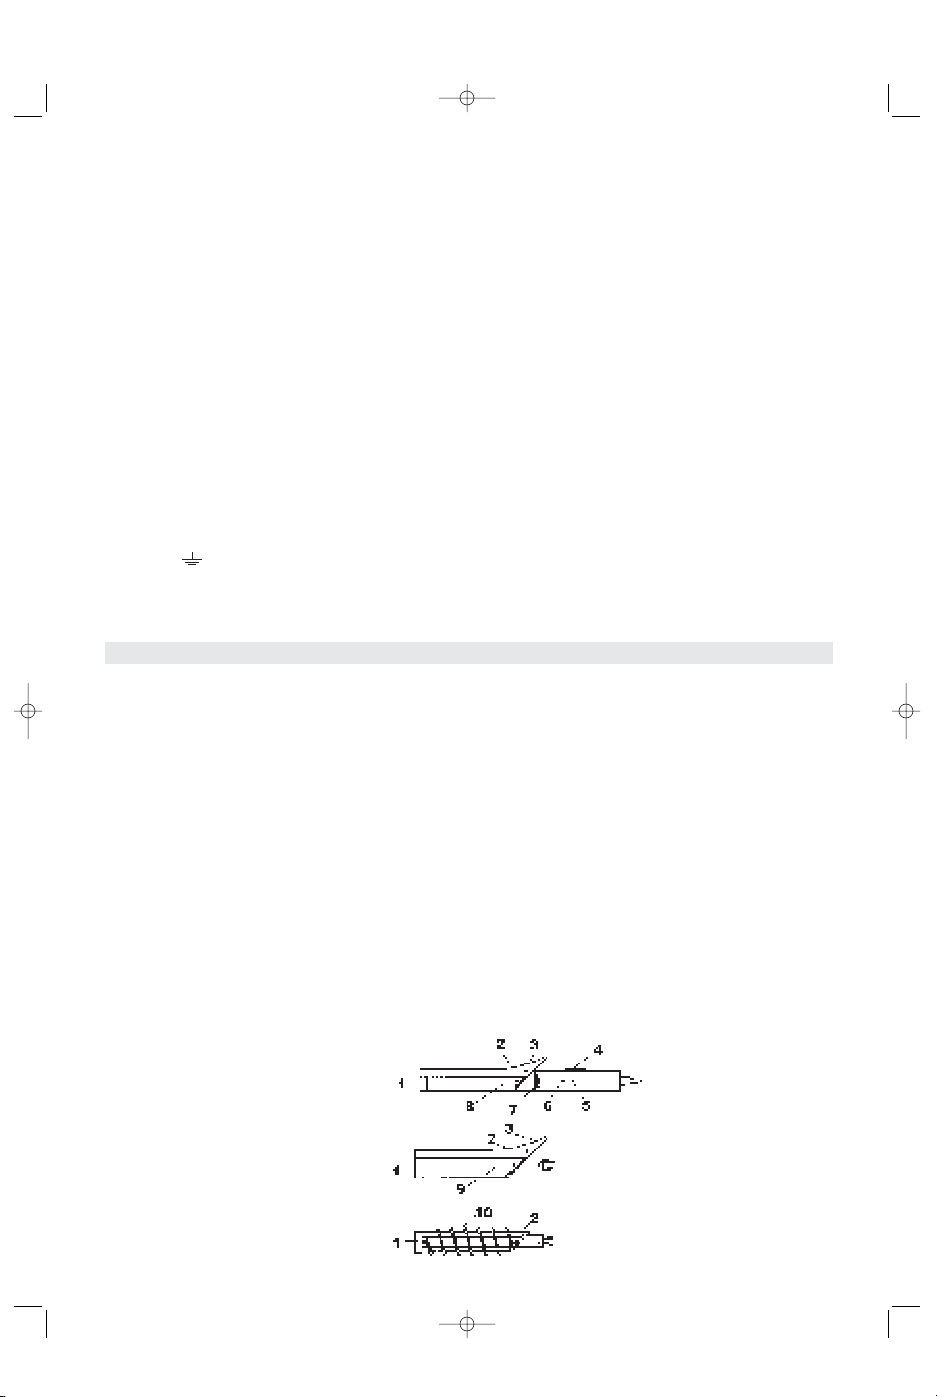
Start by sectioning hair into strands no more than 2 inches wide.
Keep the hair strand smooth by brushing or combing through the section while holding the ends
taut with the other hand. Taking one section at a time, place the ends of hair over the barrel with
the clamp open. Then close the clamp, making sure that the ends extend just a tiny bit beyond the
clamp. Grasp the cool safety tip with the other hand to roll hair. Keep the section of hair taut as you
wind it around the hot barrel by slowly turning the handle. Wind the curl toward your scalp as far as
you wish to go without touching scalp with the hot barrel.
Hold the curl in place for up to 8 to 12 seconds for tight curls or if hair is hard to curl. Hold for less
time if hair is easy to curl, or if you want loose curls or just waves. When you are ready to release
curl, unwind about half a turn (for longer hair, unwind a bit more) and push down on the clamp
release lever to open the clamp. Now, gently withdraw the barrel from the centre of curl. Allow curl
to cool and comb hair into the style you wish.
Styling tip: For bouncy, flip-up curls, the clamp should be UNDER and the barrel OVER the section of
hair at the start of curl. For curl-under, page-boy styles, the clamp should be OVER and the barrel
UNDER the hair section at the start of curl.
For tousled hair: Create soft, tousled waves by curling each hair section in a random direction. Then
bend your head forwards, shake and gently scrunch hair with fingers. Bring head back to position
and repeat for fullest volume.
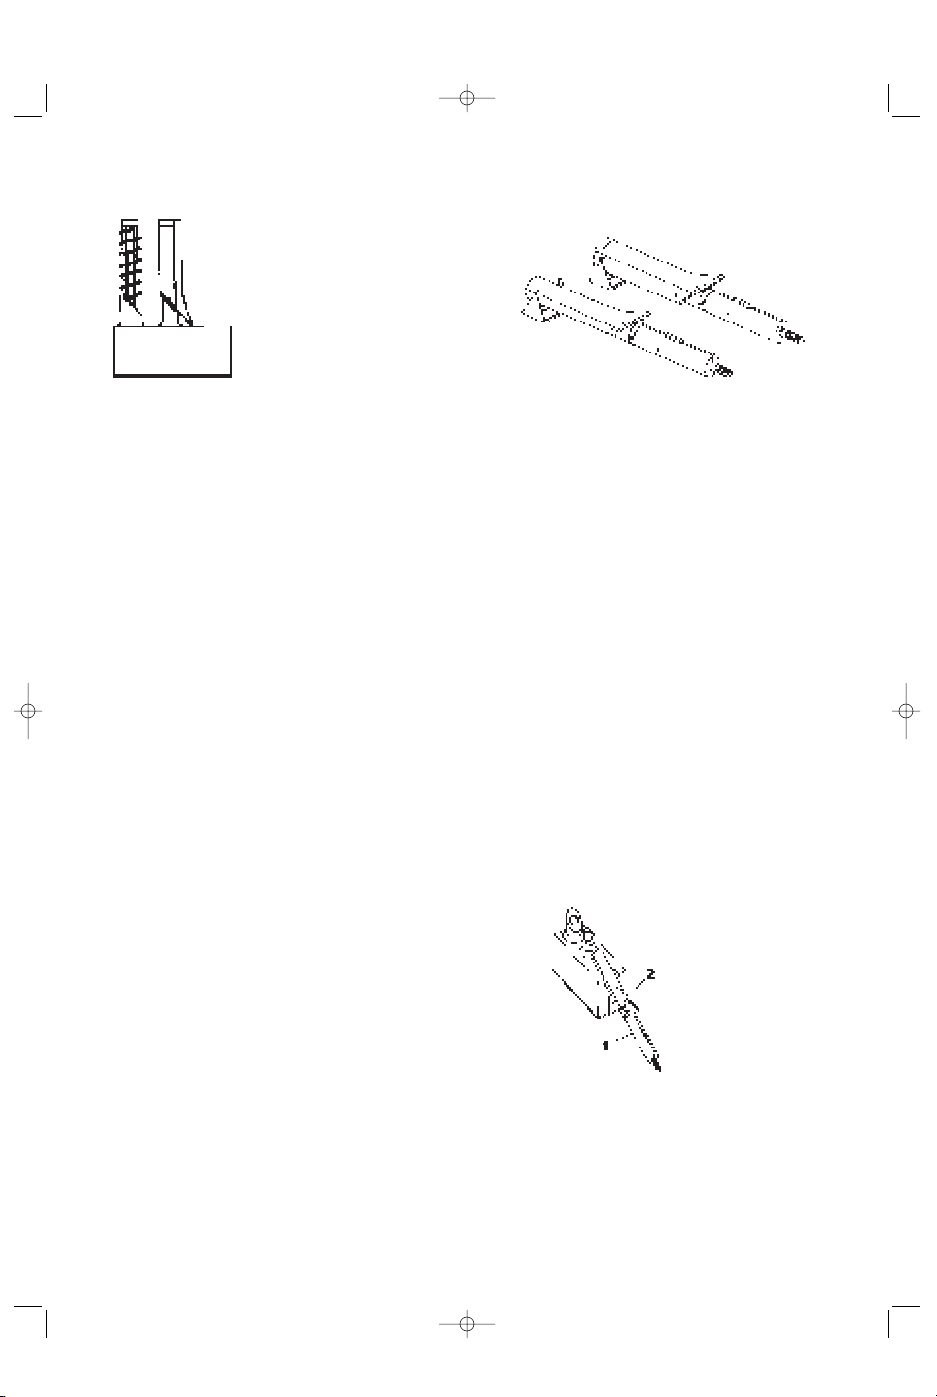
Spirals: Wind up a section of hair holding the spiral iron vertically for up to 8 to 12 seconds for tight
curls or if hair is hard to curl. Hold for less time if hair is easy to curl. When you are ready to release
curl, unwind slowly; gently withdraw the barrel from the centre of curl. Allow curl to cool, and try
not to disturb curls as you proceed in the same manner around whole head.
IMPORTANT SAFEGUARDS
When using electrical appliances, especially when children are present, basic safety precautions
should always be followed, including the following:
READ ALL INSTRUCTIONS BEFORE USE.
KEEP AWAY FROM WATER.
DANGER: As with most electrical appliances, electrical parts are live even when the switch is off.
To reduce the risk of death by electrical shock:
1. Always unplug the appliance immediately after using.
2. Do not use while bathing.
3. Do not place or store appliance where it can fall or be pulled into a tub or sink.
4. Do not place or drop into water or any other liquid.
5. If appliance falls into water, unplug it immediately. Do not reach into the water.
WARNING: TO REDUCE THE RISK OF BURNS, ELECTROCUTION, FIRE OR INJURY TO PERSONS;
1. Do not leave appliance unattended while it is operating or plugged in.
2. Close supervision is necessary when this appliance is used by, on or near children or disabled people.
3. Use this appliance only for its intended use as described in this manual. Do not use attachments
that are not recommended by the manufacturer.
4. Never operate this appliance if it has a damaged cord or plug, if it is not working properly, if it
has been dropped or damaged in any manner or if it has been dropped into water. Take
appliance to the nearest authorised service facility for examination and repair.
5. Keep the cord away from hot or heated surfaces. Do not wrap the cord around the appliance.
6. Never use while feeling sleepy or drowsy.
7. Never drop or insert any object into any opening.
8. Do not use outdoors or operate where aerosol (spray) products are being used. Do not operate
where oxygen is being administered.
9. This appliance is hot when in use. Do not let eyes and bare skin touch heated surfaces.
10. Do not place the heated appliance directly on any surface while it is hot or plugged in. Use the
stand provided.
11. Do not use an extension cord with this appliance.
SAVE THESE INSTRUCTIONS.
FOR HOUSEHOLD USE ONLY.
Starck_6002_IB_22-3-04 3/22/04 3:34 PM Page 8

9
NOTE:
If this hairdryer is used in the bathroom then we advise you to pull the plug out of the socket
immediately after use. This is because of the danger caused from water in the vicinity should you
drop the hairdryer. For extra safety the electrical circuit in the bathroom should be protected by an
earth leak switch set at 30mA. If in doubt consult your electrician.
U.K. WIRING INSTRUCTIONS
The wires in the mains lead are coloured in accordance with the following code:
BLUE-neutral
BROWN-LIVE
As the colours of the wire in the mains lead of this appliance may not correspond with the colour
markings identifying the terminals on your plug, proceed as follows:
The wire which is coloured BLUE must be connected to the terminal which is marked with the
letter N or coloured black.
The wire which is coloured BROWN must be connected to the terminal which is marked with the
letter L or coloured red.
NEITHER CORE should be connected to the earth terminal of a three pin plug marked with the
letter E or or coloured green and yellow.
With this appliance, if a 13 amp plug is used a 13 amp fuse should be fitted. If any other type of
plug is used a 15 amp fuse must be fitted either in the plug or at the distribution board.
S+ARCK 3-IN-1 CURLING IRON SET ART. 6002
CONSEILS D’ENTRETIEN
Pour conserver votre fer à friser Curling Iron en parfait état de marche, lisez attentivement ce mode
d'emploi et conservez-le pour pouvoir le consulter ultérieurement.
AVERTISSEMENT : Laissez toujours refroidir le fer à friser avant de le nettoyer.
1. Avant de nettoyer l’extérieur du fer à friser, débranchez-le de la prise de courant. Essuyez ensuite
les surfaces en plastique avec une éponge humide et savonneuse. Après un usage prolongé, le
corps de votre fer à friser peut être encrassé par les huiles naturellement présentes sur les
cheveux ou par les produits capillaires. Pour nettoyer le corps de l’appareil, utilisez une éponge
légèrement imprégnée de shampoing. Laissez sécher soigneusement le fer à friser avant de le
réutiliser. NE LE PLONGEZ PAS DANS L’EAU ! Pour conserver le corps de l’appareil plus longtemps
propre, ne vaporisez pas de laque directement dessus.
2. Ce produit est uniquement conçu pour un usage domestique et ne contient aucune pièce
pouvant être réparée par l’utilisateur.
3. Quand vous ne l’utilisez pas, rangez le fer à friser et les embouts interchangeables dans son
emballage d’origine ou dans un endroit propre et sec où il ne risque pas de s’abîmer.
4. N’enroulez jamais le cordon autour de l’appareil.
DESCRIPTIF DE VOTRE FER À FRISER 3 EN 1
(L’appareil peut légèrement différer de l’illustration)
1. Extrémité froide
2. Indicateur de chauffe
3. Levier de la pince
4. Interrupteur Marche/Arrêt
5. Poignée
6. Témoin lumineux d’alimentation
7. Bague de blocage
8. Fer moyen
9. Grand fer
10. Fer en spirale
Starck_6002_IB_22-3-04 3/22/04 3:34 PM Page 9

10
COMMENT UTILISER LES EMBOUTS INTERCHANGEABLES DE VOTRE FER À FRISER
Utilisez à votre convenance le coffret de rangement / socle pour tenir les embouts de votre fer à friser.
IMPORTANT :
Lors de la première utilisation, un peu de fumée et une légère odeur peuvent se dégager de
l’appareil. C’est un phénomène normal qui cesse rapidement.
AVERTISSEMENT : Le corps du fer à friser devient très chaud. Il doit être manipulé avec précaution en
cours d’utilisation.
•Veillez à ce que l’appareil ne soit pas en contact avec la peau. Ne touchez pas le corps du fer.
•Pour les cheveux plus courts, placez un mince peigne en plastique entre le cuir chevelu et le
corps du fer à friser pour éviter de rentrer en contact avec le cuir chevelu.
•Testez l’appareil sur une petite portion de cheveux avant de l’utiliser.
POUR CHANGER LES EMBOUTS DU FER À FRISER
LAISSEZ TOUJOURS L’APPAREIL REFROIDIR AVANT DE CHANGER LES EMBOUTS.
Pour détacher l’embout, tournez la bague de blocage dans la direction indiquée par la flèche.
Mettez l’autre embout en place en l’insérant dans la poignée puis en tournant la poignée pour le
bloquer.
POUR UTILISER LES EMBOUTS DU FER À FRISER
Choisissez l’embout que vous souhaitez utiliser pour coiffer vos cheveux en fonction de l’effet que
vous souhaitez obtenir. Pour réaliser un modèle, les cheveux doivent être propres, secs et exempts de
toute poussière, laque, crème, etc. (ce fer peut également être utilisé à tout moment pour effectuer
des retouches rapides sur votre coiffure).
PRECHAUFFAGE
Mettez le fer à friser sur son socle, lui-même posé sur une surface égale, plane et résistant à la
chaleur. Branchez l’appareil sur une prise de courant de 230V AC. Mettez l’interrupteur
MARCHE/ARRET sur la position ON et laissez chauffer le fer. Le témoin lumineux s’allume pour
indiquer que l’appareil fonctionne. Lorsque l’appareil est froid, l’indicateur de chauffe sur le levier
servant à ouvrir la pince est noir. Lorsque l’appareil est chaud, il est rouge.
1. Témoin lumineux d’alimentation
2. Lorsque l’appareil est chaud, le voyant est rouge
3. Lorsque l’appareil est froid, le voyant est éteint
COIFFURE
Commencez par diviser les cheveux en mèches de 5 cm de large maximum.
Lissez bien la mèche de cheveux en la brossant ou en la peignant d’une main tout en la tendant bien
de l’autre main. En prenant une mèche à la fois, placez l’extrémité des cheveux sur l’embout du fer
en laissant la pince ouverte. Refermez la pince en veillant à ce que l’extrémité des cheveux dépasse
juste un peu de la pince. Attrapez l’extrémité froide de sécurité de l’autre main pour enrouler les
cheveux. Tendez bien la mèche de cheveux tout en l’enroulant autour du fer chaud en tournant
lentement la poignée. Enroulez la boucle de cheveux vers le cuir chevelu aussi loin que vous
souhaitez sans toucher le cuir chevelu avec le fer chaud.
Maintenez la boucle de cheveux en place pendant 8 à 12 secondes pour obtenir des boucles serrées
ou si les cheveux frisent difficilement. Laissez agir moins longtemps si les cheveux frisent facilement
Starck_6002_IB_22-3-04 3/22/04 3:34 PM Page 10

11
ou si vous voulez des boucles plus lâches ou simplement des ondulations. Quand vous souhaitez
dégager la mèche de cheveux de la pince, déroulez-la d’un demi-tour environ (un peu plus pour des
cheveux plus longs) et appuyez sur le levier pour ouvrir la pince. Dégagez ensuite avec précaution le
fer de la boucle de cheveux. Laissez la boucle refroidir sans l’emmêler, puis coiffez vos cheveux
comme vous le souhaitez.
Conseil de coiffure : Pour des boucles souples et tournées vers l’extérieur, la pince doit être placée
SOUS la partie de cheveux au début de la mèche et l’embout PAR DESSUS. Pour des boucles
retournées vers l’intérieur, style coiffure de page, la pince doit être placée PAR DESSUS la mèche de
cheveux au début de la mèche et le fer DESSOUS.
Pour une coiffure floue : Créez des boucles souples et floues en bouclant les mèches de cheveux dans
différentes directions. Ensuite, renversez la tête en avant et secouez-la tout en faisant bouffer légèrement
les cheveux avec les doigts. Remettez la tête droite et répétez l’opération pour plus de volume.
Pour faire des anglaises : Entourez une mèche de cheveux en tenant le fer en spirale à la verticale
pendant 8 à 12 secondes. Laisser agir moins longtemps si vos cheveux frisent facilement . Quand vous
souhaitez dégager la boucle de cheveux, déroulez-la progressivement ; dégagez ensuite avec
précaution le fer du centre de la boucle de cheveux. Laissez la boucle refroidir et évitez de l’emmêler
en continuant ainsi avec les autres mèches tout autour de la tête.
IMPORTANTES MESURES DE SECURITE
Lorsque vous utilisez des appareils électriques, particulièrement en présence d’enfants, vous devez
toujours observer certaines précautions d’usage, y compris les suivantes :
LIRE TOUTES LES INSTRUCTIONS AVANT L’EMPLOI.
TENIR À L’ABRI DE L’EAU.
DANGER : Comme pour la plupart des appareils électriques, certaines pièces sont alimentées en
électricité même quand l’appareil est éteint.
Pour éviter tout risque d’électrocution :
1. Débranchez toujours l’appareil immédiatement après l’usage.
2. Ne l’utilisez jamais dans le bain
3. Ne placez pas l’appareil à un endroit d’où il risque de tomber ou d’être projeté dans une
baignoire ou un lavabo.
4. Ne plongez pas l’appareil dans l’eau ou tout autre liquide.
5. Si l’appareil tombe dans l’eau, débranchez-le immédiatement. N’essayez jamais de le rattraper
dans l’eau.
AVERTISSEMENT : POUR EVITER LES RISQUES DE BRULURE,
D’ELECTROCUTION OU DE BLESSURE :
1. Ne laissez pas l’appareil sans surveillance lorsqu’il fonctionne ou est branché.
2. Exercez une surveillance lorsque l’appareil est utilisé par des enfants ou des personnes
handicapées ou en leur présence.
3. Utilisez cet appareil uniquement pour l’usage pour lequel il a été conçu et décrit dans ce mode
d’emploi. N’utilisez pas d’autres accessoires que ceux recommandés par le fabricant.
4. Ne faites pas fonctionner cet appareil si son cordon ou sa fiche sont endommagés, s’il ne
fonctionne pas correctement, s’il est tombé, s’il a été autrement endommagé ou s’il est tombé
dans l’eau. Confiez l’appareil au réparateur agréé le plus proche pour le faire examiner et réparer.
5. Tenez le cordon à l’écart de toute surface brûlante ou chauffante. N’enroulez pas le cordon
autour de l’appareil.
6. N’utilisez jamais l’appareil en cas de somnolence ou d’assoupissement.
7. Ne faites tomber et n’insérez aucun objet par une quelconque ouverture sur l’appareil.
8. N’utilisez pas l’appareil à l’extérieur ou en même temps que des produits en aérosols. Ne faites
pas fonctionner l’appareil lorsque de l’oxygène est administré.
9. Cet appareil chauffe en cours d’utilisation. Ne laissez pas les parties brûlantes rentrer en contact
avec les yeux ou la peau nue.
10. Ne posez pas l’appareil directement sur une quelconque surface lorsqu’il est chaud ou allumé.
Utilisez pour cela le socle fourni.
11. N’utilisez pas de rallonge électrique avec cet appareil.
Starck_6002_IB_22-3-04 3/22/04 3:34 PM Page 11

12
CONSERVEZ CE MODE D’EMPLOI
DESTINÉ UNIQUEMENT A UN USAGE DOMESTIQUE
REMARQUE :
Si vous utilisez cet appareil dans une salle de bains, nous vous recommandons de le débrancher de la
prise de courant immédiatement après usage, en raison du danger que peut représenter la proximité
d’eau si vous le laissez tomber. Pour une sécurité accrue, le circuit électrique de la salle de bains
devrait être protégé par un disjoncteur réglé sur 30mA. En cas de doute, consultez un électricien.
S+ARCK 3-IN-1 CURLING IRON SET ART. 6002
WARTUNG
Im Interesse eines langen, optimalen Funktionieren des Lockenstabs diese Gebrauchsanweisung
gründlich durchlesen und aufheben, um später nachschlagen zu können.
ACHTUNG: Darauf achten, dass der Lockenstab vor der Reinigung abgekühlt ist.
1. Darauf achten, dass der Stecker aus der Steckdose gezogen wurde, bevor das Gerät außen
gereinigt wird! Kunststoffteile mit einem feuchten Schwamm abwischen. Bei intensivem
Gebrauch kann der Stab durch die natürlichen Fette im Haar oder durch Haarpflegemittel
verschmutzt werden. Den Stab dann mit einem Schwamm und etwas Shampoo reinigen. Den
Lockenstab gründlich trocknen lassen, bevor er wieder benutzt wird. NICHT IN WASSER
TAUCHEN. Damit der Stab länger sauber bleibt, darauf achten, dass kein Haarspray direkt auf
den Lockenstab gesprüht wird.
2. Dieses Gerät ist nur für den Haushaltsgebrauch bestimmt und kann nur von Fachpersonal
repariert werden.
3. Wenn der Lockenstab nicht gebraucht wird, das Gerät und die Aufsatzstücke in der
Originalverpackung an einem sauberen, trockenen Ort aufbewahren, so dass nichts beschädigt
werden kann.
4. Das Kabel nicht um das Gerät wickeln.
ELEMENTE DES 3-IN-1 LOCKENSTABS
(Produkt kann von der Abbildung etwas abweichen.)
1. Cool-Spitze
2. Kontrolllämpchen
3. Freigabehebel
4. Ein-Aus-Schalter
5. Griff
6. Stromanzeige
7. Schließring
8. Mittlerer Lockenstab
9. Großer Lockenstab
10. Spiralstab
BENUTZUNG DER AUFSATZSTÜCKE
Für die Aufsatzelemente die Verstaubox/den Ständer verwenden.
WICHTIG:
Bei Erstgebrauch des Geräts kann es in den ersten Minuten zu einer leichten Rauch- und
Geruchsentwicklung kommen. Das ist ganz normal und gibt sich schnell.
ACHTUNG: Der Stab des Geräts wird heiß. Während des Gebrauchs vorsichtig sein.
Starck_6002_IB_22-3-04 3/22/04 3:34 PM Page 12

13
• Darauf achten, dass der Lockenstab nicht mit der Haut in Berührung kommt. Den Stab nicht mit
den Fingern berühren.
• Bei kürzerem Haar einen dünnen Kunststoffkamm zwischen Kopfhaut und Lockenstab
positionieren, damit ein Kontakt mit der Kopfhaut vermieden wird.
• Den Lockenstab erst bei einer kleinen Haarsträhne ausprobieren.
AUFSATZSTÜCKE AUSTAUSCHEN
DARAUF ACHTEN, DASS DER LOCKENSTAB VOR DEM AUSTAUSCH DER AUFSATZSTÜCKE ABGEKÜHLT IST.
Den Schließring in Pfeilrichtung drehen. Das neue Aufsatzstück in den Griff einsetzen. Den Griff
drehen, um das Aufsatzstück zu befestigen.
BENUTZUNG DER AUFSATZSTÜCKE
Je nachdem, welcher Effekt erzielt werden soll, das passende Aufsatzstück auswählen. Für ein
komplettes Haar-Styling muss das Haar sauber, trocken und frei von Haarspray, Gel usw. sein. (Dieser
Lockenstab kann auch für ein schnelles Auffrischen der Frisur verwendet werden.)
VORWÄRMEN
Den Lockenstab im Ständer auf eine glatte, hitzebständige, flache Unterlage stellen. Den Stecker in
die Steckdose (230 V Wechselstrom) stecken. Den Ein-Aus-Schalter auf „ON“ stellen und das Gerät
erwärmen lassen. Wenn die Stromanzeige aufleuchtet, ist das Gerät eingeschaltet. Wenn das Gerät
kalt ist, ist das Kontrolllämpchen auf dem Freigabehebel schwarz. Ist das Gerät heiß, ist das
Kontrolllämpchen rot.
1. Stromanzeige
2. Ist das Gerät heiß, ist das Kontrolllämpchen rot.
3. Wenn das Gerät abgekühlt ist, schaltet sich das Kontrolllämpchen aus.
STYLEN
Das Haar in Strähnen von nicht mehr als 5 cm Breite einteilen.
Die Haarsträhne glatt halten, indem sie gebürstet oder gekämmt und gleichzeitig am Ende mit der
anderen Hand festgehalten wird. Immer nur eine Strähne bearbeiten und das Haarende auf den
Lockstab mit offenem Klemmhebel legen. Die Klemme schließen. Das Haar muss etwas aus der
Klemme herausragen. Die Cool-Spitze mit der anderen Hand festhalten. Die Haarsträhne gerade
halten, während sie durch langsames Drehen des Griffs um den heißen Lockenstab gewickelt wird.
So weit wie gewünscht in Richtung Kopfhaut drehen, ohne die Kopfhaut mit dem heißen Stab zu
berühren.
Für kräftige Locken oder wenn sich das Haar schwer locken lässt, den Lockenstab 8 bis 12 Sekunden
in dieser Position halten. Entsprechend kürzer, wenn sich das Haar schnell lockt oder nur lose Locken
oder Wellen entstehen sollen. Den Stab nach der erforderlichen Zeit etwa um die Hälfte aus dem
Haar wickeln (bei längerem Haar etwas mehr) und auf den Freigabehebel drücken. Jetzt das Gerät
vorsichtig aus dem Haar nehmen. Die Haarlocke abkühlen lassen und anschließend nach Wunsch
frisieren.
TIPP: Für springende Locken mit Spannkraft muss sich der Klemmhebel UNTEN und der Stab ÜBER
der Haarsträhne befinden. Für einen Pagenkopf muss sich der Klemmhebel OBERHALB und der Stab
UNTER der Haarsträhne befinden.
Für eine wilde und lässige Frisur: Wilde, lässige Locken entstehen, indem jede Haarsträhne in eine
willkürliche Richtung frisiert wird. Anschließend den Kopf nach vorn beugen, das Haar schütteln und
mit den Fingern in Form bringen. Den Kopf wieder gerade halten und Obiges für ein optimales
Volumen wiederholen.
Korkenzieherlocken: Für kräftige Locken oder wenn sich das Haar schwer locken lässt, eine
Haarsträhne aufwickeln und 8 bis 12 Sekunden vertikal halten. Entsprechend kürzer, wenn sich das
Haar schnell lockt. Danach die Locke langsam vom Lockenstab wickeln und aus dem Haar lösen. Die
Haarlocke abkühlen lassen und mit dem restlichen Haar genauso verfahren.
Starck_6002_IB_22-3-04 3/22/04 3:34 PM Page 13

14
WICHTIGE SICHERHEITSVORSCHRIFTEN
Bei der Benutzung von Elektrogeräten, besonders in der Nähe von Kindern, müssen unter anderem
folgende Sicherheitsvorschriften beachtet werden:
VOR DEM GEBRAUCH ALLE VORSCHRIFTEN LESEN.
NICHT IN DER NÄHE VON WASSER BENUTZEN.
HINWEIS: Wie bei den meisten Geräten sind die elektrischen Teile geladen, auch wenn der Schalter
ausgeschaltet ist.
So lässt sich ein Elektroschock verhindern:
1. Nach Gebrauch des Gerätes immer den Netzstecker ziehen.
2. Das Gerät nicht in der Badewanne benutzen.
3. Das Gerät nicht an einen Ort stellen oder aufbewahren, wo es fallen oder in ein Waschbecken
oder eine Badewanne geraten kann.
4. Das Gerät nie in Wasser oder andere Flüssigkeiten tauchen oder fallen lassen.
5. Wenn das Gerät ins Wasser fällt, sofort den Stecker aus der Steckdose ziehen. Das Wasser nicht
berühren.
ACHTUNG: UM BRANDWUNDEN, ELEKTROSCHOCKS, FEUER ODER
VERLETZUNGEN VORZUBEUGEN:
1. Das Gerät niemals unbeaufsichtigt lassen, wenn der Stecker noch in der Steckdose steckt oder
das Gerät eingeschaltet ist.
2. In Anwesenheit oder bei der Benutzung des Gerätes durch Kinder und Behinderte gut auf das
Gerät achten.
3. Das Gerät ausschließlich für die in der Gebrauchsanleitung beschriebenen Zwecke verwenden.
Ausschließlich vom Hersteller empfohlenes Zubehör benutzen.
4. Das Gerät nicht benutzen, wenn das Kabel oder der Stecker beschädigt ist, das Gerät nicht
ordnungsgemäß funktioniert, ins Wasser gefallen oder anderweitig beschädigt ist. Das Gerät
vom Fachhändler oder einer anerkannten Kundendienstwerkstatt überprüfen und reparieren lassen.
5. Das Kabel nicht auf heiße oder erwärmte Oberflächen legen. Das Kabel nicht um das Gerät wickeln.
6. Das Gerät nicht im schläfrigen Zustand benutzen.
7. Niemals einen Gegenstand in eine Öffnung des Gerätes stecken oder fallen lassen.
8. Niemals im Freien oder in der Nähe von Spraydosen benutzen. Das Gerät nicht benutzen, wenn
Sauerstoff zugefügt wird.
9. Dieses Gerät wird bei Gebrauch heiß. Kontakt mit den Augen oder anderen empfindlichen
Gesichtsteilen vermeiden.
10. Das Gerät nicht direkt auf eine Unterlage legen, wenn es noch heiß oder eingeschaltet ist.
Den mitgelieferten Ständer verwenden.
11. Das Gerät nicht mit einem Verlängerungskabel benutzen.
DIESE VORSCHRIFTEN GUT AUFBEWAHREN.
NUR FÜR DEN HAUSHALTSGEBRAUCH BESTIMMT.
ACHTUNG:
Wenn dieses Gerät im Badezimmer benutzt wird, sollte sofort nach dem Gebrauch der Netzstecker
gezogen werden. Dadurch entsteht bei einem eventuellen Fallen des Gerätes keine Gefahr
hinsichtlich vorhandenen Wassers. Für eine zusätzliche Sicherung sollte im Badezimmer ein
Erdschlussschalter mit 30 mA installiert werden. Gegebenenfalls einen Fachmann zu Rate ziehen.
S+ARCK 3-IN-1 CURLING IRON SET ART. 6002
INSTRUCCIONES DE MANTENIMIENTO
Para mantener en buenas condiciones su rizador de pelo, es preciso leer atentamente estas
instrucciones de uso y guardarlas para una posible consulta en el futuro.
AVISO: Asegure que el rizador de pelo se haya enfriado antes de limpiarlo.
1. Asegure que se haya desenchufado la clavija de la toma de corriente antes de limpiar el exterior
del aparato. Pase una esponja húmeda por las partes de plástico. Con un uso intensivo se puede
llenar de polvo el cabezal de su rizador o de suciedad procedente de las grasas naturales de su
cabello o productos capilares. Utilice agua jabonosa con un poco de champú para limpiar el
Starck_6002_IB_22-3-04 3/22/04 3:34 PM Page 14

15
cabezal. Deje secar bien el rizador antes de volver a usarlo. NO SUMERGIR EN AGUA. Para
mantener limpio más tiempo el cabezal, tenga cuidado de no pulverizar directamente en el
rizador lacas para el cabello.
2. Este producto está indicado únicamente para fines domésticos, el usuario no puede reparar las
partes del mismo.
3. Cuando no utiliza el rizador, recoja el aparato y los accesorios en el embalaje original o en un
lugar limpio y seco donde no se puedan dañar.
4. No enrolle nunca el cable alrededor del aparato.
ESTRENO DE SU RIZADOR DE PELO 3-EN-1
(El producto puede diferir ligeramente de la ilustración)
1. Punta fría
2. Piloto de control
3. Botón de desbloqueo
4. Interruptor de activado/desactivado
5. Asa
6. Indicador luminoso de corriente
7. Anilla
8. Rulo medio
9. Rulo grande
10. Rulo en espiral
USO DE LOS ACCESORIOS
Utilice la caja para guardar/el soporte para los accesorios.
IMPORTANTE:
Cuando usted estrena el aparato, puede que observe durante los primeros minutos algo de humo y
un ligero olor. Esto es normal y estos fenómenos desaparecerán pronto.
PRECAUCIÓN: El cabezal de este rizador se calienta. Tenga cuidado durante el uso.
• Asegure que el aparato no se ponga en contacto con la piel. No toque el cabezal con los dedos.
• Si tiene el pelo más bien corto, coloque un pequeño peine de plástico entre el cuero cabelludo y
el rizador, evitando contacto con el cuero cabelludo.
• Primero haga una prueba con el rizador en un mechón pequeño.
REEMPLAZAR LOS ACCESORIOS
ASEGURE QUE EL RIZADOR SE HAYA ENFRIADO BIEN ANTES DE REEMPLAZAR LOS ACCESORIOS.
Gire la anilla en el sentido de la flecha. Reemplace el accesorio instalando otro accesorio en el asa.
Gire una vuelta el asa para sujetarlo.
USAR LOS ACCESORIOS
Elija el accesorio con el que quiere modelar su cabello dependiendo del efecto que desea obtener.
Si quiere estilizar su pelo por completo, éste ha de estar limpio, seco y sin laca, gel, etc. (Este aparato
también se puede emplear para dar un rápido retoque al peinado).
PRECALENTAR
Deje el rizador puesto en el soporte sobre una superficie lisa, resistente al calor y lisa. Enchufe la
clavija del aparato en una toma de corriente de 230V CA. Ponga el botón de activado/desactivado
en la posición ON y deje precalentar el aparato. Cuando se enciende el indicador luminoso de
corriente, sabe que el aparato está encendido. Cuando el aparato está frío, el piloto de control en
el desbloqueador está negro. Cuando el aparato está caliente, el piloto está rojo.
Starck_6002_IB_22-3-04 3/22/04 3:34 PM Page 15

16
1. Indicador luminoso de corriente
2. Cuando el aparato está caliente, el piloto está rojo
3. Cuando el aparato se ha enfriado, se apagará el piloto.
ESTILIZAR EL CABELLO
Reparta el pelo en mechones de máximo 5 cms de ancho.
Mantenga liso el mechón al cepillarlo o peinarlo, mientras agarra el extremo con la otra mano.
Trabaje con un mechón a la vez, ponga el extremo del pelo en el rizador con la pinza abierta. Luego
cierre la pinza y asegure que el extremo salga un poco de la pinza. Agarre con la otra mano la punta
fría. Mantenga estirado el mechón mientras lo enrolla alrededor del rizador caliente girando
lentamente el asa.
Gire el rizador tan cerca de su cuero cabelludo como desee, sin tocarlo con el cabezal caliente.
Mantenga en su sitio el rizador durante 8 a 12 segundos si quiere rizos apretados o cuando el pelo
resulta difícil de rizar. Hágalo más breve cuando el pelo resulta fácil de rizar o cuando sólo quiere
rizos sueltos o cabello moldeado. Cuando el rizador ya se puede sacar de su sitio, desenrolle el
rizador hasta la mitad más o menos (en caso de pelo largo, un poco más) y presione en el
desbloqueador de la pinza. Ahora retire cuidadosamente el aparato del centro del rizo. Deje enfriar
tranquilamente el rizo y luego peine el cabello en el estilo que le guste.
CONSEJO: Si desea rizos más elásticos y rebeldes, mantenga la pinza en LA PARTE INFERIOR y el
cabezal en LA PARTE SUPERIOR del mechón cuando empieza a rizar. Si desea pelo a lo cazuela,
mantenga la pinza en LA PARTE SUPERIOR y el cabezal en LA PARTE INFERIOR del mechón cuando
empieza a rizar
Para un peinado más desordenado y enmarañado: Haga un cabello ondulado menos puesto y
más desordenado rizando cada mechón en cualquier dirección. Luego incline la cabeza, sacuda y
desenrede el pelo con los dedos. Levante la cabeza y repita el procedimiento para un volumen óptimo.
Tirabuzones: Si desea rizos sólidos o si su pelo resulta difícil de rizar, enrolle un mechón y manténgalo
vertical durante 8 a 12 segundos. Si su pelo resulta fácil de rizar, lo puede hacer en menos tiempo.
Cuando ha terminado, desenrolle el rizo lentamente y retire lentamente el cabezal del centro del
rizo. Deje enfriar tranquilamente el rizo, mientras proceda con el resto del pelo de la misma manera.
IMPORTANTES NORMAS DE SEGURIDAD
Al usar electrodomésticos, sobre todo cuando hay niños, siempre se han de observar una serie de
normas de seguridad, entre otras las siguientes:
LÉANSE TODAS LAS NORMAS ANTES DEL USO.
MANTÉNGASE ALEJADO DEL AGUA.
ATENCIÓN: Como en la mayor parte de los aparatos, las partes eléctricas están cargadas, incluso con
el interruptor desactivado.
De la siguiente manera se evita una descarga eléctrica:
1. Siempre desenchufe la clavija de la toma de corriente después de usar el aparato.
2. No lo utilice cuando está en la bañera.
3. No desactive ni recoja el aparato en un lugar donde pudiera caer o parar en una bañera o lavabo.
4. No sumergir o dejar caer en agua u otro líquido.
5. Cuando el aparato cae al agua, desenchufe inmediatamente la clavija de la toma de corriente.
No sumerja la mano en el agua.
PRECAUCIÓN: PARA EVITAR QUEMADURAS, ELECTROCUCIÓN, INCENDIO O
LESIONES PERSONALES:
1. No dejar sin vigilar el aparato cuando está enchufado en la toma de corriente o cuando el
aparato está activado..
2. Vigular bien cuando el aparato se utiliza por o cerca de niños o minusválidos.
3. Utilizar el aparato sólo para el fin descrito en estas instrucciones. No utilizar accesorios no
recomendados por el fabricante.
Starck_6002_IB_22-3-04 3/22/04 3:34 PM Page 16

17
4. No usar nunca el aparato cuando están dañados el cable o la clavija, cuando el aparato ya no
funciona correctamente, cuando se ha caído o dañado o cuando se ha caído al agua. Llevar el
aparato al servicio técnico autorizado más cercano para su revisión y reparación.
5. No poner el cable sobre superficies calientes o calentadas. No enrollar el cable alrededor del
aparato.
6. No usar nunca el aparato cuando usted tiene sueño o está aturtido.
7. No dejar caer o introducir nunca un objeto en un orificio del aparato.
8. No usar nunca en el exterior o cerca de pulverizadores. No usar cuando se añade oxígeno.
9. Este aparato se calienta al usarlos. Evite el contacto con los ojos u otras partes sensibles del
rostro.
10. No colocar directamente en superficies el aparato cuando todavía está caliente o encendido.
Use el soporte suministrado.
11. No usar un alargador para el aparato.
GUÁRDENSE BIEN ESTAS INSTRUCCIONES.
SÓLO PARA USO DOMÉSTICO
ATENCIÓN:
Cuando emplea este aparato en el baño, le aconsejamos desenchufe la clavija en seguida de la toma
de corriente después del uso, porque si dejara caer el aparato cerca de agua, ello podría resultar
peligroso. Para mayor seguridad aconsejamos mande instalar un interruptor automático de 30mA en
su baño. Consulte eventualmente con su instalador eléctrico.
S+ARCK 3-IN-1 CURLING IRON SET ART. 6002
ISTRUZIONI PER LA MANUTENZIONE
Per mantenere la vostra pinza arricciacapelli in buono stato, leggete attentamente queste istruzioni
e conservatele per eventuali consultazioni future.
ATTENZIONE: Assicuratevi che la pinza arricciacapelli si sia raffreddata prima di pulirla.
1. Togliete la spina dalla presa di alimentazione prima di pulire la superficie esterna dell'apparecchio.
Pulite le parti in plastica con un panno umido. Con un uso frequente la testa della vostra pinza
arricciacapelli può impolverarsi o sporcarsi del grasso naturalmente presente sui capelli o dei
prodotti per la loro cura. Pulite la testa della pinza con un panno inumidito con una soluzione
di acqua e shampoo. Lasciate asciugare bene la pinza arricciacapelli prima di riutilizzarla. NON
IMMERGETE L'APPARECCHIO IN ACQUA. Per mantenere la testa della pinza pulita più a lungo
dovete evitare di spruzzare i prodotti per i capelli direttamente sulla pinza.
2. Questo prodotto è destinato al solo uso domestico; i componenti non possono essere riparati
personalmente dall'utilizzatore.
3. Quando non usate l'apparecchio, riponetelo insieme ai suoi accessori nella confezione originale
o in un luogo pulito e asciutto in cui non possano essere danneggiati.
4. Non avvolgete mai il cavo di alimentazione intorno all'apparecchio.
DESCRIZIONE DEL SET ARRICCIACAPELLI 3-IN-1
(Il prodotto può variare leggermente rispetto all'illustrazione)
1. Punta termoisolante
2. Spia luminosa
3. Leva di apertura
4. Interruttore acceso/spento
5. Impugnatura
6. Spia luminosa dell'alimentazione
7. Ghiera
8. Accessorio arricciacapelli medio
9. Accessorio arricciacapelli grande
10. Arricciacapelli a spirale
Starck_6002_IB_22-3-04 3/22/04 3:34 PM Page 17

18
USO DEGLI ACCESSORI
Usate la custodia/porta accessori per conservare gli accessori.
IMPORTANTE:
Durante i primi minuti di funzionamento iniziale dell'apparecchio potreste notare un po' di fumo e
sentire un leggero odore. Questo fenomeno è del tutto normale e scompare rapidamente.
ATTENZIONE: La testa della pinza arricciacapelli diventa calda. Maneggiatela con cura.
• Fate in modo che l'apparecchio non venga a contatto con la pelle. Non toccate la testa con e
dita.
• Per il modellamento di capelli relativamente corti, interponete un pettinino di plastica tra il
cuoio capelluto e la pinza arricciacapelli, in modo da evitare il contatto con la pelle.
• Provate la pinza su una piccola ciocca di capelli prima dell'uso.
SOSTITUZIONE DEGLI ACCESSORI
LASCIATE RAFFREDDARE LA PINZA ARRICCIACAPELLI PRIMA DI SOSTITUIRE GLI ACCESSORI.
Ruotate la ghiera nella direzione della freccia. Sostituite l'accessorio inserendone un altro
nell'impugnatura. Ruotate la ghiera per bloccare l'accessorio.
USO DEGLI ACCESSORI
Scegliete l'accessorio con cui intendete modellare i vostri capelli, a seconda dell'effetto che desiderate.
Per una buona messa in piega, i vostri capelli devono essere puliti, asciutti e privi di lacca, gel, ecc.
(Questo apparecchio può essere usato anche per modellare rapidamente i capelli già messi in piega).
PRERISCALDAMENTO
Posizionate la pinza nel suo supporto su una superficie uniforme, liscia e resistente al calore. Inserite
la spina dell'apparecchio in una presa di alimentazione da 230V c.a.. Mettete l'interruttore ON/OFF
su ON e lasciate riscaldare l'apparecchio. La spia luminosa dell'alimentazione indica che l'apparecchio
è acceso. Quando l'apparecchio è freddo, la spia luminosa sulla leva di apertura è spenta. Tale spia
diventa rossa quando l'apparecchio è caldo.
1. Spia luminosa dell'alimentazione
2. Quando l'apparecchio è caldo la spia luminosa è illuminata di rosso.
3. Quando l'apparecchio si è raffreddato, la spia luminosa si spegne.
MESSA IN PIEGA
Suddividete i capelli in ciocche larghe massimo 5 cm.
Lisciate la ciocca spazzolandola o pettinandola e trattenendo l'estremità con l'altra mano. Prendere
una ciocca alla volta, mettendo la sua estremità sulla pinza arricciacapelli aperta. Chiudete la pinza
lasciando la punta della ciocca al suo esterno. Con l'altra mano prendete la punta termoisolante.
Tenete la ciocca in tensione mentre la avvolgete delicatamente intorno alla pinza, ruotando
l'impugnatura. Avvolgete la ciocca per la lunghezza desiderata in direzione della radice dei capelli,
senza toccare cuoio capelluto con la parte calda.
Tenete la pinza da 8 a 12 secondi in posizione se volete dei ricci ben pronunciati o se i vostri capelli
sono difficili da arricciare. Mantenete la posizione per meno tempo se i capelli si arricciano
facilmente o volete dei ricci più morbidi o desiderate solo ondulare i capelli. Quando avete
mantenuto la pinza in posizione per il tempo necessario, svolgetela per circa la metà della lunghezza
della ciocca (un po' più della metà per i capelli lunghi) e premete la leva di apertura. Togliete
delicatamente la pinza dal centro della ciocca. Lasciate raffreddare il ricciolo quindi pettinatelo
secondo la messa i piega desiderata.
Starck_6002_IB_22-3-04 3/22/04 3:34 PM Page 18

19
SUGGERIMENTO: Se desiderate dei riccioli più elastici e resistenti, tenete la pinza SOTTO la ciocca e la
testa dell'apparecchio SOPRA quando cominciate ad arricciare i capelli. Se desiderate dei riccioli più
morbidi, tenete la pinza SOPRA la ciocca e la testa dell'apparecchio SOTTO quando cominciate ad
arricciare i capelli.
Per una messa in piega spettinata: Create delle onde disordinate arricciando ciascuna ciocca di
capelli in una direzione diversa. Quindi piegate la testa in avanti, scuotetela e stropicciate
ulteriormente i capelli con le dita. Ritirate su la testa e ripetete la procedura per ottenere ancora
più volume.
Boccoli: Arricciate ciascuna ciocca intorno alla pinza e tenete questa in posizione verticale per 8 - 12
secondi se volete dei ricci ben pronunciati o se i vostri capelli sono difficili da arricciare. Mantenete la
posizione per meno tempo se i vostri capelli si arricciano facilmente. Dopo avere mantenuto la pinza
in posizione per il tempo necessario, svolgete lentamente i capelli e togliete la ciocca dalla pinza.
Lasciate raffreddare la ciocca mentre procedete con le ciocche successive.
IMPORTANTI DISPOSIZIONI PER LA SICUREZZA
L'uso degli elettrodomestici, specialmente in presenza di bambini, deve essere soggetto all'osservanza
di alcune disposizioni basilari per la sicurezza, tra cui le seguenti:
LEGGETE TUTTE LE ISTRUZIONI PRIMA DELL'USO.
TENETE L'APPARECCHIO LONTANO DALL'ACQUA.
ATTENZIONE: Come per la maggior parte degli elettrodomestici, le parti elettriche conducono
elettricità anche quando l'apparecchio è spento.
Per ridurre il rischio di morte dovuto a folgorazione:
1. Staccate sempre la spina dell'apparecchio dalla presa di alimentazione immediatamente dopo
l'uso.
2. Non usate l'apparecchio mentre fate il bagno.
3. Non riponete o conservate l'apparecchio in un luogo dal quale possa cadere nella vasca da
bagno o nel lavandino.
4. Non immergete l'apparecchio in acqua o altri liquidi.
5. Staccate immediatamente la spina dalla presa di alimentazione se l'apparecchio cade in acqua.
Non immergete la mano in acqua.
ATTENZIONE: PER RIDURRE IL RISCHIO DI USTIONE, FOLGORAZIONE,
INCENDIO O LESIONE A PERSONE;
1. Non lasciate l'apparecchio incustodito quando è in funzione o è collegato alla rete di alimentazione.
2. Sorvegliate attentamente l'apparecchio quando viene usato da, o in presenza di, bambini o
invalidi.
3. Usate l'apparecchio unicamente per l'uso previsto, come descritto nel presente manuale. Non
usate accessori diversi da quelli raccomandati dal fabbricante.
4. Non usate l'apparecchio se il cavo di alimentazione o la spina sono danneggiati, se il
funzionamento dell'apparecchio è difettoso, se l'apparecchio è caduto, ha subito qualche danno,
o è caduto in acqua. Portate l’apparecchio al servizio di assistenza autorizzato della vostra zona
per il controllo e la riparazione.
5. Tenete il cavo di alimentazione lontano da superfici calde o fonti di calore. Non avvolgete il cavo
di alimentazione intorno all'apparecchio.
6. Non usate mai l'apparecchio nel sonno o quando siete assonnati.
7. Non fate mai cadere, e non inserite di proposito, alcun oggetto nelle aperture.
8. Non usate l'apparecchio in ambiente esterno o in vicinanza di bombolette spray. Non usate
l'apparecchio in ambienti iperossigenati.
9. Questo apparecchio diventa caldo con l'uso. Evitate il contatto con gli occhi e con altre parti
sensibili del viso.
10. Non appoggiate l'apparecchio direttamente su alcuna superficie quando è ancora caldo o acceso.
Usate il supporto in dotazione.
11. Non usate prolunghe con questo apparecchio.
CONSERVATE CON CURA QUESTE ISTRUZIONI.
DESTINATO AL SOLO USO DOMESTICO.
Starck_6002_IB_22-3-04 3/22/04 3:34 PM Page 19

20
ATTENZIONE:
Se usate l'apparecchio nella stanza da bagno, vi raccomandiamo di togliere la spina dalla presa di
alimentazione immediatamente dopo l'uso. Questo per evitare il rischio che l'acqua in vicinanza
dell'apparecchio possa accidentalmente schizzarvi sopra. Come ulteriore sicurezza, l'impianto
elettrico della stanza da bagno dovrebbe essere dotato di un interruttore di messa a terra tarato su
30mA. Per ogni dubbio in merito, consultate il vostro elettricista.
S+ARCK 3-IN-1 CURLING IRON SET ART. 6002
INSTRUKTIONER FÖR ANVÄNDARUNDERHÅLL
För att hålla din locktång i gott skick ska du läsa dessa instruktioner noggrant och spara dem för
framtida referens.
VARNING: Kontrollera alltid att locktången är kall innan du rengör den.
1. När du rengör locktångens utsida ska du säkerställa att kontakten inte är ansluten. Torka sedan
plastytorna med en fuktig trasa. Efter längre bruk kan locktångens cylinder bli dammig eller
smutsig från hårets naturliga oljor och balsam. För att rengöra cylindern, använd en trasa med
en liten mängd shampoo. Låt locktången torka ordentligt innan du använder den igen. SÄNK
INTE NED I VATTEN! Spraya inte hårspray direkt på tången; på så sätt håller den sig ren längre.
2. Produkten är endast avsedd för hushållsbruk och innehåller inga delar som måste underhållas.
3. När den inte används ska locktången och utbytbara tillsatser förvaras i originallådan eller på en
ren, torr plats där apparaten inte skadas.
4. Linda aldrig nätsladden runt apparaten.
BLI BEKANT MED DIN 3-I-1 LOCKTÅNG
(Produkten kan skiljas sig något från figuren)
1. Kall säkerhetsspets
2. Klarpunkt
3. Spak för att öppna klämman
4. On/off-knapp
5. Handtag
6. Indikatorlampa för krafttillförsel
7. Låsring
8. Medeltång
9. Stor tång
10. Spiraltång
HUR DU ANVÄNDER DE UTBYTBARA LOCKTÄNGERNA
Använd förvaringslådan/stället för att förvara locktängerna där du önskar.
VIKTIGT:
Under de första minuterna när apparaten tas i bruk kan lite rök och en svag lukt uppstå. Detta är
normalt och kommer snart att upphöra.
VARNING: Locktångens övre del blir varm. Var försiktig när du använder den.
• Håll apparaten på avstånd från huden. Vidrör inte den övre halvan av locktången med fingrarna.
• Vid kortare hår ska en plastkam placeras mellan hårbotten och locktången för att undvika att
hårbottnen vidrörs.
• Prova på en liten del av håret innan du börjar använda den.
Starck_6002_IB_22-3-04 3/22/04 3:34 PM Page 20
Table of contents
Languages:
Other Princess Styling Iron manuals