manuals.online logo
Brands
  1. Home
  2. •
  3. Brands
  4. •
  5. Profelmnet
  6. •
  7. Control Panel
  8. •
  9. Profelmnet 3033 User manual

Profelmnet 3033 User manual

Proedrou Drakaki 11 ,173 41 Agios Dimitrios
Call center: 210 9850 244, Fax: 210 9823 264
www.profelmnet.com
3033
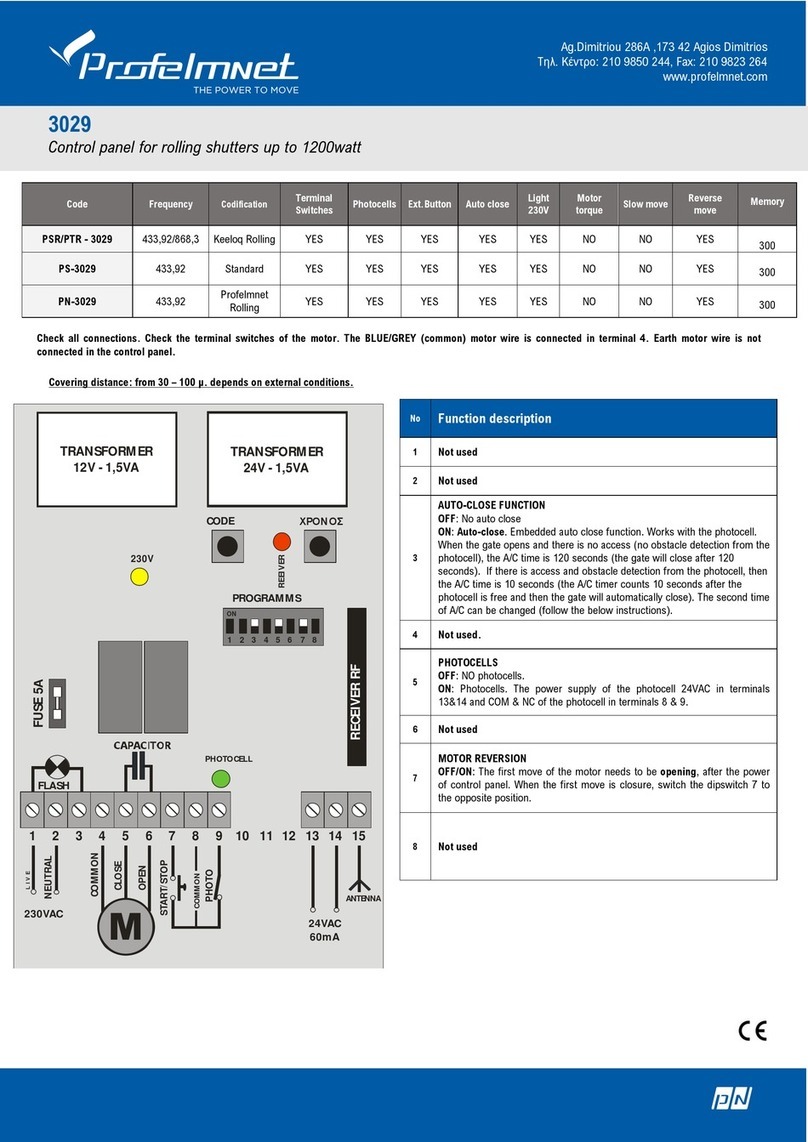
Control panel for sliding gate motor–single swing gate motor- barrier up to 1200watt
Code
Frequency
Codification
Terminal
Switches
Photocel
ls
Ext.Button
Auto
close
Light
230V
Motor
torque
Slow
move
Reverse
move
Memory
PSR - 3033
433,92
Keeloq
Rolling
YES
YES
YES
YES
YES
YES
YES
YES
300
PS-3033
433,92
Standard
YES
YES
YES
YES
YES
YES
YES
YES
300
PN-3033
433,92
Profelmnet
Rolling
YES
YES
YES
YES
YES
YES
YES
YES
300
Νο
Function description
1
DECELORATION FUNCTION
OFF: NO deceleration
ON: With deceleration, that starts 2SEC before the end-route of the
gate and continues for 40SEC or until the terminal switches is
blocked. If there are not terminal switches, the deceleration
continues for 15 seconds.
2
MOTOR BRAKE
OFF: No motor brake
ON: Brake when the gate reaches the end of the route. This
function works only with the deceleration function.
3
AUTO-CLOSE FUNCTION
OFF: No auto close
ON: Auto-close. Embedded auto close function. Works with the
photocell. When the gate opens and there is no access (no obstacle
detection from the photocell), the A/C time is 120 seconds (the gate
will close after 120 seconds). If there is access and obstacle
detection from the photocell, then the A/C time is 10 seconds (the
A/C timer counts 10 seconds after the photocell is free and then
the gate will automatically close). The second time of A/C can be
changed (follow the below instructions).
4
TERMINAL SWITCHES
OFF: NO terminal switches. In case of single swing gate or rolling
shutter.
ON: Terminal switches. In case of sliding gate or barrier.
5
PHOTOCELL
OFF: NO photocells.
ON: Photocells. The power supply of the photocell 24VAC in
terminal 13&14 and COM & NC of the photocell in terminal 8 & 9
6
ADJUSTABLE DECELERATION
OFF: motors up to 800kg
ON: motors above 800kg
7
MOTOR REVERSION
OFF/ON: The first move of the motor needs to be opening, after the
power of control panel. When the first move is closure, switch the
dipswitch 7 to the opposite position.
8
BLINKER LIGHT (FLASH) - LIGHT
OFF: FLASH. The terminals 1 & 3 give 230VAC/5A for how long the
gate is working.
ON: LIGHT. The terminals 1 & 3 give constant power 230VAC for 2
minutes after the latest command in the control panel.
Proedrou Drakaki 11 ,173 41 Agios Dimitrios
Call center: 210 9850 244, Fax: 210 9823 264
www.profelmnet.com
Functions and connections
Power supply 230V:
Supply the control panel with
230V.Check that the yellow
indication light is ON. Press the
button of the transmitter and
check the red indication light is
ON. The first gate move after
power-up (230V) is the OPEN
direction, otherwise place the
dipswitch 7 in the opposite
position.
Clear memory:
The first step is to clear the control panel memory. Press the
button CODE of the control panel and the RED indication light goes
ON after a while. Keep it pressed until the RED indication light goes
OFF. The memory is now clear.
Adding a new transmitter with the control panel
CODE button:
Press the CODE button and the RED indication light goes ON (after
a small delay). Leave it and during the next 3 seconds, press the
desired transmitter channel button until the RED indication light
blinks and goes OFF. The new transmitter is saved. Follow the same
procedure to program more (up to 300 transmitters) new
transmitters.
Working time:
Adjustable from 1-180S. While the gate is fully closed, press and
keep the TIME button of the control panel pressed until the gate
goes to fully open position. Then leave it. The working time is
saved.
Adjust motor force-torque:
The motor power adjustment for the normal motor speed will
ONLY be made while the user is programming the working time
using the trimmer of the automation. The user will be able to
adjust and control the force of normal motor speed while
programming working time. After the program of working time, the
motor force will also be automatically saved. If the user wishes to
change the motor's force, it must again program the working time.
Adding a new transmitter remotely:
The motor is fully closed or open. Press a working transmitter
button (already in memory) to start the motor working and hold it
pressed until the motor stops. When it stops, leave it and press the
new transmitter button immediately. The new transmitter is saved.
Repeat steps to program more transmitters remotely. When the
memory is full (300 transmitters) you cannot add more new
transmitters.
Pedestrian function:
When the pedestrian traverses the gate, the gate will open for a
while and then automatically will close. Photocells need to be
installed. The time of closing is the same with the second time of
A/C.
Photocell connection:
Connect the photocell contact
and power supply 24VAC
according to the diagram in the
right. When you finish, put the
program dipswitch 5 in the ON
position.
Photocell operation:
When the gate closes and the photocell beam is cut-off, the gate
stops immediately and automatically activates the open function. If
the photocell beam is cut-off, the gate never closes.
Adjusting the auto close time:
There is a double counter in the A/C function. The first one is 120
seconds and is applied when the door stops after an open function.
During this counting time of 120 sec., if the photocell beam is
disturbed, then after the beam is free, the A/C counting time
becomes 10 sec. until the fully closed position. In this control panel,
the second counting time of 10 sec., can be regulated. Press the
TIME button, keep it pressed and within 1 sec. , press the CODE
button. The red indicating light starts flashing, indicating the
seconds of the counter. The time of the counter is from 1-120
seconds. Keep it pressed for the time you wish to give in A/C and
pedestrian function. The dipswitch 3 needs to be ON.
Deceleration:
Indication light LED:
There are indication LED lights that displays the different functions
of the control panel.
For motors up to
800 kgs
Programm 6 of the control board=> OFF
And we adjust the power of deceleration of
the trimmer of the control board
For motors above
800 kgs
Programm 6 of the control board=> ON
And we adjust the power of deceleration of
the trimmer of the control board
Other Profelmnet Control Panel manuals

Profelmnet 3433 User manual

Profelmnet

Profelmnet 3433 User manual

Profelmnet 2114 User manual

Profelmnet

Profelmnet 2114 User manual

Profelmnet 3029 User manual

Profelmnet

Profelmnet 3029 User manual

Profelmnet 3033 User manual

Profelmnet

Profelmnet 3033 User manual

Profelmnet 3029 User manual

Profelmnet

Profelmnet 3029 User manual

Popular Control Panel manuals by other brands

Honeywell NOTIFIER SFP-10UD Series manual

Honeywell

Honeywell NOTIFIER SFP-10UD Series manual

Siemens FC121-ZA Technical manual

Siemens

Siemens FC121-ZA Technical manual

Notifier NFS-3030/E installation manual

Notifier

Notifier NFS-3030/E installation manual

Ross Ultrix Acuity Operation manual

Ross

Ross Ultrix Acuity Operation manual

GC5 iSMA-B-SP user manual

GC5

GC5 iSMA-B-SP user manual

Generac Power Systems H-100 Technical manual

Generac Power Systems

Generac Power Systems H-100 Technical manual

XFP NETWORKABLE ANALOGUE ADDRESSABLE FIRE ALARM CONTROL... user manual

XFP

XFP NETWORKABLE ANALOGUE ADDRESSABLE FIRE ALARM CONTROL... user manual

Dometic MPC01 Installation and operating manual

Dometic

Dometic MPC01 Installation and operating manual

Integrated Technical Vision DLK640Plus Dlk640plus

Integrated Technical Vision

Integrated Technical Vision DLK640Plus Dlk640plus

C-TEC CAST ZFP Quick start installation guide

C-TEC

C-TEC CAST ZFP Quick start installation guide

Panasonic AW-RP50 manual

Panasonic

Panasonic AW-RP50 manual

Hamworthy MARSHALL HE Installation, commisioning and maintenance instructions

Hamworthy

Hamworthy MARSHALL HE Installation, commisioning and maintenance instructions

Salus KL08RF Installation and wiring guide

Salus

Salus KL08RF Installation and wiring guide

Alderon Industries Check It Panel Operation, maintenance & installation manual

Alderon Industries

Alderon Industries Check It Panel Operation, maintenance & installation manual

Maple Systems OIT3185 installation manual

Maple Systems

Maple Systems OIT3185 installation manual

DSC PowerSeries Neo user manual

DSC

DSC PowerSeries Neo user manual

weintek MT8071iER1 Series Installation instruction

weintek

weintek MT8071iER1 Series Installation instruction

Dea NET230N Operating instructions and warnings

Dea

Dea NET230N Operating instructions and warnings

manuals.online logo
manuals.online logoBrands
  • About & Mission
  • Contact us
  • Privacy Policy
  • Terms and Conditions

Copyright 2025 Manuals.Online. All Rights Reserved.