PROLUMIA LED PRO-AQUA III User manual

www.prolumia.com
LED PRO-AQUA III
40281600 Pro Aqua III, 607mm, 18W, 2700Lm
40281601 Pro Aqua III + Sensor, 607mm, 18W, 2700Lm
40281602 Pro Aqua III, 1207mm, 32W, 4800Lm
40281603 Pro Aqua III + Sensor, 1207mm, 32W, 4800Lm
40281606 Pro Aqua III, 1507mm, 52W, 7800Lm
40281607 Pro Aqua III + Sensor, 1507mm, 52W, 7800Lm
OPERATING INSTRUCTION
GEBRUIKSAANWIJZING
MANUEL D’UTILISATION
INSTALAČNÍ NÁVOD
GEBRAUCHSANLEITUNG

2
www.prolumia.com
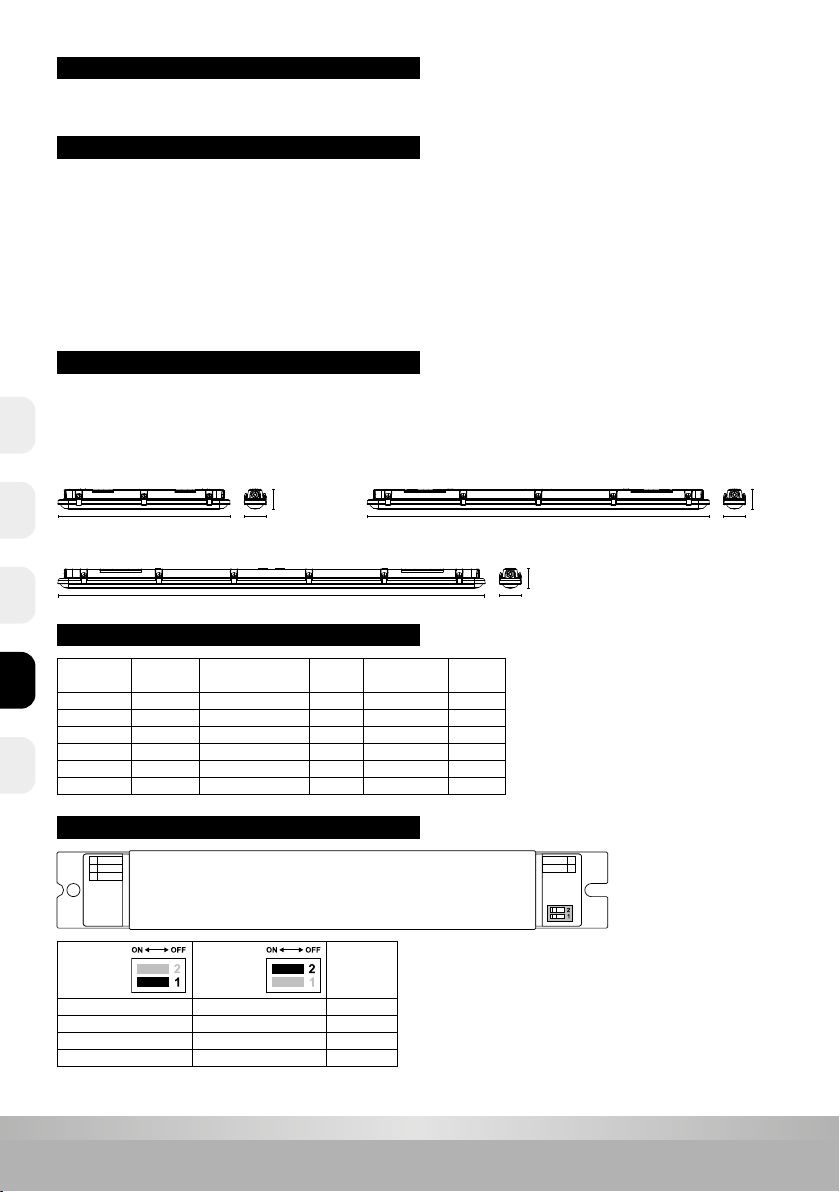
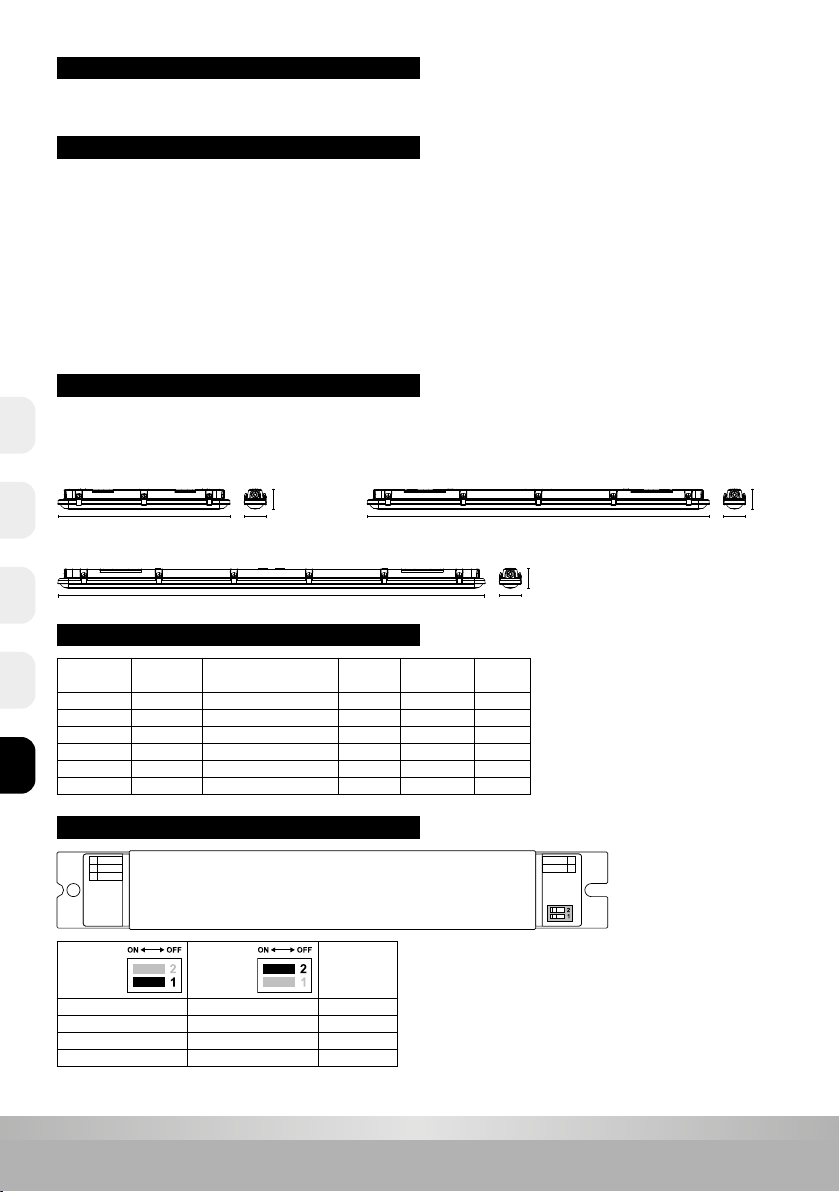
607mm 75mm
70mm
1207mm 75mm
70mm
1507mm 75mm
70mm
LED Pro-Aqua III - 607mm LED Pro-Aqua III - 1207mm
LED Pro-Aqua III - 1507mm
ATTENTIE
OPGELET
TECHNISCHE DATA
Lees de volgende instructies zorgvuldig door om ervoor te zorgen dat de montagewerkzaamheden op de juiste manier
worden uitgevoerd. Bewaar deze instructies goed voor eventueel toekomstig gebruik.
1. Werk niet aan het armatuur wanneer deze is ingeschakeld.
2. Controleer voor de installatie of de lamp is beschadigd. Gebruik de beschadigde lamp niet.
3. Het armatuur moet worden geïnstalleerd door een professionele elektricien.
4. Dek de lampbehuizing niet af na installatie en stel de lamp niet bloot aan externe krachten.
5. Zorg ervoor dat de stroom is uitgeschakeld voordat u de lamp schoonmaakt en maak deze schoon met een zachte, droge doek.
6. De LED-module is niet vervangbaar.
7. Als de verlichting er ongebruikelijk uitziet, moet de stroom onmiddellijk worden uitgeschakeld om een professionele elektricien te vragen om
het armatuur te repareren.
8. Prik geen gaten in de lampbehuizing. Hierdoor zullen de IP-prestaties van de lamp afnemen.
9. Belast de externe bedrading niet.
Voedingsspanning: AC 220-240V 50/60Hz
Lichtbron: LED SMD2835
Driver: Osram Optotronic
Kleurtemperatuur: 4000K
Lichtstroom: Schakelbaar
Bedrijfstemperatuur: -25°C – +40°C
Elektrische veiligheidsklasse: Klasse II
IK-classicatie: IK08
Artikelnr. Type LED Afmetingen (LxBxH)
(mm)
Vermogen
(W)
Lichtstroom
(Lm) Sensor
40281600 SMD2835 607x75x70 18 2700 -
40281601 SMD2835 607x75x70 18 2700 Ja
40281602 SMD2835 1207x75x70 32 4800 -
40281603 SMD2835 1207x75x70 32 4800 Ja
40281606 SMD2835 1507x75x70 52 7800 -
40281607 SMD2835 1507x75x70 52 7800 Ja
Schakelaar 1 Schakelaar 2 Percentage
lichtstroom
OFF OFF 56,25%
OFF ON 66,67%
ON OFF 83,33%
ON ON 100%
TECHNISCHE INFORMATIE
DRIVER - LICHTSTROOM SCHAKELAAR
NLENCZ FRDE

3
www.prolumia.com
Plafondmontage met beugels
Toegang tot 0,75-1,5 mm²
mantelkabel
Gependelde montage
Toegang tot 0,75-1,5 mm²
mantelkabel
Toegang tot 0,75-1,5 mm²
mantelkabel
Open de clip met behulp van gereedschap
LF
Duw de plastic expansiebuis in het gat
Boordiameter 5-6 mm, diepte 30-35 mm Bevestig de roestvrijstalen montagehaak
aan de muur met behulp van
zelftappende schroeven uit de set
L
N
206 3x0,75-1,5mm²
Let op: Controleer na installatie goed of het armatuur echt in te haken is.
Sluit het armatuur en voltooi de installatie
KLIK
Bevestigingsaccessoires
Draai de reector omlaag
Zelftappende schroef x2 Roestvrijstalen installatiecomponent x2
Plastic expansiepijp x2 Driehoek haak x2 (Gependelde montage)
INSTALLATIE
BESCHERMING VAN HET MILIEU
Defecte elektrische apparaten behoren niet te worden weggegooid bij het huishoudelijk afval. Recycle waar mogelijk.
Neem contact op met uw gemeente of uw leverancier voor een deskundig recycling advies.
I. Installatie methode
II. Installatie stappen
III. Bedradingsmethode Let op: Schakel de stroom uit voordat u aan de bedrading gaat werken.
1
3
21
3
2
NL EN CZFR DE

4
www.prolumia.com
607mm 75mm
70mm
1207mm 75mm
70mm
1507mm 75mm
70mm
ATTENTION
CAUTION
TECHNICAL DATA
1. Do not work on the xture when it is switched on.
2. Before installation, please conrm whether the lamp is damaged. Do not use the damaged lamp.
3. The luminaire should be installed by a professional electrician.
4. Do not cover the lamp housing after installation or expose the lamp to external forces.
5. Make sure the power is o before cleaning the lamp and clean it with a soft, dry cloth.
6. The LED module is not replaceable.
7. When the lighting is looking unusual, the power should be cut o immediately to ask a professional electrician to repair the xture.
8. Do not punch holes in the lamp housing, which will cause the IP performance of the lamp to decline.
9. Do not stress the external wiring.
Supply voltage: AC 220-240V 50/60Hz
Light source: LED SMD2835
Driver: Osram Optotronic
Color temperature: 4000K
Light output: Switchable
Operating temperature: -25°C – +40°C
Electrical safety class: Class II
Impact protection rating: IK08
LED Pro-Aqua III - 607mm LED Pro-Aqua III - 1207mm
LED Pro-Aqua III - 1507mm
Please read the following instructions carefully to ensure that mounting operation will be carried out correctly.These instructions
should be properly preserved for future reference.
TECHNICAL INFORMATION
DRIVER - LIGHT OUTPUT SWITCH
Art. no. LED type Dimensions (LxWxH)
(mm)
Power consumption
(W)
Light output
(Lm)
Sensor
40281600 SMD2835 607x75x70 18 2700 -
40281601 SMD2835 607x75x70 18 2700 Yes
40281602 SMD2835 1207x75x70 32 4800 -
40281603 SMD2835 1207x75x70 32 4800 Yes
40281606 SMD2835 1507x75x70 52 7800 -
40281607 SMD2835 1507x75x70 52 7800 Yes
Switch 1 Switch 2 Light output
percentage
OFF OFF 56,25%
OFF ON 66,67%
ON OFF 83,33%
ON ON 100%
CZ FRDE NLEN

5
www.prolumia.com
INSTALLATION
ENVIRONMENTAL PROTECTION
Waste electrical products should not be disposed of with household waste. Please recycle where facilities exist.
Check with your local authority or retailer for recycling advice.
Ceiling mounting by brackets
Access 0.75-1.5mm²
sheath cable
Open the clip with the help of a tool
Pendant mounting
Access 0.75-1.5mm²
sheath cable
L
N
206 3x0,75-1,5mm²
Turn down the reector
Access 0.75-1.5mm²
sheath cable
LF
Push the plastic expansion pipe into the hole
Drilling diameter 5-6mm, depth 30-35mm Secure the stainless-steel mounting
hook to the wall using the self-tapping
screws in the kit
Note: After installation, please check carefully if the xture really can be hooked in.
Close the xture and complete the installation
CLICK
Mounting accessories
Tapping screw x2 Stainless-steel installation component x2
Plastic expansion pipe x2 Triangle hook x2 (Pendant mounting)
I. Installation method
II. Installation steps
III. Wiring method Note: Please cut o the power before wiring.
21
3
1
3
2
CZFR DENL EN

6
www.prolumia.com
ATTENTION
ATTENTION
DONNÉES TECHNIQUES
Lisez attentivement les instructions suivantes pour vous assurer que les travaux d’installation sont eectués correctement.
Conservez ces instructions en toute sécurité pour une utilisation future possible.
607mm 75mm
70mm
1207mm 75mm
70mm
1507mm 75mm
70mm
1. Ne travaillez pas sur l’appareil lorsqu’il est allumé.
2. Avant l’installation, vériez si la lampe est endommagée. N’utilisez pas la lampe endommagée.
3. L’appareil doit être installé par un électricien professionnel.
4. Ne couvrez pas le boîtier de la lampe après l’installation et n’exposez pas la lampe à des forces extérieures.
5. Avant de nettoyer la lampe, assurez-vous que l’alimentation est coupée et nettoyez-la avec un chion doux et sec.
6. Le module LED n’est pas remplaçable.
7. Si l’éclairage semble inhabituel, coupez immédiatement l’alimentation pour demander à un électricien professionnel de réparer l’appareil.
8. Ne percez pas de trous dans le boîtier de la lampe. Cela réduira les performances IP de la lampe.
9. Ne forcez pas le câblage externe.
Tension d’alimentation: AC 220-240V 50/60Hz
Source de lumiere: LED SMD2835
LED driver: Osram Optotronic
Température de couleur: 4000K
Flux lumineux: Commutable
Température de fonctionnement: -25°C – +40°C
Classe de sécurité électrique: Classe II
Classication IK: IK08
LED Pro-Aqua III - 607mm LED Pro-Aqua III - 1207mm
LED Pro-Aqua III - 1507mm
Art. no. Type de LED Measurements (LxWxH)
(mm)
Puissance
(W)
Courant lumineux
(Lm)
Capteur
40281600 SMD2835 607x75x70 18 2700 -
40281601 SMD2835 607x75x70 18 2700 Oui
40281602 SMD2835 1207x75x70 32 4800 -
40281603 SMD2835 1207x75x70 32 4800 Oui
40281606 SMD2835 1507x75x70 52 7800 -
40281607 SMD2835 1507x75x70 52 7800 Oui
DRIVER - COMMUTATEUR DE FLUX LUMINEUX
Commutateur 1 Commutateur 2 Pourcentage
de ux
lumineux
OFF OFF 56,25%
OFF ON 66,67%
ON OFF 83,33%
ON ON 100%
INFORMATIONS TECHNIQUES
NLENCZ FRDE

7
www.prolumia.com
Accessoires de xation
PROTECTION DE L’ENVIRONNEMENT
Les appareils électriques défectueux ne doivent pas être jetés avec les ordures ménagères. Recycler si possible.
Contactez votre municipalité ou votre fournisseur pour obtenir des conseils spécialisés en matière de recyclage.
Vis autotaraudeuse x2 Composant d'installation
en acier inoxydable x2
Tuyau d'expansion
en plastique x2
Crochet triangulaire x2
(Montage suspendu)
Montage au plafond avec supports
Accès à un câble gainé
de 0,75 à 1,5 mm²
Ouvrez le clip à l'aide de l'outil
Montage suspendu
Accès à un câble gainé
de 0,75 à 1,5 mm²
L
N
206 3x0.75-1.5mm²
Baissez le réecteur
Accès à un câble gainé
de 0,75 à 1,5 mm²
LF
Poussez le tube d'expansion en plastique
dans le trou
Diamètre de forage 5-6 mm, profondeur 30-35 mm Fixez le crochet de montage en acier
inoxydable au mur à l'aide des vis
autotaraudeuses du kit
Remarque: après l'installation, vériez soigneusement si l'appareil peut vraiment être accroché.
Fermez le luminaire et terminez l'installation
CLIQUEZ
SUR
INSTALLATION
I. Méthode d’installation
II. Etapes d’installation
III. Méthode de câblage Remarque: coupez l’alimentation avant de travailler sur le câblage.
21
3
1
3
2
NL EN CZFR DE
8
www.prolumia.com
UPOZORNĚNÍ
UPOZORNĚNÍ
TECHNICKÁ DATA
Prosíme, přečtěte si pozorně návod k použití před začátkem instalace. Tento návod k použití si uchovejte
pro případnou budoucí potřebu.
TECHNICKÉ INFORMACE
607mm 75mm
70mm
1207mm 75mm
70mm
1507mm 75mm
70mm
1. Nepracujte na zařízení, které je pod proudem.
2. Před instalací zkontrolujte, zda není svítidlo poškozeno. Poškozené svítiddlo nepoužívejte.
3. Instalace může být provedena pouze kvalikovaným pracovníkem.
4. Po instalaci nezakrývejte kryt svítidla ani nevystavujte svítidlo vnějším vlivům.
5. Před čištěním svítidla se ujistěte, že je vypnuto, a očistěte ho měkkým suchým hadříkem.
6. LED modul není vyměnitelný.
7. Pokud osvětlení již na pohled nevypadá v pořádku, měli byste okamžitě přerušit napájení a požádat profesionálního elektrikáře o opravu svítidla.
8. Do krytu svítidla nevyřezávejte otvory, snížilo by to IP ochranu svítidla.
9. Nezatěžujte vnější vedení.
Napájení: AC 220-240V 50/60Hz
Světelný zdroj: LED SMD2835
LED napájení: Osram Optotronic
Teplota chromatičnosti: 4000K
Světelný tok: Přepínatelné
Provozní teplota: -25°C – +40°C
Třída ochrany: Třída II
Třída ochrany proti nárazu: IK08
LED Pro-Aqua III - 607mm LED Pro-Aqua III - 1207mm
LED Pro-Aqua III - 1507mm
Obj.č. Typ LED Rozměry (LxWxH)
(mm)
Příkon
(W)
Světelný tok
(Lm)
Senz or
40281600 SMD2835 607x75x70 18 2700 -
40281601 SMD2835 607x75x70 18 2700 Ano
40281602 SMD2835 1207x75x70 32 4800 -
40281603 SMD2835 1207x75x70 32 4800 Ano
40281606 SMD2835 1507x75x70 52 7800 -
40281607 SMD2835 1507x75x70 52 7800 Ano
NAPÁJENÍ - PŘEPÍNAČ SVĚTELNÉHO TOKU
Přepínač 1 Přepínač 2 Procento
světelného
výkonu
OFF OFF 56,25%
OFF ON 66,67%
ON OFF 83,33%
ON ON 100%
NLENCZ FRDE

9
www.prolumia.com
OCHRANA ŽIVOTNÍHO PROSTŘEDÍ
Vyřazené elektronické přístroje nepatří do směsného odpadu. Prosíme recyklujte na místech tomu určených.
Případně se poraďte s místním úřadem nebo svým prodejcem.
Montáž na strop pomocí montážních držáků
Přístup 0,75 - 1,5 mm²
plášťový kabel
Otevřete sponu pomocí nástroje
Závěsná montáž
Přístup 0,75 - 1,5 mm²
plášťový kabel
L
N
206 3x0,75-1,5mm²
Otočte reektor
Přístup 0,75 - 1,5 mm²
plášťový kabel
LF
Zasuňte hmoždinku do otvoru
Průměr vrtání 5-6 mm, hloubka 30-35 mm Upevněte montážní hák z nerezové
oceli na zeď pomocí samořezných
šroubů v sadě
Poznámka: Po instalaci pečlivě zkontrolujte, zda je zařízení pevně uzavřeno.
Zavřete svítidlo a dokončete instalaci
CVAK
Montážní příslušenství
Šroub do plechu x2 Instalační prvek z nerezové oceli x2
Hmoždinka x2 Trojhranný hák x2 (Závěsná montáž)
MONTÁŽ
I. Způsob instalace
II. Instalační postup
III. Způsob zapojení Poznámka: Před zapojením odpojte od přívodu napětí.
21
3
1
3
2
NL EN CZFR DE
10
www.prolumia.com
ACHTUNG
HINWEIS
TECHNISCHE DATEN
Lesen Sie die folgende Anleitung bitte aufmerksam durch, um eine korrekte Ausführung der Montage zu gewährleisten. Bewahren Sie
diese Anleitung zum späteren Nachschlagen gut auf.
TECHNISCHE INFORMATIONEN
607mm 75mm
70mm
1207mm 75mm
70mm
1507mm 75mm
70mm
1. Arbeiten Sie nicht an dem Gerät, wenn es eingeschaltet ist.
2. Prüfen Sie vor der Installation, ob das Leuchtmittel beschädigt ist. Verwenden Sie das beschädigte Leuchtmittel nicht.
3. Das Produkt muss durch einen qualizierten Techniker installiert werden.
4. Decken Sie das Leuchtengehäuse nach der Installation nicht ab und setzen Sie die Leuchte keinen äußeren Einüssen aus.
5. Vergewissern Sie sich, dass die Stromversorgung ausgeschaltet ist, bevor Sie die Leuchte reinigen, und reinigen Sie sie mit einem weichen,
trockenen Tuch.
6. Das LED-Modul ist nicht austauschbar.
7. Wenn die Beleuchtung ungewöhnlich aussieht, sollte der Strom sofort abgeschaltet werden und ein qualizierter Techniker mit der Reparatur
der Leuchte zu beauftragen werden.
8. Stanzen Sie keine Löcher in das Lampengehäuse, da sonst die IP-Klasse der Lampe beeinträchtigt wird.
9. Belasten Sie nicht die externe Verkabelung.
Betriebsspannung: AC 220-240V 50/60Hz
Lichtquelle: LED SMD2835
Treiber: Osram Optotronic
Farbtemperatur: 4000K
Lichtleistung: Schaltbar
Betriebstemperatur: -25°C – +40°C
Schutzklasse: Klasse II
Schlagschutzklasse: IK08
LED Pro-Aqua III - 607mm LED Pro-Aqua III - 1207mm
LED Pro-Aqua III - 1507mm
Artikelnr. LED-Typ Abmessungen (LxBxH)
(mm)
Leistung
(W)
Lichtstrom
(Lm)
Sensor
40281600 SMD2835 607x75x70 18 2700 -
40281601 SMD2835 607x75x70 18 2700 Ja
40281602 SMD2835 1207x75x70 32 4800 -
40281603 SMD2835 1207x75x70 32 4800 Ja
40281606 SMD2835 1507x75x70 52 7800 -
40281607 SMD2835 1507x75x70 52 7800 Ja
TREIBER - LICHTLEISTUNGSSCHALTER
Schalter 1 Schalter 2 Lichtleistung
in Prozent
OFF OFF 56,25%
OFF ON 66,67%
ON OFF 83,33%
ON ON 100%
NLENCZ FRDE

11
www.prolumia.com
UMWELTSCHUTZ
Defekte Elektrogeräte dürfen nicht über den Hausmüll entsorgt werden. Führen Sie sie, falls möglich, dem Recycling zu.
Für weitere Hinweise zum Recycling wenden Sie sich bitte an Ihre Gemeinde oder Ihren Lieferanten.
INSTALLATION
Deckenmontage durch Halterungen
Zugang 0,75-1,5mm²
Mantelleitung
Önen Sie den Clip mit Hilfe
eines Werkzeugs
Hängende Montage
Zugang 0,75-1,5mm²
Mantelleitung
L
N
206 3x0,75-1,5mm²
Drehen Sie den Reektor
nach unten
Zugang 0,75-1,5mm²
Mantelleitung
LF
Schieben Sie den Dübel in die Bohrung
Bohrung Durchmesser 5-6mm, Tiefe 30-35mm Befestigen Sie den Edelstahl-
Montagehaken mit den
selbstschneidenden Schrauben
aus dem Bausatz an der Wand
Hinweis: Bitte prüfen Sie nach der Installation sorgfältig, ob die Vorrichtung wirklich eingehängt werden kann.
Schließen Sie die Armatur und beenden Sie die Installation
KLICK
Montagezubehör
Schrauben x2 Edelstahl-Montageteil x2
Dübel x2 Dreieckshaken x2 (Hängende Montage)
I. Montageart
II. Installation
III. Verdrahtung Hinweis: Bitte prüfen Sie nach der Installation sorgfältig, ob die Vorrichtung wirklich eingehängt werden kann.
21
3
1
3
2
NL EN CZFR DE

www.prolumia.com
NEDELKO BELGIUM NV
Prins Boudewijnlaan 49
2650 EDEGEM
T+32 (0)3 826 99 99
Einfo@nedelko.be
NEDELKO S.R.O.
Purkyňova 74/2
110 00 PRAHA 1 - NOVÉ MĚSTO
T+420 222 563 003
Einfo@nedelko.cz
NEDELKO GERMANY GMBH
Heinz-Bäcker-Str. 27
45356 ESSEN
T+49 (0)201 560503 50
Einfo@nedelko.de
IMPORTER
NEDELKO B.V.
Riga 10
2993 LW BARENDRECHT
T+31 (0)180 64 54 00
Einfo@nedelko.nl
This manual suits for next models
6
Table of contents
Languages:
Other PROLUMIA Lighting Equipment manuals

PROLUMIA
PROLUMIA Prodisc III + Emergency mode User manual

PROLUMIA
PROLUMIA PRO-PORTAL 40010021 User manual

PROLUMIA
PROLUMIA ROCKDISC III User manual

PROLUMIA
PROLUMIA ECODISC II MAXI User manual

PROLUMIA
PROLUMIA 40010302 User manual

PROLUMIA
PROLUMIA LUMIAFLEX 1004 User manual

PROLUMIA
PROLUMIA PRO-SIGN User manual


